

SliceWP Integration
Let partners promote your trips and earn commissions on bookings they bring in, all tracked automatically through the SliceWP Integration add-on.
Run an affiliate program for your trips
Affiliate marketing lets other people help sell your trips. An affiliate is a partner who promotes your trips in exchange for a cut of the sales they bring in.
With the SliceWP Integration add-on, you can connect WP Travel Engine to the SliceWP plugin and track those partner sales inside your WordPress site. For example, a travel blogger could share your 7-day trek on their website, and when someone books through that link, SliceWP records the sale and the commission owed to that partner.
This setup helps you grow beyond your own website traffic. You can see which partners are sending bookings, how much they have earned, and when payouts need to be made. Once the connection is in place, the rest of the setup is mostly about adding people and giving them the right links.
What you'll need before you start
Before you begin, make sure you have all of these ready:
- The SliceWP plugin installed and activated on your WordPress site.
- The SliceWP Integration add-on installed and activated with a valid license key.
- At least one trip already created in WP Travel Engine.
If those pieces are ready, you can turn on the connection and start setting up your partners.
Installing the SliceWP Integration add-on
Install and activate the add-on before you move to the setup steps below.
See how to activate a Pro add-on license key for the full installation and activation walkthrough.
Once the add-on is active, you can connect WP Travel Engine with SliceWP.
Step 1: Turn on the WP Travel Engine connection in SliceWP
This step tells SliceWP to start watching for bookings that come through affiliate links. Without it, commissions will not be tracked.
Open SliceWP settings
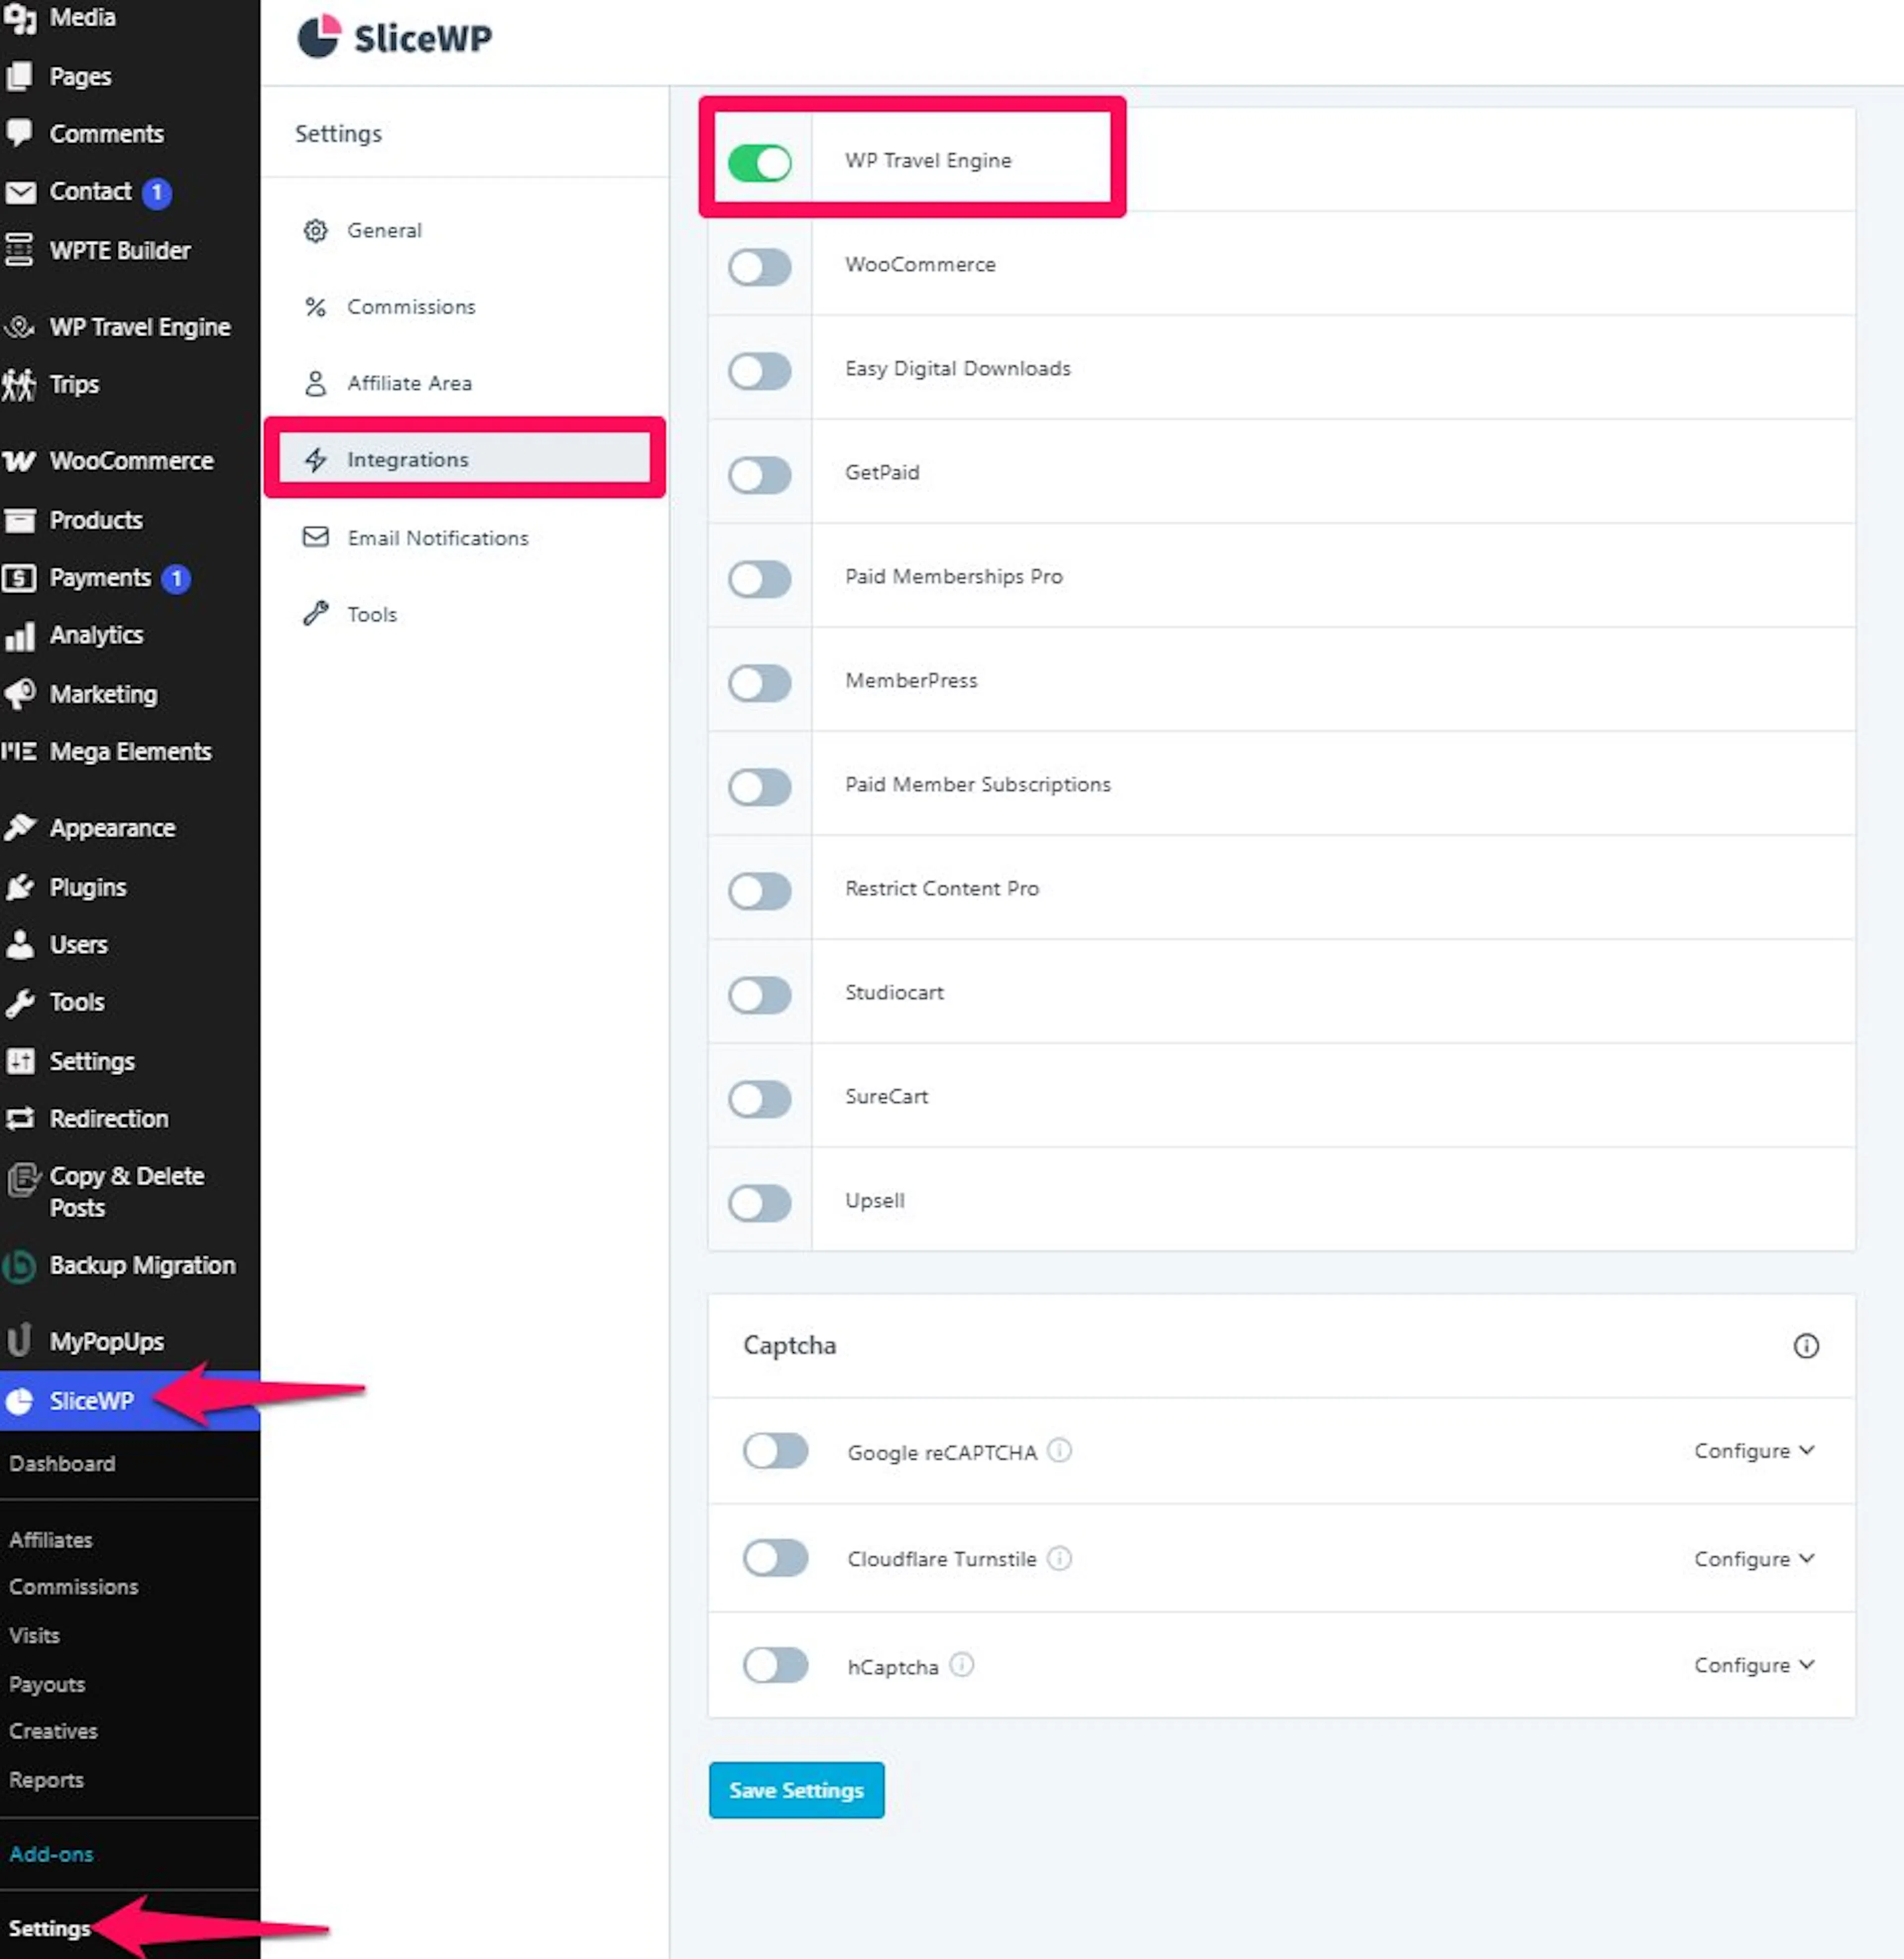
In your WordPress dashboard, go to SliceWP on the left sidebar. Then open Settings and click Integration.
Find WP Travel Engine in the list
Look through the available integrations until you see WP Travel Engine.
Enable the connection
Turn on the toggle for WP Travel Engine.
Check that tracking is ready
Once the toggle is on, SliceWP can track commissions for trips sold through affiliates.
Now that the connection is active, you can add the people who will promote your trips.
Step 2: Create a user account for your affiliate
In WordPress, every person who logs in needs a user account. You will create one for each affiliate before adding them inside SliceWP.
Open the Add New User screen
In your WordPress dashboard, go to Users on the left sidebar and click Add New.
Enter the user's details
Fill in the required fields such as Username, Email, and Password.
Choose the Affiliate role
In the Role dropdown, select Affiliate.
Register the user as an affiliate
Check Register User as Affiliate so the new user is also added to SliceWP.
Save the new user
Click Add New User to finish.
You can also check SliceWP's own instructions for creating an affiliate registration page, or manually add an existing user as an affiliate directly from the SliceWP dashboard.
If you run trips with local guides, bloggers, or hotel partners, this is the point where each person gets their own login. Next, you will turn that user into an active affiliate record inside SliceWP.
Step 3: Add the affiliate in SliceWP
This step creates the affiliate profile that SliceWP uses for tracking and payouts. Think of it as the working record behind the person's WordPress user account.
Open the Affiliates area
In your WordPress dashboard, go to SliceWP on the left sidebar and click Affiliates.
Start a new affiliate profile
Click Add New.
Fill in the affiliate details
In the Affiliate Details section:
- Select the User from the dropdown.
- Enter the Payment Email for commission payouts.
- You can also add the Website if they have one.
- Add a short note about how they plan to promote your trips.
- Set Status to Active.
- Turn on Send Welcome Email if you want SliceWP to notify them.
Save the affiliate profile
Click Add Affiliate to save the profile.
Once the affiliate is active, they are ready to promote your trips. The next part is giving them the correct links.
Step 4: Share affiliate links for your trips
Affiliate links are how SliceWP knows which partner sent the booking. Each affiliate gets a unique Affiliate ID, and that ID is added to the end of a trip URL.
For example, if a blogger is promoting your 3-day city tour on Instagram or in a trip roundup on their website, they should share the trip link with their own Affiliate ID attached. When someone clicks that link and books, the sale is credited to that affiliate.
Example of an affiliate link:
https://example.site/trip/5-days-tour-to-philippines/?aff=2
The number 2 at the end of the URL represents the Affiliate ID. The affiliate must replace it with their own Affiliate ID.
Once your affiliates are using these links, SliceWP can begin recording the bookings they bring in.
Step 5: Track and manage commissions
A commission is the amount you owe an affiliate for a booking they helped bring in. This is where you can keep an eye on sales and see what needs to be paid.
Open the Commissions screen
In your WordPress dashboard, go to SliceWP on the left sidebar and click Commissions.
Review the commission list
You will see all recorded commissions in one place. The list shows the affiliate name, commission amount, reference number or booking ID, type such as sale or refund, date, and status.
A quick check here can tell you which partners are performing well. For example, you might notice that a travel blogger is driving more bookings for your monsoon-season rafting package than for your winter treks.
Understanding commission status
| Status | Meaning |
|---|---|
| Pending | The trip has been referred but not yet purchased. |
| Unpaid | The trip has been purchased, but the commission hasn't been paid yet. |
| Paid | The commission has been processed and given to the affiliate. |
| Rejected | The trip was canceled, and the commission was not approved. |
Checking booking details from the commission page
If you want to confirm where a commission came from, you can open the related booking from the commission list. This is useful when you need to check details for a group booking, a discounted seasonal package, or a trip that included add-ons like gear rental.
In the Commissions section, booking reference numbers appear under the Reference column. Click a Reference link to open the booking details.
In the Commission Details box, you can see the commission amount assigned to the affiliate for that sale.
This section helps you see which affiliates are bringing in sales and how much they have earned. Once you are ready, you can move on to paying them.
Step 6: Pay your affiliates
This is the final part of the workflow. After you review unpaid commissions, you can process payouts and mark those records as completed.
Open the Payouts screen
In your WordPress dashboard, go to SliceWP on the left sidebar and click Payouts.
Choose the unpaid commissions
Select the unpaid commissions you want to process.
Process the payment
Click Process Payment.
Mark the commissions as paid
After the payment is complete, mark those commissions as Paid.
If you're still stuck or have a question we didn't cover, our support team is happy to help. Reach out at our support page and we'll get you sorted.