

Accommodation
Add room choices, trip-specific pricing, and upgrades to your bookings so travelers choose their stay during checkout and you manage everything in one place.
Keep accommodation inside the same booking flow as the trip. That means fewer follow-up messages, fewer separate invoices, and fewer missed details.
You set up room types, guest capacity, pricing, and descriptions once. Then you decide what is available for each trip. Travelers choose their room during booking, and that choice carries through to confirmation and payment emails.
Key features and benefits
| Feature | Benefit |
|---|---|
| Global room type library | Create your room list once, then reuse it across all your trips without setting it up again. |
| Per-trip pricing | Charge different room prices for different trips, seasons, or packages while keeping the same room type. |
| Included room toggle | Mark a room as included in the package price so travelers are not charged extra at checkout. |
| Room upgrades | Offer paid upgrades, such as a better hotel room or premium stay, on top of the base room choice. |
| Mandatory accommodation | Require travelers to choose a room before they finish booking when your trip needs that step. |
| Pricing format control | Choose whether you want to price accommodation by traveler or by room, based on how you sell your trips. |
Prerequisites
You will save time if these are ready before you begin.
- You have WP Travel Engine installed and activated on your WordPress site.
- You have updated WP Travel Engine to the latest version.
- You have installed and activated the Accommodation add-on.
Once those pieces are in place, you can check that the add-on is working.
Installing the Accommodation add-on
Start here if you still need to install or activate the add-on. A plugin is an extra feature you add to WordPress, and you manage plugins from your WordPress dashboard.
See how to activate a Pro add-on license key for the full installation and activation walkthrough.
Verification
This quick check tells you the add-on is active before you spend time setting up rooms.
What you will need before you start: access to your WordPress admin area. The dashboard is the main control area you see after logging in, with the menu on the left side.
Open your WordPress dashboard
Log in to your site's admin area.
When you are in the right place, you will see the WordPress menu on the left side of the screen.
Check that Accommodation appears in Extensions
In the left sidebar, go to WP Travel Engine → Settings → Extensions.
Confirm that Accommodation appears in the extensions list. This tells you WordPress can see the add-on.
Check that the Accommodation tab appears inside a trip
Open any trip for editing.
In the trip editor, look at the left sidebar under WP Travel Engine - Trip Settings and click Accommodation.
If the tab appears, the add-on is active and ready.
If the tab does not appear, deactivate and reactivate the add-on from the Plugins screen. The Plugins screen is where WordPress lists all installed plugins for your site.
Configuring global settings for Accommodation
Set these up once for your whole site. Global settings affect every trip that uses accommodation, so this is the best place to build your room library first.
Go to WP Travel Engine → Settings → Extensions → Accommodation to open these settings.
What you will need before you start: a clear list of the room types you sell, how many guests fit in each one, and whether you charge by room or by traveler.
Turn on Accommodation
Use the Enable toggle to switch accommodation management on for your site.
A toggle is an on and off switch inside the settings screen. When this is turned on, the rest of the accommodation fields appear.
Set the title travelers will see
Use Title to choose the heading shown above the accommodation section during booking.
The default is Accommodation. Change it if you use a different label in your business, such as Room selection or Stay options.
Add a short description for travelers
Use Description to add a short line below the title in the booking pop-up modal.
A booking pop-up modal is the small window that opens during booking. Use this line to guide the traveler, such as Select the accommodation for your trip.
Choose how you want accommodation pricing to work
Use Pricing Format to control how accommodation charges are calculated at checkout.
This choice affects how travelers see room selection on the booking form, so it is worth deciding now before you build out your room list.
Per Traveler
Choose this if you price the stay based on each person.
Travelers will see a Select Room(s) dropdown with options based on room capacity, such as 1 Room (2 people) or 2 Rooms (4 people).
This works well for many shared departures where you price each guest separately.
Per Room
Choose this if you want to sell the room as one unit.
Travelers will see a Select Traveler(s) dropdown with options based on the number of travelers, such as 2 Travellers or 4 Travellers.
Room sharing is only available when this format is selected. This can fit private tours or fixed room packages where the room price matters more than the per-person rate.
Decide whether travelers can book part of a shared room
Use Allow Shared Room Bookings if you want travelers to book fewer spots than the full room capacity.
This option is available when Pricing Format is set to Per Traveler.
For example, if you run a multi-day trek with twin-share accommodation, one solo traveler could book one spot in a double room and leave the second spot open for another traveler.
Once you enable this globally, you can also turn it on for individual room types by opening that room's Details panel and checking Allow Shared Room Bookings.
Write the shared occupancy notice
Use Shared Occupancy Notice to explain how shared room booking works.
This message appears during booking when the traveler's group does not fill the whole room. For example, if one traveler books a double room and one bed is still open, this note helps avoid confusion.
Choose who must select accommodation
Use Mandatory For to decide which traveler categories must choose a room before booking can be completed.
For example, if you select Child, any booking that includes a child will require a room selection.
Leave this empty if accommodation should be optional for everyone.
Build your global room type library
Use Room Types to create the room options you want available across your trips.
Think of this as your master room list. Every room type you add here can be assigned later to individual trips.
Click + Add Room Type to create a room type.
For each row, fill in these fields:
- Room Type - The room name, such as
Deluxe Double RoomorFamily Suite. - Guests - The maximum number of guests the room can hold.
- Short Description - A short summary travelers see on the booking form.
- Action - Turn the room on or off.
- Details - Open this section to add an image and a longer description.
Under Details, you can set:
- Image - Upload a room photo. JPG, PNG, and WebP are supported.
- Description - Add a longer explanation of the room, amenities, or view.
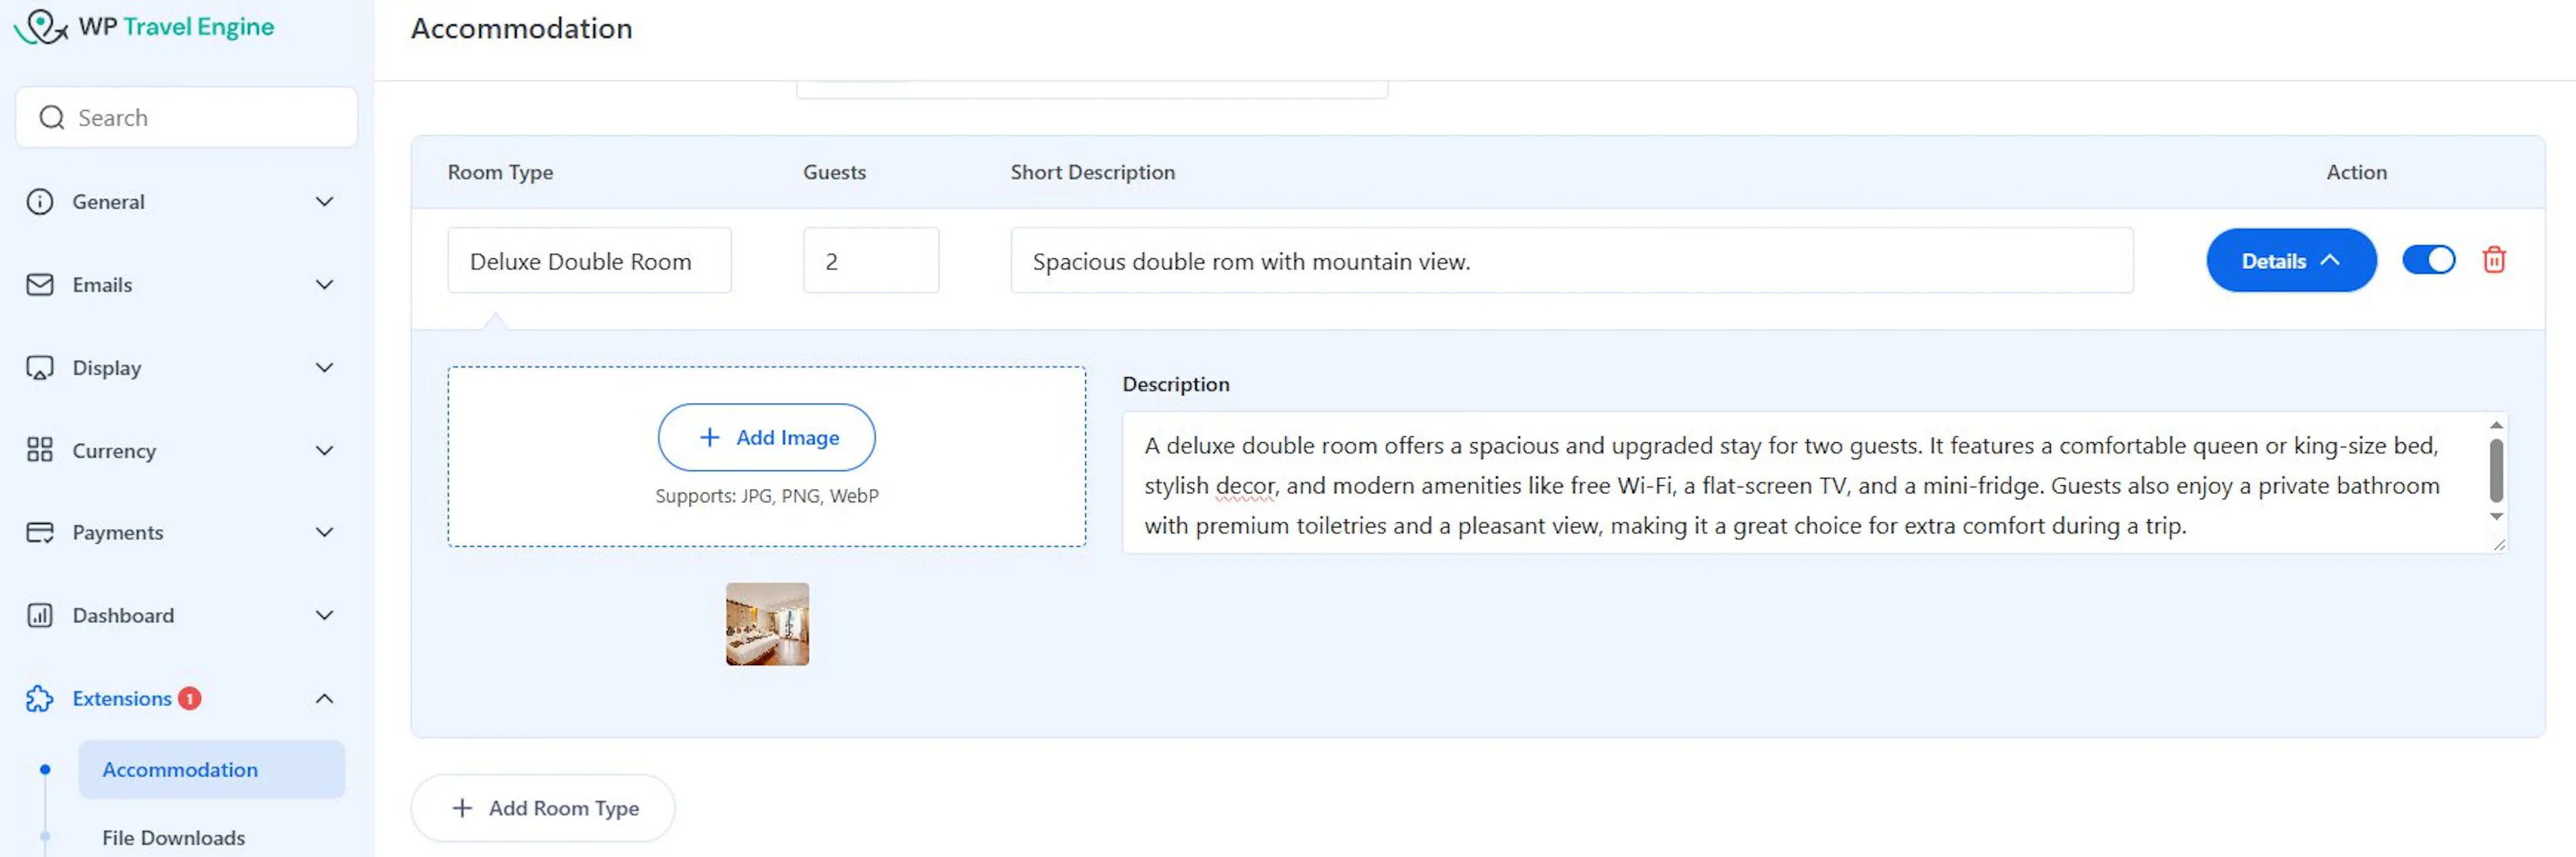
A good example is creating one Standard Twin Room once, then using it on a trekking package, a cultural tour, and a lodge stay with different pricing on each trip.
Create room upgrades you can reuse later
Use Room Upgrades for paid add-ons that sit on top of a traveler's base room choice.
You create upgrades here once. Then you attach them to specific room types on each trip.
Click + Add Upgrades to create an upgrade.
Each upgrade row includes:
- Upgrade Name - The name of the upgrade, such as
Luxury Upgrade Package. - Hotel Name - The hotel tied to that upgrade, such as
Mountain View Resort. - Details - Open this section to set the upgrade price.
For example, you might sell a standard lodge room as the base option and offer a private ensuite room as an upgrade.
Save your global settings
Click Save Settings after you finish making changes.
Your room library and upgrade list are now ready to use on individual trips.
If you leave this page without clicking Save Settings, your room types, upgrades, and setting changes will not be kept.
Trip-specific settings for Accommodation
Now take your global room library and apply it to one trip. These settings let you choose which rooms appear, what they cost, and which upgrades are available for that specific trip.
Go to Trips, open the trip you want to edit, and click the Accommodation tab in the trip settings sidebar. The Trips menu is on the left side of your WordPress dashboard.
What you will need before you start: at least one room type created in the global Accommodation settings.
Room Types
This is where you decide how each room behaves on one trip. All room types created in the global settings appear here automatically.
Open the trip you want to set up
In the WordPress left sidebar, go to Trips and open the trip for editing.
Then click Accommodation in the trip settings area.
Review the room types that were pulled in from global settings
You will see the room types you created earlier.
This saves you from building the same room again for every trip.
Adjust the room details for this trip
For each room, you can change the details for this one trip without changing the global version.
You can configure:
- Short Description - Replace the global short description with one that fits this trip.
- Price Per Room - Set the room price for this trip only. This does not change other trips.
- Action toggle - Turn the room on or off for this trip. Off means travelers will not see it on the booking form.
- Details - Replace the global image and description if needed.
If Included is set, the room shows an Included tag next to the room name on the booking form.
When Included is set, the price per room field is disabled because travelers are not paying extra for that room.
Leave the room price at 0 if the room is included in the trip package price.
Room types with shared bookings enabled show a Shared badge next to the room name. This helps you spot shared-room options quickly while you are setting up the trip.
Room Upgrades
Use this section to decide which upgrades are available on this trip and which base rooms they apply to.
Add the upgrades you want to offer on this trip
Use the Add Upgrades dropdown to select from the upgrades you created in the global settings.
Only upgrades created in the global Accommodation settings appear here.
Set the trip-specific upgrade price
Each upgrade has its own Price Per Room field for this trip.
This lets you charge different upgrade prices for different trips. For example, a hotel upgrade on a peak-season departure may cost more than the same upgrade on a low-season trip.
Choose which room types can use each upgrade
Use Room Types to select the base rooms that the upgrade applies to.
For example, you might allow Luxury Upgrade Package only for Deluxe Double Room, or make it available for every standard room on a group tour.
Turn the upgrade on or off
Use the Action toggle to control whether the upgrade appears on this trip.
Turn it off if you want to keep the upgrade in your library but not offer it for this departure.
That finishes the trip-level setup. Next, check the common problems below if something does not look right on the booking form.
Troubleshooting
I turned Accommodation on, but nothing shows on the booking form
Check the trip's Accommodation tab and make sure at least one room type is turned on with the Action toggle. Also confirm the add-on is enabled under WP Travel Engine → Settings → Extensions → Accommodation. If both are off, travelers will not see any accommodation choices.
The Accommodation tab is missing inside my trip
Go back to Plugins and deactivate, then reactivate the Accommodation add-on. Then open the trip again and check the left sidebar under WP Travel Engine - Trip Settings.
My room upgrade is not showing during booking
Open the trip's Accommodation tab and confirm three things. The upgrade must be added from Add Upgrades. The upgrade's Action toggle must be on. The upgrade must also be assigned to the correct Room Types.
I created room types globally, but they are not available on a trip
First, click Save Settings in the global Accommodation settings. Then reopen the trip. If the room types were not saved globally, they will not appear at the trip level.
Travelers can book a room, but shared occupancy is not available
Check both levels of the setting. You must enable Allow Shared Room Bookings in the global Accommodation settings, and then enable it again inside the Details area for the specific room type.
Accommodation details are missing from booking confirmation emails
Check your email templates in WP Travel Engine → Email Customizer. Make sure the template you use includes accommodation details.
Frequently asked questions
Can I include accommodation in the trip price by default?
Yes. Set the room price to 0 or mark the room as included. The room will be treated as part of the package instead of an extra charge.
Can I charge different room prices for different trips?
Yes. Create the room type once in global settings, then set a different Price Per Room inside each trip. This is useful for seasonal pricing, different hotel partners, or premium departures.
Can I offer multiple upgrades for one room type?
Yes. You can add as many upgrades as you need. Each one can have its own hotel name and price.
Do room choices and upgrades show up in emails?
Yes. The accommodation details appear in booking confirmations and payment receipts.
Do I have to make accommodation mandatory for every traveler?
No. Use Mandatory For to choose which traveler categories must select accommodation. Leave it empty if accommodation should stay optional.
If you're still stuck or have a question we didn't cover, our support team is happy to help. Reach out at our support page and we'll get you sorted.