

Trips Embedder
Add selected trips to blog posts, pages, or partner websites so travelers can browse and book without leaving the content they are reading.
Show trips inside your content
Trips Embedder lets you place selected trips inside your WordPress posts and pages. You can also show those trips on another WordPress website, such as a partner site or affiliate site.
A plugin, also called an add-on, is a small tool you add to WordPress to give it more features. Trips Embedder is the add-on that adds trip embeds to your site.
The add-on uses a shortcode when you insert trips into content. A shortcode is a small line of text you paste into a WordPress page or post so WordPress can display the feature there.
Here is a common example. You might write a blog post about trekking in Nepal and want to show your Annapurna trek inside that post so readers can book it without leaving the page.
The Trips Embedder add-on requires WP Travel Engine plugin v2.2.4 or later installed and activated on your website.
Install the add-on
What you will need before you start: the wp-travel-engine-trips-embedder.zip file and access to your WordPress dashboard.
Upload from your computer
This is the best option for most site owners. You will upload the plugin file from your computer into WordPress.
Open the Plugins area
You need to start where WordPress manages installed plugins.
In your WordPress dashboard, look at the left sidebar and go to Plugins. Then click Add New.
Open Upload Plugin
This opens the area where you can upload the zip file.
Click Upload Plugin near the top of the screen.
Choose the plugin file
WordPress needs the original zip file for installation.
Select wp-travel-engine-trips-embedder.zip from your computer.
Install the plugin
This copies the add-on into your WordPress site.
Click Install Now.
Activate the plugin
Activated means the add-on is turned on and ready to use.
Click Activate Plugin after installation finishes.
Upload via FTP
FTP is a method for transferring files to your website server directly. Use this method if the plugin file is too large for the normal upload in WordPress.
Download the plugin zip file
You need the add-on file on your computer before you can upload it.
Download wp-travel-engine-trips-embedder.zip.
Extract the plugin folder
FTP uploads the folder, not the zip file.
Extract the wp-travel-engine-trips-embedder directory to your computer.
Upload the folder to your site
This places the add-on inside WordPress's plugin folder.
Upload the wp-travel-engine-trips-embedder directory to the /wp-content/plugins/ directory.
Activate the plugin in WordPress
The upload only adds the files. Activation turns the add-on on.
In your WordPress dashboard, go to Plugins on the left sidebar and activate the plugin.
Once activation is complete, the add-on is ready to use. The next step is connecting your license key so you can receive updates.
Add your plugin license
Your license key connects your site to your purchase. It lets you receive updates when new versions of the add-on are released.
What you will need before you start: the license key you received when you bought the add-on.
Open the Plugin License page
You will enter your license key from inside WP Travel Engine.
In your WordPress dashboard, go to WP Travel Engine on the left sidebar. Then click Plugin License.
Enter your license key
This tells your site which purchase belongs to you.
Enter the license key you received when you bought Trips Embedder into the license field.
Save the key
WordPress needs to save the key before it can activate it.
Click Save Changes.
Activate the license
This finishes the connection between your website and your purchase.
Refresh the page. Then click Activate License. You will see a message after the license is activated.
After activation, you can update the add-on from the plugins page whenever a new version is released. Now you are ready to start embedding trips.
Understand where Trips Embedder works
Trips Embedder works from the two main places where you write content in WordPress. You can embed trips in either a grid layout or a list layout from both editors.
The Classic Editor is the older text editor that comes with WordPress. The Gutenberg editor, also called the block editor, is the newer default editor in WordPress.
A block is a building block of content in the Gutenberg editor, like a paragraph, image, or embed. Once you know which editor you use, the setup feels much more straightforward.
Embed trips in the Classic Editor
Insert trips into a post or page
What you will need before you start: a post or page open in the Classic Editor. The Classic Editor is the older text editor in WordPress.
While editing your post or page, click one of the Trips Embedder buttons in the editor toolbar. This opens a popup window where you choose which trips to show.
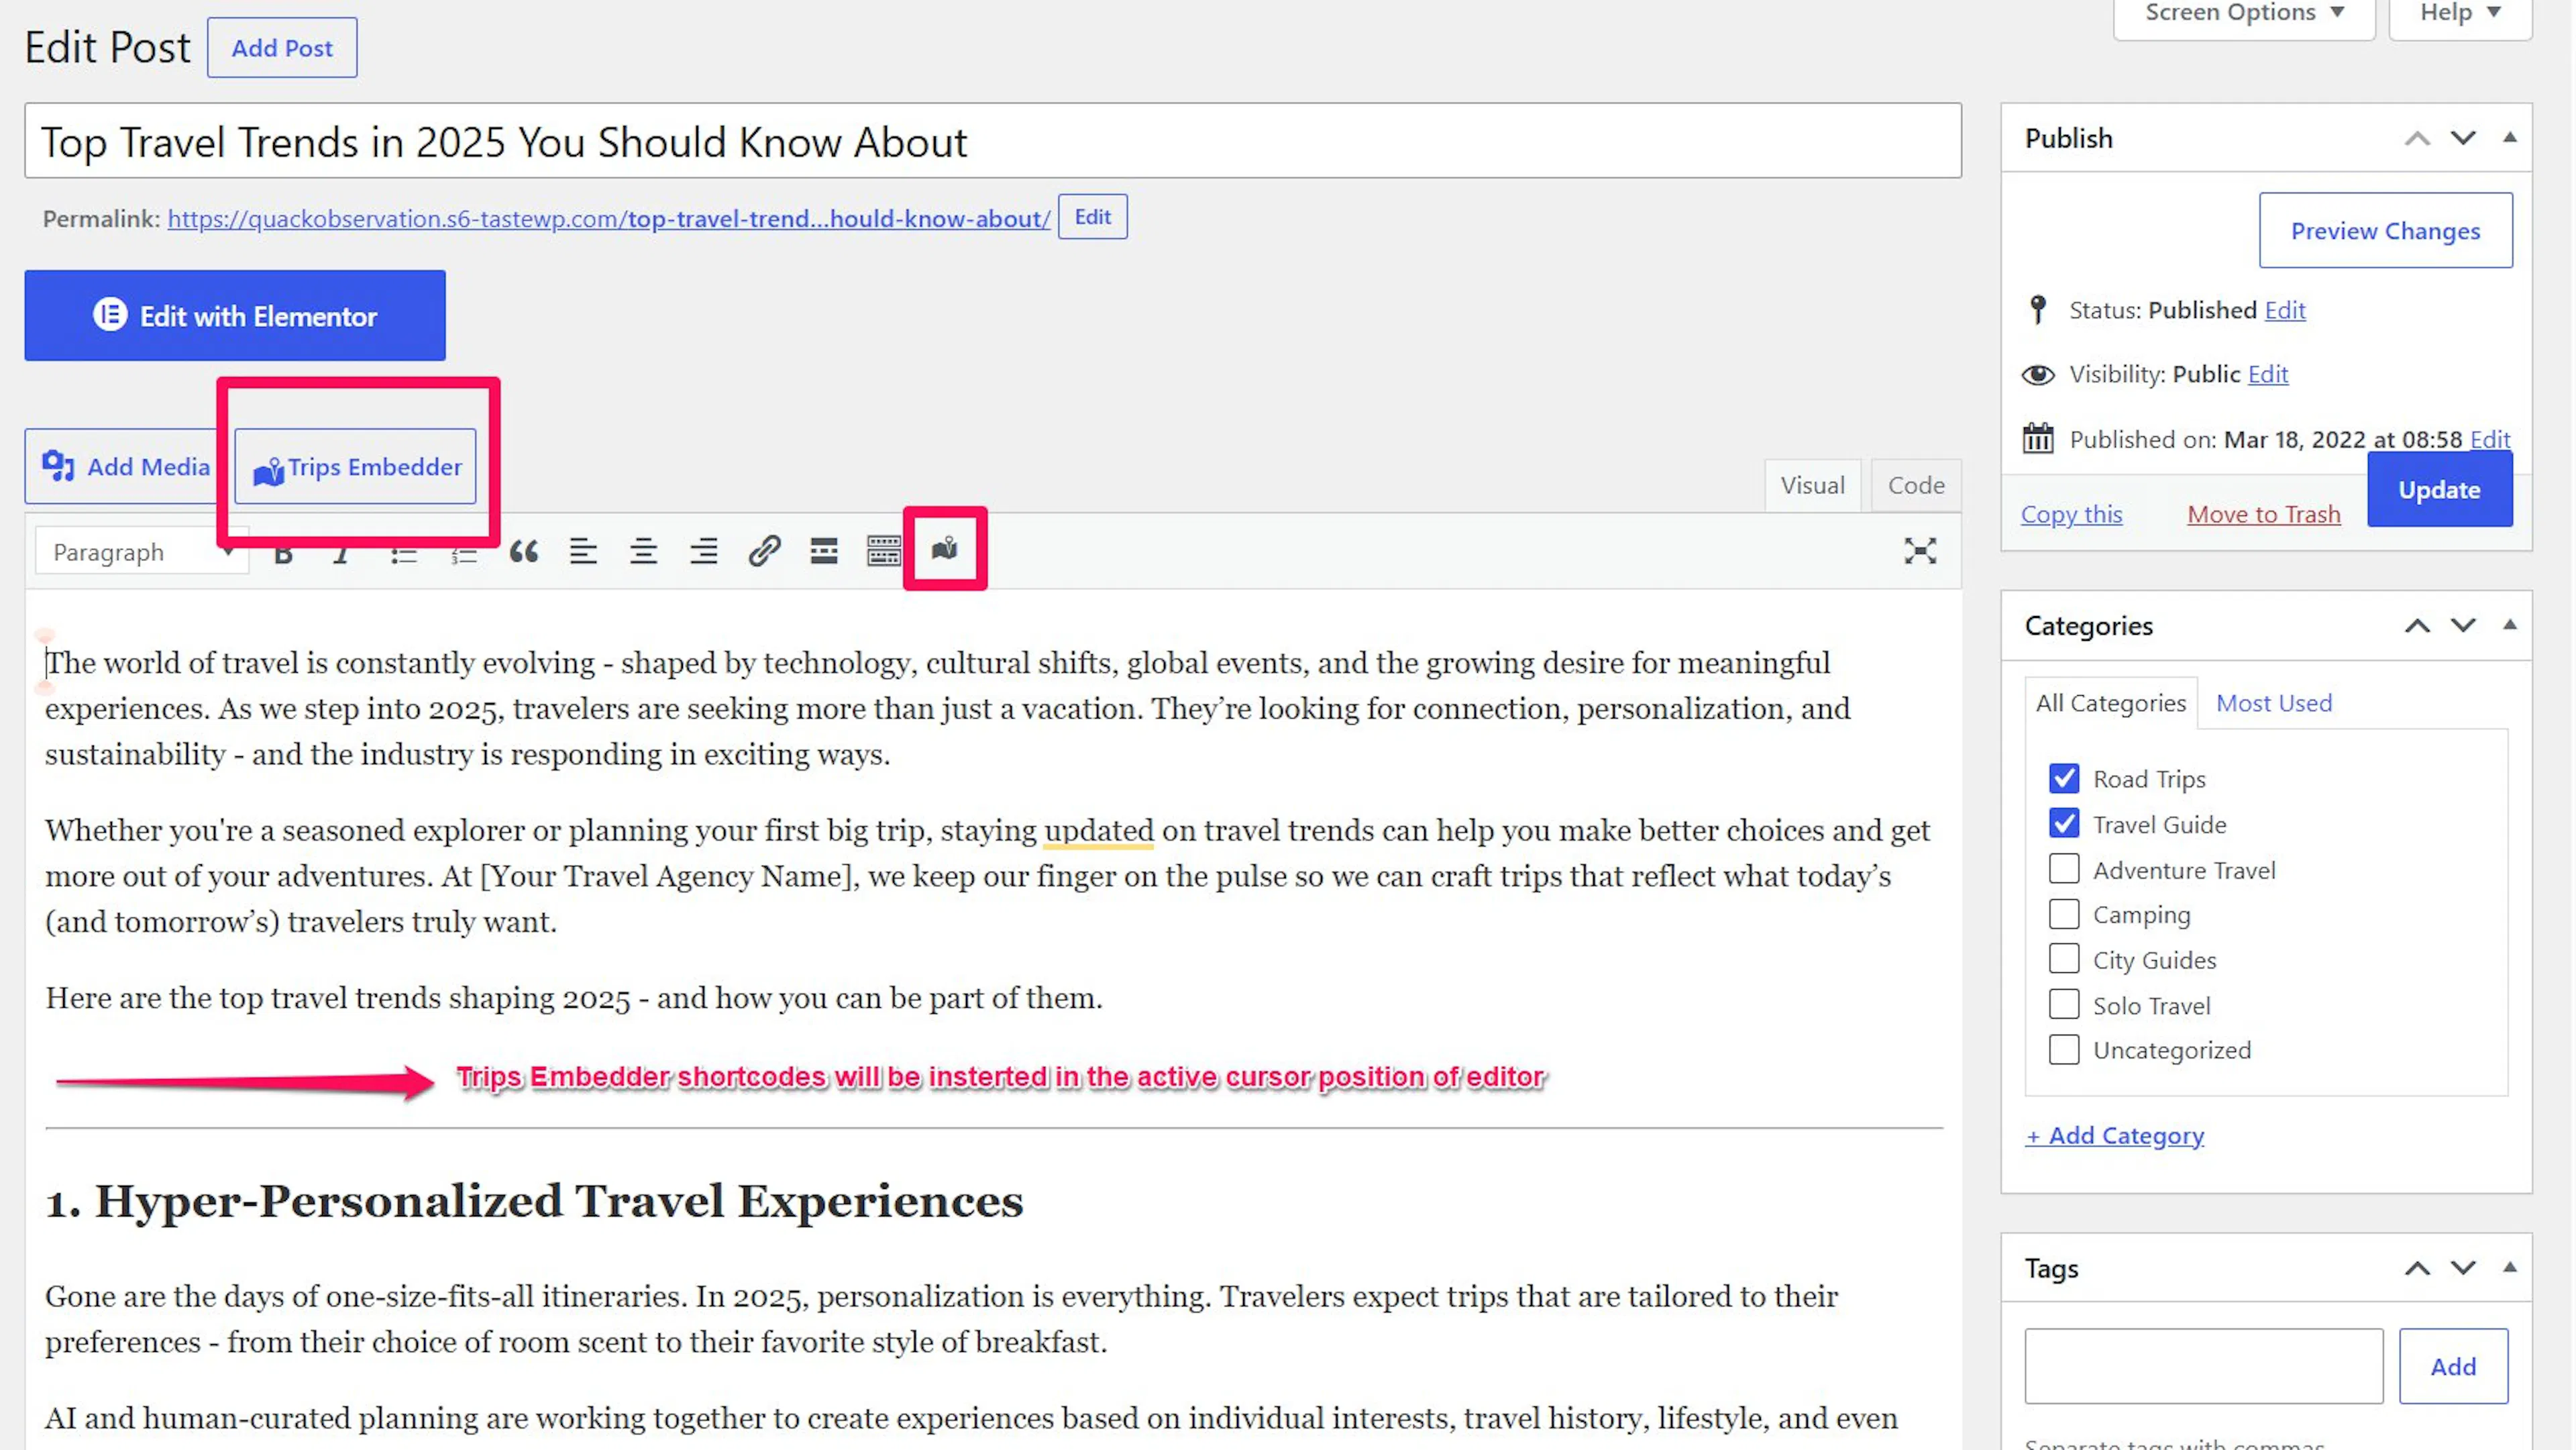
The popup has four tabs:
- Trips - shows individual trips
- Destinations - shows trips from a specific destination, such as all trips in Nepal
- Activities - shows trips that match an activity, such as trekking or rafting
- Trip Type - shows trips of a certain type, such as day tours or multi-day packages
The add-on inserts a shortcode based on the tab you are using.
Since Trips Embedder inserts different shortcodes for each tab, trips are shown based on the settings and selection in the active tab only, one at a time.
You can choose multiple trips, destinations, activities, or trip types and add them to your selection.
Add items to the selection area
This builds the set of trips you want readers to see.
After choosing the trips or terms you want, click Add to selected trips to move them to the selection area.
Reorder or remove items
This helps you control the order readers see first.
Drag items to reorder them. Click the cross icon beside a title to remove it.
Once your selection looks right, you can fine-tune how it appears.
Search for trips by name
If you have many trips, the search bar saves time. It helps you find a trip by name instead of scrolling through a long list.
This is especially useful when your site has many trek variations, seasonal departures, or similar day tours. Next, choose how those results should look on the page.
Choose a grid or list layout
Below the selection area, choose either a grid or list layout. Grid shows trips in cards side by side. List shows them stacked one below the other.
Grid is selected by default. Grid works well when you want to show three or four trips in a blog post sidebar. List works better when you want more detail for each trip in the main content area.
After choosing your trips and layout, click Insert to place them in your post. WordPress will place the shortcode into the editor for you.
Control how many trips appear
The Destinations, Activities, and Trip Types tabs include an extra field called No. of posts. This field controls how many trips will appear from your selection.
For example, if you select the destination Nepal and set the field to 6, only 6 Nepal trips will appear. If you leave the field blank, WordPress uses its default number of posts.
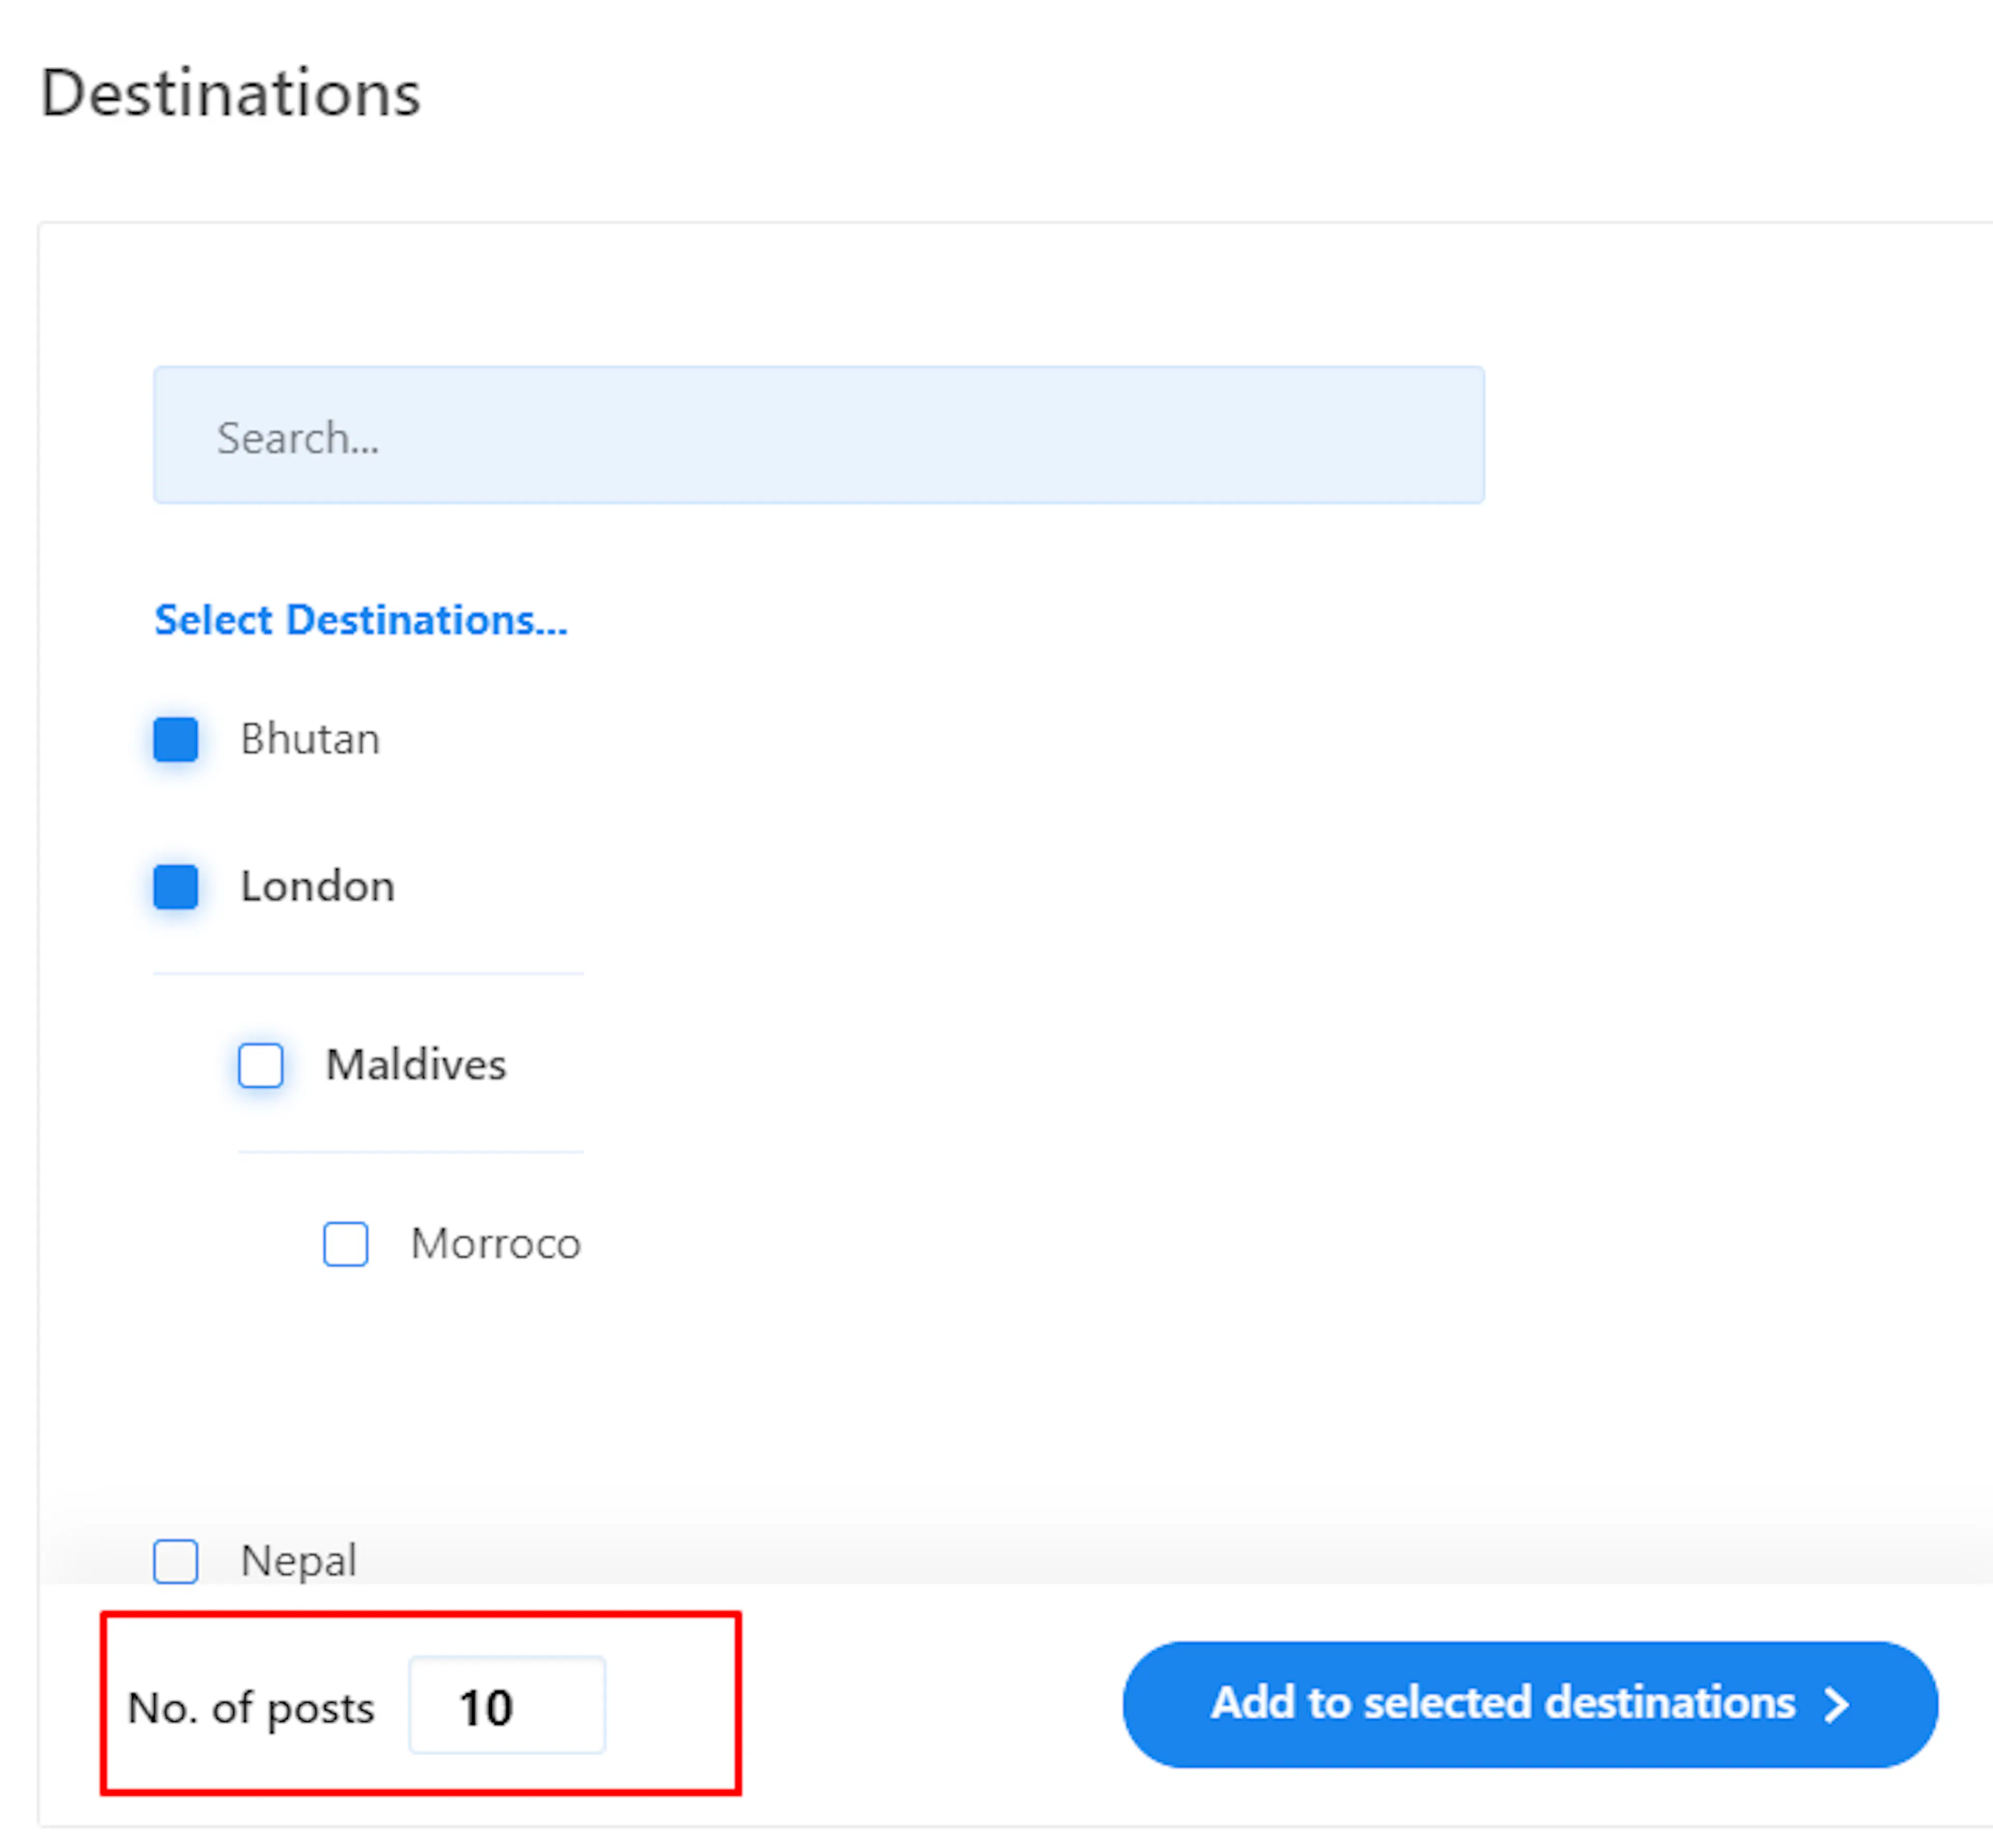
Use No. of posts when you want to keep a section short and focused. For example, you might show 4 day tours on a city guide page or 6 multi-day packages on a seasonal promotion page.
That is all you need for the Classic Editor. If you use the newer WordPress editor, use the Gutenberg blocks instead.
Embed trips in Gutenberg
The add-on also works in the Gutenberg editor. Gutenberg is the newer WordPress editor and is also called the block editor.
A block is a building block of content in Gutenberg. Trips Embedder adds two blocks that let you place trip listings inside a post or page while you are creating content.
If you are already comfortable adding paragraphs or images in Gutenberg, using these blocks will feel familiar. You can also use Trips Embedder outside your own site content.
Embed trips on external websites
This feature lets you show your trips on another WordPress website. That could be your second website or a partner or affiliate site.
The other website does not need WP Travel Engine installed. Trips Embedder turns your selection into an iframe. An iframe is a small window inside a web page that shows content from another website.
What you will need before you start: the add-on must be active on your main site where your trips are stored.
Create a new external embed
This sets up the trip display that another website will use.
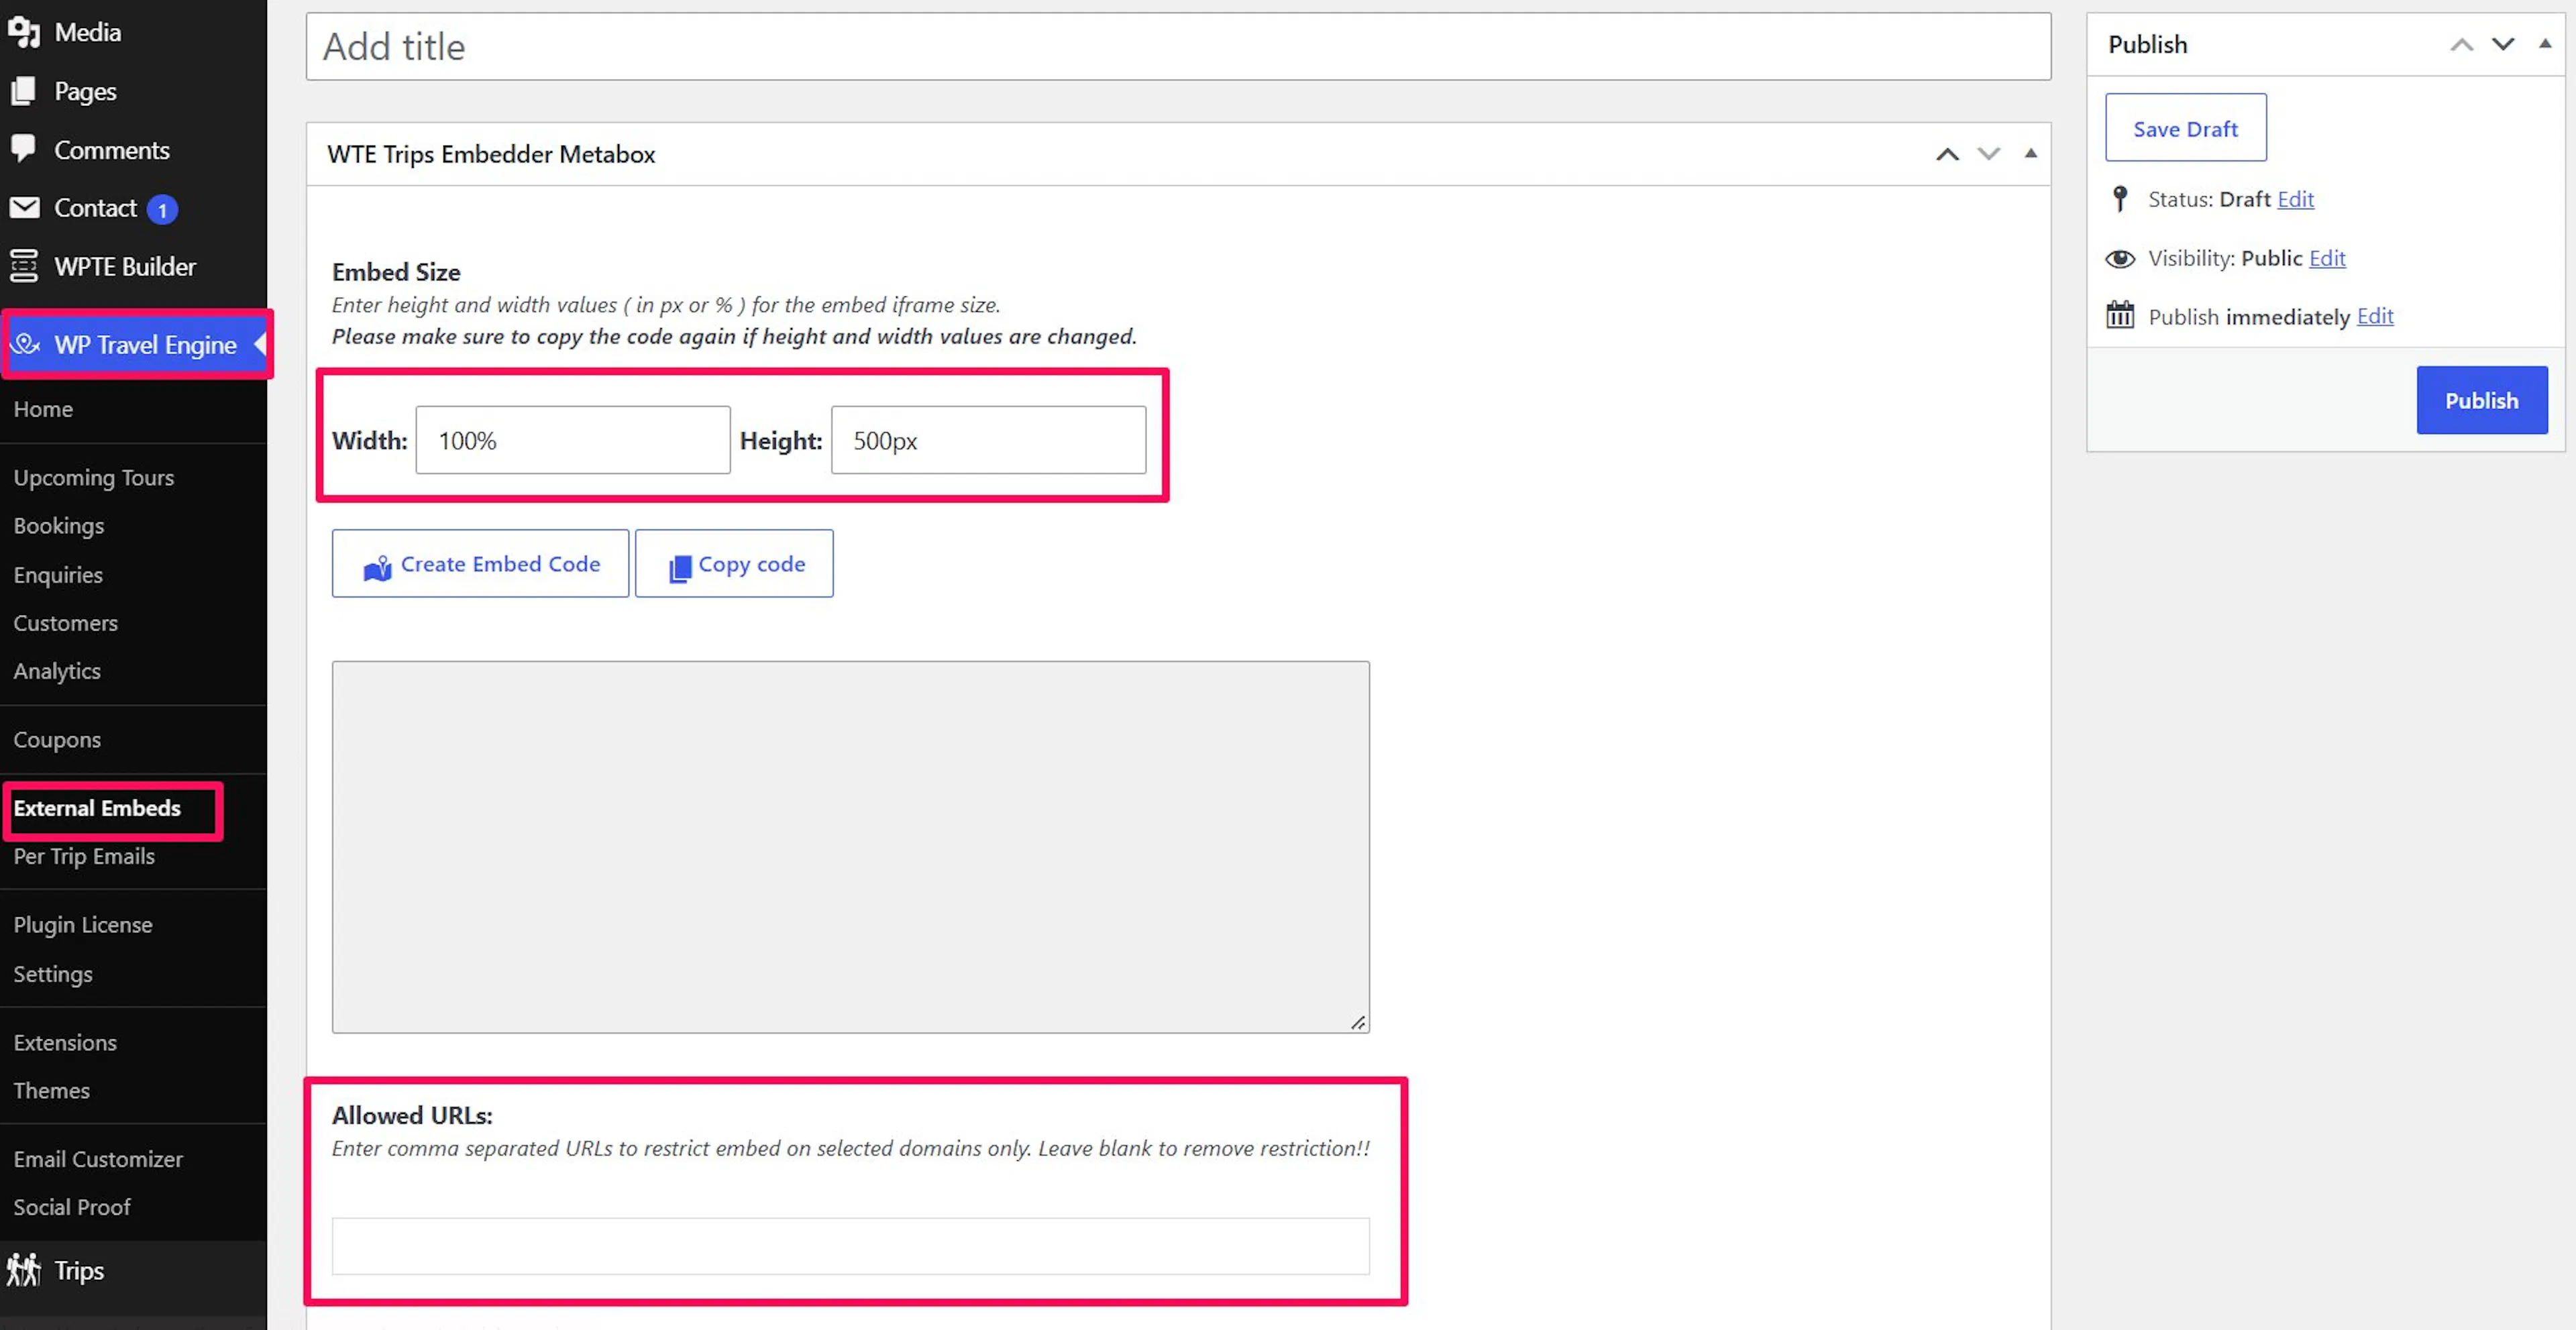
In your WordPress dashboard, go to WP Travel Engine on the left sidebar. Then open External Embeds and click Add New.
Enter a title. Then set the width and height for how the trips will display on the other website.
Create the embed code and choose what to show
This is where you decide which trips people will see.
Click Create Embed Code. Choose trips, destinations, activities, or trip types and add them to your selection.
After choosing items, click Add to selected trips to move them to the selection area. Drag items to reorder them. Click the cross icon beside a title to remove an item.
Use the search bar if you want to find trips by name instead of scrolling.
Choose either grid or list layout below the selection area.
Copy the generated code
You will paste this code into the other website.
Click Copy Code to copy the generated embed code.
Paste the code into the destination website
This places your trip display into the other site's page or post.
On the destination website, open the post or page where you want the trips to appear. Add a Custom HTML block and paste the code. A Custom HTML block is a Gutenberg block that lets you paste raw code.
Update the post or page.
Once the page is updated, the trips will show on the other site with a live preview. That means visitors can browse your selected trips without leaving the page they are reading.
If you are still stuck or have a question we did not cover, our support team is happy to help. Reach out at our support page and we will get you sorted.