

Travelverse Theme: Getting Started
Set up Travelverse on WordPress, learn its dashboard, and find where to customize trip pages, colors, typography, and layouts.
What Travelverse is
A theme controls how your WordPress website looks. It sets the starting design for your pages, menus, colors, and text.
Travelverse is a free, block-based WordPress theme. A block is a piece of page content, such as a heading, image, button, or text section. You build pages by arranging these pieces instead of editing theme files.
Travelverse also supports Full Site Editing. This means you can change your whole website from the Site Editor, including page layouts, headers, footers, and other site-wide areas.
You get a working website as soon as you activate Travelverse. You can then open each page template in the Site Editor and adjust the layout to suit your business. For example, you could place a large trip image above the details for a multi-day trek.
Travelverse includes patterns. Patterns are pre-designed page sections that you can add to your site. You might use a ready-made tour section for a day tour, a call-to-action section for group bookings, or a travel blog layout.
Travelverse works with WP Travel Engine. WP Travel Engine is a WordPress plugin for managing and booking trips. With both products, you can showcase your trips and add booking blocks to Travelverse templates.
You can also change your site's colors and typography. Typography controls how text looks, including its style and size. If you want to start again, reset a template to remove your changes and return it to the original Travelverse design.
How to use this documentation
Follow the sections in order if this is your first time setting up Travelverse. You will install the theme, find the Travelverse dashboard, and learn where to change your site's pages and design.
When you need one specific task later, use the links at the bottom of this page. Each link takes you to a focused guide for that part of your site.
If you need help with something not covered here, open a support ticket. The WP Travel Engine support team can help you work through it.
Install the Travelverse theme
You will need the Travelverse theme .zip file downloaded to your computer before you start. A .zip file is a compressed folder that WordPress uses to install the theme.
The installation takes place in the WordPress dashboard. The dashboard is the control area for your website.
Download the theme file
Before you upload Travelverse, save its installation file somewhere you can find it, such as your Downloads folder.
Download the Travelverse theme installation file. Keep the file in .zip format.
Log in to WordPress
You need to be signed in to your WordPress dashboard before you can install a theme.
Log in to your WordPress admin dashboard. On the left sidebar, open Appearance, then select Themes.
You should now see the themes currently available on your website.
Open the theme uploader
The uploader gives you a way to install a theme file from your computer.
Click Add New near the top of the Themes screen. Then click Upload Theme.
The screen should now show an option for choosing a theme file.
Upload the theme file
WordPress needs the compressed .zip file to install Travelverse correctly.
Click Choose File. Select the Travelverse .zip file you downloaded. Then click Install Now.
When the upload finishes, WordPress should show that the theme installation was successful.
Activate the theme
Activation applies the Travelverse design to your website. Your existing content stays in WordPress, but your site's appearance changes to use Travelverse.
Click Activate after the installation finishes.
Travelverse is now active. You can open the Site Editor and begin adjusting your site's pages and design.
If you use Safari on a Mac, downloaded .zip files may unzip automatically. Check that the Travelverse file still ends in .zip before you upload it. If Safari has already unzipped the file, turn off automatic unzipping in Safari's preferences and download the file again.
Your theme is ready once Travelverse is active. Next, open its dashboard to see the tools available for your site.
Tour the Travelverse dashboard
The Travelverse dashboard is a settings page inside WordPress for this theme. You can find it in the left sidebar by opening Appearance, then selecting Travelverse.
The dashboard brings the main Travelverse tools together in four tabs. Use the table below to see what each tab is for.
| Tab | What it's for |
|---|---|
| Dashboard | Start customizing your website. You can also find links to the Travelverse documentation and support. |
| Starter Sites | Browse the ready-made Travelverse site designs. Choose one as a starting point for your tour business. |
| Free vs Pro | Compare the free theme with the premium Pattern Engine plugin. |
| Settings | Find premium customizer shortcuts for Colors, Custom Script, Typography, and Custom CSS. This tab requires the Pattern Engine premium plugin. |
You can return to this dashboard whenever you need to check a setting or find a related guide. The links below take you to the parts of Travelverse you are most likely to customize first.
How to Configure Page Settings?
Page settings control which page visitors see first and whether your homepage shows fixed content or your latest blog posts. Choose the option that fits your tour business. A fixed homepage works well when you want to highlight your main trips, booking options, and contact details.
Static Homepage
Travelverse shows the Front Page Template as your homepage by default. Use a static homepage when you want a fixed page for your main message and a separate page for your blog.
A static homepage does not change when you publish a new blog post. The separate blog page updates automatically with your latest posts.
Before you begin, create the two pages that WordPress will use for your homepage and blog.
Create the Home and Blog pages
Create two pages so WordPress has separate places for your main website content and blog posts.
From the left sidebar, open Pages and click Add New. Create a page titled Home, then create another page titled Blog.
You can leave both pages empty for now. You will choose their roles in the reading settings.
Open the reading settings
These settings tell WordPress which page to show first and where to display your posts.
Open Settings from the left sidebar, then click Reading.
The Reading Settings screen should now be open.
Choose the homepage
Selecting Home makes your fixed homepage appear when visitors open your website.
Under the homepage display options, select Home as the homepage.
WordPress will use the Home page instead of displaying your latest posts on the front page.
Choose the posts page
Selecting Blog gives your latest posts their own page.
Select Blog as the posts page.
Your blog posts will now appear on the Blog page.
Save the page settings
Saving applies the new homepage and blog page choices to your website.
Click Save Changes.
Open your website in a new browser tab to confirm that the Home page appears first. The Blog page should list your posts.
Your main page and blog now have separate jobs. If you prefer to show new blog posts on the homepage, use the Front Page Template instead.
Latest Posts on Homepage
Use the latest-posts layout when your blog is the main way you share news about trips, seasonal pricing, or new group packages. You will edit the Front Page Template in the Site Editor.
Before you begin, decide which sections you want to keep on the homepage. You can remove the starter sections and add a blog pattern in their place.
Open the Front Page Template
The Site Editor is where you change the layout used across your website.
Open Appearance from the left sidebar, then click Editor.
The Site Editor should now be open.
Open List View
List View shows a tree-style outline of every block on the page. Use it to find and select sections that are difficult to select on the page itself.
Click the List View icon near the top left of the editor.
The list of blocks and sections should appear on the left side of the screen.
Remove the sections you do not need
Removing the starter sections leaves space for the blog layout you want to show.
In List View, click each section you want to remove. Open its three dots menu, then click Delete.
Keep the Header Template Part block so your site header stays in place.
Open the block inserter
The block inserter opens the panel where you can add blocks and patterns.
Select the Header Template Part block. Click the Toggle block inserter icon.
The inserter panel should open beside the editor.
Choose the Travelverse blog pattern
Travelverse patterns give you a ready-made blog layout without requiring you to build every section yourself.
Click the Patterns tab, then select Travelverse Patterns. Choose the Blog pattern.
The blog pattern should appear in the Front Page Template.
Adjust the blog pattern
Adjusting the pattern helps you match the homepage to your tour business.
Select the added Blog pattern and make your changes. You might change the heading, spacing, images, or number of posts shown.
Check that the section is easy to scan on a phone before you continue.
Save the homepage
Saving publishes the new homepage layout for visitors.
Click Save.
Your homepage should now show the blog pattern and your latest posts.
If you cannot find a block on the page, use List View to locate it. The block inserter is the button that opens the panel for adding new blocks and patterns.
The homepage now matches the way you share information with travelers. Next, add individual sections with Travelverse patterns.
Travelverse Patterns
Patterns are pre-designed page sections built with WordPress blocks and WP Travel Engine blocks. They help you add professional-looking sections without designing everything from scratch.
For example, if you run a 3-day trek, you might want a section that shows trip highlights with images. Travelverse may include a pattern that gives you that layout. You can then replace the sample content with your own routes, photos, and trip details.
How to Create a Pattern
Create your own pattern when the built-in Travelverse patterns do not cover a specific need. You might create a reusable group discount section or a gear rental section that you want to add to several trip pages.
A pattern category is a folder that helps you organize your patterns. Choose a category name that will help you find the pattern later.
Open the Site Editor
The Site Editor contains the pattern tools for your theme.
Open Appearance, then click Editor.
Open Patterns
The Patterns area stores reusable page sections.
Click Patterns.
Start a new pattern
Creating the pattern gives you a reusable place for the section you want to save.
Click the Plus icon.
Name and organize the pattern
A clear name and category make the pattern easier to find when you need it.
Enter a name for the pattern and select a category for it.
Your new pattern is ready for you to add blocks and build the section.
You can now build a reusable section for a specific part of your tour business. Add it to a page when you need it.
How to Add a Travelverse Pattern to a Page
Use a Travelverse pattern when you want to add a ready-made section to a new page. This works well for destination information, trip highlights, testimonials, or seasonal offers.
Create a page
Starting with a page gives the pattern a place to display.
Open Pages, click Add New, and enter a title for the page.
Your new page should be open in the WordPress editor.
Open the Patterns tab
The Patterns tab contains reusable sections that you can add to the page.
Click the Patterns tab.
Find a Travelverse pattern
Filtering by Travelverse helps you find patterns designed for this theme.
Select Travelverse Pattern from the dropdown. You can also click Explore and select Travelverse.
Add the pattern
Adding the pattern gives your page a complete starting section.
Click the pattern you want to use.
The pattern should appear on your page.
Customize the section
Replace the starter content with information that matches your tour.
Modify the added block as needed. Add your own images, trip details, prices, or booking information.
Publish the page
Publishing makes the page available to visitors.
Click Publish.
Open the page on your website to confirm that the pattern and your content display correctly.
Patterns give you a faster starting point for new pages. Templates control the larger layout around those pages.
Travelverse Templates
Templates are pre-designed page layouts that you can assign to pages. When you assign a template to a page, the page inherits that template's design.
Travelverse includes these templates:
- About Page
- Contact Page
- Team Page
- Destination Page
- Trip Search Result Page
- Activities Page
- Trip Types Page
- Blank Page
For example, create a new Contact page and apply the Contact Page template. The page already has the right layout for contact details, a contact form, and a map.
How to Create a New Template
Create a template when you need a layout that is different from the templates Travelverse provides. A custom template could give your multi-day packages a different structure from your day tours.
Open the Templates area
The Templates area is where you create and manage page layouts.
Open Appearance, then click Editor. Open the Templates tab.
Start a new template
Starting a new template lets you choose the type of content that will use the layout.
Click the Plus icon to add a new template.
Choose the template type
Choosing the type tells WordPress where the template can be used.
Choose the type of post or page for which you want to create a template. You can also choose Custom template.
Configure the template settings
The required settings determine how WordPress identifies and uses the template.
Configure the required settings shown by WordPress.
Build the page layout
Adding blocks and patterns creates the design visitors will see.
In the Page Template Editor, add the elements and patterns you want to use. Arrange the sections in the order that makes sense for your visitors.
Save the template
Saving makes the template available for the pages that use it.
Click Save.
Your new template is ready to assign to a page.
Your custom layout is now available for the content type you selected. You can also change the order of sections in an existing Travelverse template.
How to Sort the Added Sections of a Travelverse Template
Rearrange sections when the current order does not match the way you sell your tours. For example, move your trip search section before your featured trips section so visitors can search first.
Open the Site Editor
The Site Editor contains the templates and their sections.
Open Appearance, then click Editor.
Open the navigation panel
The navigation panel opens on the left side so you can move between templates.
Click the Toggle Navigation icon.
Choose a template
Selecting the right template makes sure your changes affect the intended page layout.
Click the Templates tab, then select the template you want to edit.
Open List View
List View shows every section in the template in a tree-style outline.
Inside the template editor, click the List View icon.
Select the section to move
Selecting the section lets you use the movement controls for that part of the layout.
Click the section you want to move.
Move the section
Moving the section changes the order visitors see on the page.
On the toolbar, click Move up or Move down until the section is in the right position.
Save the new order
Saving publishes the new section order.
Click Save.
Preview the page to confirm that the sections appear in the order you want.
You can now arrange a template around the way travelers use your site. Assign that template to a page when you are ready to use it.
How to Apply a Page Template to a Page
Apply a template when you create a page that needs a specific layout. A Contact Page template, for example, gives your contact page a suitable starting structure.
Create a page
The page needs to exist before you can choose its template.
Open Pages, then click Add New.
Enter the page title
A clear title helps you identify the page in your dashboard and on your website.
Enter the page title.
Open the template choices
The Template option shows the layouts available for the page.
Click Swap Template through the Template option.
Choose a template
Choosing a template applies its layout to the page.
Select the template you want to use.
The page should now display the selected template layout.
Publish the page
Publishing makes the page and its selected layout available to visitors.
Click Publish.
The page now uses the template you selected. If you change a built-in template and want to start over, reset its customization.
How to Clear Template Customization
Reset a template when your changes no longer fit your site and you want to return to the original Travelverse design. The reset option only appears for templates you have customized.
Open the Site Editor
The Site Editor contains the reset controls for templates.
Open Appearance, then click Editor.
Open the navigation panel
The navigation panel gives you access to all templates.
Click the Toggle Navigation icon.
Open all templates
Managing all templates lets you find the template you want to restore.
Click the Templates tab, then click Manage all Templates.
Reset the template
Resetting removes your changes and restores the original design.
Click the Reset icon for the template you want to reset.
Reset works only for built-in Travelverse templates. You cannot use it to restore a template you created from scratch.
The built-in template returns to its original design. Template parts work in a similar way for reusable headers, footers, and other sections.
Travelverse Template Parts
Template parts are reusable sections that you can use across multiple templates. Headers and footers are common examples. Change a shared template part once and the change can appear wherever that part is used.
Travelverse template parts have three categories:
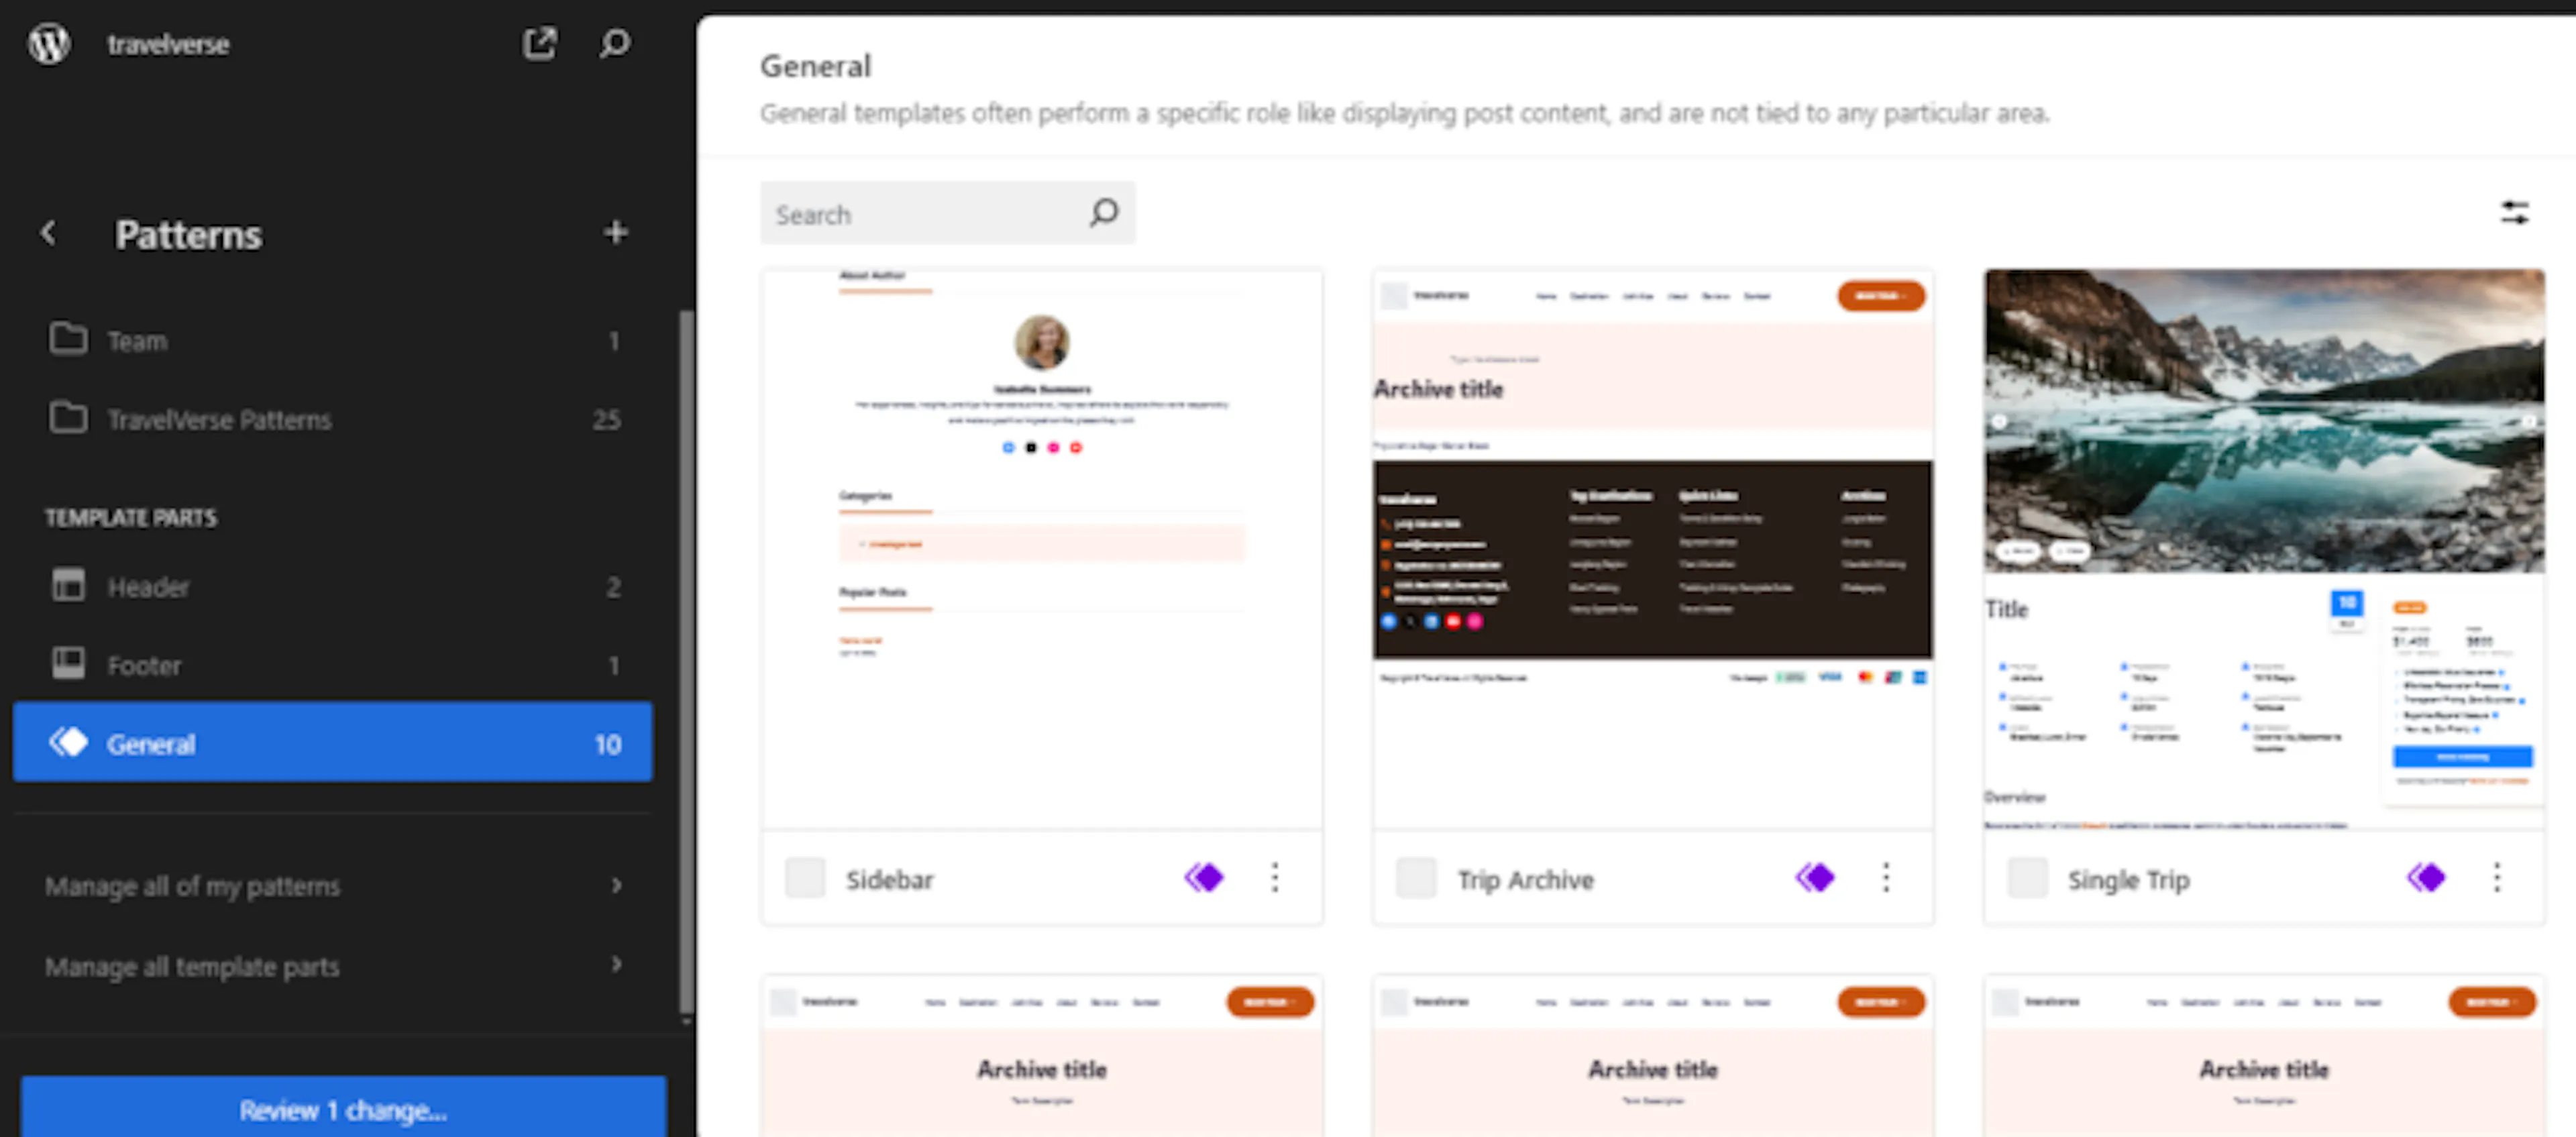
- General: A reusable section that is not tied to one specific area. You can add it anywhere, such as a sidebar.
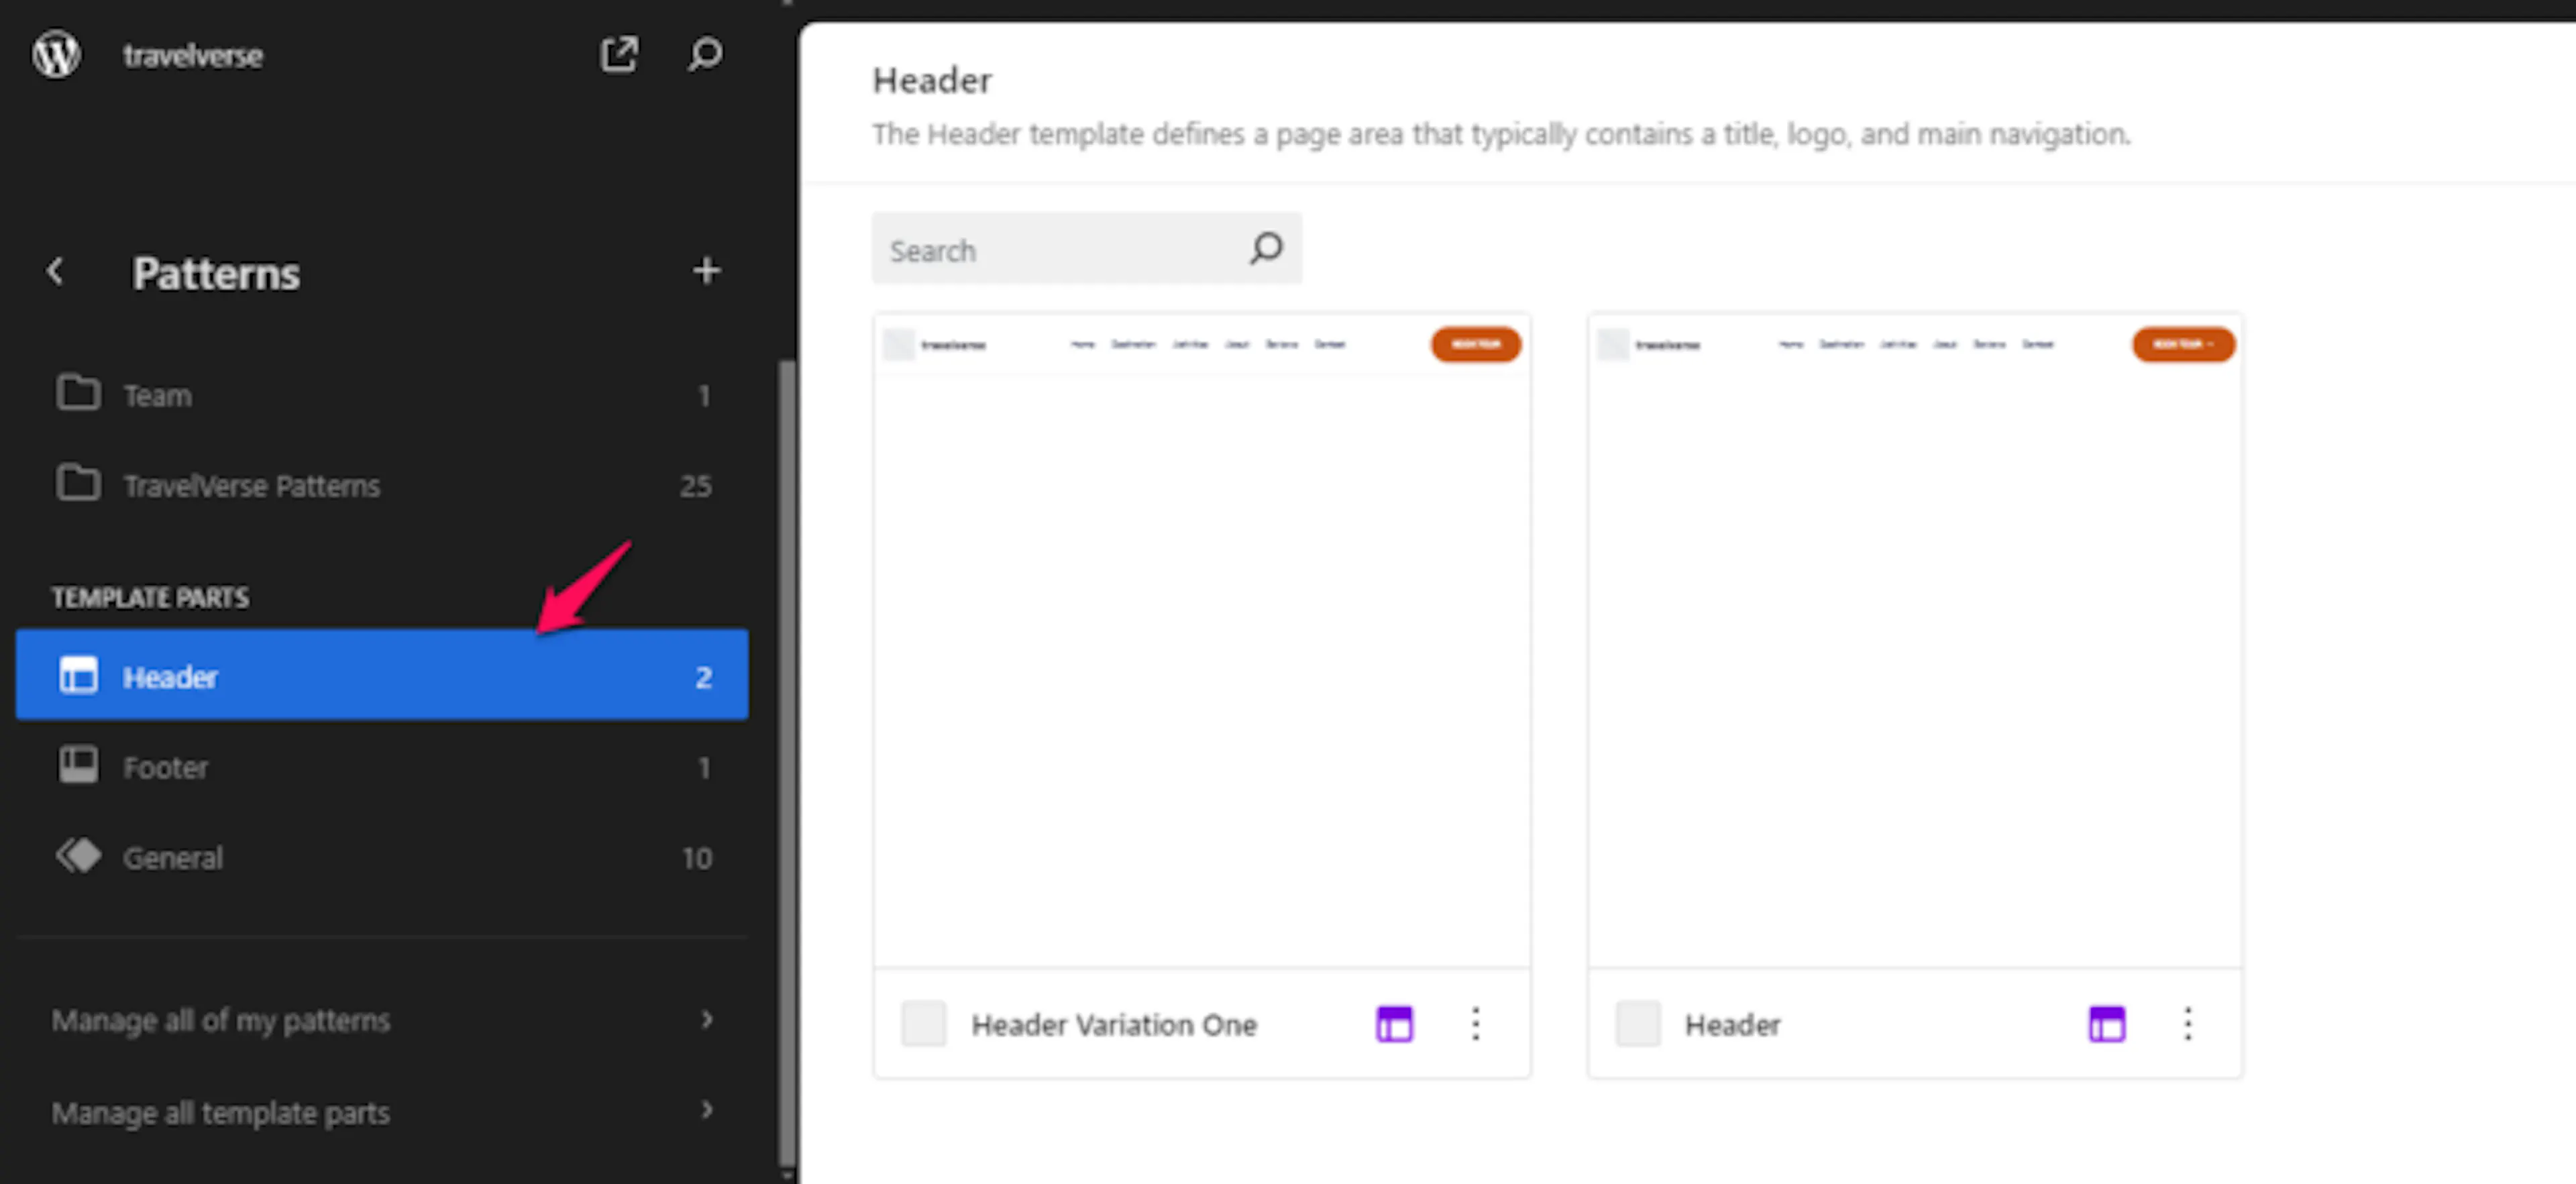
- Header: The layout at the top of your website. It can include your site title, logo, and navigation menu.
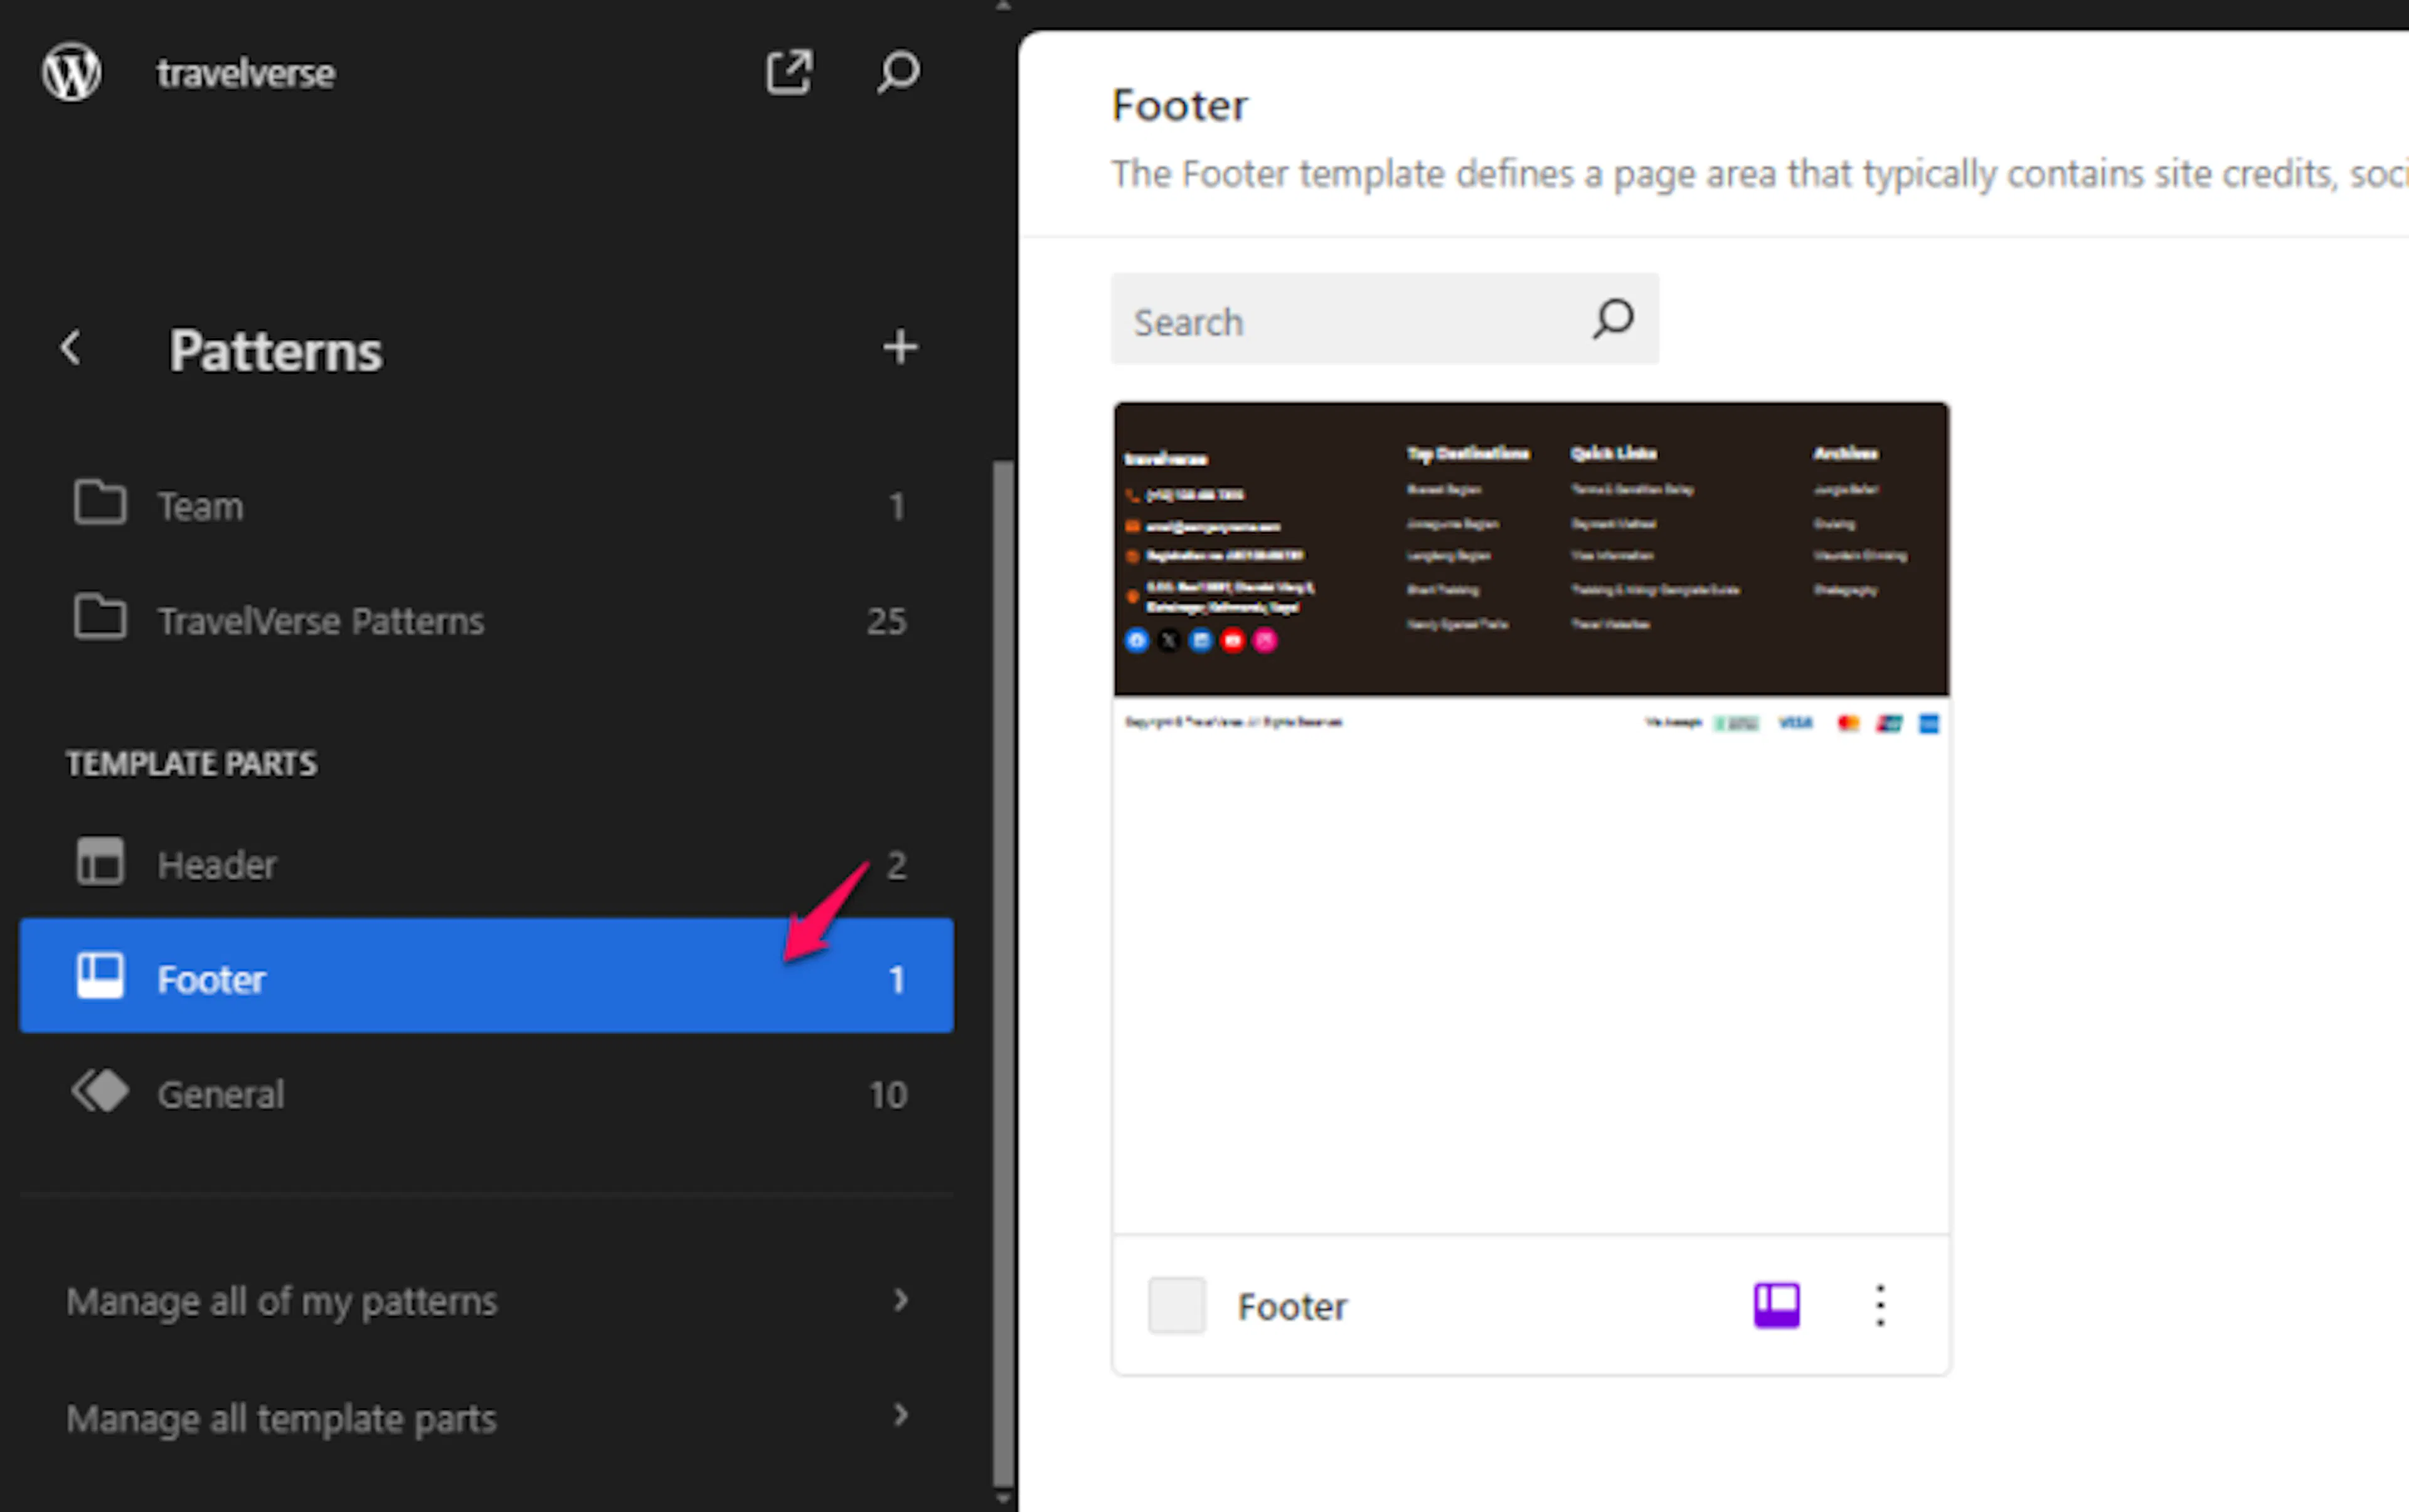
- Footer: The layout at the bottom of your website. It can include site credits and social links.
Template parts help keep shared areas consistent across your trip, destination, and blog pages. Create one when you need a reusable section that is not a complete page layout.
How to Create a New Template Part
Create a template part when you want to reuse a section across several templates. For example, create a footer with your booking phone number and social links, then use it across your site.
Open the Site Editor
The Site Editor contains the tools for managing template parts.
Open Appearance, then click Editor.
Open the navigation panel
The navigation panel gives you access to the template part settings.
Click the Toggle Navigation icon.
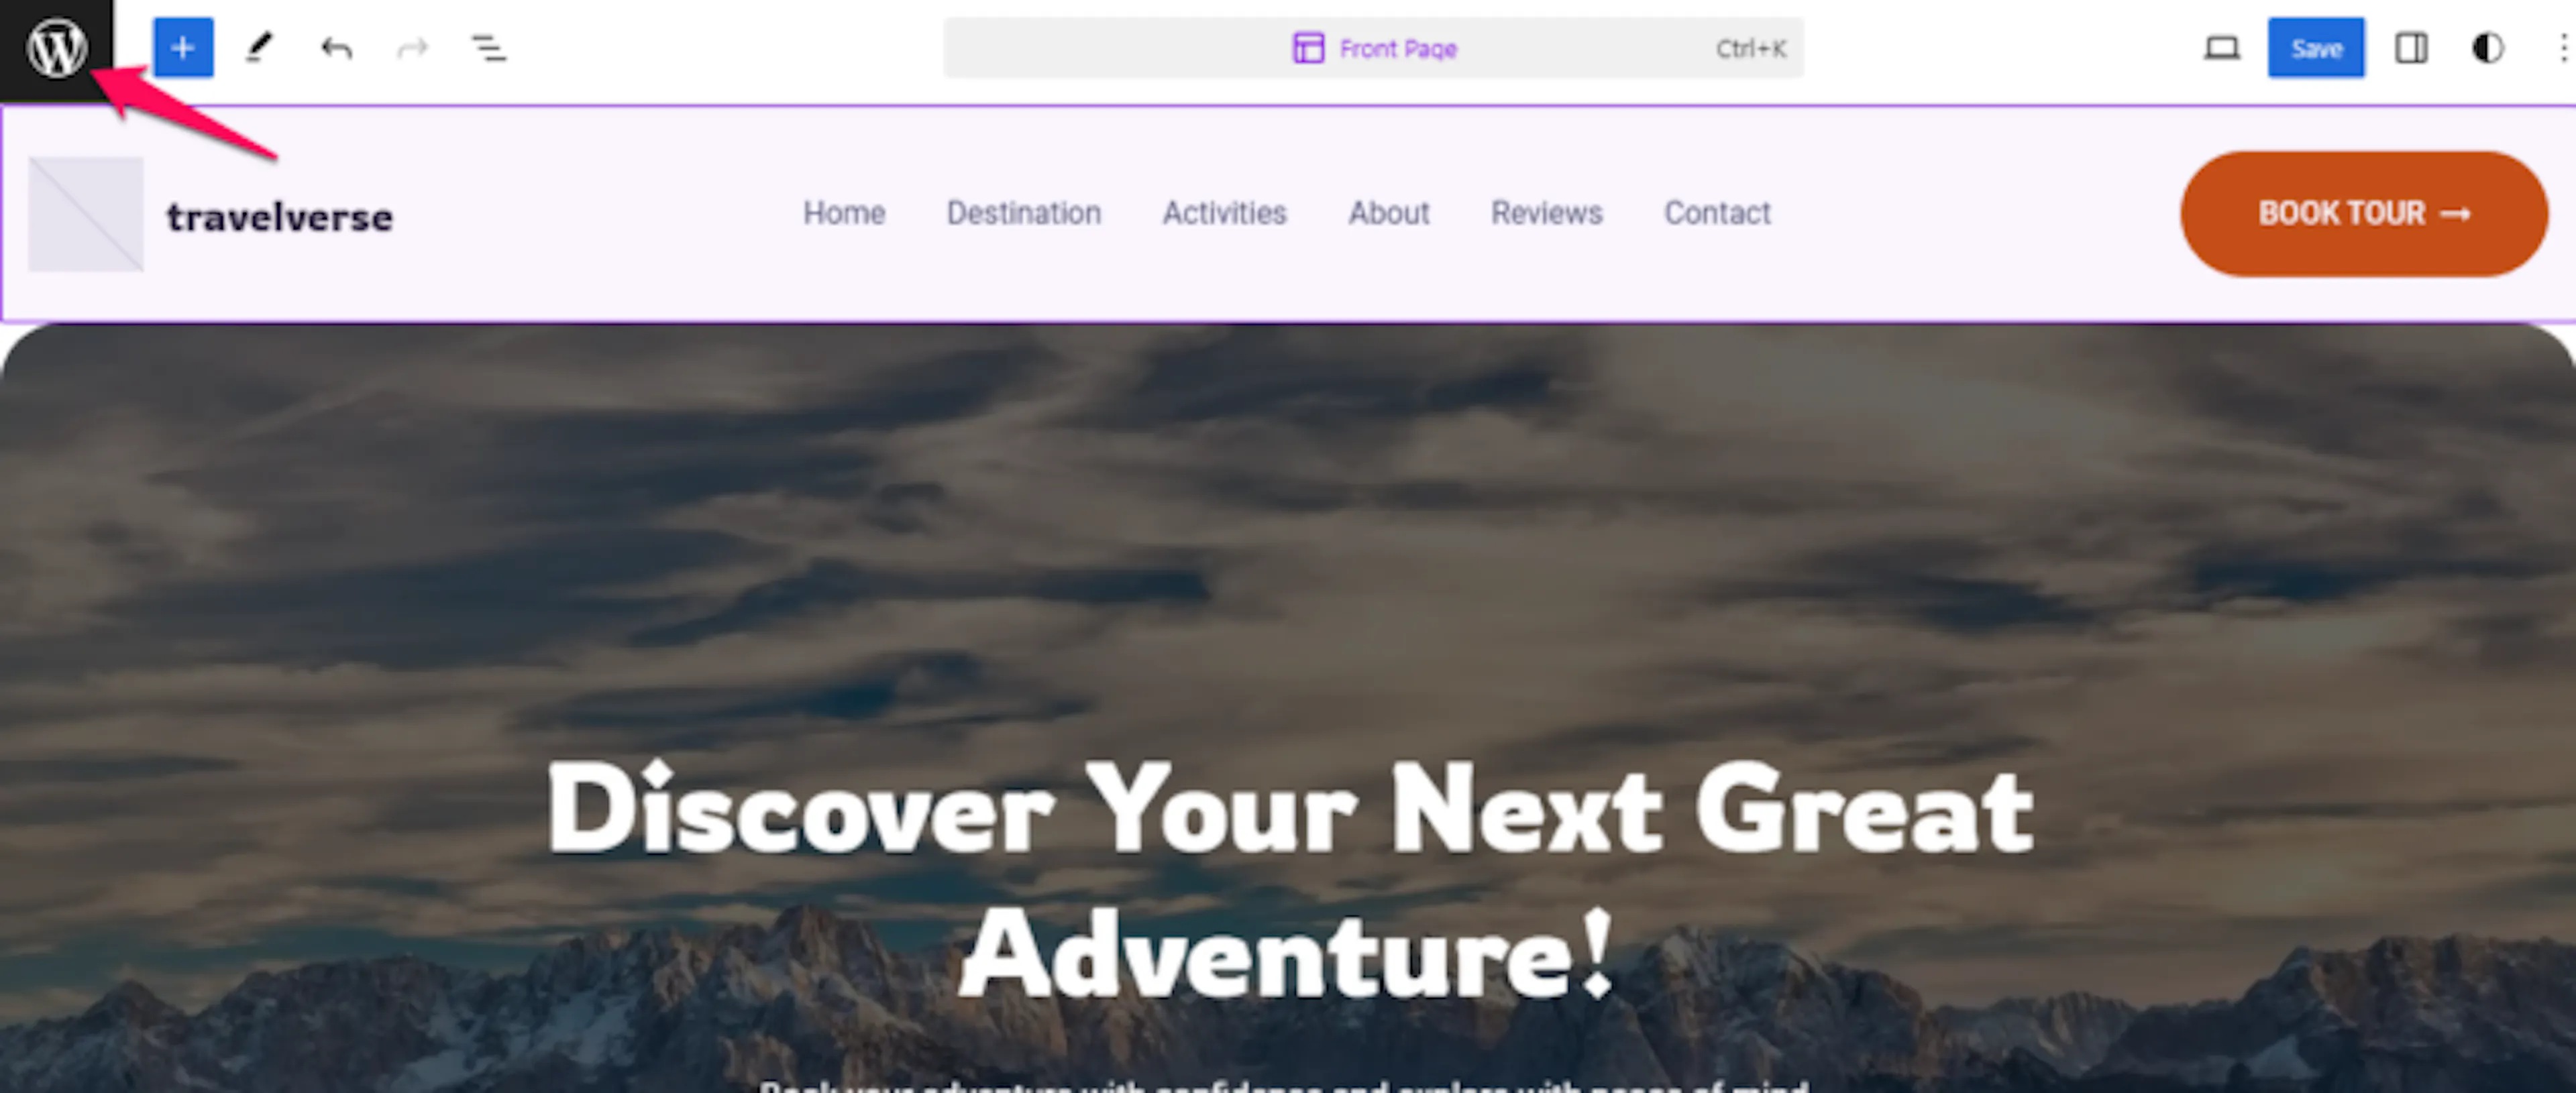
Open template parts
The template parts area stores reusable headers, footers, and general sections.
Click the Patterns tab. Click Manage all template parts, then click Add New Template Part.
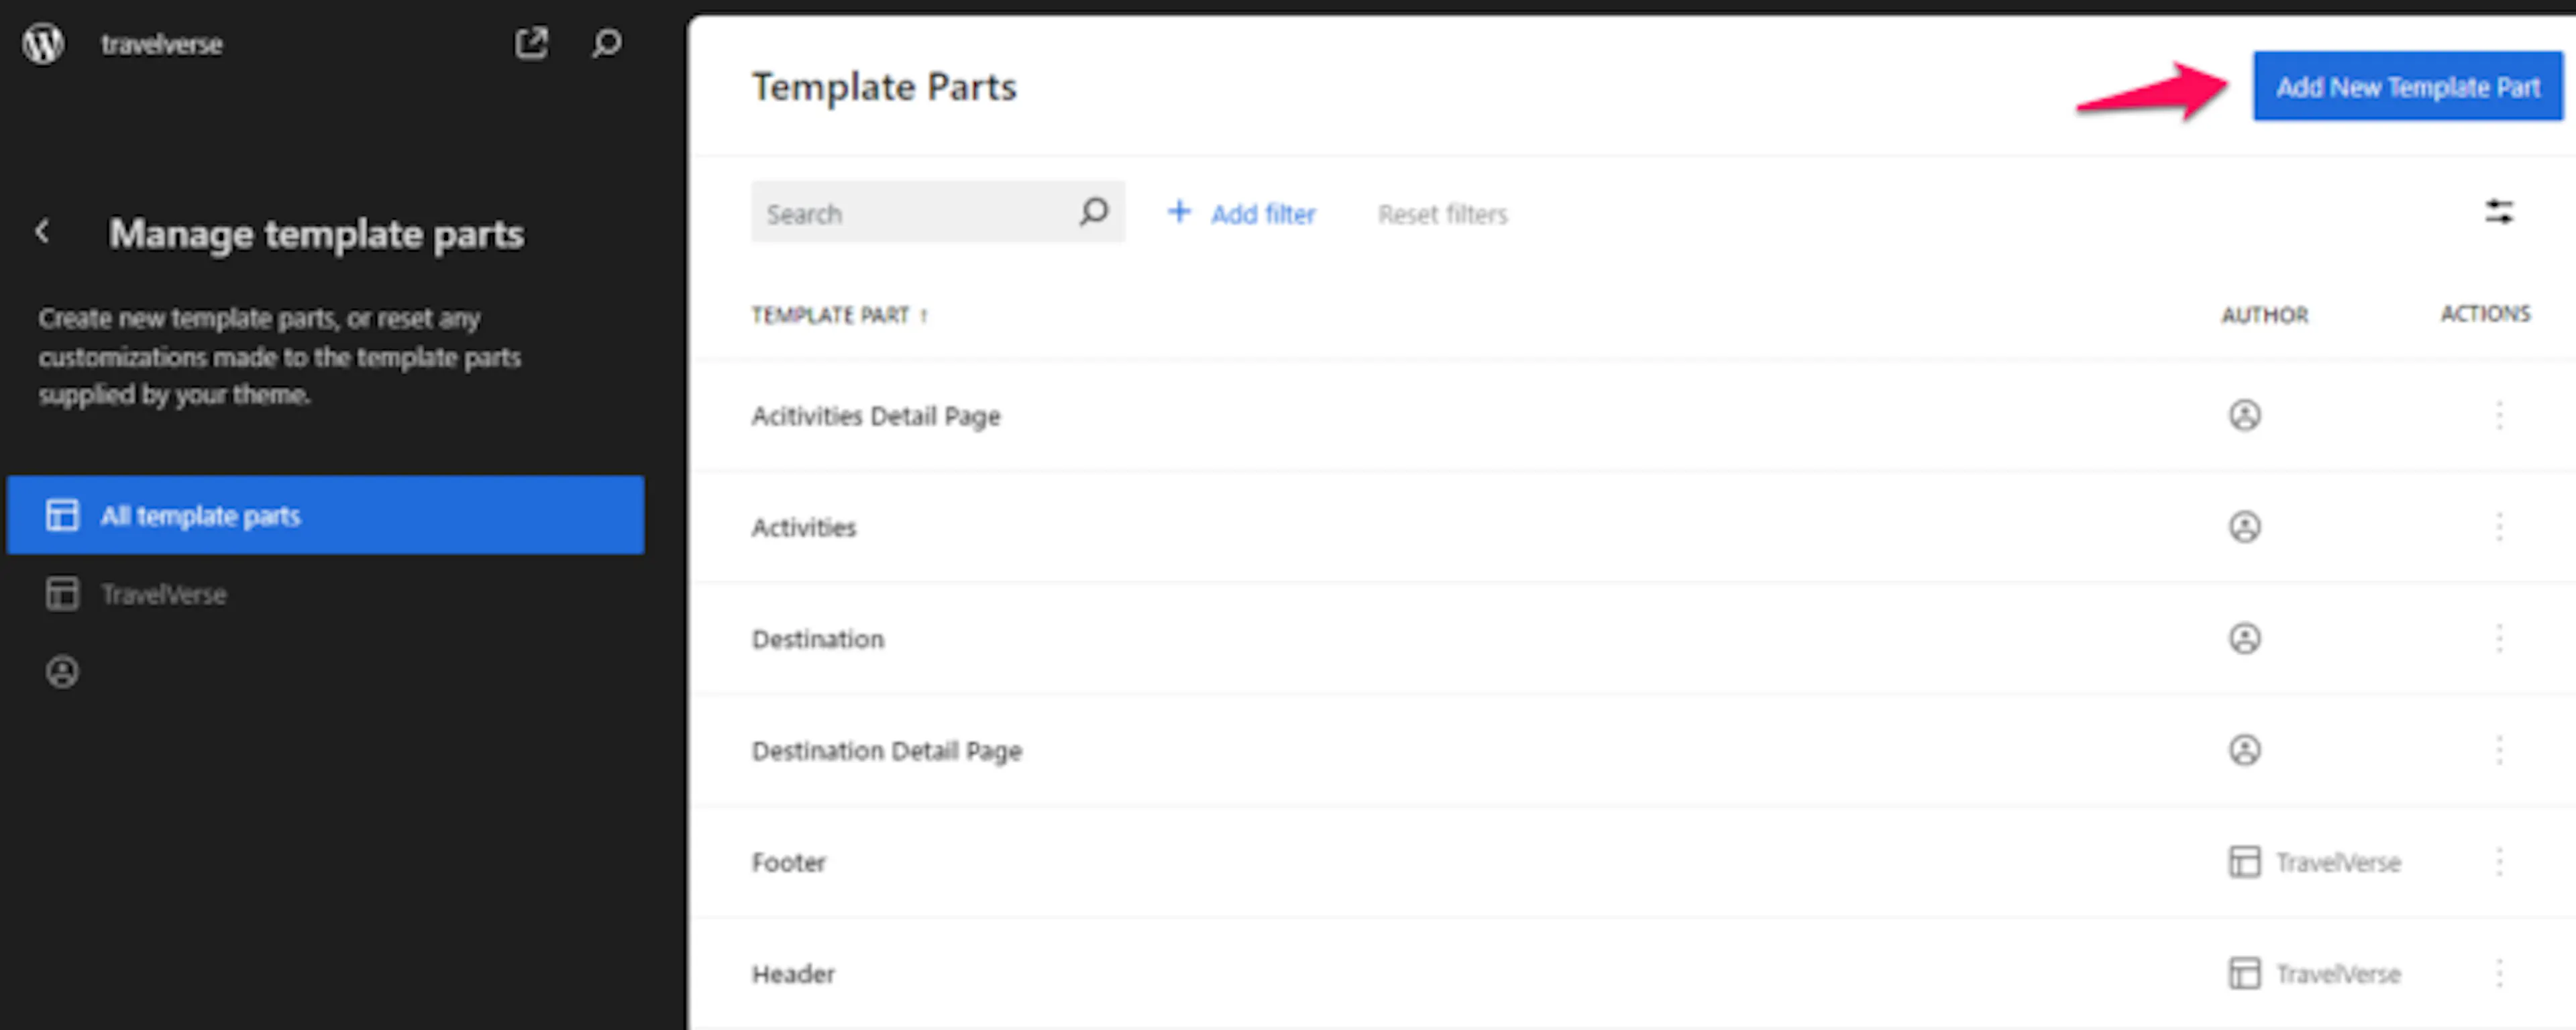
Name and classify the template part
The name and area help you identify where the reusable section belongs.
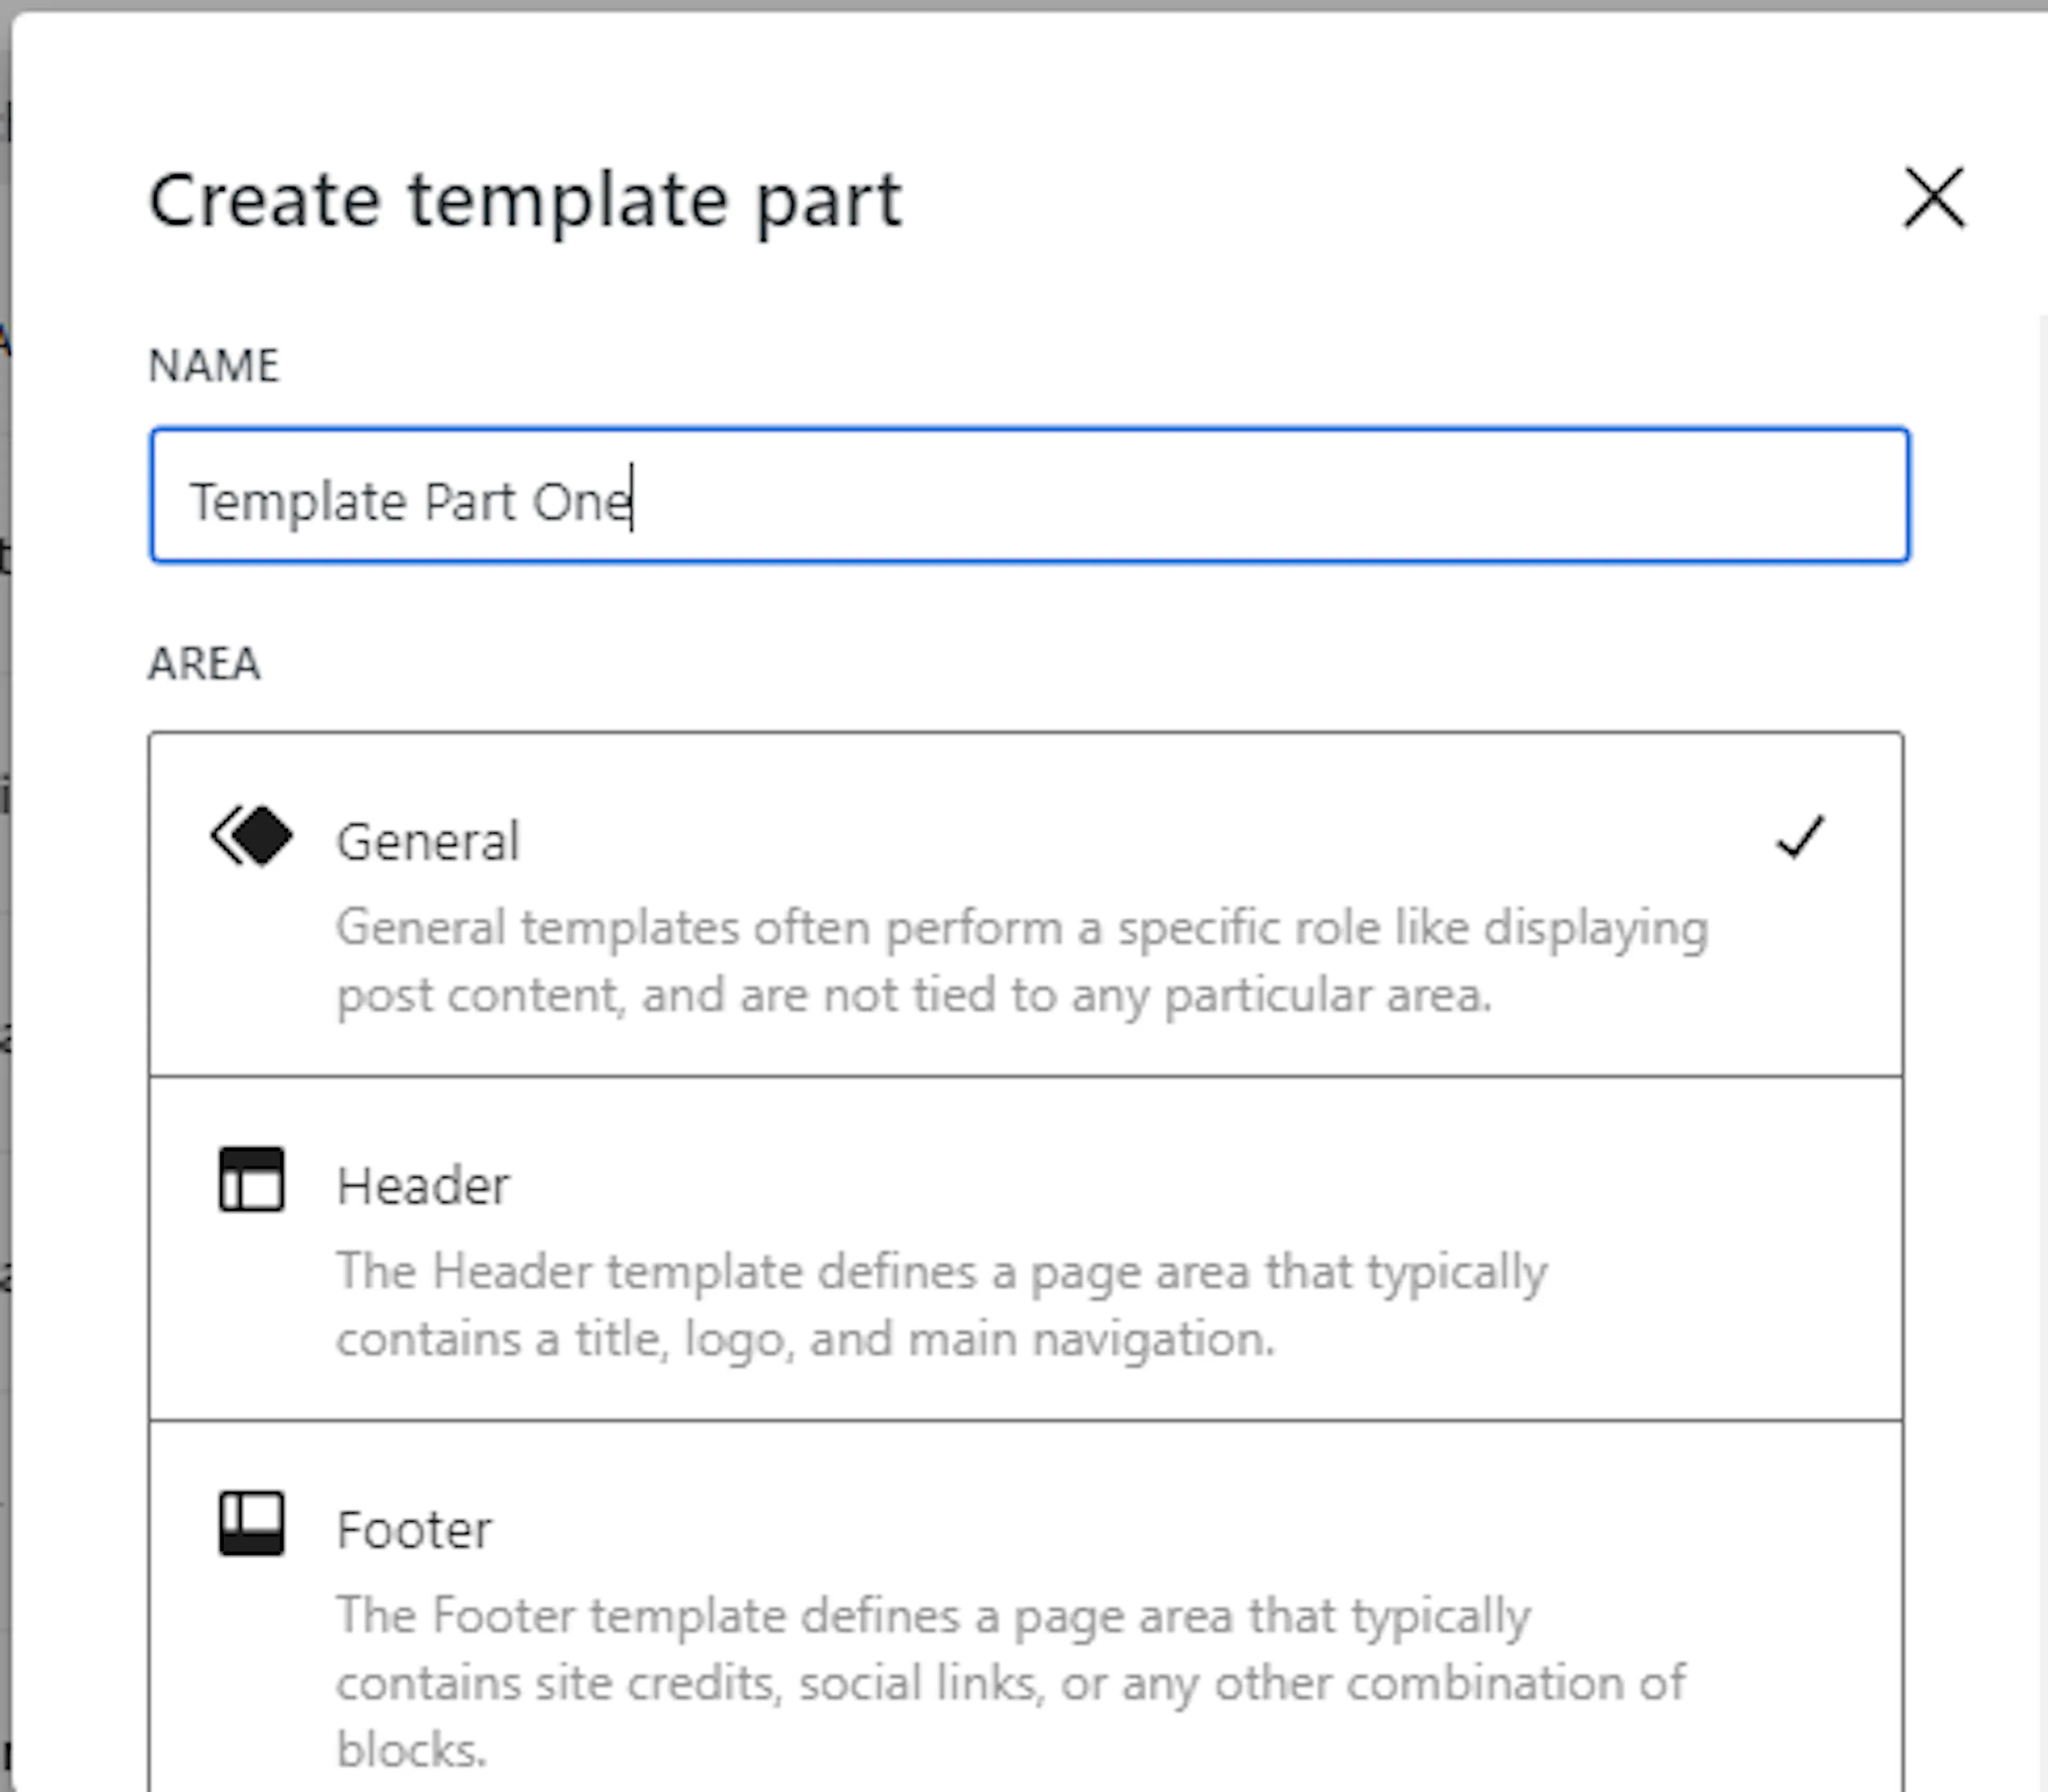
Enter a name for the template part. Choose General, Header, or Footer as its area.
Create the template part
Creating the part opens the editor where you can build its content.
Click Create.
Add blocks and patterns
Blocks and patterns form the reusable section visitors will see.
Click the Toggle block inserter icon. Select the blocks and patterns you want to add.

Customize the content
Customizing the content makes the template part match your business.
Enter your content and make any required changes. For a footer, you might add your company name, booking phone number, and social links.
Save the template part
Saving makes the reusable section available to the templates that use it.
Click Save.
Your new template part is ready to reuse. If you change a built-in part and want to restore it, use the reset option.
How to Clear Template Part Customization
Reset a template part when you want to return a built-in header or footer to its original Travelverse design. The reset option only appears for template parts you have customized.
Open the Site Editor
The Site Editor contains the reset controls for template parts.
Open Appearance, then click Editor.
Open the navigation panel
The navigation panel gives you access to the template part settings.
Click the Toggle Navigation icon.
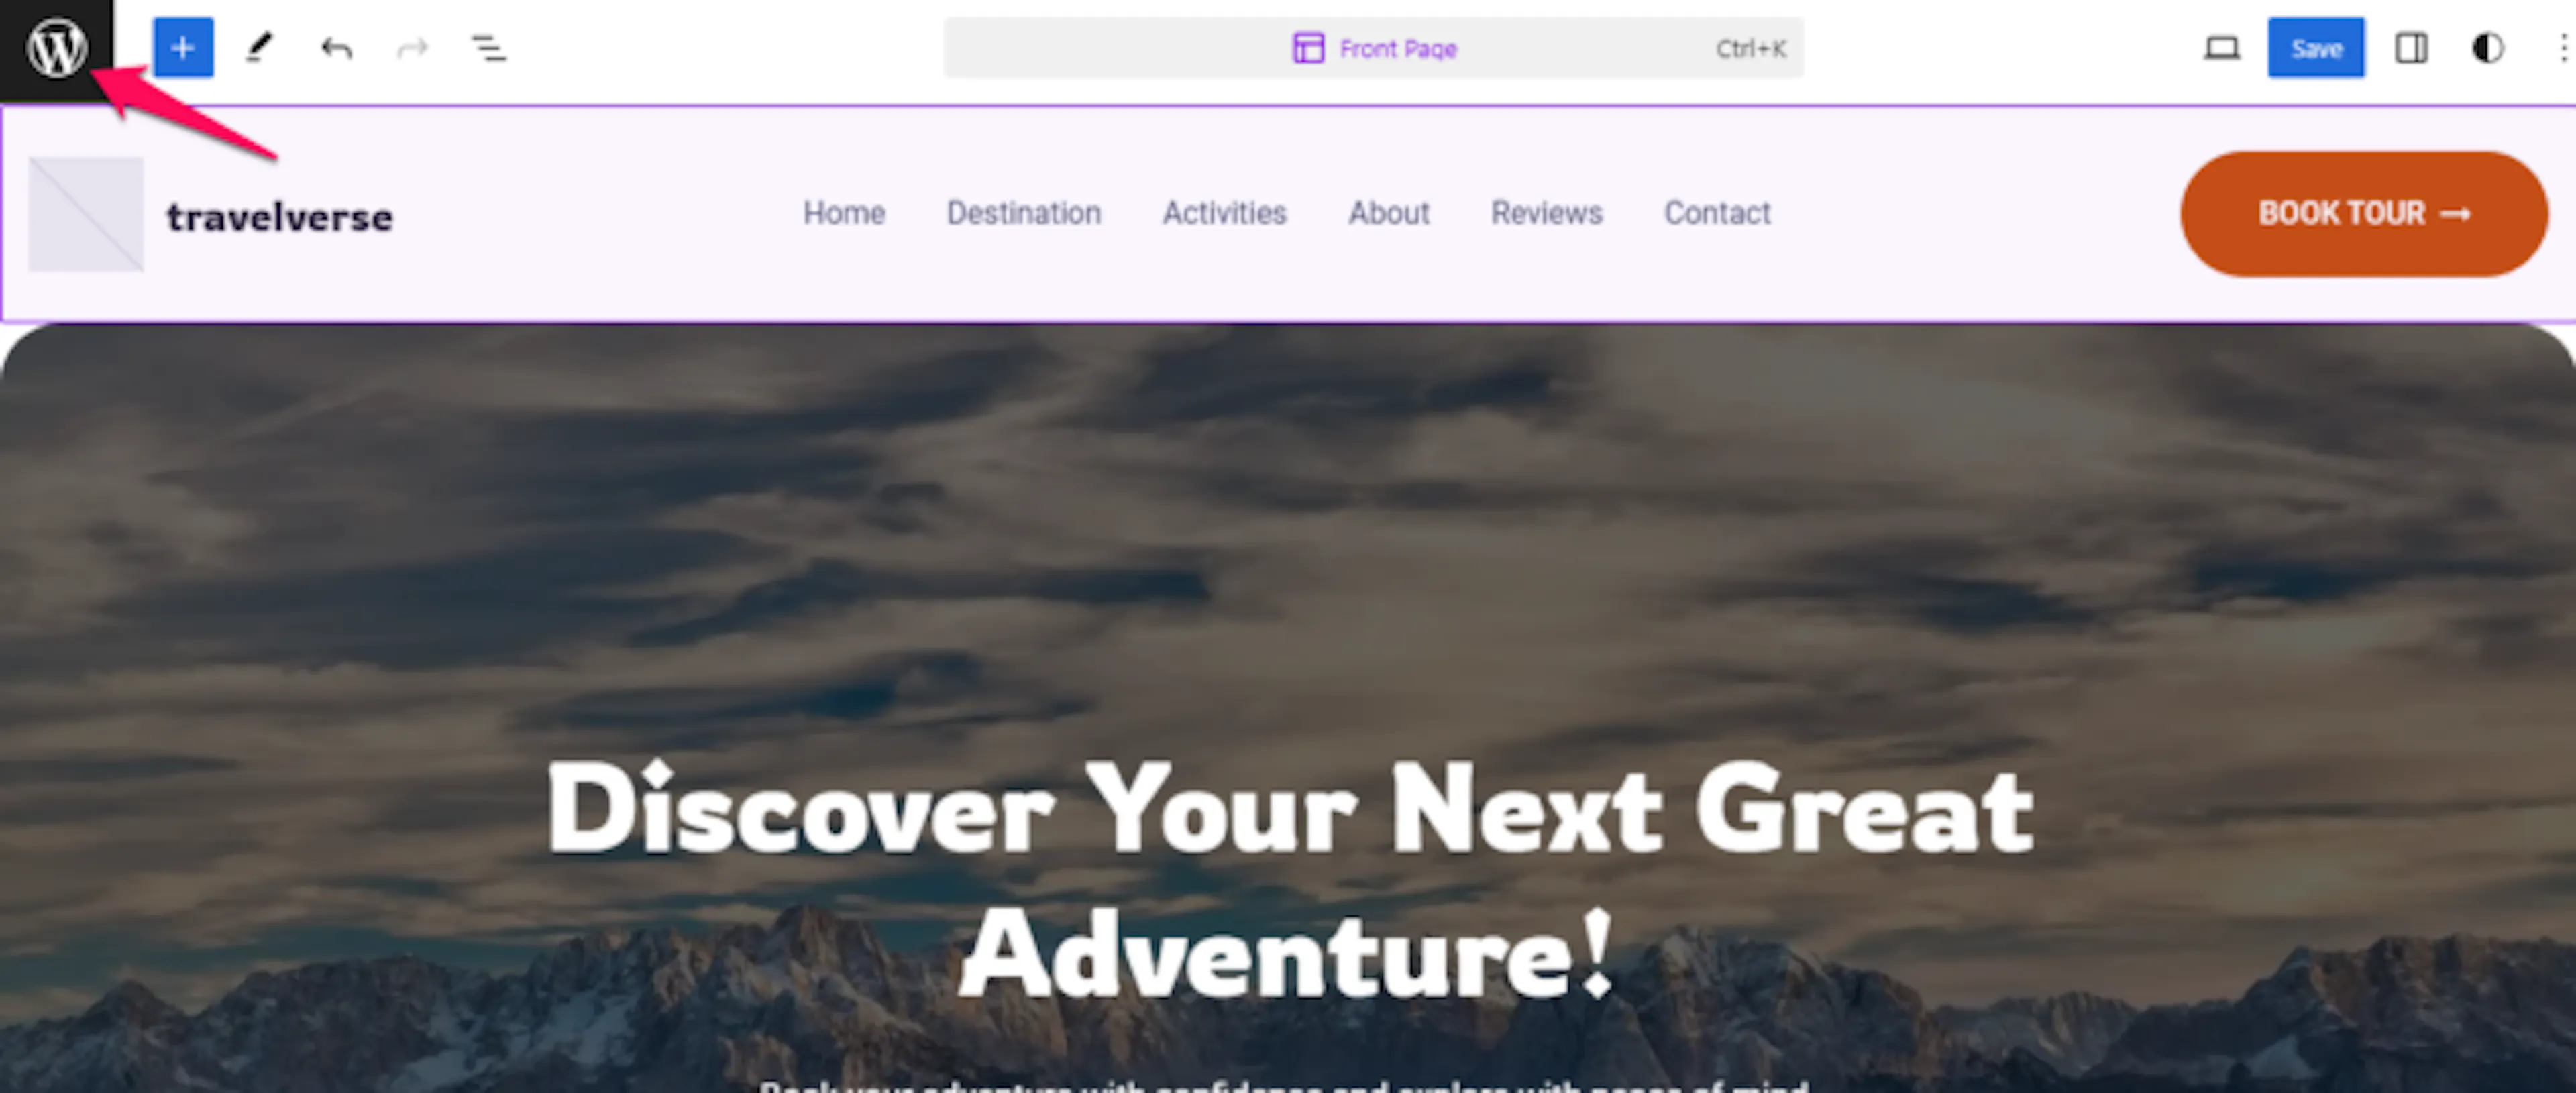
Open all template parts
Managing all template parts lets you find the part you want to restore.
Click Patterns, then click Manage all Template Parts.
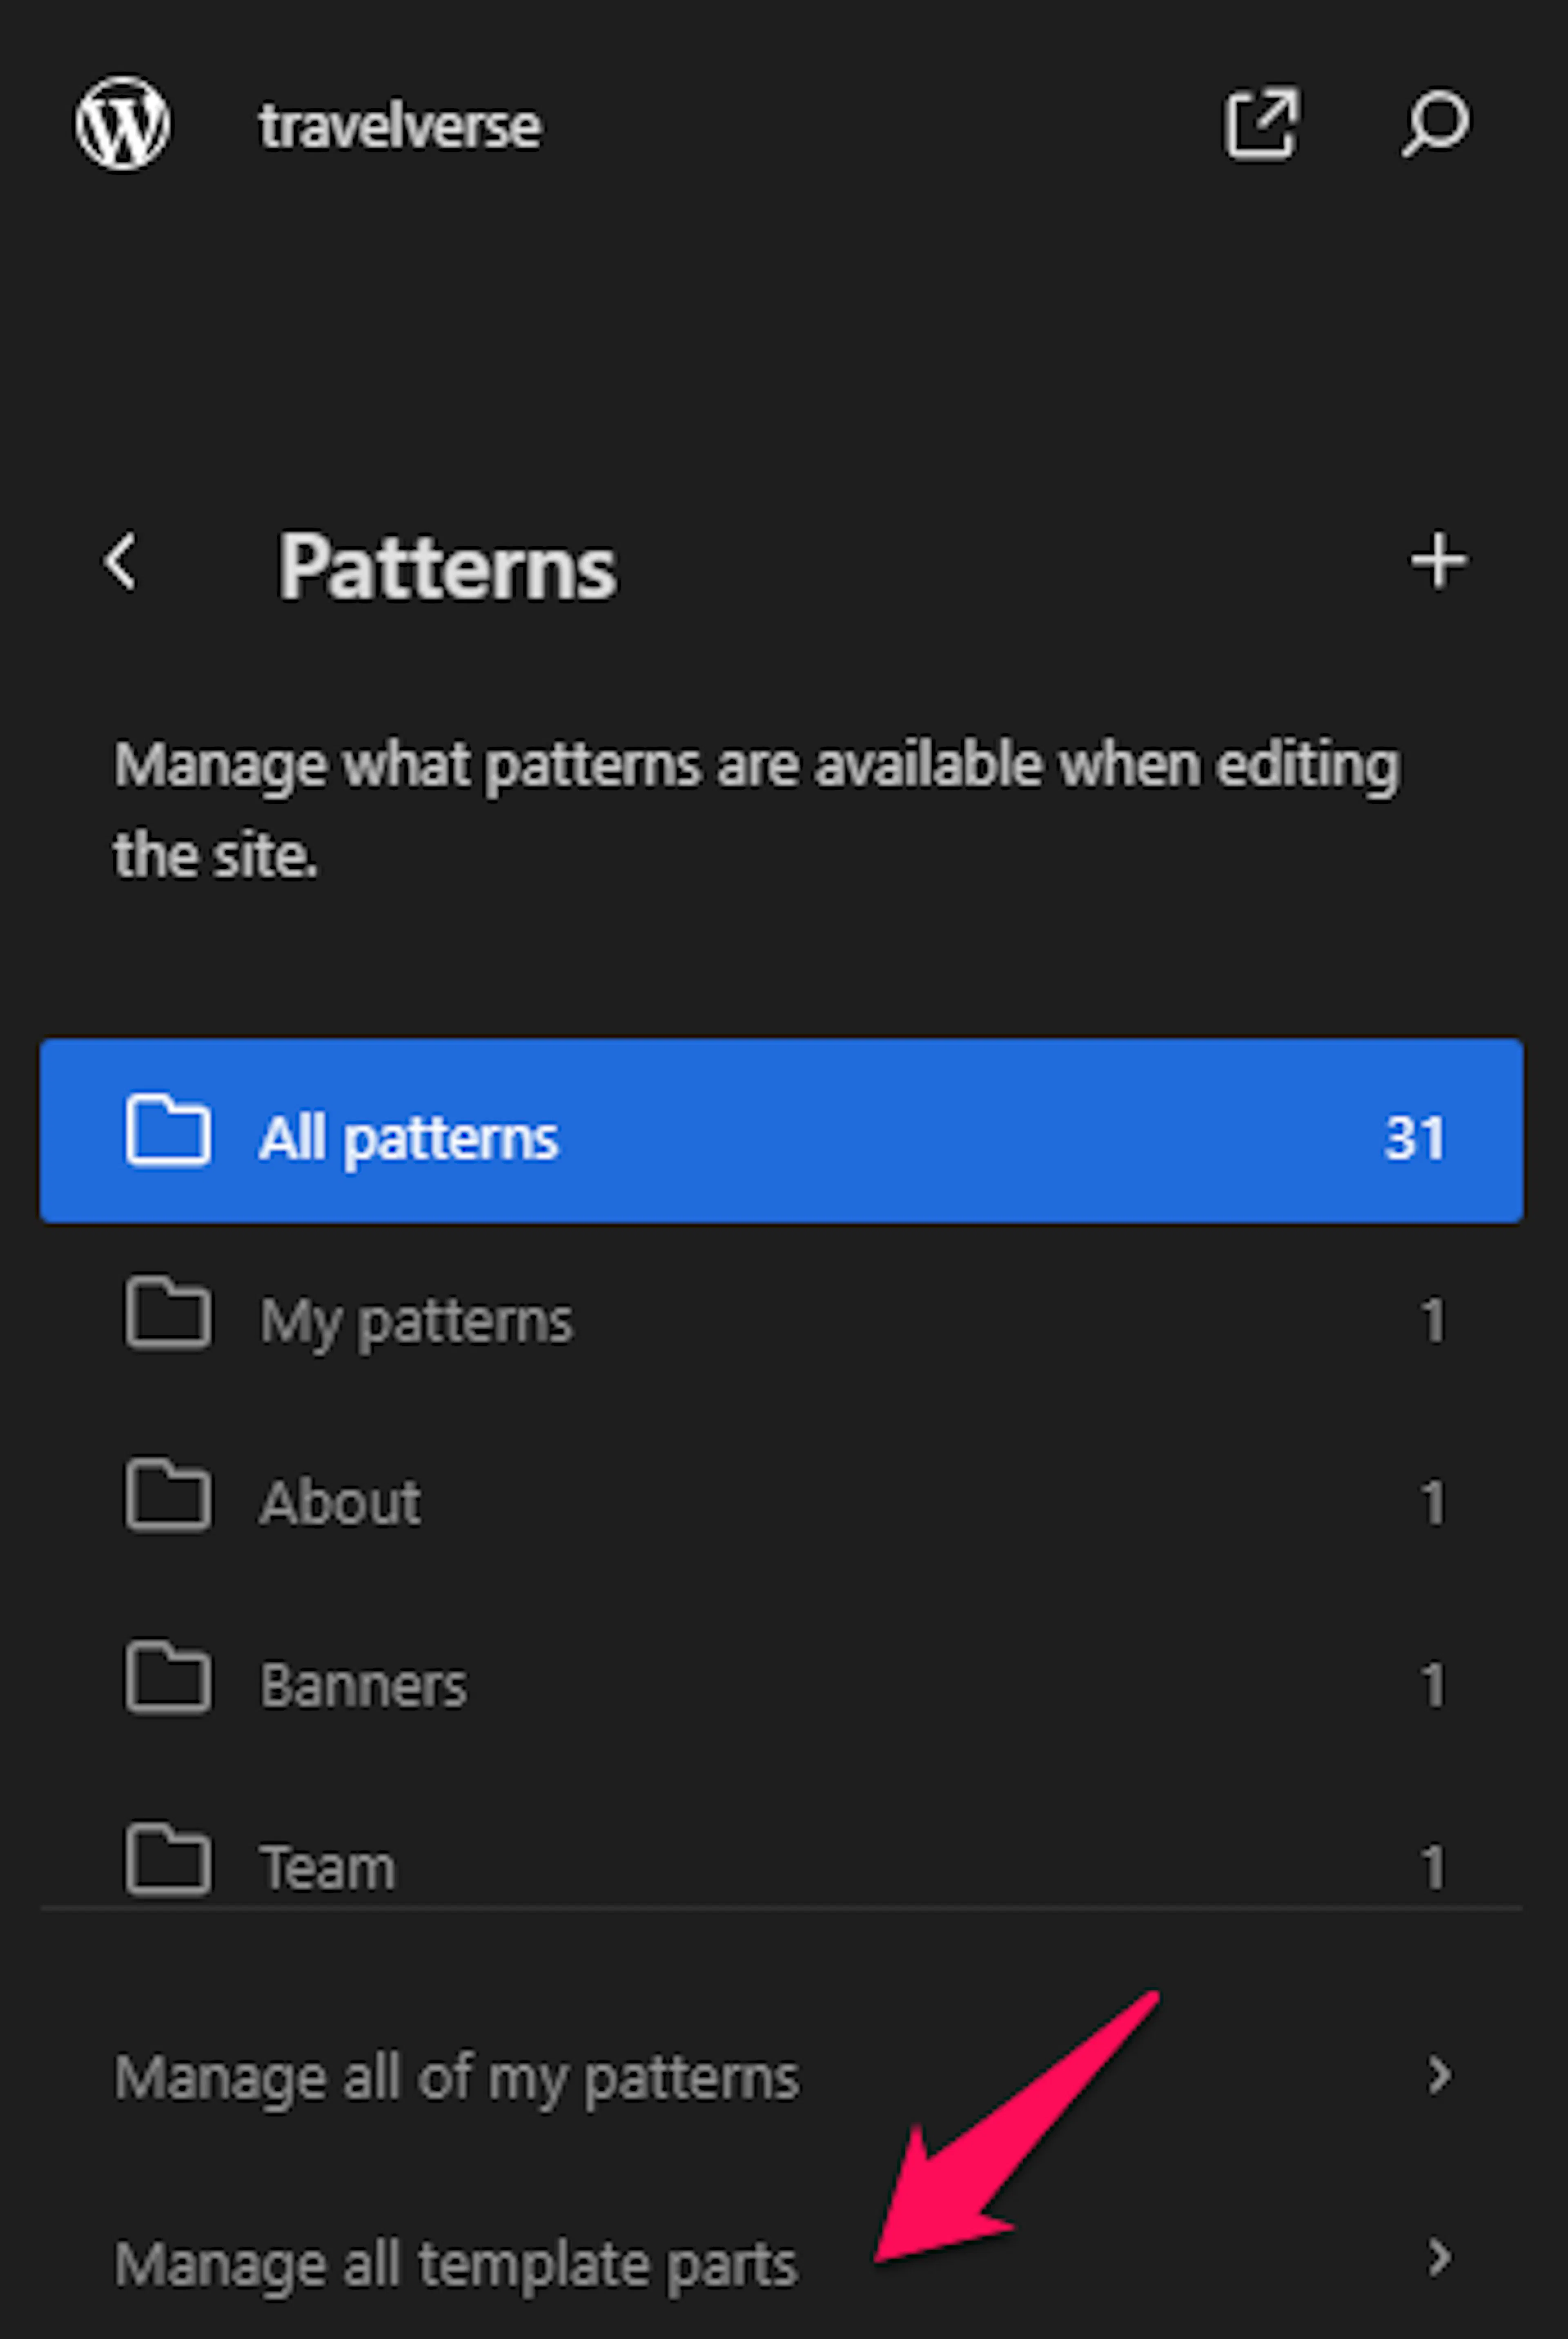
Reset the template part
Resetting removes your changes and restores the original design.
Click the reset Actions icon for the template part you want to reset.
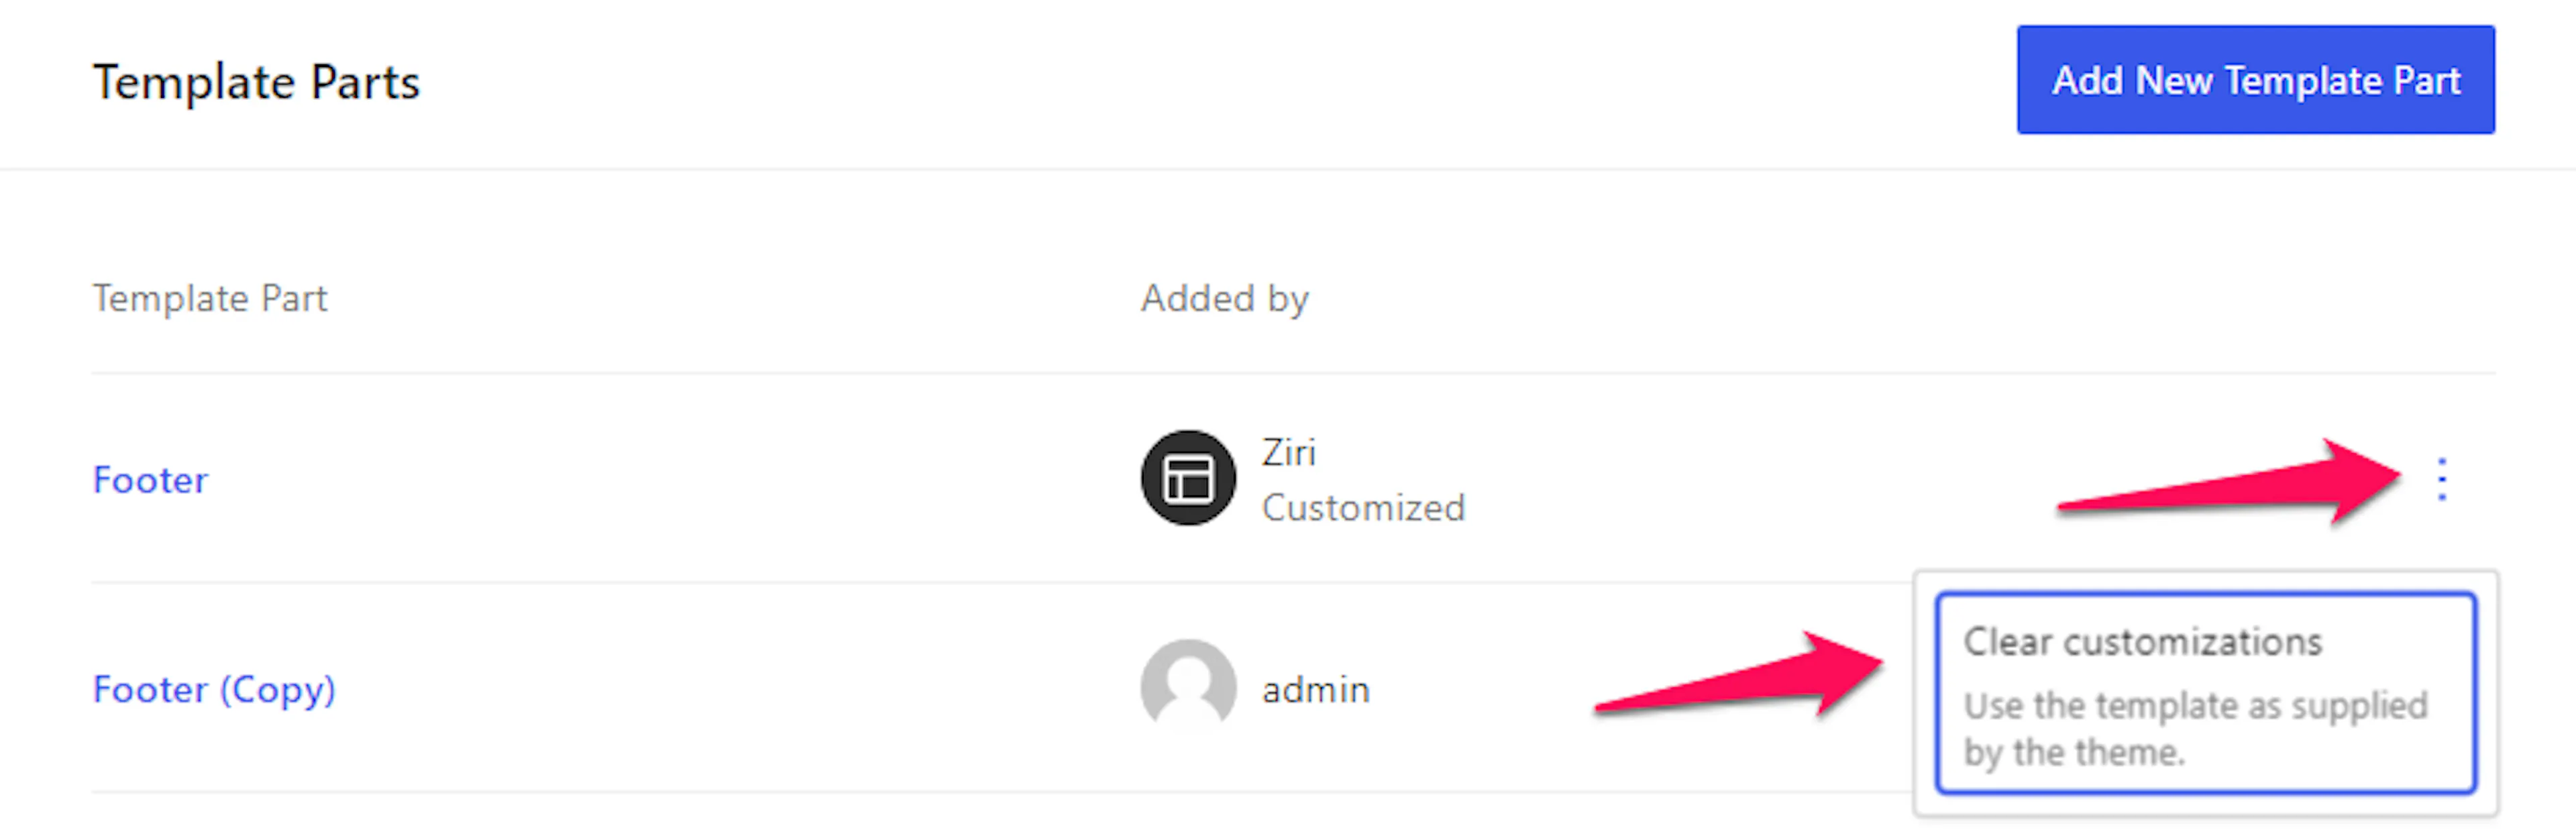
Reset works only for built-in Travelverse template parts. You cannot use it to restore a template part you created yourself.
Your shared sections can now match the rest of your site again. Next, adjust the logo, colors, and typography that visitors see.
Appearance Settings
Appearance settings control your site logo, colors, and typography. Use them to make your website match your tour company's branding across its pages.
How to Add a Site Logo
A site logo helps travelers recognize your business as they move between your homepage, trip pages, and blog. Prepare a clear logo image before you begin.
Open the Site Editor
The Site Editor contains the Site Logo block used in your header.
Open Appearance, then click Editor.
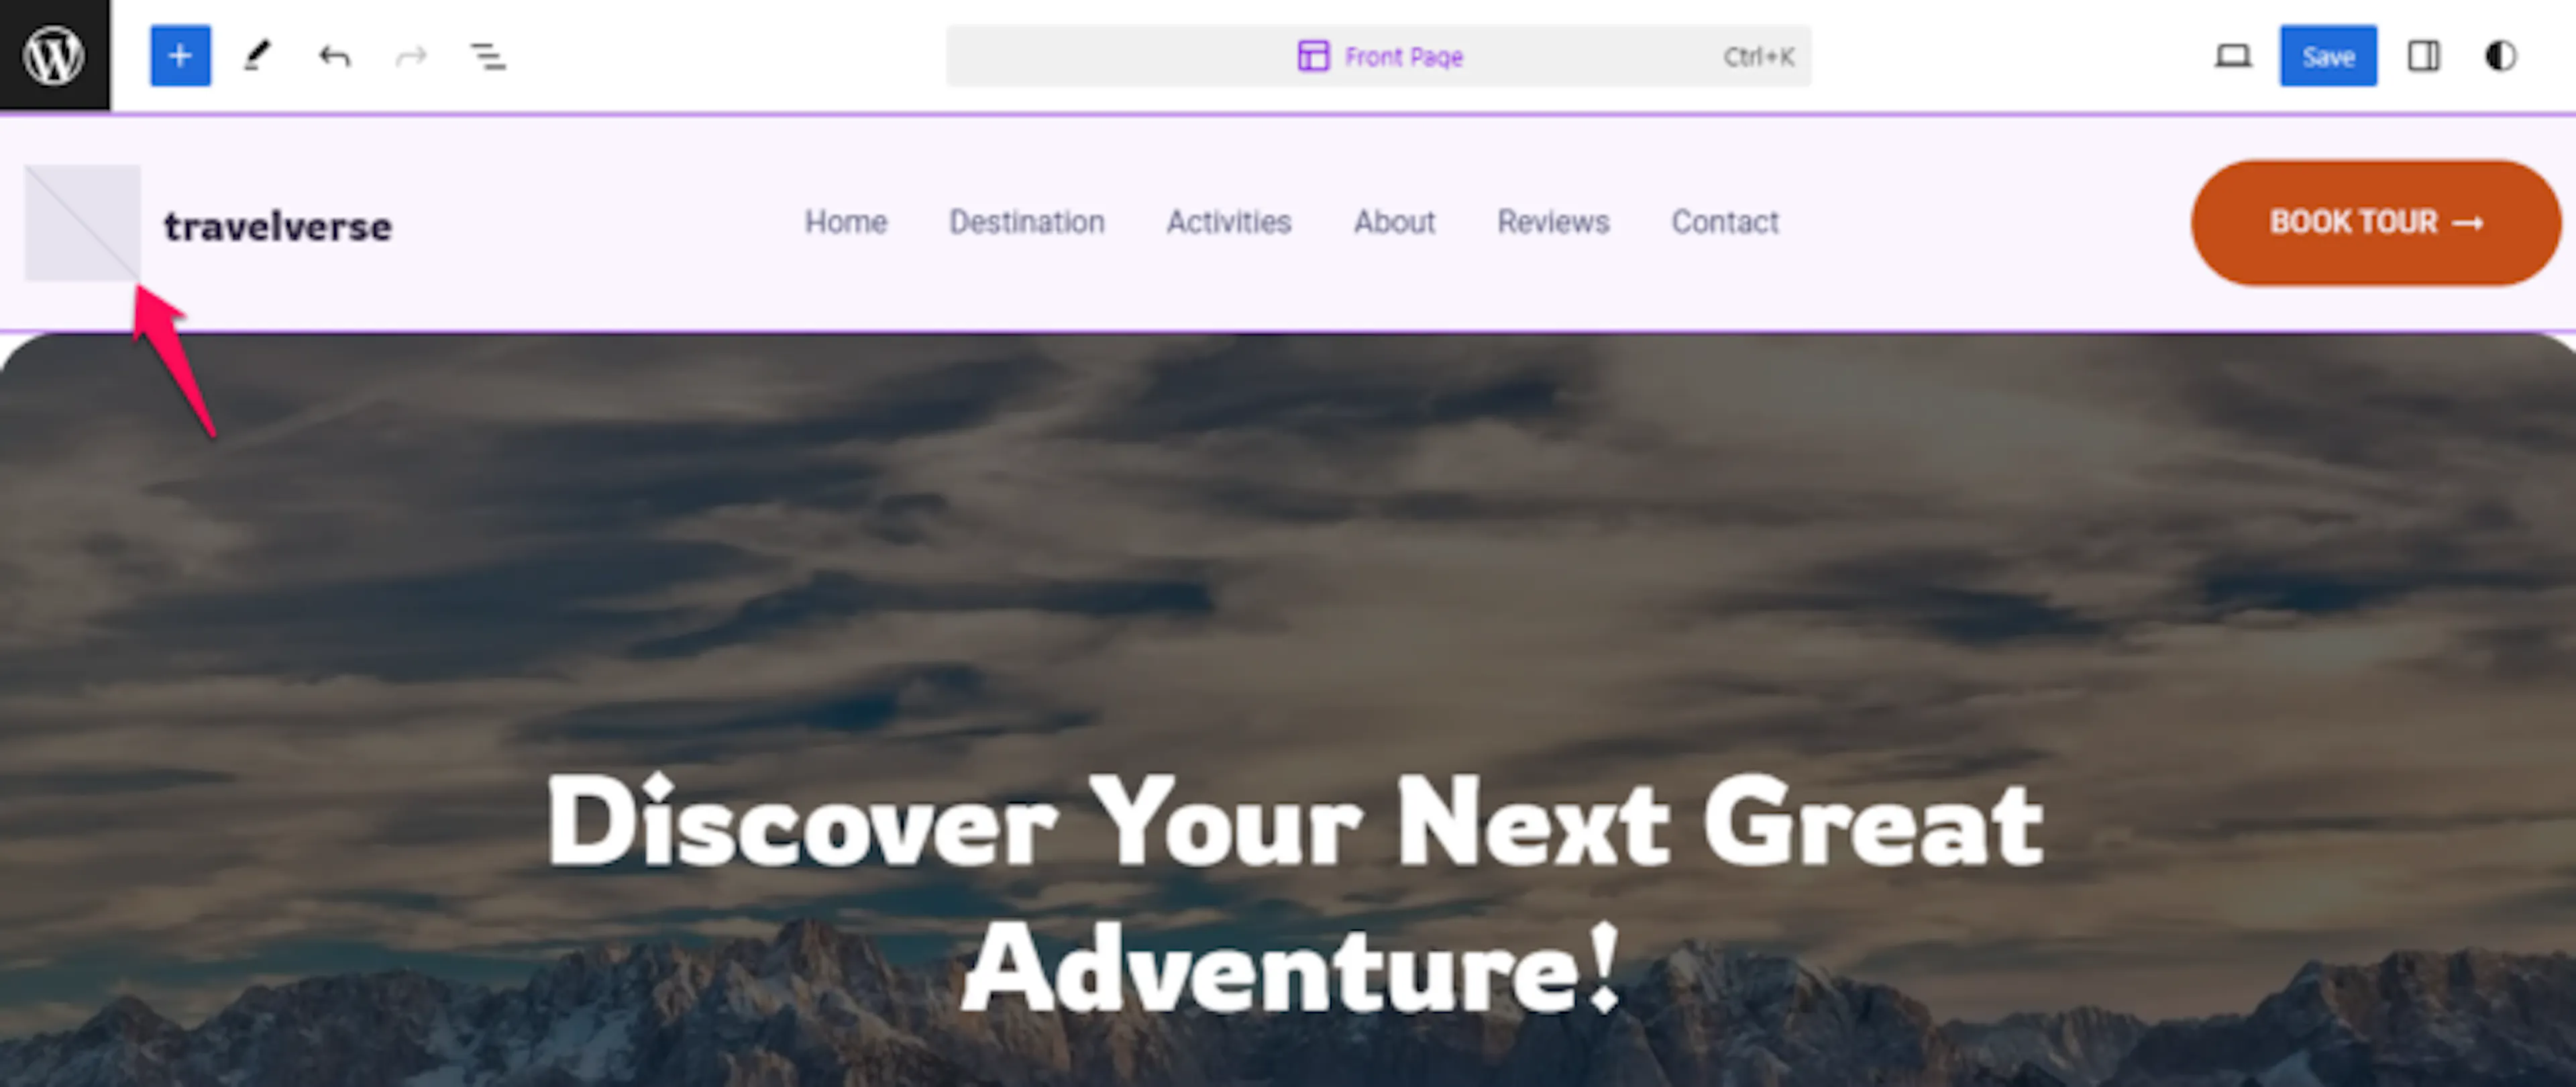
Select the Site Logo block
Selecting the block opens its settings.
Click the Site Logo block.
Choose your logo image
WordPress can use a new image or one you have already uploaded.
Upload a logo image or choose one from your Media Library, then click Select.
The Media Library is the collection of images and files uploaded to your WordPress site.
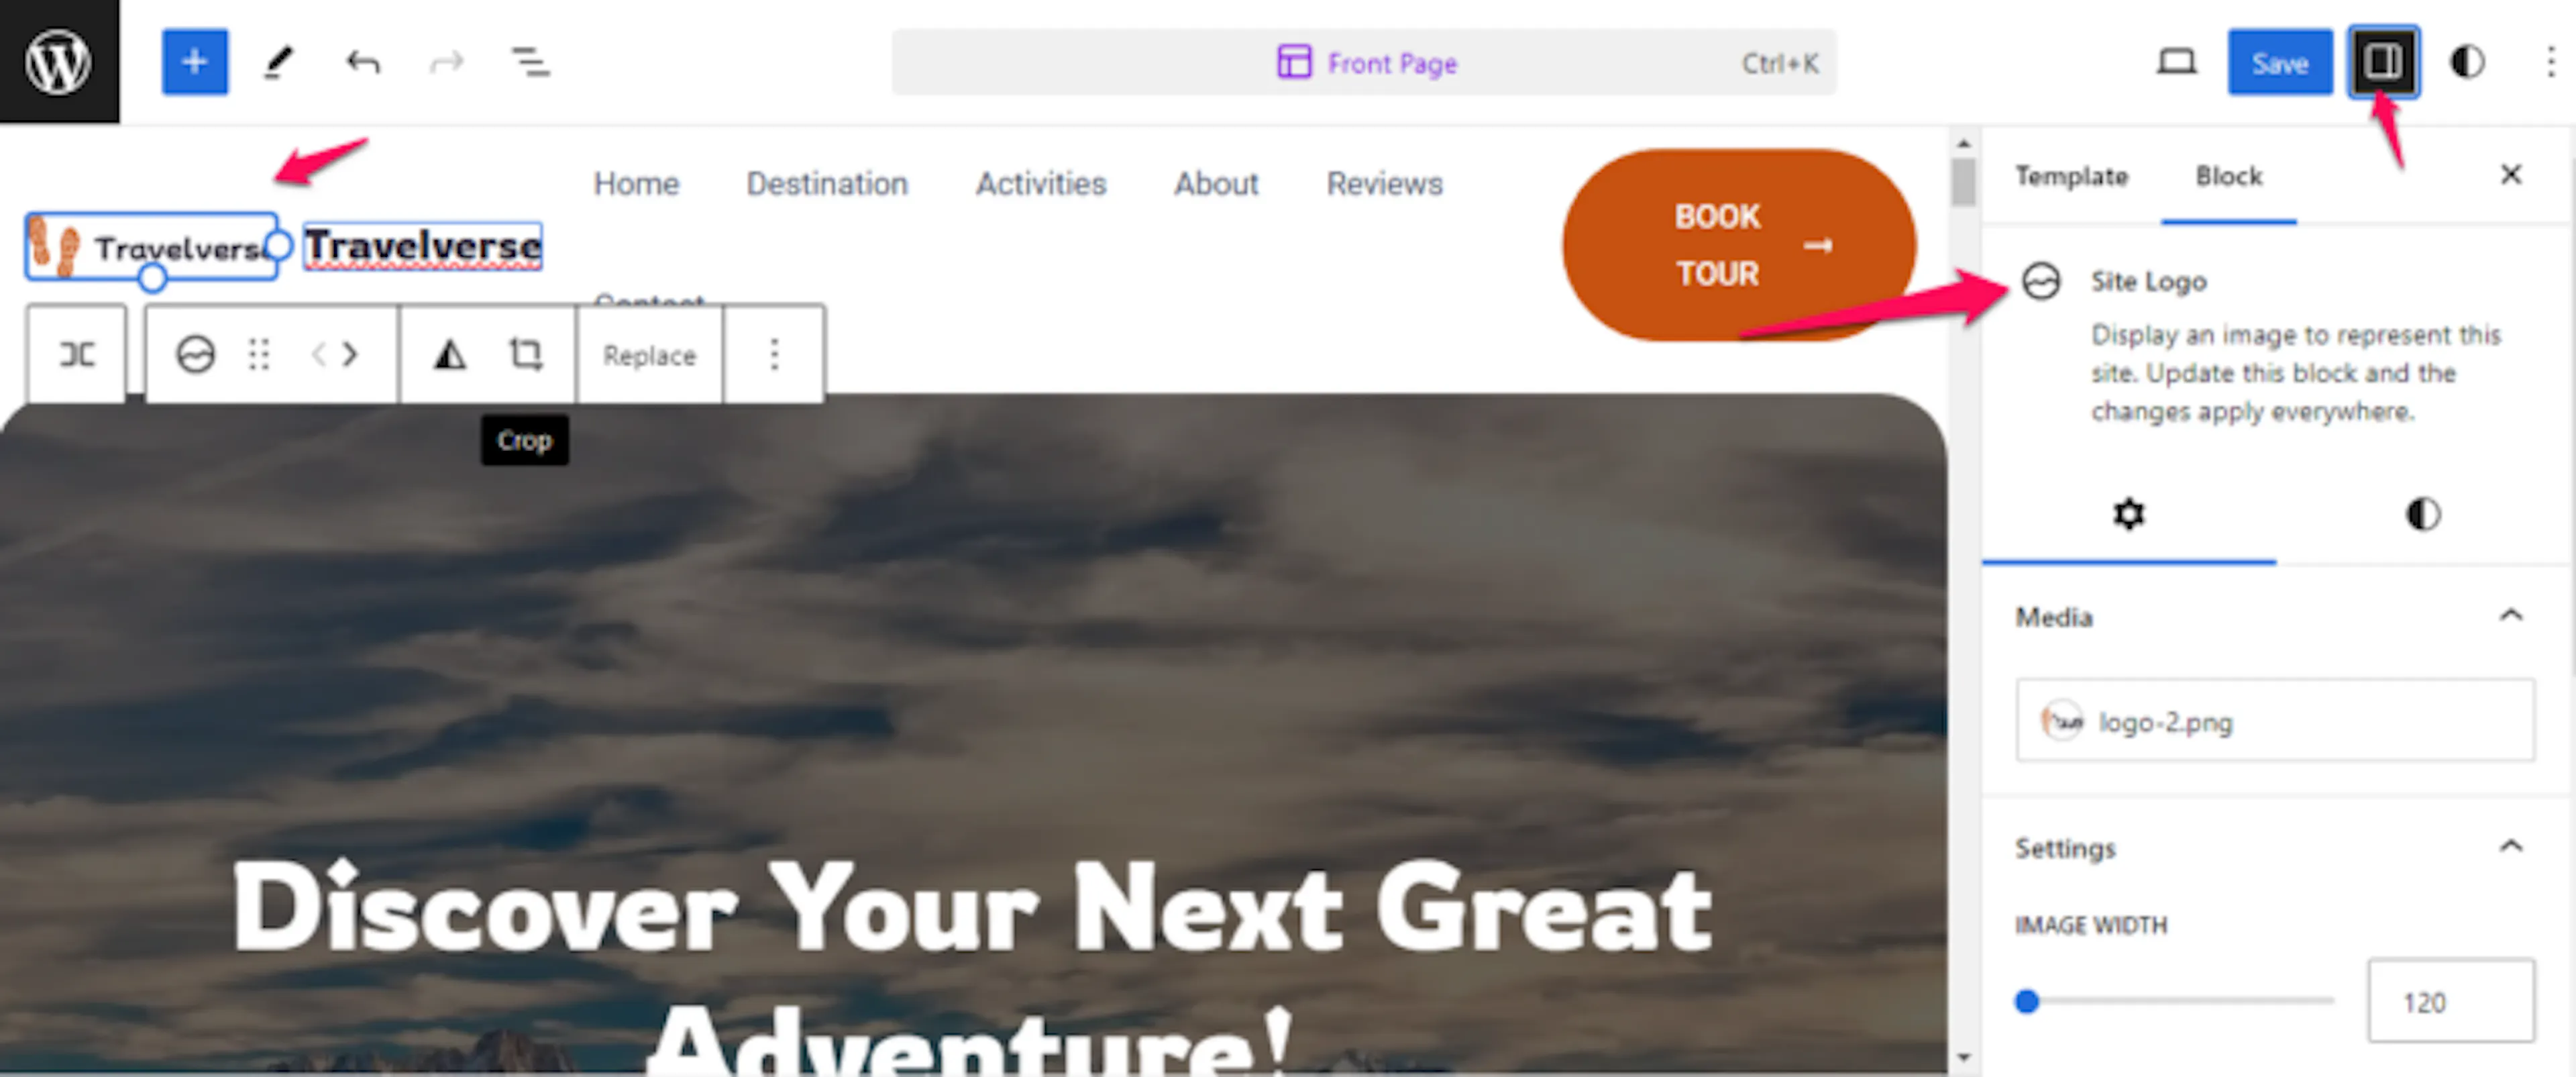
Adjust the logo settings
The block settings help you control how the logo fits in your header.
Configure any block settings you want to change, such as the logo size.
Save the logo
Saving applies the logo to the site header.
Click Save.
Check your homepage and a trip page to confirm that the logo displays correctly.
Your logo now identifies your tour company throughout the site. Set your brand colors next so buttons and links use a consistent look.
How to Change Theme Color
Change the theme colors from the Site Editor to update colors across your website. For example, if your tour company uses a specific shade of blue, set it as the primary color so it appears on buttons and links.
Open the Site Editor
The Site Editor contains the global style settings for your site.
Open Appearance, then click Editor.
Open the color settings
The color settings control the palette used across your site.
Click the Styles icon in the top right corner, then click Colors.
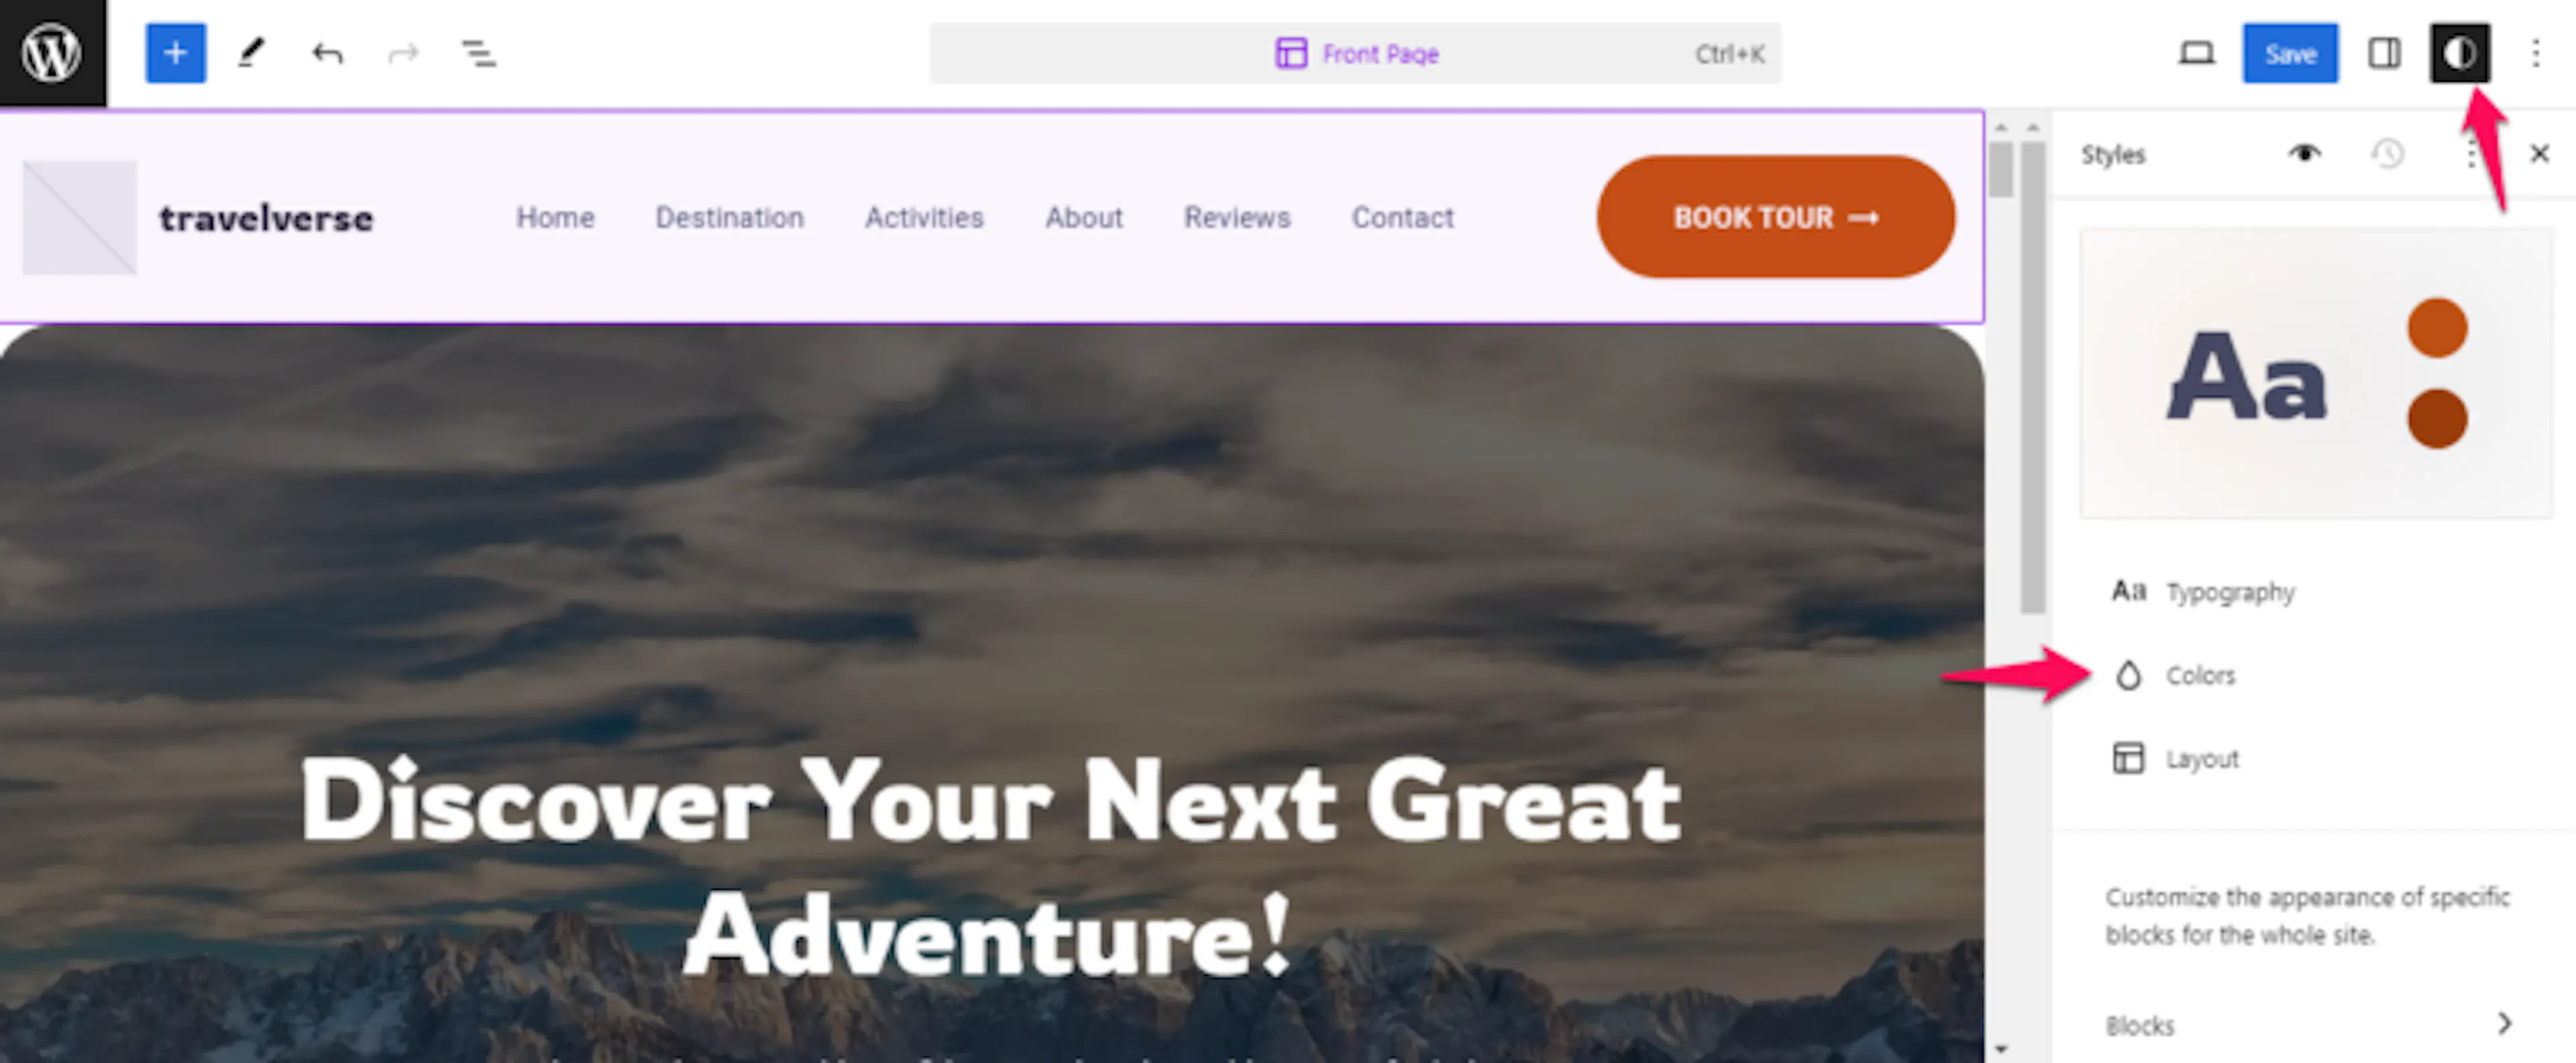
Open the color palette
The palette shows the colors currently assigned to the theme.
Click Palette under the color block.
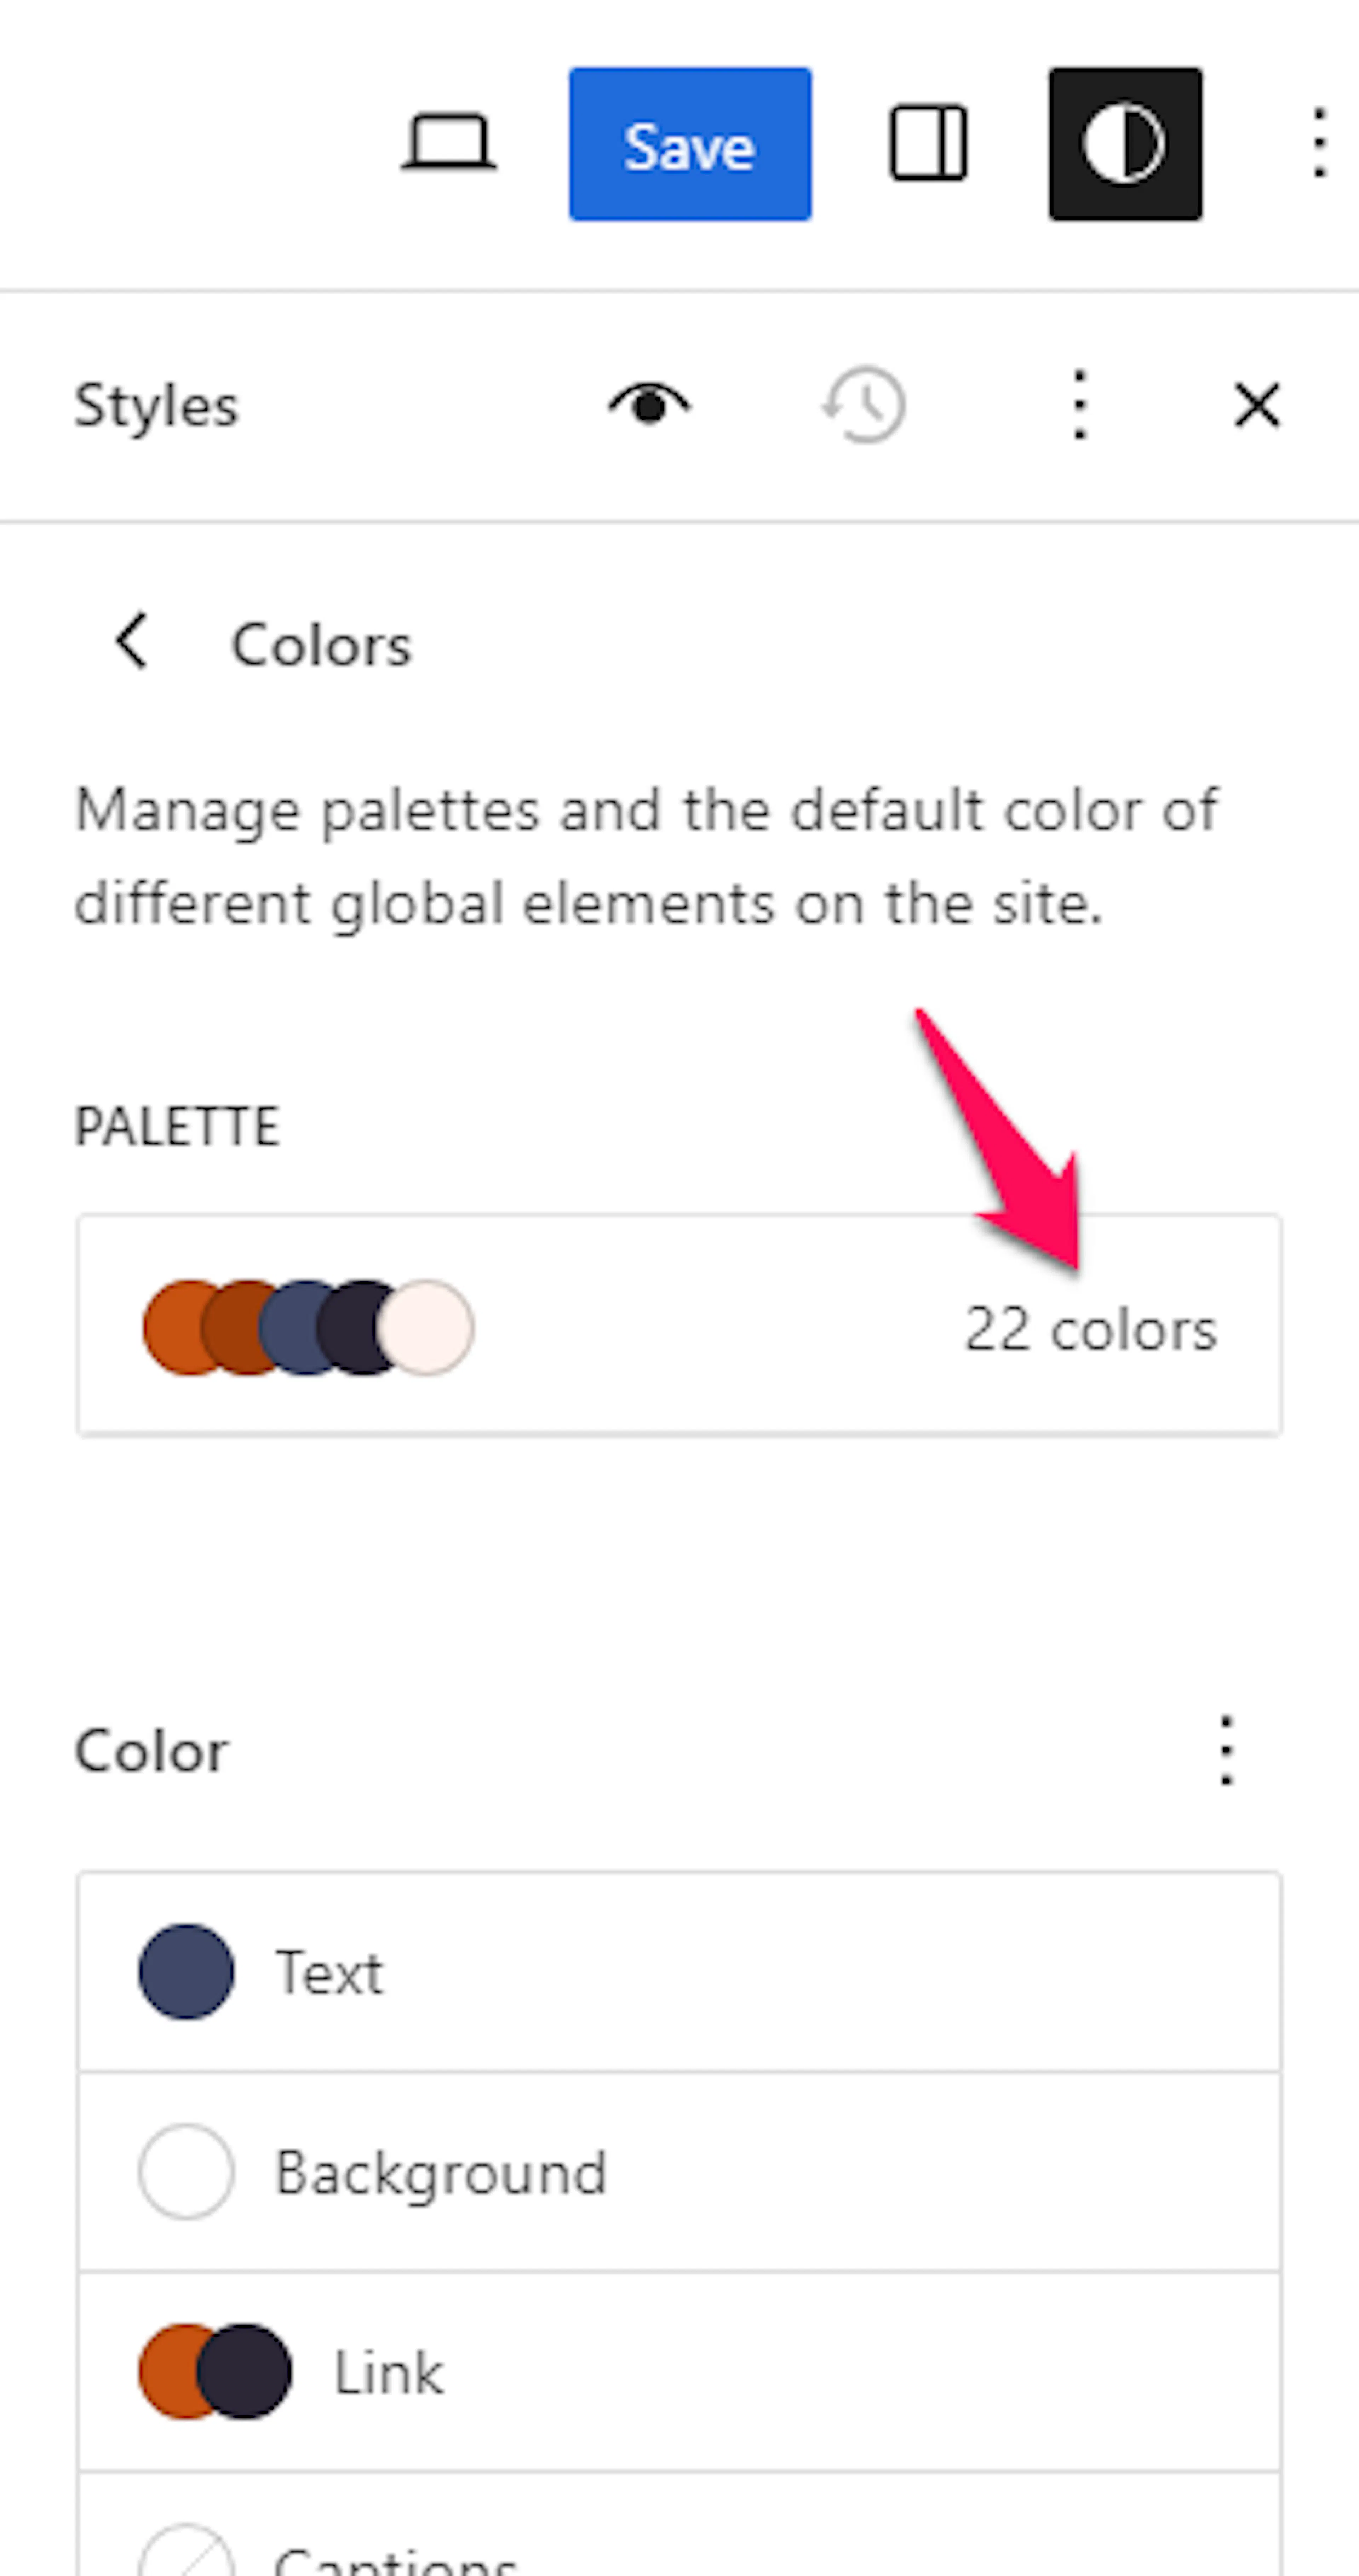
Show the color details
The details view shows each color that you can change.
Under the Solid tab, click the three dots icon, then click Show details.
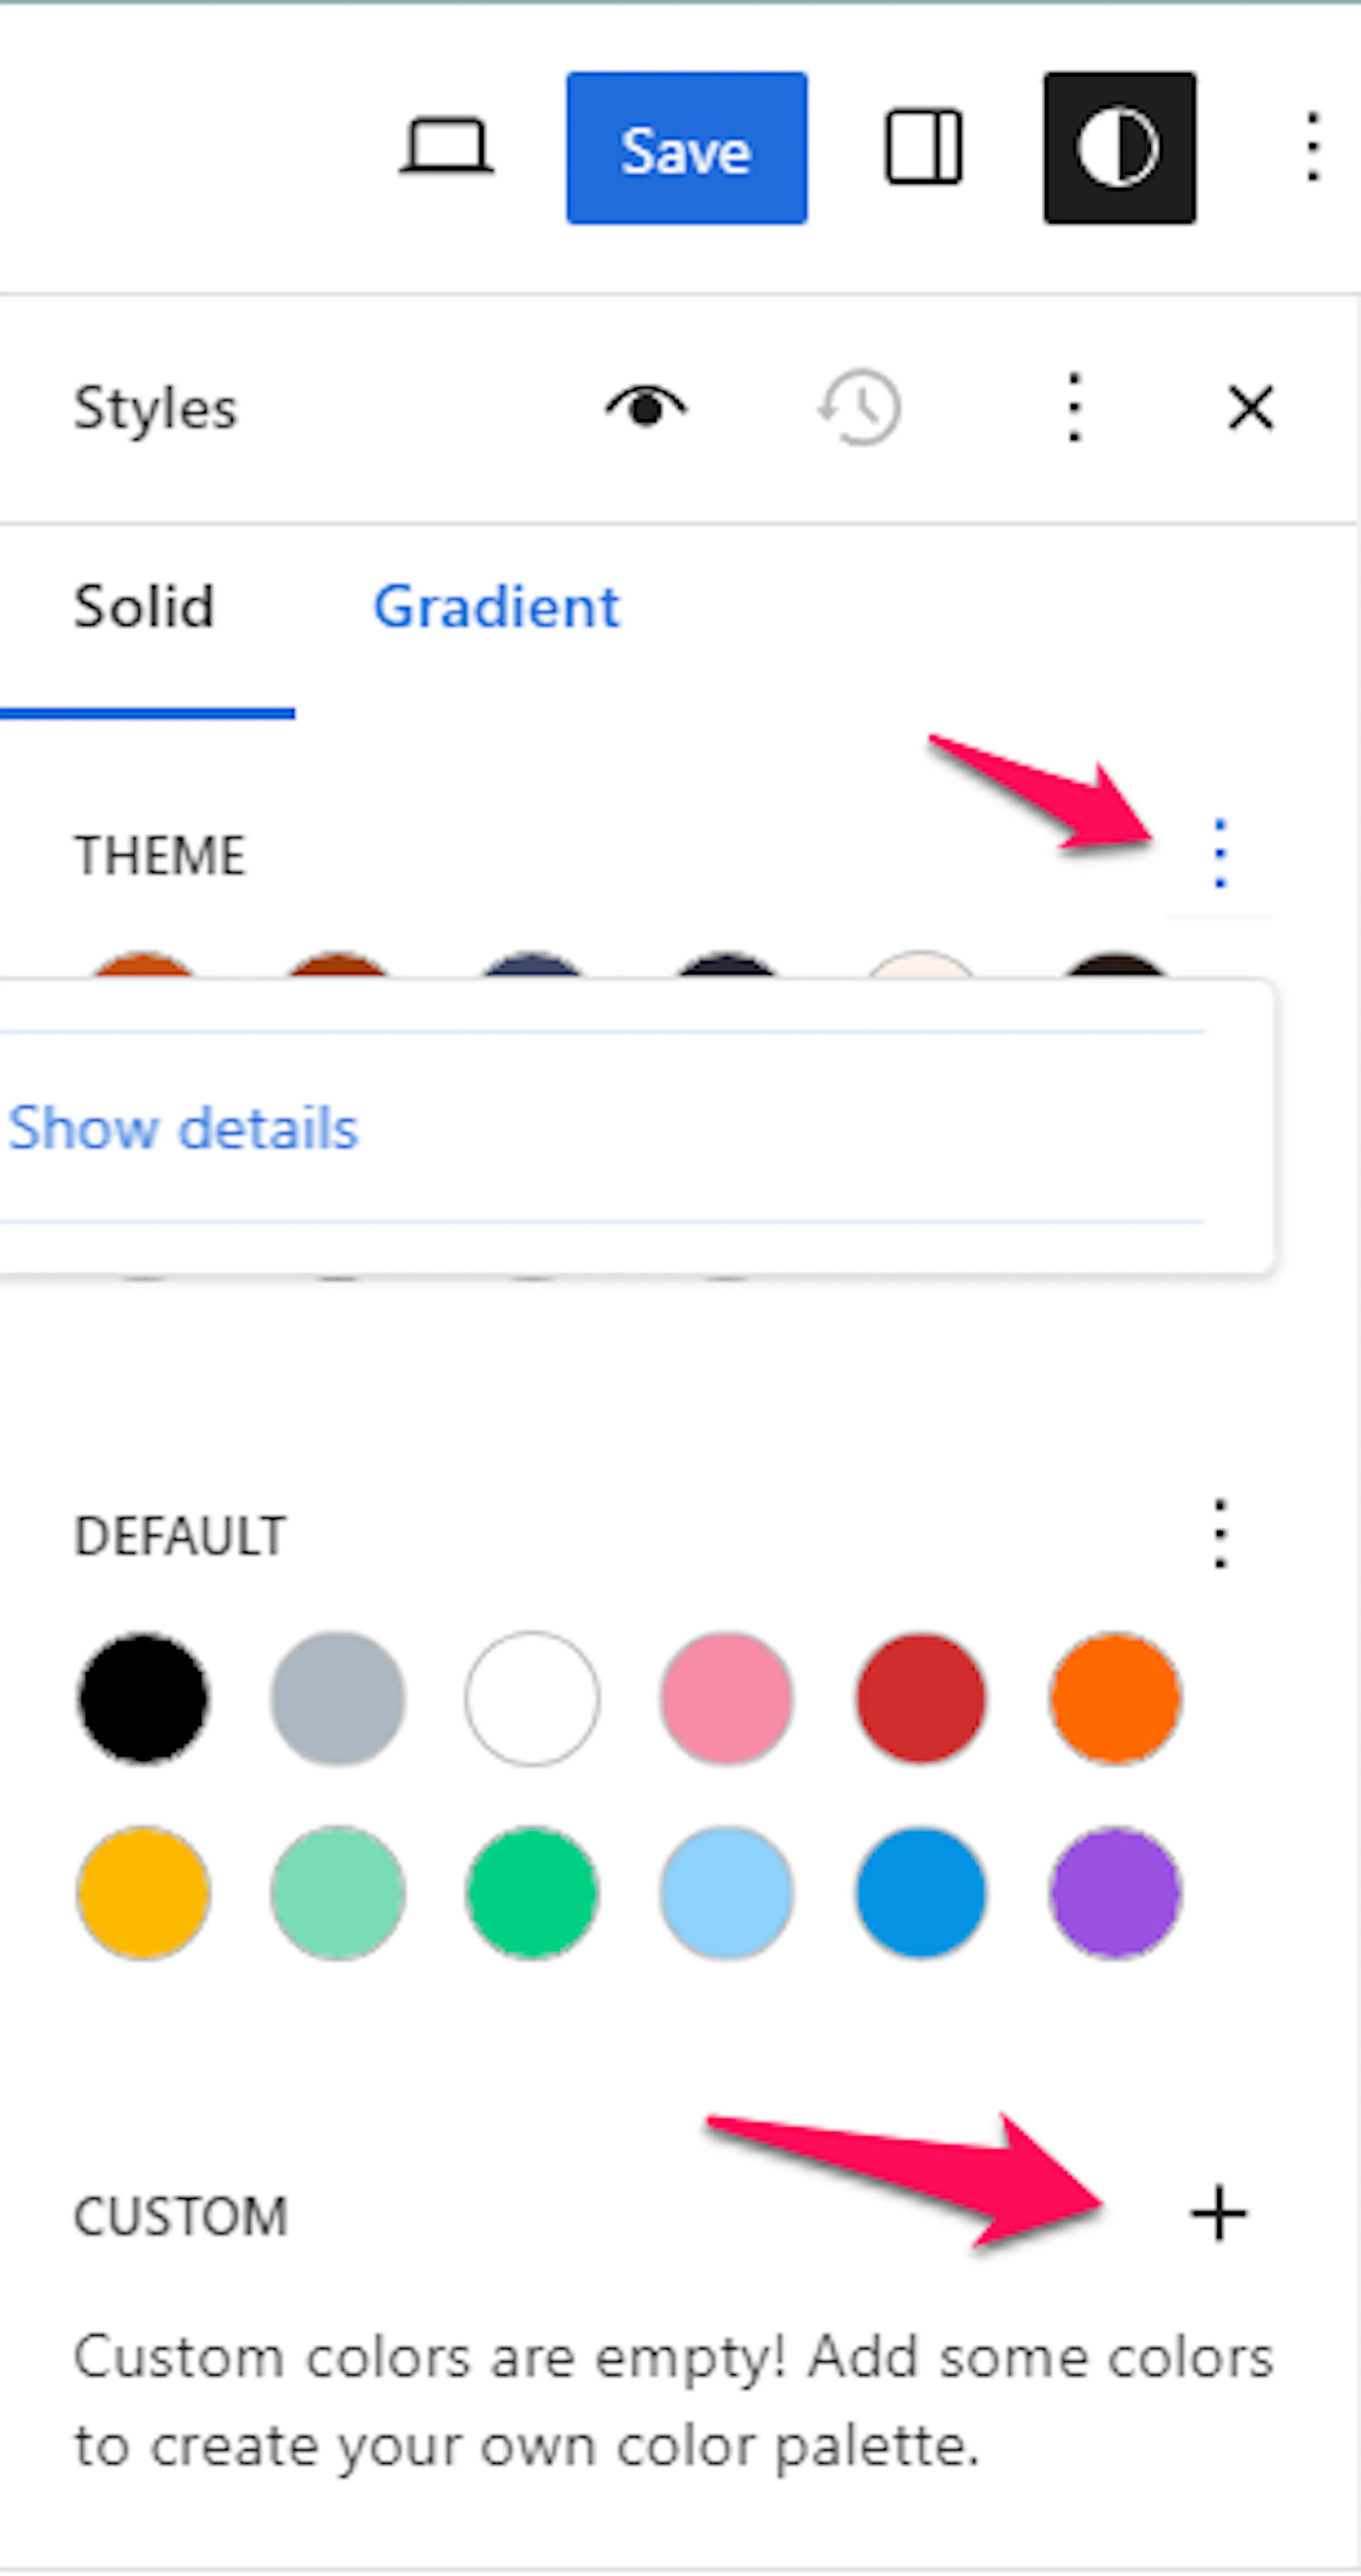
Change the assigned colors
Changing an assigned color updates the parts of the site that use it.
Click each available section to change its assigned color. You can also select Custom Color to choose a specific shade.
Save the color palette
Saving applies the new colors across the site.
Click Save.
Check a button, link, and heading to confirm that the colors match your brand.
Your main brand colors now appear consistently across the site. Typography settings control how the text looks within that color design.
How to Change Typography Settings
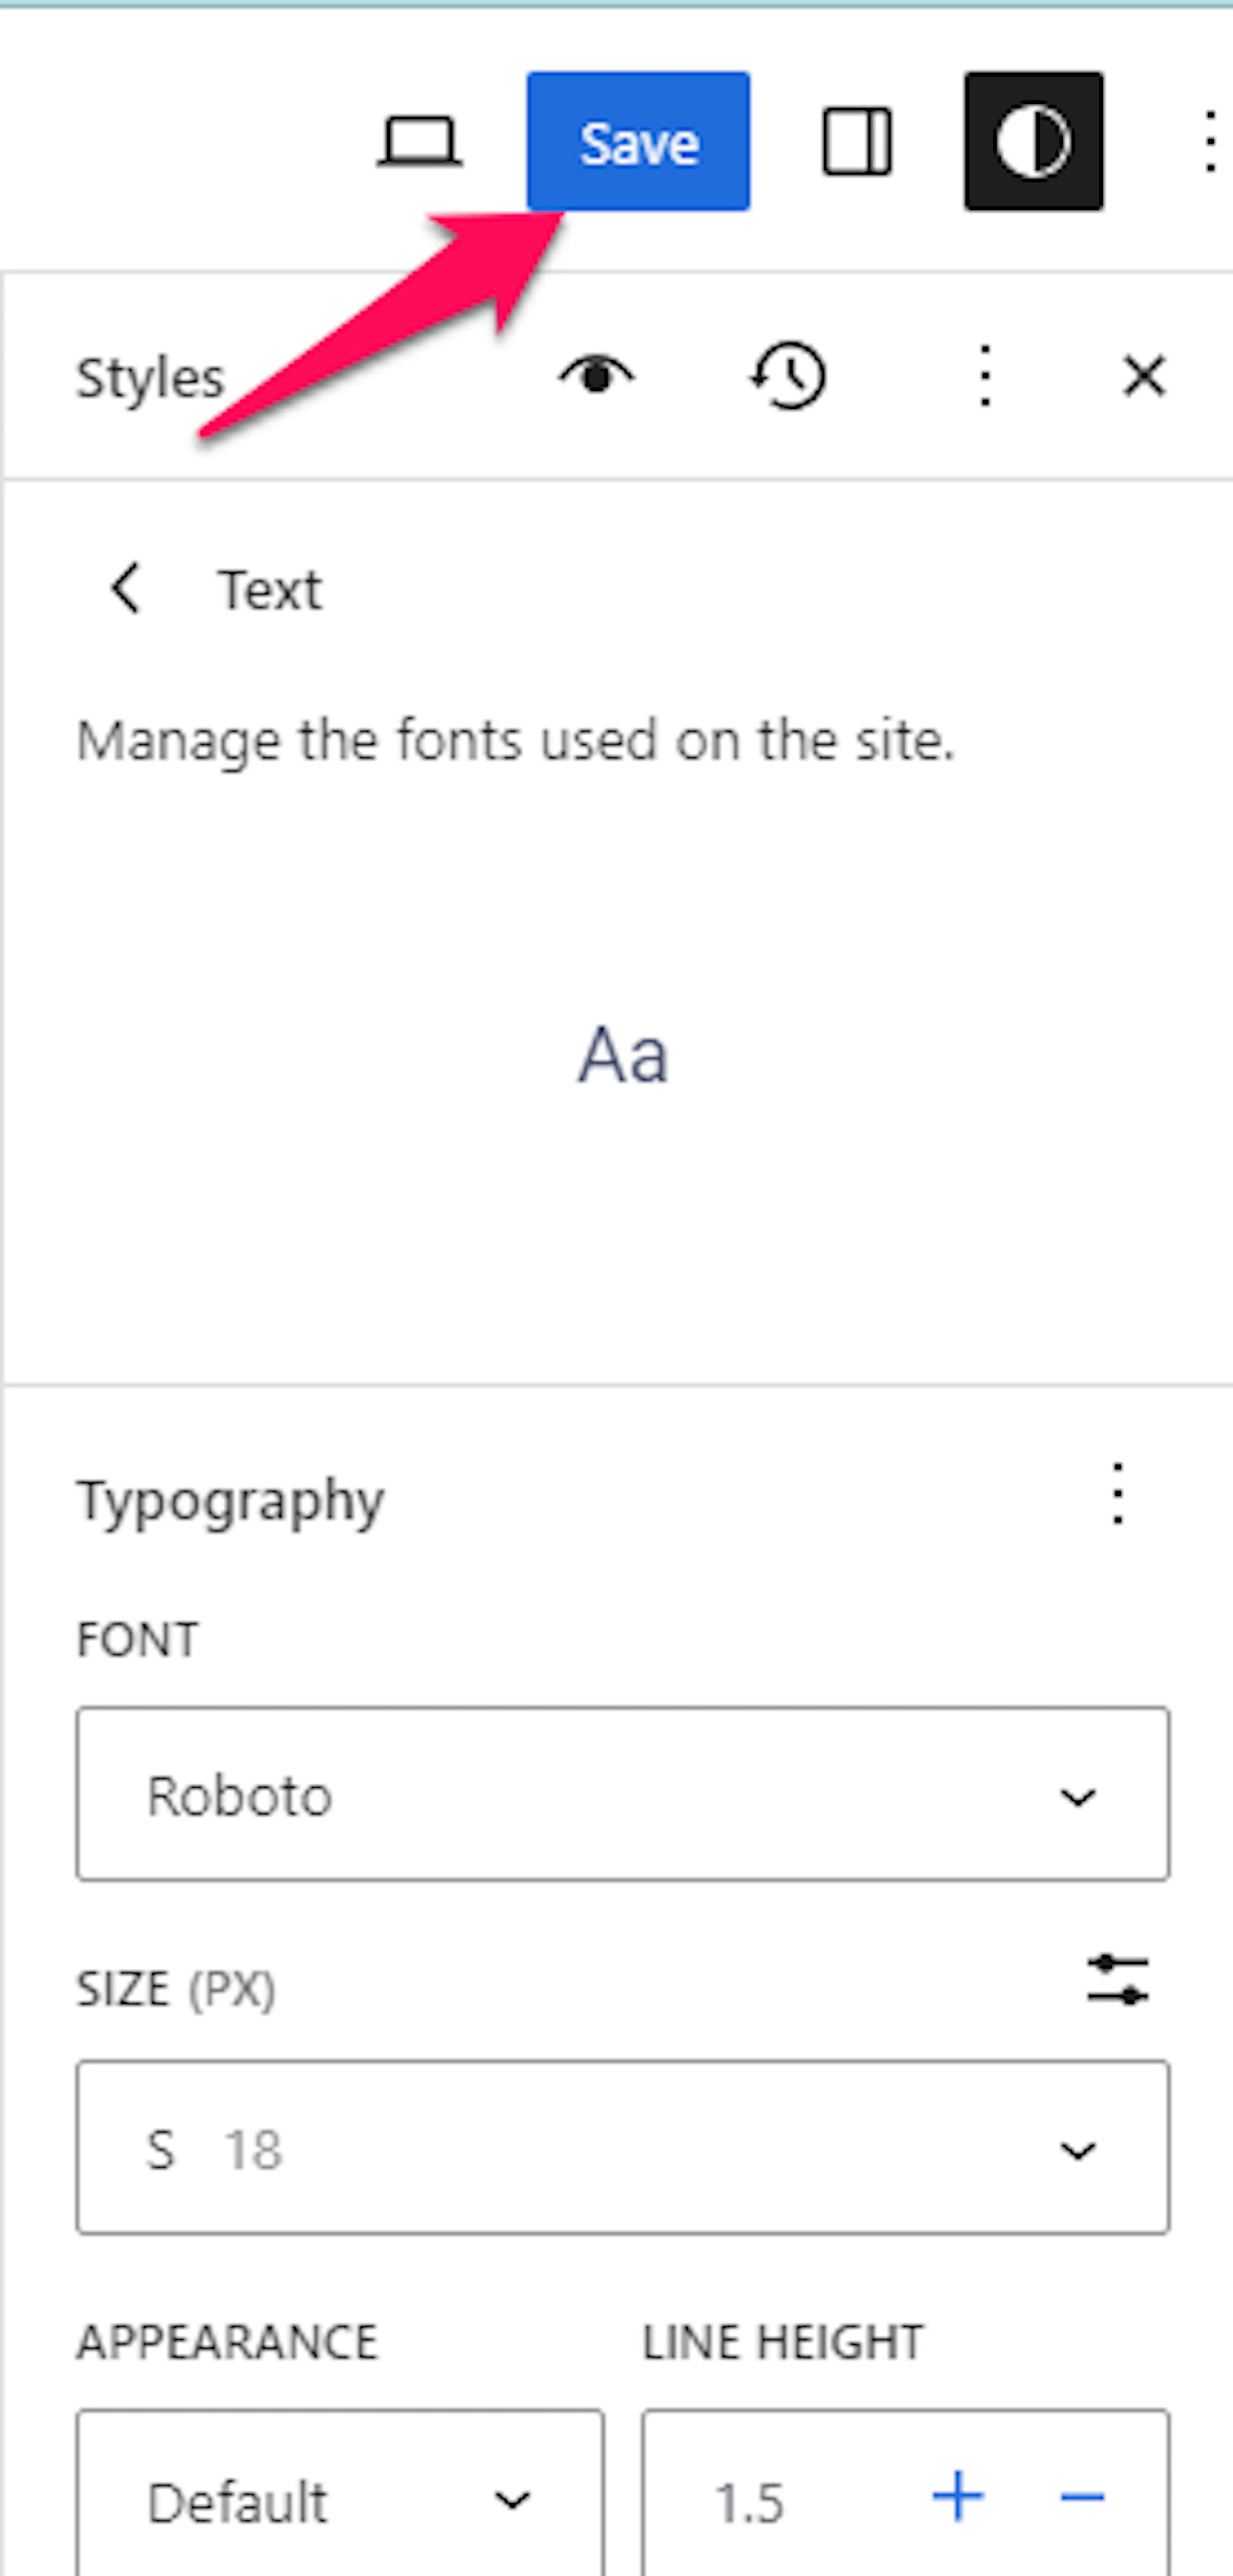
Typography controls the appearance of your text. You can change its font size, font weight, and line height to make trip details and booking information easier to read.
Font weight controls how thick the letters look. Line height controls the vertical space between lines of text.
Open the Site Editor
The Site Editor contains the global typography settings.
Open Appearance, then click Editor.
Open the typography settings
The typography settings let you choose how different text elements appear.
Click the Styles icon in the top right corner, then click Typography.
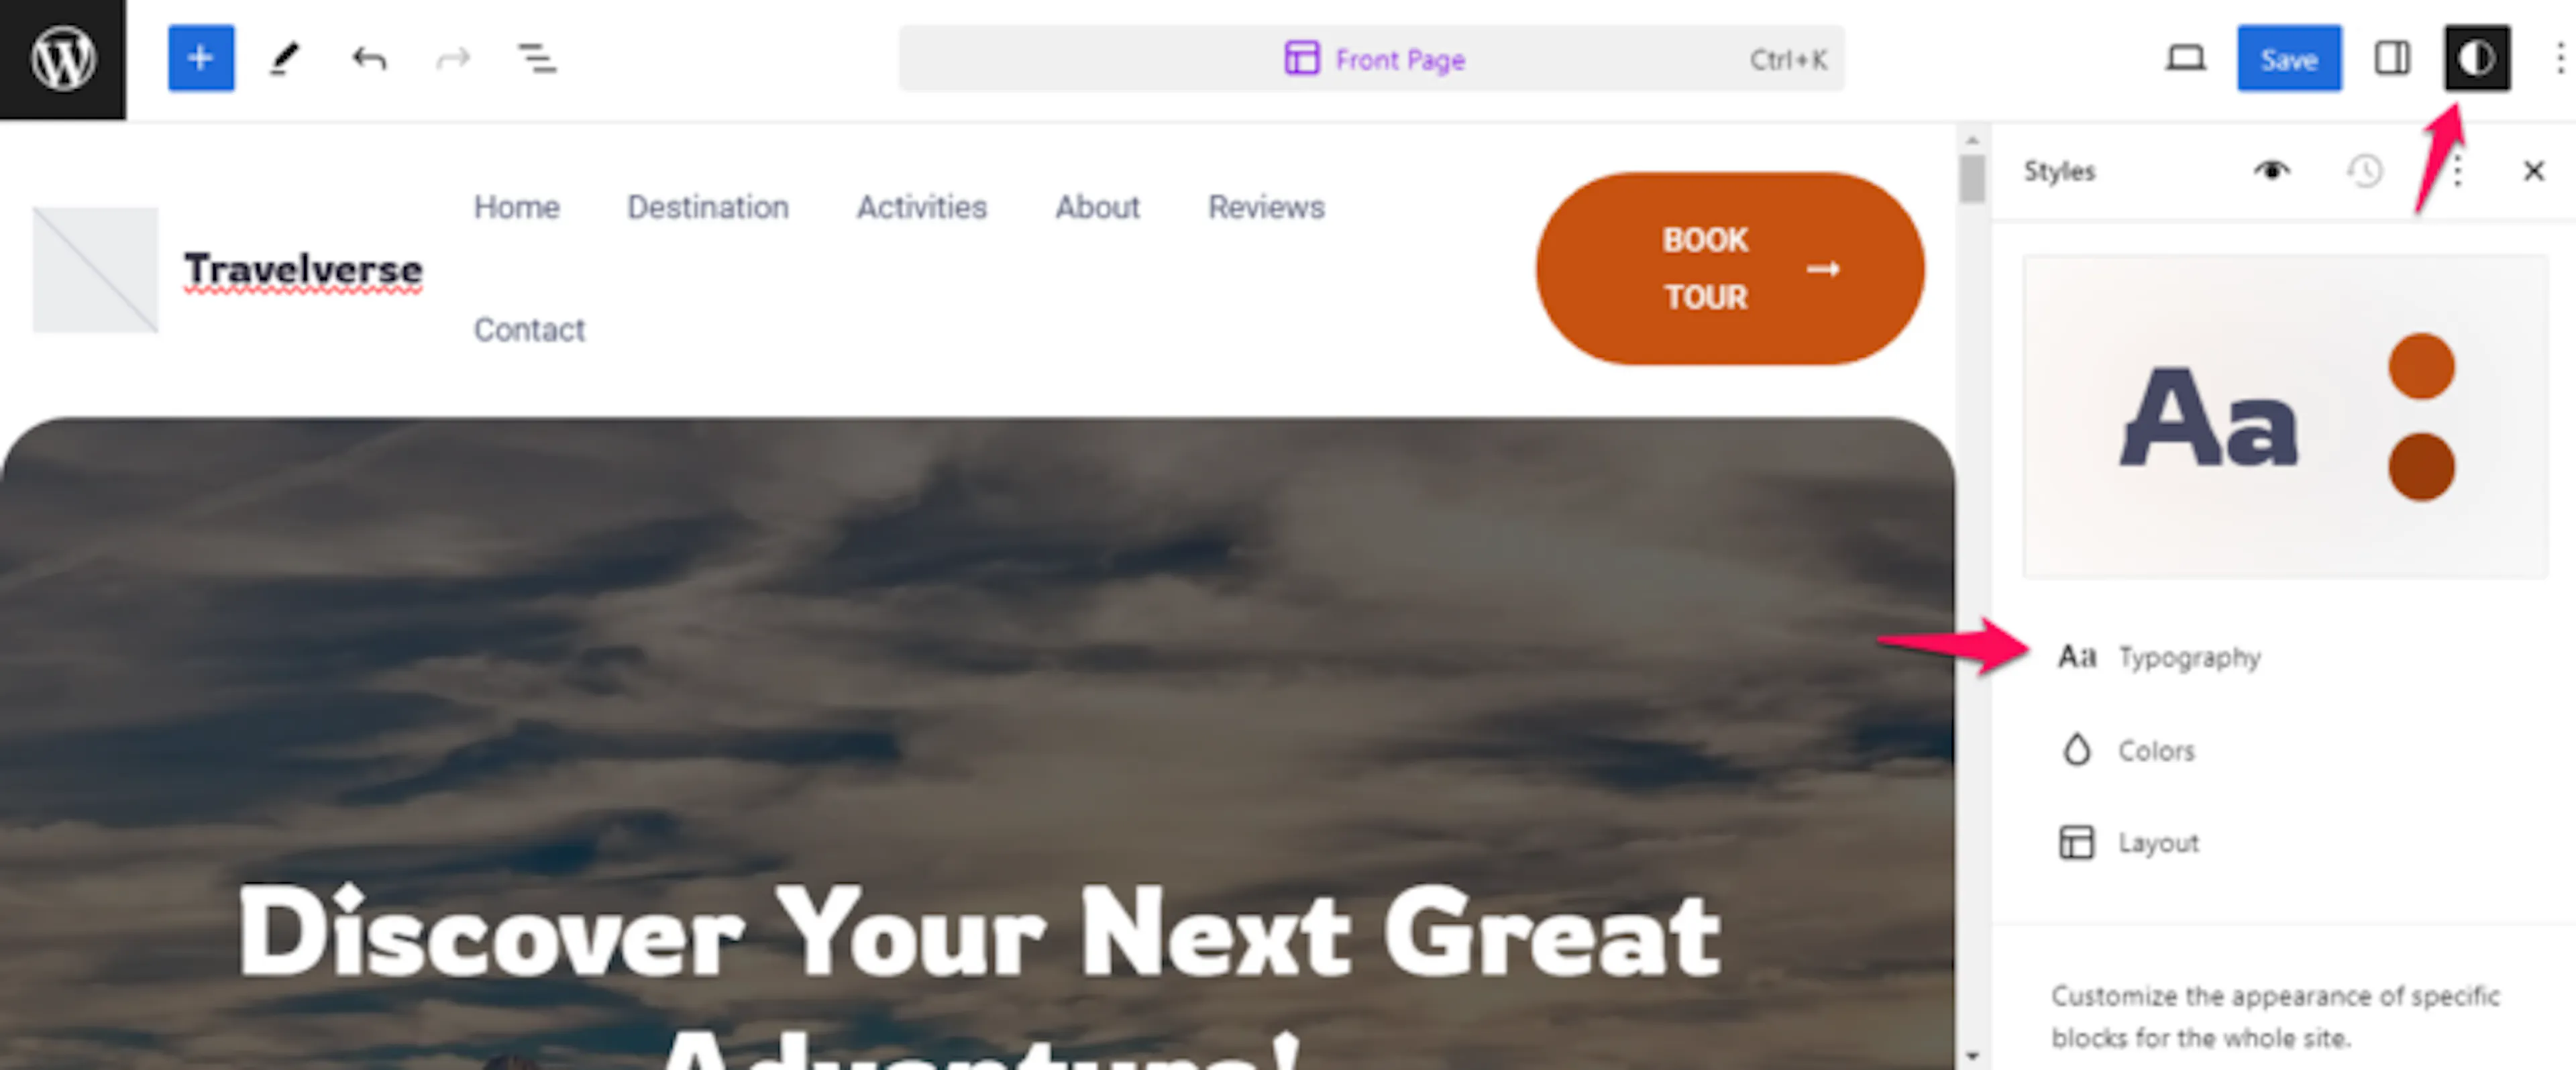
Choose a text element
Each element can have its own typography settings.
Click the element whose typography you want to change, such as text, headings, or buttons.
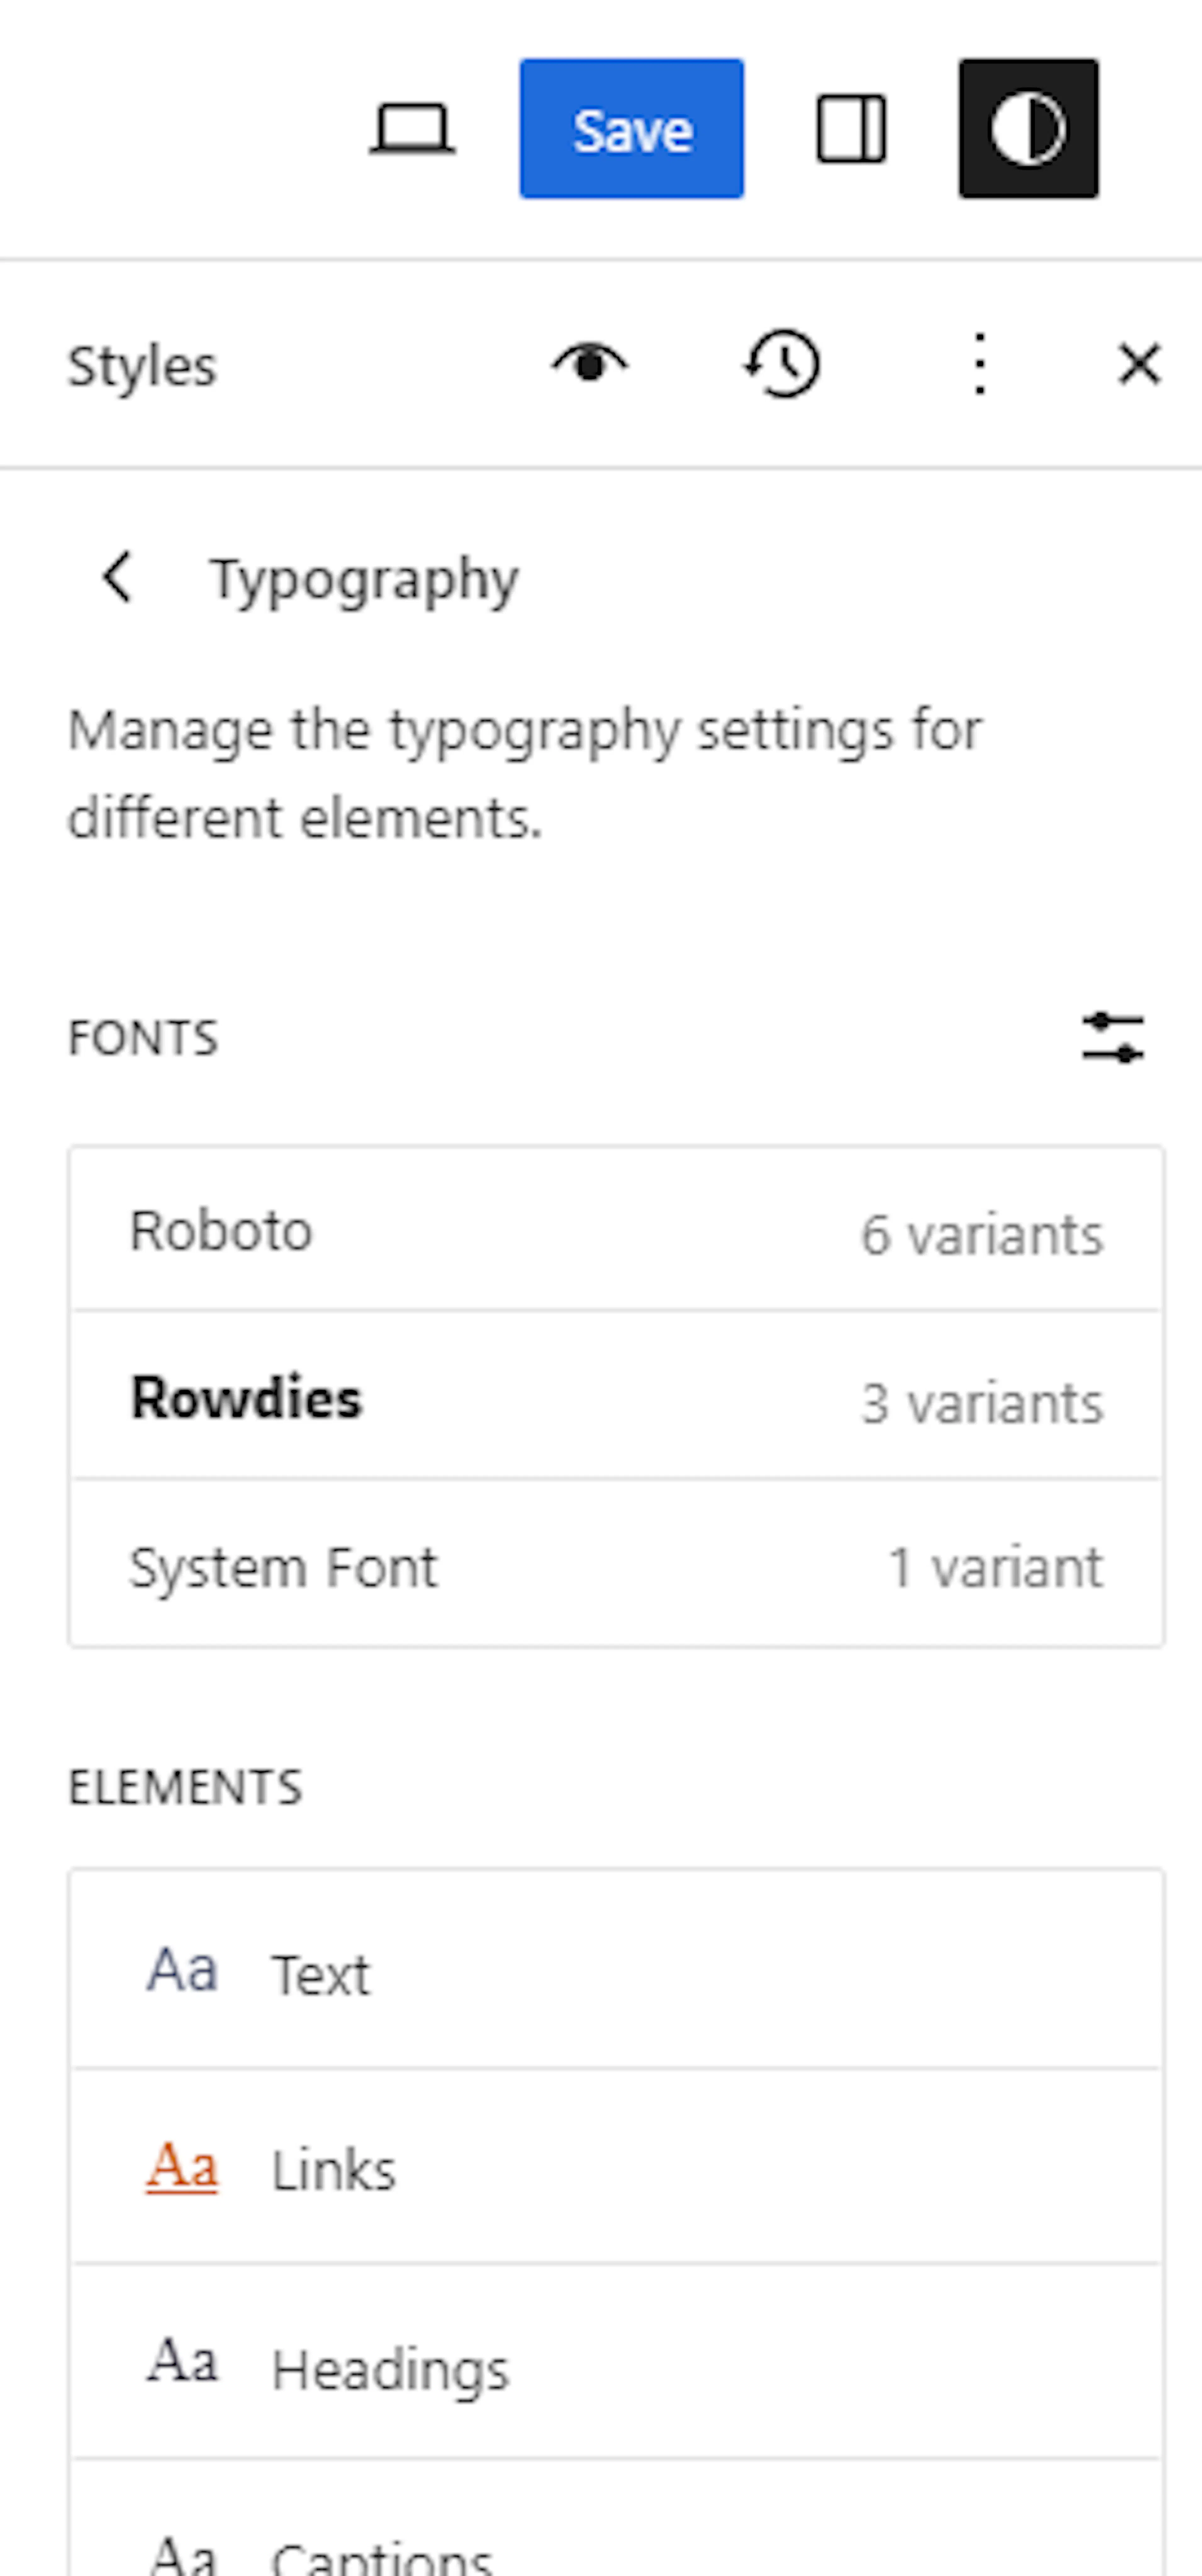
Set the text appearance
Adjusting the text settings helps visitors read important trip information.
Select the font-size, font-weight, and line-height values you want to use.
Save the typography settings
Saving applies the new text appearance across the site.
Click Save.
Review a trip page on both a computer and a phone to make sure the text remains easy to read.
Your site now has a consistent logo, color palette, and text style. Travelverse also includes extra styles for selected blocks.
Styles for the Block
Travelverse adds extra style options to certain WordPress blocks, including Group blocks and Button blocks. These options appear in the block settings when you select a block in the Site Editor.
Group Block Styles
Group blocks hold several blocks together as one section. Travelverse adds hover animation options that control how a section moves or appears when a visitor points to it.
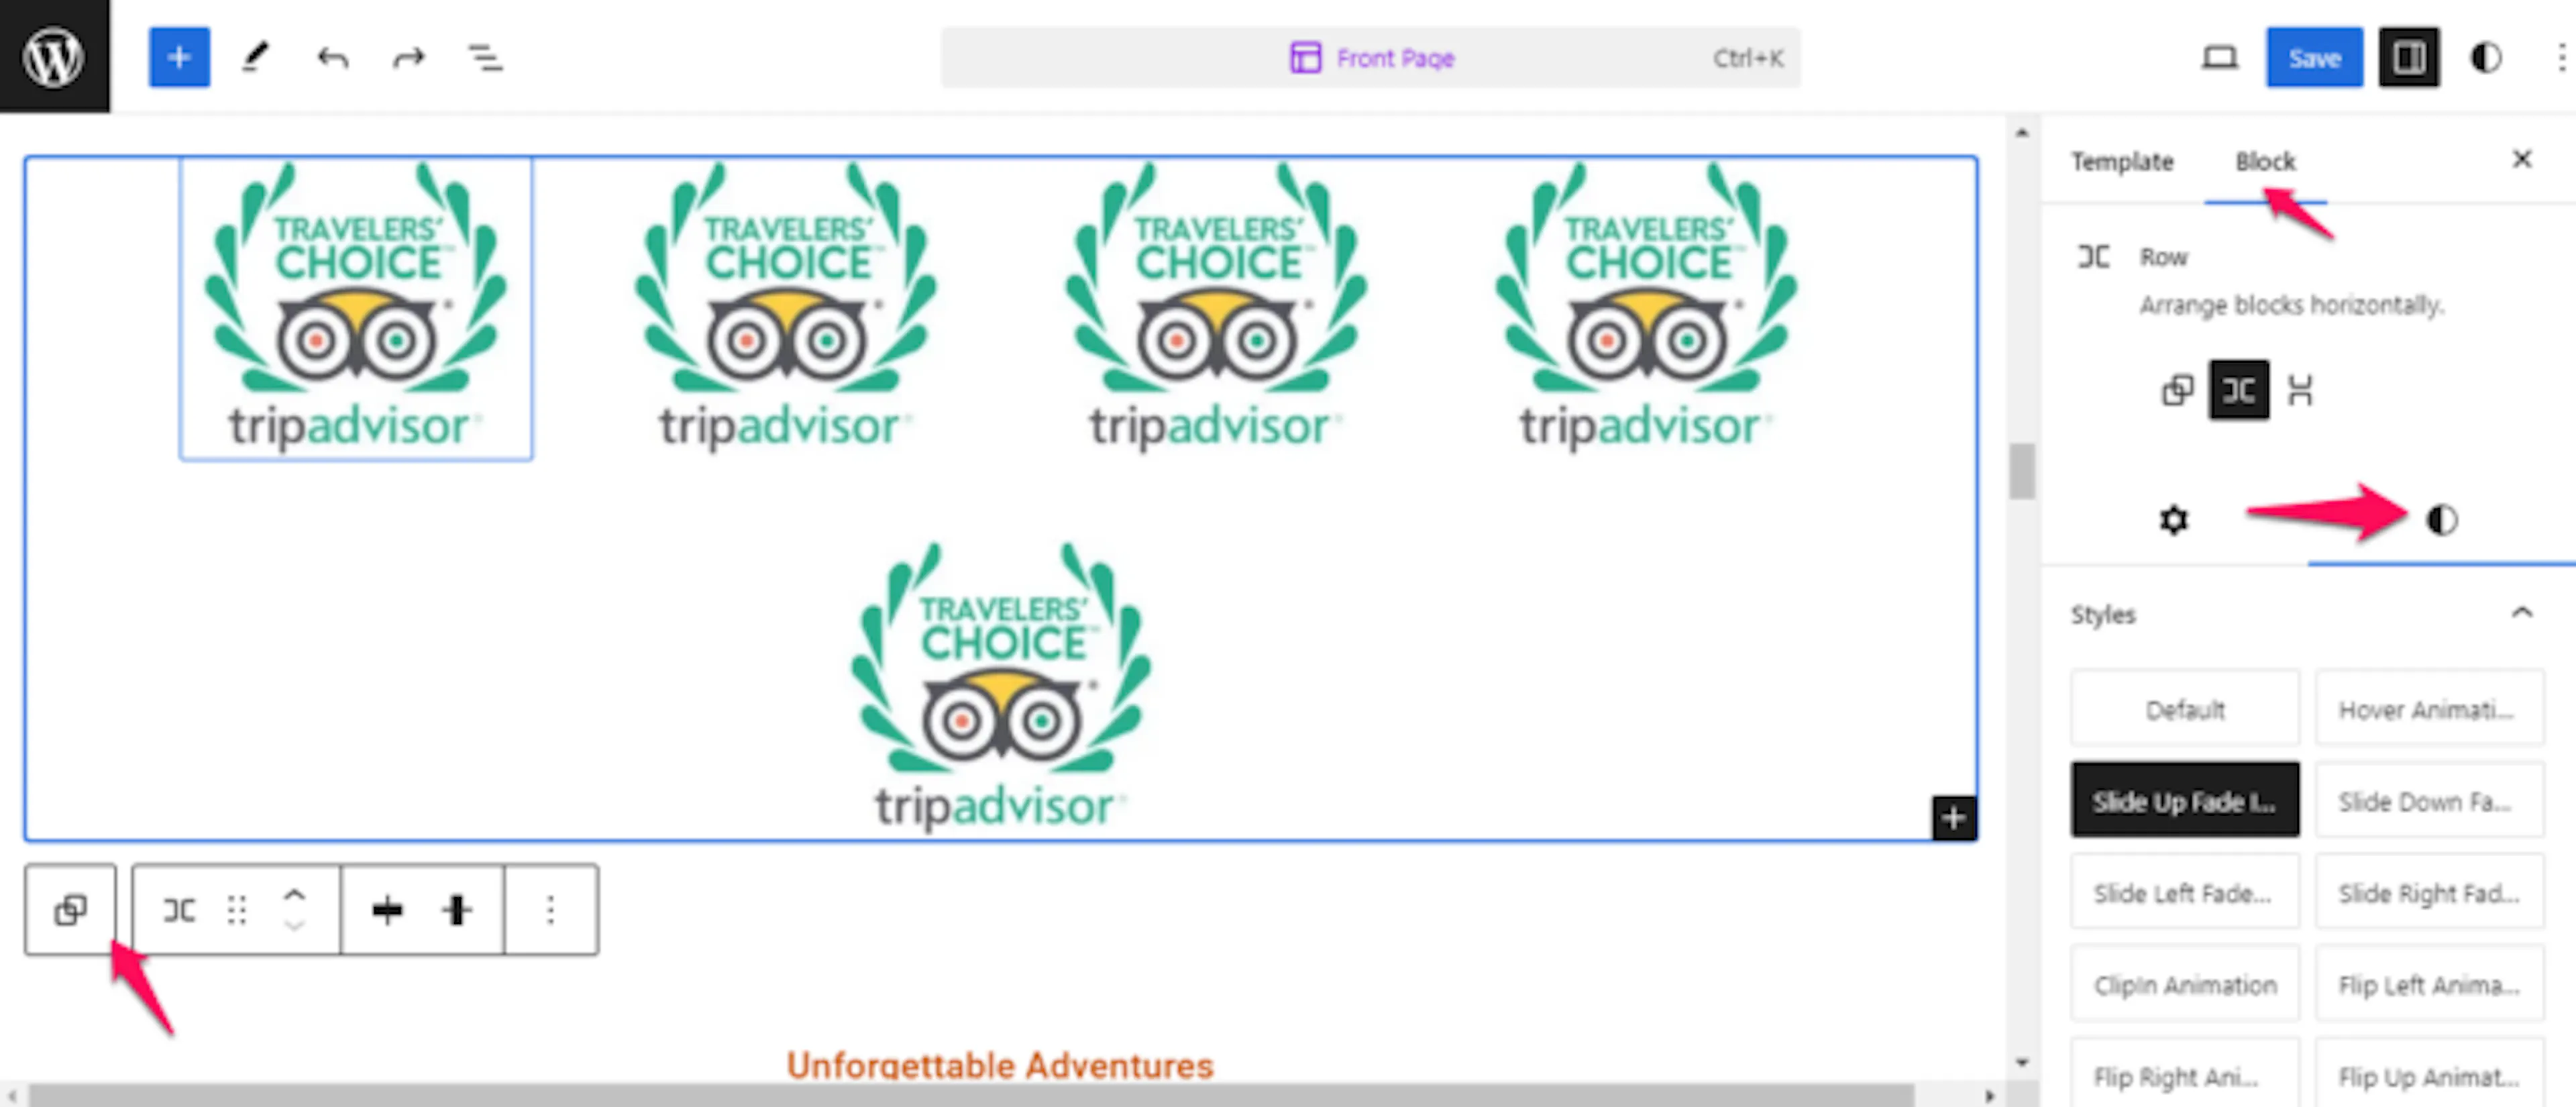
Use these effects on sections such as featured trek cards or seasonal tour offers. Avoid adding movement to every section so the most important content remains easy to follow.
- Default: Shows the Group block without a hover animation.
- Hover Animation: Applies the standard Travelverse hover effect to the Group block.
- Slide Up Fade In: Moves the section slightly upward while it fades into view.
- Slide Down Fade In: Moves the section slightly downward while it fades into view.
- Slide Right Fade In: Moves the section slightly to the right while it fades into view.
- Slide Left Fade In: Moves the section slightly to the left while it fades into view.
- ClipIn: Reveals the section through a clipped opening effect.
- Flip Left: Flips the section toward the left when the visitor hovers over it.
- Flip Right: Flips the section toward the right when the visitor hovers over it.
- Flip Up: Flips the section upward when the visitor hovers over it.
- Flip Down: Flips the section downward when the visitor hovers over it.
- Zoom In: Makes the section appear slightly larger on hover.
- Zoom Out: Makes the section appear slightly smaller on hover.
- Zoom In Up: Enlarges the section while moving it upward.
- Zoom In Down: Enlarges the section while moving it downward.
- Zoom In Right: Enlarges the section while moving it to the right.
- Zoom In Left: Enlarges the section while moving it to the left.
- Zoom Out Up: Shrinks the section while moving it upward.
- Zoom Out Down: Shrinks the section while moving it downward.
- Zoom Out Left: Shrinks the section while moving it to the left.
- Zoom Out Right: Shrinks the section while moving it to the right.
Choose an animation that supports the purpose of the section. A light effect can help visitors notice a trip card without distracting them from the trip details.
Button Block Styles
Button blocks link visitors to actions such as viewing a trek, requesting a group discount, or booking a day tour.
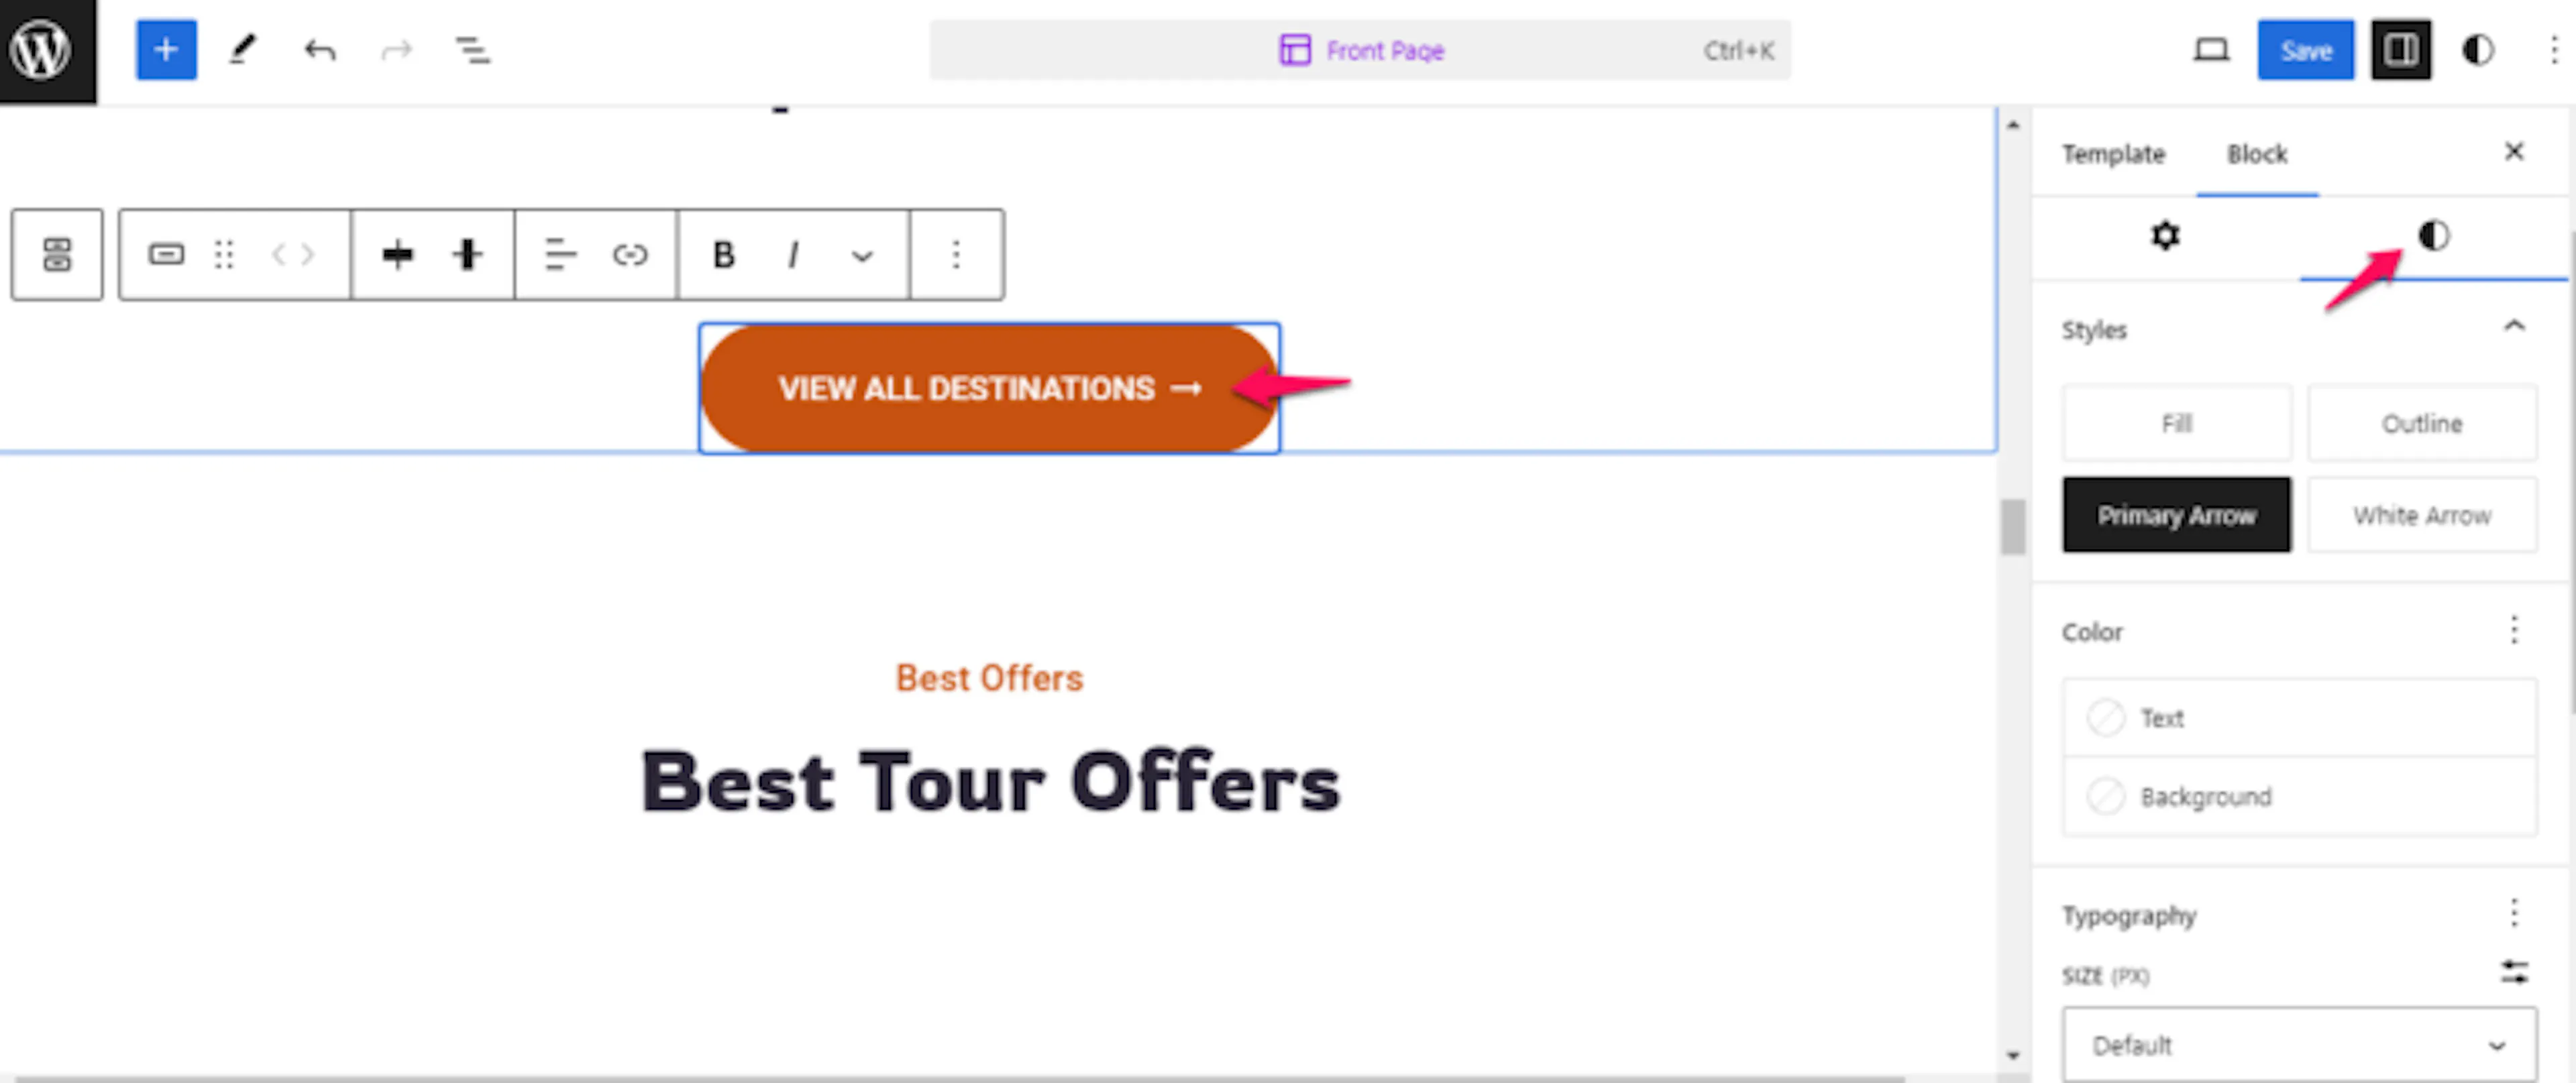
Travelverse adds these button styles:
- Default: Uses the standard Travelverse button appearance.
- Outline: Shows the button with an outlined border and a lighter interior.
- Primary Arrow: Uses the main button style with an arrow to show that the button leads to another action.
- White Arrow: Uses a white button style with an arrow, which works well on dark or image-based backgrounds.
Your block styles are ready to use across trip pages and landing pages. Choose styles that keep important actions clear for travelers.
If you're still stuck or have a question we didn't cover, our support team is happy to help. Reach out at our support page and we'll get you sorted.