

Currency Converter
Let travelers view trip prices in their own currency so they can understand costs faster, feel more confident, and book with fewer questions.
Show trip prices in more than one currency
Show your trip prices in the currency your travelers know best. That small change can make a big difference. When someone from another country looks at one of your treks, day tours, or multi-day packages, they can understand the cost right away.
Instead of showing only your base currency, you can let visitors switch to other currencies like EUR, GBP, AUD, or INR. The add-on uses real-time exchange rates, so the displayed amount stays current.
If you sell to travelers from different countries, this helps them feel more comfortable while they browse. It also cuts down on the back-and-forth that happens when someone is trying to work out the price on their own.
Your customer will still pay in your site's base currency at checkout. The currency switcher is only for display. It helps people see the price in a familiar currency before they pay, and it stays off the checkout page itself.
Key features
These are the main things the add-on helps you do on your trip pages.
- Show prices in familiar currencies: A traveler from the UK can view your Everest trek in GBP. A traveler from Australia can look at the same trip in AUD.
- Update rates automatically: Exchange rates can refresh on their own, so you do not need to keep changing them by hand.
- Keep the switcher visible: You can turn on a sticky currency switcher so visitors can change currency while they scroll through a trip page.
- Detect currency behind a cache: If your site runs a full-page caching plugin, Cache Compatible mode still shows each visitor their local currency instead of one cached version to everyone.
- Control what visitors see: Add the currencies you want, choose a title, and decide where the switcher appears.
- Build trust with international travelers: People are more likely to continue booking when they understand the price right away.
Once you know what the add-on does, you are ready to set it up.
What you'll need before you start
Get these ready first. That will make the setup much smoother.
- You have WP Travel Engine installed and activated on your WordPress site (Version 6.6.9 or above).
- You have installed and activated the Currency Converter add-on.
- You have an API key from a currency exchange service. An API key is like a password that lets your website talk to another service. In this case, it lets your site fetch live exchange rates.
Please check the instructions here to install the add-on and activate the License Key.
Once these are in place, you can move into the setup with confidence.
Setting up the Currency Converter
You will do all of this from your WordPress dashboard. That is the main admin area you see after you log in.
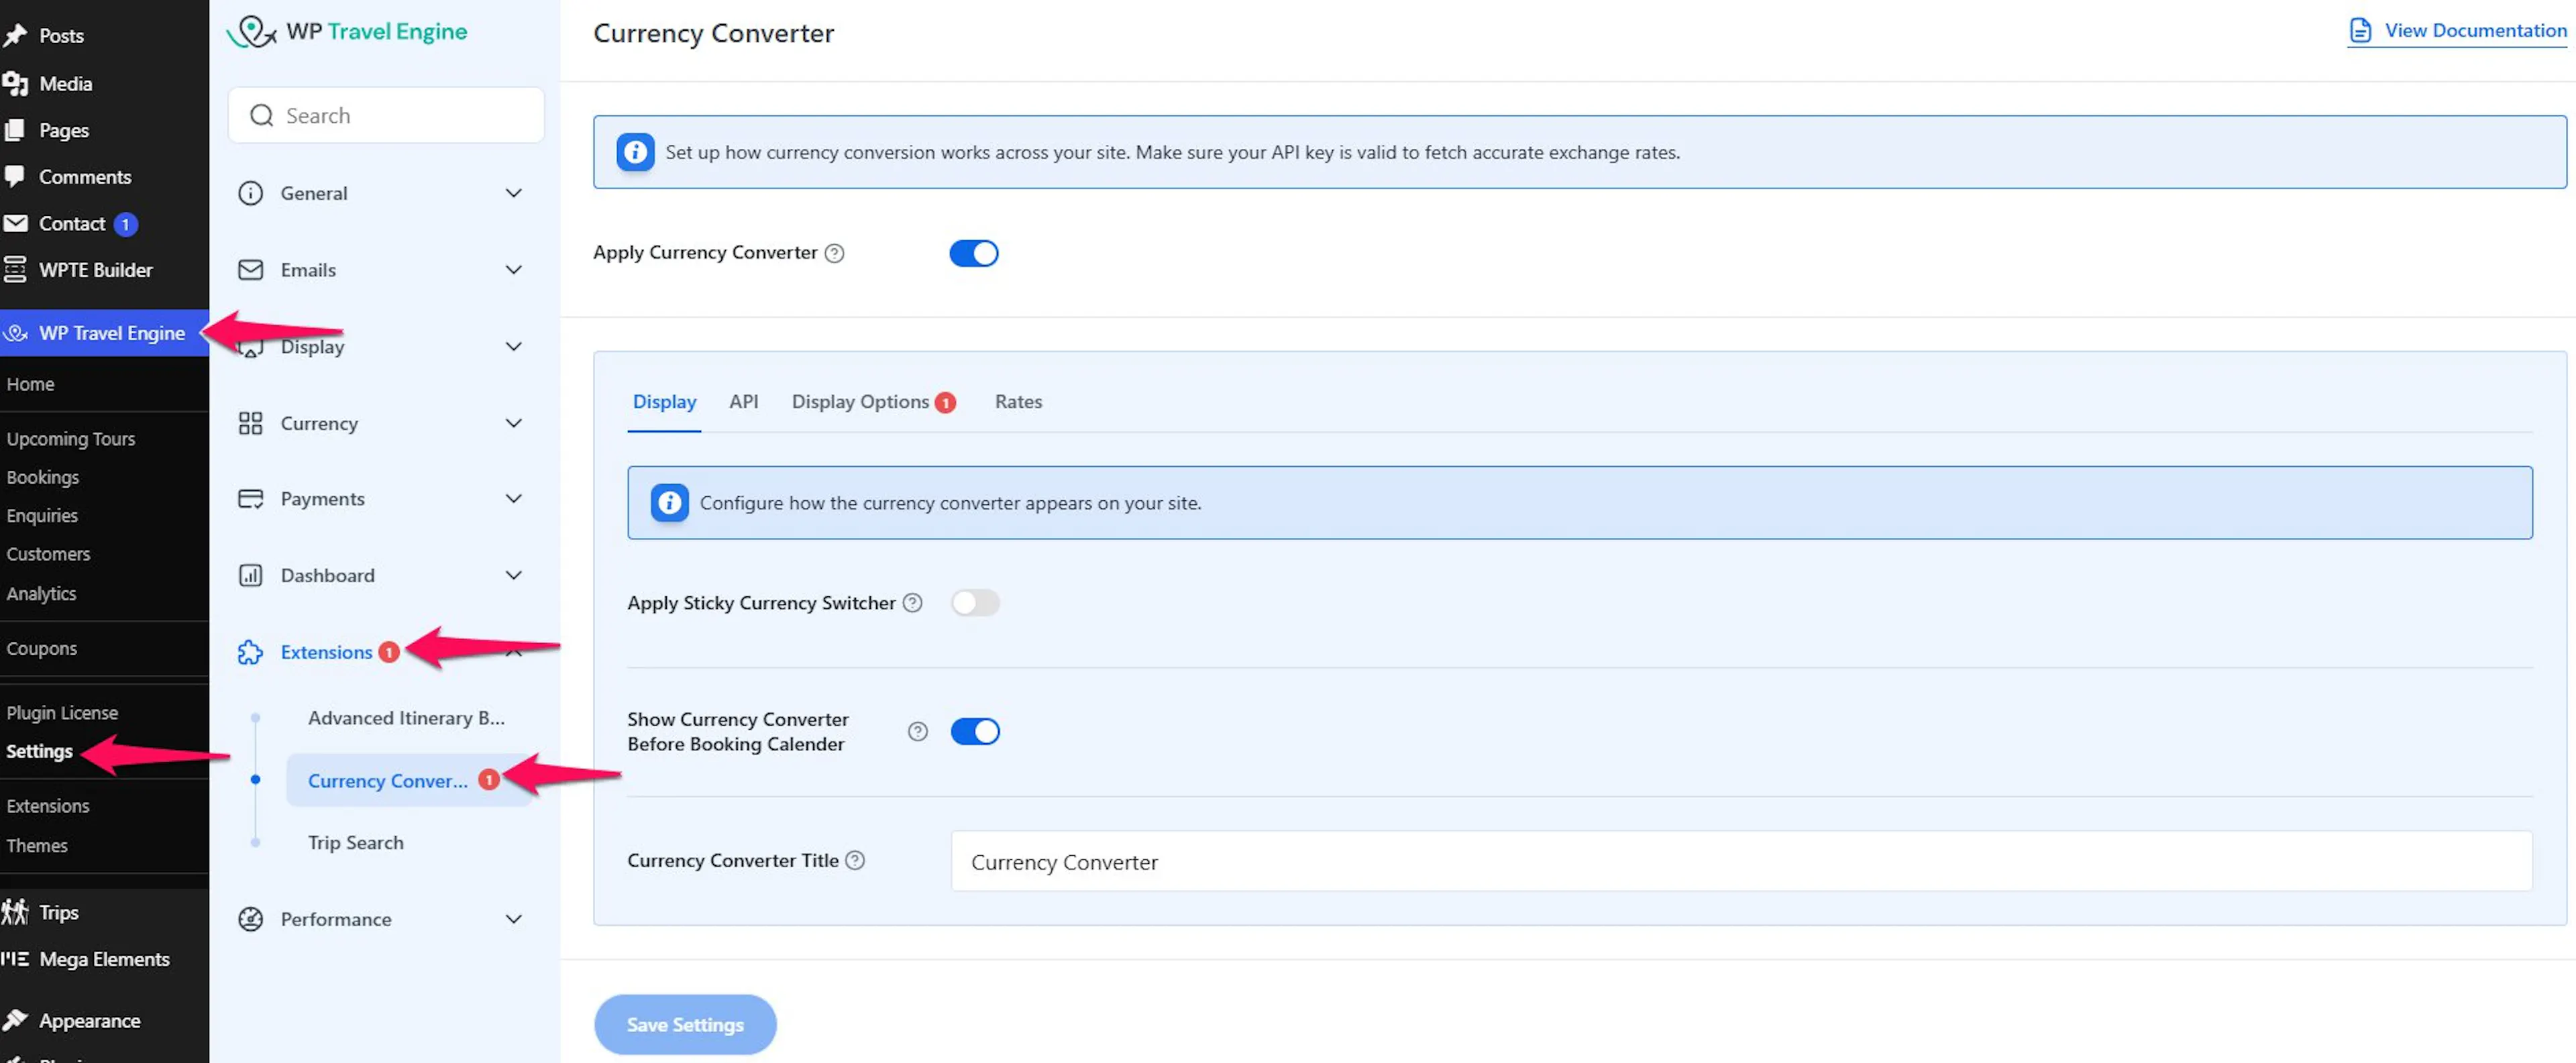
The settings live on the left sidebar of your dashboard. Go to WP Travel Engine. Then click Settings. Open Extensions. Then choose Currency Converter.
Open the Currency Converter settings
This takes you straight to the settings you need.
On the left sidebar of your WordPress dashboard, click WP Travel Engine. Then click Settings. Open Extensions. Then click Currency Converter.
Turn on the Apply Currency Converter
This is the setting that makes the add-on start working on your site.
Find Apply Currency Converter and turn it on. Once it's on, four tabs appear below it: Display, API, Display Options, and Rates.
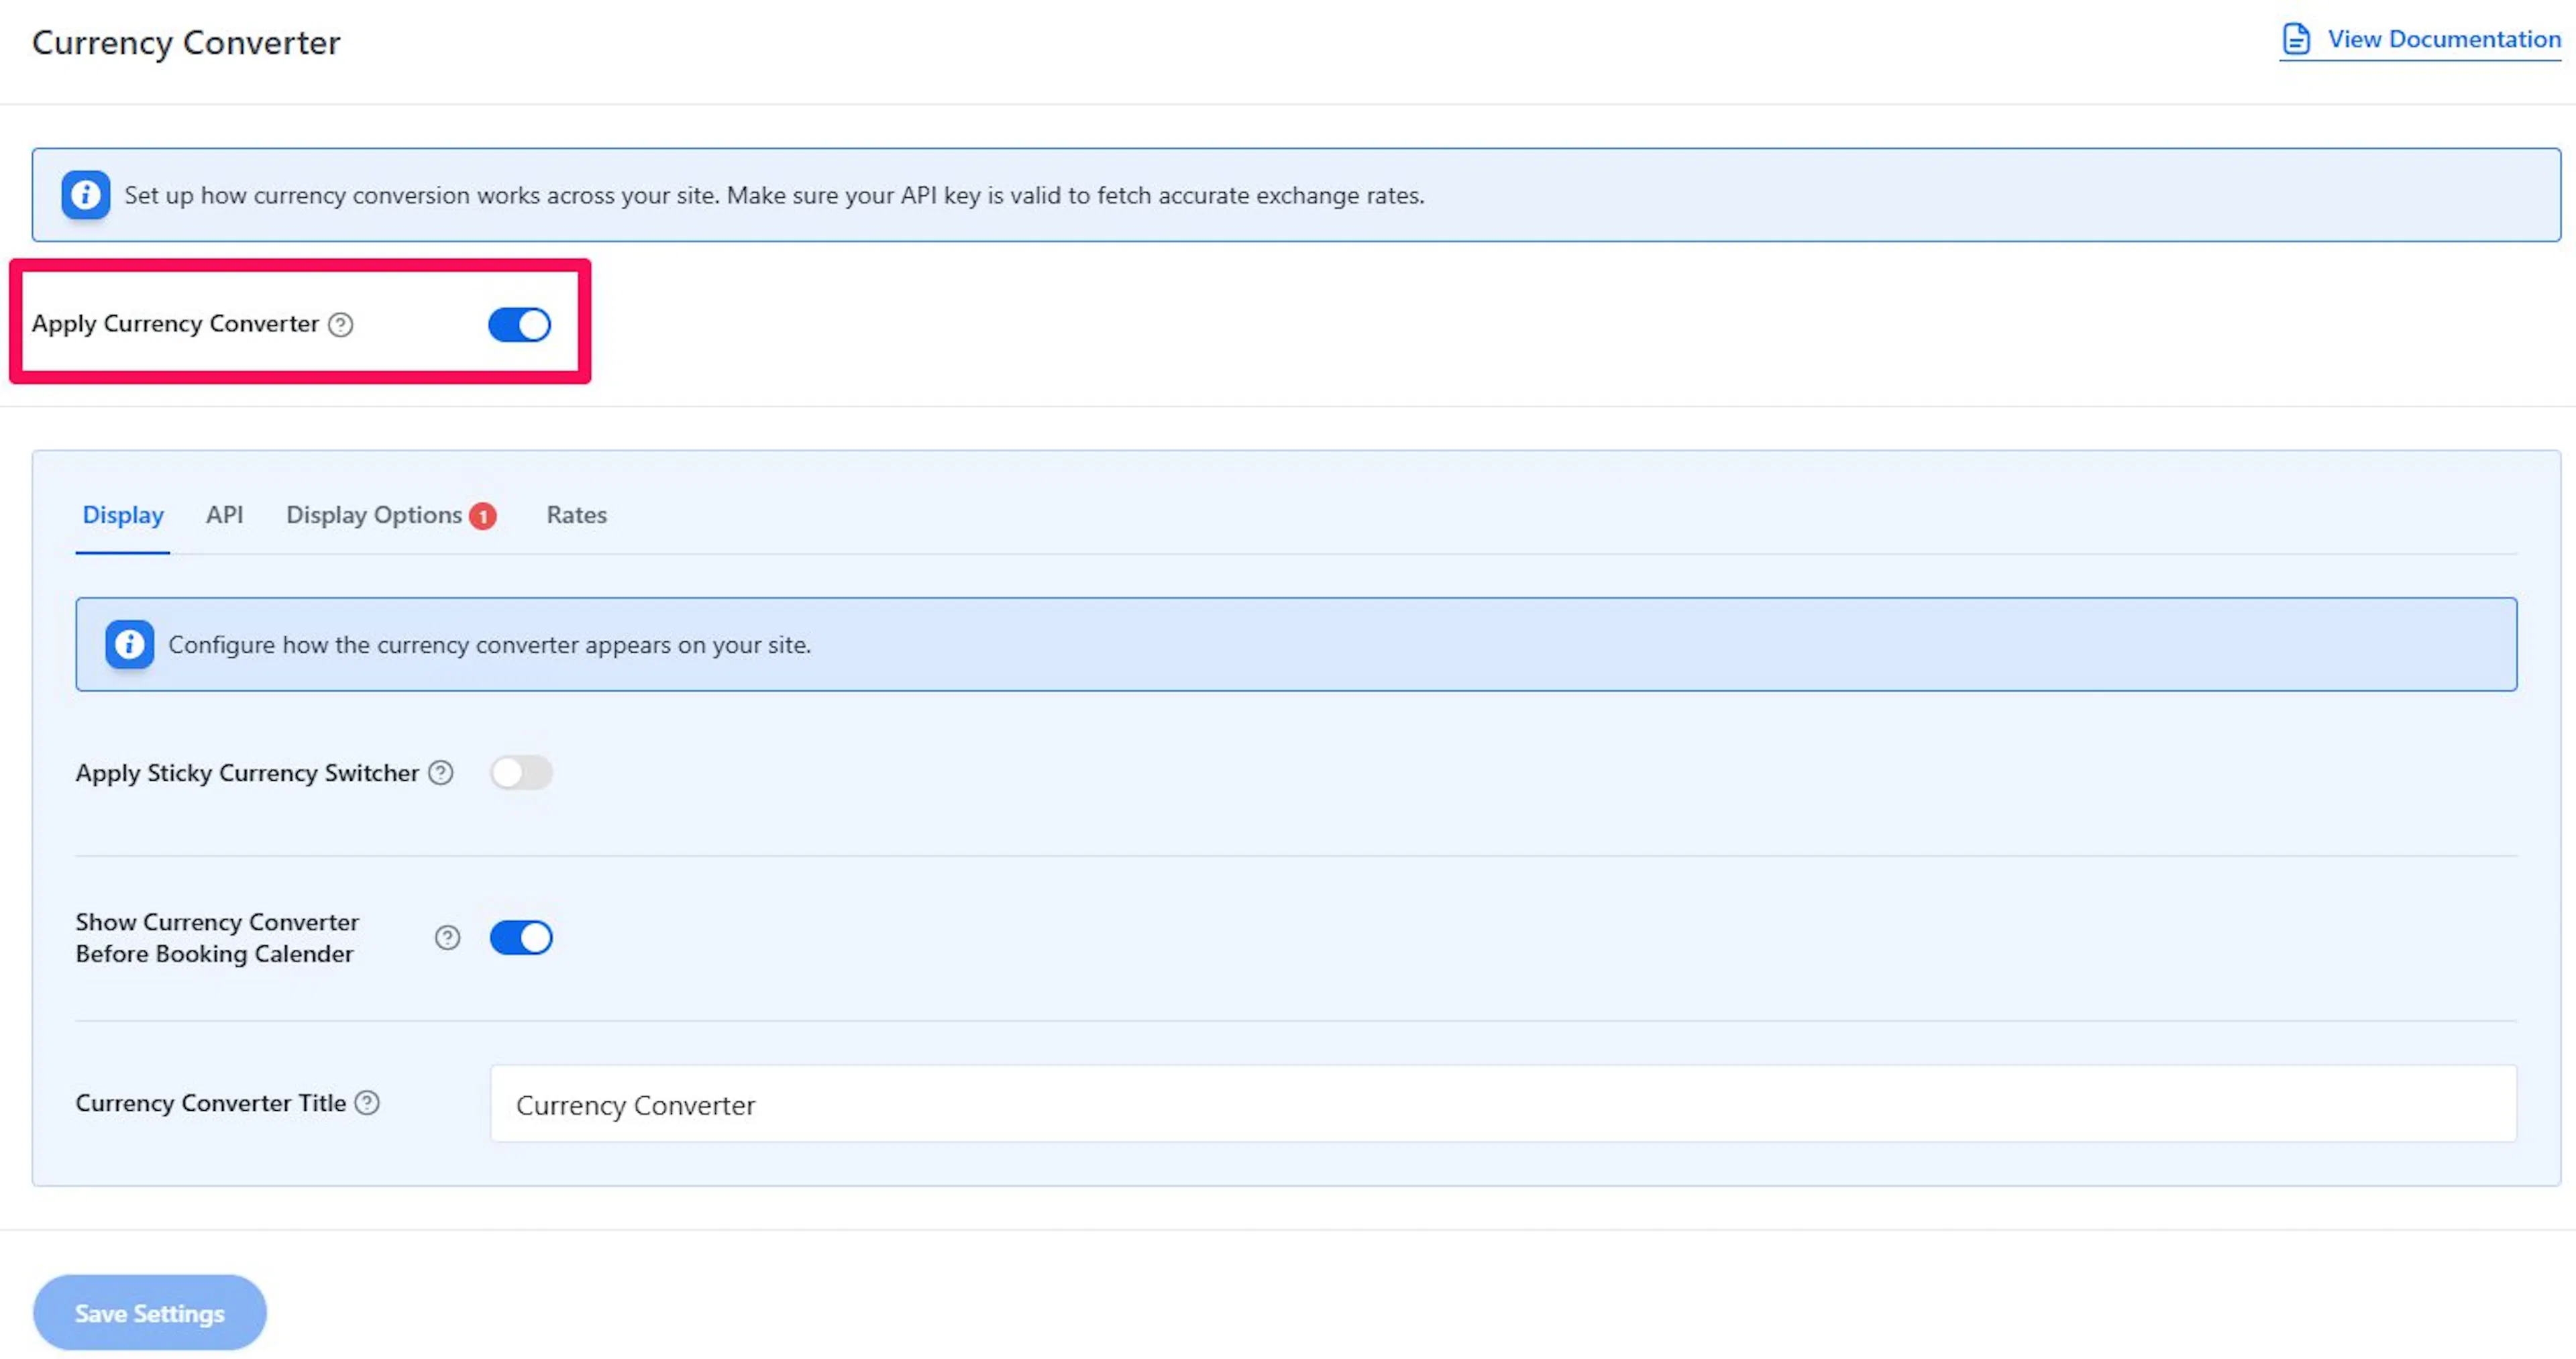
Turning on Apply Currency Converter doesn't show the switcher by itself. You also need at least one currency added under the Rates tab, or Geo Locate turned on under the Display Options tab. On top of that, under the Display tab, turn on either Apply Sticky Currency Switcher since the switcher only appears on the front end once this is on.
Save your changes before testing
This makes sure your new settings show up on your site.
After you change the settings, click Save. Then open one of your trip pages to check how the switcher looks.
You are now in the right place. Next, you can go through each tab one by one.
Display tab
This tab controls whether the switcher appears and where your visitors can find it. If you want a traveler to switch from USD to EUR while checking a Nepal trek or a family day tour, this is where that starts.
The front end is the part of your site visitors see - the pages they browse.
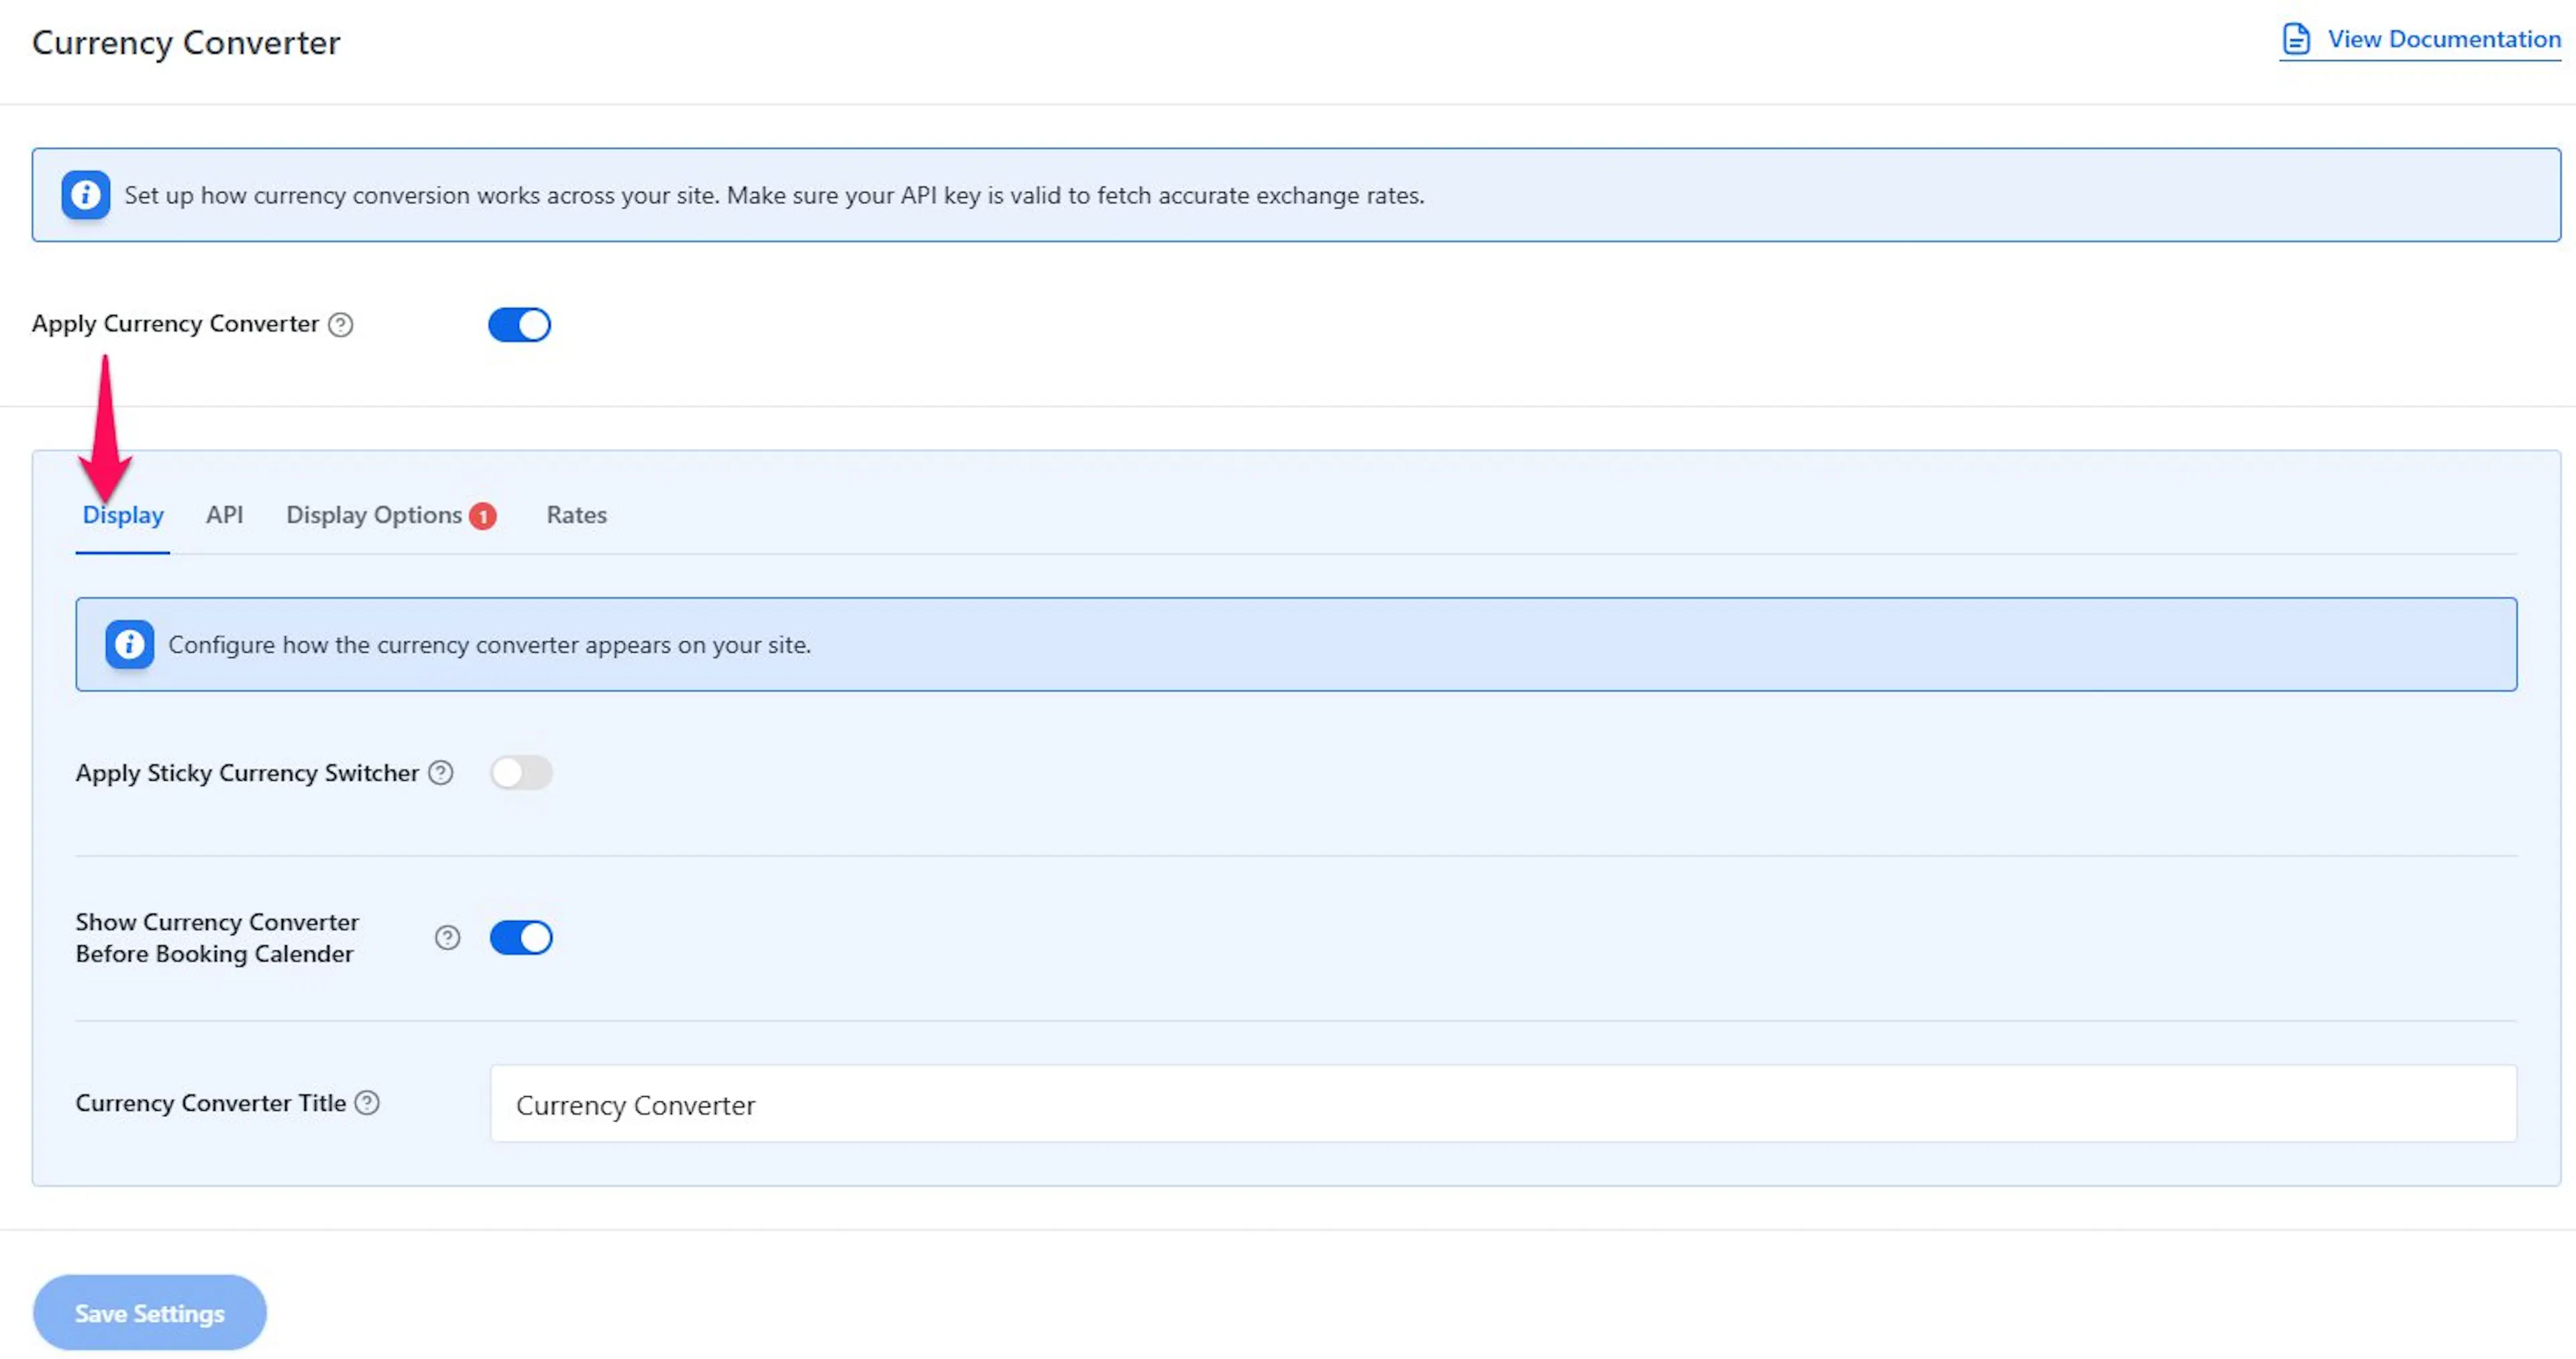
- Apply Sticky Currency Switcher: Keeps the currency switcher visible while someone scrolls. This helps on long trip pages with lots of itinerary details, photos, and inclusions.
- Show Currency Converter Before Booking Calendar: Places the switcher above the trip booking calendar so people can change currency before they look at dates and pricing.
- Currency Converter Title: Enter the heading shown above the switcher. For example, if someone lands on your Kilimanjaro package page, a title like Check Prices in Your Local Currency makes the purpose clear right away.
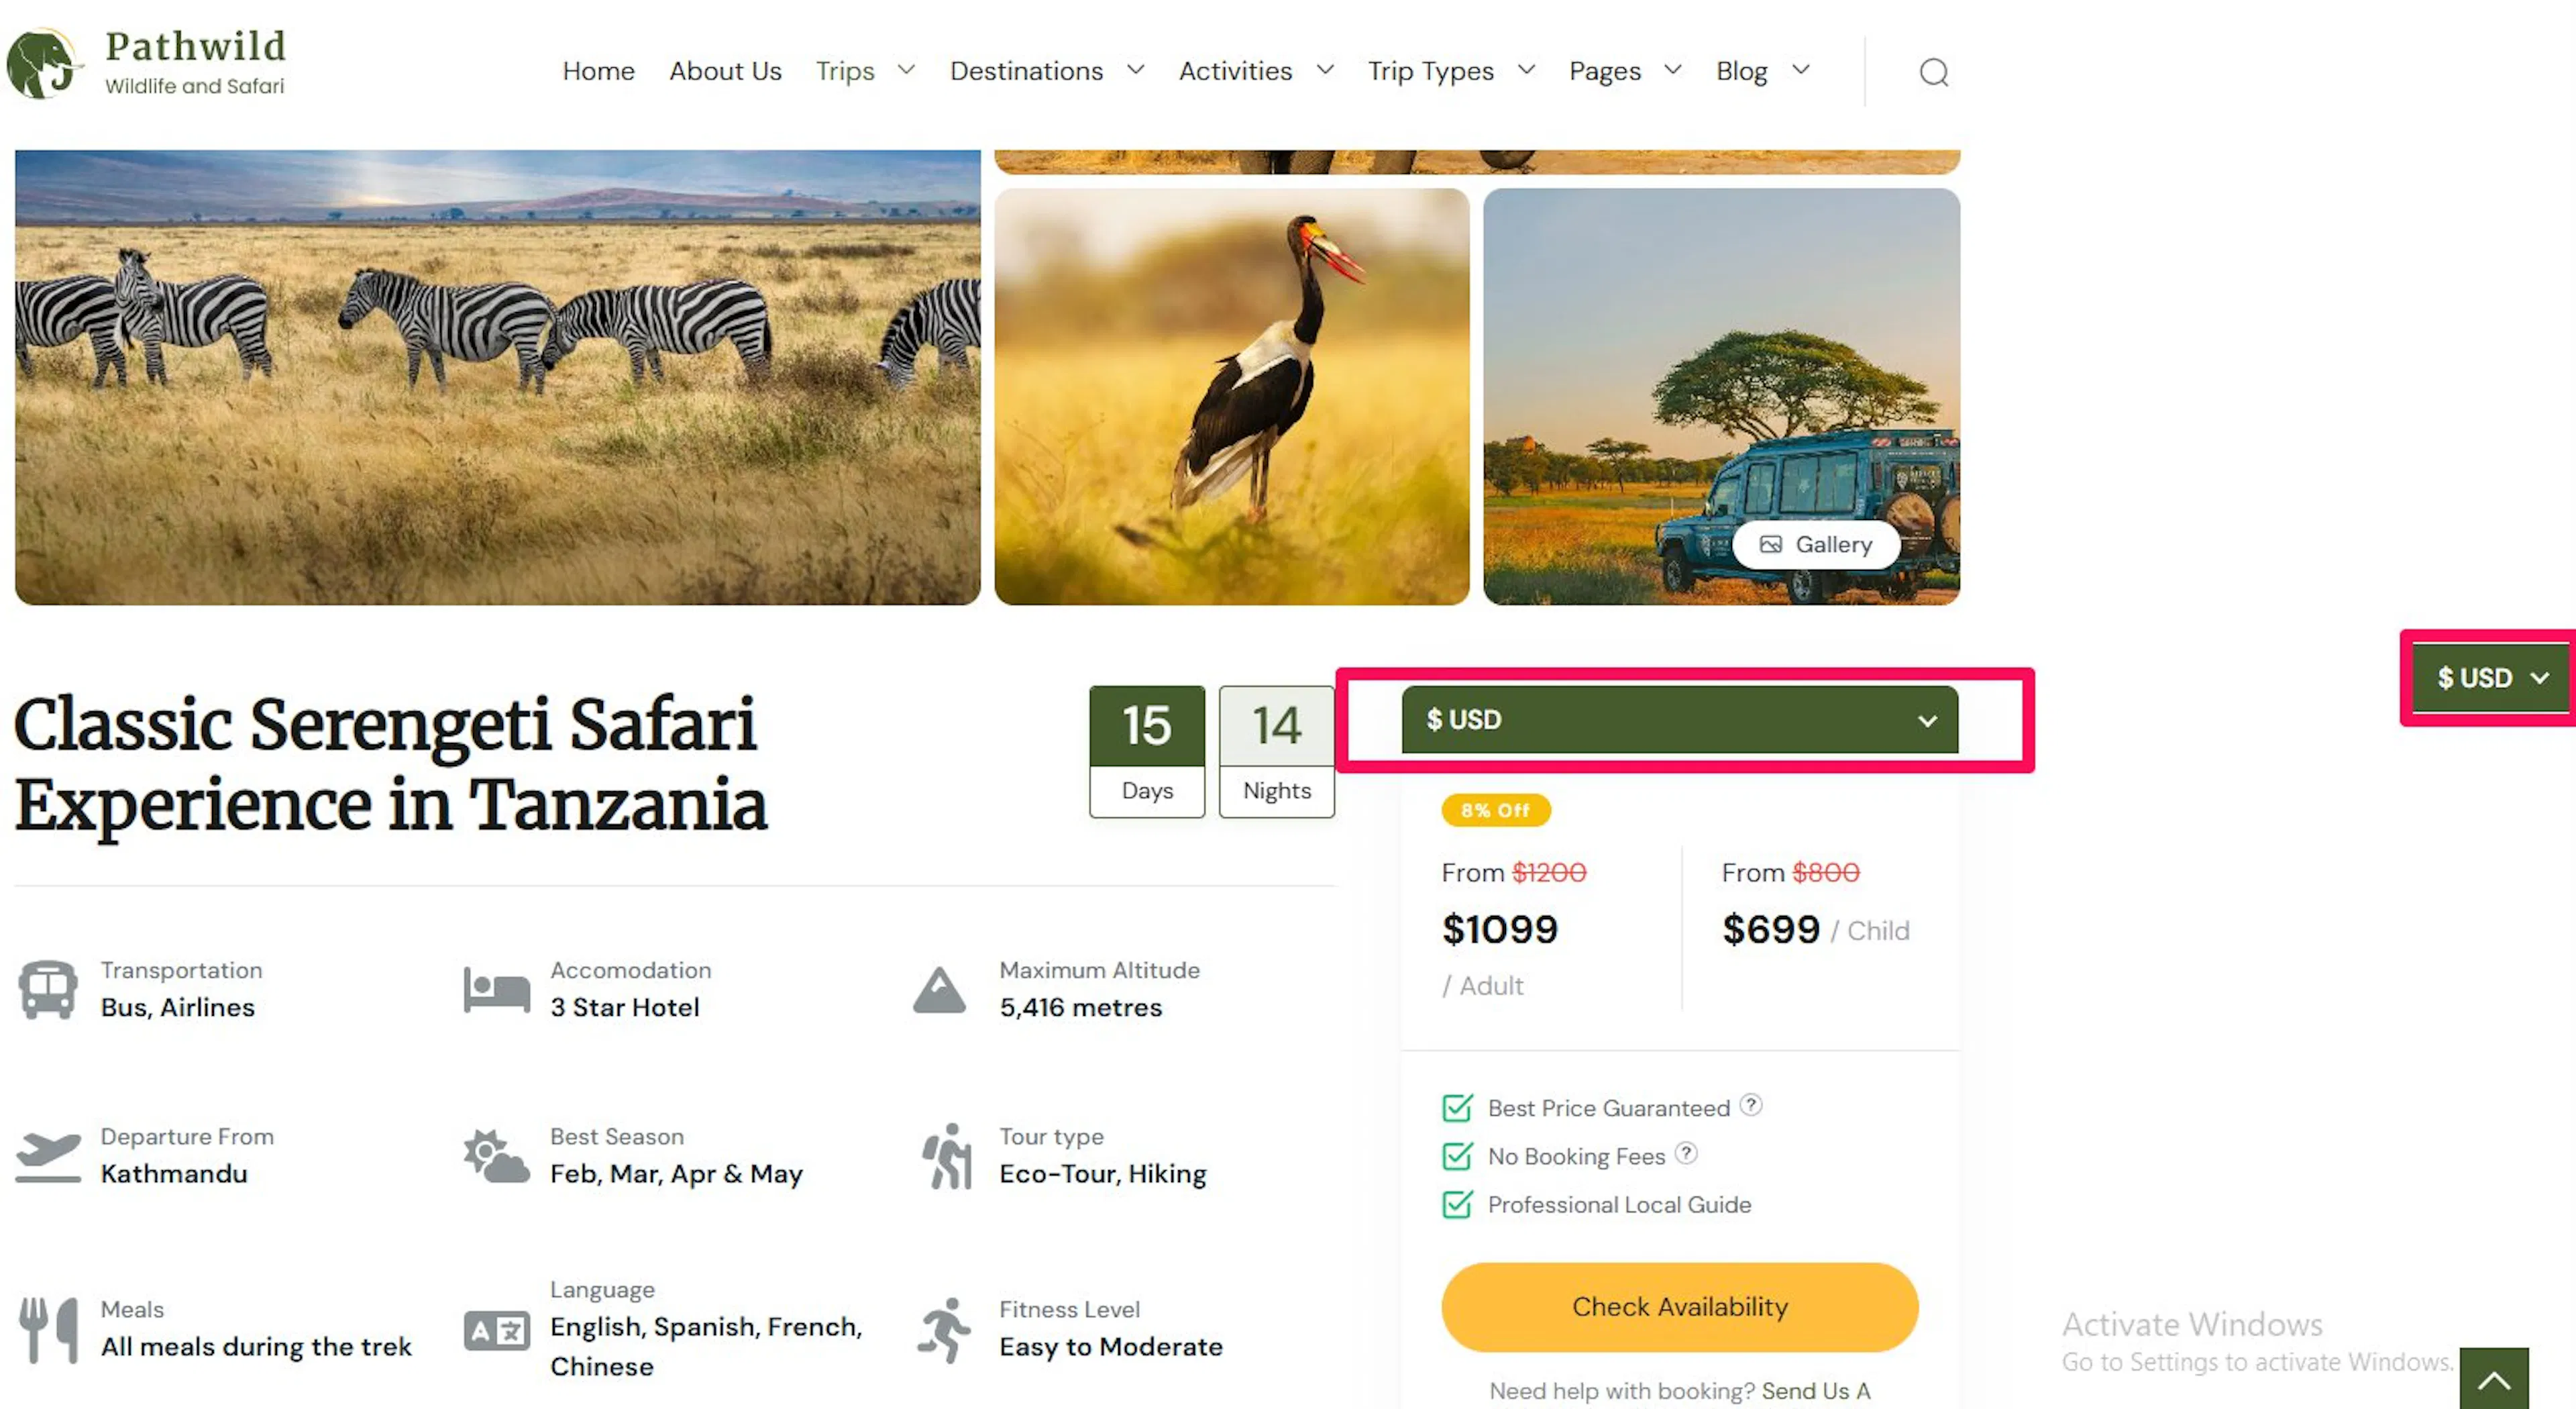
If you want the switcher to stand out more, the sticky option is often a good choice. Once the display settings are in place, you can connect the add-on to a live exchange-rate service.
API tab
This tab connects your site to a currency exchange service so it can pull in real-time rates. Without a valid key here, the add-on cannot update prices.
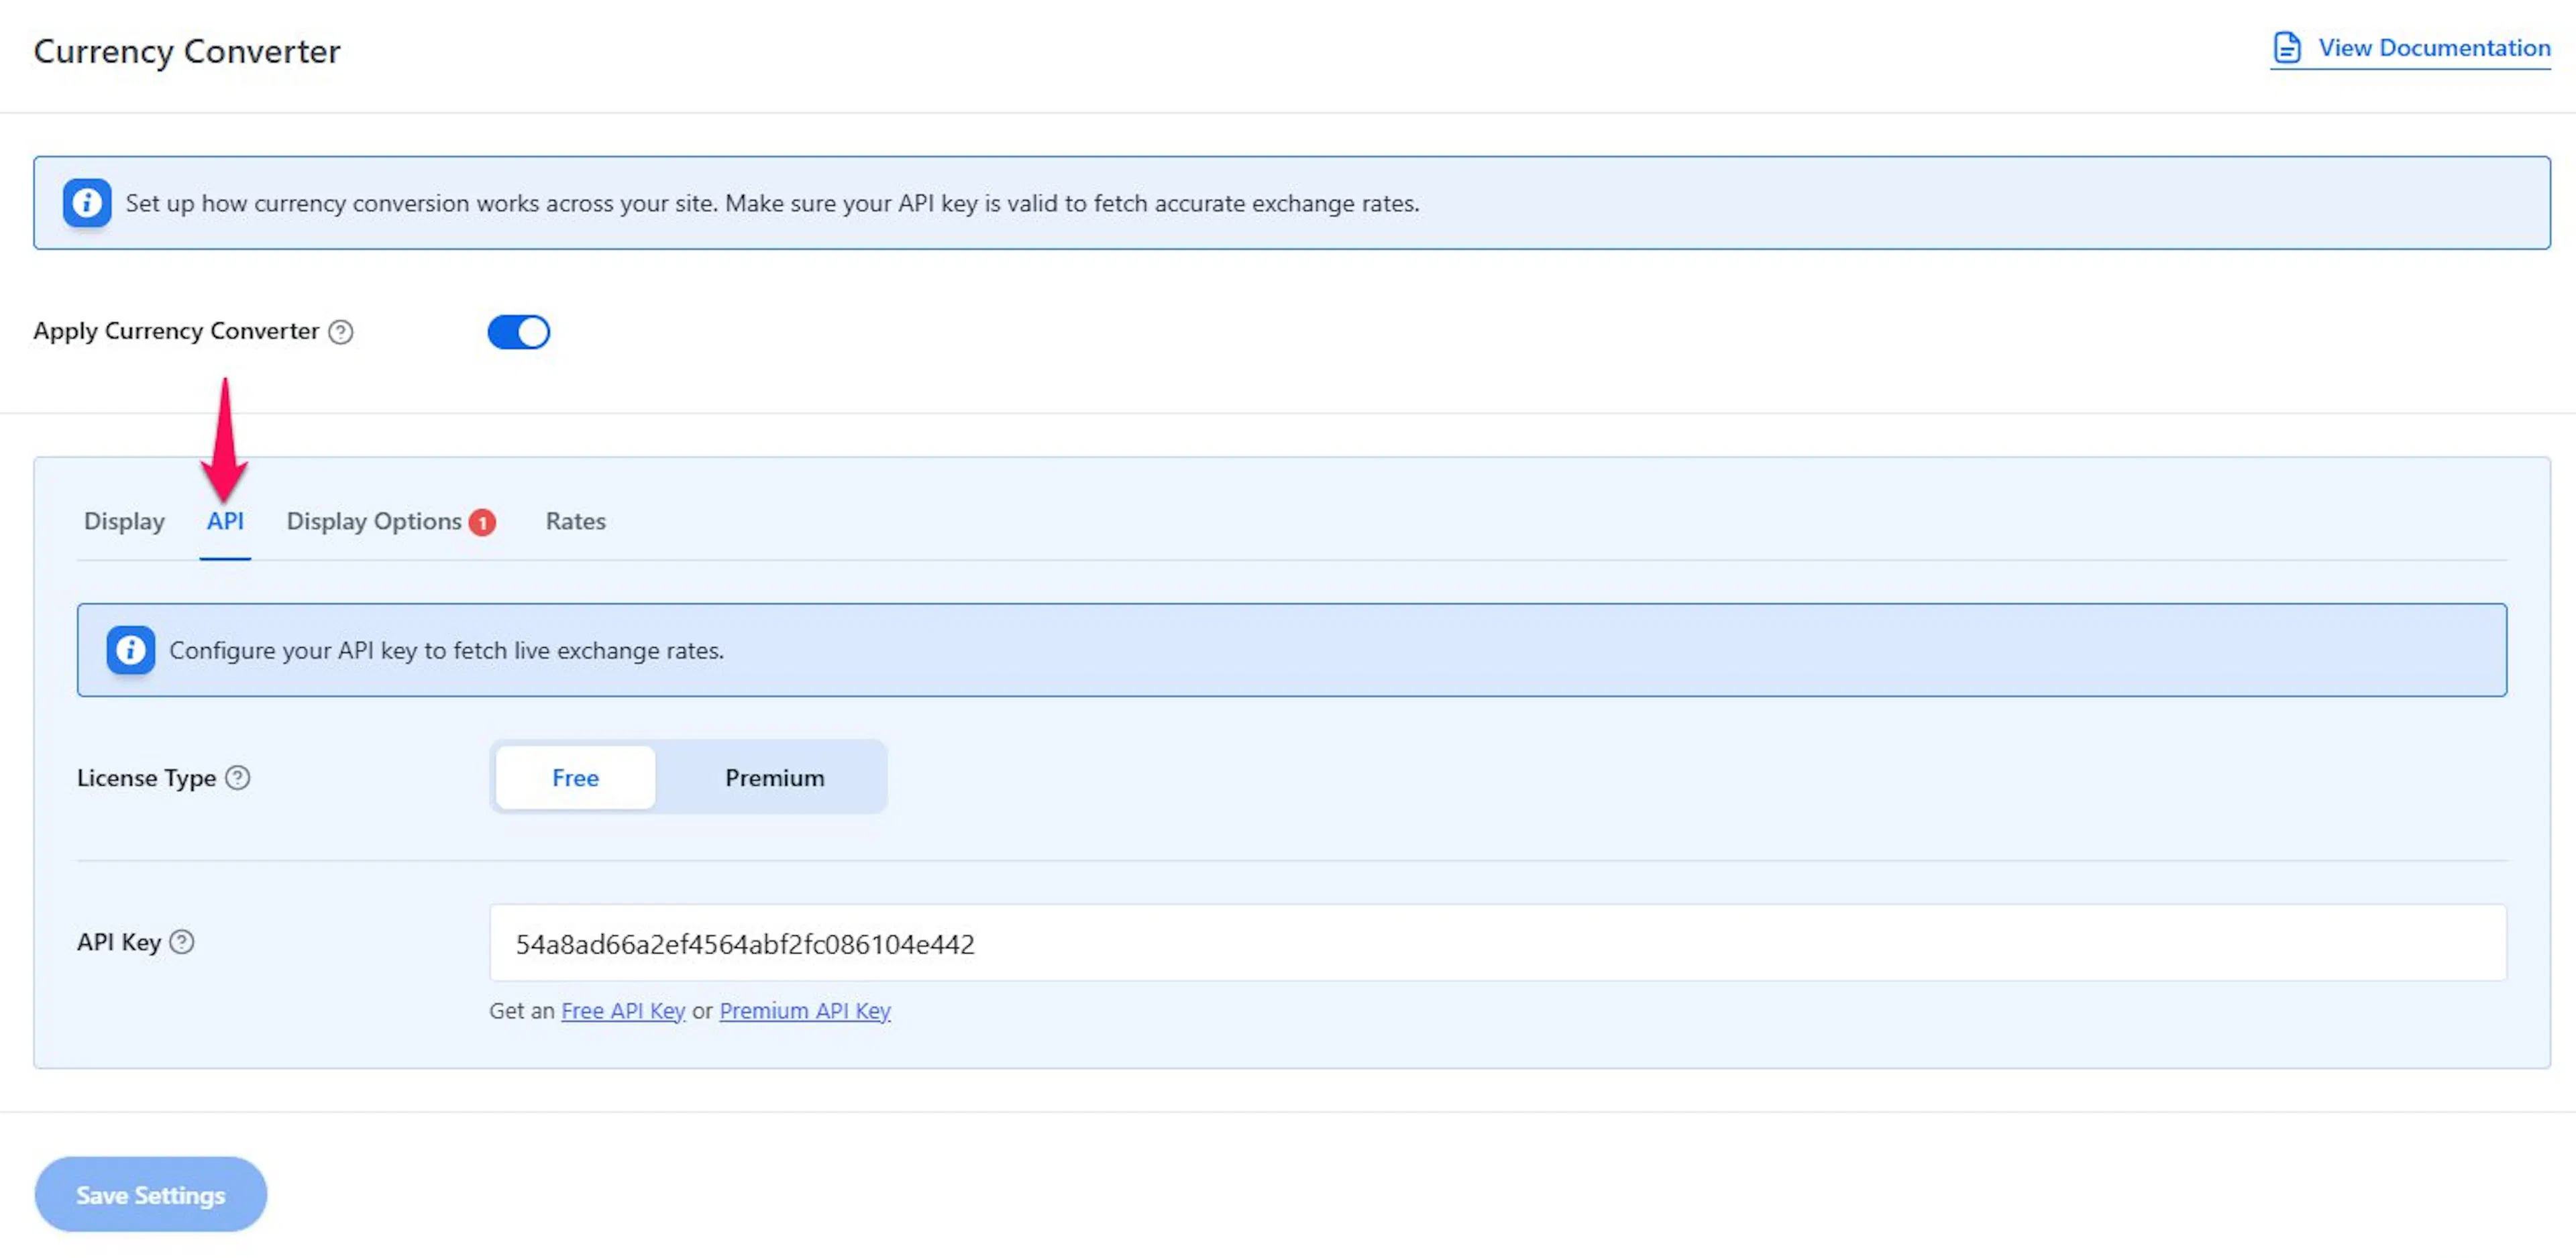
- License Type: Select Free or Premium to match the key you're about to enter. Premium supports faster updates and additional currencies.
- API Key: Paste your Free or Premium API key here.
You can use either of these services:
- Free API Key - good for basic use with limited requests.
- Premium API Key - a better fit for larger sites with more visitors.
If you get regular traffic from several countries, a premium plan may be worth it. That can matter if you run seasonal campaigns, group tours, or popular fixed departures that get lots of price checks every day.
If your key hits its request limit while saving, WPTE saves your settings anyway and shows a dismissible notice at the top of the dashboard telling you to upgrade your plan or try again later.
Once your key is in and verified, you can decide how visitors see prices update.
Display Options tab
This tab controls how your site chooses a currency and how often rates change. These settings matter most if you want prices to feel local without extra manual work from you.
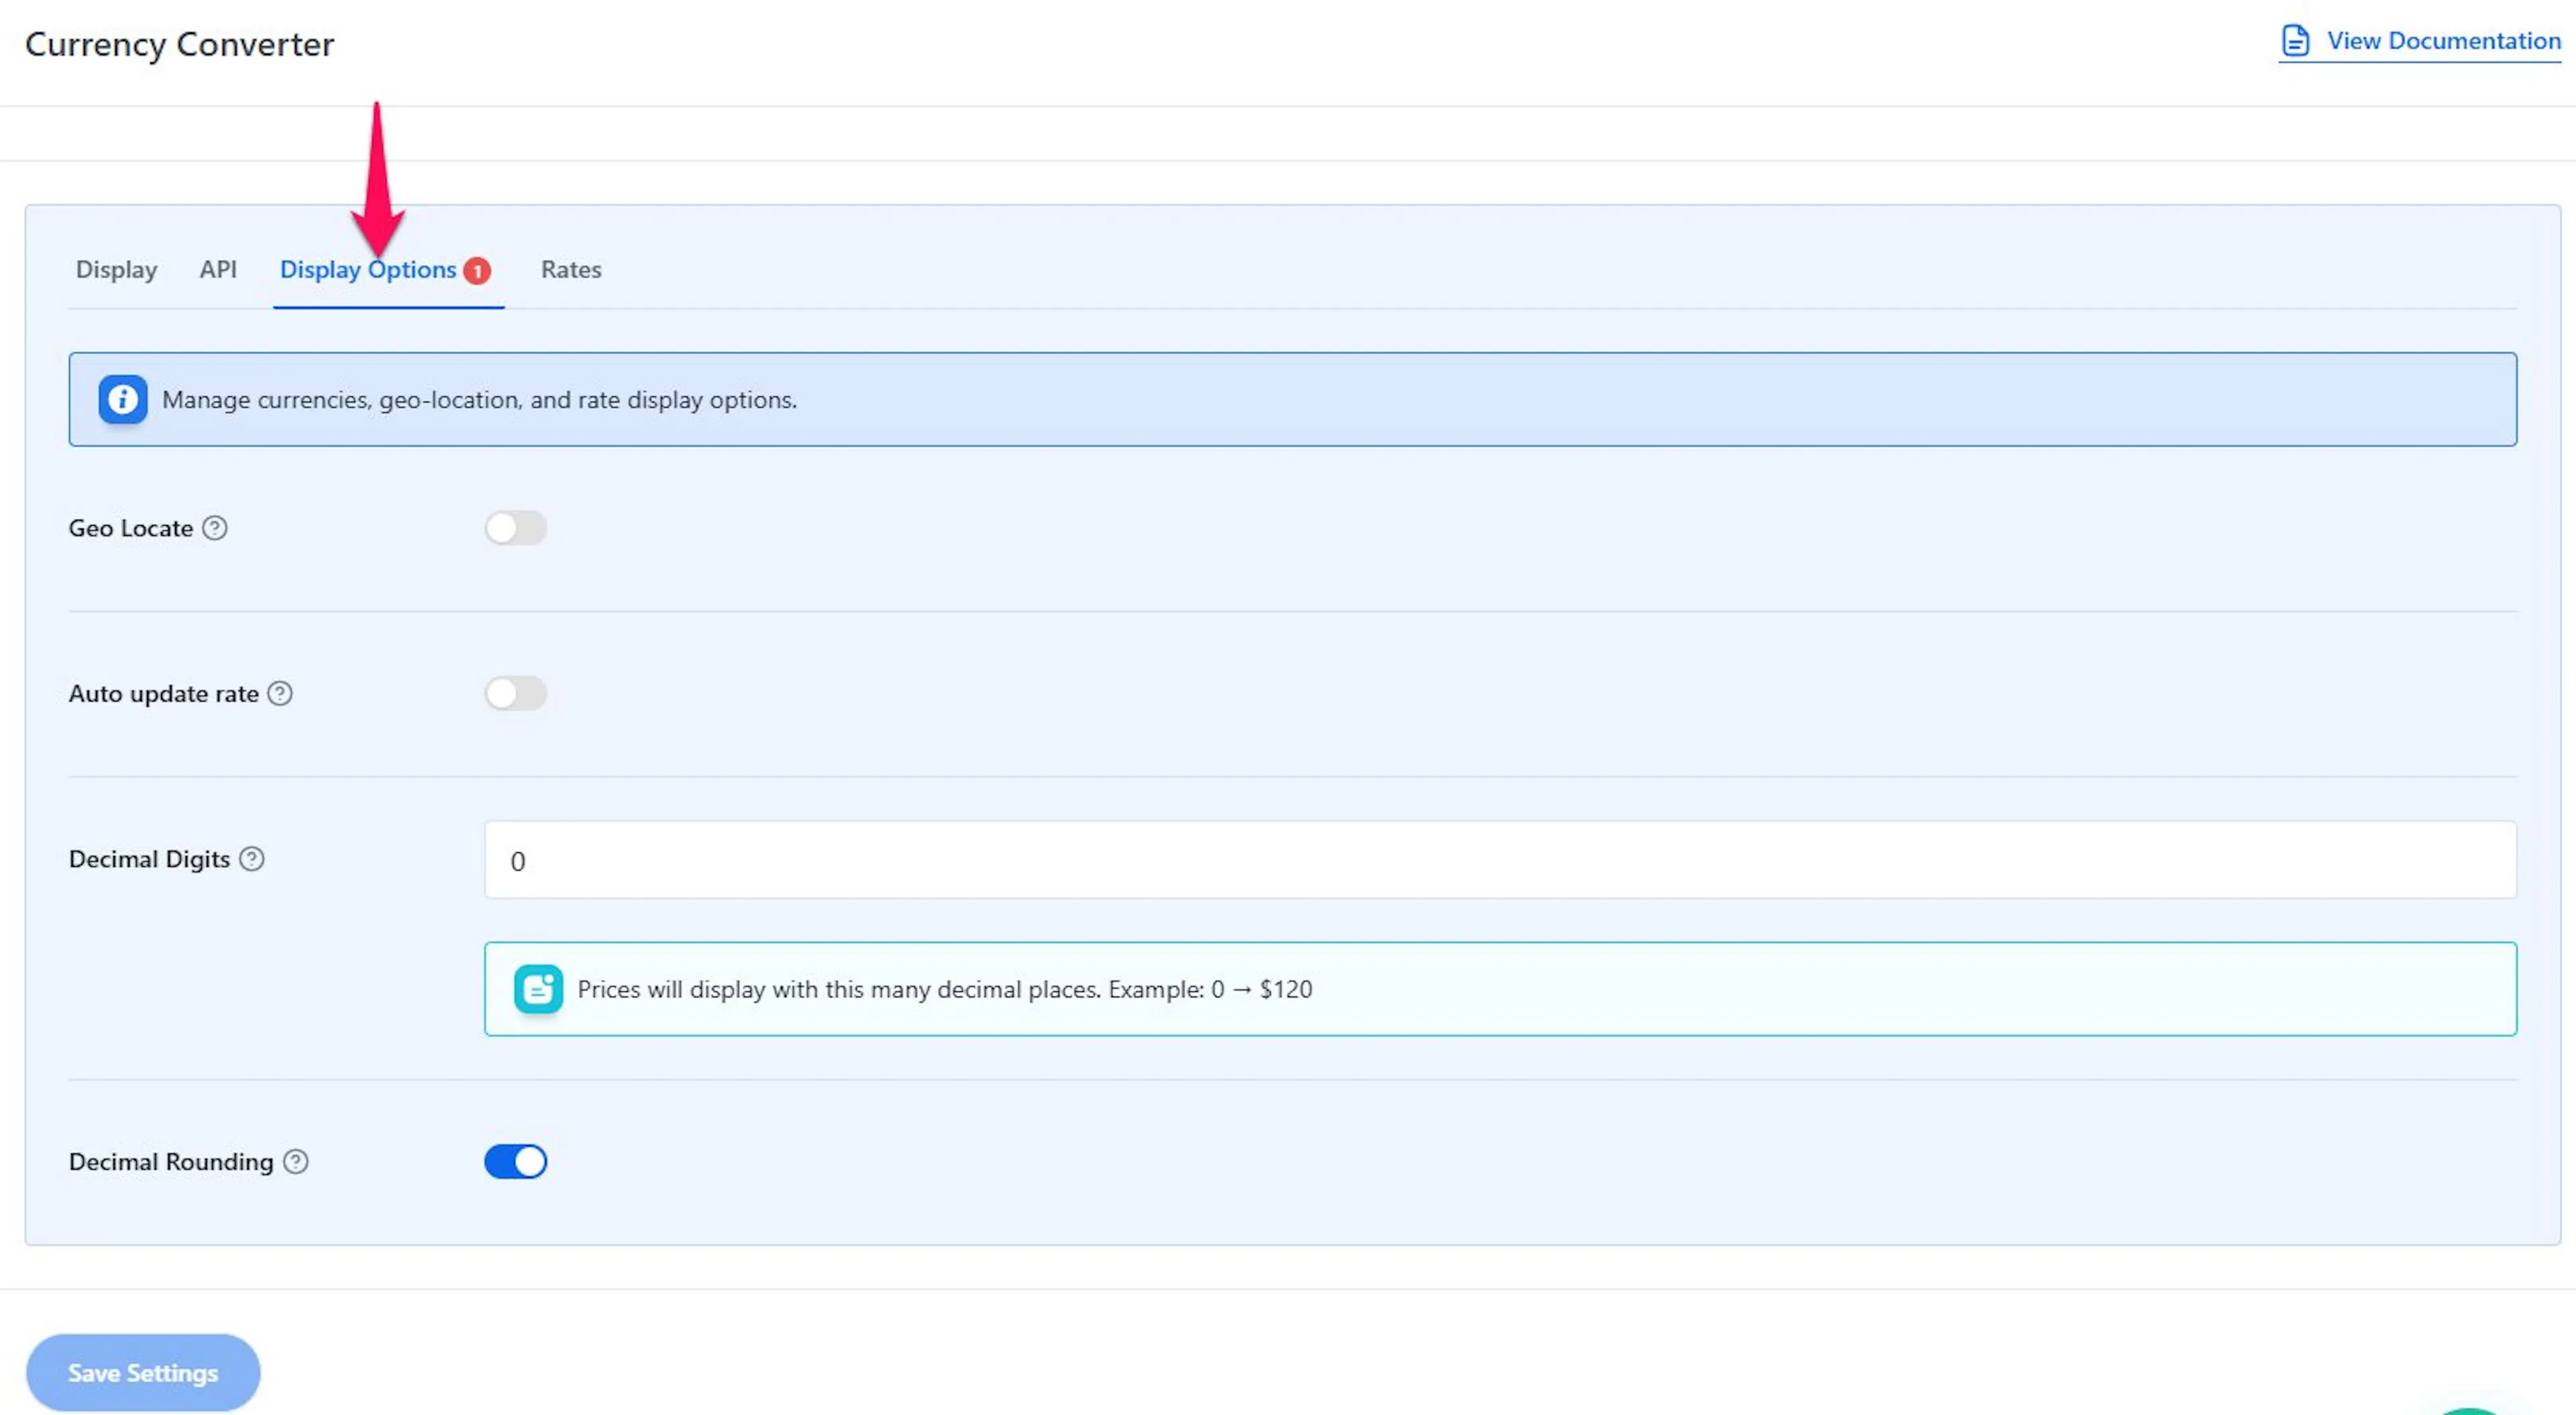
- Geo Locate: Detects a visitor's location and shows prices in that person's local currency. If someone in Germany visits your site, Geo Locate can show your Annapurna trek price in EUR. If someone in India visits, the same trip can show in INR.
Turning Geo Locate on reveals Detection Mode, which decides how the add-on figures out where a visitor is coming from.
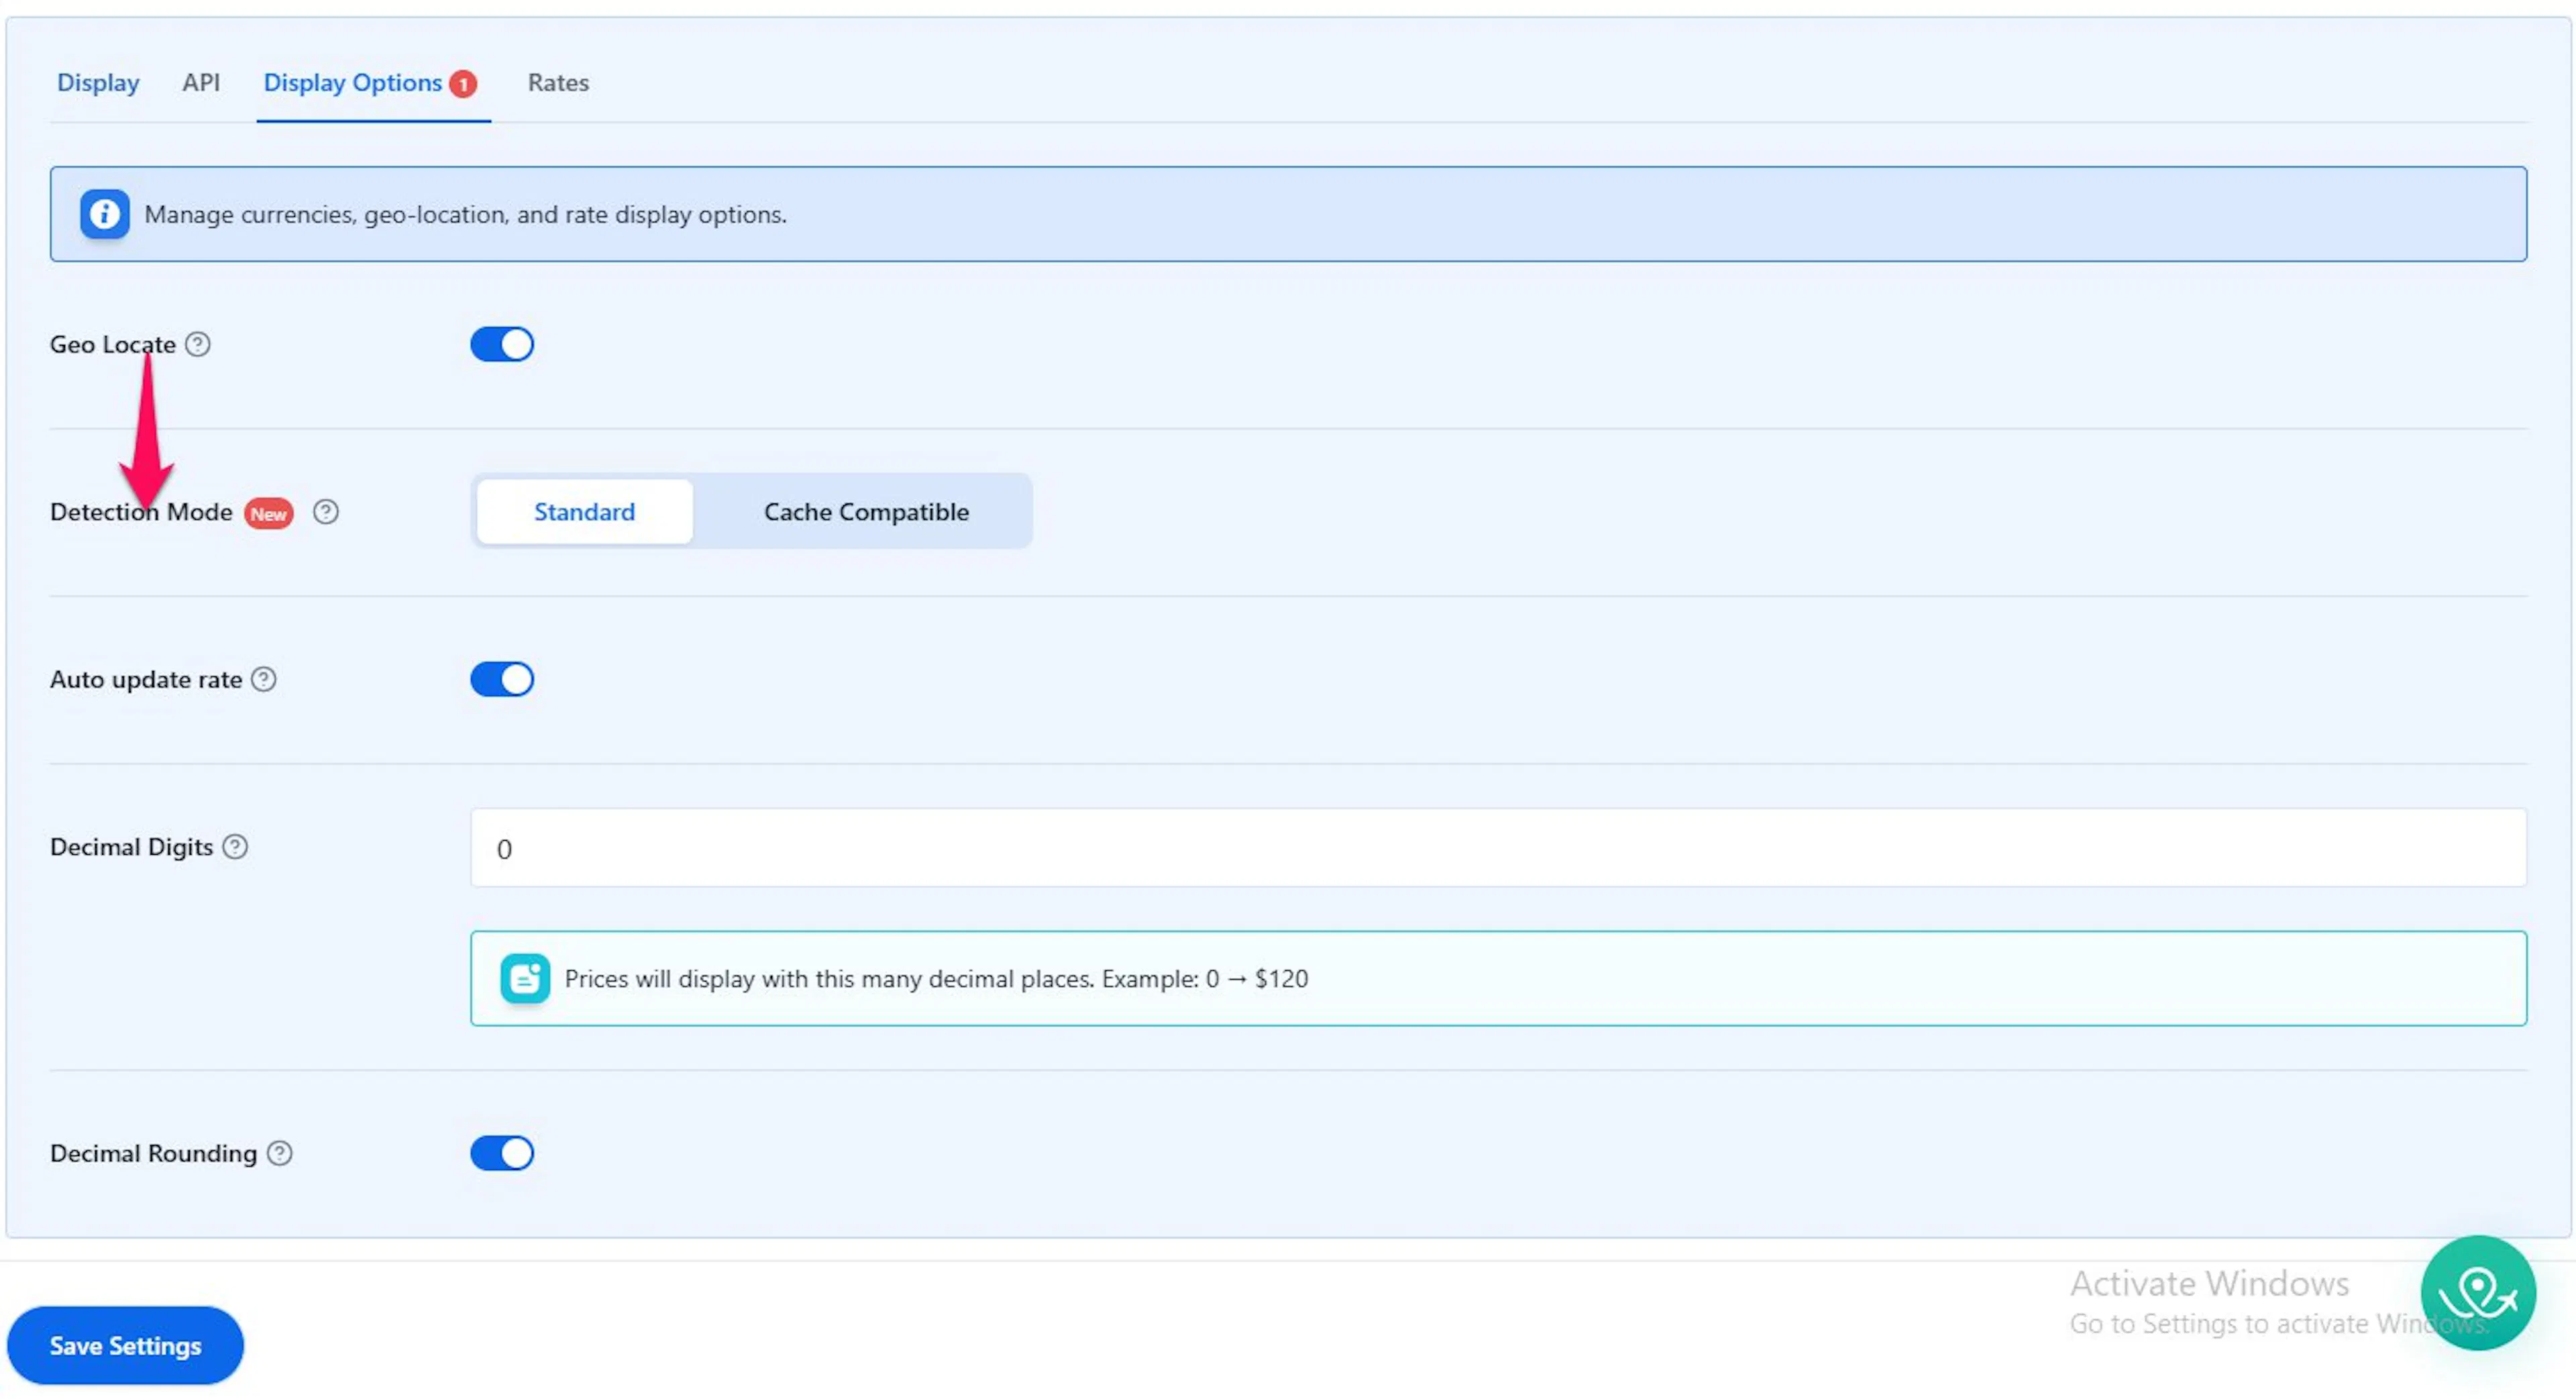
Standard
Use this when you want the plugin to detect a visitor's location on the server, before the page loads. This works well for sites that are not using full-page caching.
Cache Compatible
Use this if your site uses a full-page caching tool such as NitroPack, WP Rocket, or Cloudflare. A cache is a saved copy of a page that helps it load faster. In a normal cached setup, different visitors may all see the same saved version of the page, which can show the wrong currency. Cache Compatible mode detects the visitor's currency in the browser after the page loads, so it still works even though the page itself is cached.
Action required for cached sites. For Cache Compatible mode to work behind a full-page caching plugin, add the cookie cc_code to your caching plugin's Dynamic Content Cookies setting (sometimes called "Vary by cookie"), then purge your cache once after saving. Skip this step and the first cached copy of a page may keep showing the wrong currency, since visitors from different countries could all be served the same cached version.
On a visitor's first visit, the page reloads once automatically so the correct currency can appear. This is expected, not a bug. The currency is then remembered for future visits, so no further reloads happen.
- Auto Update Rate: Keeps exchange rates updated automatically from the API service.
Example: On Monday, 1 USD equals 0.92 EUR. A USD 1,000 trip shows as 920 EUR. On Friday, 1 USD equals 0.95 EUR. If Auto Update Rate is on, that same trip now shows as 950 EUR without you changing anything. If Auto Update Rate is off, the trip will still show 920 EUR until you update the rate yourself.
- Decimal Digits: Choose how many numbers appear after the decimal point. For example, 2 shows a converted price like 120.50.
- Decimal Rounding: Turn this on if you want cleaner whole-number prices. For example, 120.50 becomes 121.
If you sell premium private trips, rounded numbers can look cleaner. If you sell lower-priced day tours or gear rental add-ons, showing decimals may feel more accurate.
These settings do not apply to Geolocated Currency, Base Currency, or zero-decimal currencies.
Once these settings look right, you can choose which currencies people can switch to.
Rates tab
This is where you decide which currencies appear on the front end of your site. You do not need to add every currency in the world. Start with the ones your customers use most.
For example, if most of your bookings come from the UK, Australia, and Germany, you might start with GBP, AUD, and EUR.
Note: The Rates tab only shows the Add Currency option once you've entered a valid API key on the API tab.
Click Add Currency
This opens the list where you choose what currencies your visitors can use.
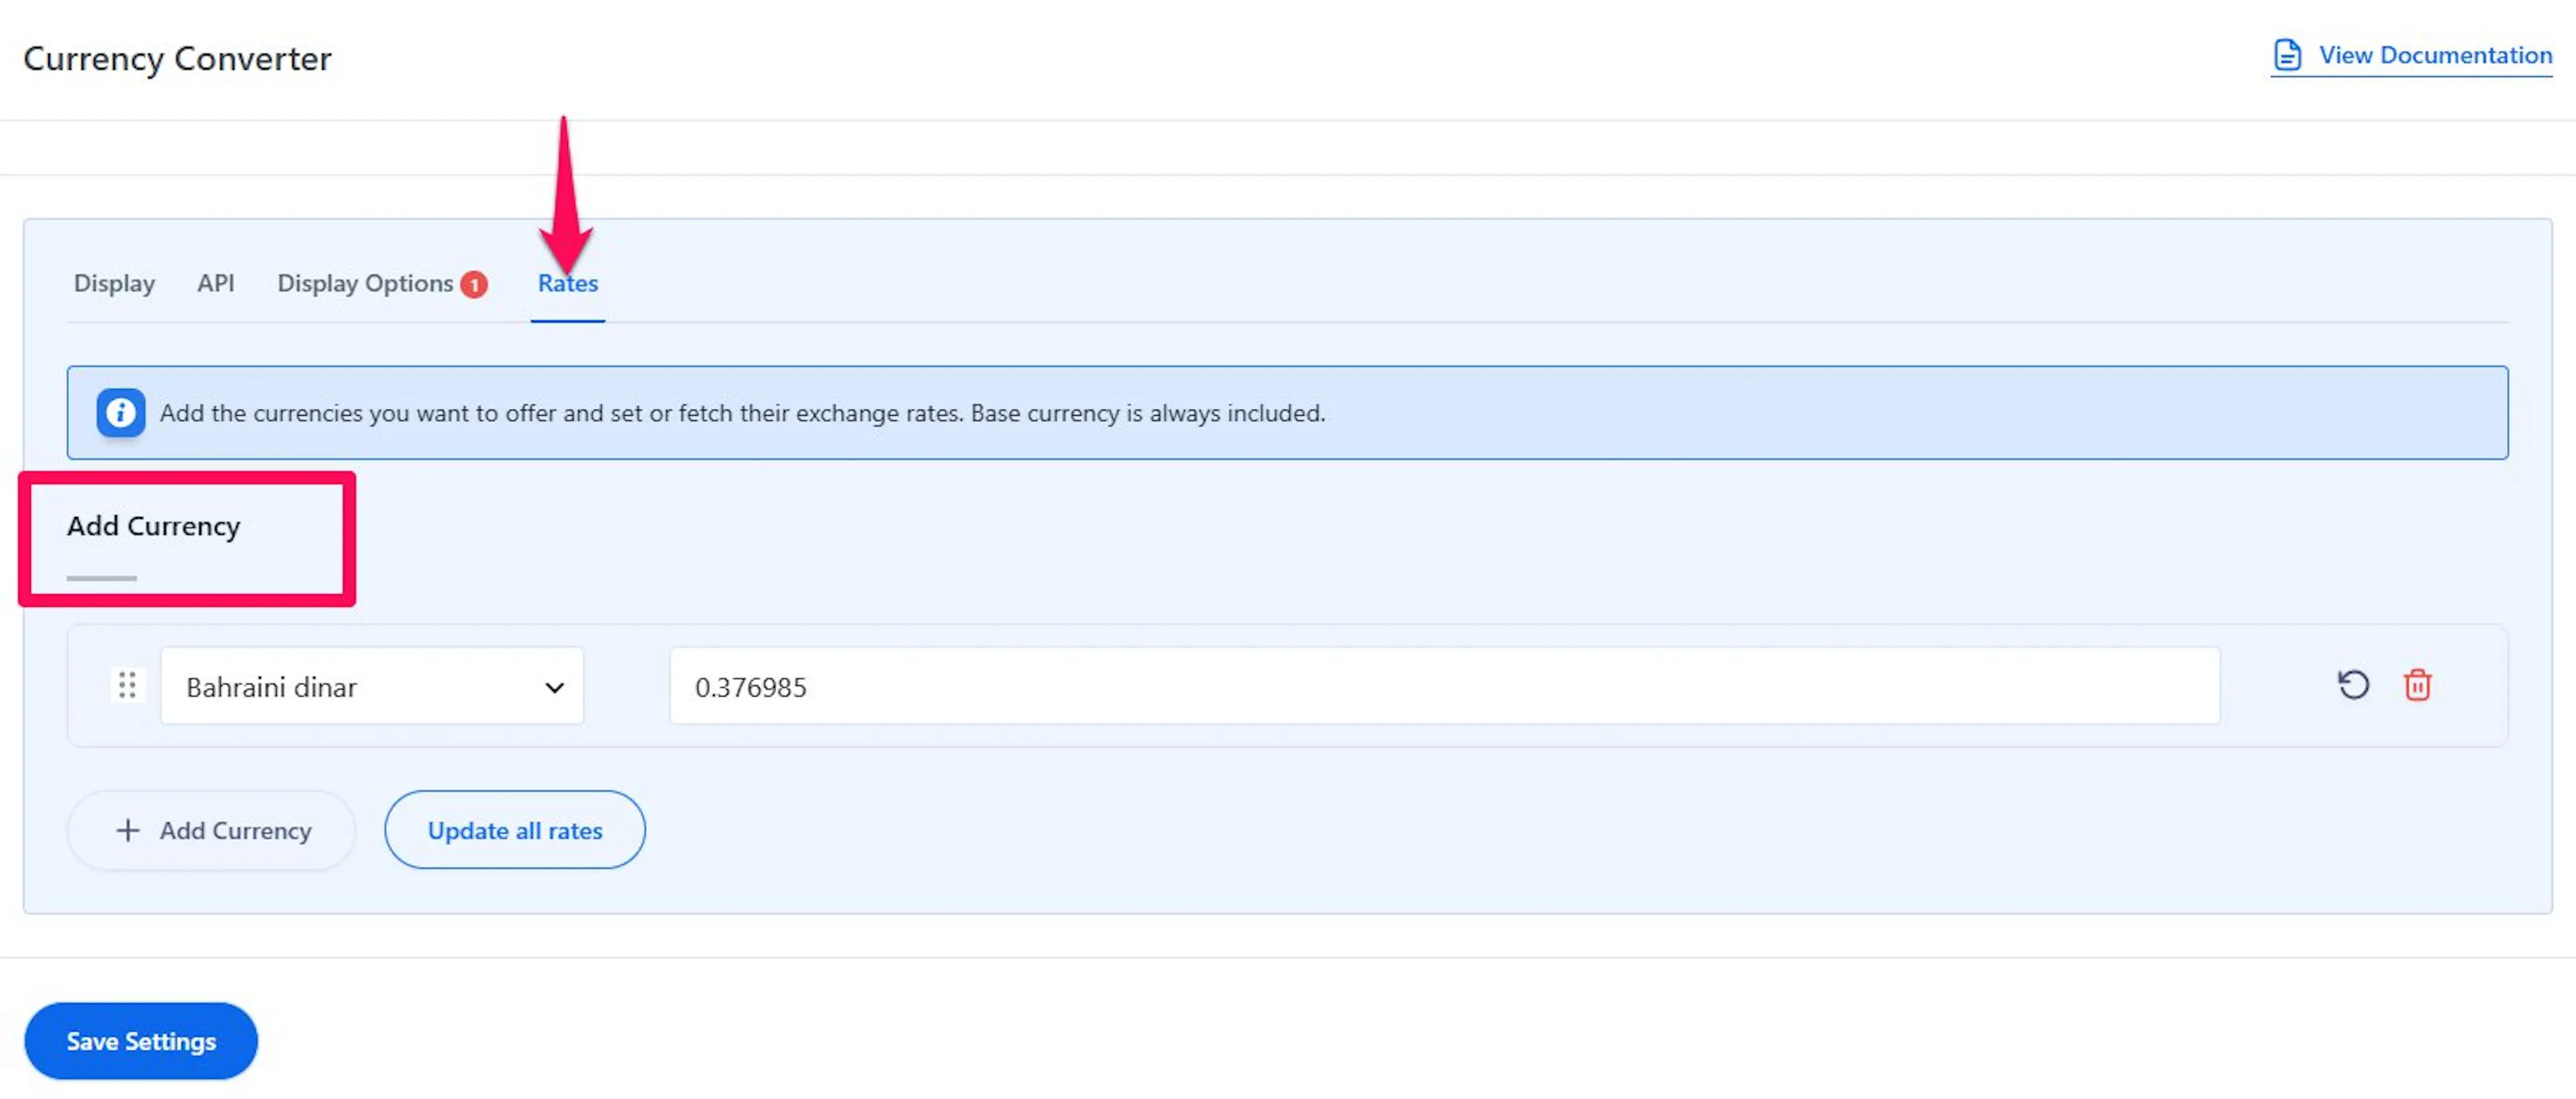
Click Add Currency to add a currency to the front end of your site.
Choose a currency code
This decides which currencies your travelers will see in the switcher.
Pick any currency code from the dropdown list. For example, you might add EUR and GBP for European travelers, or AUD for travelers booking adventure holidays from Australia.
Review the exchange rate
This helps you confirm that each added currency is pulling in a rate against your base currency.
Each added currency shows its exchange rate relative to your base currency. Examples include Bahraini Dinar 0.377, Afghan Afghani 71.255, Australian Dollar 1.67983, and Croatian Kuna 7.02062.
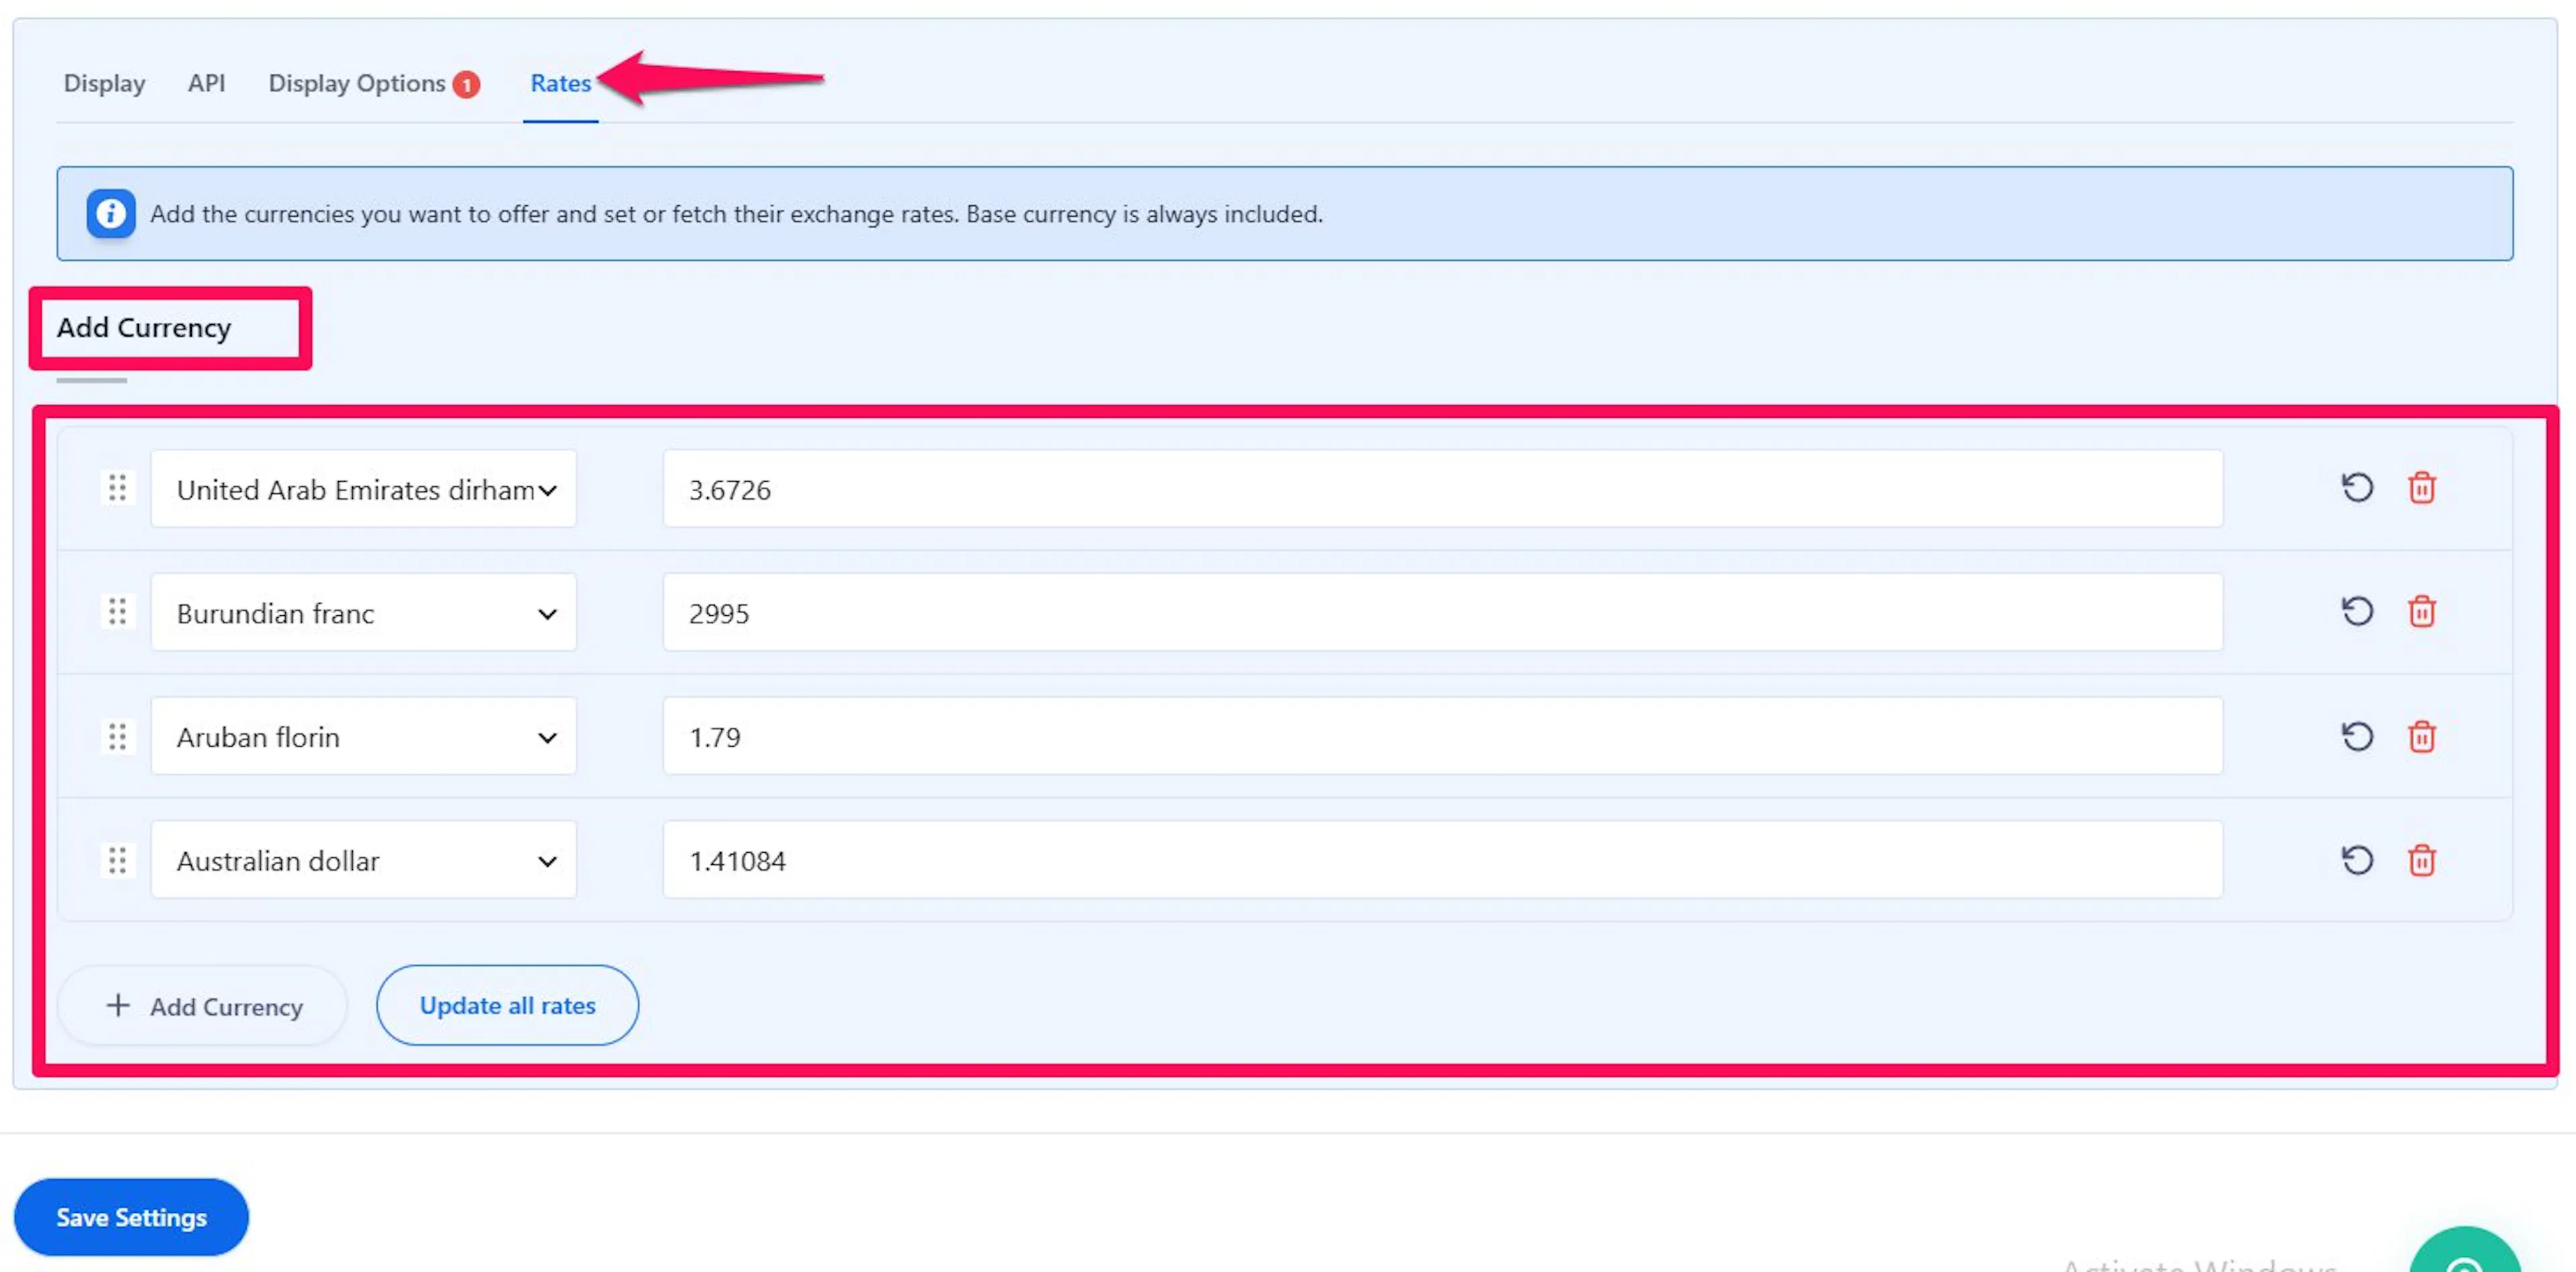
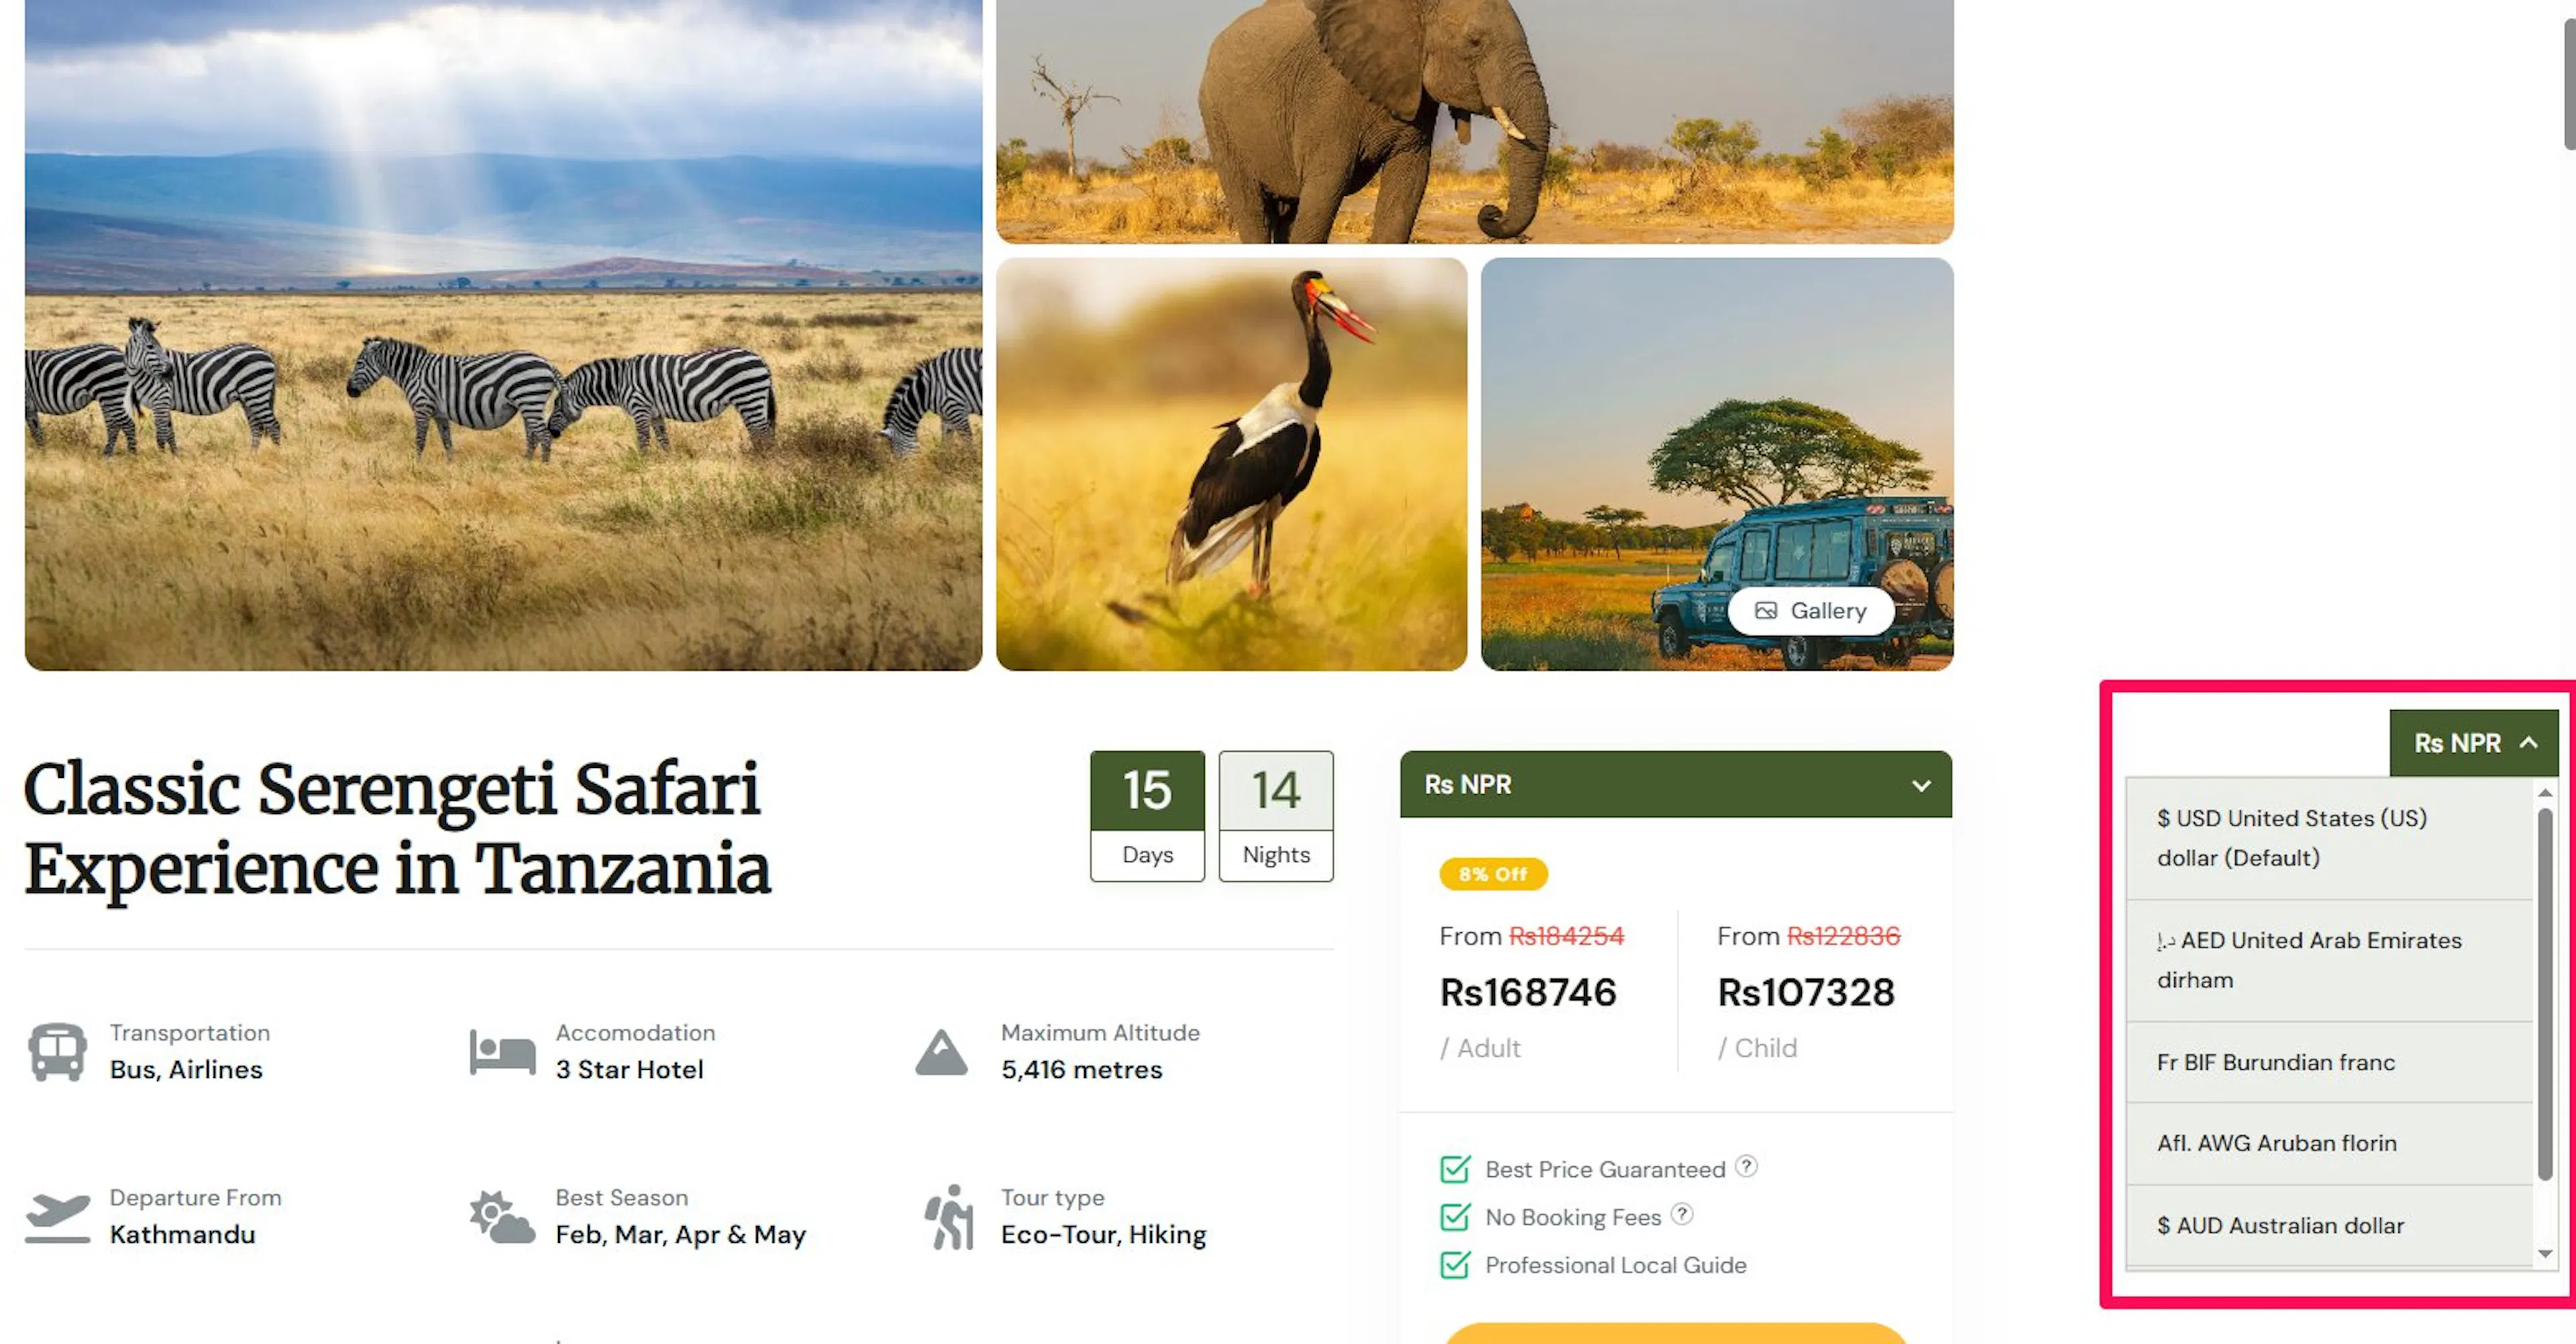
You can also choose how much control you want over the rates.
- Manually edit exchange rates if you want to use your own fixed custom rates.
- Update all rates with one click using your API key.
Manual rates can be useful if you want stable display pricing during a short seasonal campaign. That can help if you are promoting a fixed-price spring trek or a limited-time group discount.
At this point, the converter is ready. The last thing worth knowing is how to get the best results from it.
Good to know
These tips can help you keep the setup clear and useful for your travelers.
- Use Geo Locate when most of your customers come from different countries: This helps people see a familiar currency as soon as they land on your site.
- Turn on Cache Compatible mode if your site uses a caching plugin: Otherwise Geo Locate may show the same currency to everyone until a visitor manually reloads the page.
- Keep Auto Update Rate turned on if you want current prices: This is helpful when exchange rates move often.
- Add only the currencies you actually need: Too many options can make the switcher feel cluttered.
- Match currencies to your market: If most of your bookings come from Asia and Europe, focus on the currencies travelers in those regions use most.
- Don't expect the switcher at checkout: The switcher is hidden on the checkout page by design, since customers always pay in your base currency there.
A small, clear setup is usually better than a long list of rarely used currencies. If something does not look right, the fixes below are the best place to start.
Troubleshooting
The currency switcher isn't showing up on my trip page
Start with the basics. Make sure the add-on is installed and turned on under Extensions, then Currency Converter.
Next, check that Apply Currency Converter is turned on. Turning this on by itself won't make the switcher appear though. You also need at least one currency added under the Rates tab, or Geo Locate turned on under the Display Options tab.
Then check the Display tab. Turn on either Apply Sticky Currency Switcher, since the switcher won't show on the front end unless this is on.
Click Save after any change, then reload one of your trip pages and check again..
I see a notice saying the API request limit was reached
Your key hit its request limit while WPTE was verifying it. Your settings still saved, but WPTE couldn't confirm the key at that moment, so it shows a dismissible notice at the top of the dashboard. Wait for your plan's limit to reset, or move to a Premium key if this keeps happening.
My exchange rates are not updating
First, make sure Auto Update Rate is turned on in the Display Options tab. Then check that your API key on the API tab is still valid and active.
Free keys often have daily limits. If you have reached that limit, new rates may stop coming in until your quota resets.
The wrong currency is showing to visitors
If Geo Locate is turned on, the add-on may be choosing a currency based on the visitor's location. Turn it off if you want all visitors to choose their own currency instead.
If your site uses caching, switch Detection Mode to Cache Compatible. Then add the cc_code cookie to your caching plugin's Dynamic Content Cookies (or "Vary by cookie") setting and purge the cache once. Without that cookie step, cached visitors can keep seeing whichever currency was cached first.
The prices look wrong after I switch currency
Check the exchange rate shown in the Rates tab. If the rate looks old, click Update all rates or turn on Auto Update Rate.
If you entered a manual rate earlier, that custom number may be the reason. Review the rate you saved and adjust it if needed.
The switcher is not showing where I expected on the page
Turn on Show Currency Converter Before Booking Calendar if you want it above the booking area. Turn on Apply Sticky Currency Switcher if you want it to stay visible while people scroll. Both live under the Display tab.
After that, open a trip page and check both places. Look near the booking section and also look for the sticky switcher on the screen.
The switcher does not look right on mobile
Try one display option at a time. Some layouts look better above the booking calendar than in a floating position on a smaller screen.
Open a trip page on your phone after each change. That makes it easier to see which option feels clearer for your customers.
Visitors see the wrong currency until the page reloads
This can happen on sites that use full-page caching. Move Detection Mode to Cache Compatible if you use tools such as NitroPack, WP Rocket, or Cloudflare, and make sure the cc_code cookie is added to that plugin's cookie exceptions. That mode allows one automatic reload so the correct currency can appear for each visitor, then remembers it for later visits.
Frequently asked questions
If you're still stuck or have a question we didn't cover, our support team is happy to help. Reach out at our support page and we'll get you sorted.