

Travel Muni Theme: Installation and Getting Started
Install the Travel Muni theme, import demo content, add your logo and branding, and build a homepage that turns visitors into booked travelers.
Getting started with Travel Muni
Set up your Travel Muni website from start to finish. Add your logo, contact details, homepage sections, blog settings, and footer information. Travelers can then find and book your trips.
Travel Muni is a WordPress theme made for tour and travel businesses. A WordPress theme controls your website's colors, layout, fonts, and page structure.
To search this page, press Ctrl+F on your keyboard. Your browser will show a search box. Type a word such as "logo" or "homepage."
What you'll need before you start
Travel Muni needs WordPress version 4.5 or newer. WordPress is the software that runs your website. A newer version gives you the latest features and security fixes. You can download the latest version from the WordPress repository.
Before you begin, make sure you have:
- Checked your WordPress version and updated it if needed.
- Installed and activated the Travel Muni theme.
- Installed the recommended plugins. Some Travel Muni features need these plugins to work.
Check and update your WordPress version
Updating WordPress first gives you a better starting point. You will find the update area on the left sidebar of your WordPress dashboard.
Open the update page
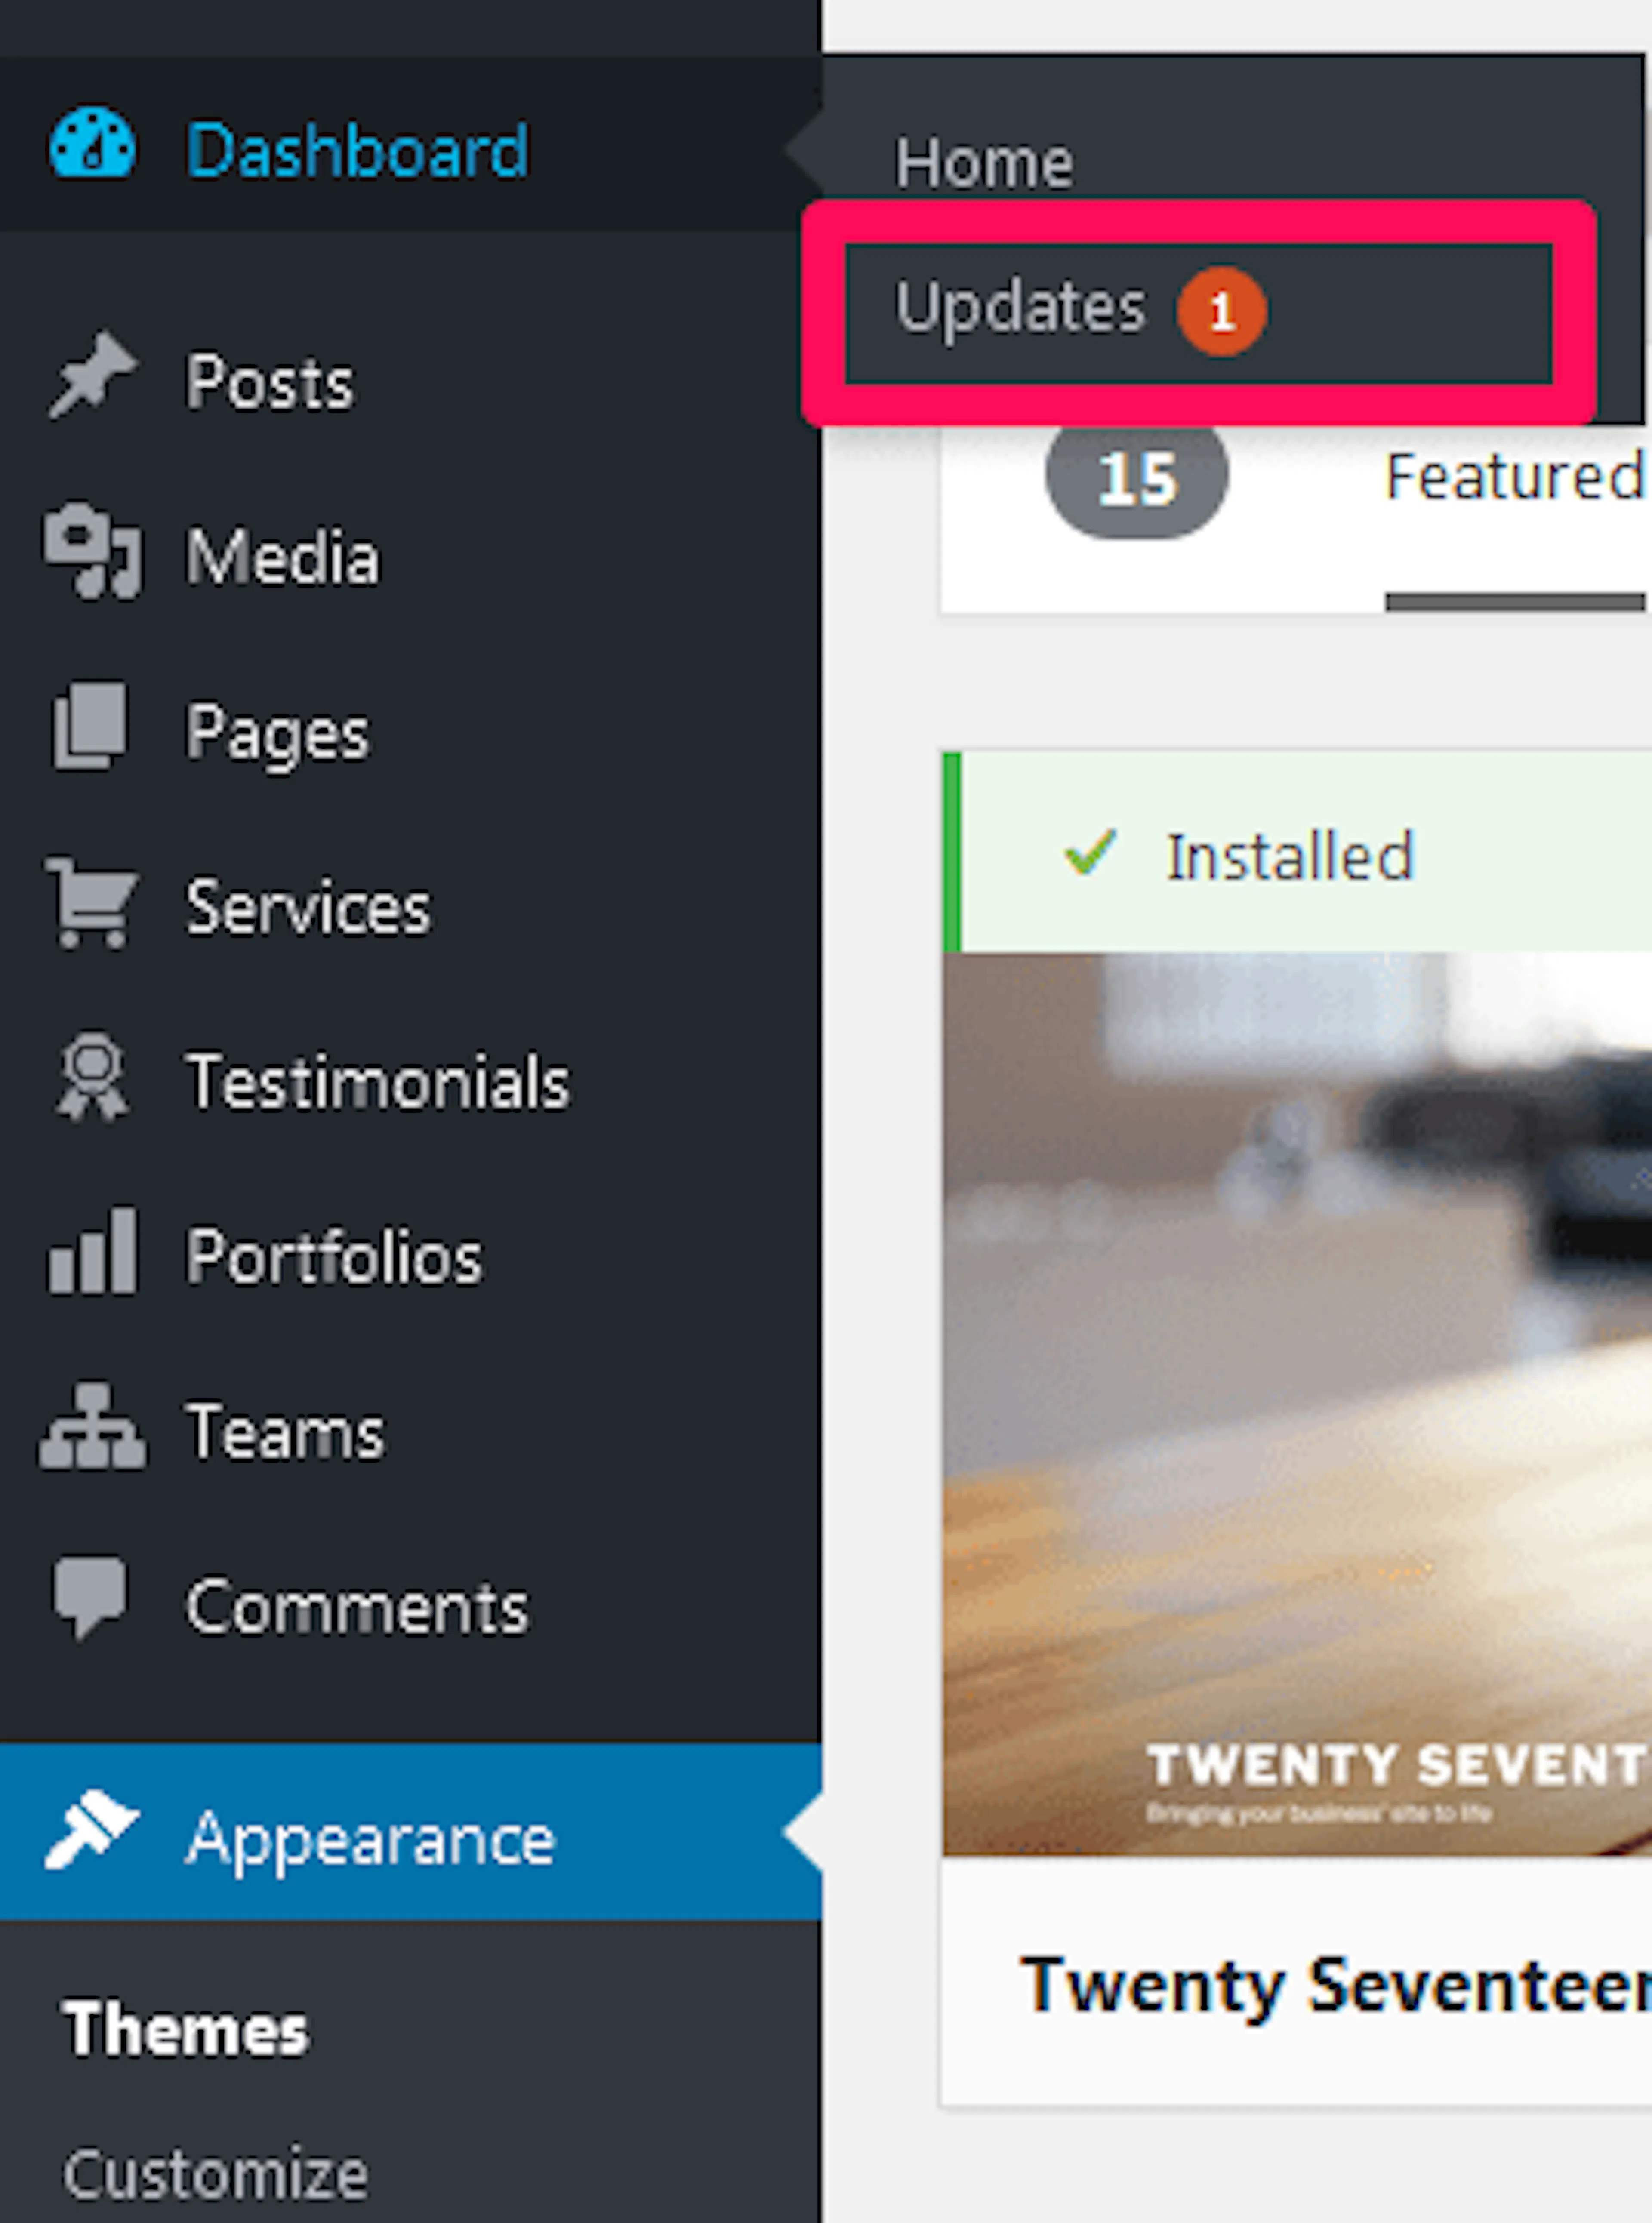
Open Dashboard > Updates on the left sidebar of your WordPress dashboard. The Updates page shows your current WordPress version.
Install available updates
If WordPress shows an available update, select Update Now. Wait for the update to finish before you continue.
Confirm your version
Check that your WordPress version is 4.5 or newer. Your website is ready for the theme and its plugins when the version meets this requirement.
Your WordPress installation is now ready. Next, you can choose the right image sizes for your trip photos and banners.
Recommended image sizes
The right image size helps your photos look clear on your website. Images that are too large or too small can look stretched or blurry.
| Element | Recommended size |
|---|---|
| Header Image | 960 × 650 px |
| Header Background Image | 1920 × 350 px |
| Site Logo | 150 × 150 px |
| Trip Taxonomy Image | 600 × 600 px |
| Post Thumbnail Image | 610 × 343 px |
| Single Trip Page Banner | 1920 × 500 px |
Say you are adding a photo of your trek group on a mountain trail. For the banner at the top of a trip page, aim for 1920 × 500 pixels. The image will fill the banner without looking stretched.
You do not need to resize every image perfectly. Photos close to these dimensions should look fine on your site.
Import the demo content
Demo content is a set of sample pages, images, and settings that makes your website look like the Travel Muni preview. You can replace the sample content with your own trips, dates, and photos once the import finishes.
Think of it like importing a sample itinerary. You see how a finished trip page looks. Then swap in details for your own Annapurna trek or weekend rafting tour.
What you'll need before you start: the demo content zip file and the One Click Demo Import plugin. You download the zip file in step 1 and install the plugin in step 2.
Download the demo content
Start by getting the files that contain the sample pages and settings. A .zip file is a compressed folder. You need to extract, or unzip, it to access the files inside.
Download the Travel Muni demo content and extract the .zip file.
Install the demo import plugin
The importer plugin adds the page where you upload the sample content. Install and activate the One Click Demo Import plugin.
Open the demo importer
The importer is where WordPress receives the sample pages, images, and settings. Go to Appearance > Import Demo Data in the left sidebar of your WordPress dashboard.
Upload the demo files
The demo uses three file types for different parts of your site. The XML file contains pages and posts. The WIE file contains widget settings. The DAT file contains Customizer settings.
Select and upload the XML file, WIE file, and DAT file from the extracted demo content folder.
Run the import
This step copies the sample content into your website. Select Continue & Import and wait for the process to finish.
The import can take a few minutes. The importer is copying pages, images, and settings. Do not close or refresh the page while it runs. Closing the page interrupts the process.\
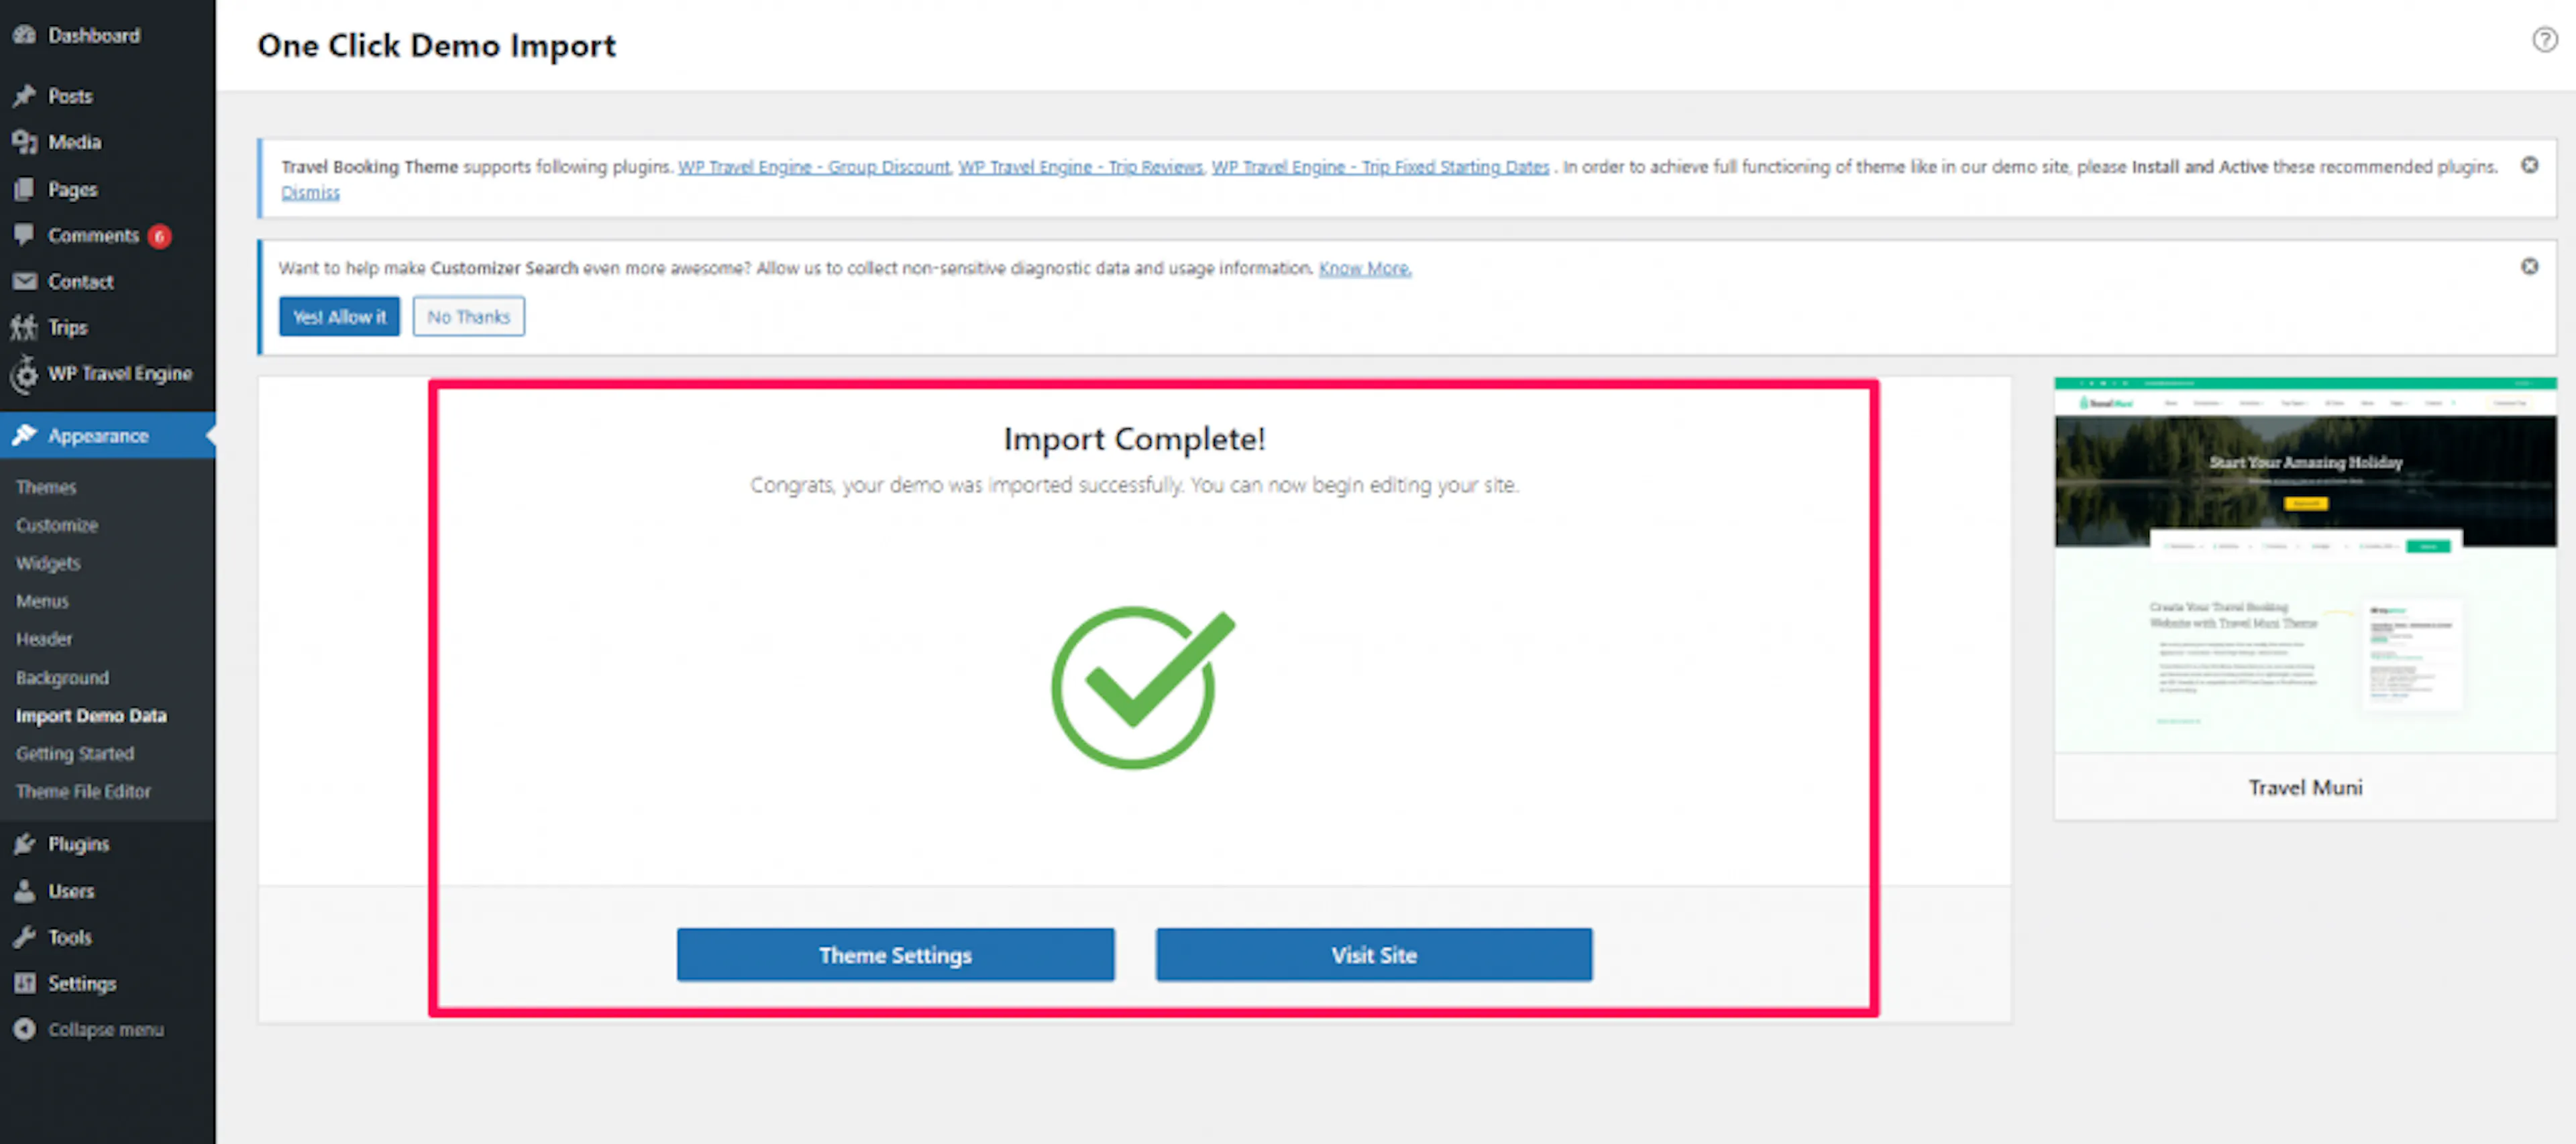
You will see a success message when the demo content has finished importing. Your site now has the sample layout ready for you to customize.
The sample layout gives you a clear starting point. Next, make sure the Travel Muni theme is installed and active.
Install and activate the theme
Installing the theme changes the design your visitors see. You can upload the theme from the WordPress dashboard.
On macOS Safari, downloaded .zip files sometimes unzip automatically. Check that your theme file is still in .zip format before uploading. If Safari has already unzipped it, here's how to stop Safari from auto-unzipping files.
What you'll need before you start: the travel-muni.zip file you downloaded when you purchased the theme.
Save the theme file
Keep the theme file in a place you can find during the upload. Save the downloaded travel-muni.zip file somewhere on your computer.
Open the theme uploader
The Appearance menu is on the left sidebar of your WordPress dashboard. The Themes page is where you manage your site's design.
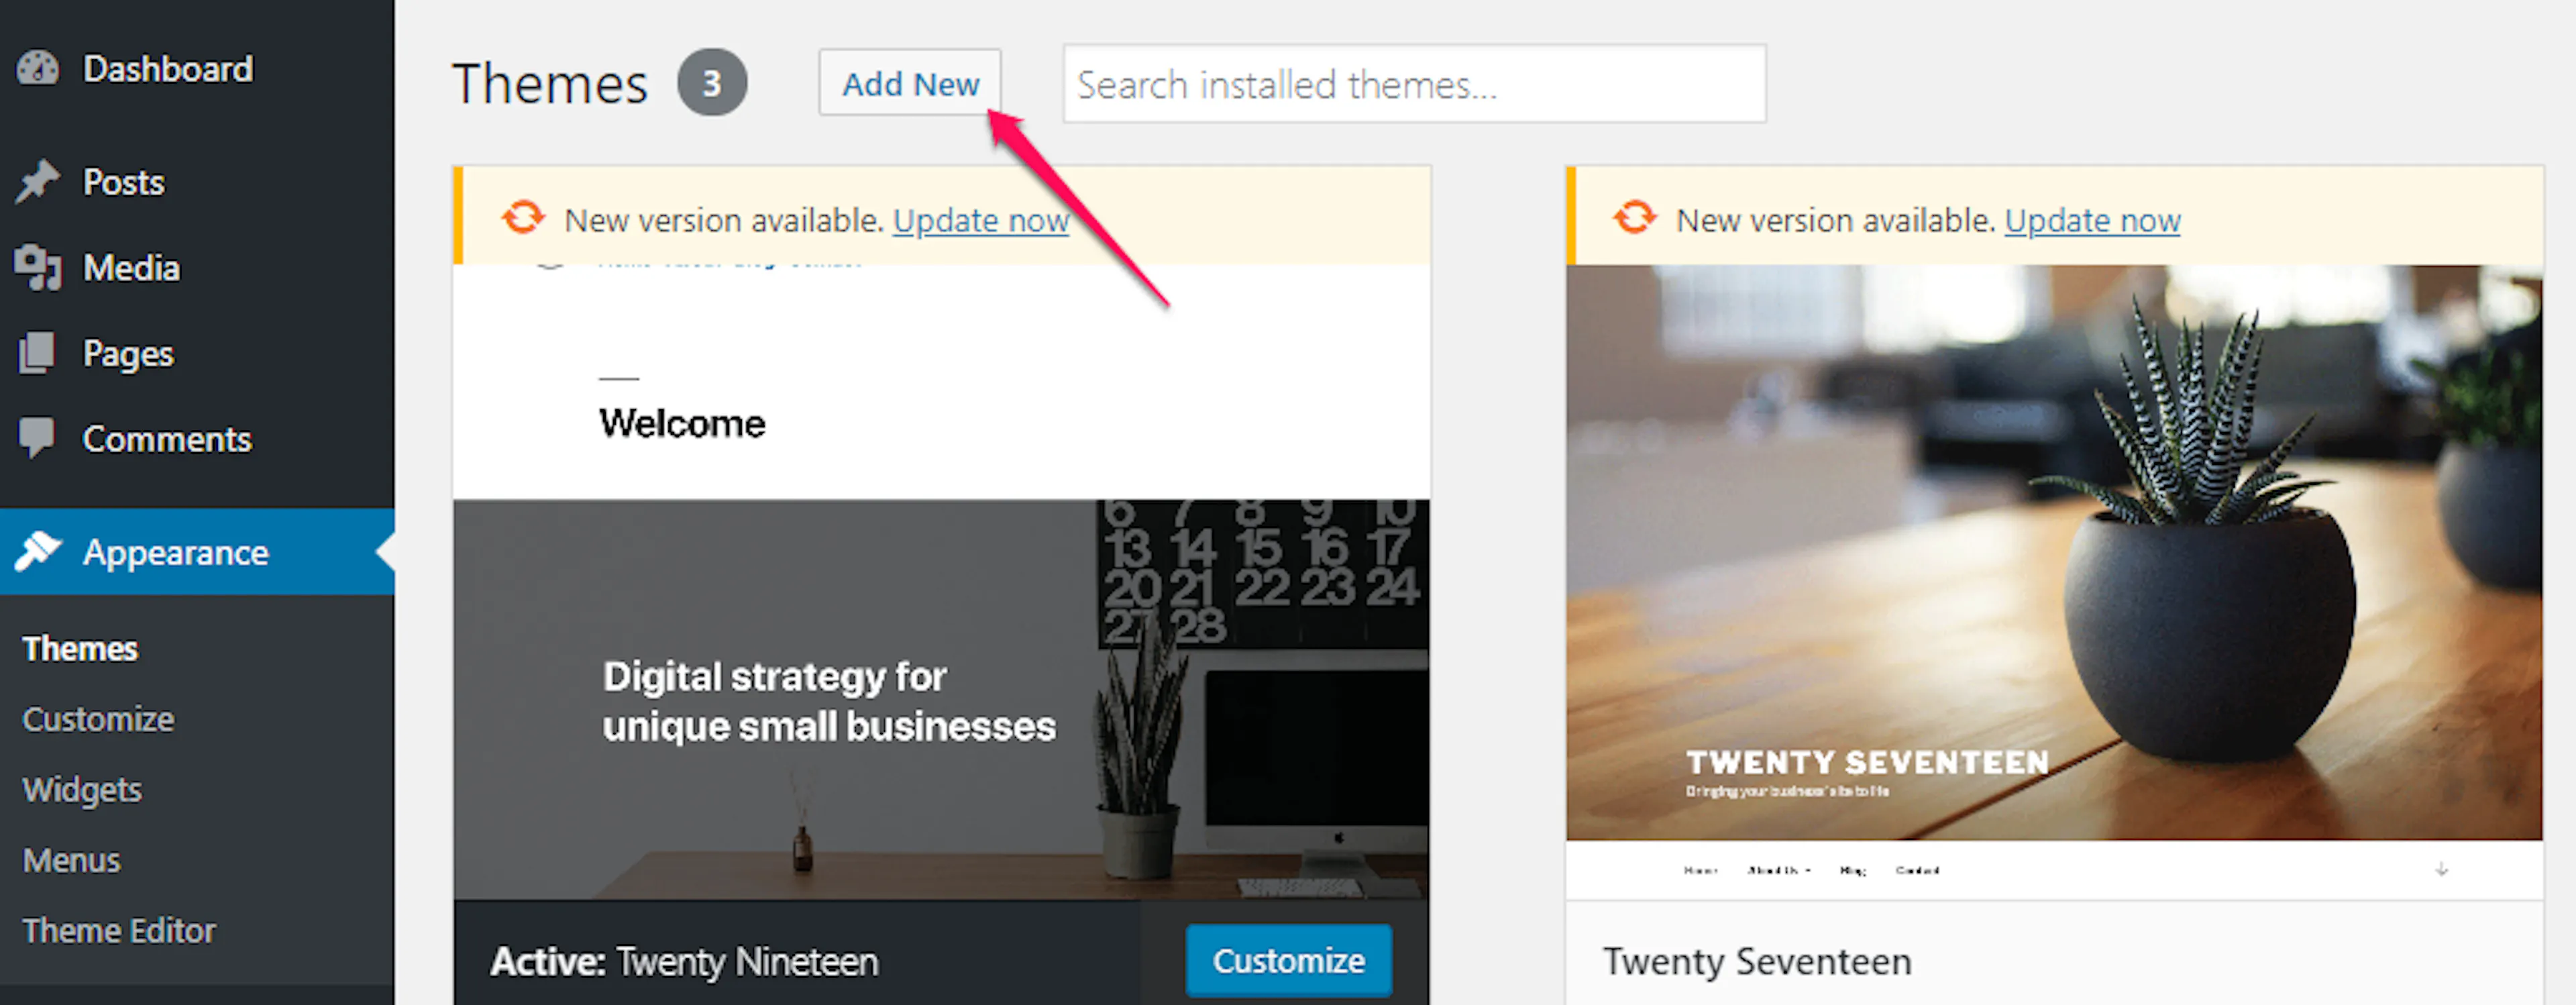
Go to Appearance > Themes. Select Add New. Select Upload Theme.
Upload the theme
Select Choose File. Select travel-muni.zip on your computer. Select Open.
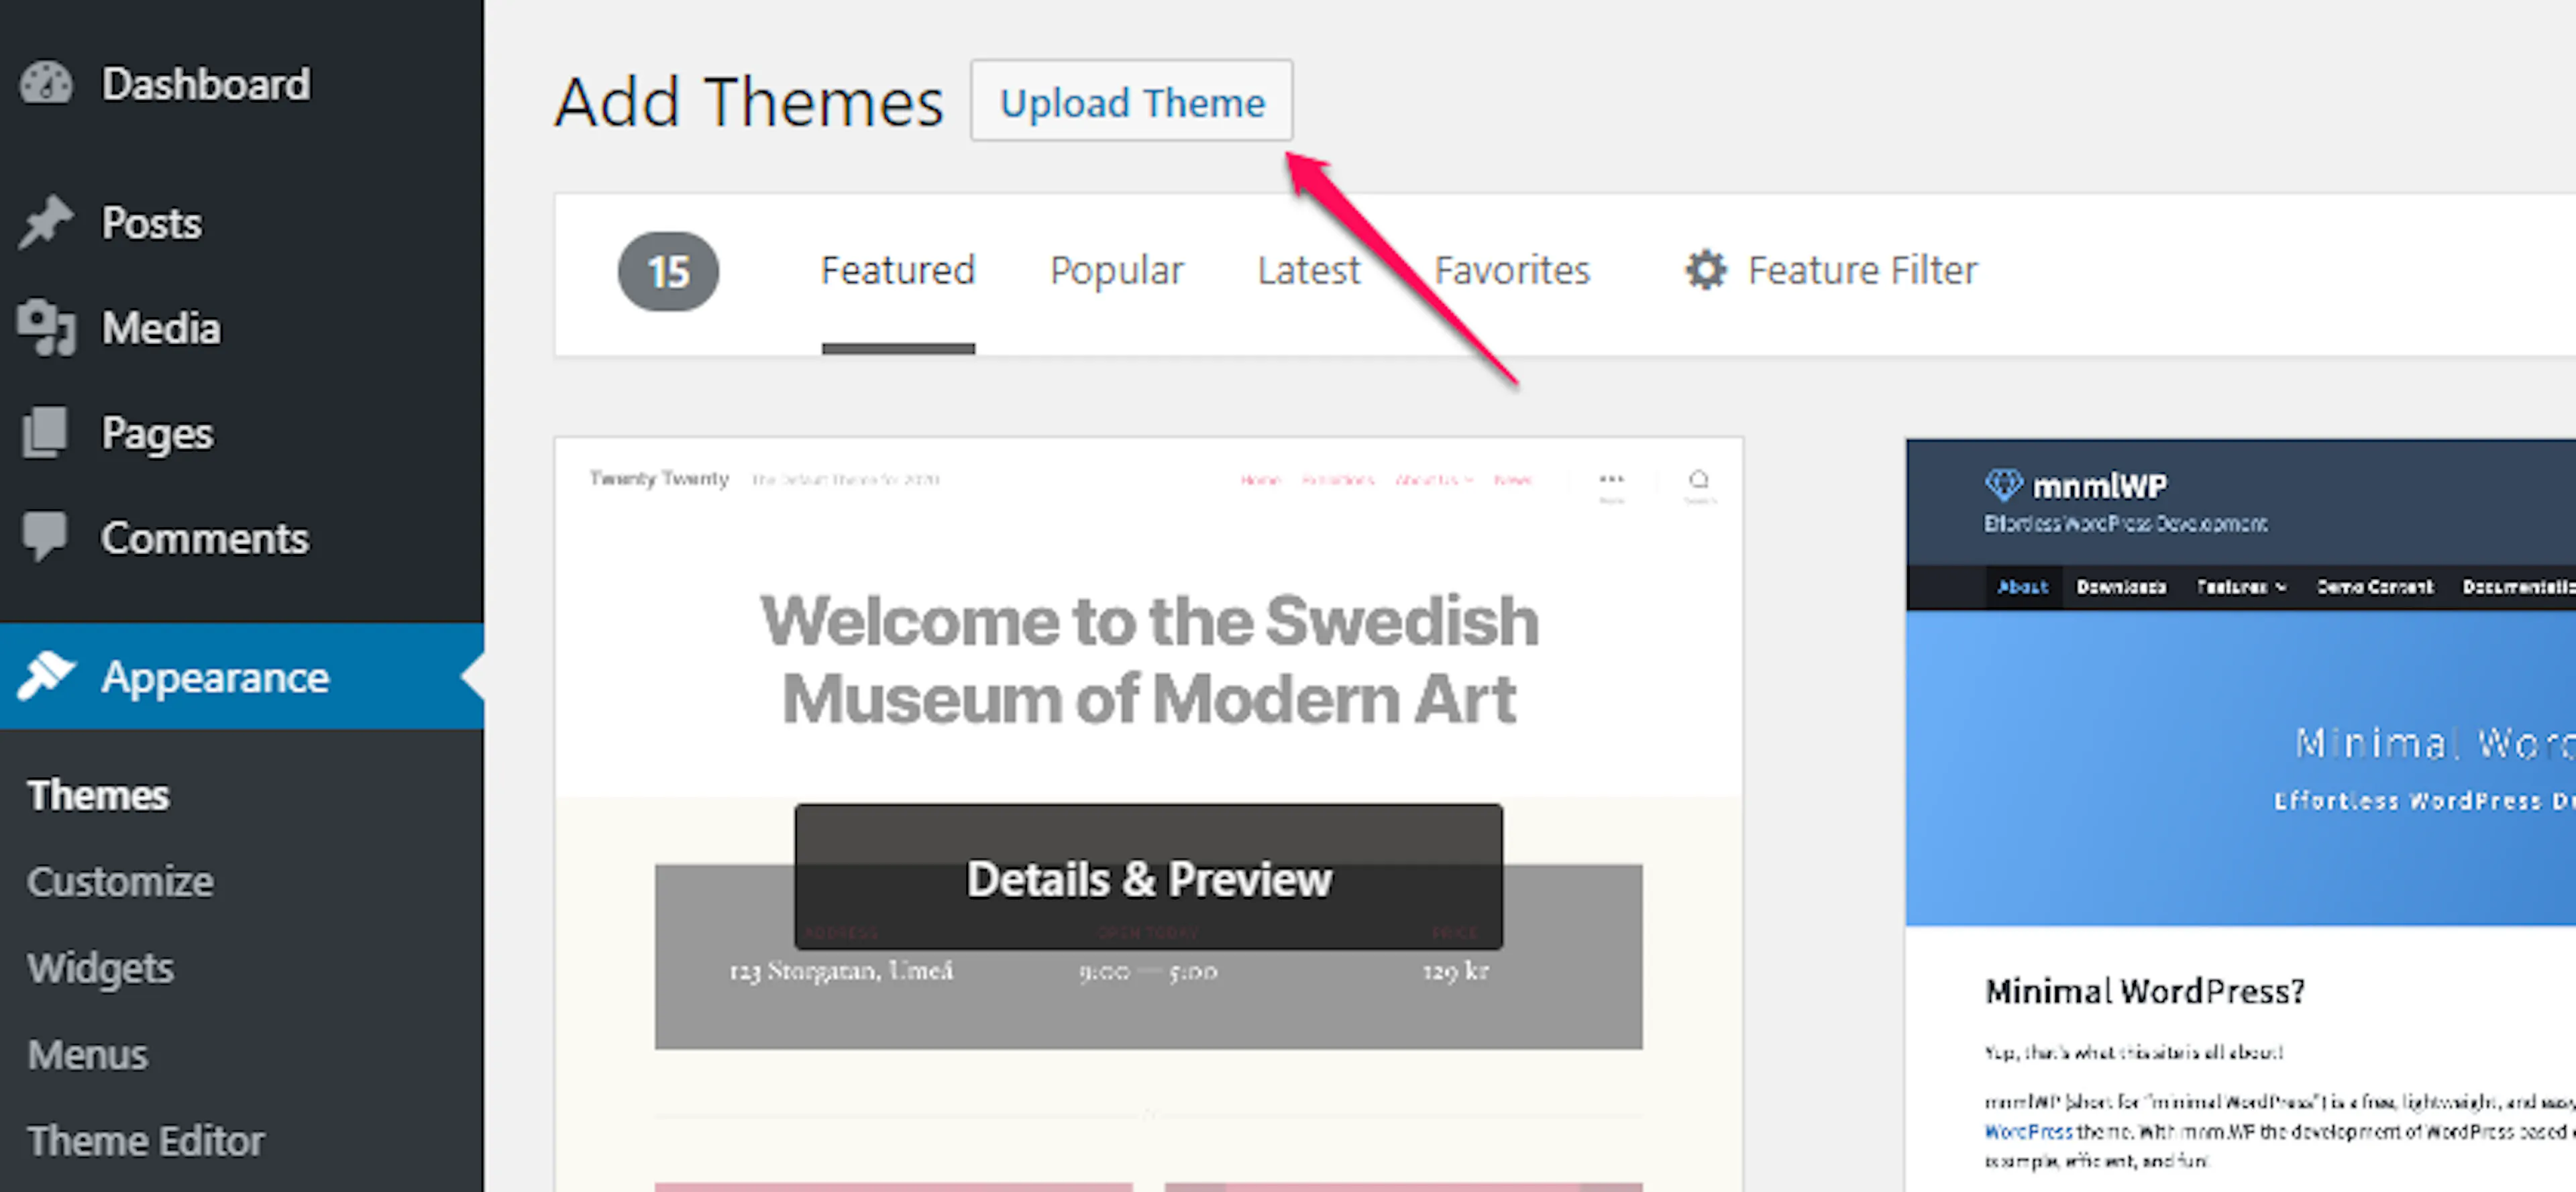
WordPress uploads the theme and prepares it for your website.
Activate the theme
When the installation finishes, select Activate. WordPress will start using the Travel Muni design.
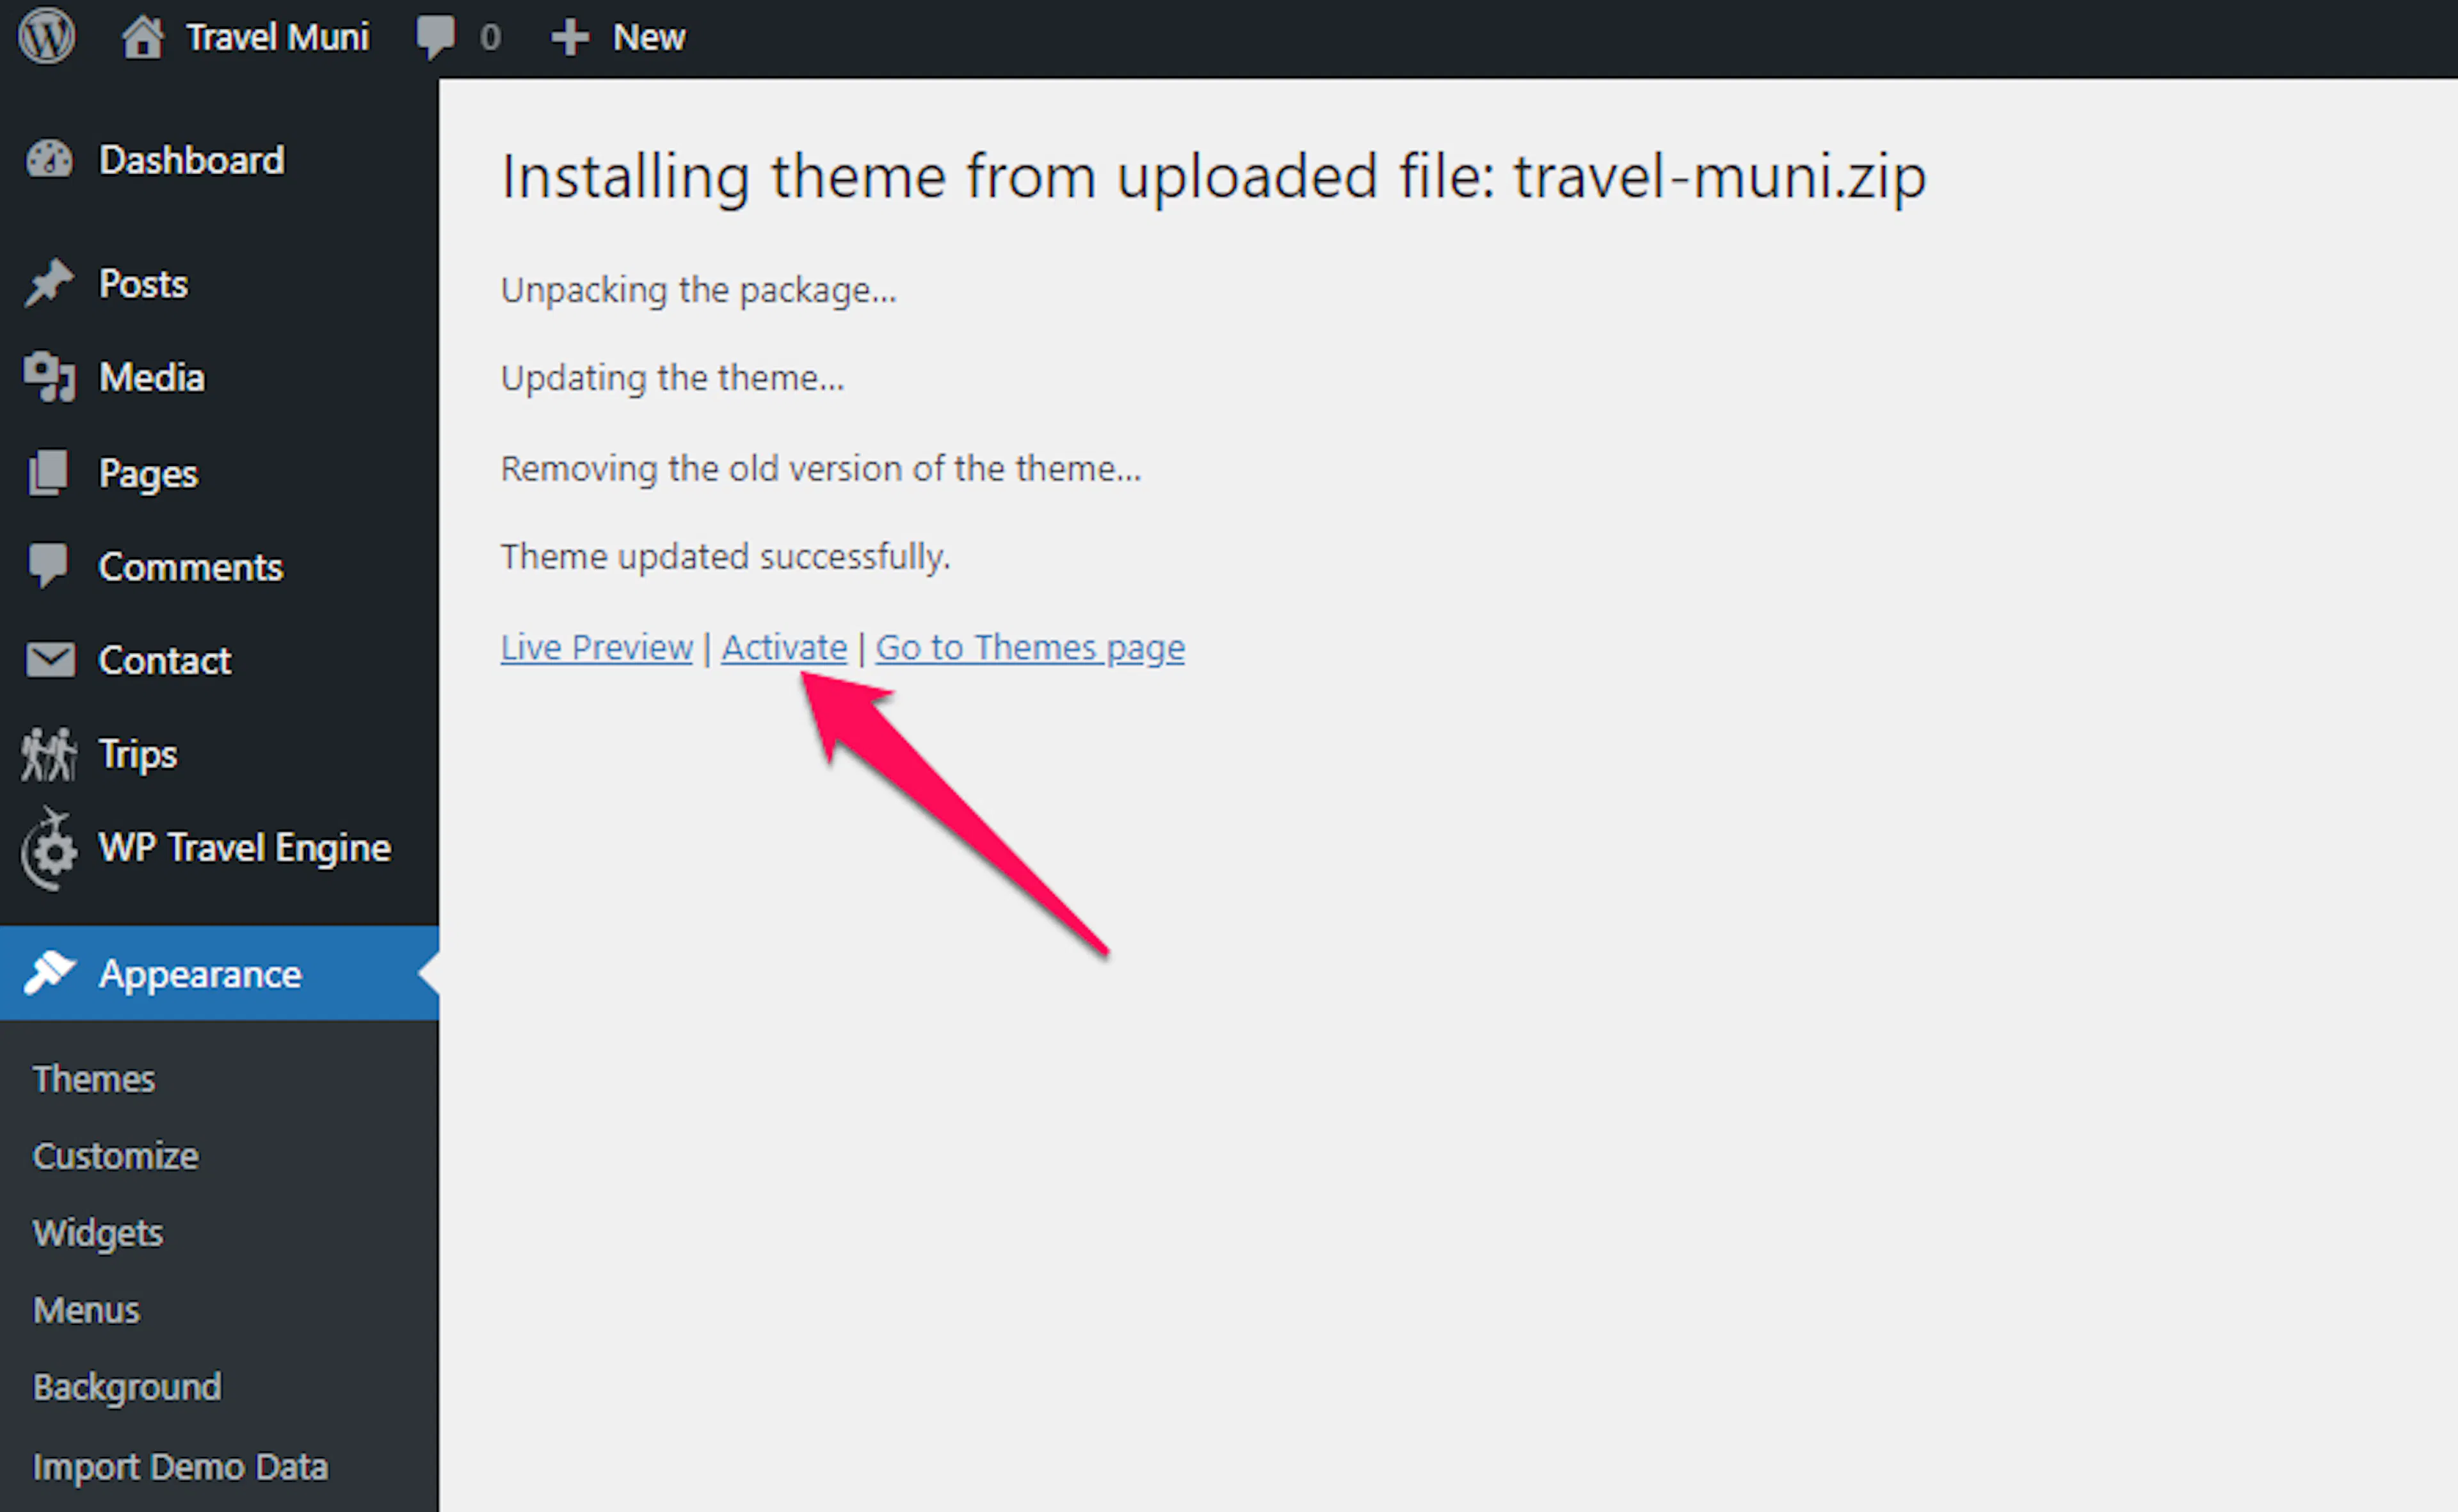
Travel Muni is now active. Your website has the theme design in place. Next, add the plugins that provide the travel features.
Install recommended plugins
A plugin is a small app that adds a specific feature to your WordPress site. You install it and activate it. The plugin then adds new options to your dashboard or website.
Install and activate these plugins to get the full Travel Muni experience:
| Plugin | What it does |
|---|---|
| WP Travel Engine | The main plugin for creating and managing trips, destinations, and bookings. It is the core of your tour website. |
| Travel Booking Toolkit | Adds extra design options and widgets so your site can display more features. |
| Contact Form 7 | Lets you add a contact form so travelers can send you questions directly from your website. |
| Regenerate Thumbnails | Fixes image sizes for photos you already uploaded. Run it if you are moving existing content into Travel Muni. |
What you'll need before you start: these plugins are free and available from the WordPress plugin directory.
Open the plugin installer
The plugin installer lists the tools recommended for Travel Muni. Open Appearance > Install Plugins on the left sidebar of your WordPress dashboard.
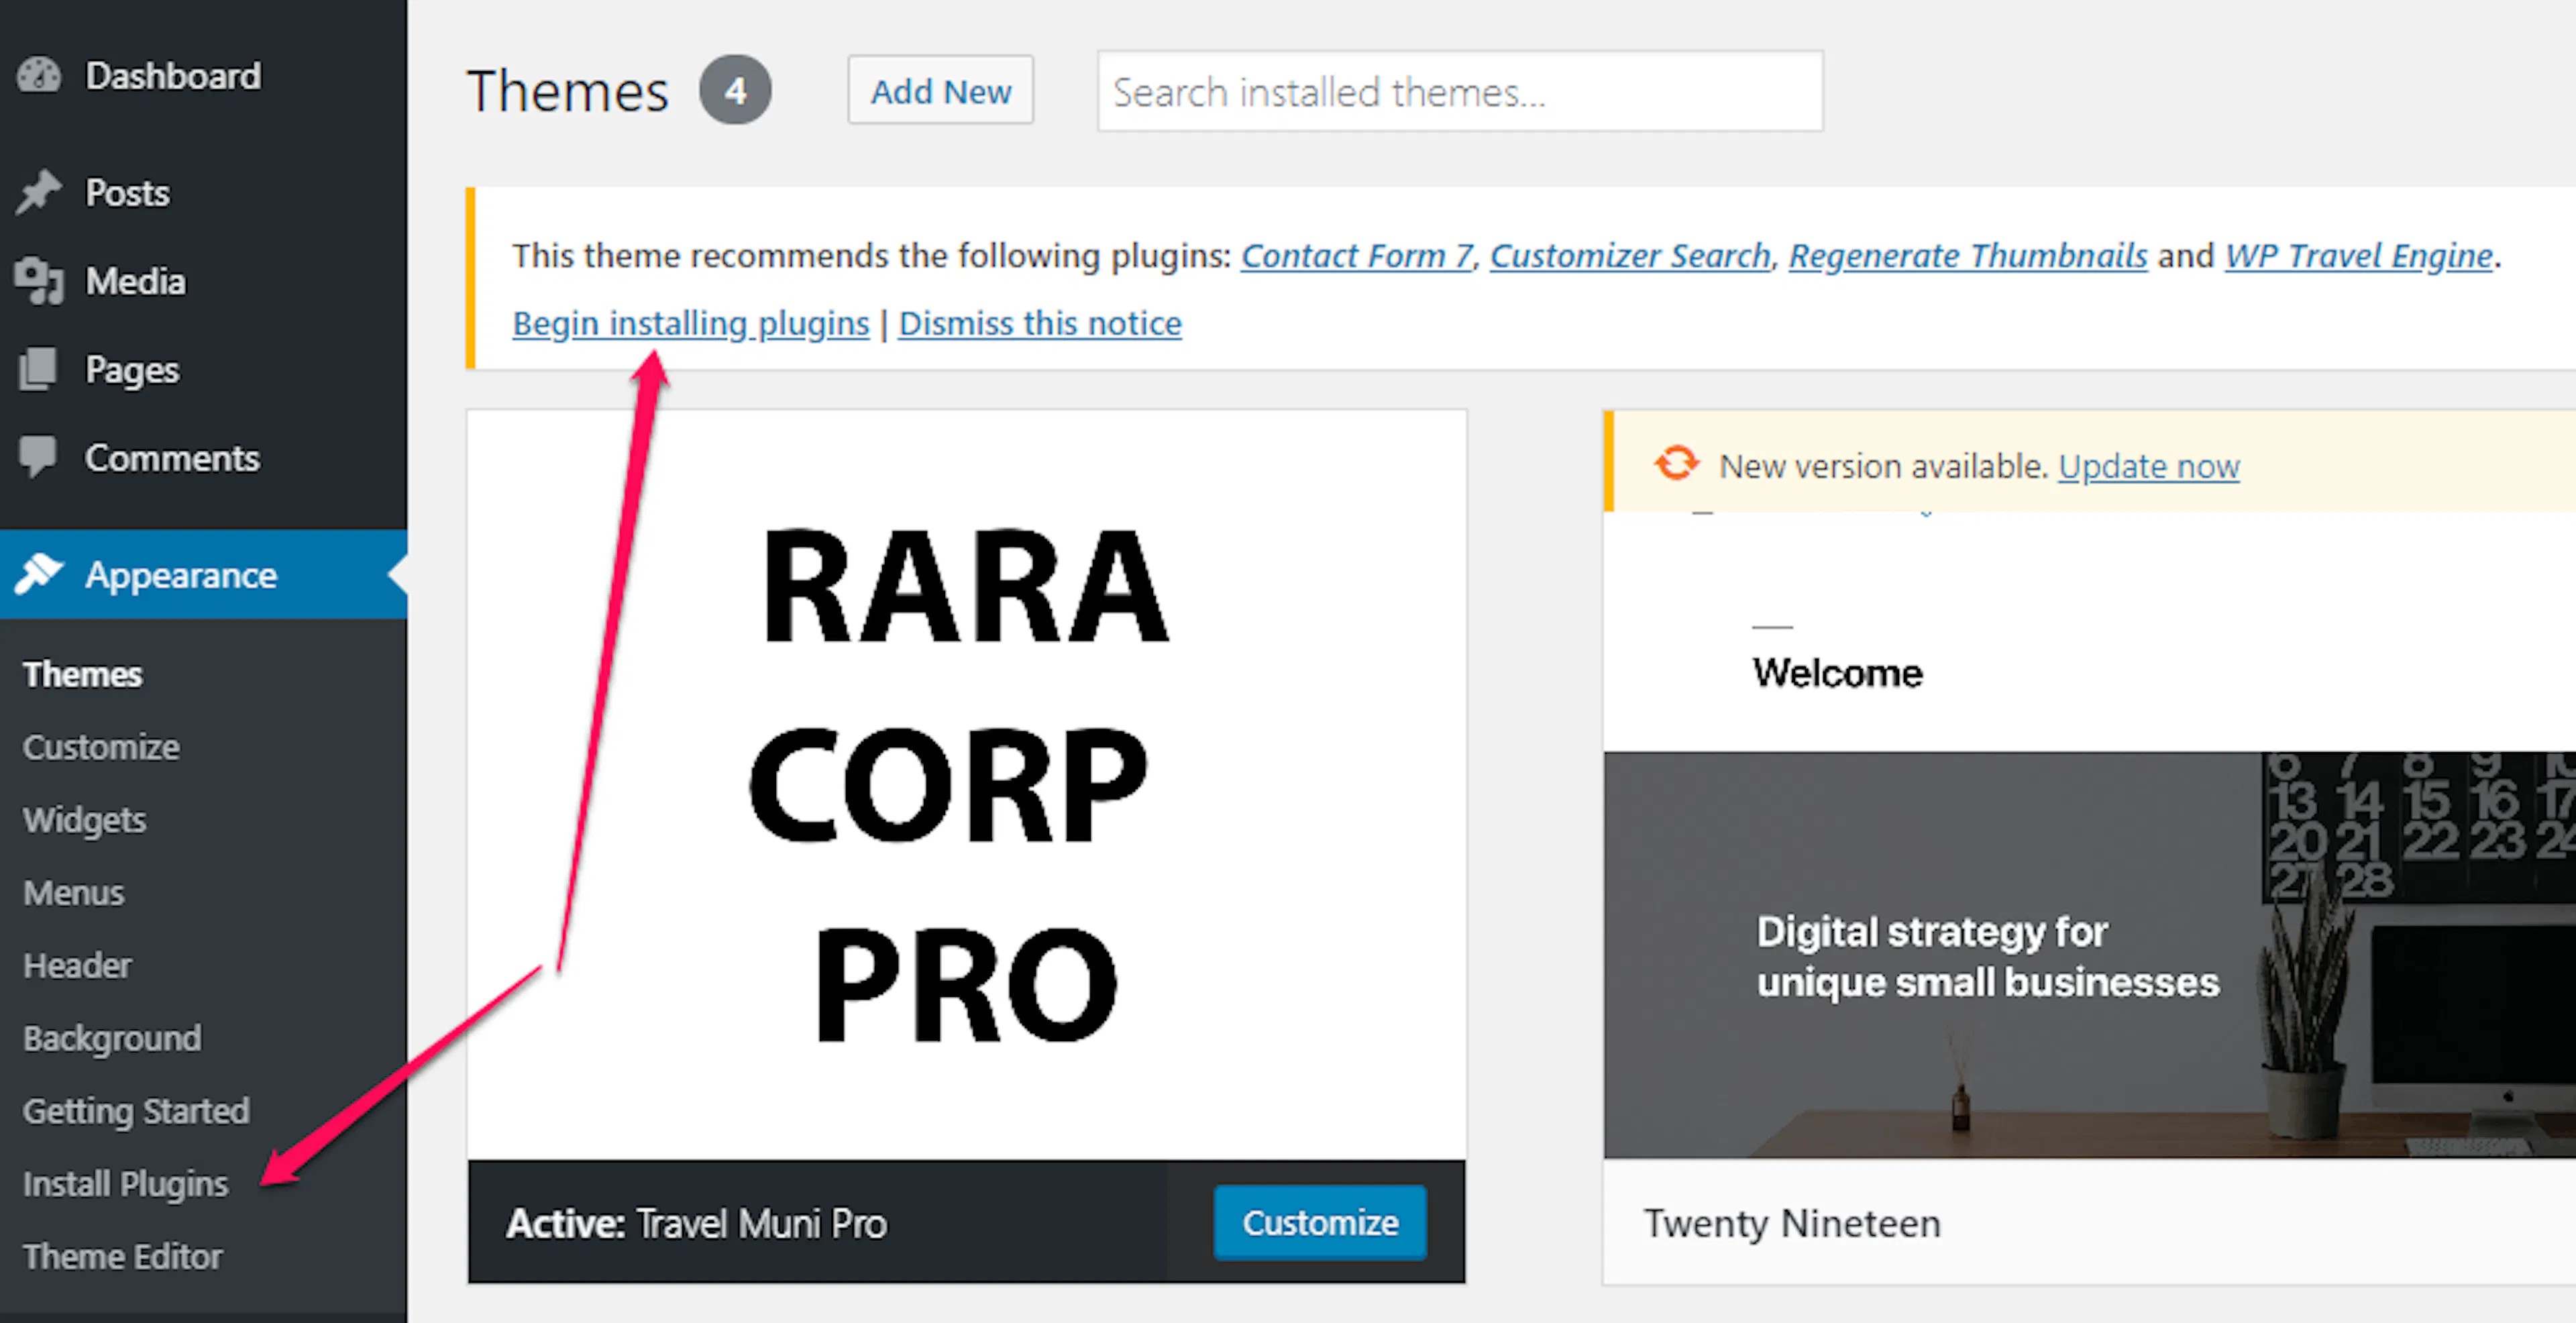
Install each plugin
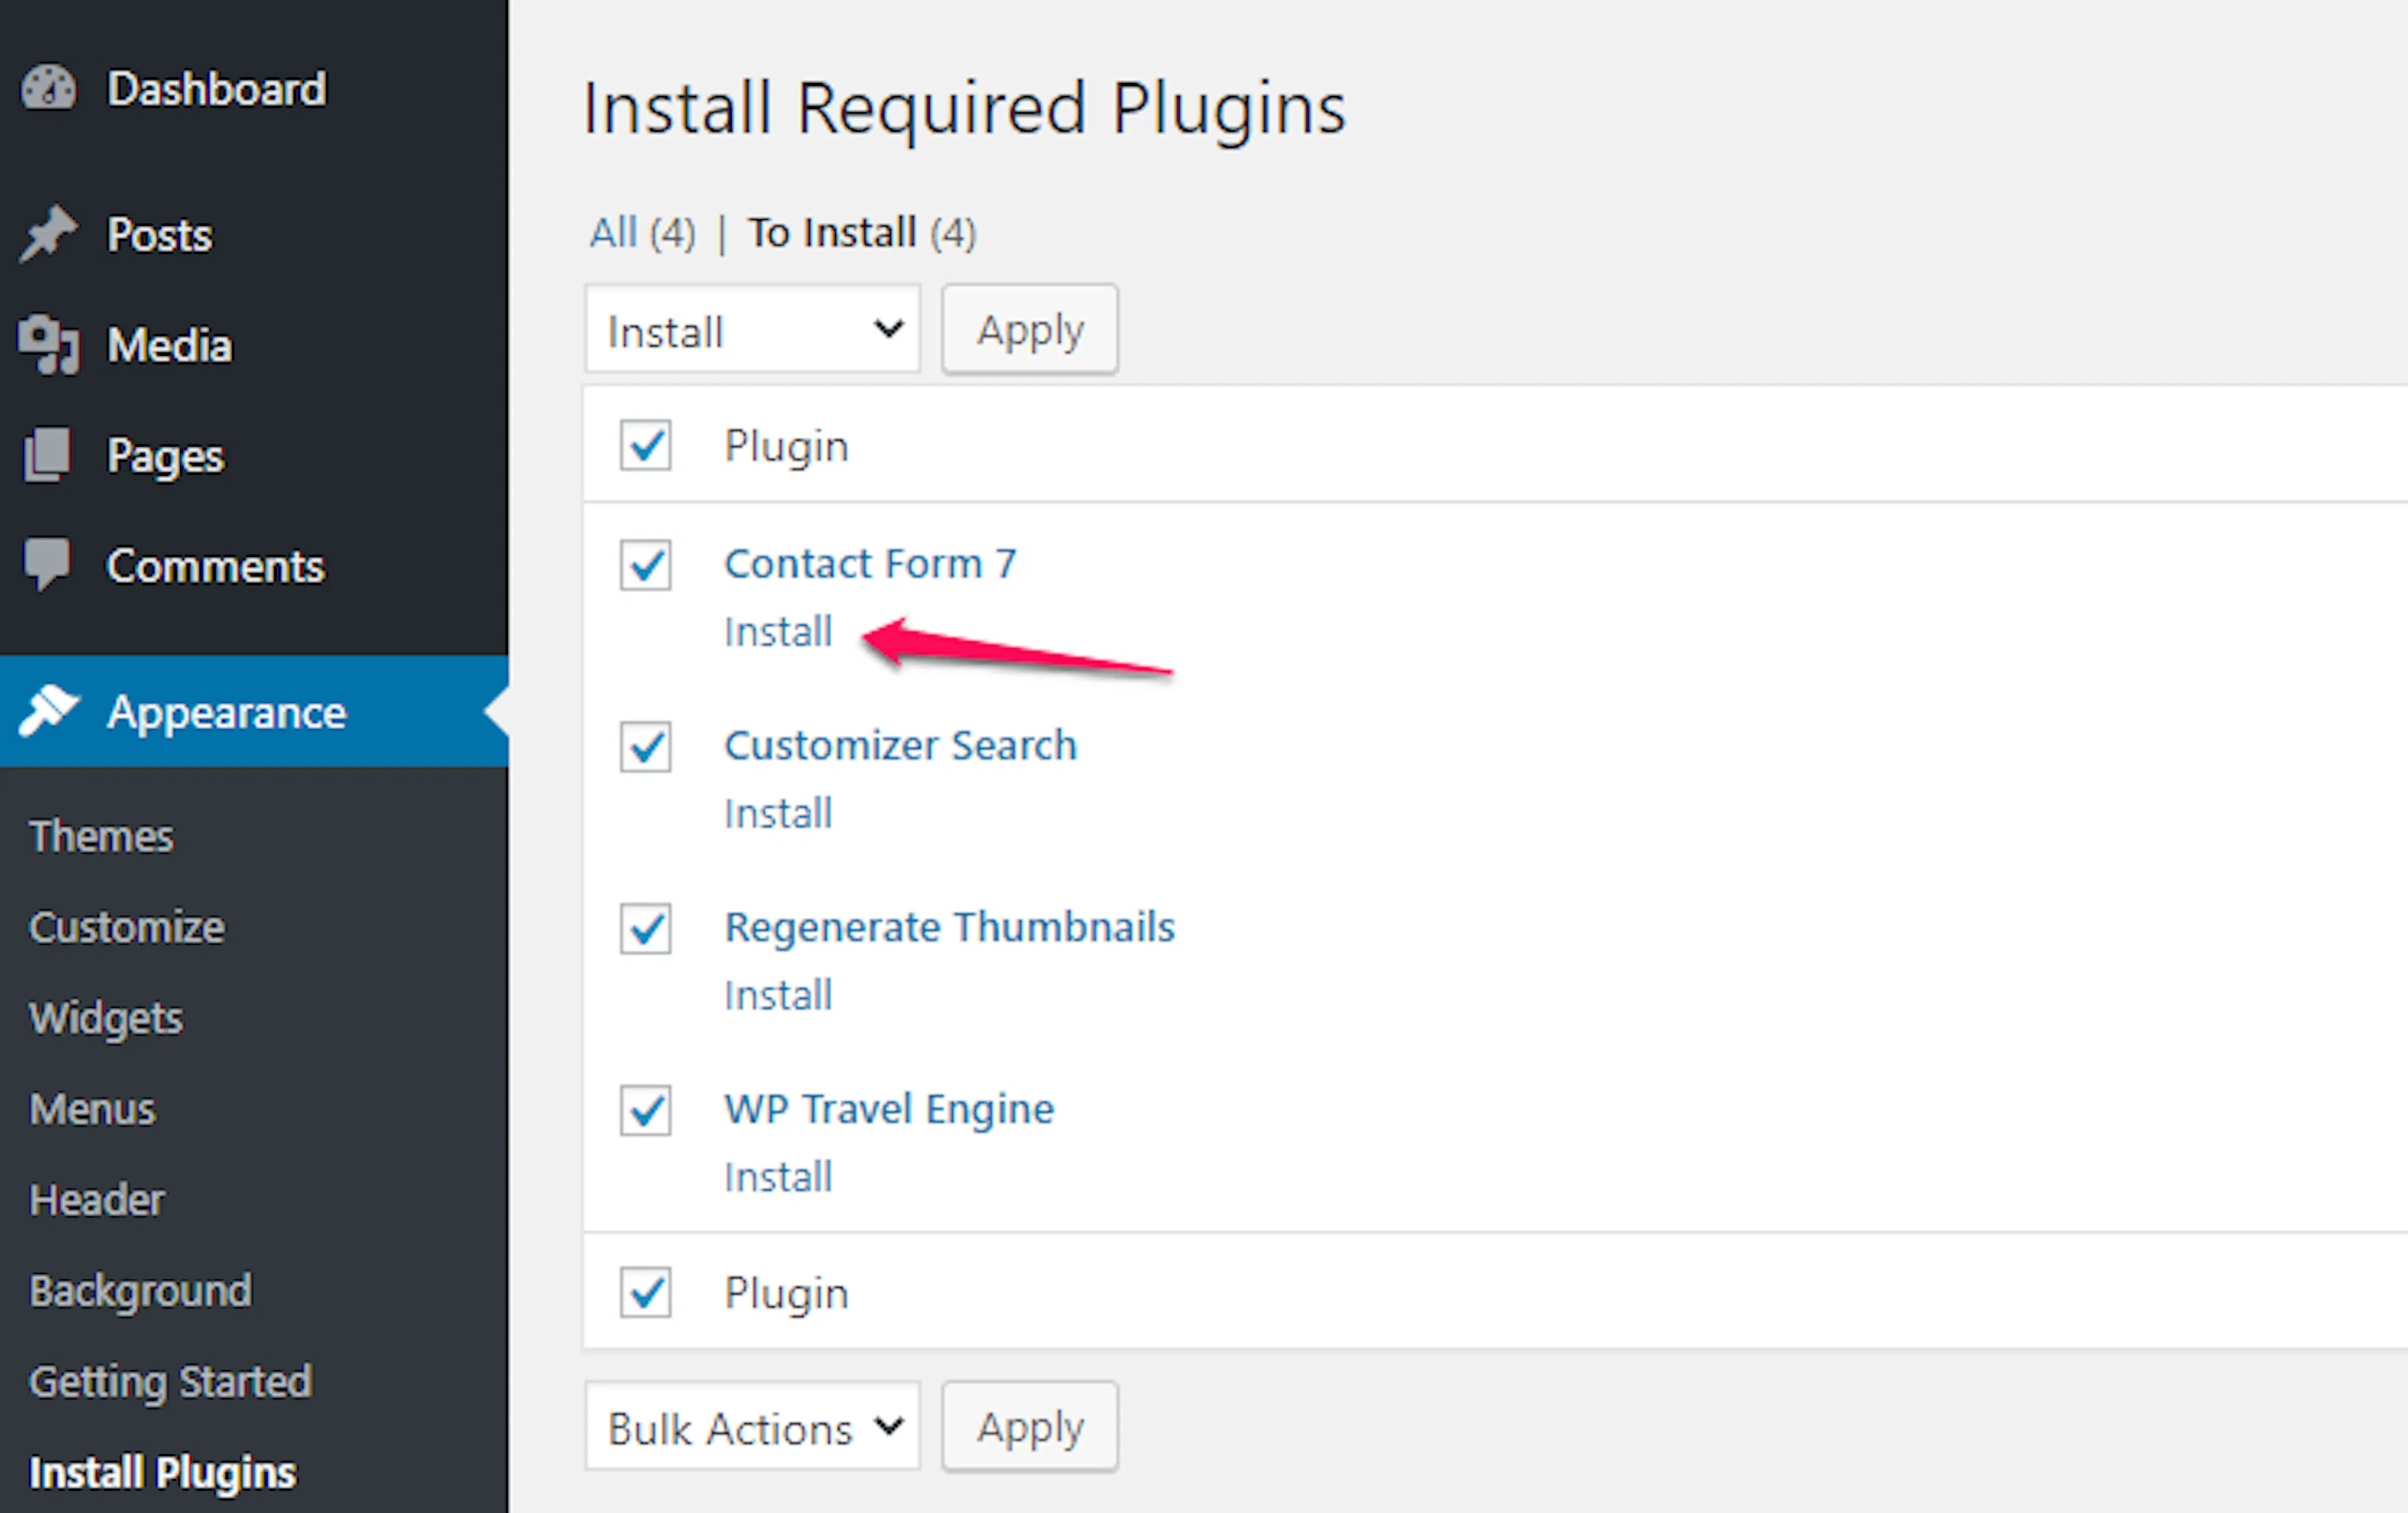
Find each plugin in the list. Select Install next to it.
Installing adds the plugin to your website. It does not turn the plugin on yet.
Activate each plugin
Select Activate next to each installed plugin. The plugins will then add their features to your website and dashboard.
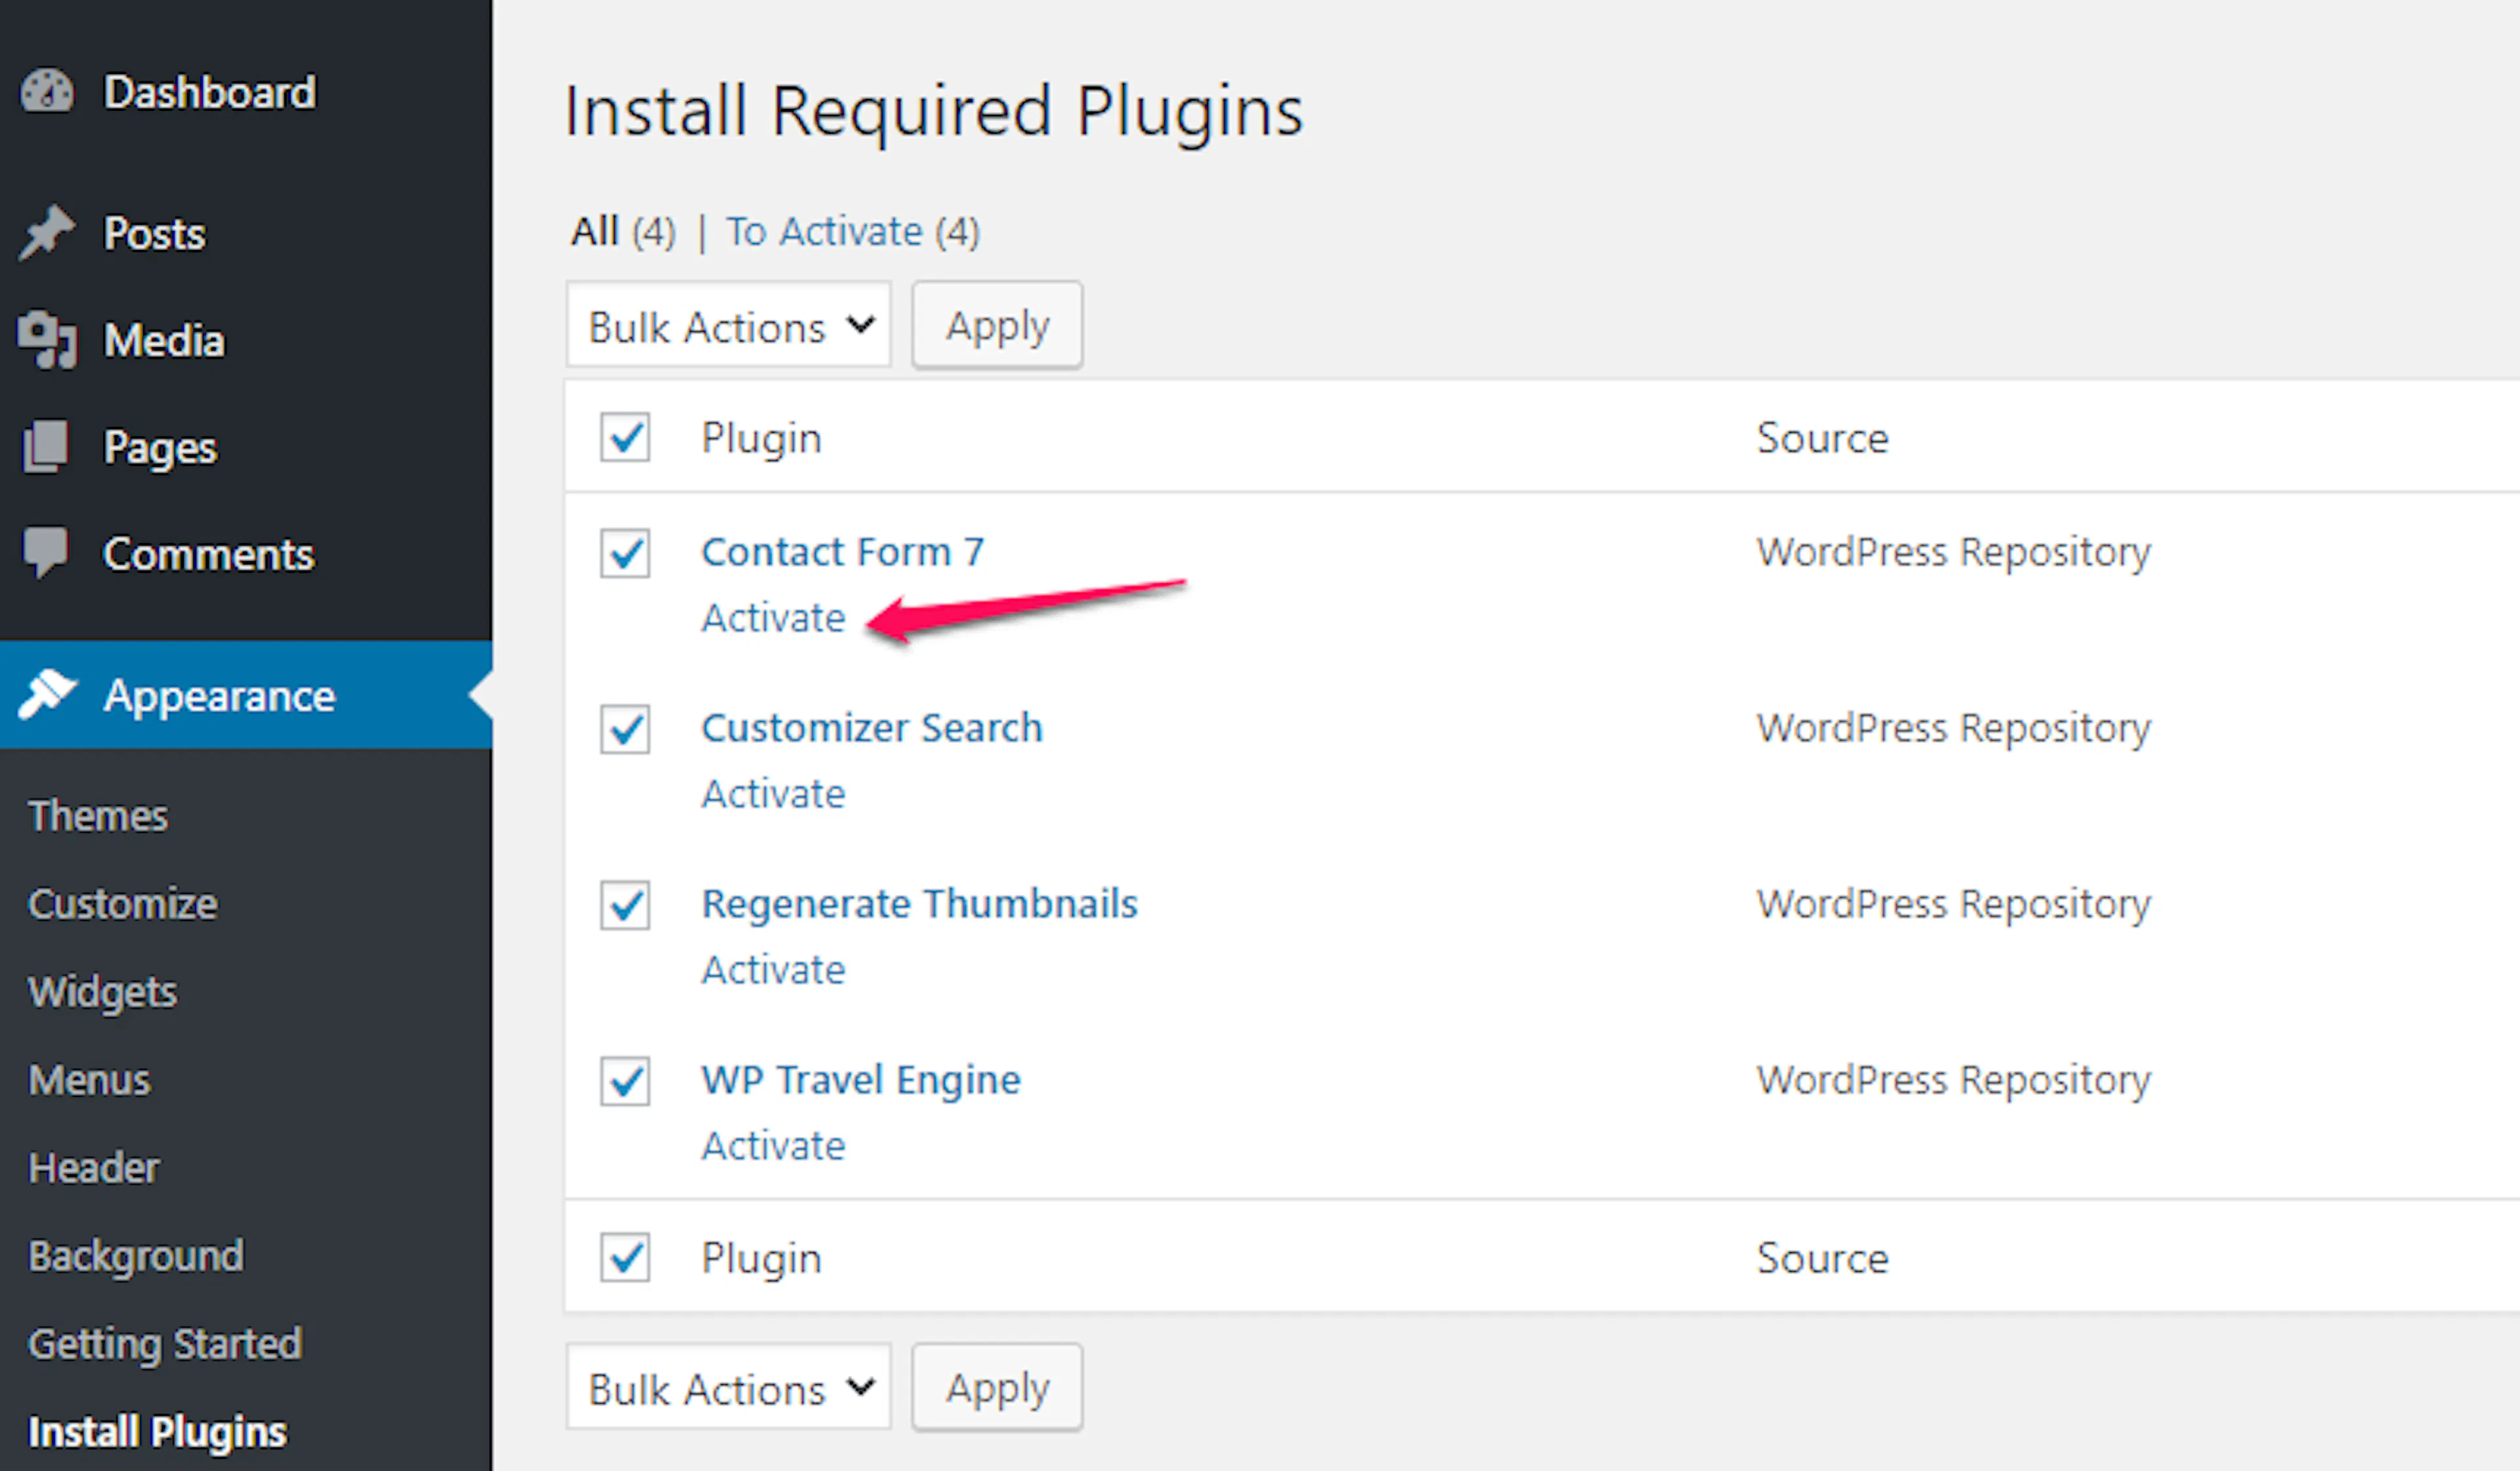
WP Travel Engine lets you create trips such as an Annapurna trek. Contact Form 7 lets travelers send questions before booking.
These plugins are all free. Together, they help Travel Muni work the way it was designed for tour websites.
Your main tools are ready. Next, choose the page travelers see first and the page that holds your blog posts.
Set up your homepage and blog page
By default, WordPress shows your latest blog posts on the homepage. A static front page shows one fixed page instead.
Most tour businesses use a static front page. Travelers then see trips and booking information first. Your blog still has its own page for packing advice, travel news, and tour stories.
For example, a trekking company can use the homepage for featured trips and a welcome message. The blog page can hold an article about what to pack for the Everest Base Camp trek.
What you'll need before you start: at least two pages created in WordPress. Create one page for your homepage. Create one page for your blog. If you imported the demo content, these pages already exist.
The Customizer is WordPress's built-in settings panel for changing design options. Find it under Appearance on the left sidebar of your dashboard. Homepage Settings is a section inside the Customizer. It controls what appears on your homepage.
Open Homepage Settings
Homepage Settings controls whether visitors see a fixed page or your latest posts. Go to Appearance > Customize > Homepage Settings.
Select a static homepage
Choose A Static Page under Your homepage displays. WordPress will then show the page you choose instead of your newest blog posts.
Assign your pages
Choose your main website page under Homepage. Choose the page that should list your articles under Posts Page.
Your visitors will now see your trip information first. Your articles will remain available on the separate blog page.
Publish your changes
Select Publish at the top of the Customizer. Your homepage and blog page are now assigned.
Your website is ready for its own branding and tour content. The next settings help visitors recognize your business.
Logo and Header Settings
You can add your logo, tagline, phone number, search form, and social media icons to the top of your website. Open the Customizer under Appearance on the left sidebar of your WordPress dashboard.
Site Identity
Site Identity controls the name, tagline, logo, and browser icon visitors see. A favicon is the small icon that appears in a browser tab.
What you'll need before you start: your logo file and a square image for your site icon.
Open Site Identity
Go to Appearance > Customize > Site Identity. These options appear in the Customizer on the left side of the screen.
Add your logo
Select Select Logo. Upload your logo.
Your logo helps travelers recognize your business when they move between your homepage and trip pages.
Add your site name and tagline
Enter your business name in Site Title. Enter a short description in Tagline. For example, use "Guided treks in Nepal."
Show your site name and tagline
Check Display Site Title and Tagline if you want both items to appear with your logo.
Add your site icon
Select Select Image. Upload the image for your site icon.
Use a square image so the favicon looks clear in browser tabs.
Publish your identity settings
Select Publish. Your logo, business name, tagline, and site icon are now saved.
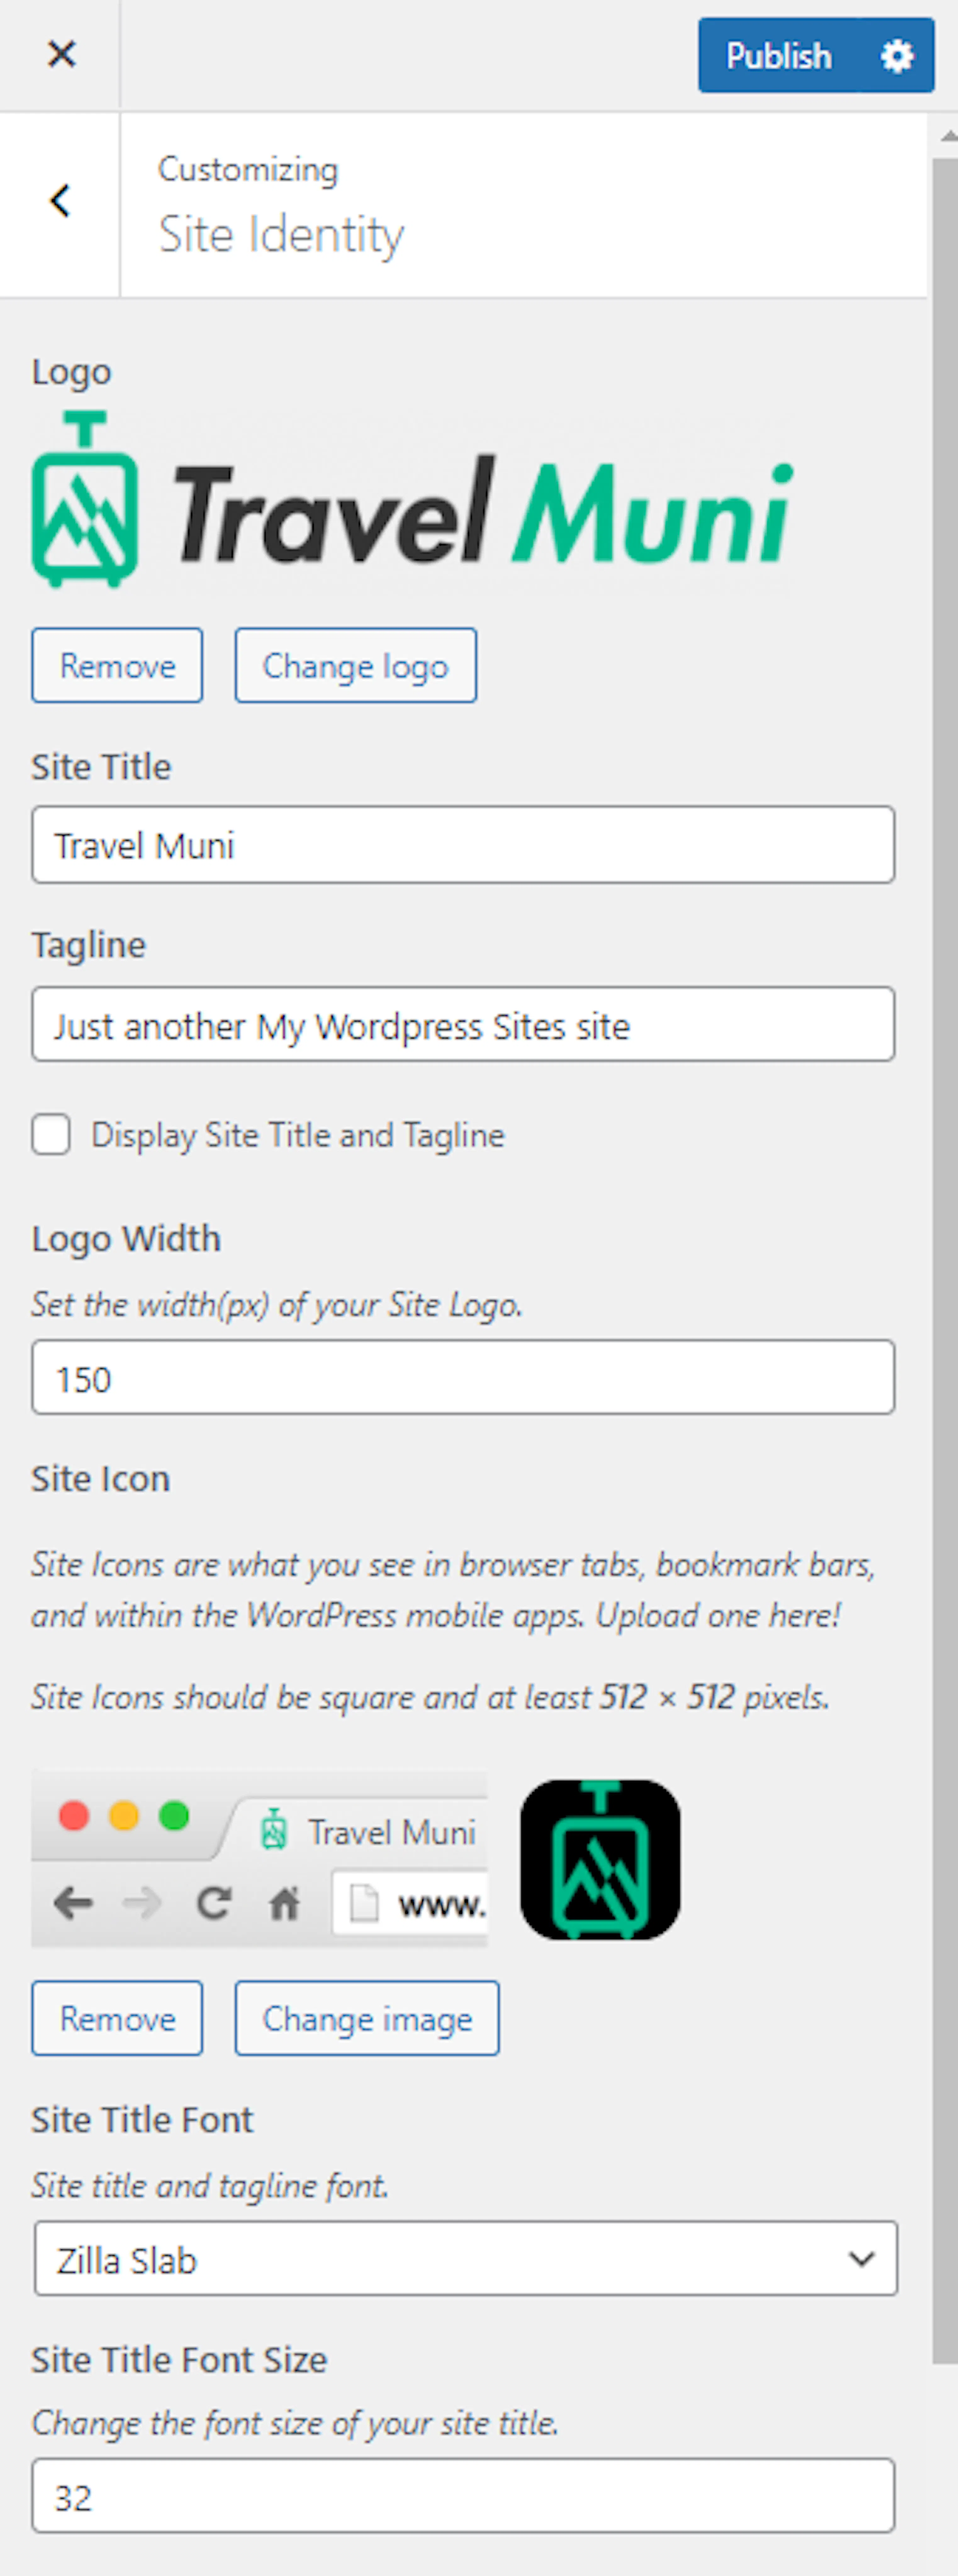
Your visitors can now identify your business across the site. Next, add the contact details and actions in your header.
Header Settings
Header Settings controls the contact details, search button, banner image, and main header button visitors see at the top of your site.
What you'll need before you start: your contact phone number, email address, button destination, and any header or contact images.
Open Header Settings
Go to Appearance > Customize > General Settings > Header Settings. You will find the Customizer under Appearance on the left sidebar of your dashboard.
Add the header button
Enter the text visitors should click in Customize The Trip Label. For example, use "Plan your trip."
Enter the destination in Customizer The Trip URL. The destination could be your contact page or your full list of trips.
Show the header search button
Enable Header Search if you want visitors to search your site from the header.
This helps a traveler look for a specific trip such as "Bhutan cultural tour."
Add the header images
Upload a Header Image for archive pages and other site pages. An archive page lists related content, such as all trips in one destination.
Upload a contact person's image in Upload Vip Image if you want to show a guide or booking contact.
Add contact details
Enter your phone number in Phone. Enter your email address in Email.
Use details that someone on your team checks regularly.
Publish the header settings
Select Publish. Your header now gives visitors a clear way to contact you or search for a trip.
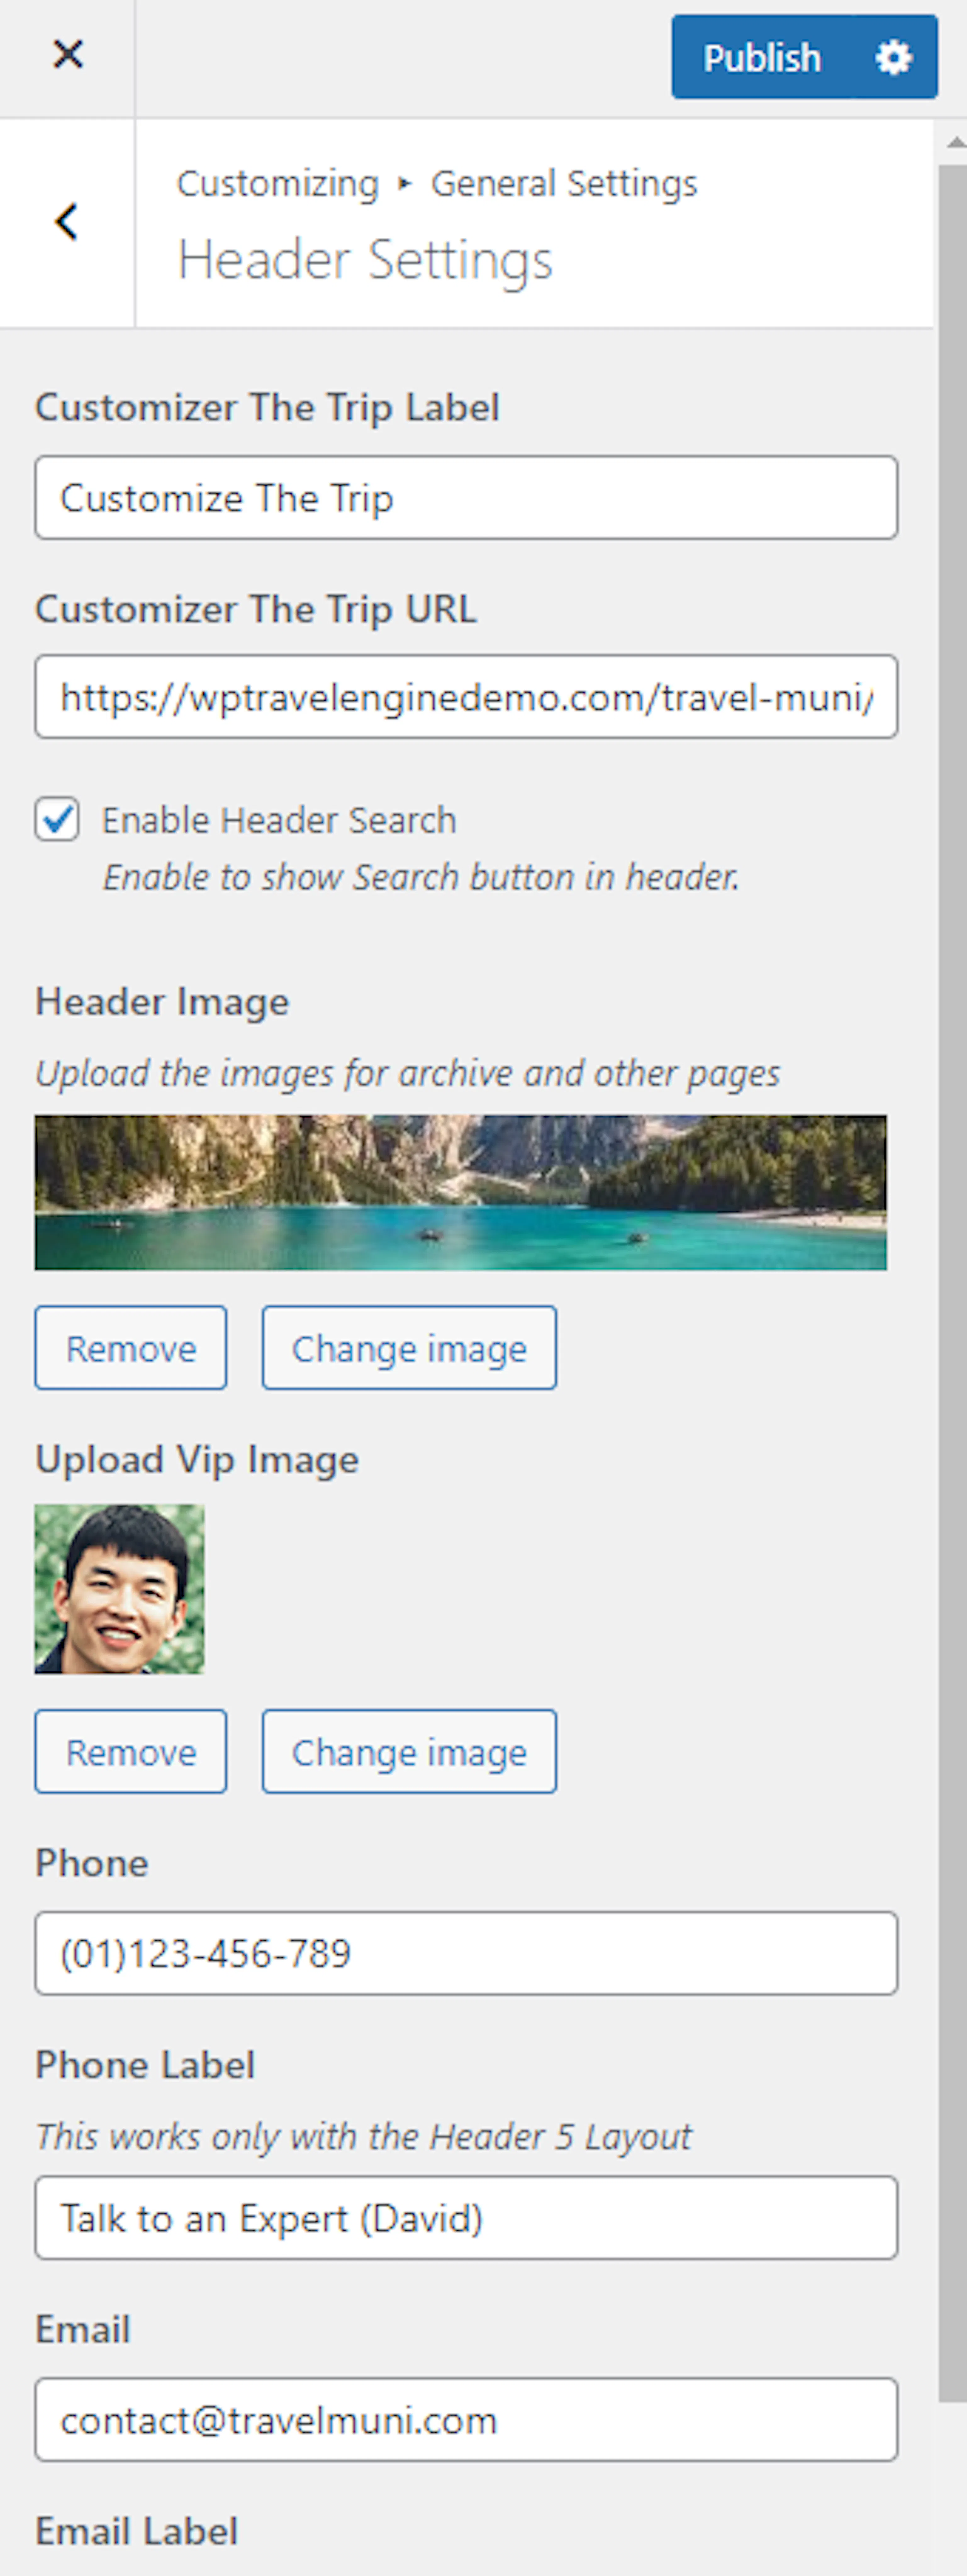
Your header is ready to welcome visitors and help them contact you. The next settings control the site's colors and background.
Appearance Settings
Appearance Settings controls the colors and background image used across your website. Open these options from the Customizer under Appearance.
Color Scheme
The color scheme sets the main background color for your site. Choose a color that matches your logo and printed tour materials.
For example, a soft background color can make a dark green trekking logo easier to read.
Open the color settings
Go to Appearance > Customize > Appearance Settings > Colors.
Choose the background color
Select Background Color. Choose the color you want visitors to see behind your content.
Check the text on the page after choosing the color. Make sure visitors can still read your trip details.
Publish the color
Select Publish. The new background color is now active.
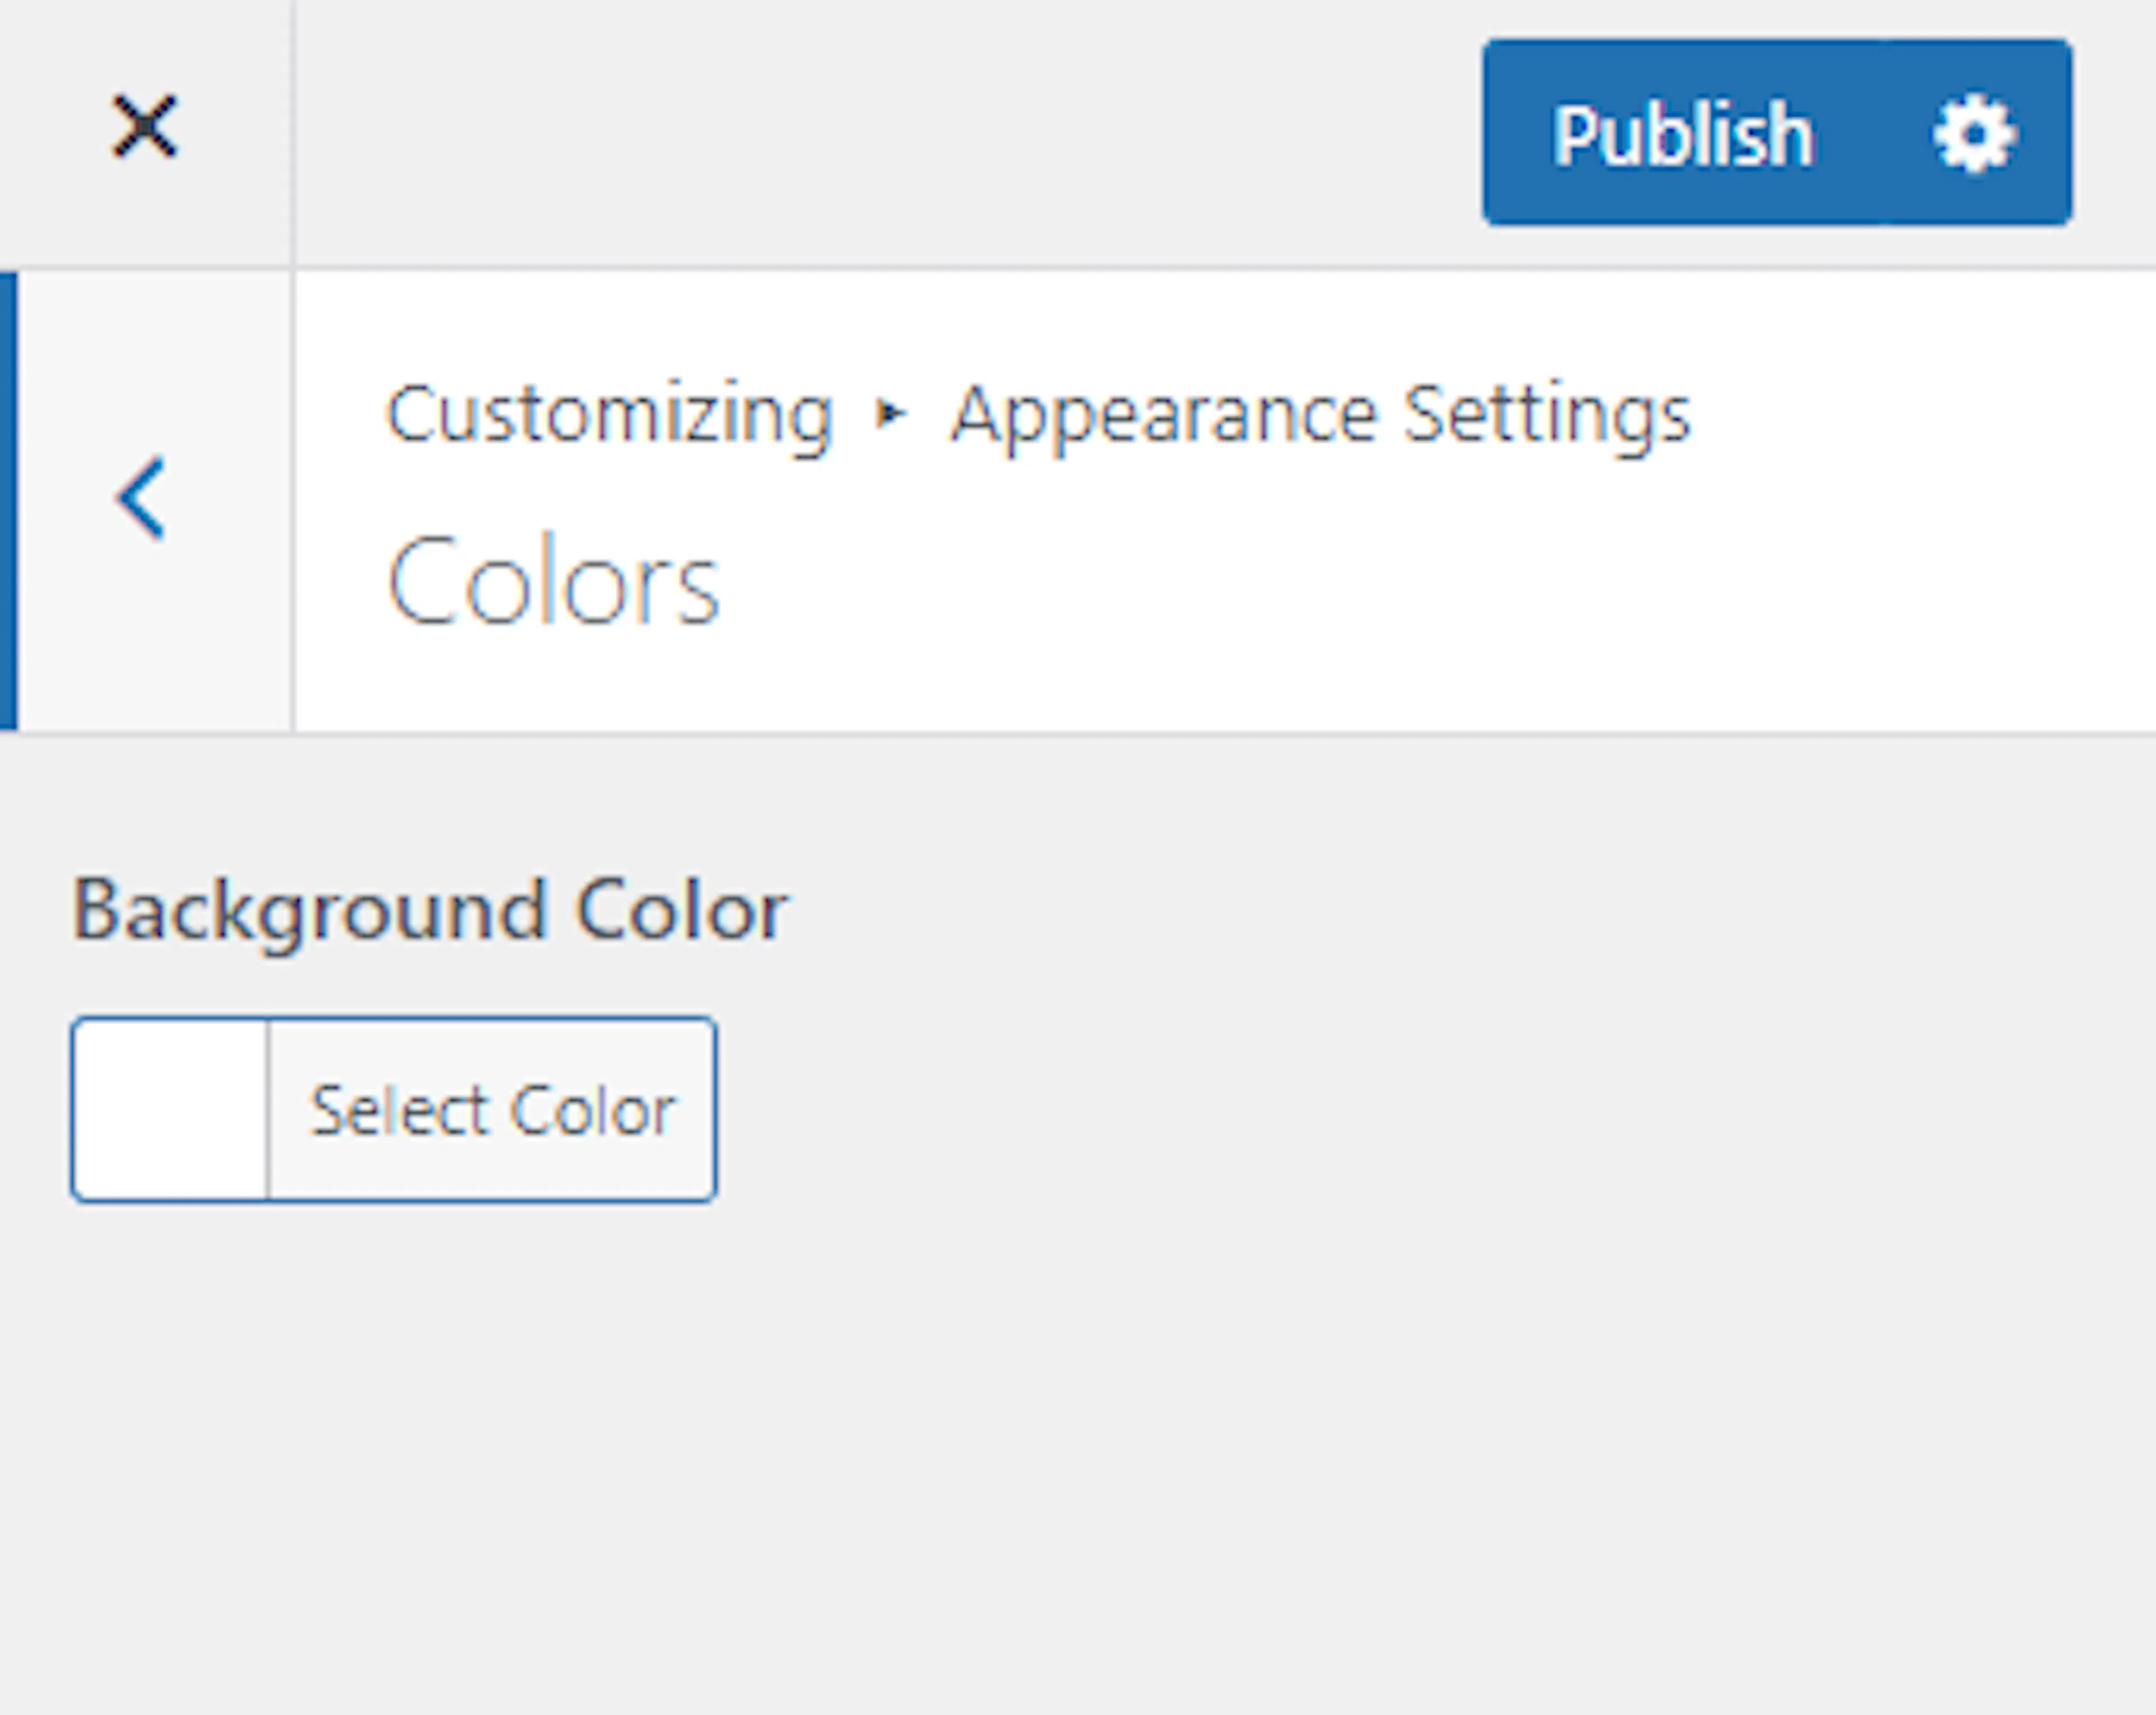
Your site colors now match your preferred style. You can add a background image if you want more visual detail.
Background Settings
A background image adds a photo or pattern behind your site's content. Use a light image. Visitors can then still read your text.
A pale texture can work well behind a page about day tours. Avoid a busy mountain photo if it makes the trip description hard to read.
What you'll need before you start: a background image that does not make your text difficult to read.
Open the background settings
Go to Appearance > Customize > Appearance Settings > Background Image.
Upload a background image
Select Select Image. Upload the background image you want to use.
Publish the background
Select Publish. The image now appears as your site's background.
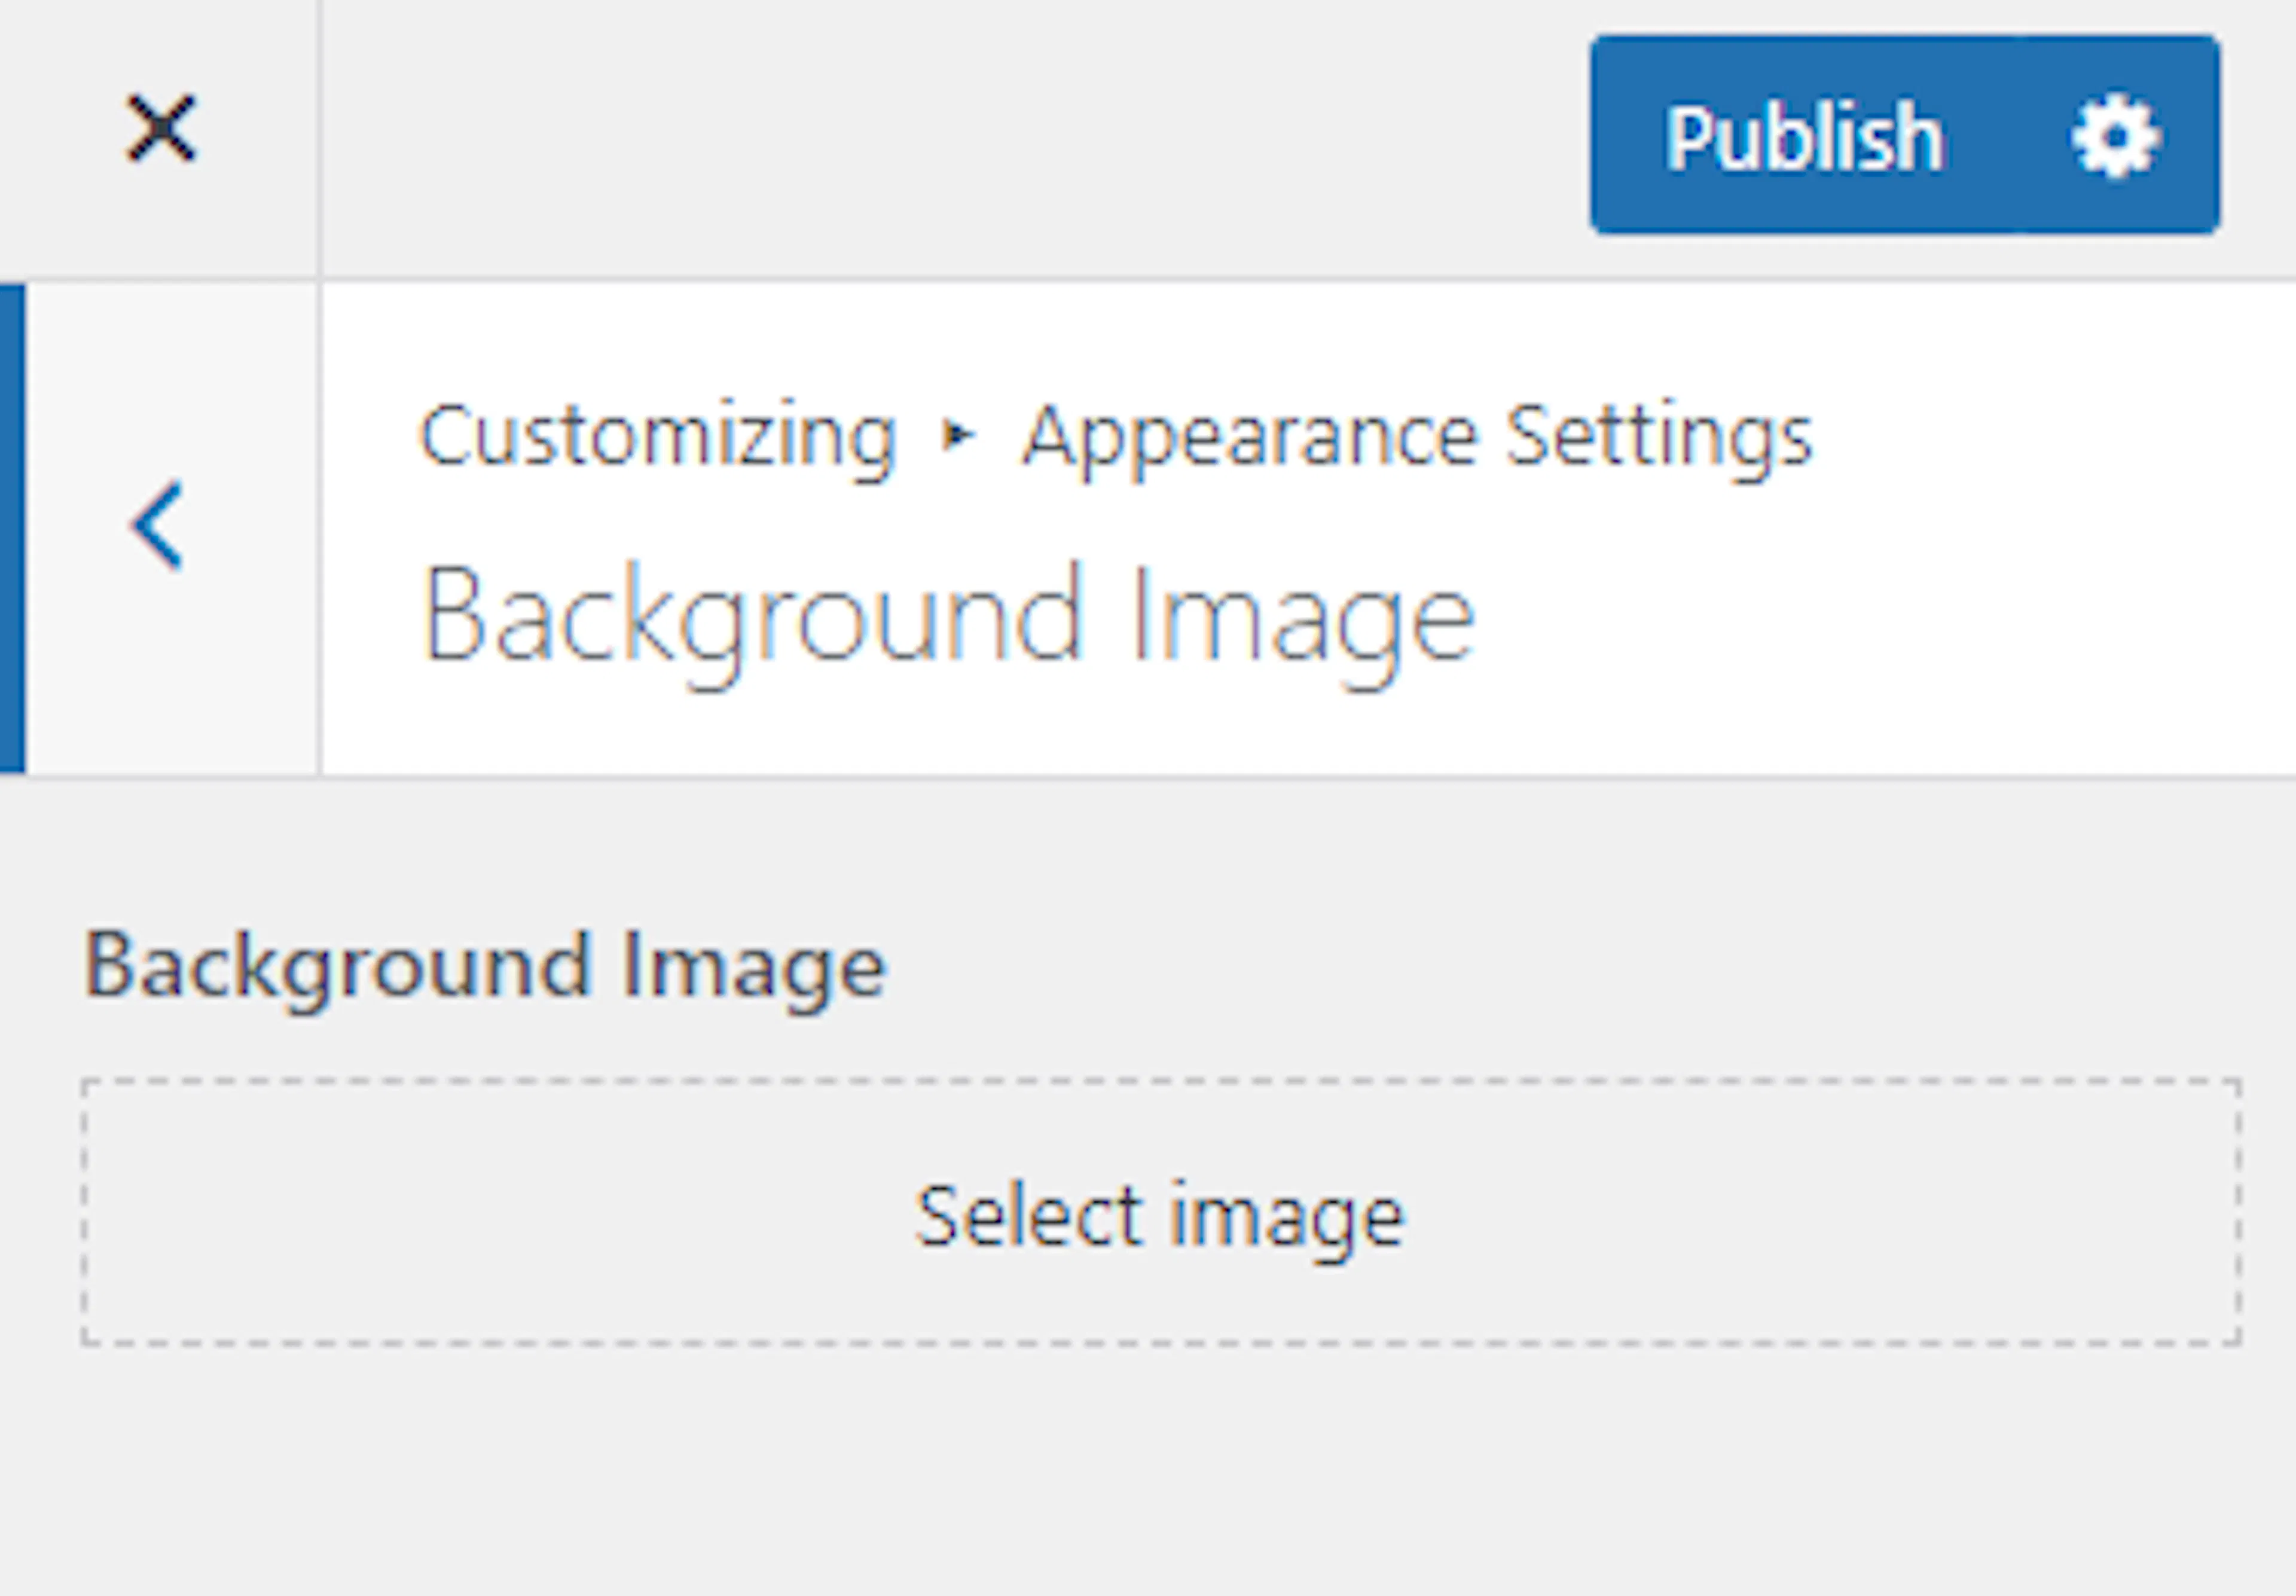
Your colors and background are set. Next, choose how your header, banners, and sidebars are arranged.
Layout Settings
Layout Settings controls the position and style of the main areas of your site. Find these options in the Customizer under Appearance.
Header Layout
The header layout controls how your logo, navigation, contact details, and buttons are arranged.
Choose a layout that keeps your phone number and booking button easy to find. Travelers often look for those details before they read a full trip page.
Open Header Layout
Go to Appearance > Customize > Layout Settings > Header Layout.
Choose a header layout
Select the header layout you want visitors to see. Check the preview to make sure your logo and contact details fit comfortably.
Publish the layout
Select Publish. The header now uses your selected arrangement.
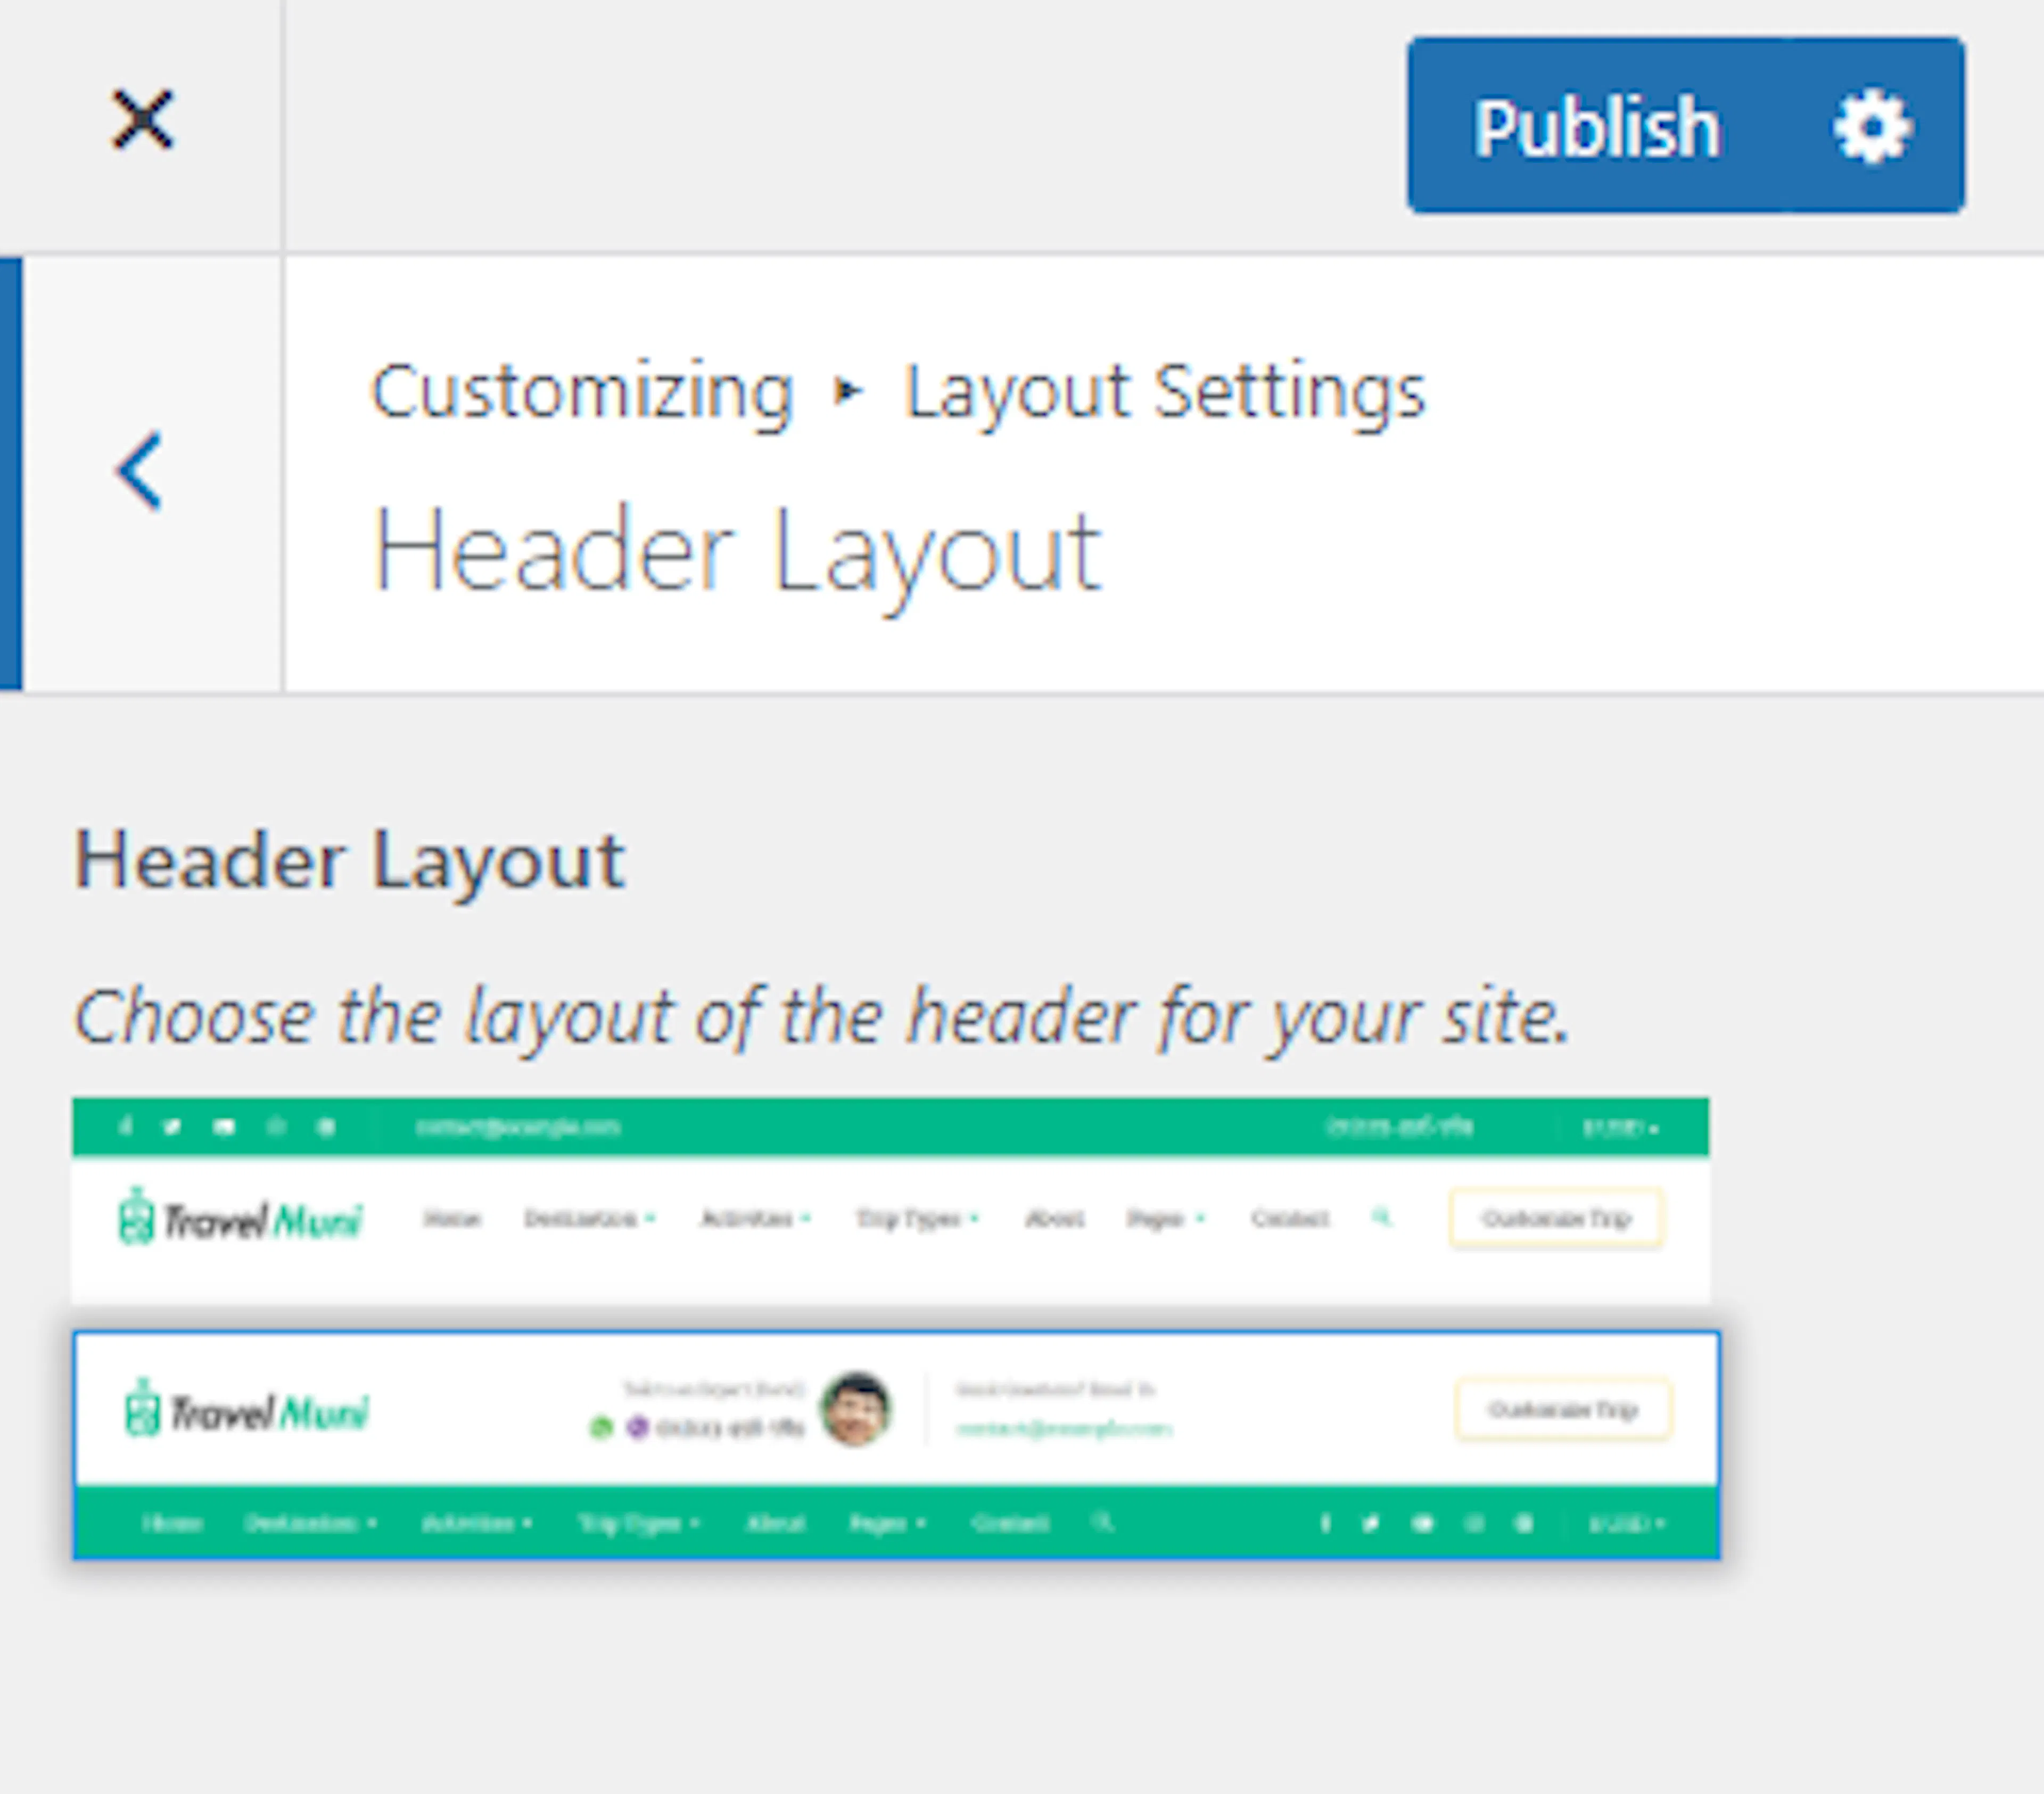
Your header structure is set. Choose the layout for the banner next.
Banner Layout
The banner layout controls how the large image or video area appears on site pages.
For example, a wide banner can show a trekking photo across the top of a trip page. A video layout can show a short rafting or wildlife tour clip.
Open Banner Layout
Go to Appearance > Customize > Layout Settings > Banner Layout.
Choose a banner layout
Select the banner layout you want to use. Check that the image or video leaves enough room for the page title.
Publish the layout
Select Publish. Your site pages now use the selected banner arrangement.
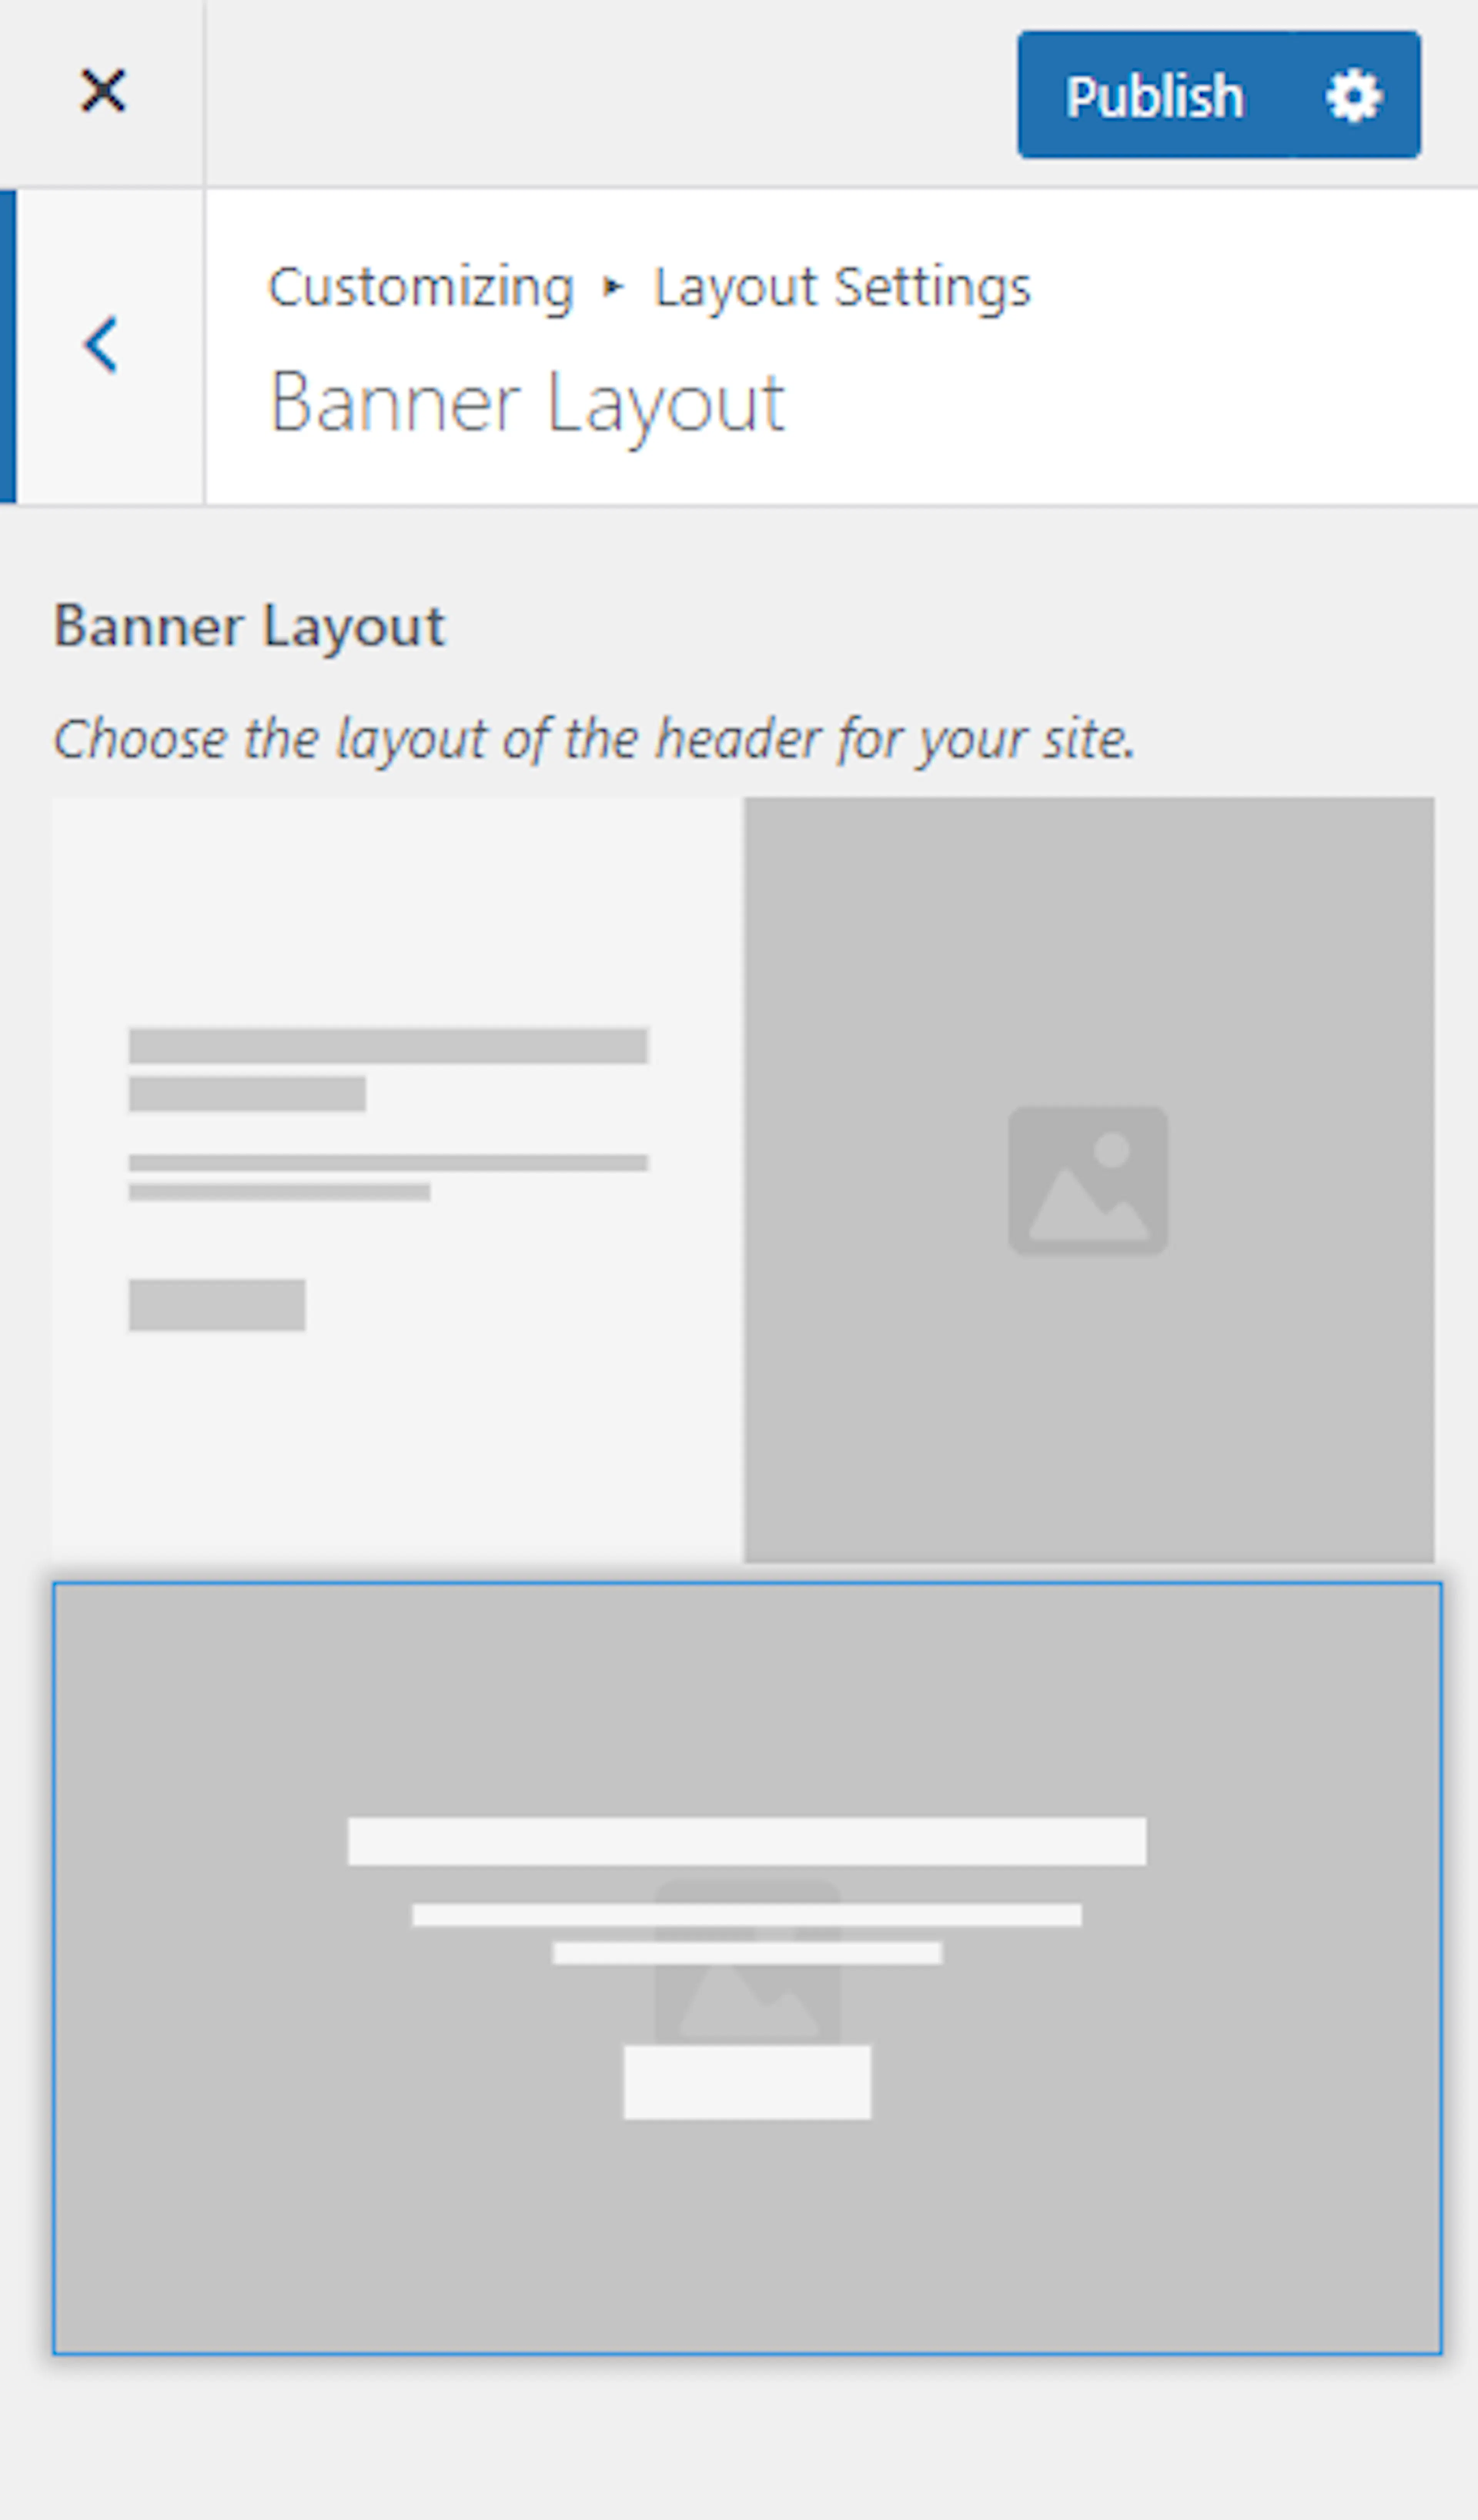
Your banner layout is ready. The sidebar settings control where side content appears beside pages and posts.
General Sidebar Layout
The sidebar layout controls the default sidebar and the sidebar used on pages and blog posts.
A sidebar can hold helpful information such as a contact form, office hours, or a link to your booking page. Choose a layout that leaves enough room for the trip description.
Open General Sidebar Layout
Go to Appearance > Customize > Layout Settings > General Sidebar Layout.
Choose the sidebar layouts
Select the default sidebar layout. Then select the sidebar layout for pages and posts.
You might use a sidebar for blog posts but choose a wider layout for detailed multi-day trip pages.
Publish the layouts
Select Publish. Your pages and posts now use the selected sidebar settings.
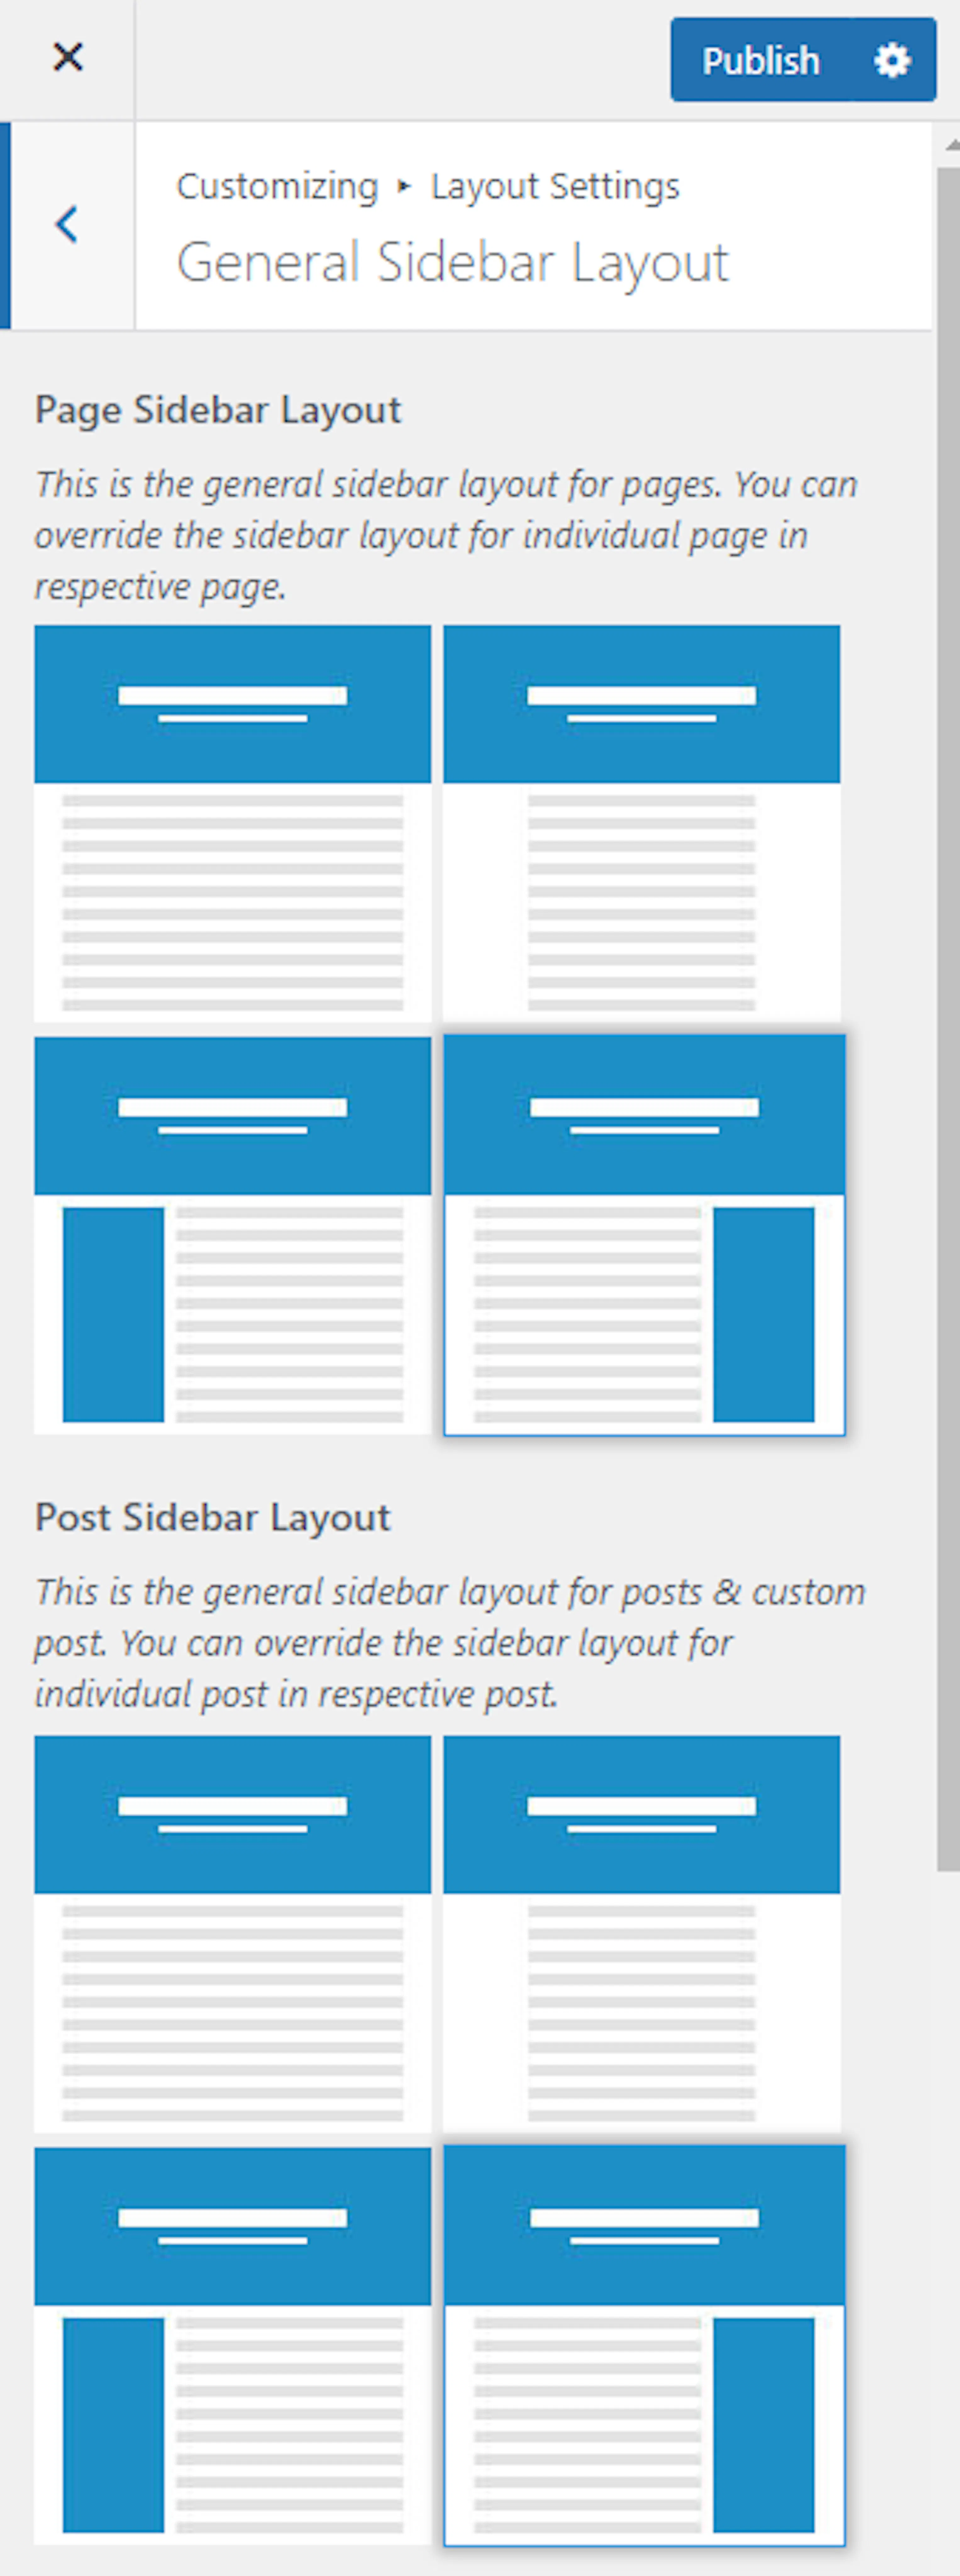
Your site's main layout is complete. The next section lets you build the content visitors see on your homepage.
Front Page Settings
The front page sections let you control what visitors see on your homepage. Set the homepage as a static page first. The homepage setup earlier on this page shows you how.
These sections help you guide a traveler from their first visit to a possible booking. You can show destinations, trips, reviews, offers, and contact options in one clear order.
Banner Section
The banner section is the large image or video area at the top of your homepage. Use it to introduce a trek, day tour, or booking action.
What you'll need before you start: a banner image or video, a title, and a link if you want a button.
Open Banner Section
Go to Appearance > Customize > Front Page Settings > Banner Section.
Choose the banner type
Choose Static/Video CTA Banner under Banner Options. This option lets you show an image or video with a message and action.
Choose Disable Banner Section if you do not want a banner.
Add a video or image
Upload and select a video. You can also enter a YouTube link.
When a video is selected, the banner image does not appear. If you want to use an image, select Add new image and add one or more banner images.
Select the image you want to display. Select Randomize uploaded headers to show a different uploaded image each time the site loads.
Do not select a video when you want to show an image.
Add the banner text and link
Enter the Title and Sub Title for the banner. Enter the Banner Label and Banner Link for the button.
For example, the button could say "View our treks" and lead to your trip list.
Publish the banner
Select Publish. Your homepage now shows the banner settings you chose.
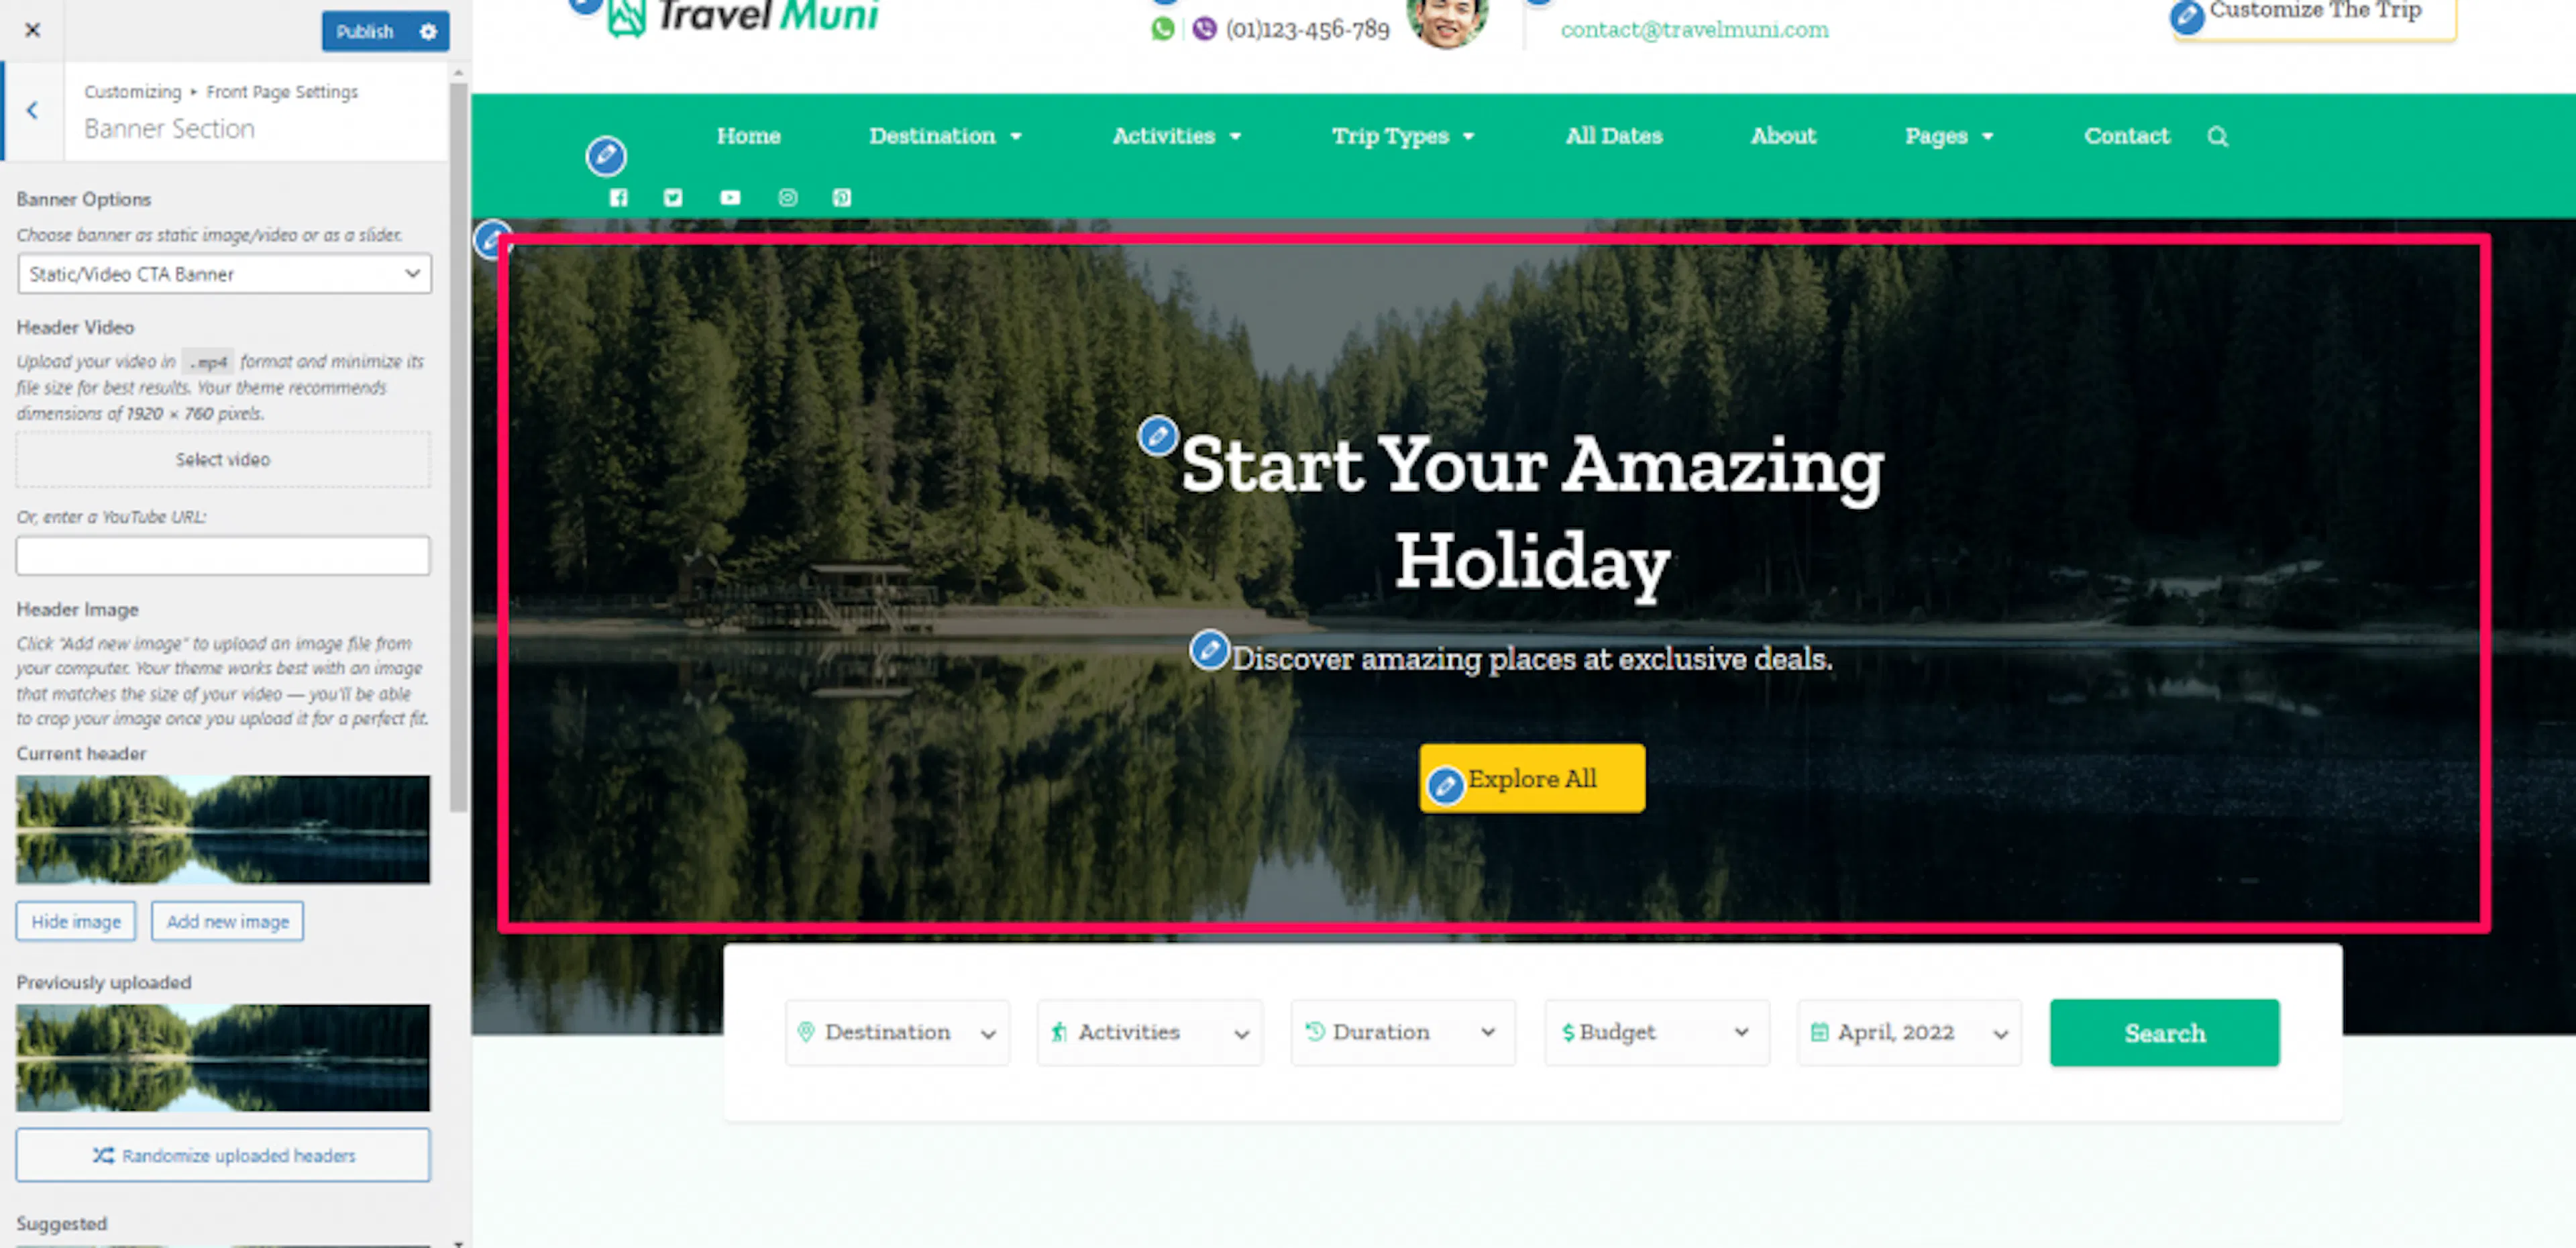
Your homepage has a clear first message for visitors. Add trip search next so visitors can find tours by their needs.
Search Section
The search section adds a trip search bar to your homepage. Visitors can use it to find tours by details such as destination or activity.
A traveler could search for a trekking trip in Nepal. Another traveler could search for a wildlife tour.
Install and activate the WP Travel Engine plugin before setting up this section. The search bar needs that plugin to work correctly.
Open Search Section
Go to Appearance > Customize > Front Page Settings > Search Section.
Show the search bar
Check Search Bar. The trip search bar will appear on your homepage.
Publish the search setting
Select Publish. Visitors can now search for trips from the homepage.
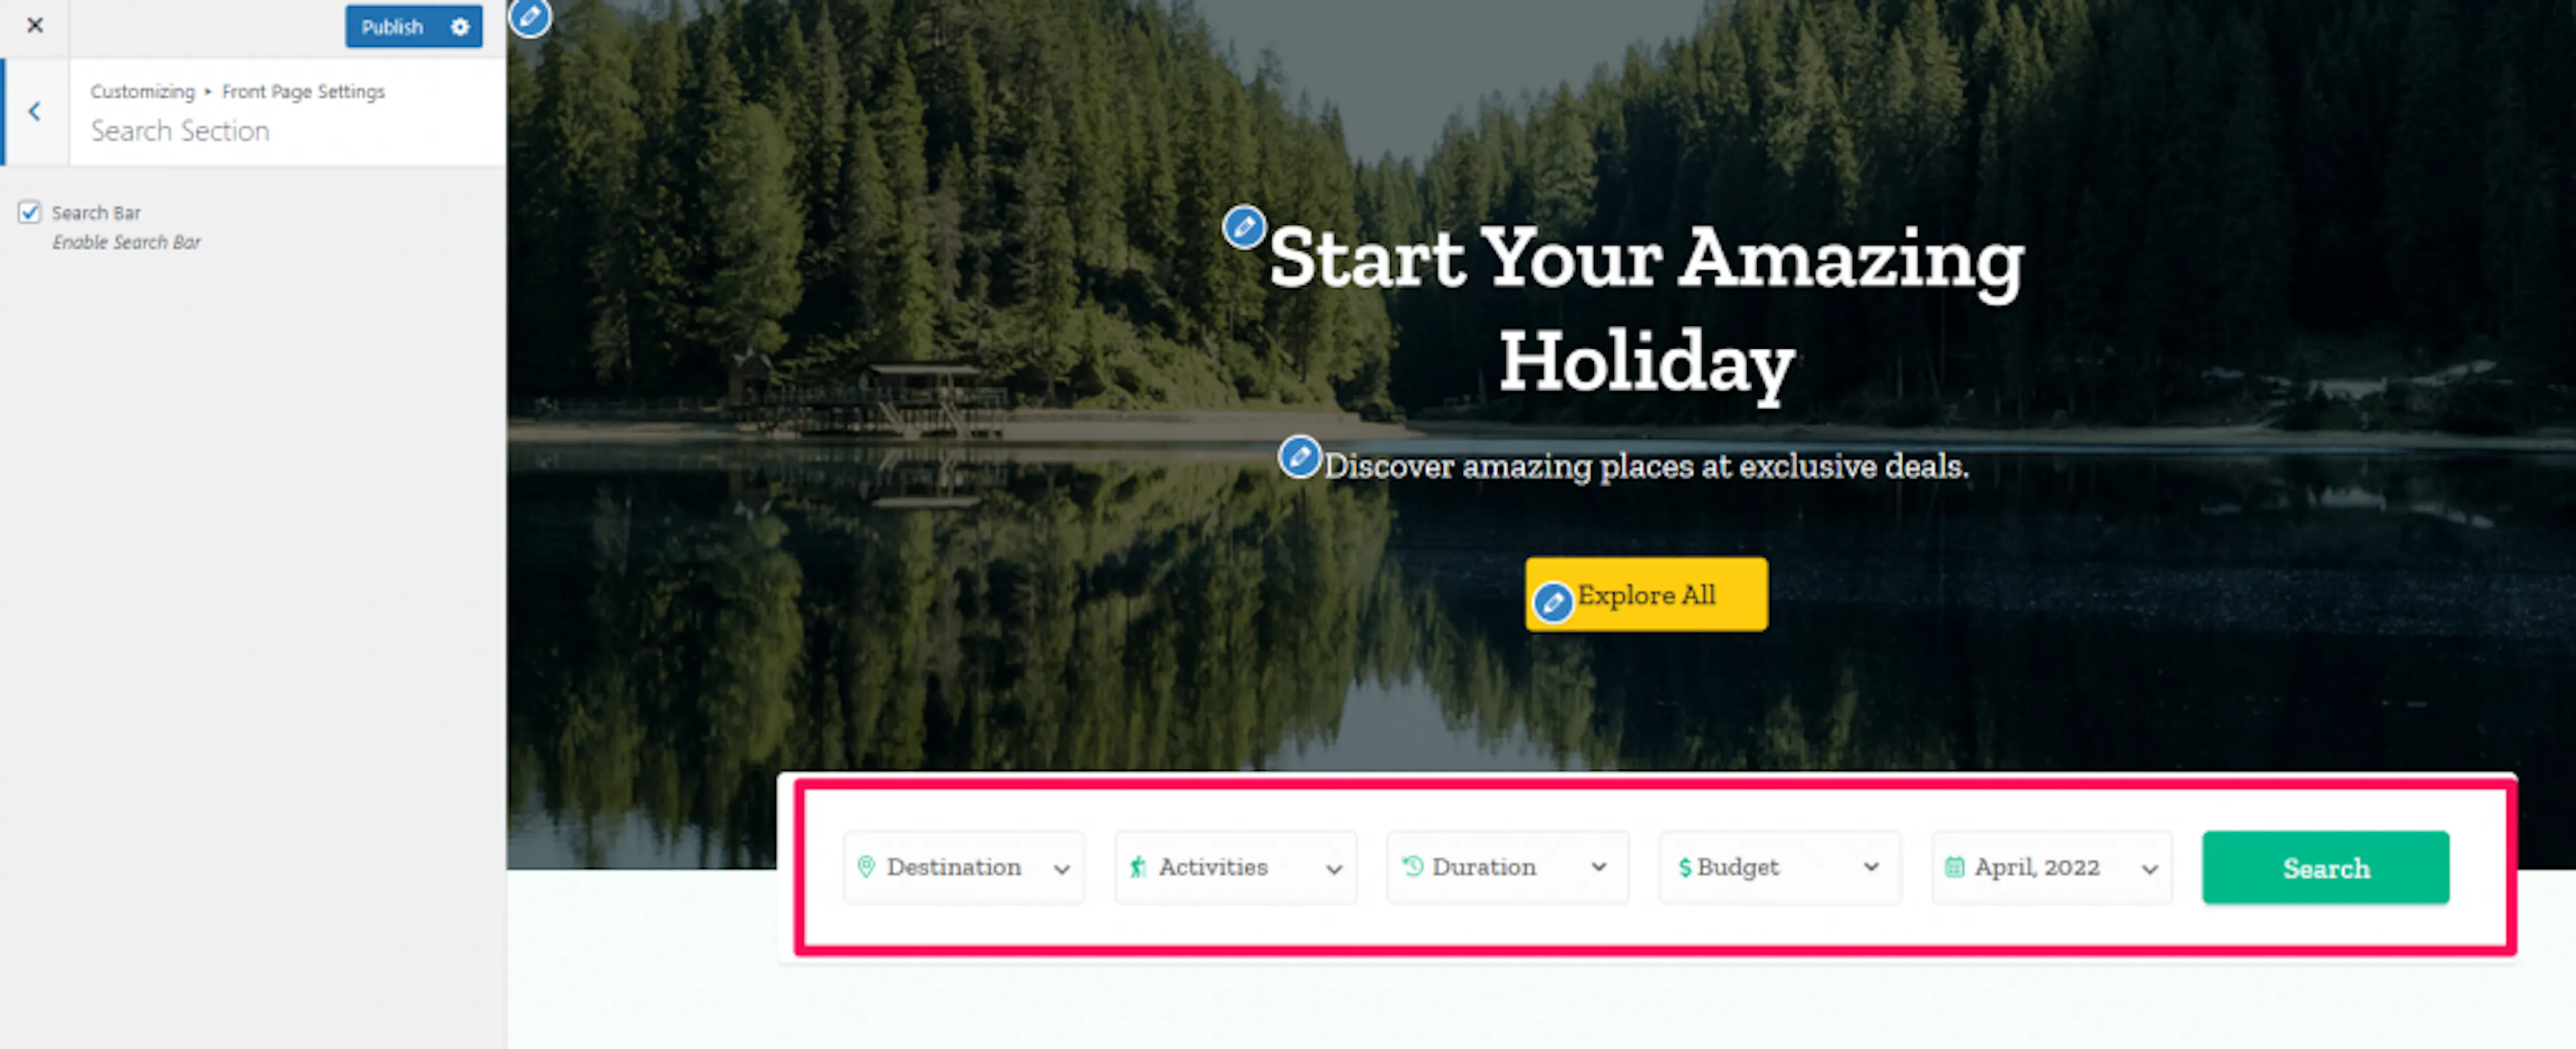
Visitors can now find trips without browsing every page. The Intro Section gives them a short welcome message.
Intro Section
The Intro Section introduces your tour business with a title, description, and optional link. Use it to explain what makes your treks or day tours a good fit.
You could explain that your guides know the local trails. You could also mention that your company offers private groups for families.
Open Intro Section
Go to Appearance > Customize > Front Page Settings > Intro Section.
Choose whether to show the section
Choose Enable or Disable for the section.
Add the introduction
Enter the Intro Title and Section Description. Add the Readmore Label and Readmore Label URL if you want visitors to open a longer page.
Enter your Trip Advisor Code if you use TripAdvisor reviews or widgets. A code is a piece of text that connects the review service to your website.
Publish the introduction
Select Publish. Your welcome message now appears on the homepage.
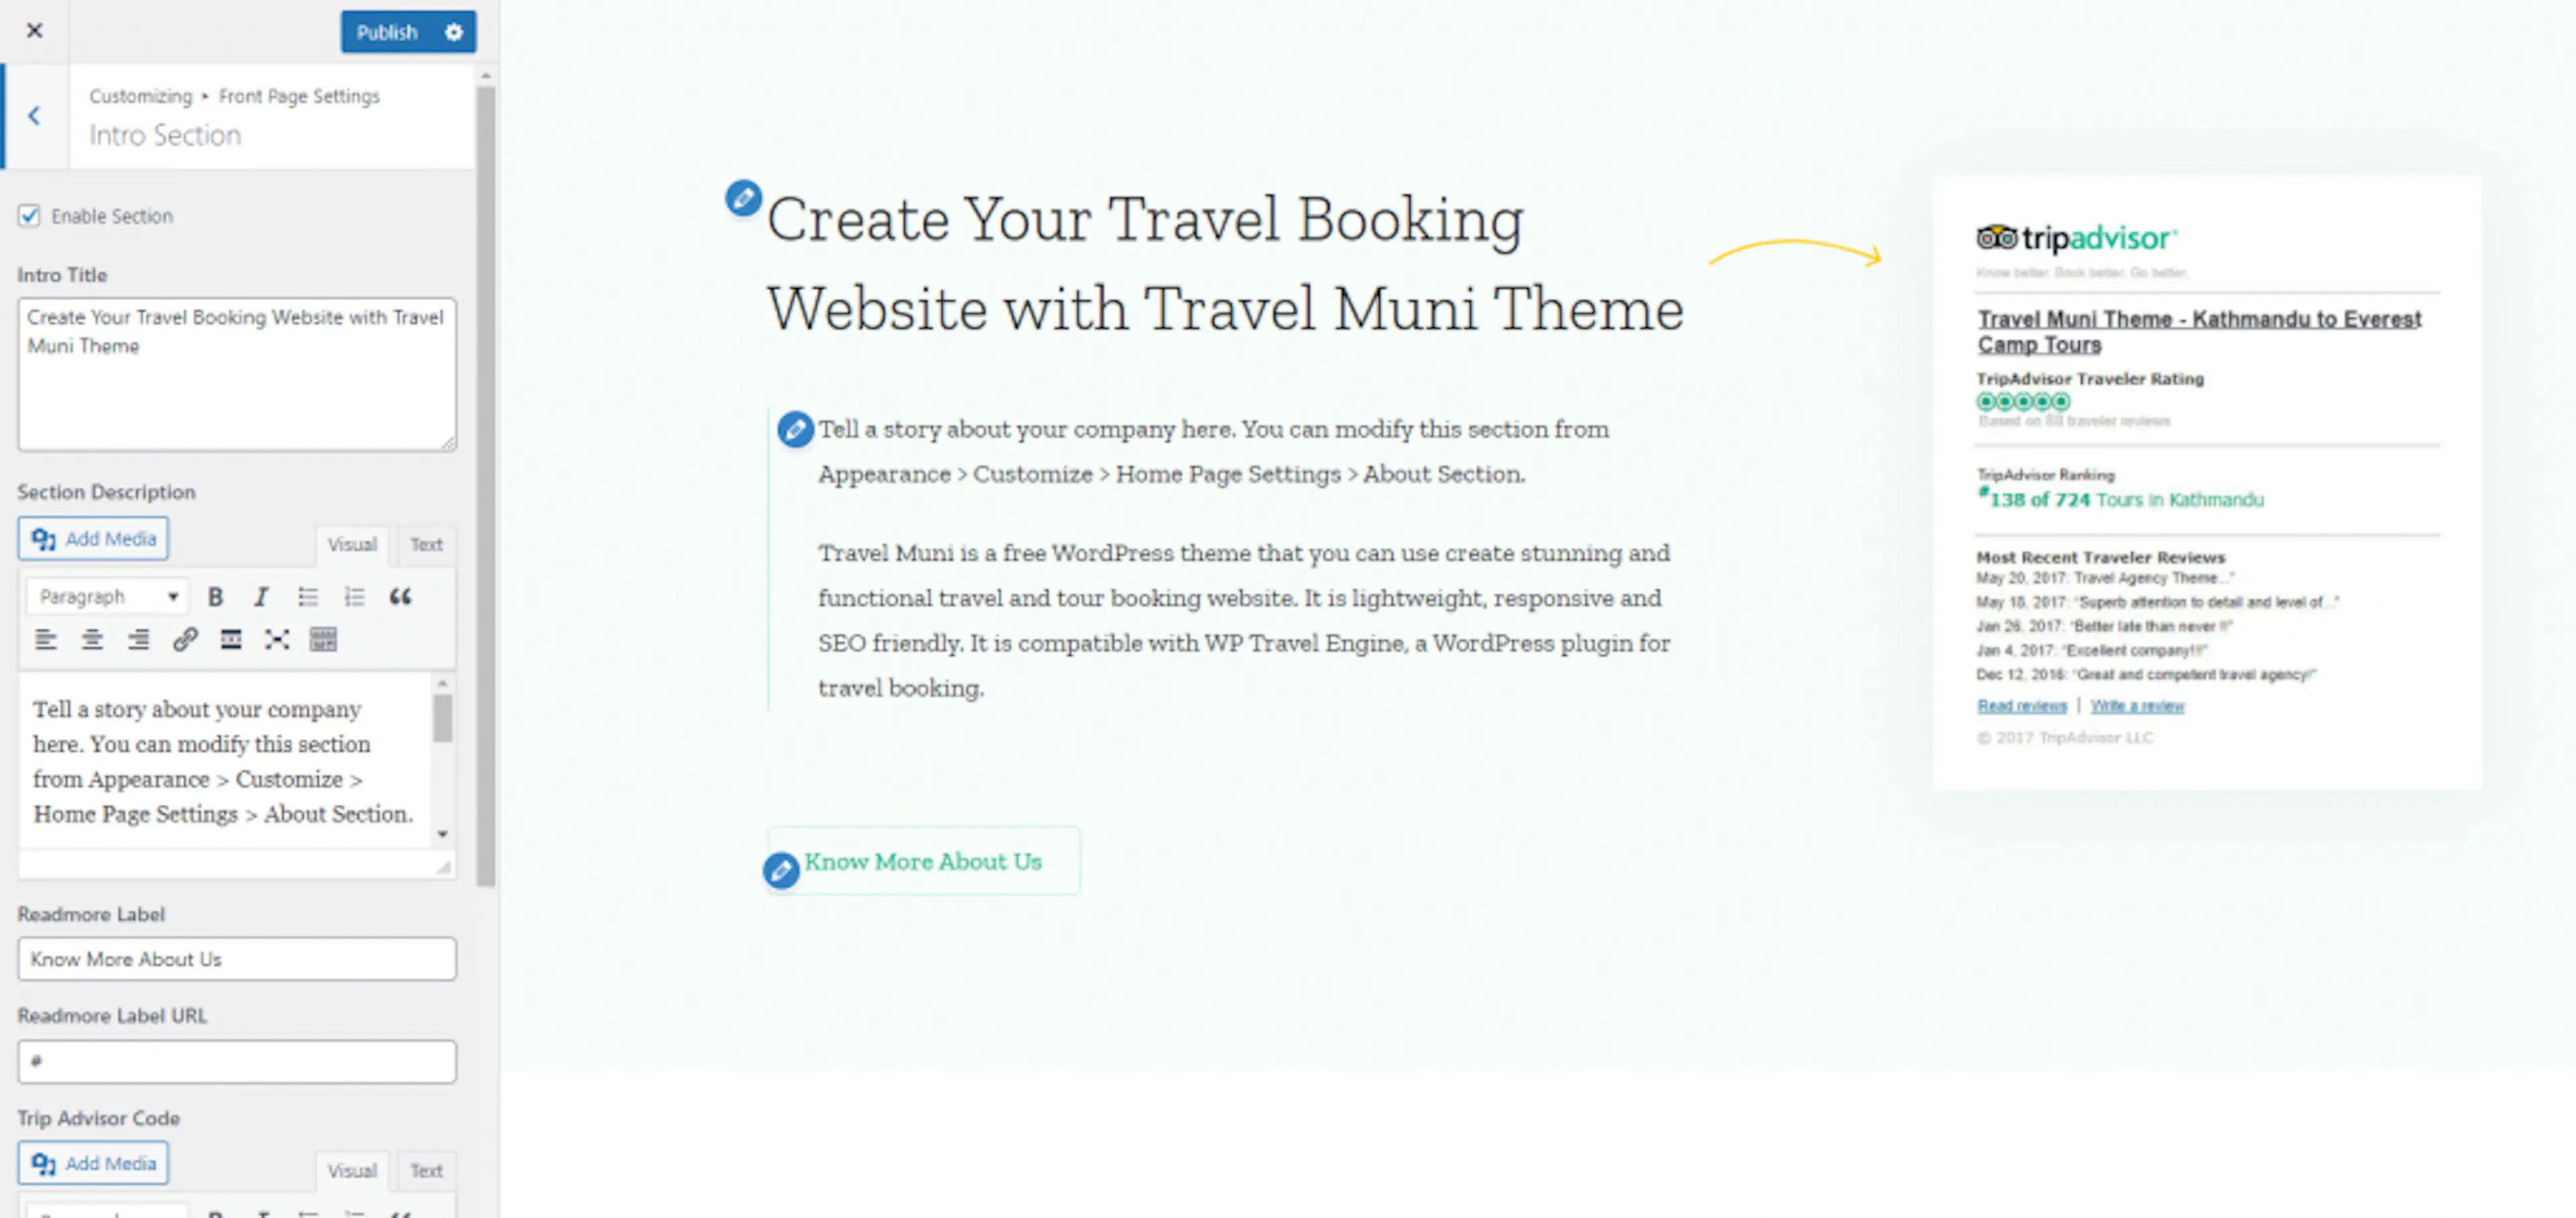
Your homepage can now introduce your business. Use the Destination Section to help visitors choose where to go.
Destination Section
The Destination Section displays places where you offer tours. For example, you could show Nepal, Bhutan, and northern India as your top destinations.
Showing destinations helps a traveler start with a place in mind. A visitor who wants to visit Bhutan can select Bhutan before choosing a specific tour.
Open Destination Section
Go to Appearance > Customize > Front Page Settings > Destination Section.
Choose whether to show the section
Choose Enable or Disable for the section.
Add the section text
Enter the Section Title and Section Description. Explain what travelers can find in the destinations you show.
Choose the destination content
Check Enable Destination Demo Content if you want to display the sample destinations. Otherwise, select your Top Destinations.
Add the destination links
Enter the Top Destination Label. Enter the label in Destination View More Label.
Enter the destination page link in Destination View More Link. This link could lead to a page listing all the places where you operate.
Publish the destinations
Select Publish. Your selected destinations now appear on the homepage.
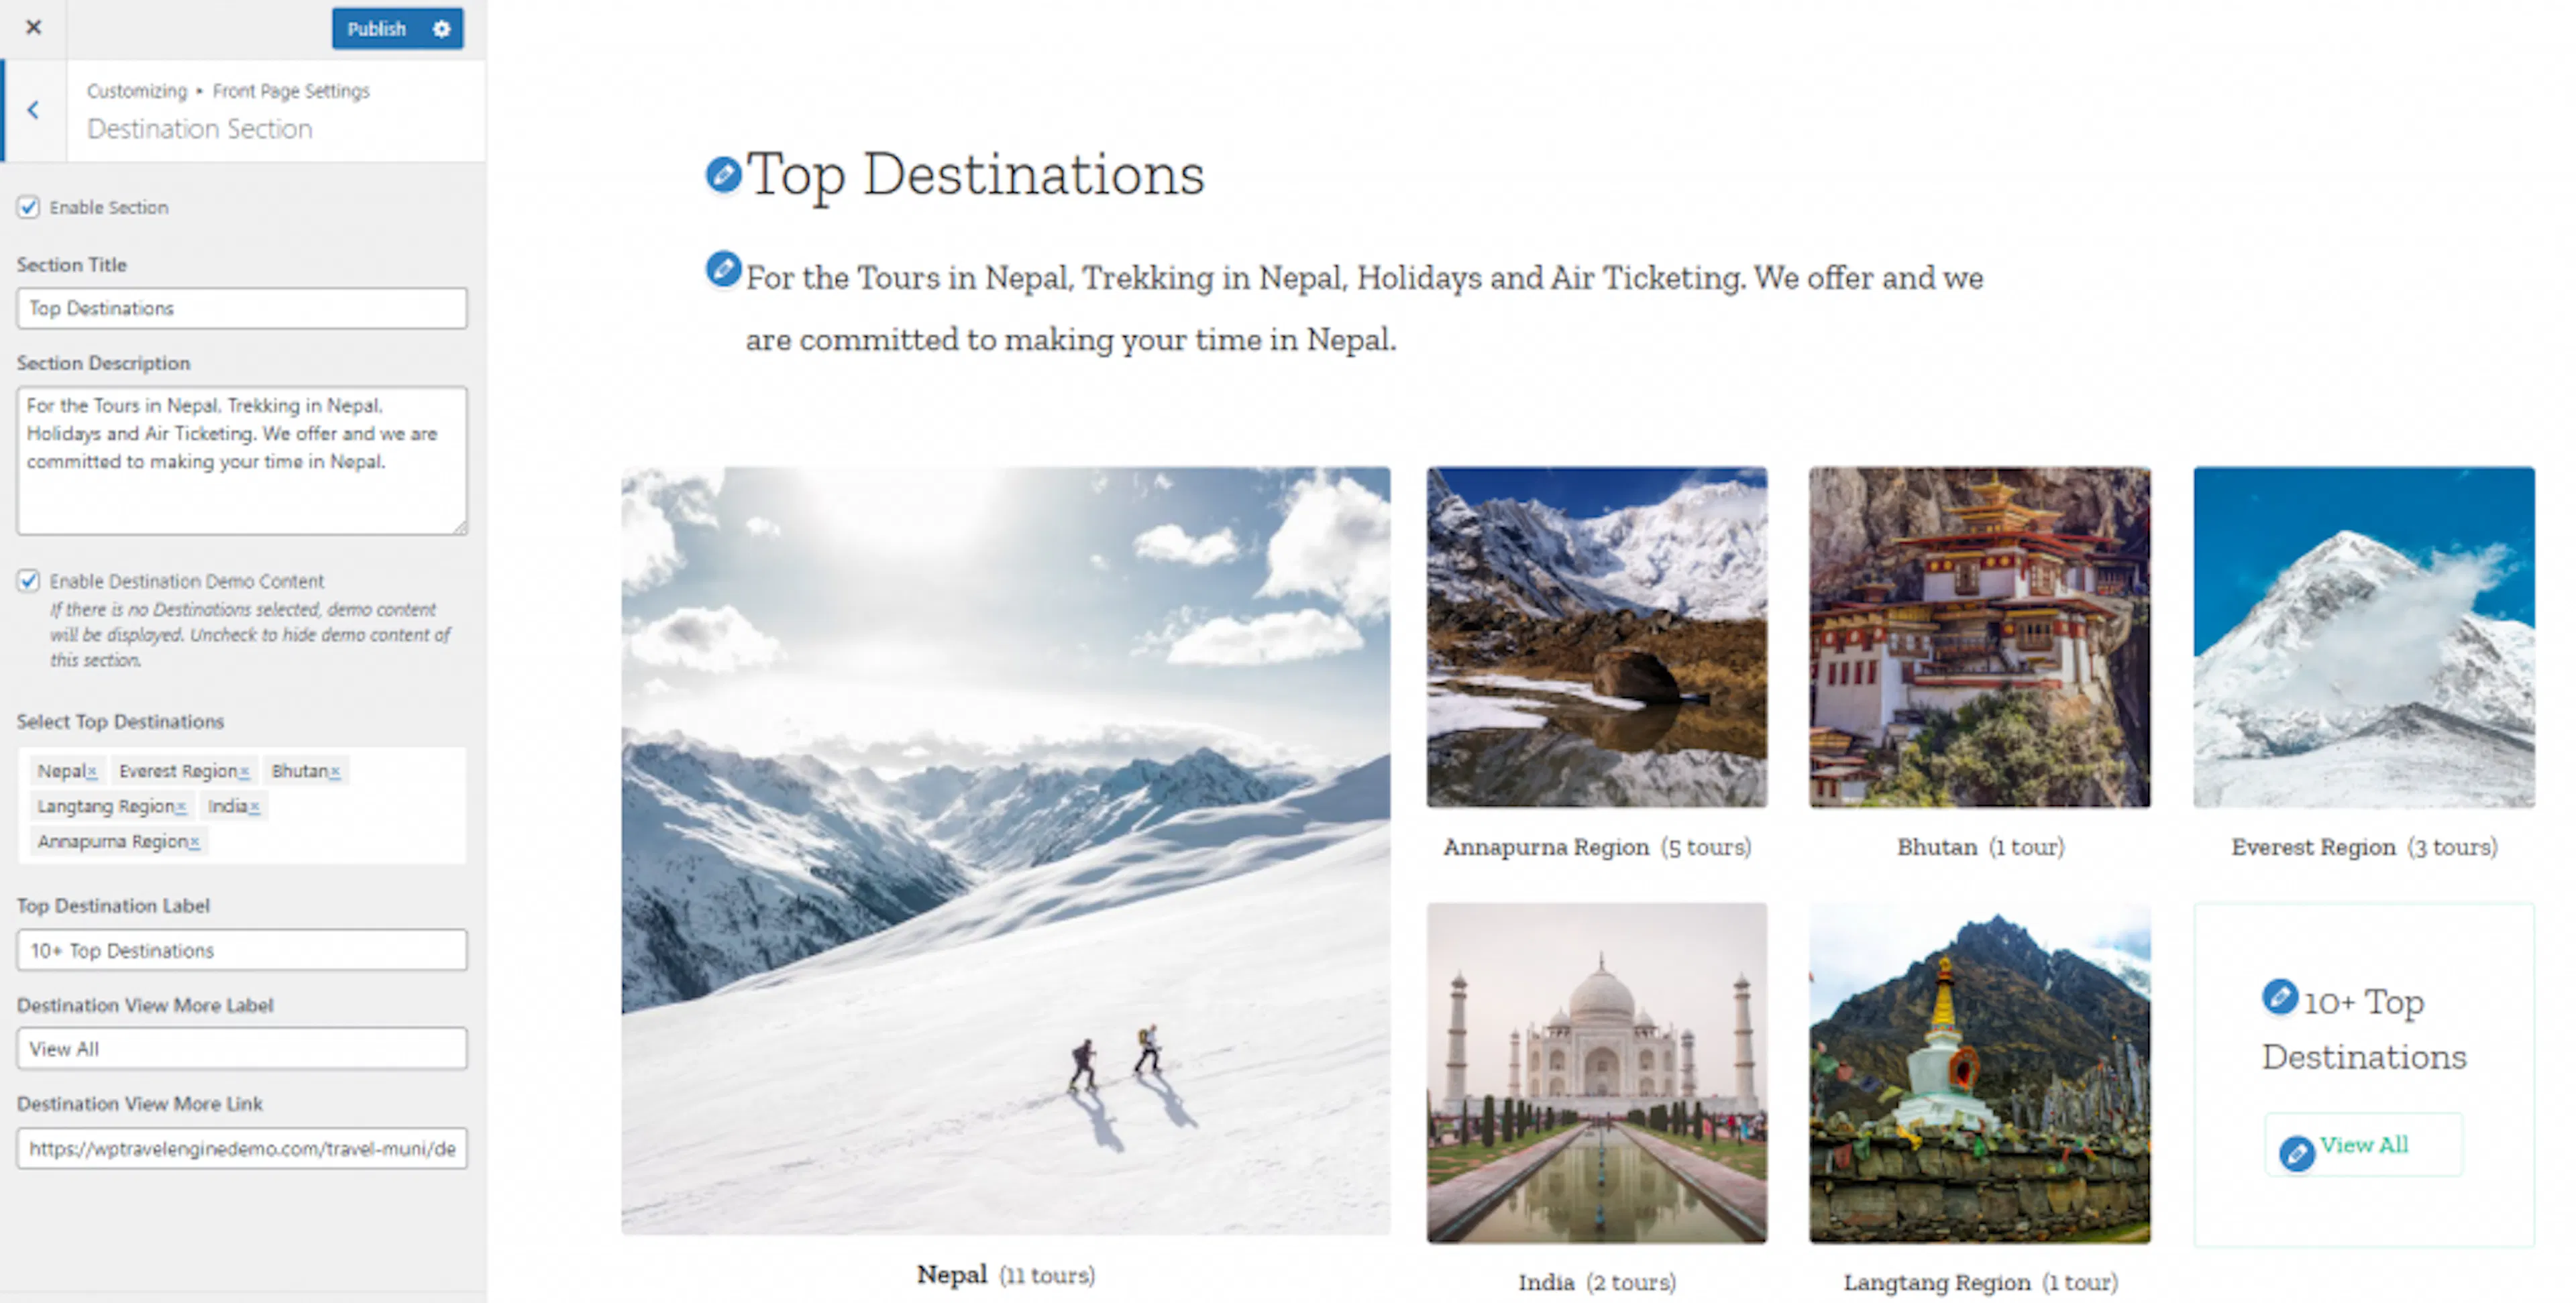
Visitors can see your main destinations at a glance. Add customer feedback to build confidence before they choose a trip.
Testimonial Section
The Testimonial Section displays reviews from past travelers. Reviews can help a visitor feel comfortable booking a multi-day package with you.
For example, a review from a family that enjoyed a private trek can answer questions that a new traveler may have about your guides and service.
This section works with the WP Travel Engine Trip Reviews addon. Install that addon if you want the review section to match the demo.
Open Testimonial Section
Go to Appearance > Customize > Front Page Settings > Testimonial Section.
Choose whether to show the section
Choose Enable or Disable for the section.
Add the section text
Enter the Section Title and Section Description. Tell visitors what the reviews represent.
Choose the reviews
Check Enable Testimonial Demo Content if you want to display the sample reviews. Otherwise, select reviews from the review dropdown.
Add the review link
Enter the label in Read More Label. Enter the destination in Testimonial Button URL.
The link could lead to a page with more reviews or to your booking enquiry form.
Publish the testimonials
Select Publish. Your selected reviews now appear on the homepage.
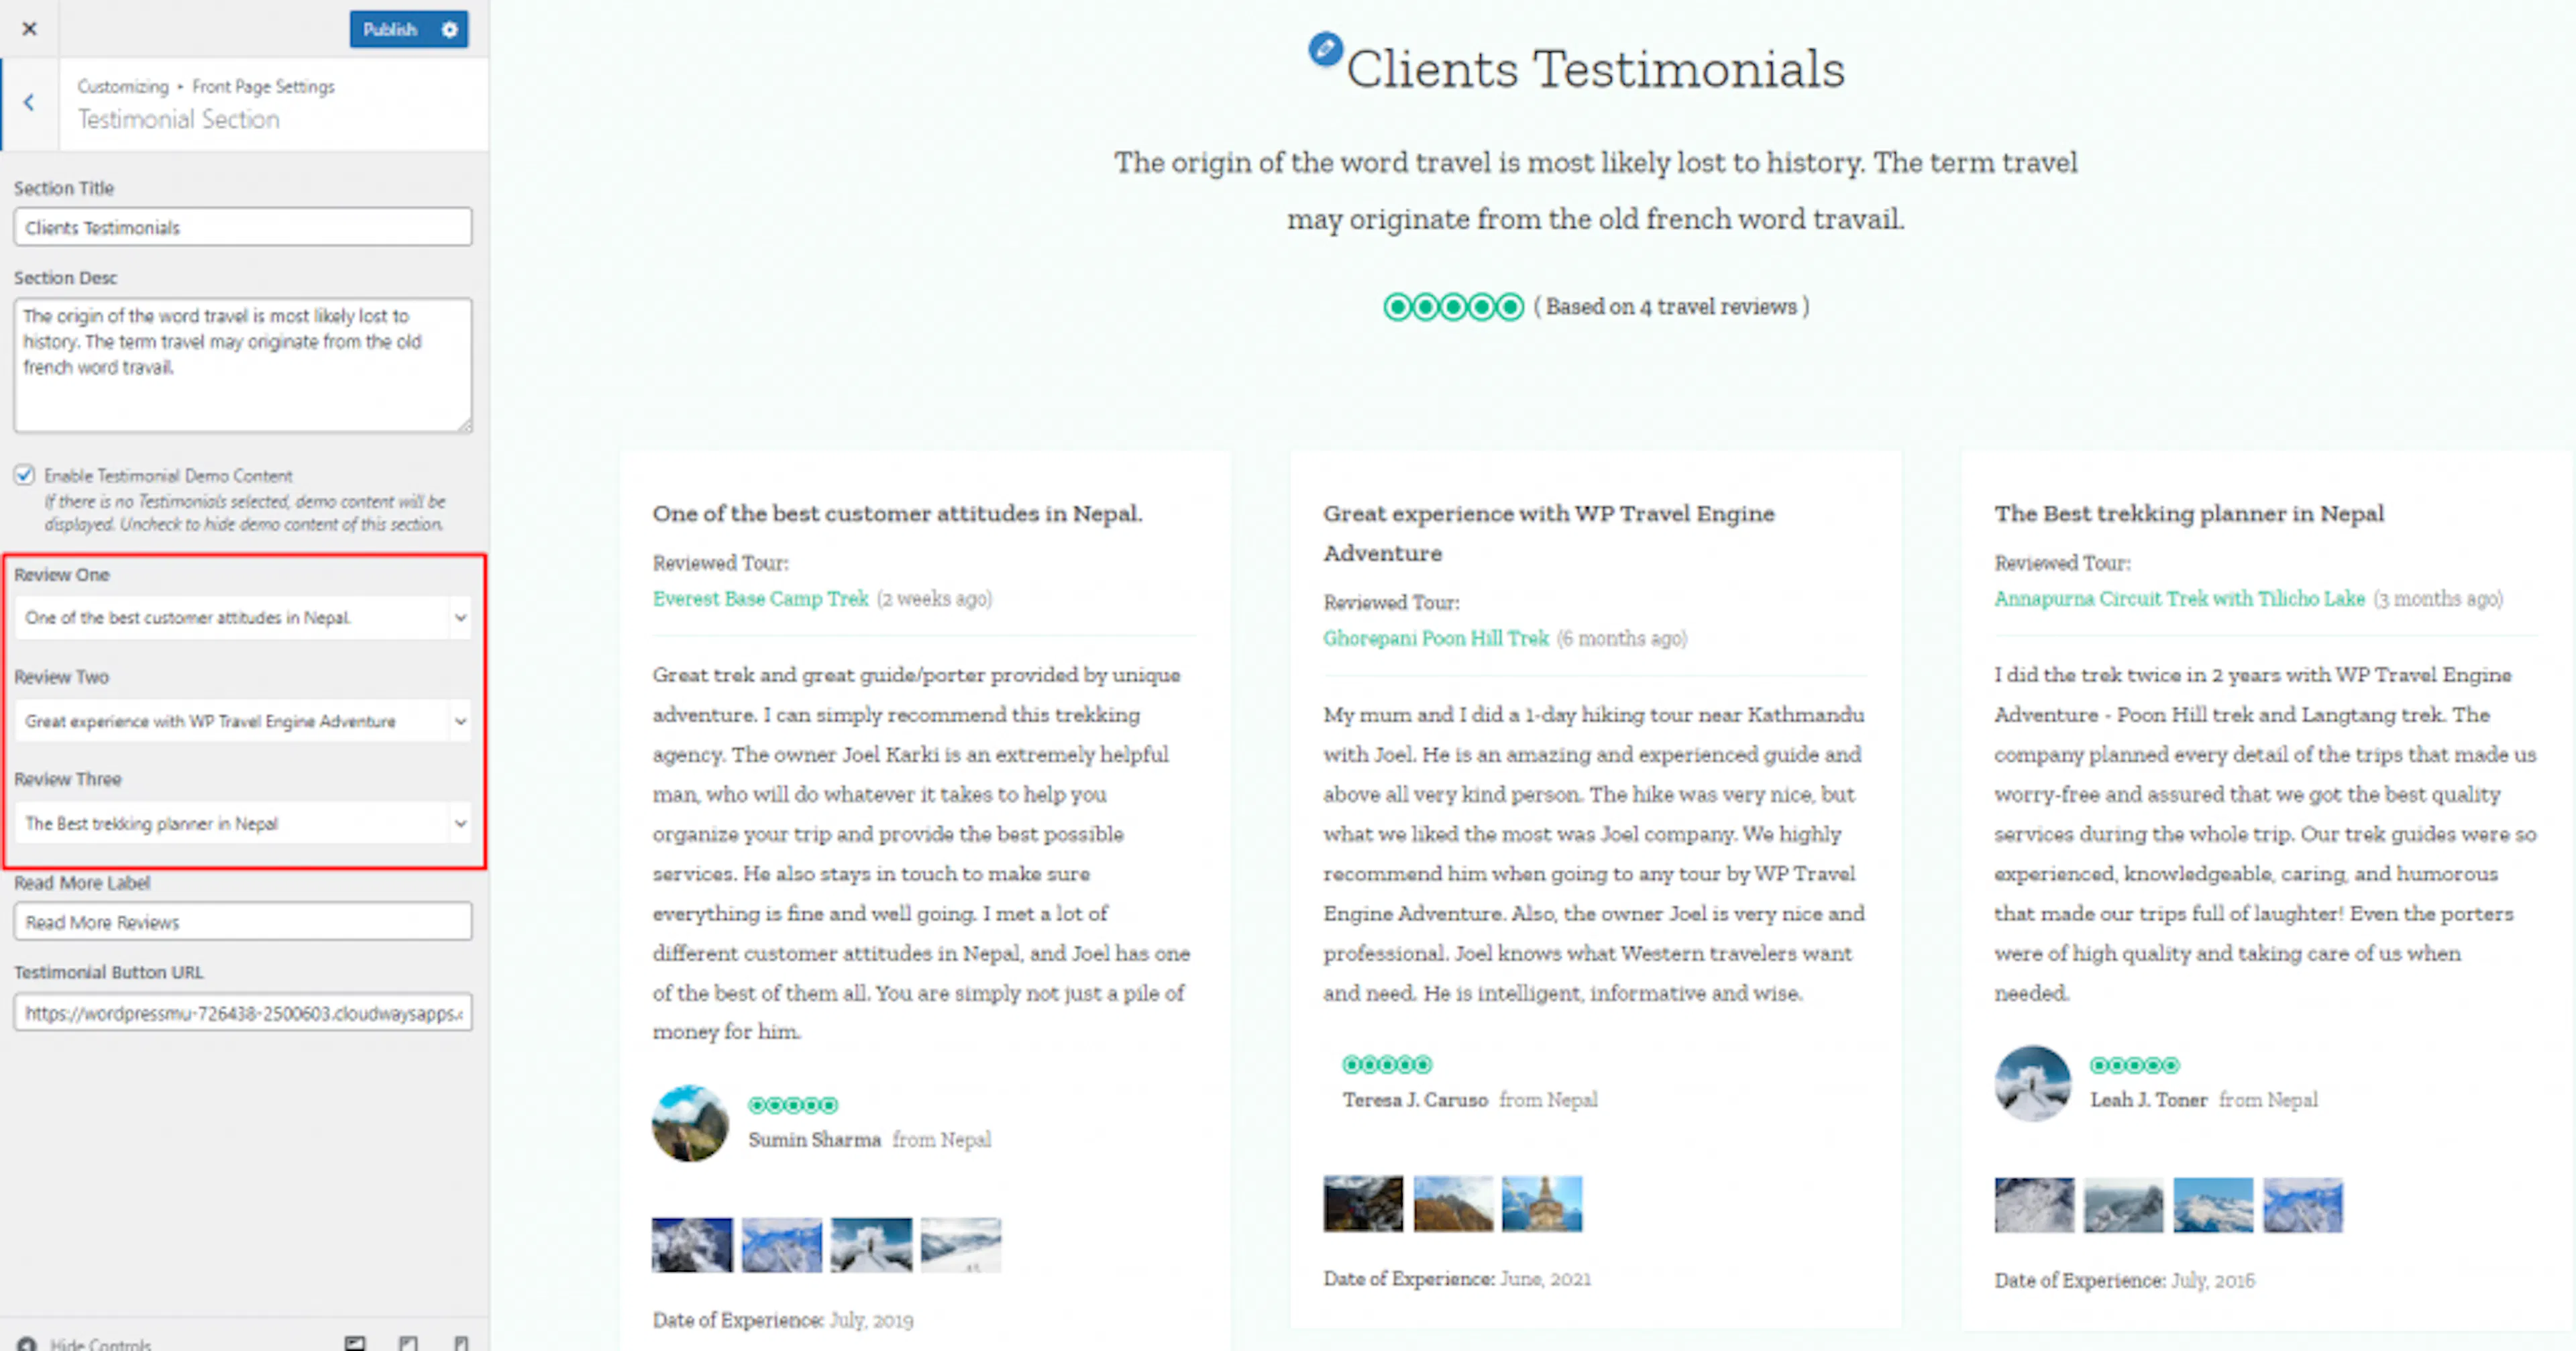
Your homepage can now show real traveler feedback. The Popular Section highlights the trips you most want to sell.
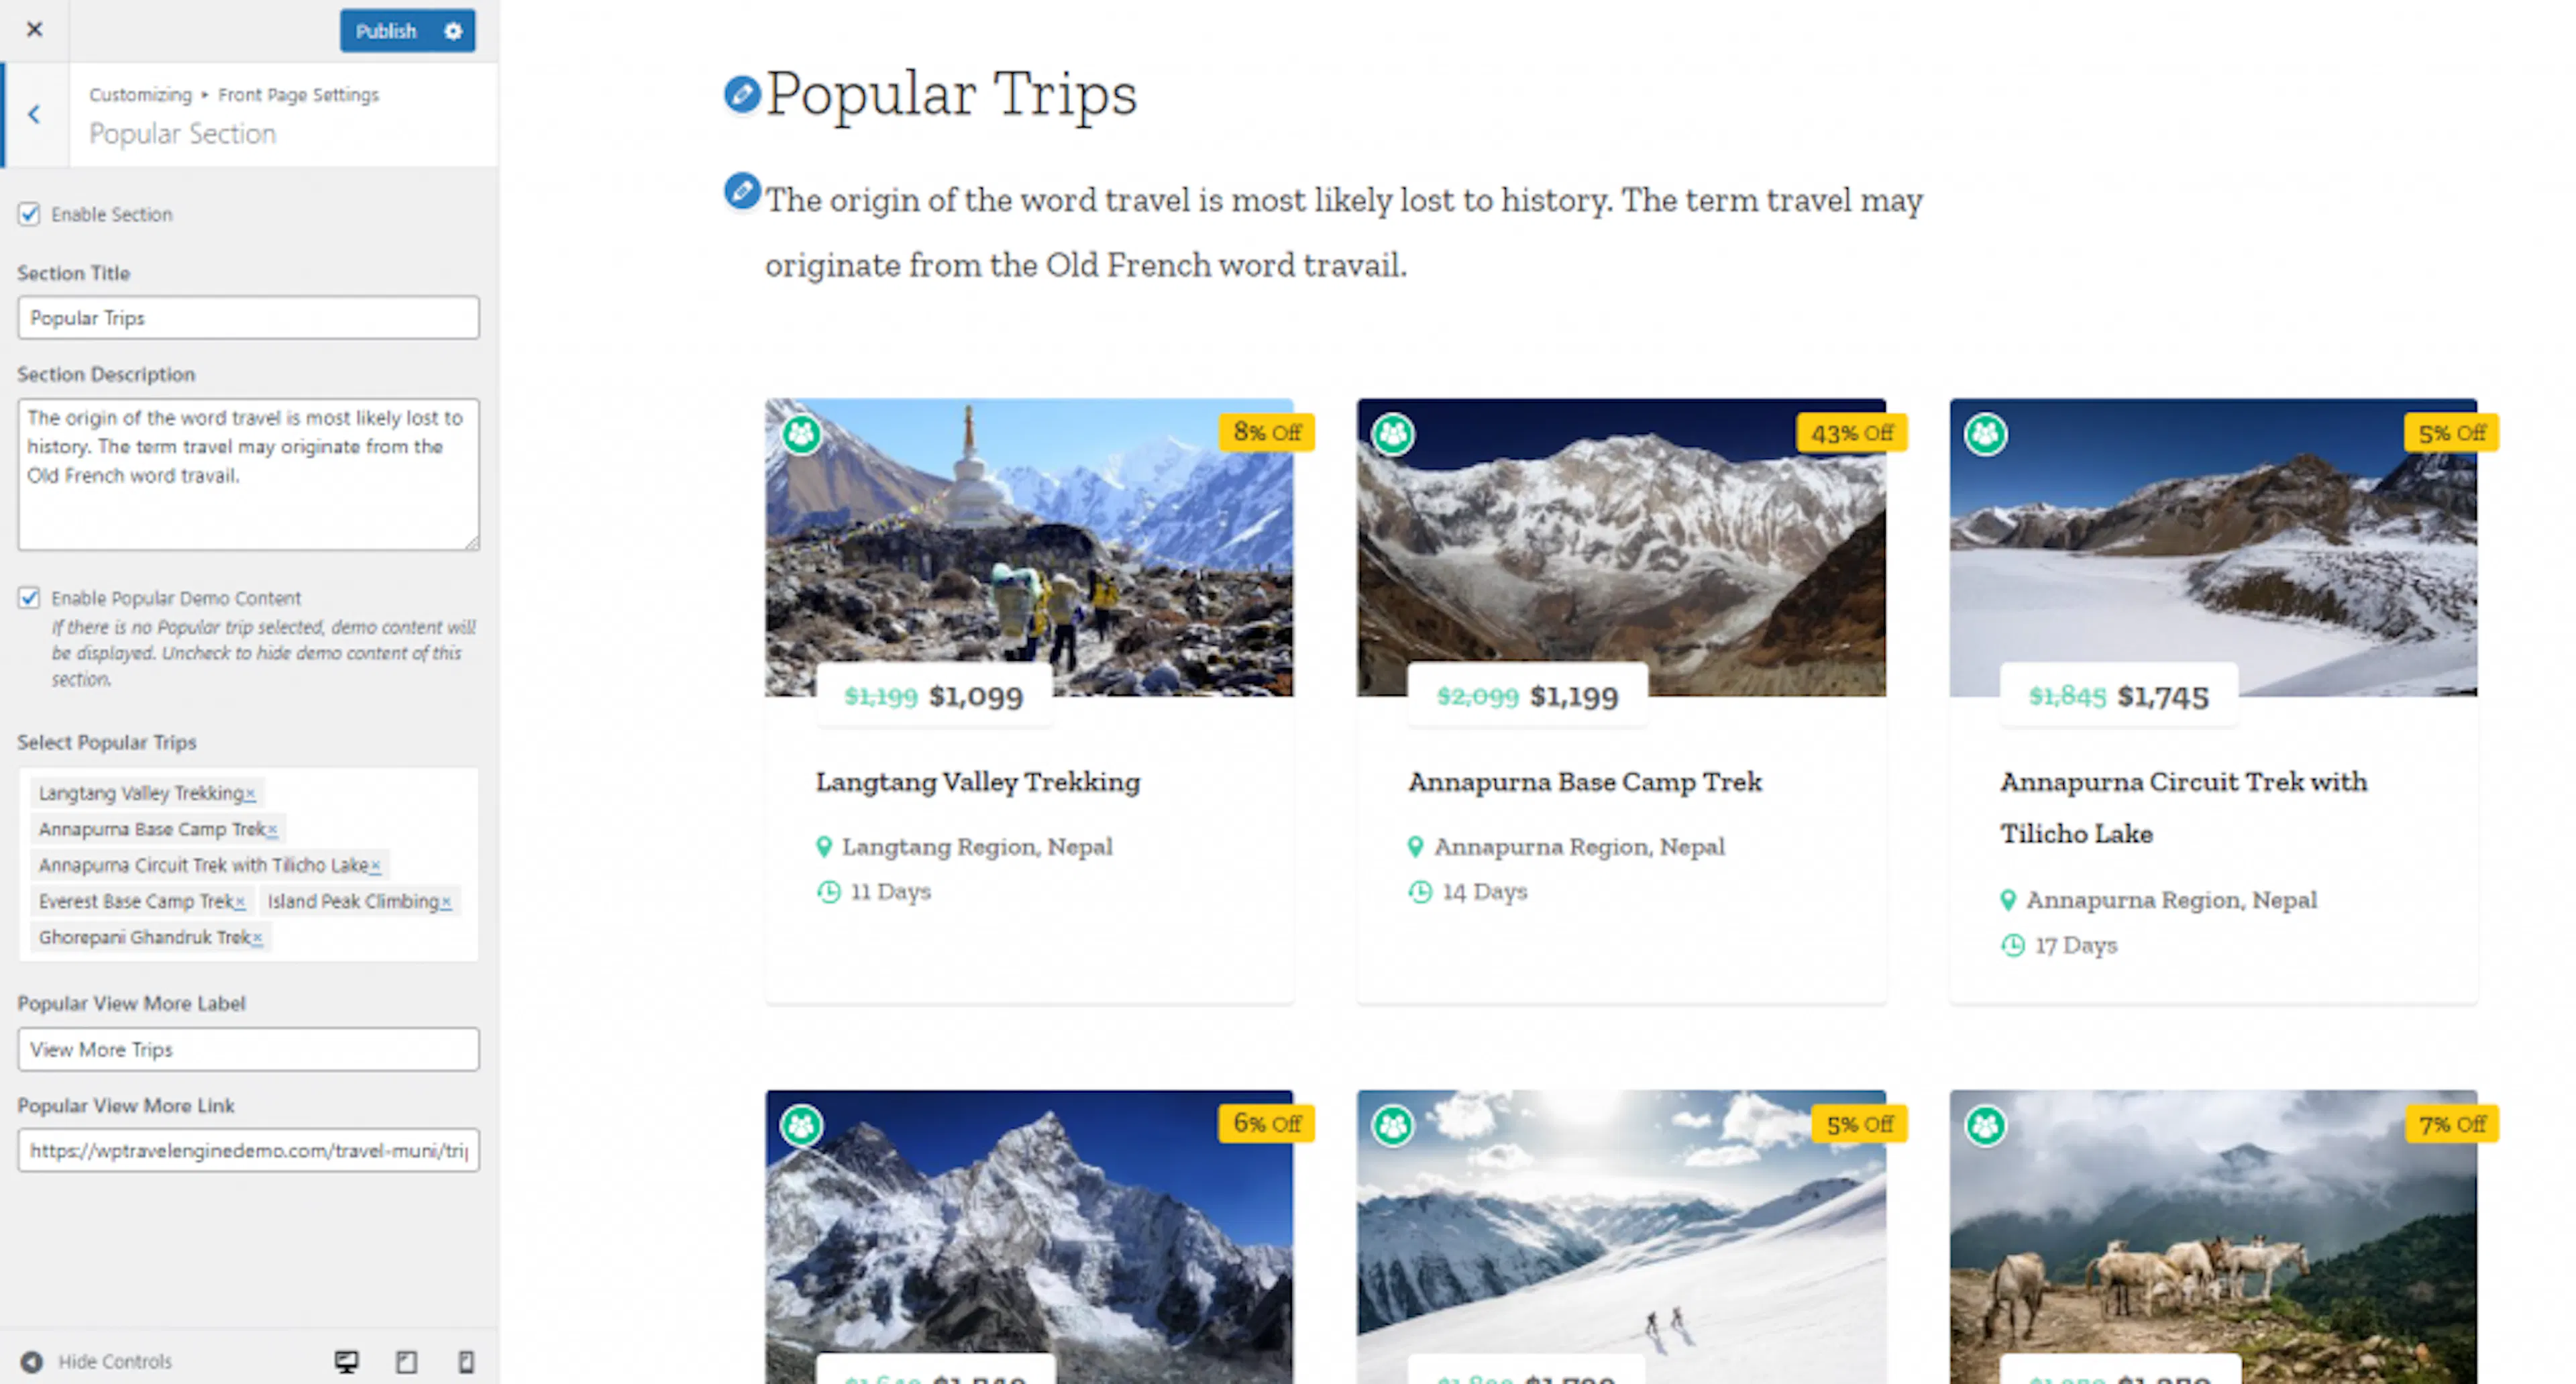
Popular Section
The Popular Section displays selected trips as your most popular or recommended tours. Use it for trips such as your Annapurna trek or a best-selling city tour.
This section puts your most important trips where travelers can see them quickly. Choose trips that are ready to accept bookings.
Open Popular Section
Go to Appearance > Customize > Front Page Settings > Popular Section.
Choose whether to show the section
Choose Enable or Disable for the section.
Add the section text
Enter the Section Title and Section Description. You could use a title such as "Our most-loved treks."
Choose the popular trips
Check Enable Popular Demo Content if you want to display the sample trips. Otherwise, select the Popular Trips for your site.
Add the view-more link
Enter the button label in Popular View More Label. Enter the button link in Popular View More Link.
Publish the popular trips
Select Publish. Your chosen trips now appear in the popular trips section.
Your best-selling tours are now easier to find. The Activity Section helps visitors browse by the kind of experience they want.
Activity Section
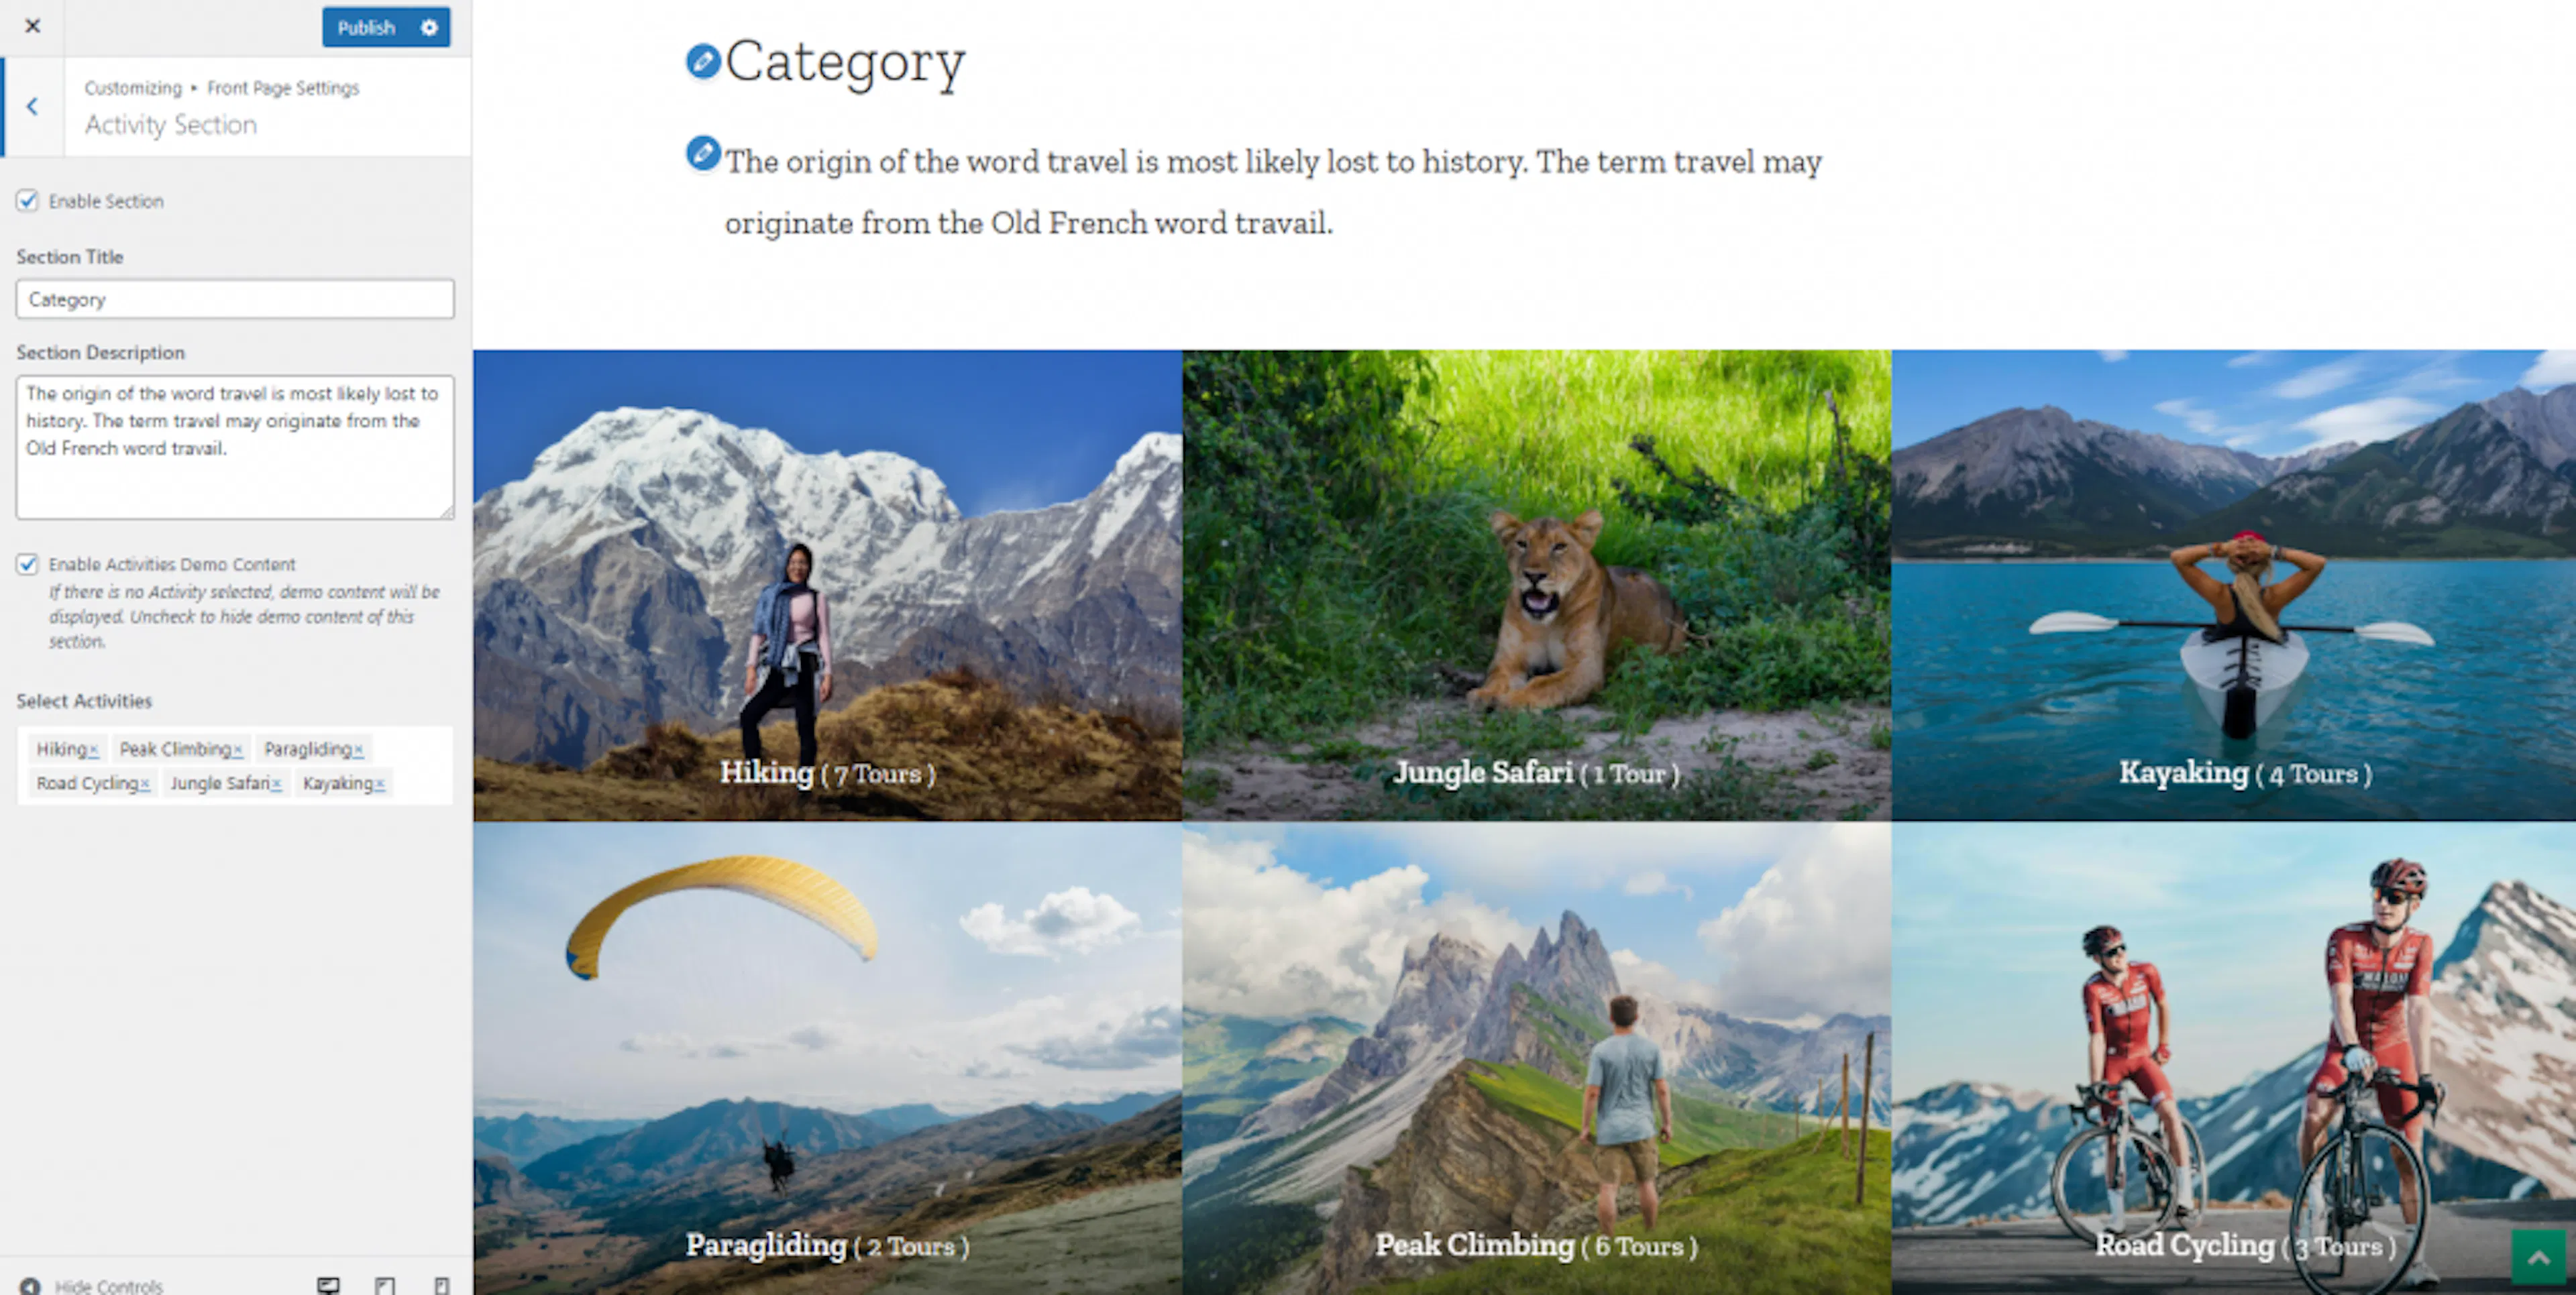
The Activity Section groups trips by activity type. Examples include trekking, rafting, wildlife tours, and cultural walks.
A traveler who wants rafting can browse that activity without opening every trip on your site.
Open Activity Section
Go to Appearance > Customize > Front Page Settings > Activity Section.
Choose whether to show the section
Choose Enable or Disable for the section.
Add the section text
Enter the Section Title and Section Description. Describe the experiences travelers can choose.
Choose the activities
Check Enable Activities Demo Content if you want to display the sample activities. Otherwise, select the activities you want to display on the front page.
Publish the activities
Select Publish. Your selected activities now appear on the homepage.
Visitors can now browse by activity as well as destination. Use the Special Offer Section for seasonal pricing or group discounts.
Special Offer Section
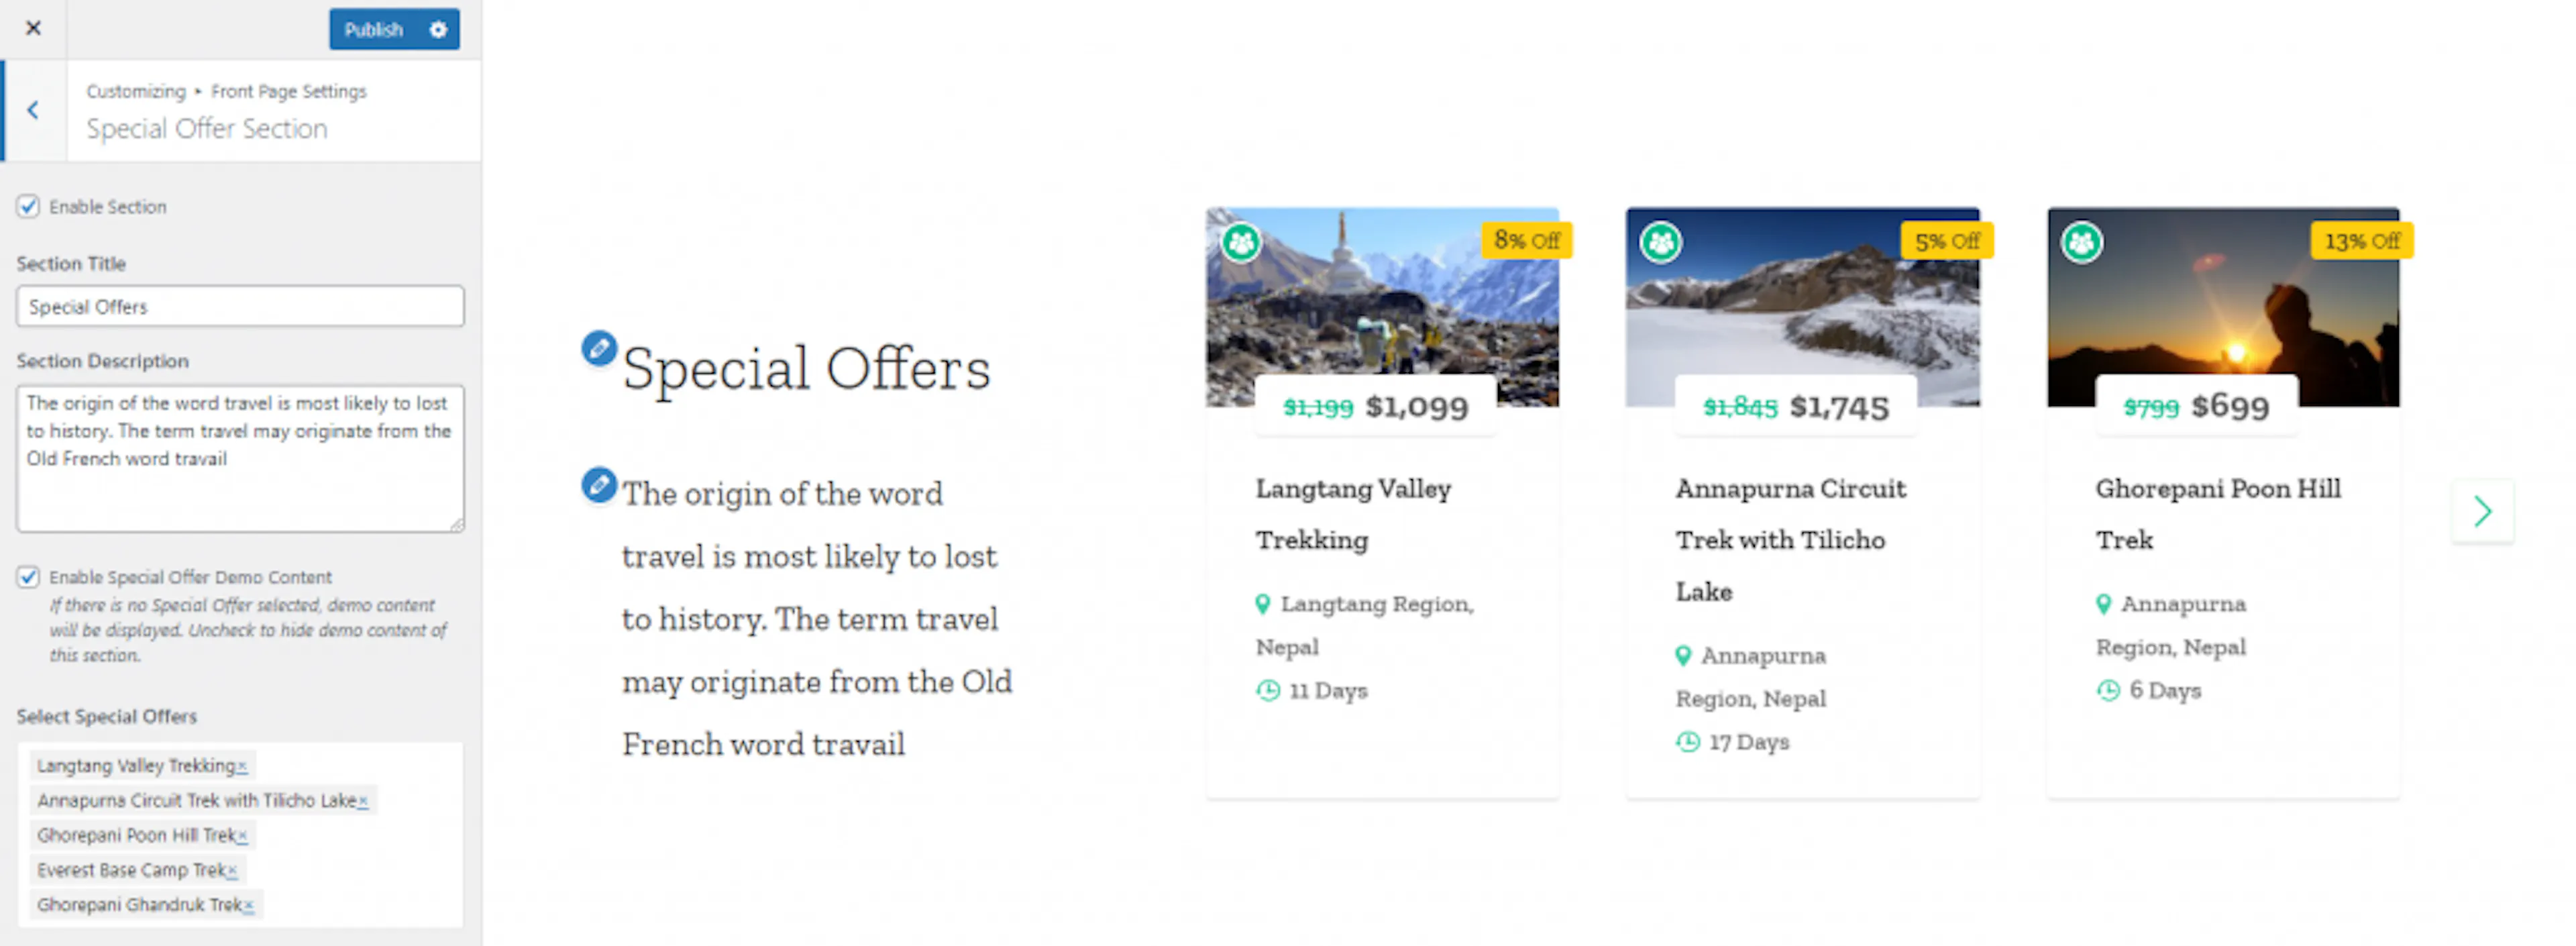
The Special Offer Section highlights trips with reduced prices or other limited offers. Use it for seasonal pricing, early booking discounts, or group rates.
For example, you could show a lower price for an autumn trek. You could also offer a group discount for six or more travelers.
Open Special Offer Section
Go to Appearance > Customize > Front Page Settings > Special Offer Section.
Choose whether to show the section
Choose Enable or Disable for the section.
Add the section text
Enter the Section Title and Section Description. Include enough detail for travelers to understand the offer.
Choose the offer content
Check Enable Special Offer Demo Content if you want to display the sample offers. Otherwise, select the trips with special offers.
Publish the special offers
Select Publish. Your selected offers now appear on the homepage.
Your current offers are visible to visitors. The CTA Section gives visitors one more clear action to take.
CTA Section
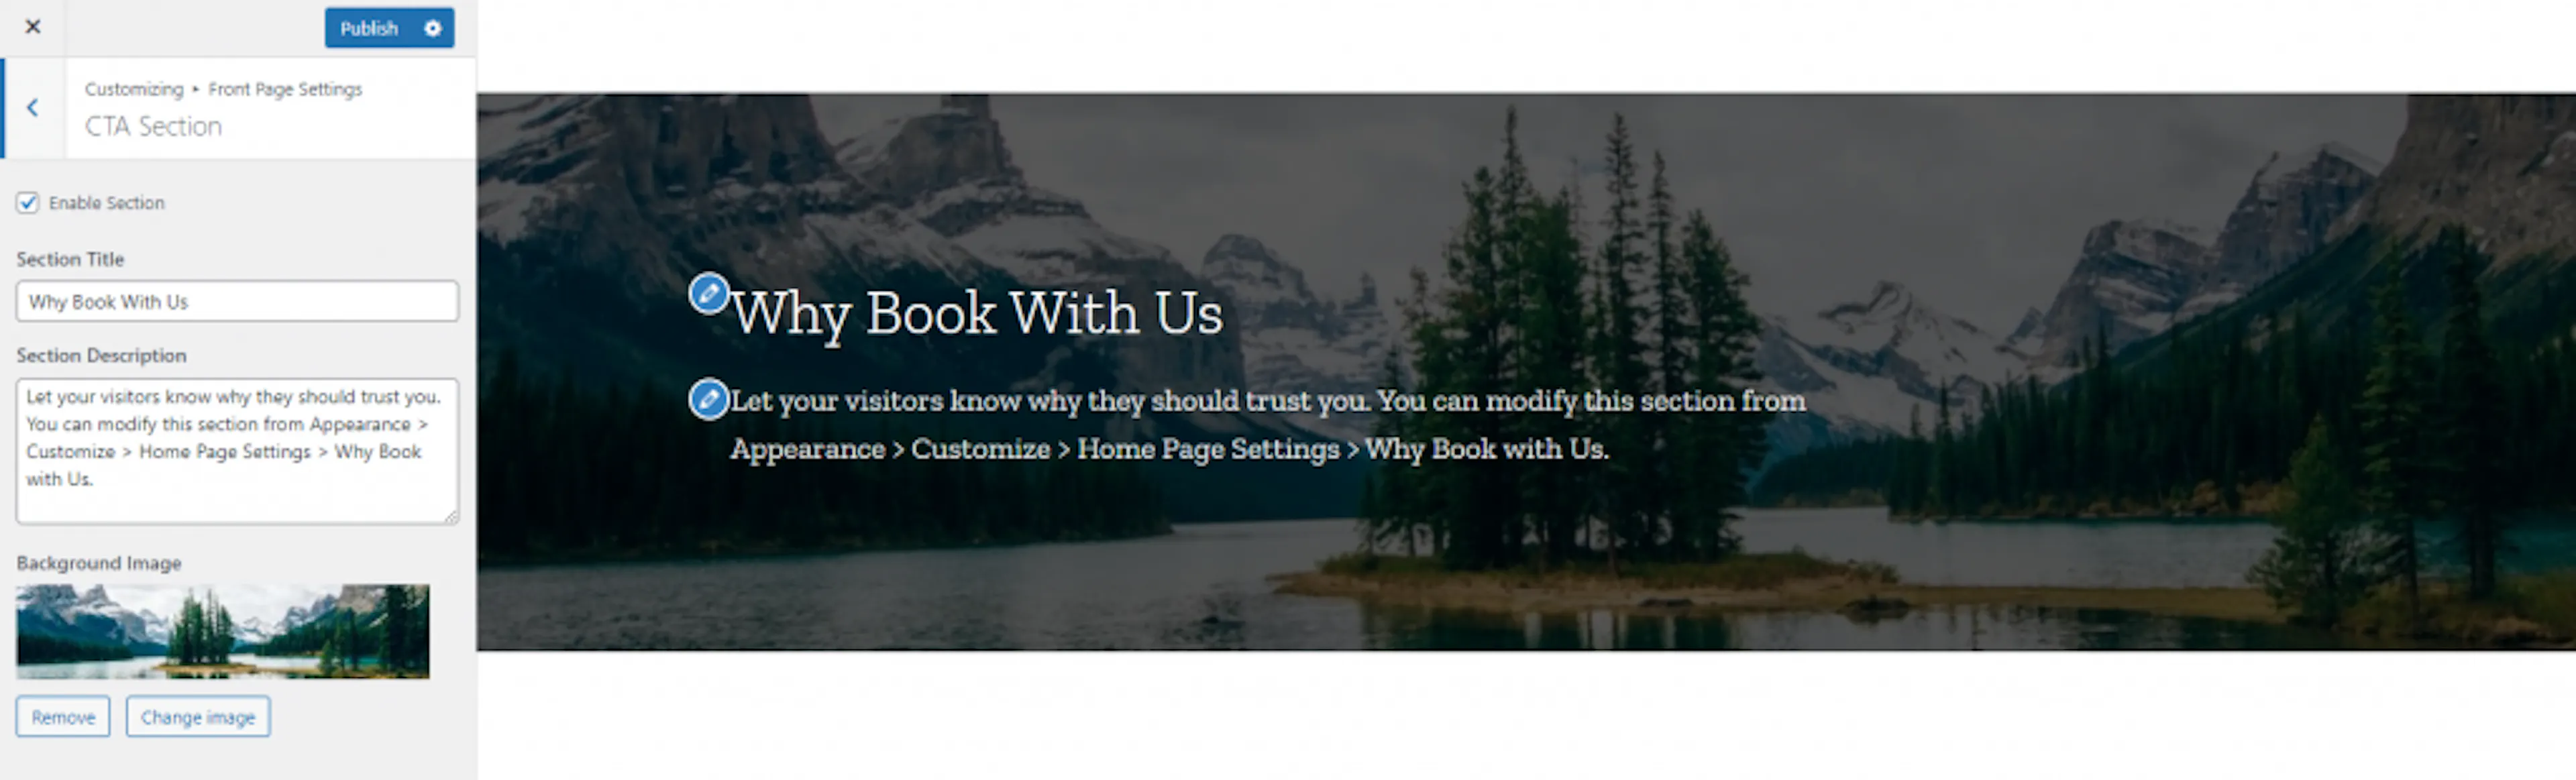
The CTA Section is a call to action that encourages visitors to contact you or view a trip. A call to action tells visitors what to do next.
For example, use this section to invite visitors to ask about a private group tour. You could also direct them to request a price for a custom itinerary.
Open CTA Section
Go to Appearance > Customize > Front Page Settings > CTA Section.
Add the section text
Enter the Section Title and Section Description. Use a clear message such as "Planning a private trek?"
Choose the CTA background
Select the Background Image for the CTA section. Choose an image that matches the action you want visitors to take.
Publish the CTA
Select Publish. The call to action now appears with your chosen image.
Your homepage now guides visitors toward contacting you or viewing a tour. The Info Section adds a smaller block of useful business information.
Info Section
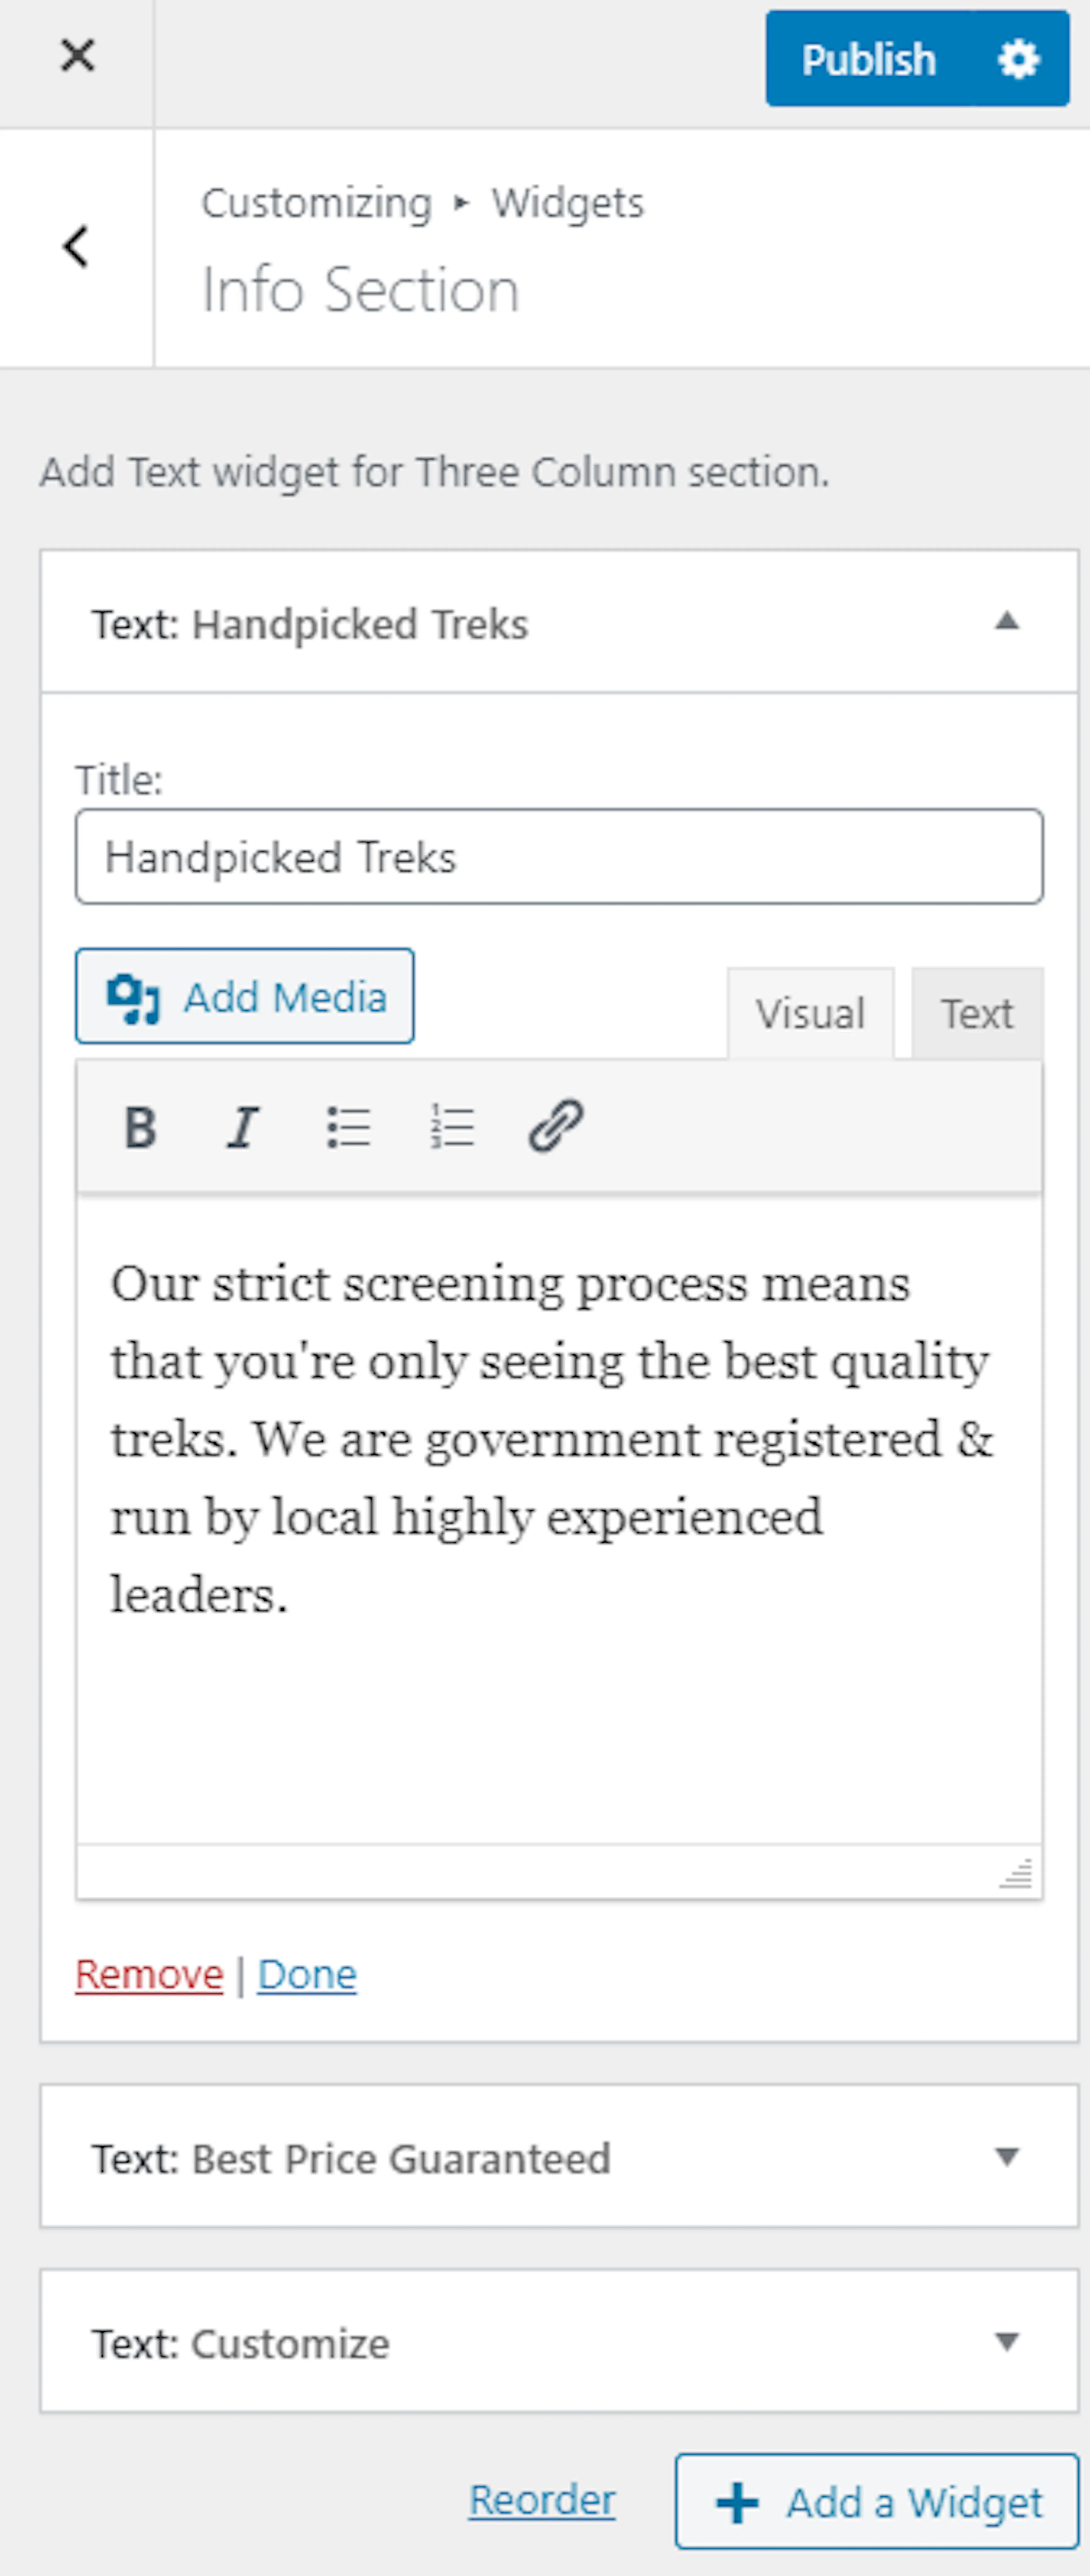
The Info Section displays a text block on the homepage. A widget is a small block of content that you can place in different areas of your site.
Use this space for details that travelers often need before contacting you. Examples include office hours, gear rental, airport pickup, or a short booking reminder.
Open Info Section
Go to Appearance > Customize > Front Page Settings > Info Section.
Add a text widget
Select Add a Widget. Add the Text Widget.
Use this area for information such as office hours, gear rental, or a short booking reminder.
Add the information
Enter the Title and Description for the text widget.
Publish the information
Select Publish. Your information block now appears on the homepage.
Your homepage can now answer a common visitor question before they contact you. The Blog Section helps you share news and travel advice.
Blog Section
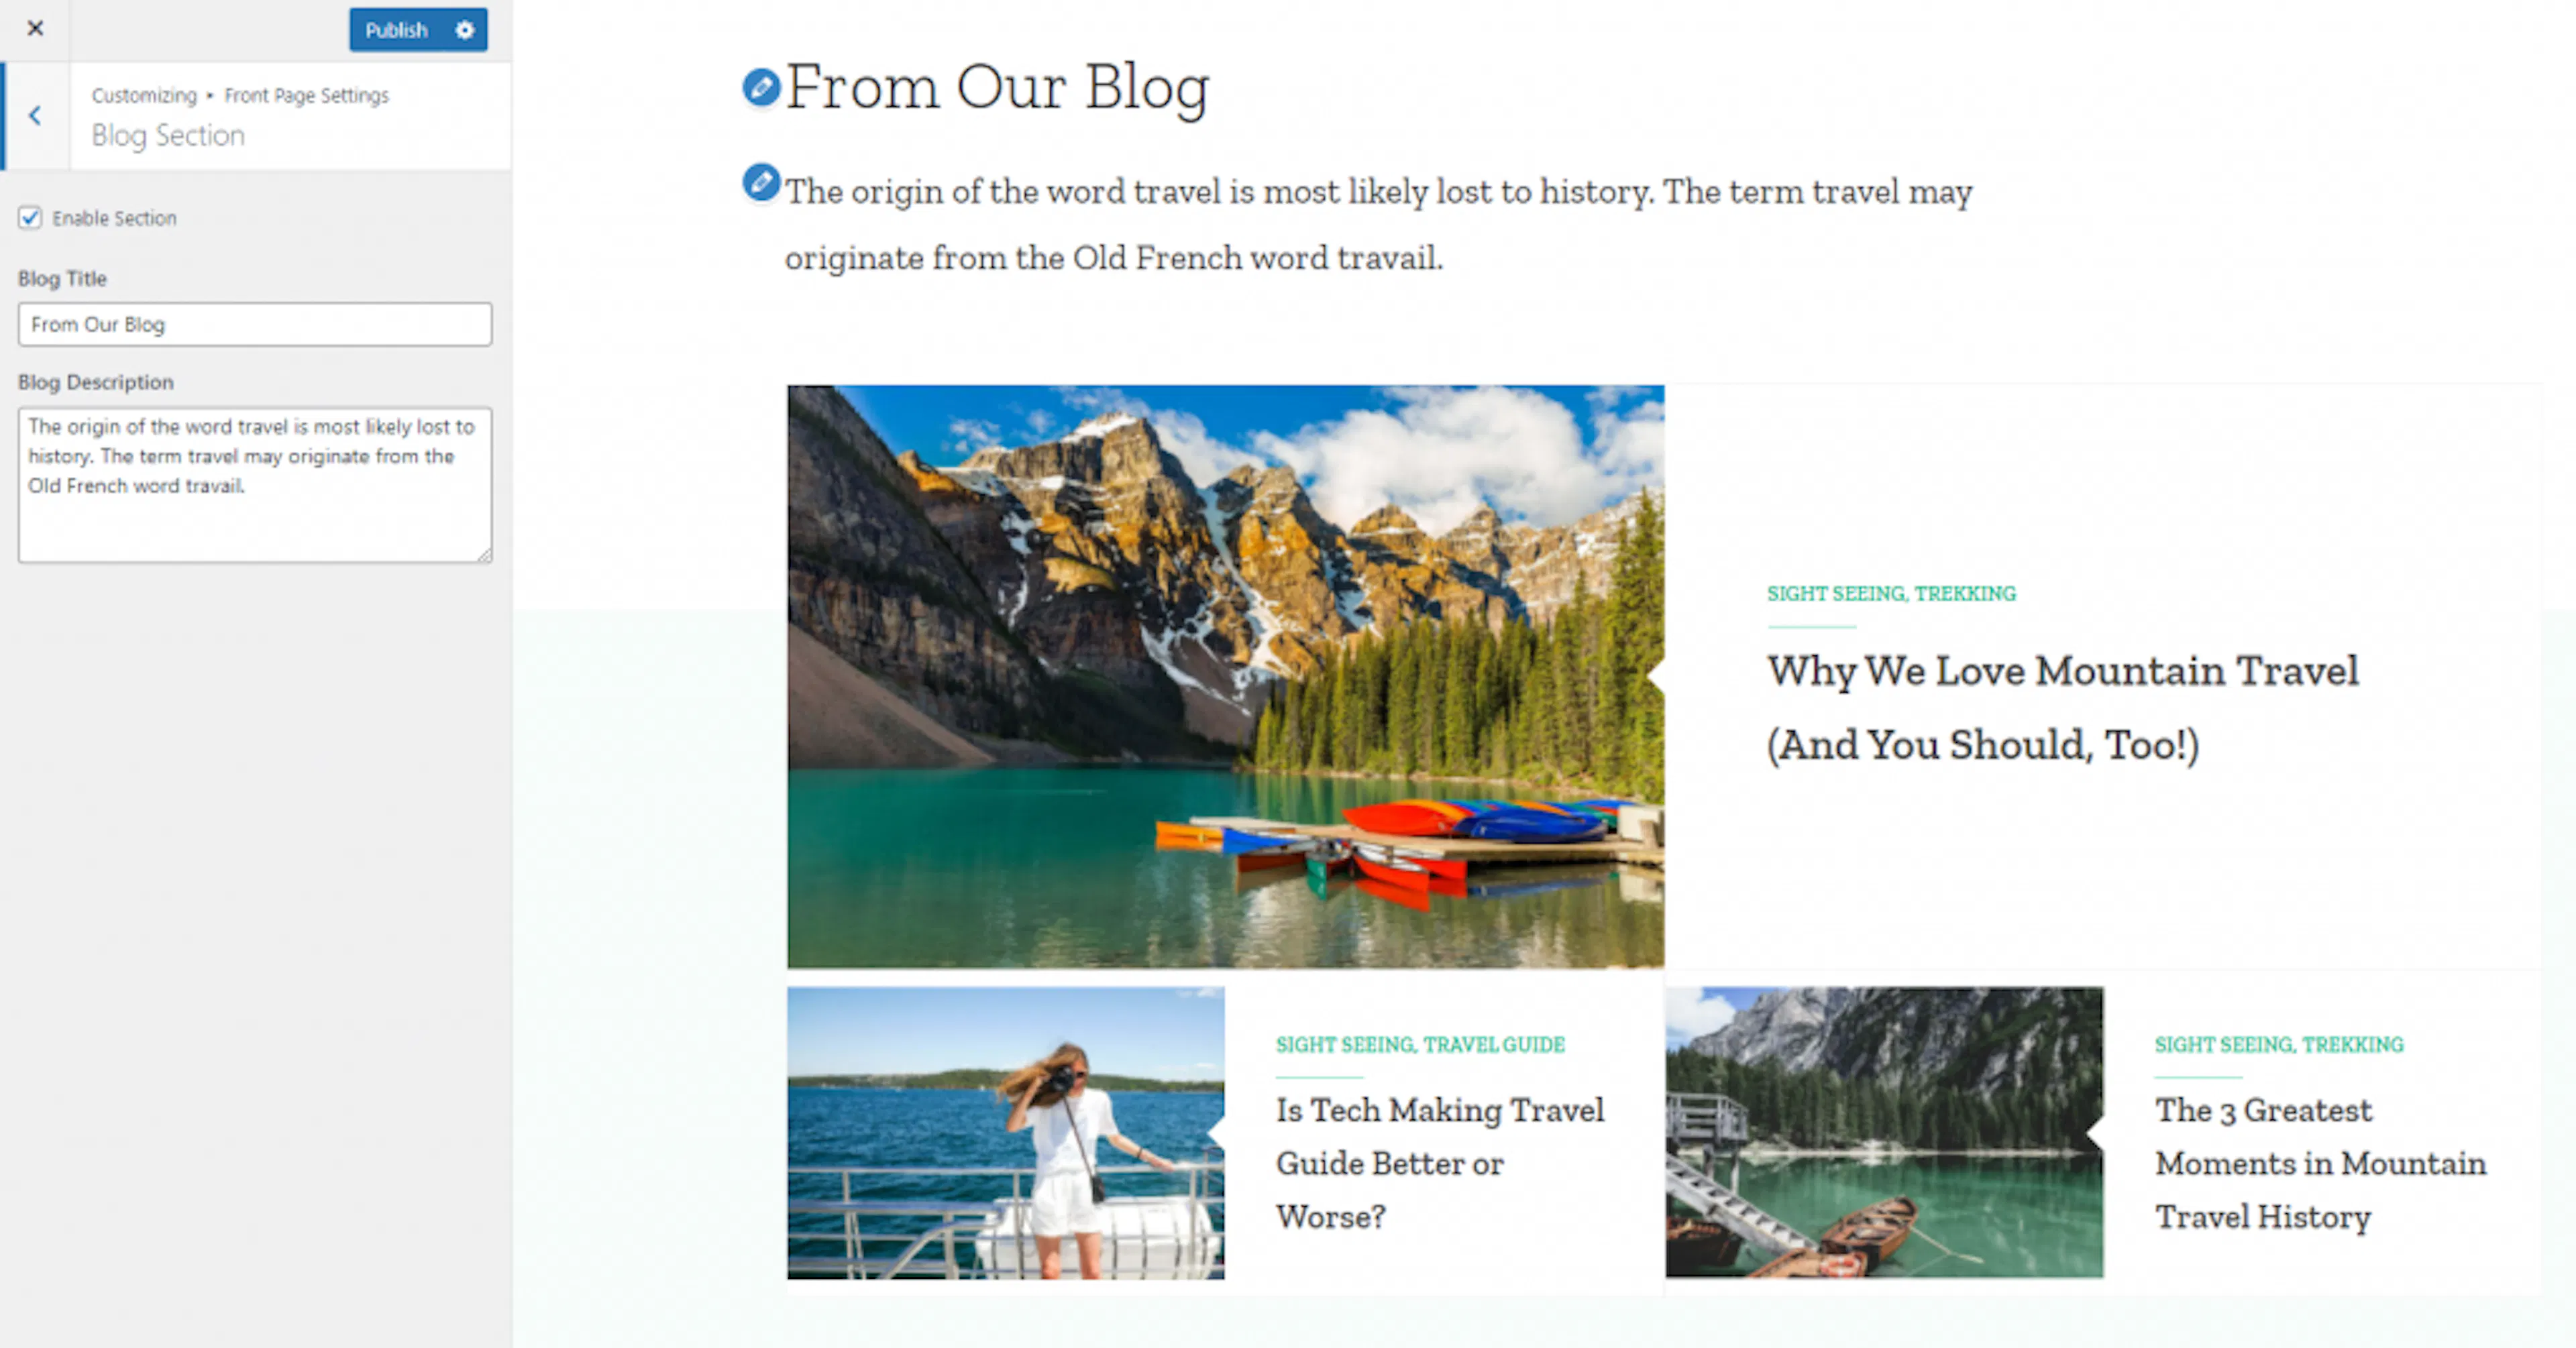
The Blog Section displays recent blog posts on your homepage. Use it for packing advice, seasonal travel updates, or stories from recent treks.
A post about monsoon travel can help visitors choose the right season. A packing guide can help them prepare for a multi-day tour.
Open Blog Section
Go to Appearance > Customize > Front Page Settings > Blog Section.
Choose whether to show the section
Choose Enable or Disable for the section.
Add the blog text
Enter the Blog Title and Blog Description. Tell visitors what they will find in your articles.
Publish the blog section
Select Publish. Your recent posts now appear on the homepage.
Your homepage can now connect visitors with useful travel content. The final front page setting combines recommendations and related information.
Recommendation and Associated Section
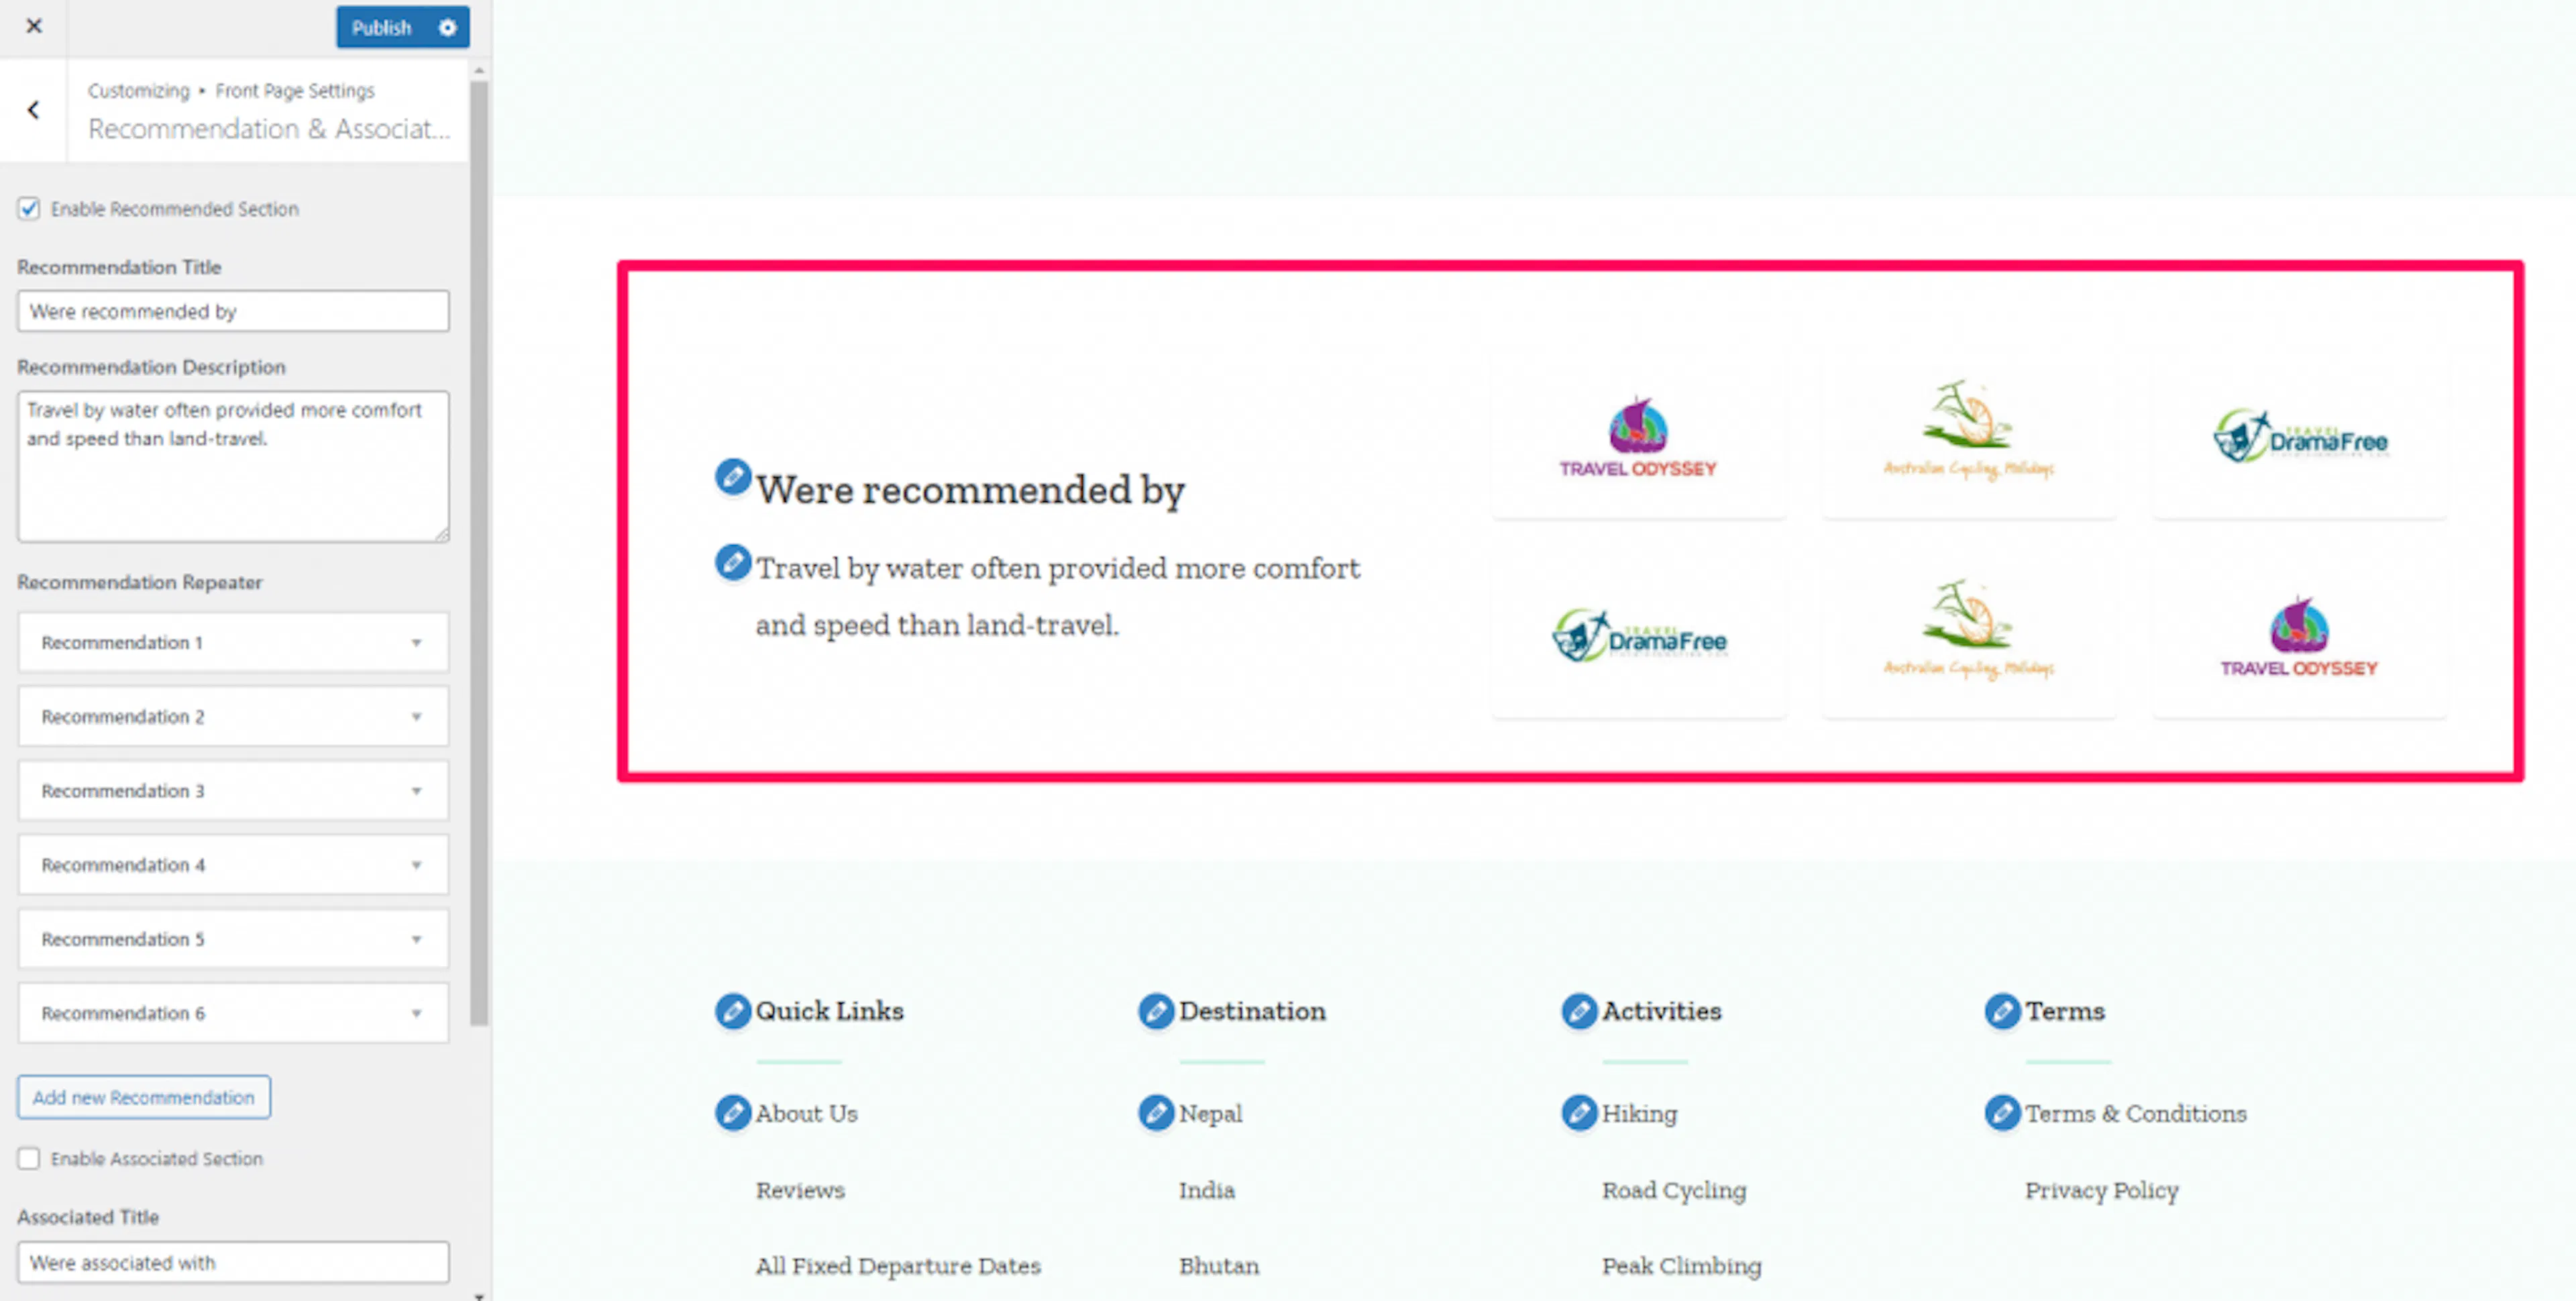
The Recommendation and Associated Section lets you add recommendation content and related content blocks. Use recommendations for trusted partners, guides, or services that help travelers plan their trip.
For example, you could recommend a local airport transfer company. You could also show a related gear rental service for travelers joining a trekking package.
Open the recommendation settings
Go to Appearance > Customize > Front Page Settings > Recommendation and Associated Section.
Add recommendations
Choose Enable or Disable for the Recommended Section. Enter the Recommendation Title and Recommendation Description.
Select Add new Recommendation to add each recommendation.
Add associated content
Choose Enable or Disable for the Associated Section. Enter the Associated Title and Associated Description.
Select Add new Associated to add each associated item.
Publish the sections
Select Publish. Your recommendations and associated content now appear on the homepage.
Your front page sections are ready. Next, control the related trips shown on each single trip page.
Trip Page Settings
You can configure the Related Trip Section on a single trip page. Open a single trip page in the Customizer before changing these settings.
These settings help travelers continue browsing. Someone reading about one Annapurna trek could see other Nepal treks or similar hiking experiences.
Related Trip Settings
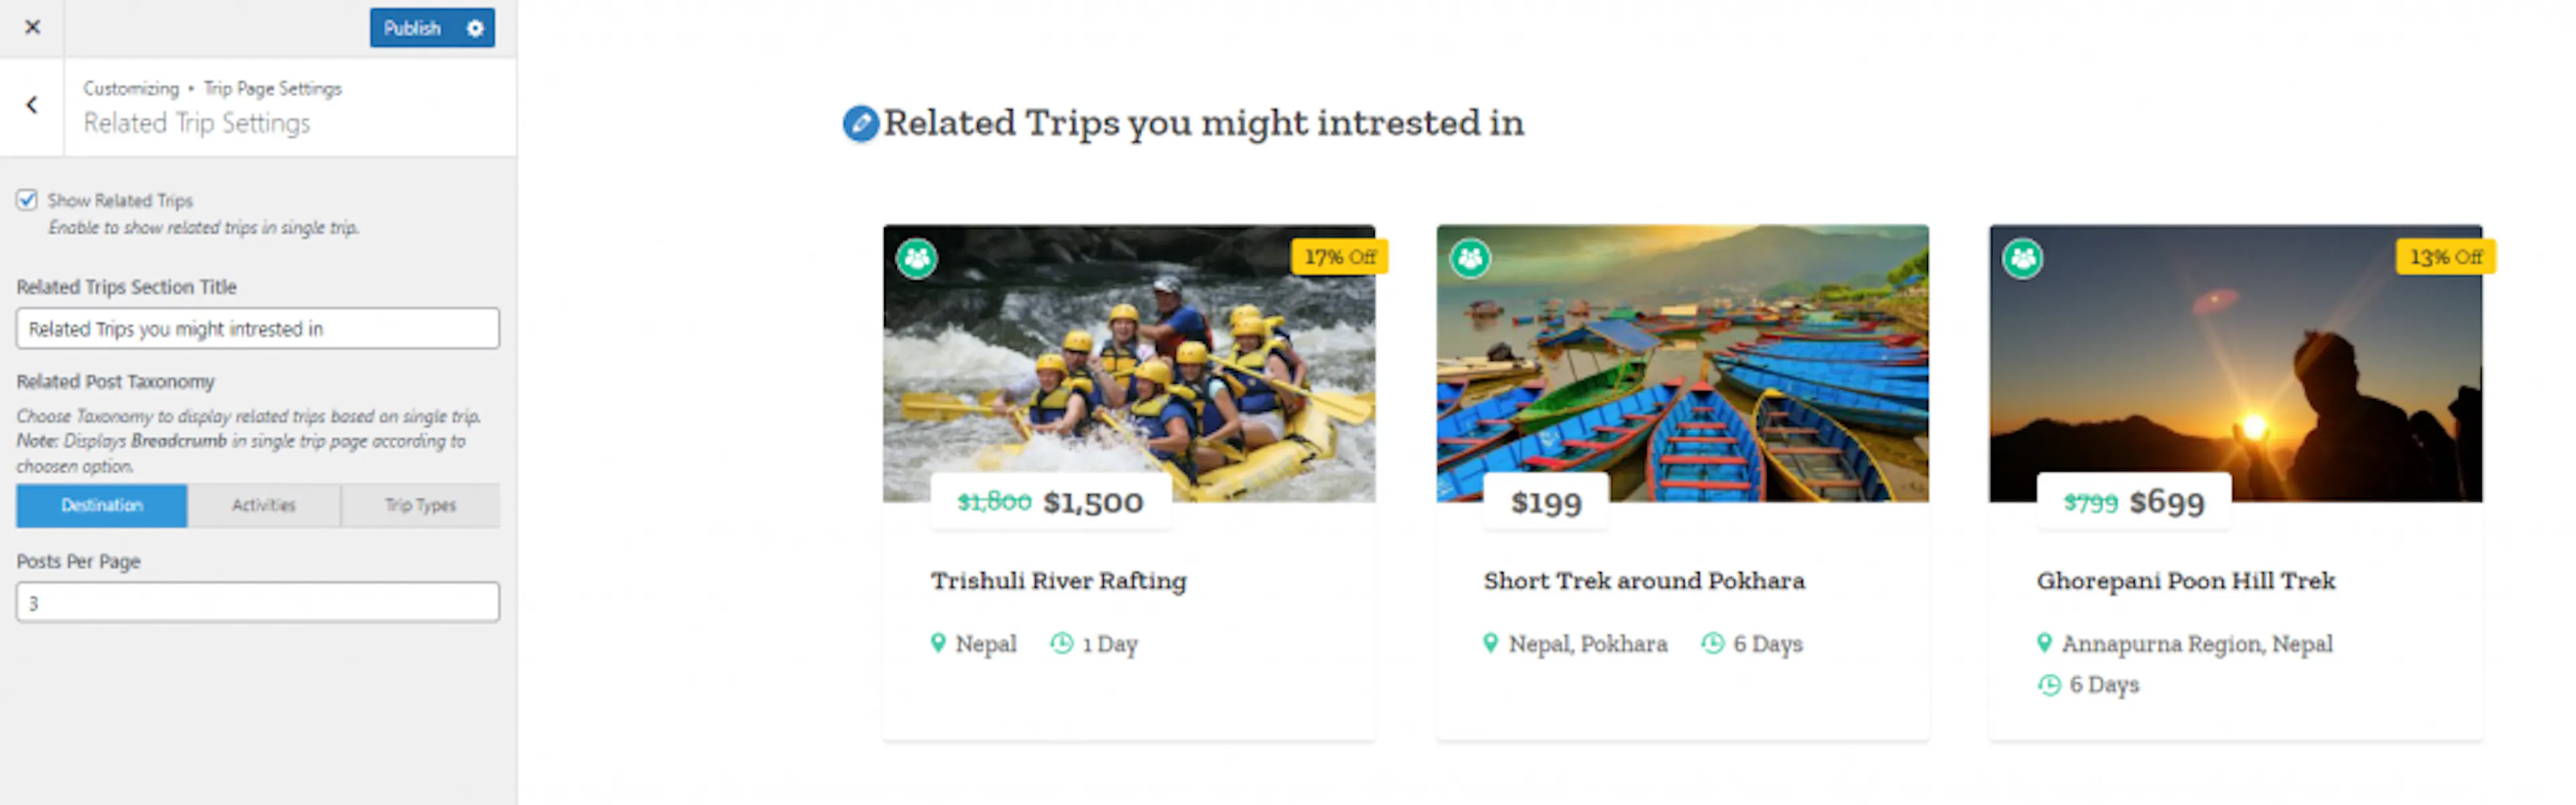
The Related Trip Section shows other trips that match the current trip. A taxonomy is a way to group trips by a shared detail, such as destination or activity type.
For example, you can group trips by Nepal, Bhutan, trekking, or rafting. A trekking trip can then show other trips in Nepal or other trekking trips.
Open Related Trip Settings
Go to Appearance > Customize > Trip Page Settings > Related Trip Settings while viewing a single trip page.
Choose whether to show related trips
Choose whether to show or hide the Related Trips Section. Showing it gives travelers another trip to explore after they finish reading.
Add the section title
Enter the title for the Related Trips Section. Use a phrase such as "You may also like."
Choose the trip group
Choose the taxonomy that Travel Muni should use to find related trips.
Select a destination to show trips in the same place. Select an activity to show similar experiences.
Set the number of trips
Enter the number of trips to display in Posts Per Page. A small number keeps the page focused. A larger number gives travelers more choices.
Publish the related trips
Select Publish. Related trips now appear according to your chosen group and count.
Each trip page can now guide visitors to another relevant tour. The general settings control social links, breadcrumbs, and blog details.
General Settings
You can manage site-wide options from General Settings. Open the Customizer under Appearance on the left sidebar of your WordPress dashboard.
Social Media Settings
Social Media Settings adds links to your social accounts in the site header. These links help visitors find your photos, updates, and travel announcements.
For example, you could link to photos from your latest mountain trek. You could also link to updates about seasonal departure dates.
Open Social Media Settings
Go to Appearance > Customize > General Settings > Social Media Settings.
Enable the social links
Choose to Enable Social Links at header. Your social links will then be available in the header.
Add a social link
Select Add new links. Choose the social icon. Enter the link to your account.
Check the link before publishing. It should open the account that belongs to your tour business.
Publish the social links
Select Publish. Your social icons now appear in the header.
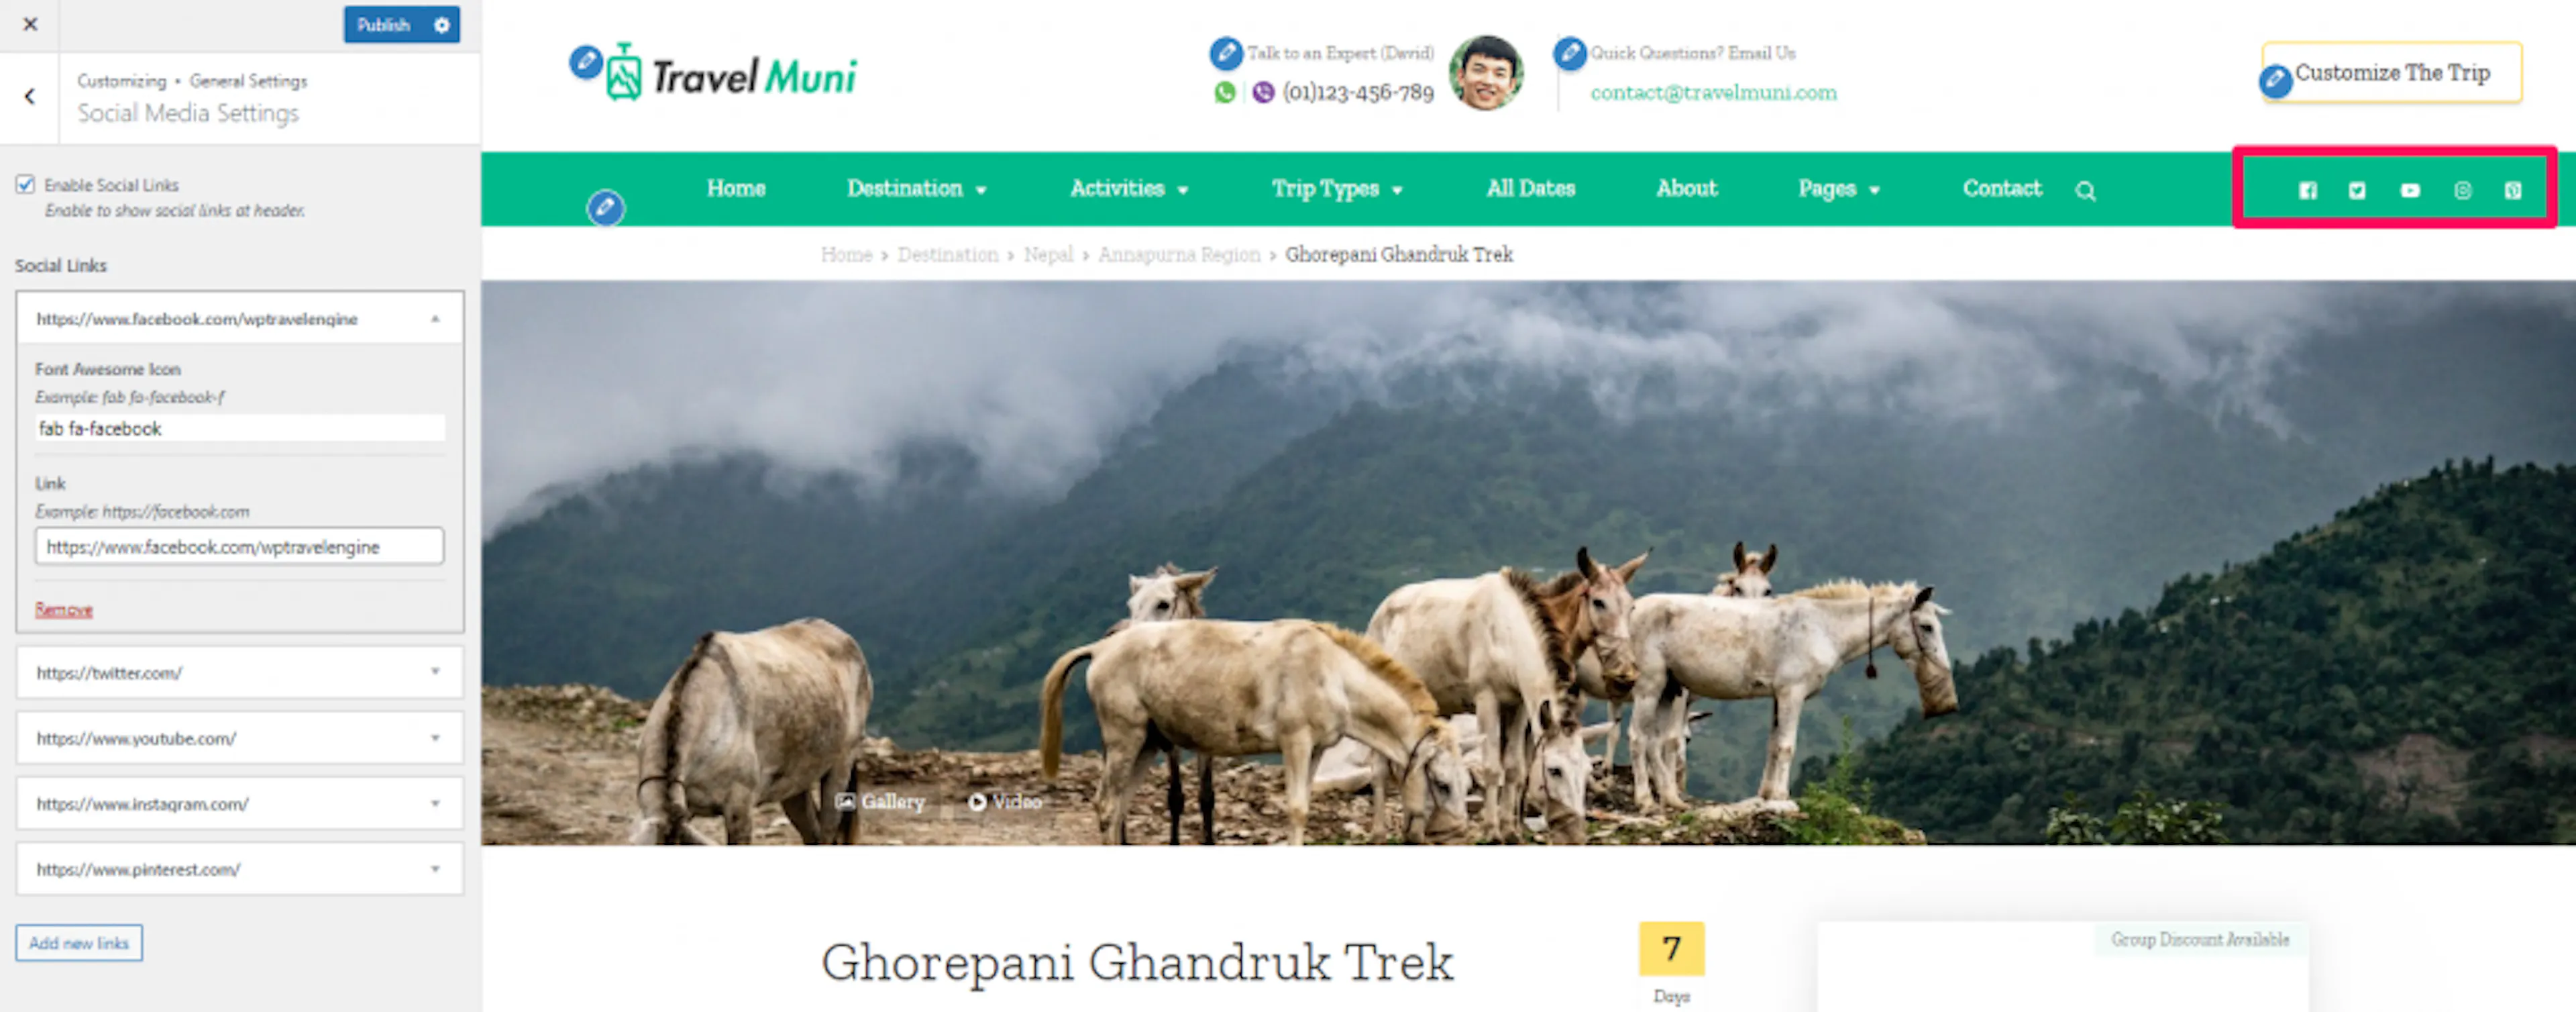
Visitors can now follow your business from the site header. Breadcrumbs can help them understand where they are on your site.
SEO Settings
SEO Settings controls breadcrumb navigation on inner pages. Breadcrumb navigation shows the path from the homepage to the current page.
For example, a traveler might see Home, Treks, and Annapurna Circuit. The path helps the traveler return to the wider list of treks.
Open SEO Settings
Go to Appearance > Customize > General Settings > SEO Settings.
Enable breadcrumbs
Check Enable Breadcrumb in inner pages. Breadcrumbs will then appear on pages below the homepage.
Set the breadcrumb home text
Enable Breadcrumb Home Text. This adds a home label to the start of the breadcrumb path.
Publish the breadcrumb settings
Select Publish. Breadcrumbs now appear on your inner pages.
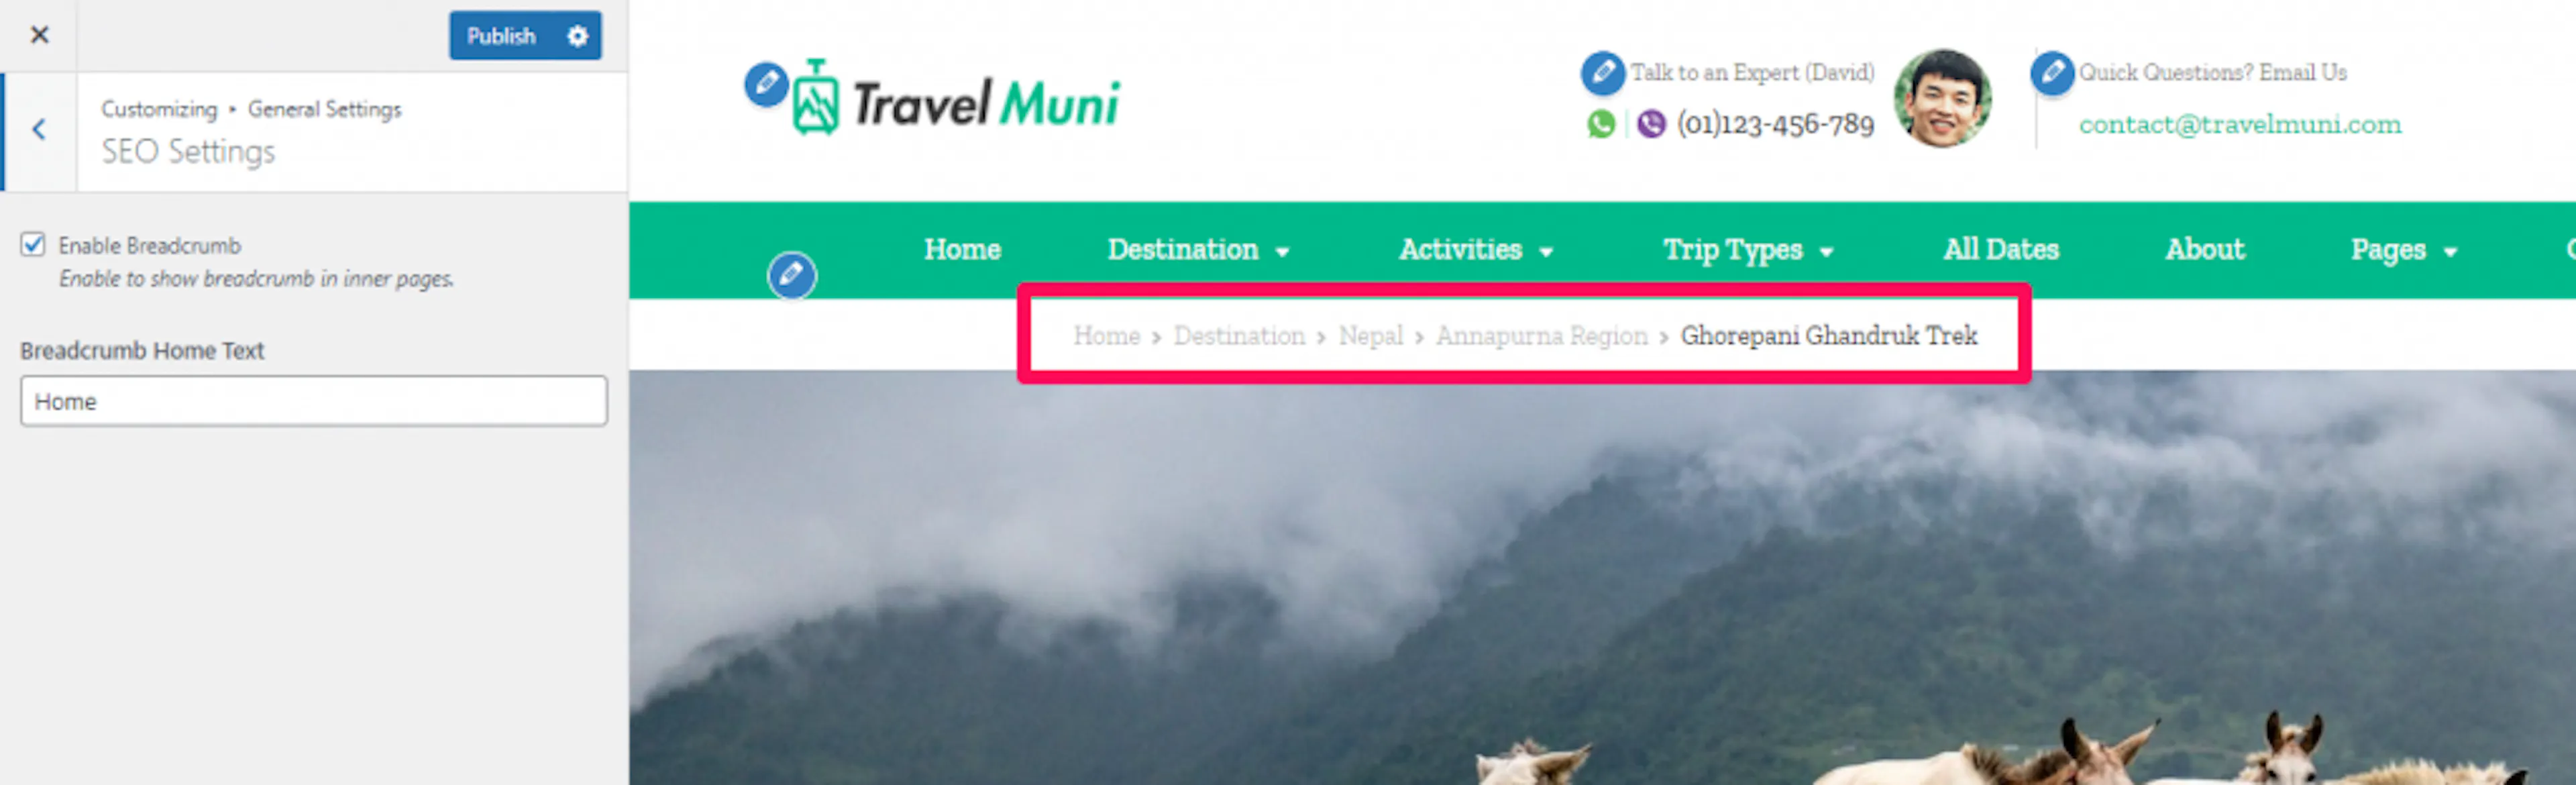
Visitors can now see their location within your site. The blog and pages settings control how articles and related posts appear.
Posts and Pages Settings
These settings control blog excerpts, author details, dates, categories, and related posts.
An excerpt is a short summary of a post. It lets a traveler scan several articles before opening one in full.
Open Posts and Pages Settings
Go to Appearance > Customize > General Settings > Posts(Blog) and Pages Settings.
Choose the blog content length
Check Enable Blog Excerpt to show a short summary of each post. Uncheck it to show the full post content.
Set Excerpt Length when excerpts are enabled. A shorter length helps visitors scan travel tips quickly.
Choose single-post details
Choose whether to show or hide the Author Section and Related Posts on a single post page.
Related posts can guide someone from a packing article to a trip page.
Set the related-post labels
Enter the Related Posts Section Title. Enter the label for the Related Posts See All button.
Choose the post information to hide
Enable or disable the options to hide the Category, Post Author, and Posted Date.
Keep information that helps your readers understand the article. Hide details that do not help your business.
Publish the blog settings
Select Publish. Your blog and single-post pages now use the selected settings.
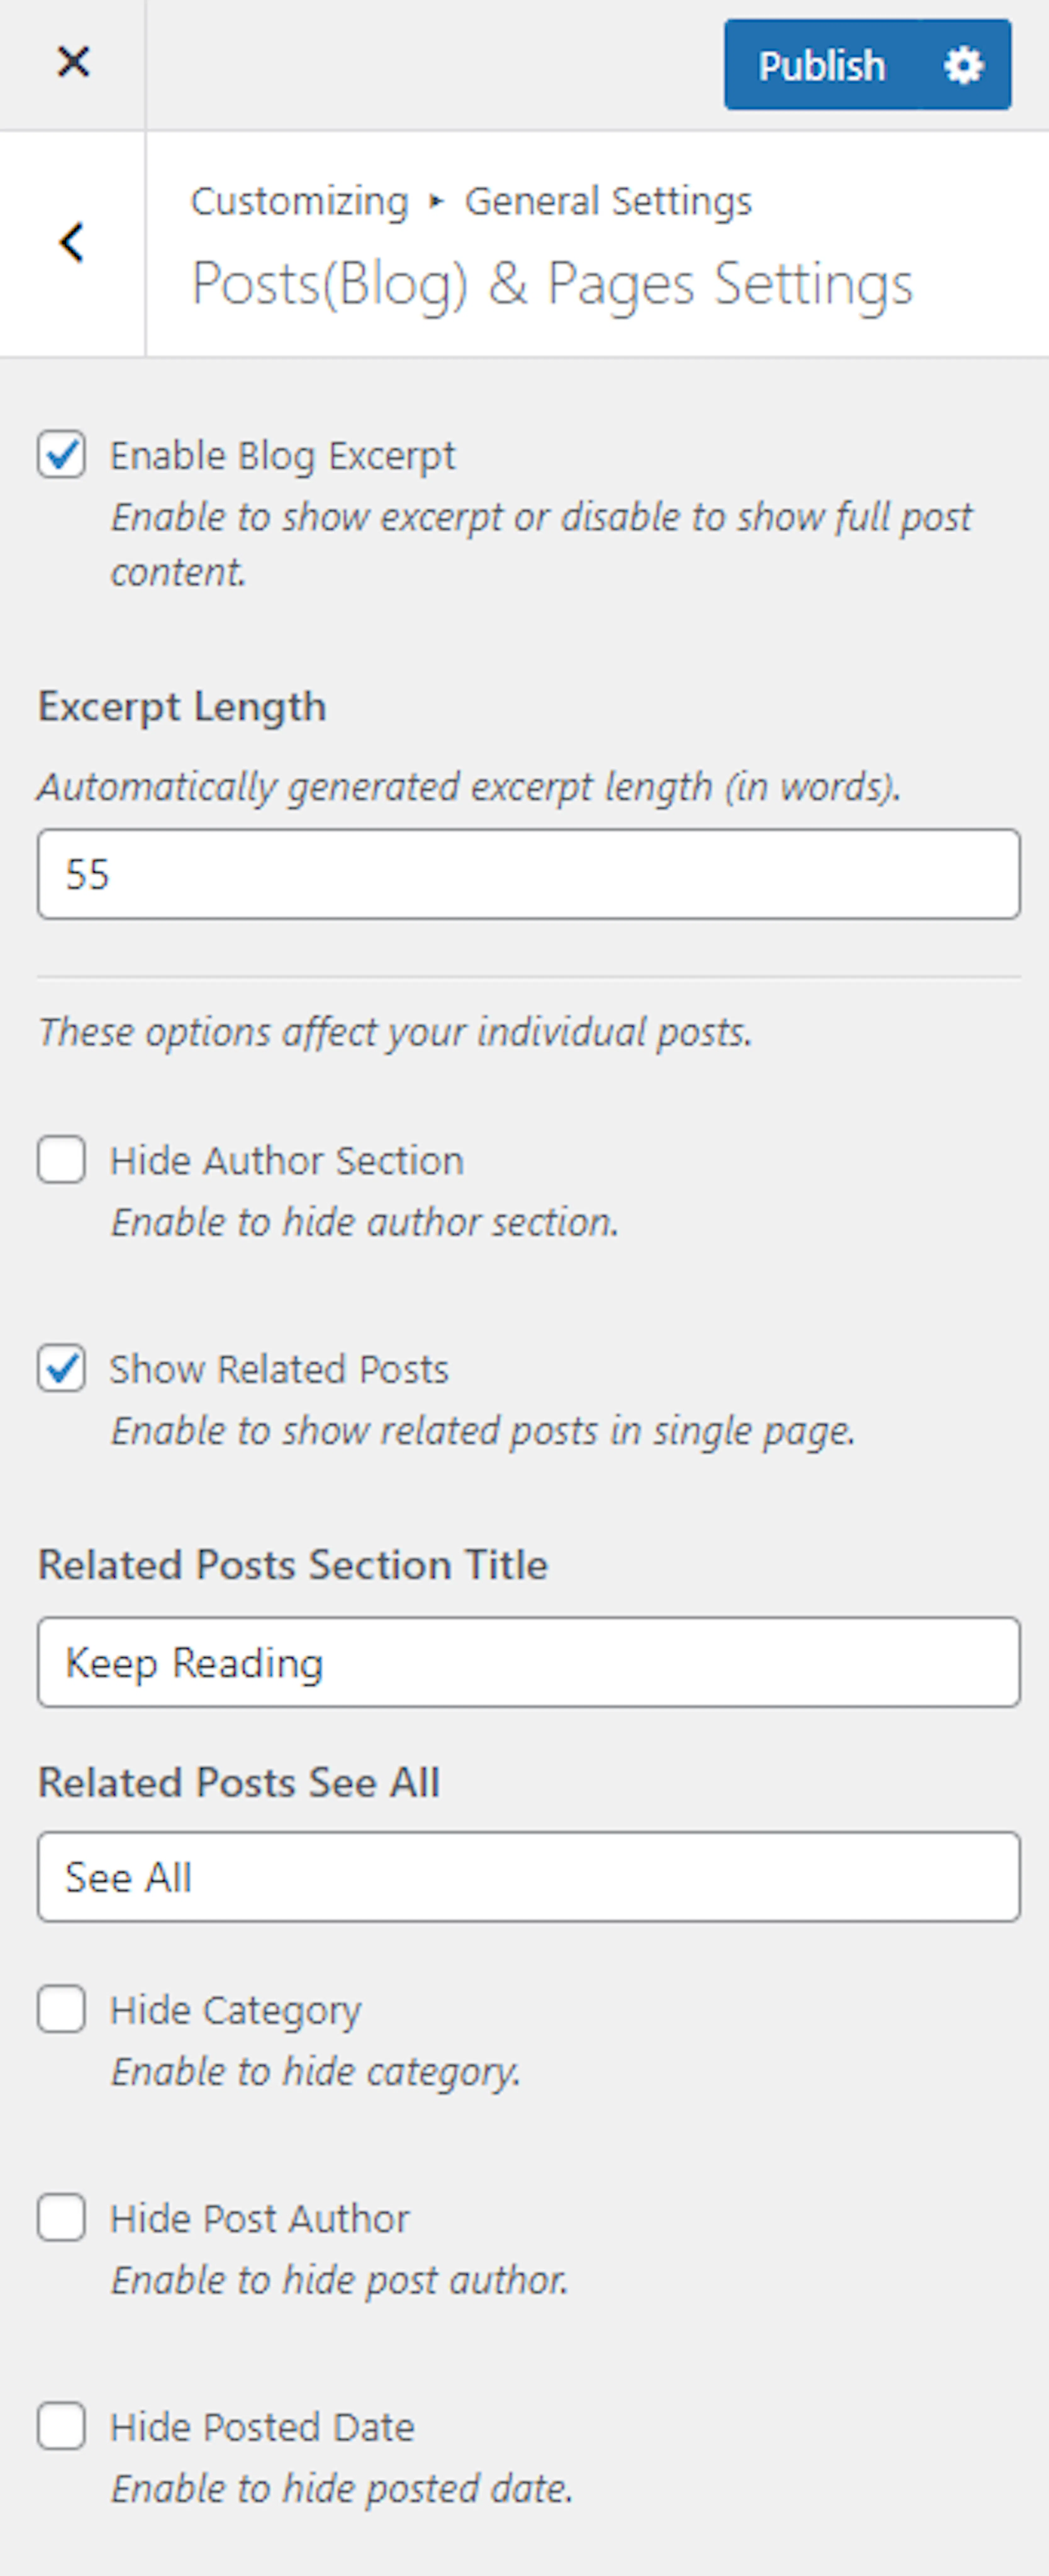
Your blog pages now show the amount of information you want. Finish the setup by adding your footer contact and payment details.
Footer Settings
Footer Settings controls the information visitors see at the bottom of every page. Add contact details. Travelers can then reach you after reading a trip or blog post.
Footer Bottom Settings
Footer Bottom Settings adds your business description, phone numbers, messaging contacts, and email addresses to the footer.
What you'll need before you start: your phone number, WhatsApp number, Viber number, and contact email addresses.
Open Footer Bottom Settings
Go to Appearance > Customize > Footer Settings > Footer Bottom Settings.
Add the footer description
Enter the description you want to display in the footer.
You could describe your tour area. You could mention that you create private group trips.
Add phone contacts
Enter the title for the phone details in Enter Label For the Phones. Enter your main contact number in Enter Phone.
Enter your WhatsApp number in Enter Whatsapp Phone Number. Enter your Viber number in Enter Viber Phone Number.
Add email contacts
Enter the title for the email details in Enter Label For the Email. Enter your contact email addresses in Enter Email.
Separate multiple email addresses with commas.
Publish the footer contacts
Select Publish. Your contact details now appear in the footer.
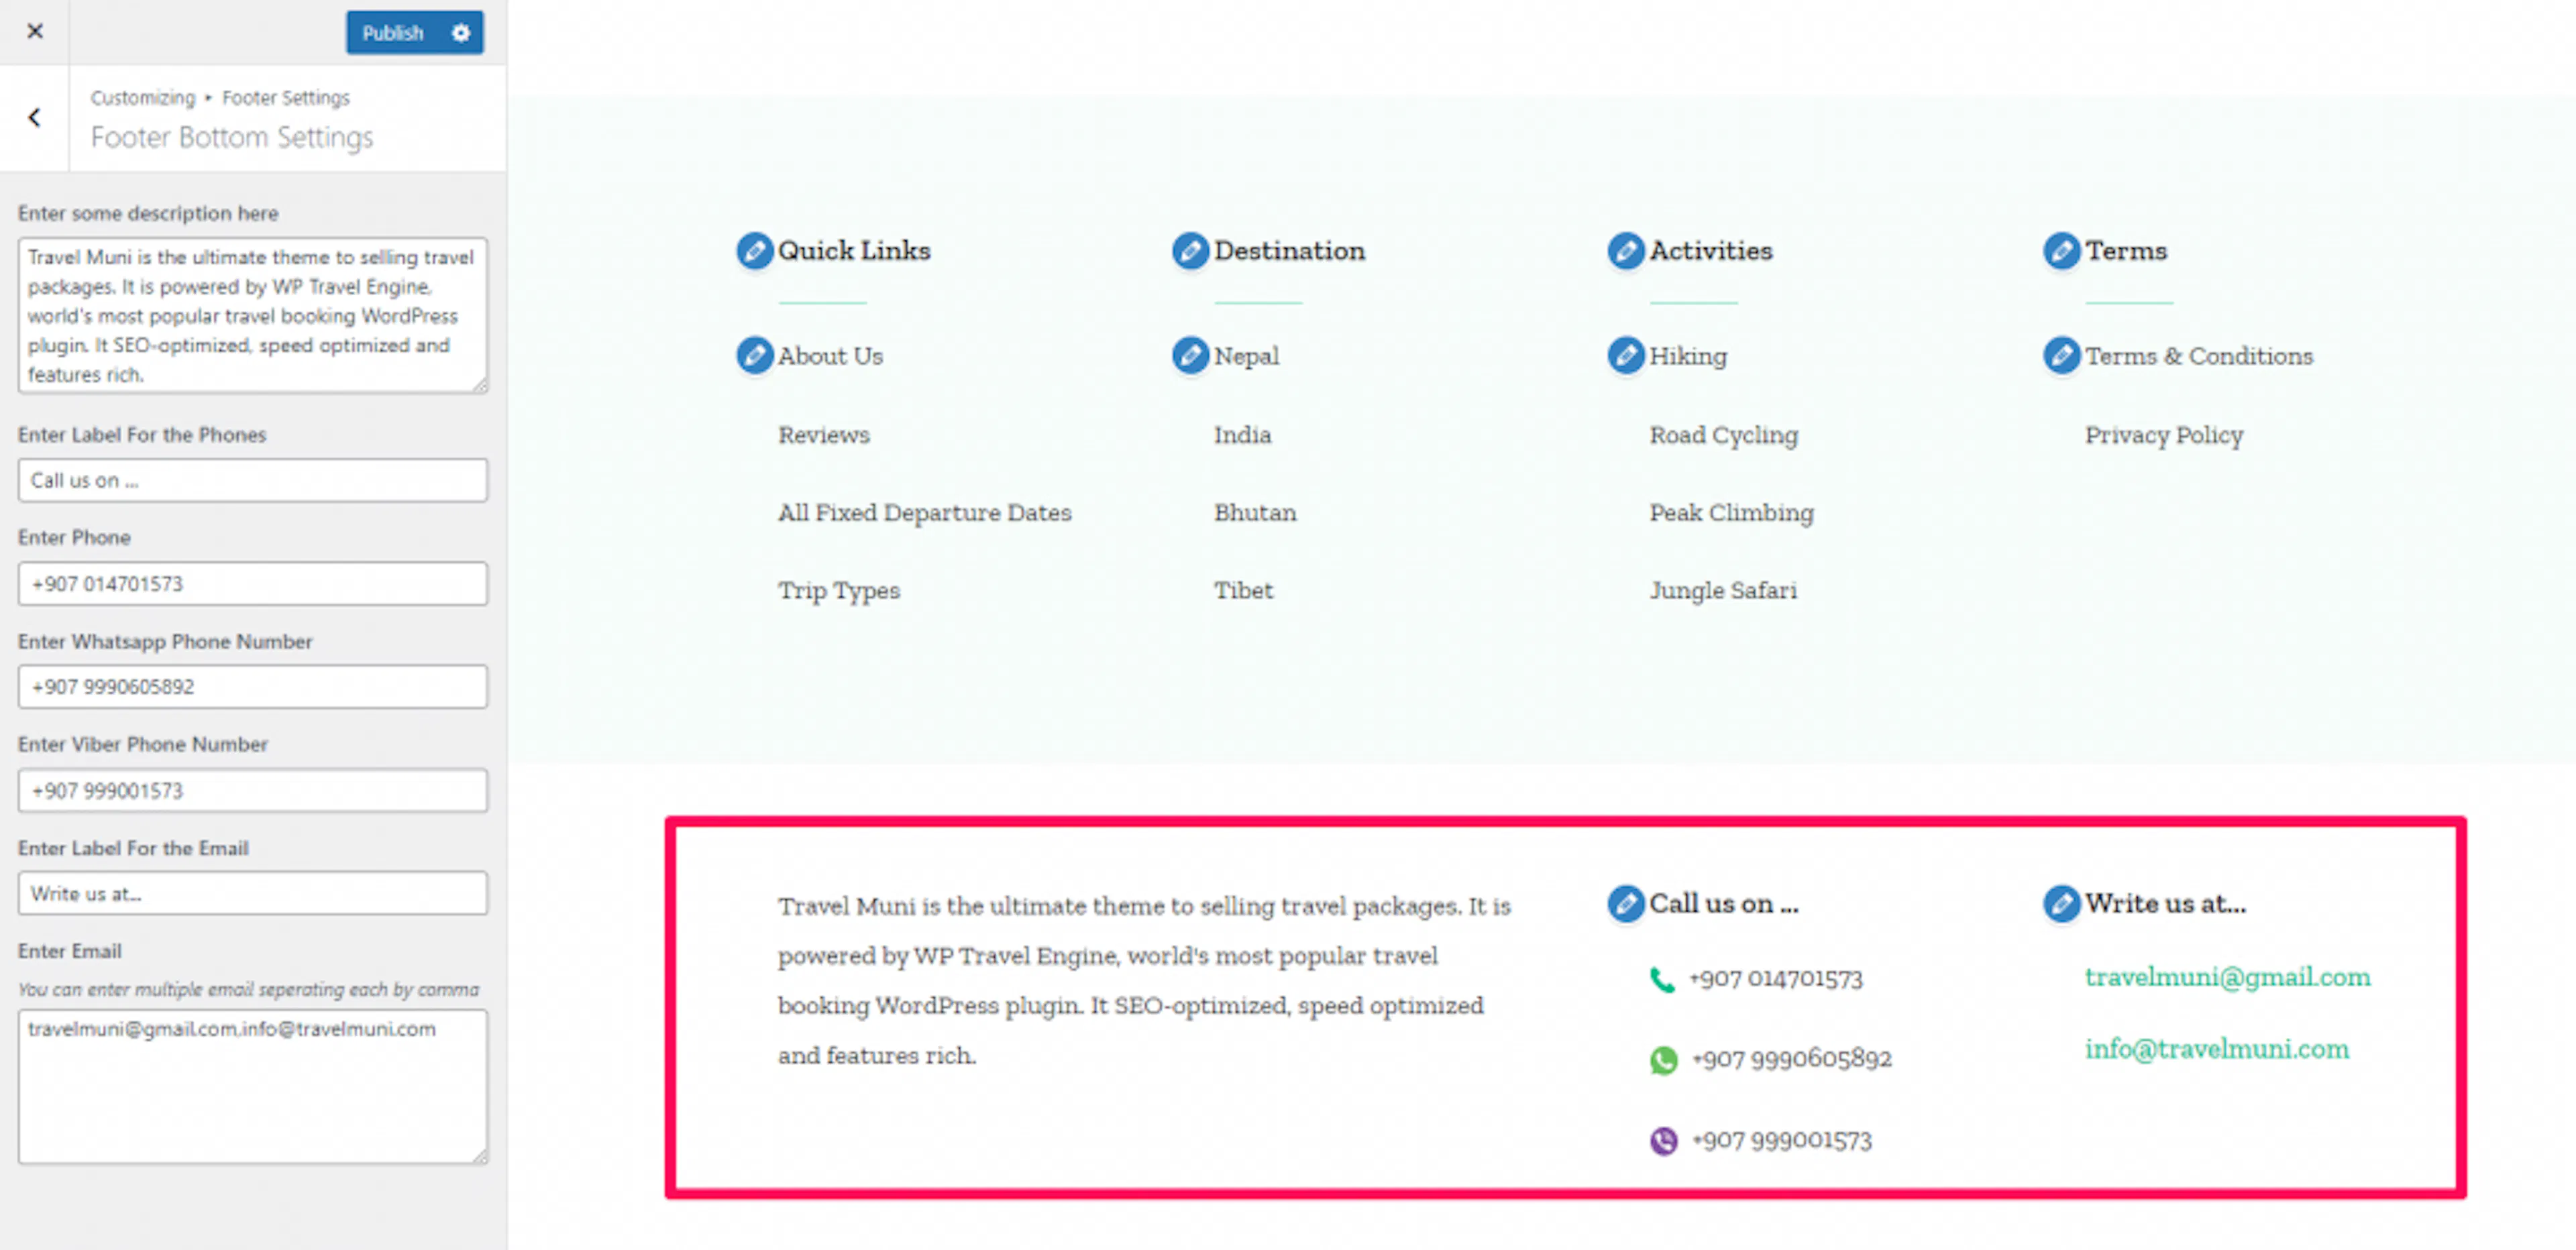
Visitors now have several ways to contact you. Add payment information and copyright text to complete the footer.
Copyright Settings
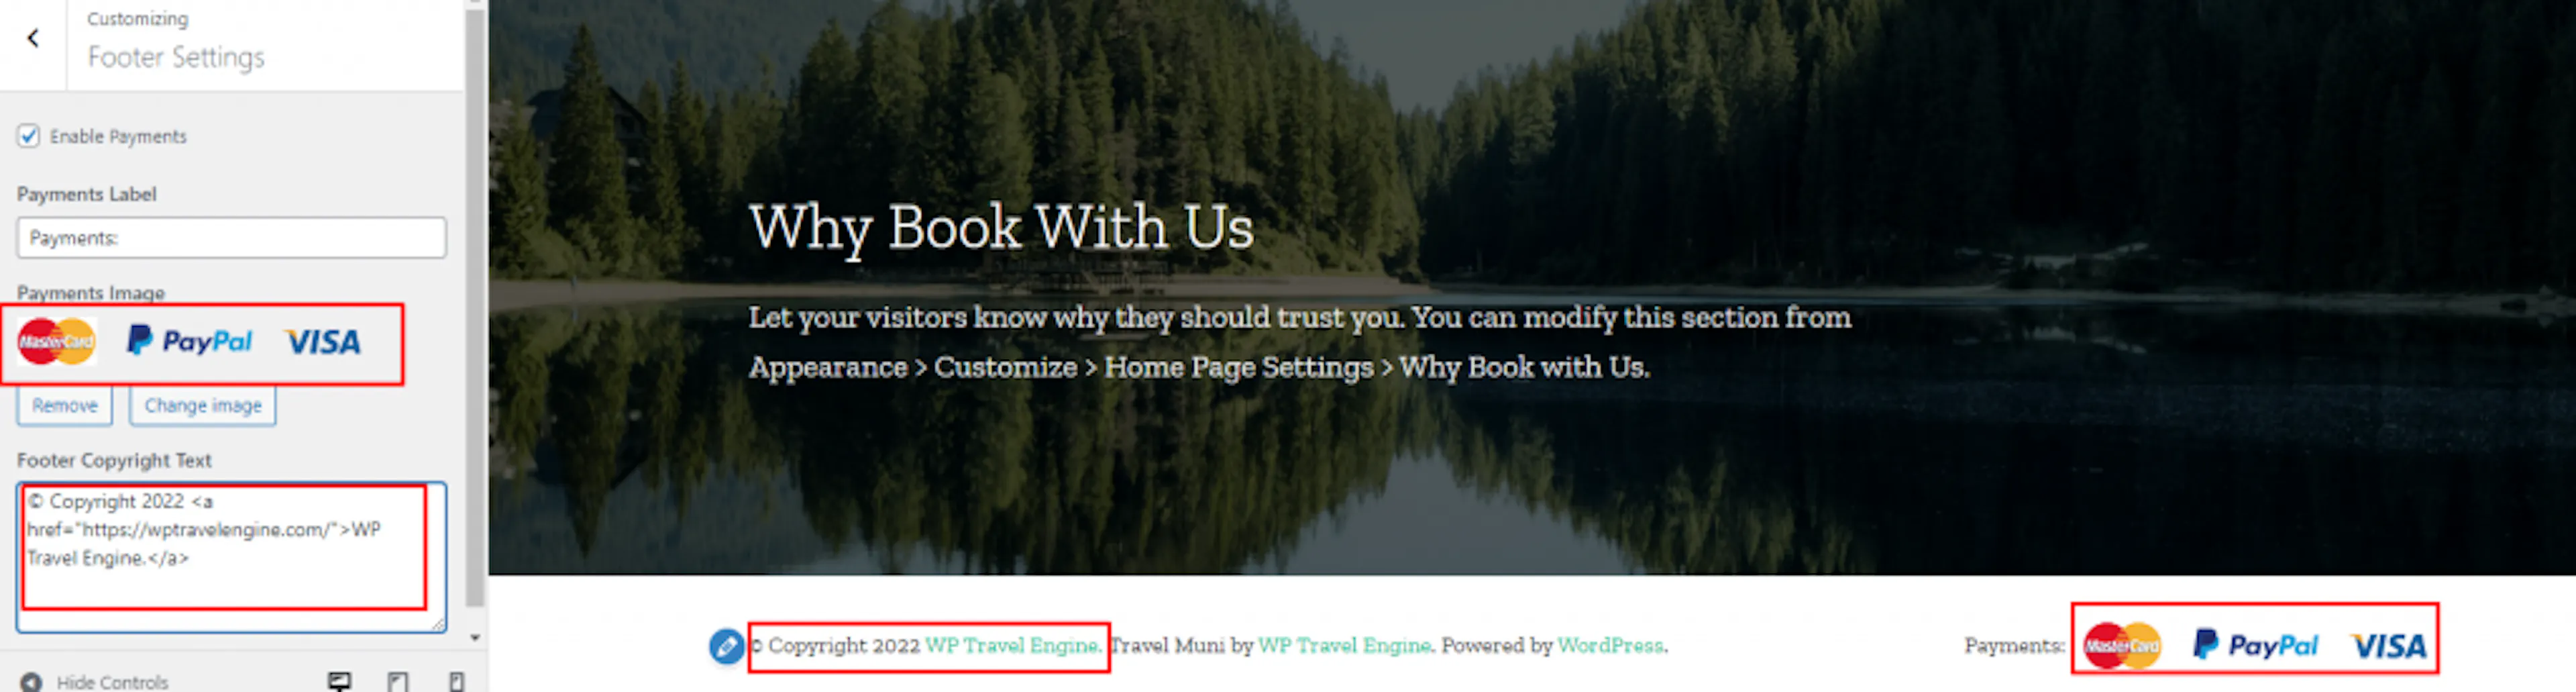
Copyright Settings controls payment information and the copyright text at the bottom of your site.
What you'll need before you start: a payment methods image if you want to display one.
Open Copyright Settings
Go to Appearance > Customize > Footer Settings > Copyright Settings.
Show payment information
Check Enable Payments to display payment information in the footer copyright area.
Add payment details
Enter the Payments Label. Upload the Payments Image that shows the payment methods you accept.
For example, the image could show the card or payment services travelers can use to pay for a multi-day package.
Add copyright text
Enter the text you want to display in Footer Copyright Text.
Publish the copyright settings
Select Publish. Your footer now includes the payment and copyright details you selected.
Travel Muni is now configured with your business information, homepage content, trip settings, blog options, and footer details.
If you're still stuck or have a question we didn't cover, our support team is happy to help. Reach out at our support page and we'll get you sorted.