

How to Customize the Trip Search / Archive Page
Configure the Trip Archive page's title, view mode, sorting, featured trips, filters, pagination, and trip card display options in WP Travel Engine.
The Trip Archive page is the page where visitors browse all your published trips. It helps people look through your tours, compare options, and find the trip that fits their dates, budget, and interests.
Customizing this page helps you show trips in a way that matches how you sell. For example, a trekking company may want to highlight difficulty and duration, while a day tour business may want travelers to see price, next departure, and destination first.
Access the Trip Archive settings
You will need access to your WordPress dashboard and permission to change WP Travel Engine settings.
Before you change anything, it helps to know where these settings live. WordPress shows menu items in the left sidebar of your dashboard, and WP Travel Engine keeps the archive settings inside its main settings area.
Open WP Travel Engine settings
Log in to your WordPress dashboard.
In the left sidebar, click WP Travel Engine. Then click Settings.
You should now see the main settings screen for the plugin.
Go to the display settings
At the top of the settings screen, click Display.
This section controls how your trip pages look to visitors.
Open the Trip Archive tab
Click Trip Archive.
Most of the settings on this page are here. A few card-related settings are under Trip Card Display on the same screen.
After you make any change, click Save. That makes sure your updates appear on the front end of your website.
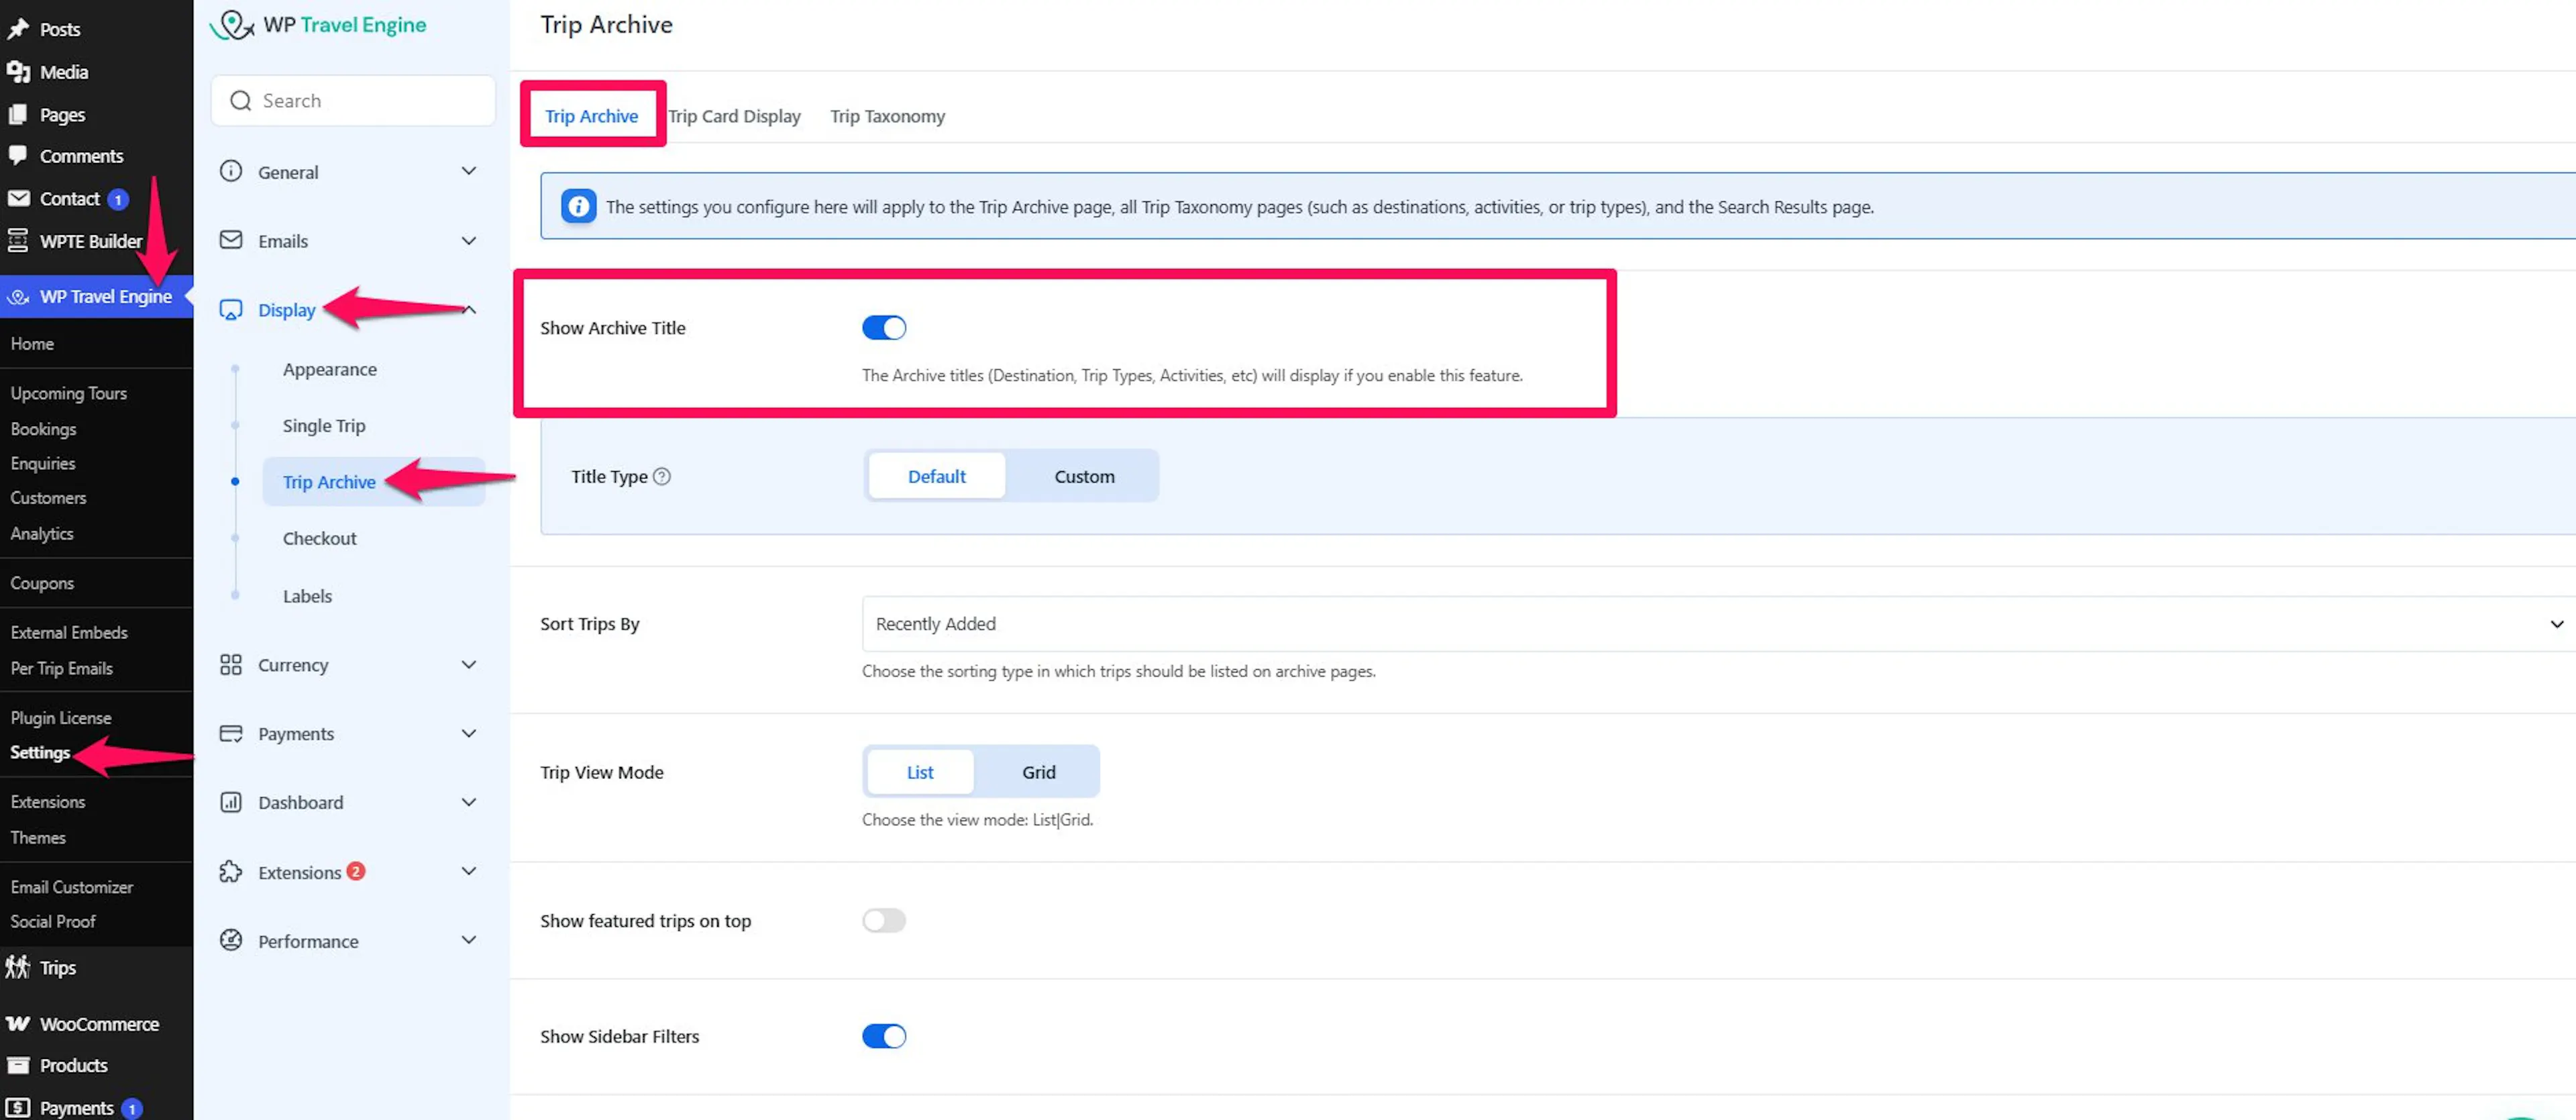
Good to know: Settings like Show Slider, Show Wishlist, Show Map, Show Excerpt, Show Difficulty, Show Tag, Show Next Departure Dates, Show Available Months, and Show Trip Duration are under Trip Card Display, not Trip Archive.
Now that you know where the settings are, you can start adjusting how travelers see your trips.
Show the archive title
The archive title tells visitors what kind of trip list they are looking at. This is helpful when someone lands on a destination page or a trip type page from search results.
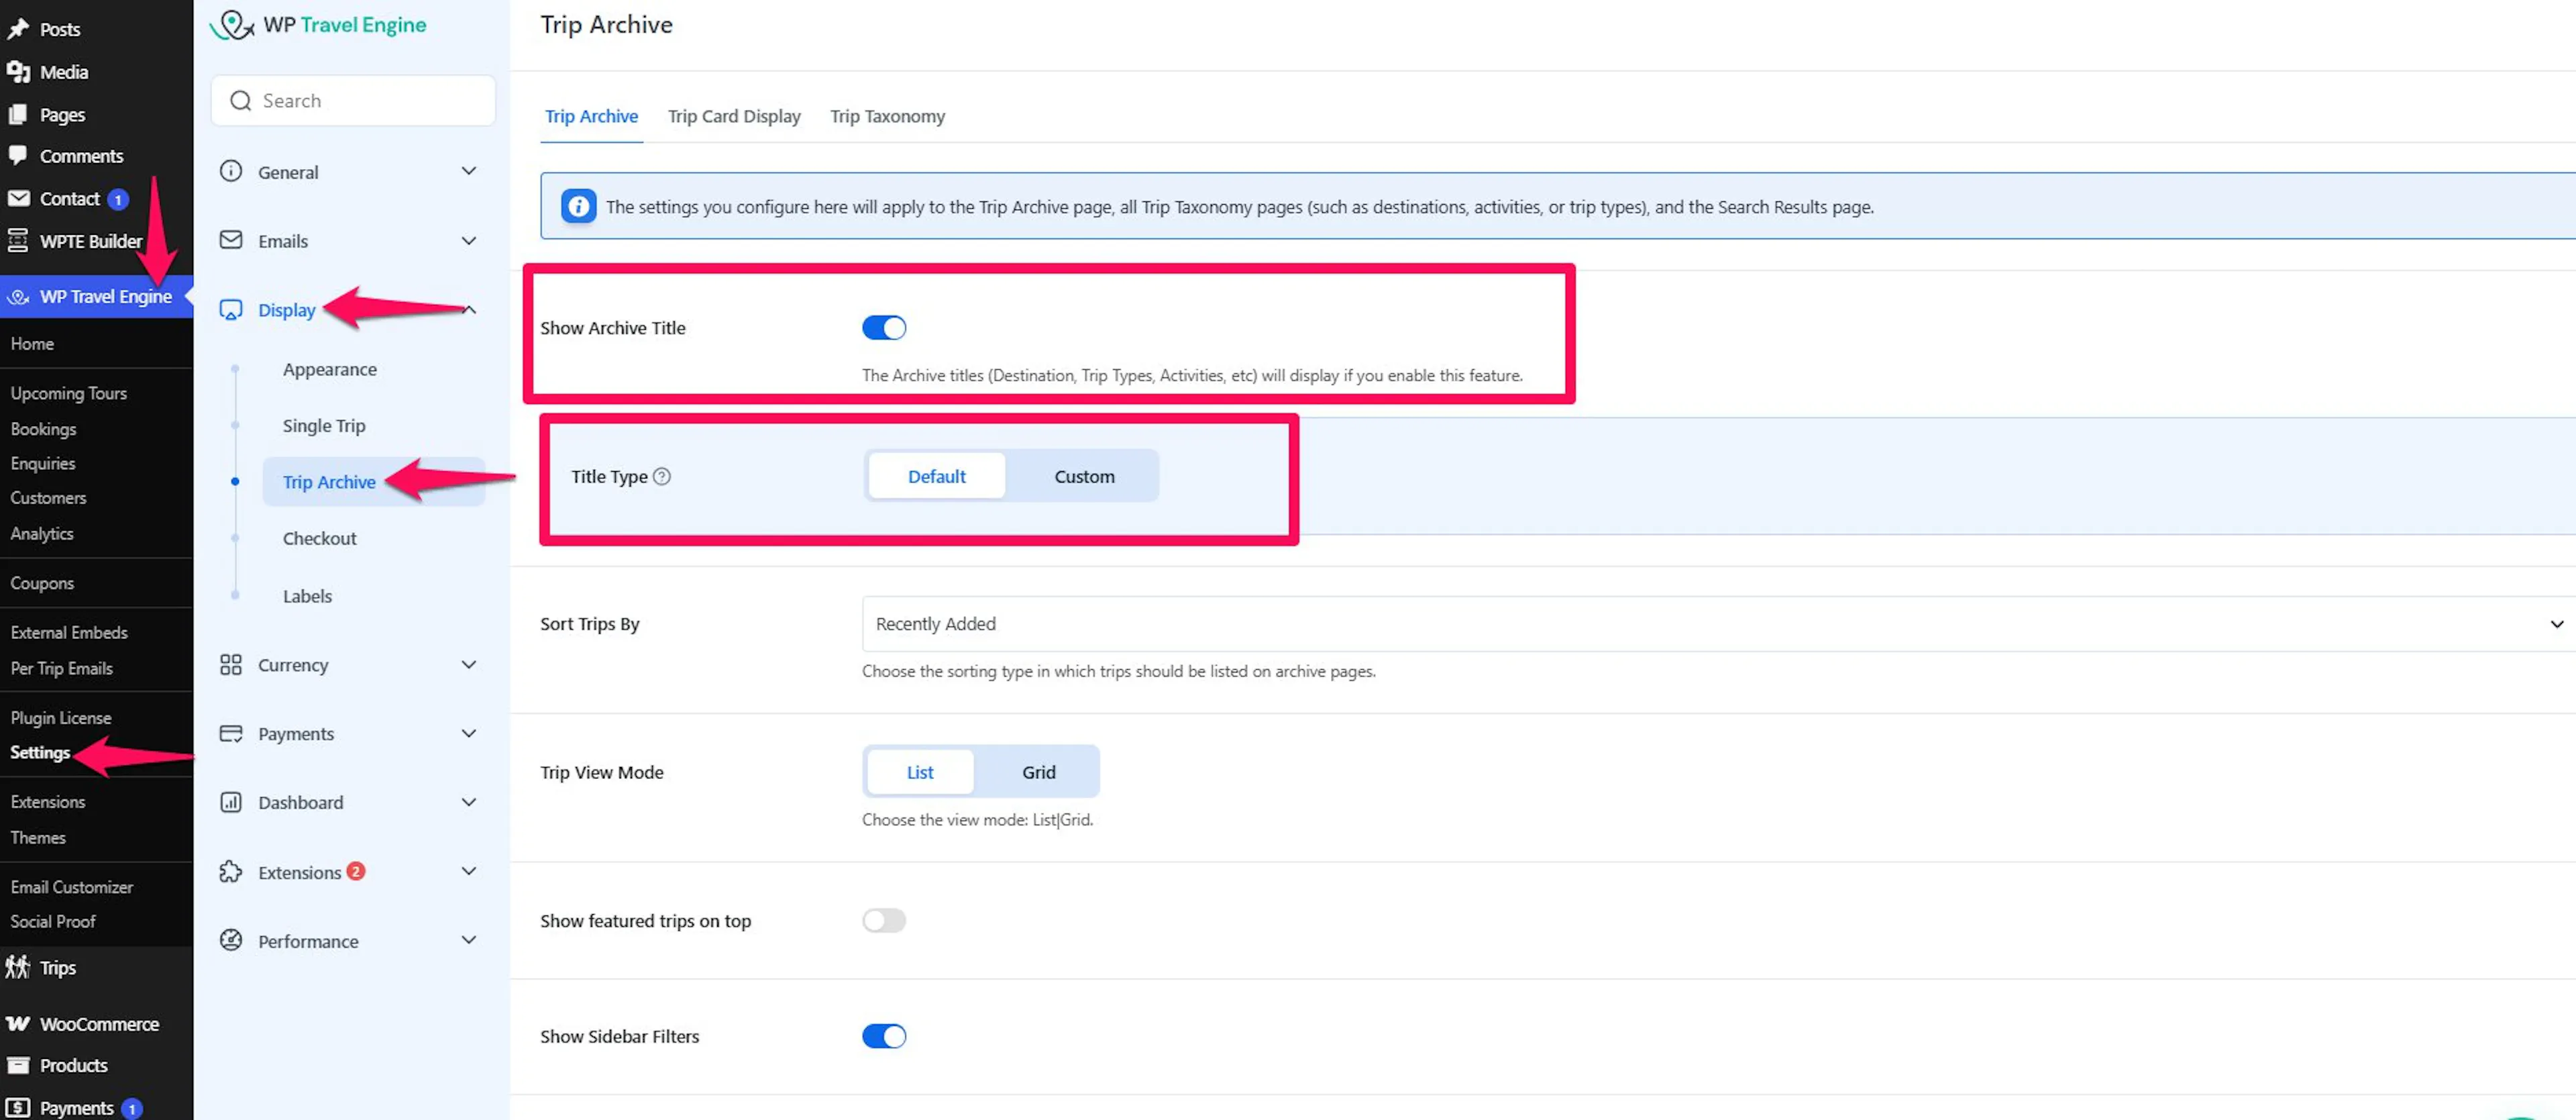
Turn on Show Archive Title to display titles such as Destination, Trip Types, or Activities at the top of the archive page.
Then choose the Title Type that fits your page:
- Default - Shows the standard page title.
- Custom - Lets you enter your own archive title.
A custom title can help you speak more clearly to travelers. For example, instead of a generic title, you might use “Everest Region Treks” or “Family-Friendly Day Tours.”
If you want visitors to understand the page right away, this is a good setting to start with.
Change the trip view mode
The view mode changes how the trip list is laid out on the page. This affects how much information visitors can see at a glance.
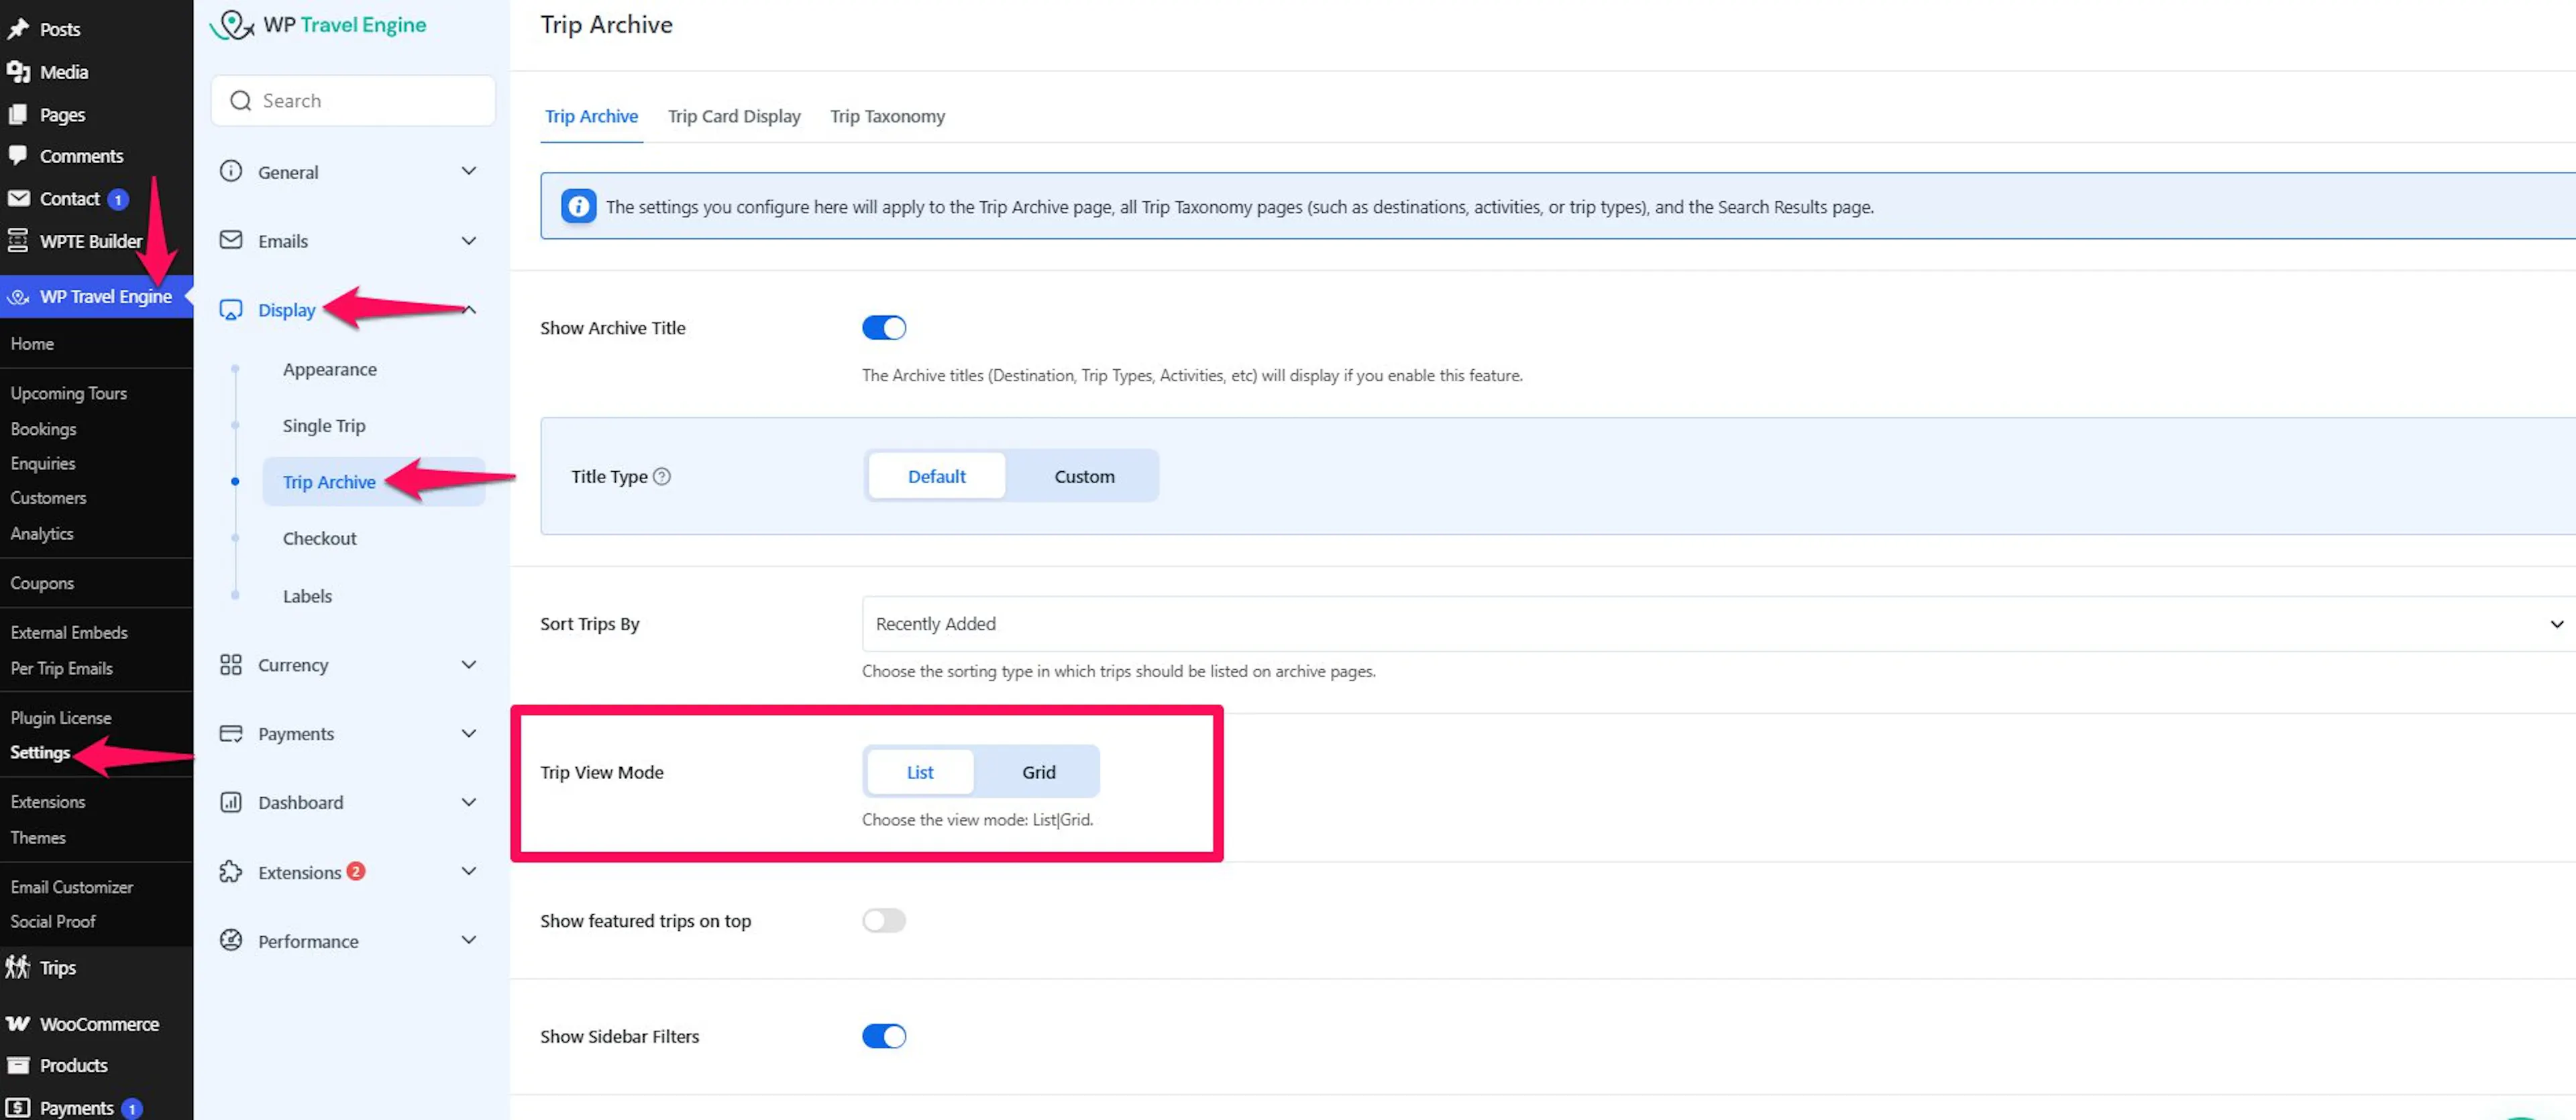
Under Trip View Mode, choose one of these options:
- List View
- Grid View
List View works well when you want to show more trip details in each result. This is useful for longer tours where travelers compare duration, difficulty, and departure dates.
Grid View works well when you want a more visual layout. This is often a good fit for day tours, short getaways, or destination-based browsing.
If you are not sure which one to use, think about how your customers usually compare trips.
Change the sort order
Sorting controls which trips appear first. This matters because many visitors only look at the first few results.
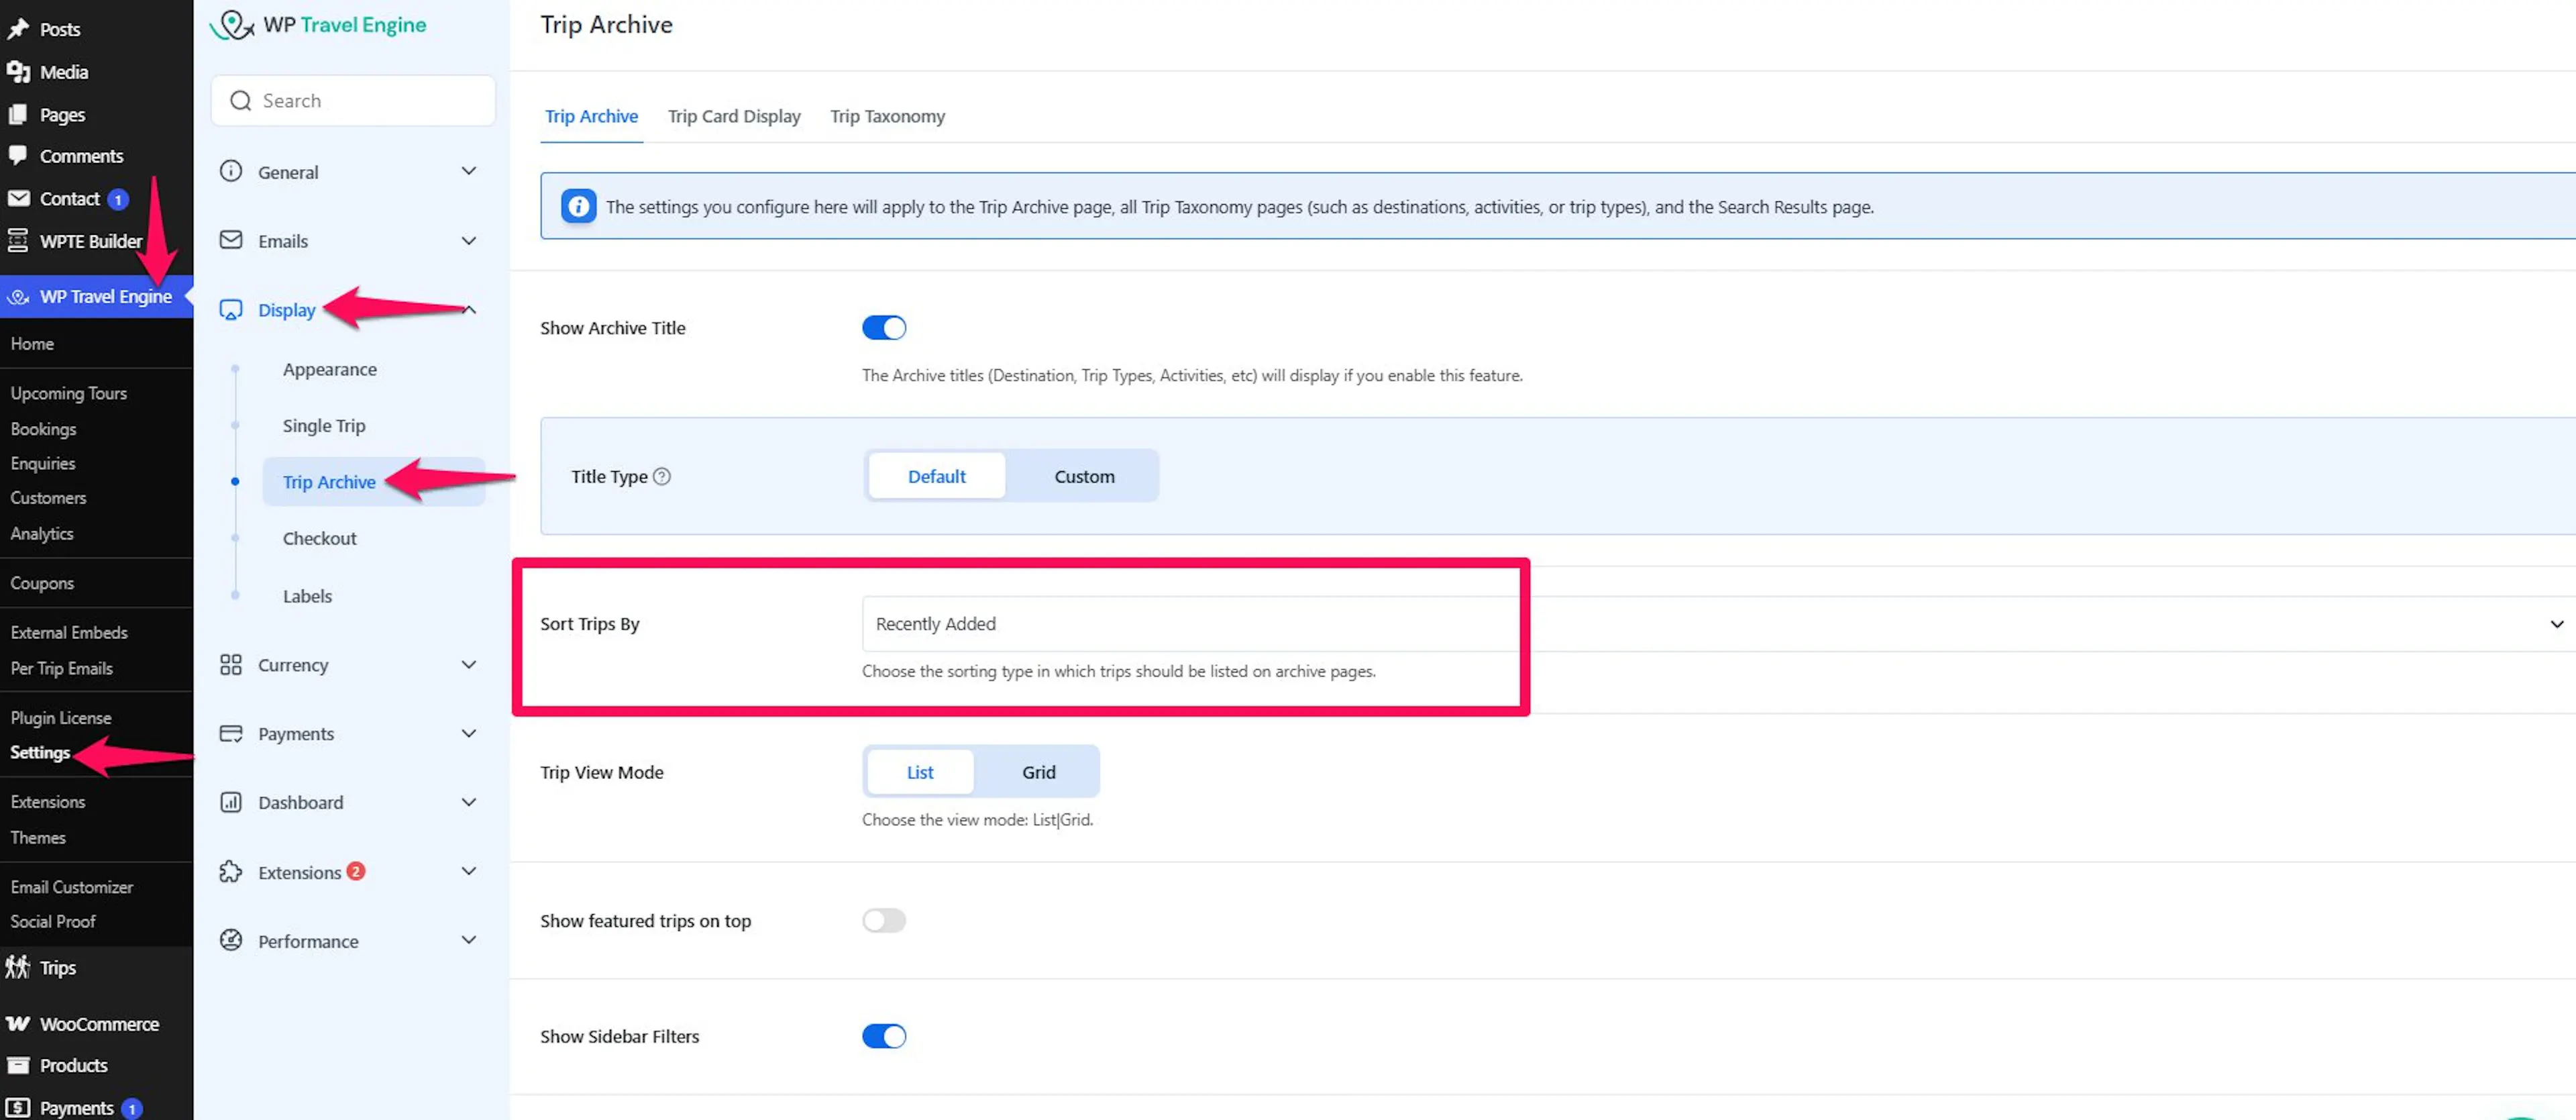
Under Sort Trips By, choose one of these options:
- Recently Added - Shows the newest trips first.
- Top Rated - Shows trips with the highest visitor ratings first.
- Lowest Price First - Shows the least expensive trips first.
- Highest Price First - Shows the most expensive trips first.
- Shortest Duration First - Shows the shortest trips first.
- Longest Duration First - Shows the longest trips first.
- Alphabetical A-Z
- Alphabetical Z-A
Pick the order that matches how people usually shop for your tours. For example, budget-conscious travelers may respond better to Lowest Price First, while a business focused on premium guided expeditions may prefer Top Rated or Highest Price First.
Once the sort order feels right, you can decide whether featured trips should stay at the top.
Show featured trips on top
This setting keeps your featured trips at the beginning of the archive page. It works even if you use a different sort order for the rest of the trips.
Turn on Show featured trips always on top to pin featured trips first.
This is useful when you want to push best-selling tours, seasonal offers, or high-margin packages. For example, you might keep your Annapurna Base Camp trek at the top during peak booking season even if the page is sorted by price.
If you use featured trips, the next setting lets you control how many show up first.
Change the number of featured trips
This setting controls how many featured trips appear on the archive page. It gives you more control over how much space those trips take up.
Adjust Number of Featured Trips to choose how many featured trips to display.
A smaller number keeps the page balanced. A larger number gives more exposure to promoted tours.
For example, if you run five main trips but only want to spotlight two flagship packages, set the number to match that plan.
Enable or disable the side filter
Filters help visitors narrow down choices without leaving the page. This is especially useful if you offer many trips across different destinations or trip types.
Turn Show Sidebar Filters on to display the filter area on the archive page. Turn it off if you want a cleaner layout with fewer choices on screen.
A filter sidebar is helpful when travelers need to sort through a large catalog. For example, someone looking for a short spring trek may want to filter by destination, activity, or price range.
If your business offers only a few tours, hiding the sidebar can make the page feel less crowded.
Add pagination or a Load More button
This setting controls how visitors move through more trips after the first set of results. It changes how browsing feels on the archive page.
Under Display, choose one of these options:
- Pagination - Splits trips across numbered pages.
- Load More - Adds a button that loads more trips on the same page.
Pagination is familiar and works well for larger tour catalogs. Load More keeps visitors on the same page, which can feel smoother on mobile devices.
For example, if you run many multi-day tours across several regions, pagination can keep browsing organized. If you have a shorter list of day tours, Load More may feel more natural.
The next group of settings changes what each trip card shows.
Enable the slider
The slider changes the way trips are presented on the archive page. You will find this under the Trip Card Display tab.
Turn Show Slider on or off:
- Enabled - Trips appear in a scrolling slider.
- Disabled - Trips appear in the standard layout.
A slider can work well when you want to draw attention to selected trips. A standard layout is often better when visitors need to compare several tours at once.
Good to know: Sliders are more visual, but they can hide some trips until visitors scroll through them. If easy comparison matters more than promotion, the standard layout is often the better choice.
Once the layout looks right, you can fine-tune the details shown on each trip card.
Enable or disable the feature tag
The feature tag helps travelers spot promoted trips quickly. It appears directly on the trip card.
Turn Show Feature Tag on to display the tag. Turn it off to keep the card design cleaner.
This is useful if you want people to notice tours you are actively promoting. For example, you might tag a newly launched group departure or a seasonal festival package as featured.
Enable the wishlist feature
A wishlist lets visitors save trips they are interested in and come back later. This setting is under the Trip Card Display tab.
Turn Show Wishlist on to let visitors save trips for later review.
This can help when people are comparing several options before booking. For example, a traveler choosing between a 3-day wildlife safari and a 7-day trekking package may want to save both before deciding.
If your customers often plan in advance, this setting can be especially useful.
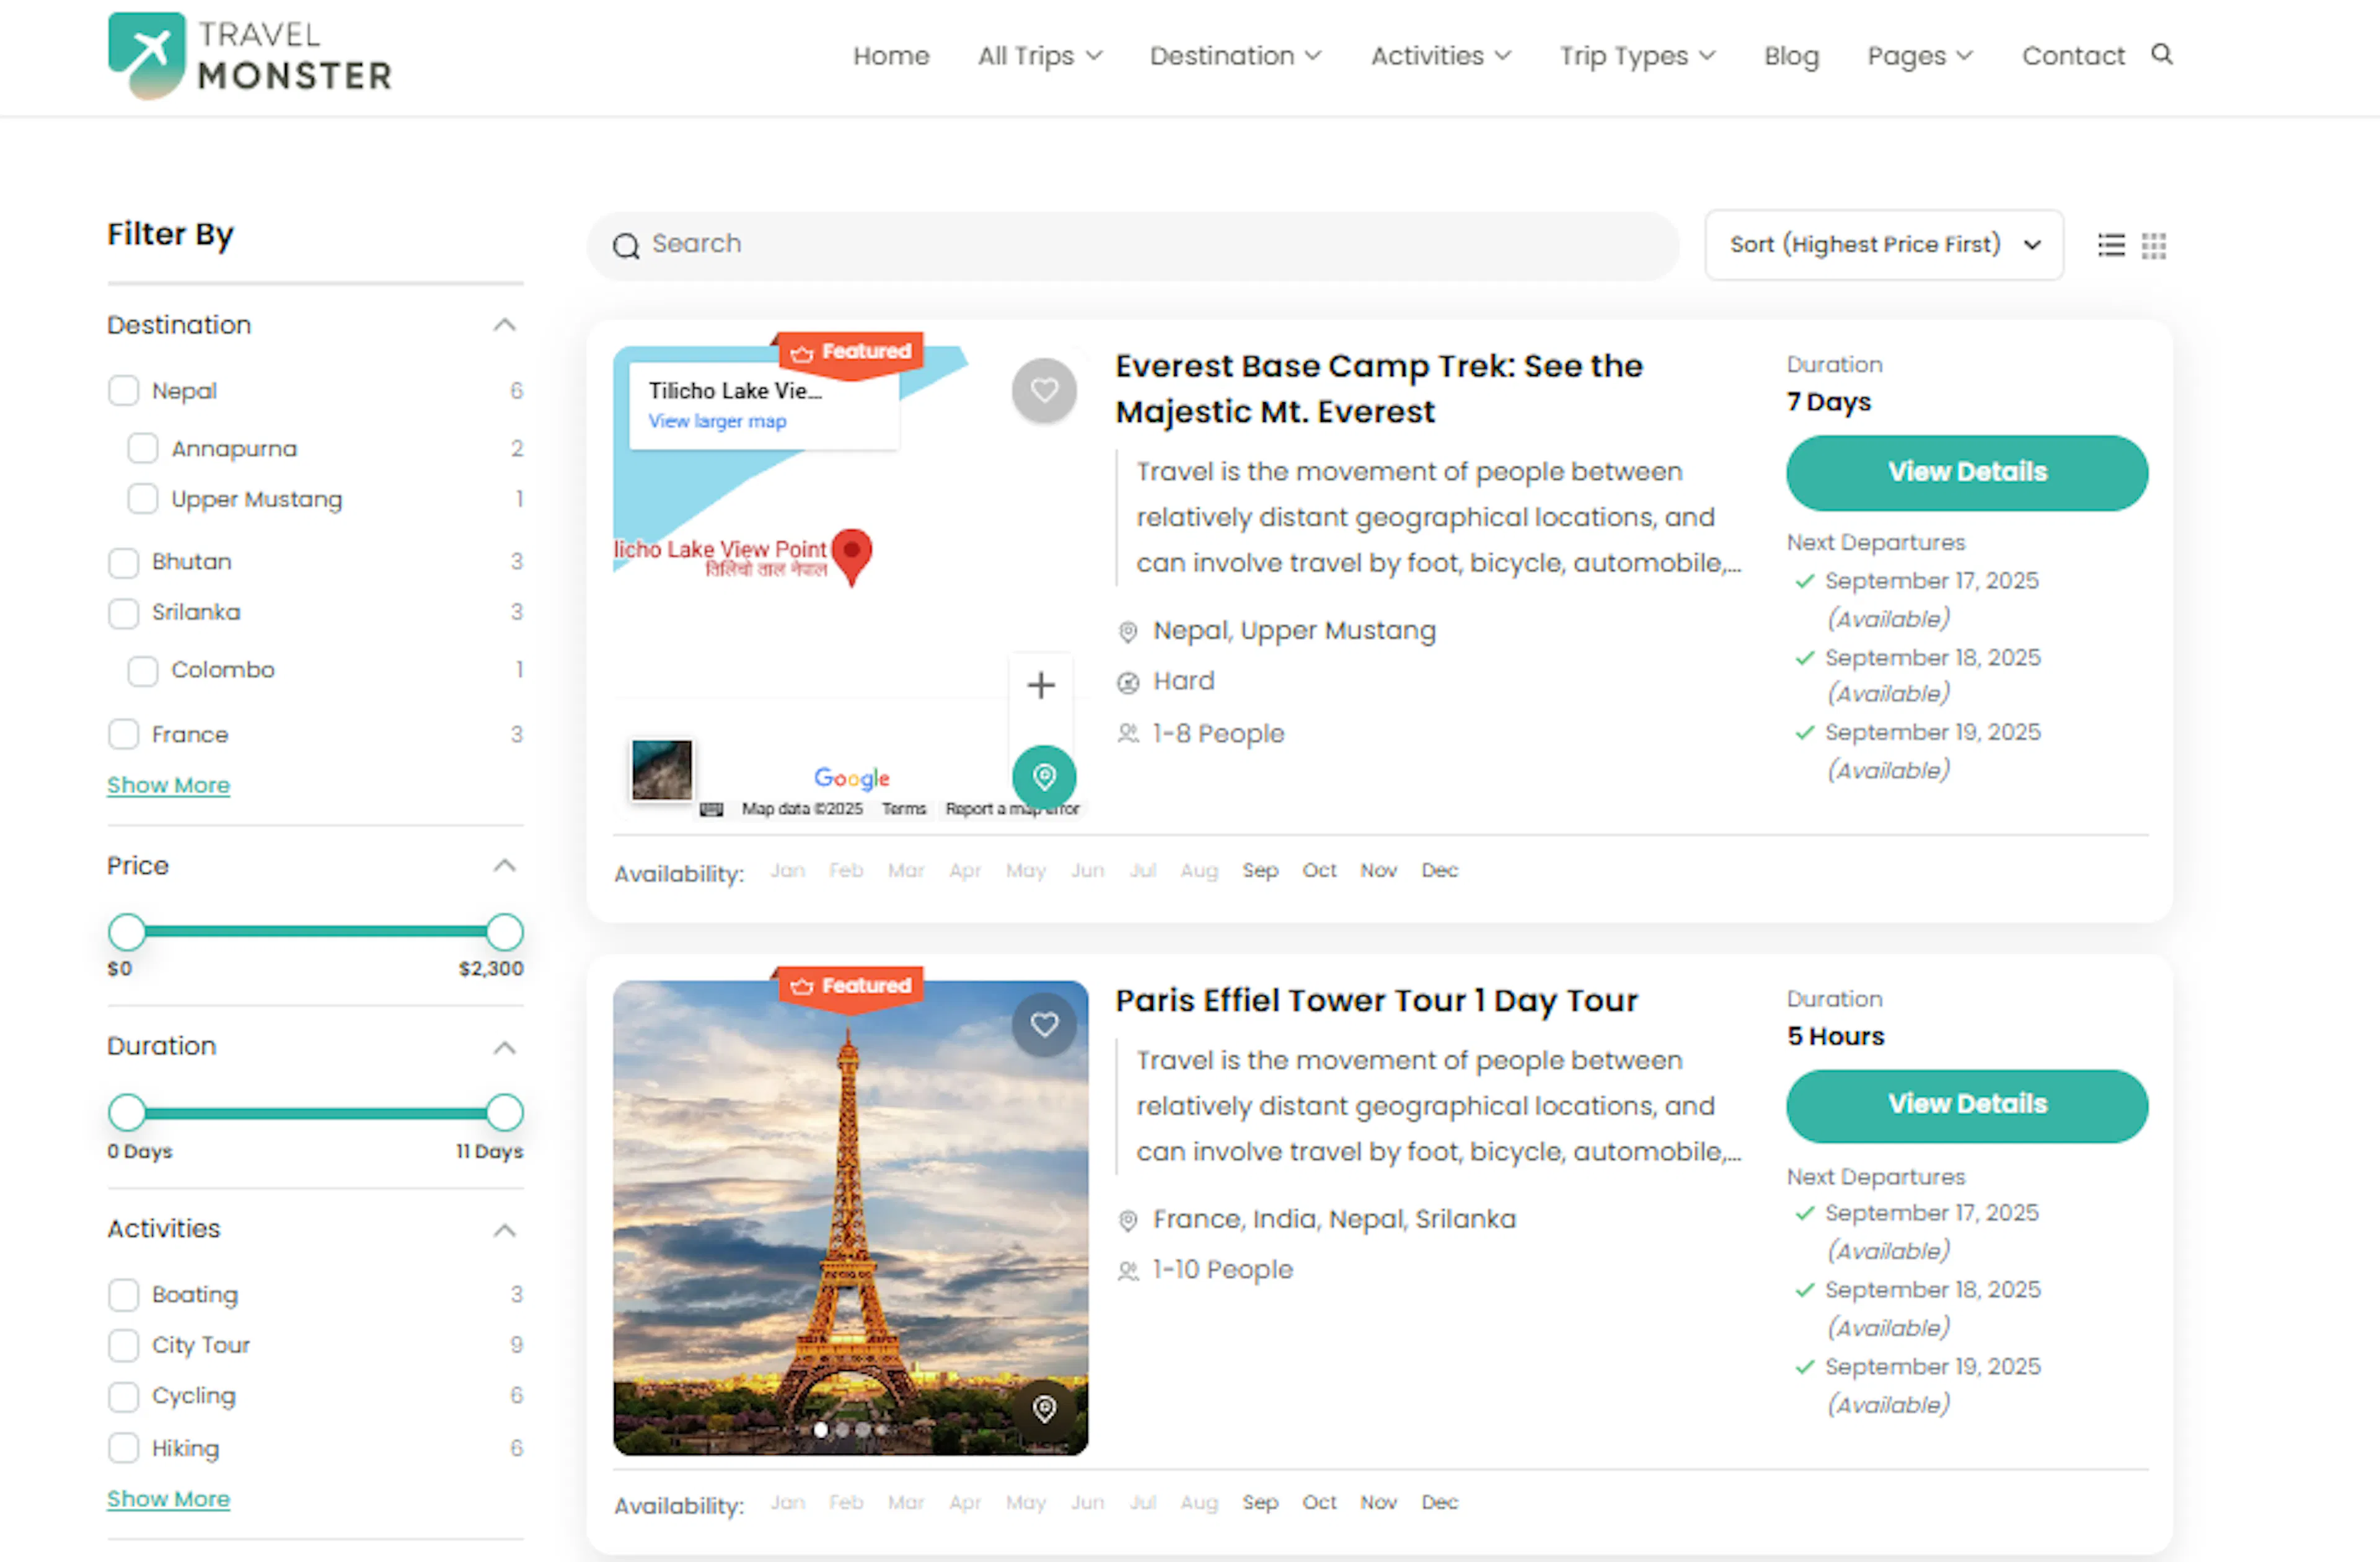
Show the map
The map helps visitors understand where the trip takes place. This setting is under the Trip Card Display tab.
Turn Show Map on to display the location of each travel destination on the trip card.
This is helpful when location is a major selling point. For example, a traveler comparing tours in Pokhara, Chitwan, and Mustang can quickly tell which region each trip belongs to.
If your trip titles already make the destination very clear, you can decide whether the extra map detail is worth the space.
Show an excerpt
An excerpt adds a short summary to each trip card. This setting is under the Trip Card Display tab.
Turn Show Excerpt on to display a brief description of each trip.
This helps travelers understand the trip before they click through. For example, a short line like “5-day guided trek with teahouse stays and mountain views” gives a much clearer picture than the trip title alone.
If your trips need a little more explanation to stand out, excerpts can help.
Show trip difficulty
Difficulty tells travelers how challenging a trip is. This setting is under the Trip Card Display tab.
Turn Show Difficulty on to display the difficulty level on each trip card.
This is especially useful for trekking, cycling, rafting, or adventure tours. A traveler looking at two similar hikes may choose differently if one is marked easy and the other is marked strenuous.
Clear difficulty labels can also reduce questions before booking.
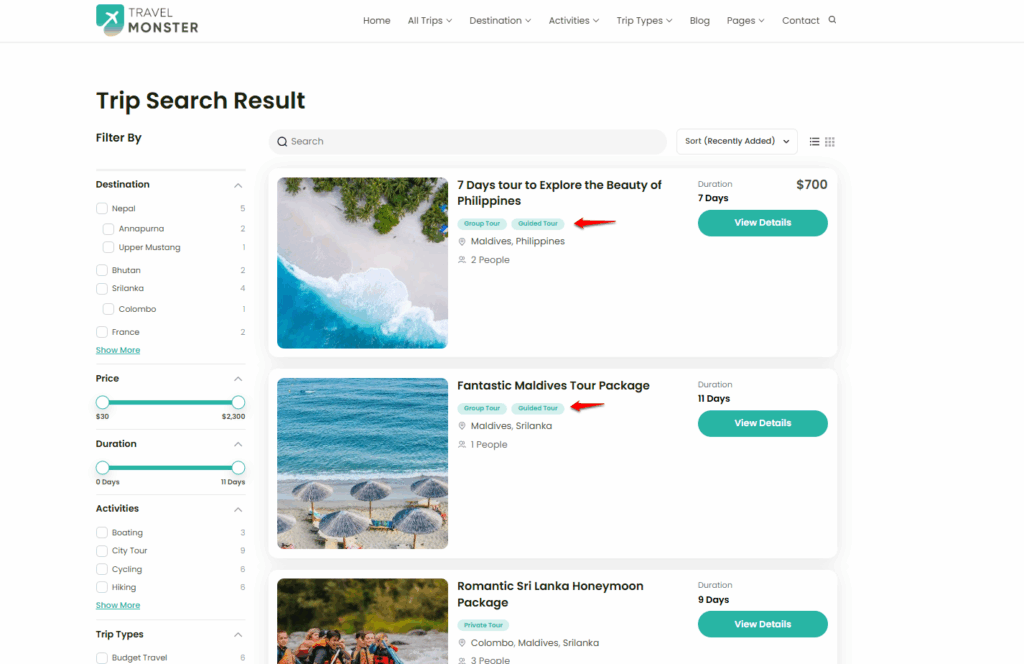
Show trip tags
Tags help visitors spot themes or categories quickly. This setting is under the Trip Card Display tab.
Turn Show Tag on to display the tags assigned to each trip.
Tags are useful when you group trips by travel style or special interest. For example, a trip card might show tags such as family, cultural, luxury, or photography.
If tags help people compare trips faster, keep them visible.
Show next departure dates
Next departure dates tell visitors when a trip is next available. This setting is under the Trip Card Display tab.
Turn Show Next Departure Dates on to show the upcoming departure schedule on each trip card.
This is helpful for trips with fixed departure dates. For example, if your Island Peak climb leaves on April 12 and April 26, travelers can see that schedule before opening the full trip page.
If dates drive bookings, this setting can make the archive page much more useful.
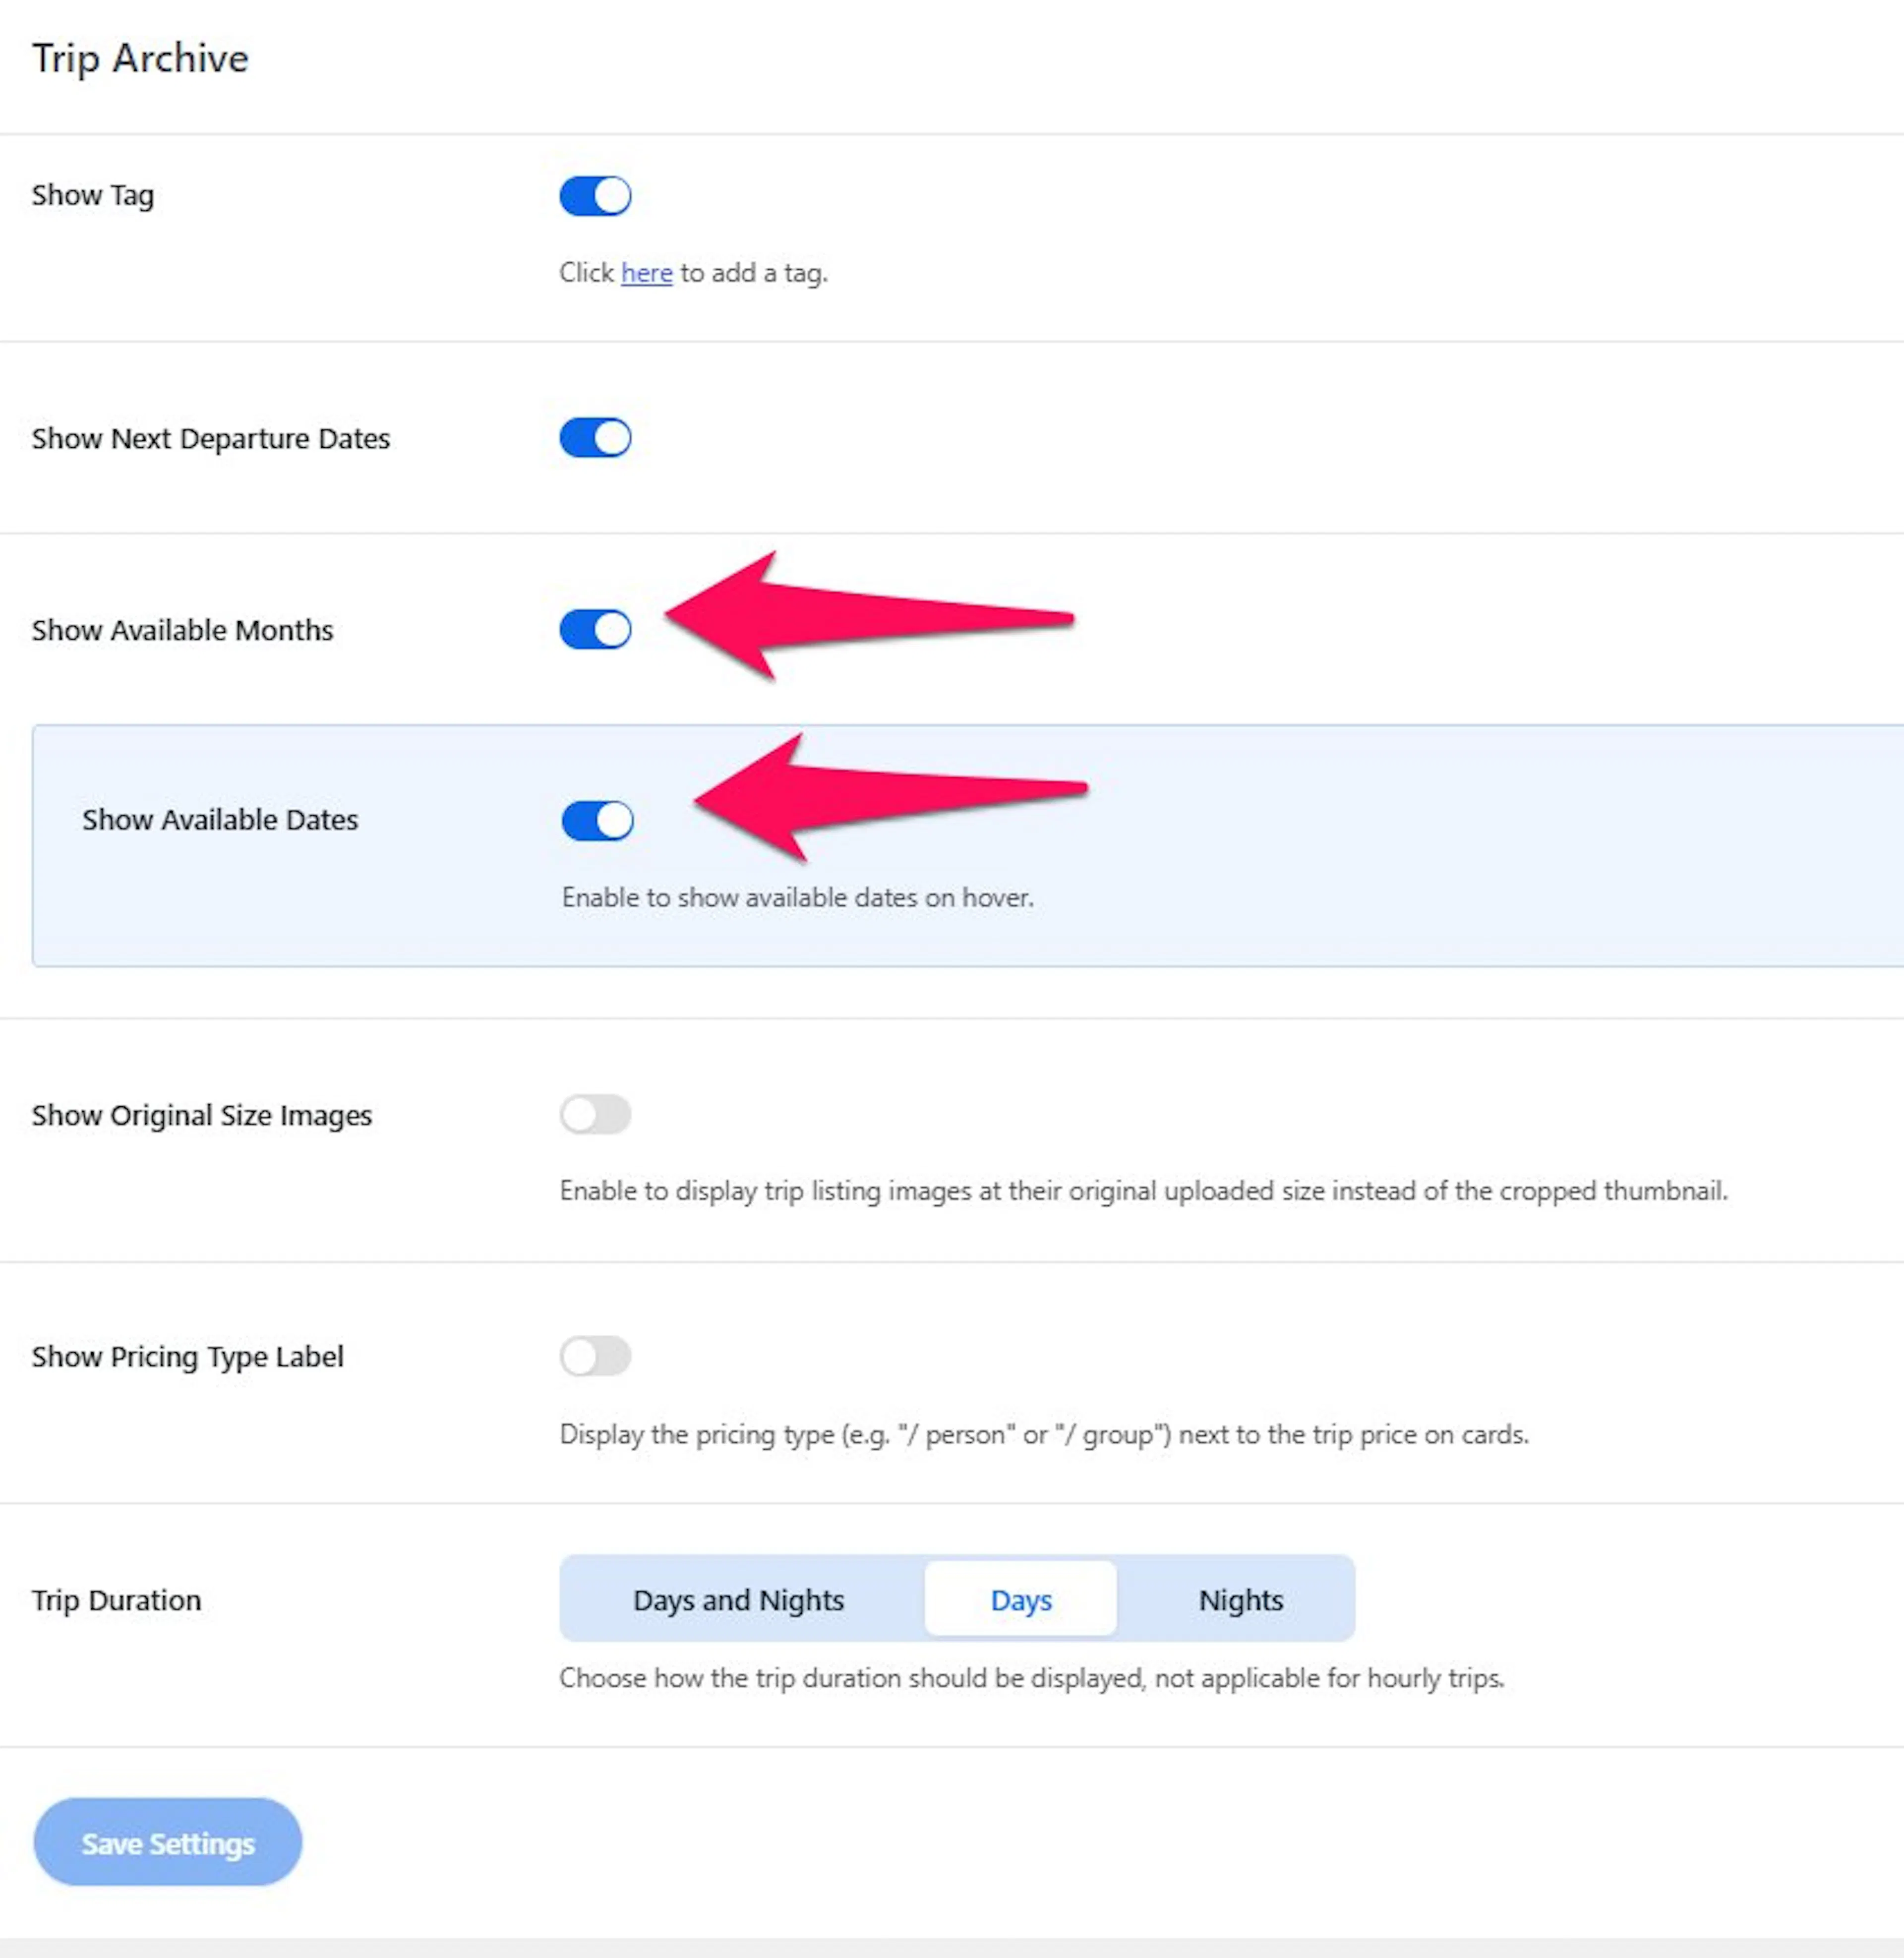
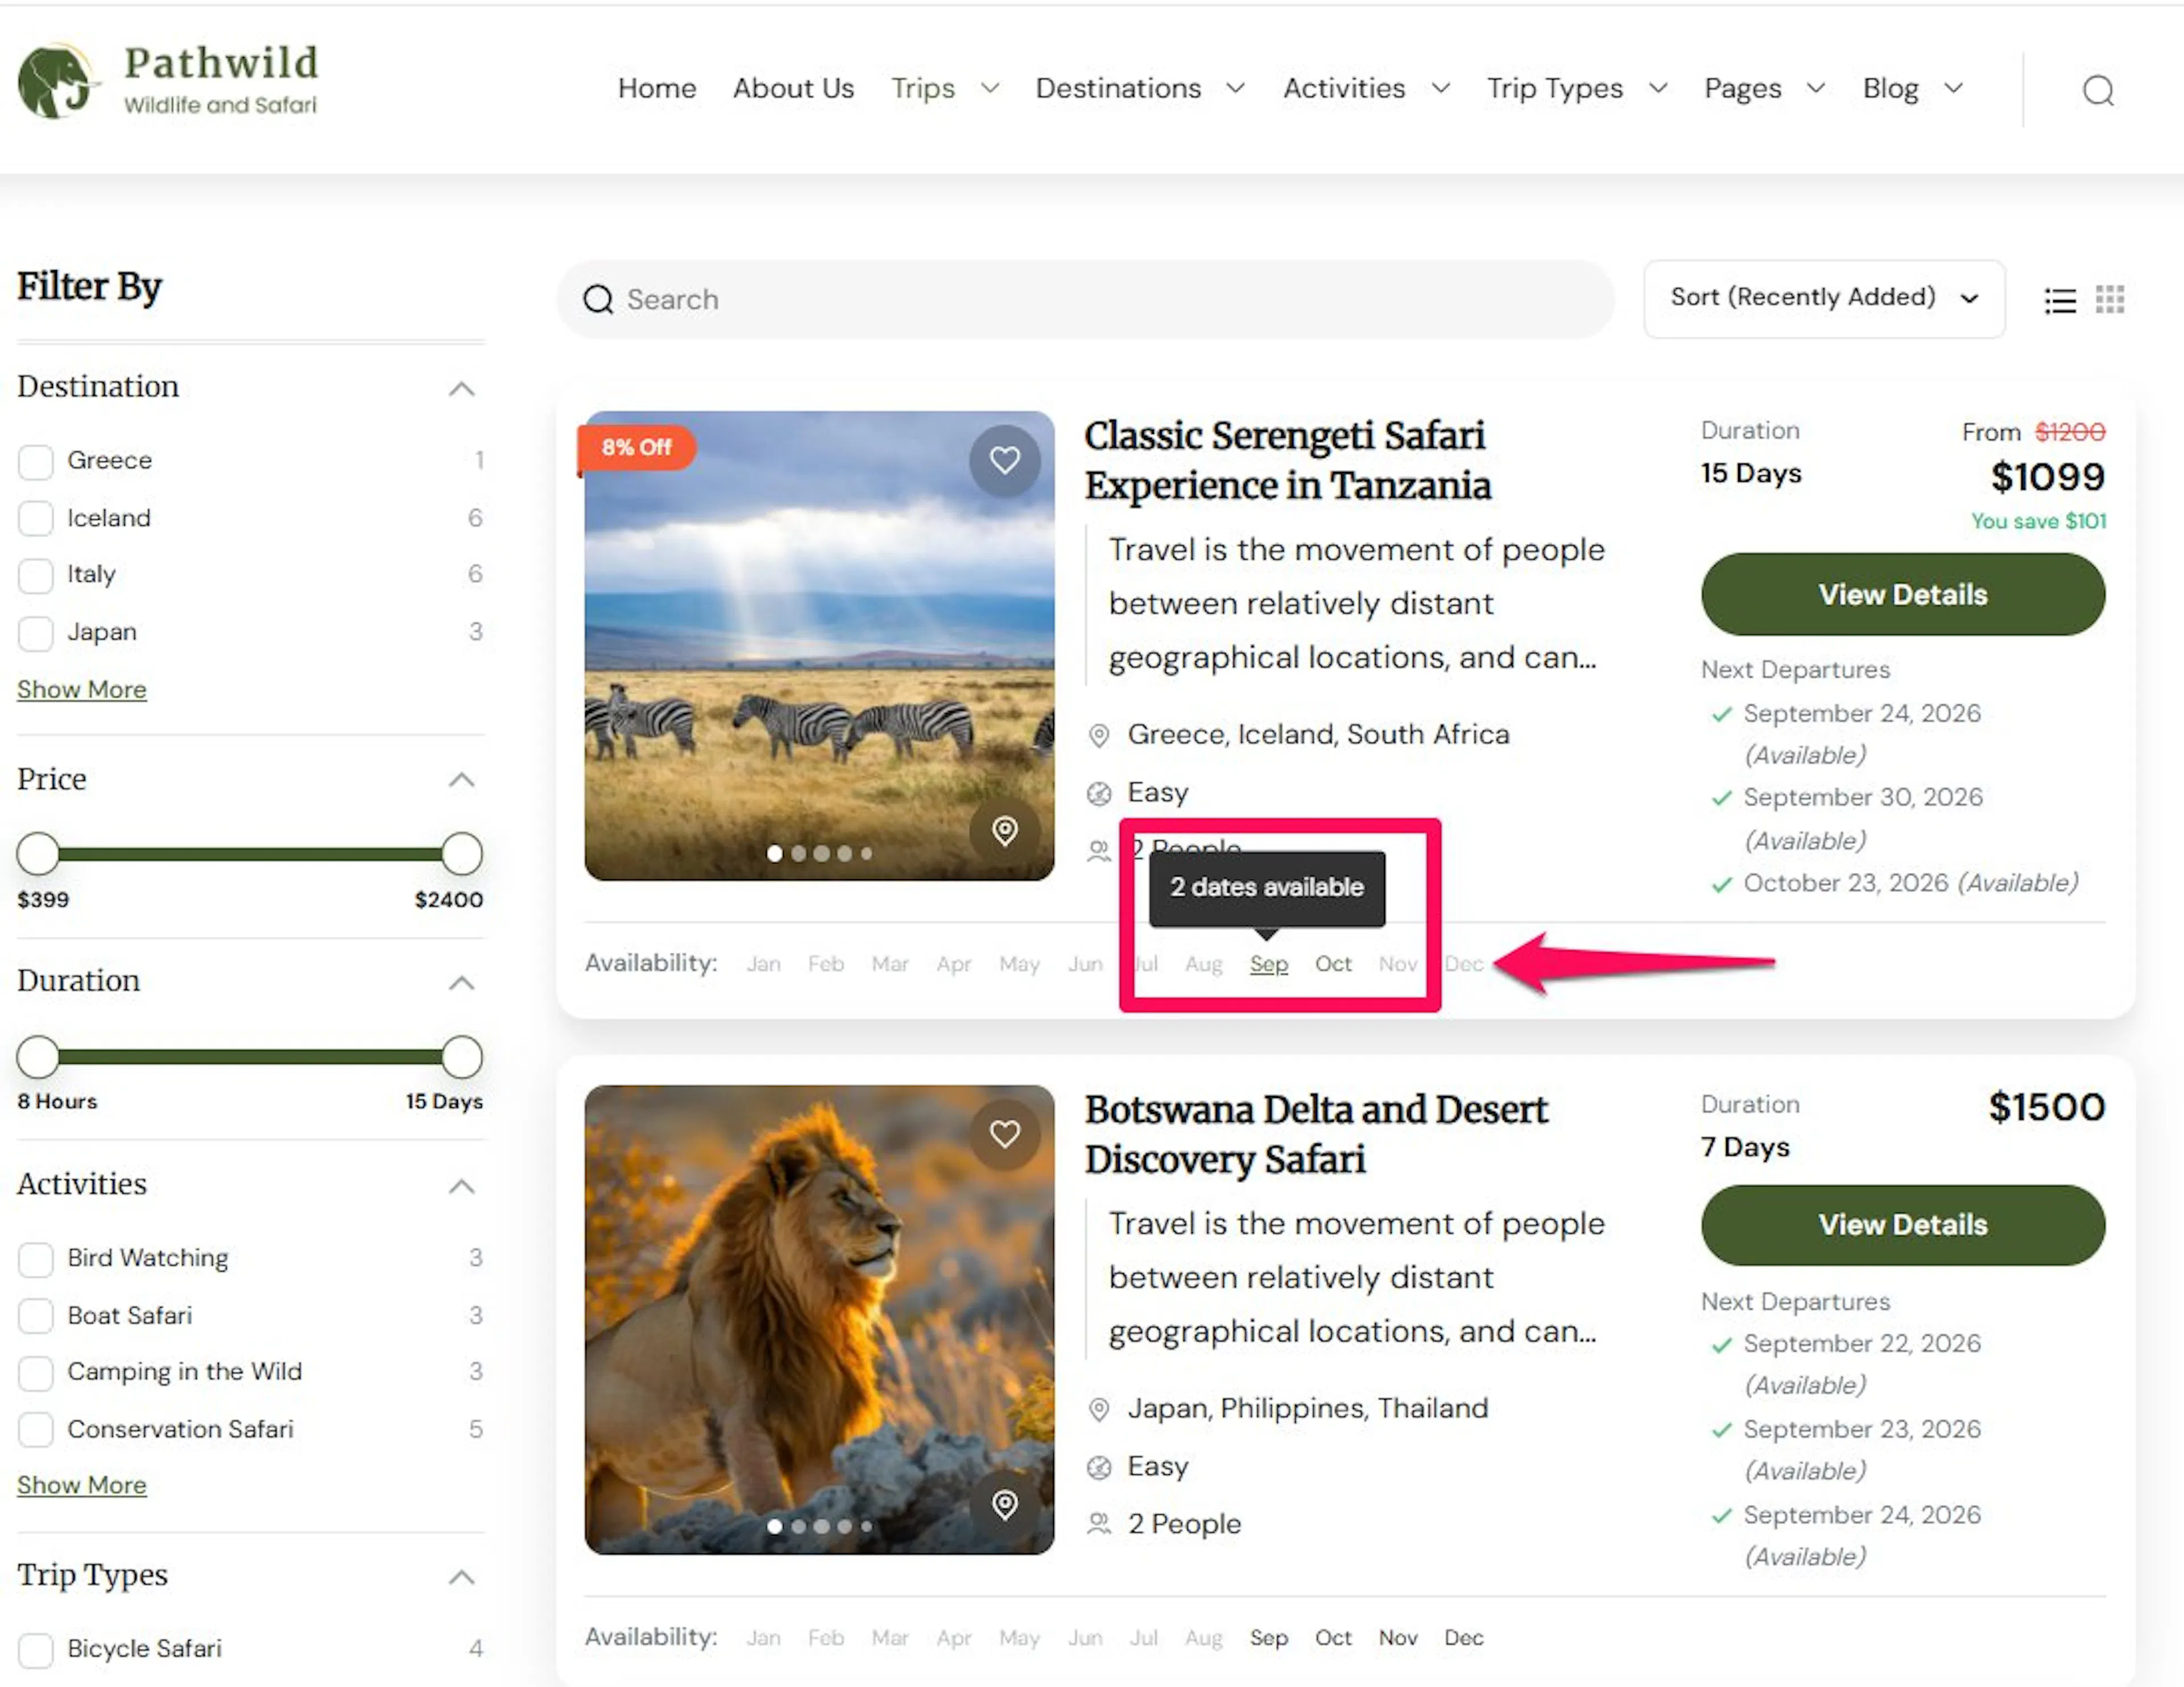
Show available months
Available months help travelers see seasonal availability at a glance. This setting is under the Trip Card Display tab.
Turn Show Available Months on to display the months when each trip is available.
This works well for seasonal tours. For example, if a high-altitude trek runs best from March to May and September to November, visitors can understand that right from the trip card.
If many of your tours depend on weather or season, this setting can save time for both you and your customers.
Turn Show Available Dates on to display the available dates for each trip when you hover over a specific month.
Show trip duration
Duration tells visitors how long the trip lasts. This setting is under the Trip Card Display tab.
Turn Show Trip Duration on to display the trip length on each card. Then choose the format that fits your business:
- Days and Nights
- Days Only
- Nights Only
The right format depends on how you sell your tours. A lodge-based package may make more sense as days and nights, while a single-day activity may only need days.
For example, a 10-day trek with 9 overnight stays may be clearer in Days and Nights format. A city walking tour may look cleaner in Days Only.
If you're still stuck or have a question we didn't cover, our support team is happy to help. Reach out at our support page and we'll get you sorted.