

Midtrans Payment Gateway
Accept trip payments in Indonesian Rupiah through Midtrans. Set it up in a few steps so travelers can pay for your tours using bank transfers, e-wallets, and cards.
Overview
Midtrans Payment Gateway is an extension for WP Travel Engine that lets you accept trip and tour payments through Midtrans. Midtrans is one of Indonesia's most popular payment services. It handles the payment part of your booking process for you.
When a traveler books a tour on your site, Midtrans collects their payment and sends confirmation back to your website. You don't need to handle card details or bank transfers yourself. Midtrans takes care of all of that on their secure servers.
This matters because it gives your travelers a familiar way to pay. Many Indonesian travelers already use GoPay, QRIS, or bank transfers for everyday purchases. When they see those options at checkout, they're more likely to complete the booking without second-guessing.
Supported payment methods
When you connect Midtrans with WP Travel Engine, your customers can pay using:
- Credit and debit cards (Visa, Mastercard, JCB, American Express)
- Bank transfers through virtual accounts (BCA, BNI, BRI, Mandiri, Permata, CIMB, and other major Indonesian banks)
- E-wallets (GoPay, OVO, Dana, ShopeePay, LinkAja)
- QRIS (scan-to-pay using any Indonesian banking app)
- Convenience store payments (Alfamart and Indomaret)
This gives travelers flexibility at checkout. For example, one traveler booking a day tour might prefer paying with GoPay on their phone. Another booking a multi-day package might want to use a BCA virtual account transfer.
Midtrans Payment Gateway requires WP Travel Engine v3.0.6 or later. If you're not sure which version you have, go to the Plugins page in your WordPress dashboard and find WP Travel Engine in the list. The version number appears below the plugin name.
What you'll need before you start
Before you set up Midtrans, make sure you have these ready:
- The Midtrans Payment Gateway addon purchased and downloaded from your WP Travel Engine account. A plugin is a small add-on that gives your WordPress site extra features. This addon is the plugin that connects WP Travel Engine to Midtrans.
- An active merchant account with Midtrans. You can sign up for free at their website. Midtrans will ask for some basic information about your business to verify your account.
- Your Midtrans credentials handy: a Merchant ID, a Client Key, and a Server Key. You'll find these inside your Midtrans account dashboard.
- Your WordPress login so you can access your dashboard.
You must have an active merchant account with Midtrans to use this payment gateway. Only payments in Indonesian Rupiah (IDR) can be accepted.
If you serve travelers from outside Indonesia, some international cards may work. But the primary currency on your site must be IDR.
Installing the Midtrans Payment Gateway add-on
This add-on must be installed before Midtrans can appear in your payment settings.
Download the extension
Log in to your WP Travel Engine account and download the Midtrans Payment Gateway extension from your dashboard. Save the file somewhere you can find it later, like your Downloads folder.
Upload the plugin folder
Upload the folder to your /wp-content/plugins/ directory. This is a folder on your website's server. If you're not sure how to access it, you can use the Plugins page in your WordPress dashboard instead. Go to Plugins on the left sidebar, click Add New at the top of the page, then click Upload Plugin. Choose the file you downloaded and click Install Now.
Activate the plugin
After the upload finishes, activate WP Travel Engine - Midtrans Payment Gateway from the Plugins menu in WordPress. If you used the Upload Plugin method, click Activate on the same page right after installation.
Once the addon is active, you're ready to connect it to your Midtrans account.
Setting up your redirection URLs in Midtrans
Before you configure anything in WordPress, there's one step to do inside your Midtrans account. You need to tell Midtrans where to send travelers after they finish paying.
When a traveler completes a payment through Midtrans, Midtrans redirects them back to your website. There are three possible outcomes, and each one needs a destination page:
- Finish URL: Where the traveler goes after a successful payment.
- Error URL: Where the traveler goes if the payment fails.
- Unfinish URL: Where the traveler goes if they close the payment page without finishing.
Say a traveler books a 3-day Bali trek and pays with GoPay. When the payment goes through, Midtrans sends them to your Finish URL. That might be a thank-you page saying "Your booking is confirmed." If something goes wrong with the payment, they go to your Error URL instead.
Log in to your Midtrans dashboard
Go to the Midtrans MAP portal and log in with your email and password. MAP stands for Merchant Administration Portal. It's the dashboard where you manage everything related to your Midtrans account.
Go to Configuration
On the left sidebar of your Midtrans dashboard, click Settings, then click Configuration.
Enter your redirect URLs
On the Configuration page, enter your website URLs for the Finish Redirect URL, Error Redirect URL, and Unfinish Redirect URL. These should be pages on your own website, such as a thank-you page for successful payments and an error page for failed ones.
Make sure each URL starts with https:// (or http:// if your site doesn't use https). You can check this by looking at your website's address bar in your browser.
Save your changes
Click Update to save your redirect URLs.
For more detail on configuring redirect URLs, see the Midtrans configuration guide.
This step is easy to miss, but it matters. Without redirect URLs set up, travelers might see a blank page or an error after paying, even though their payment went through fine. With them in place, you're ready to connect Midtrans to WordPress.
Connecting your Midtrans account to WordPress
Now you'll enter your Midtrans credentials into WP Travel Engine. This is what links your website to your Midtrans account so payments can flow between them. An API key is a kind of password that lets your website talk to Midtrans securely. You'll use three pieces of information from your Midtrans account.
Open Payment settings
In your WordPress dashboard, click WP Travel Engine on the left sidebar, then click Settings, then click the Payments tab at the top of the page.
Select Midtrans
You'll see a list of payment gateways on this page. Find Midtrans and click on it to open its settings.
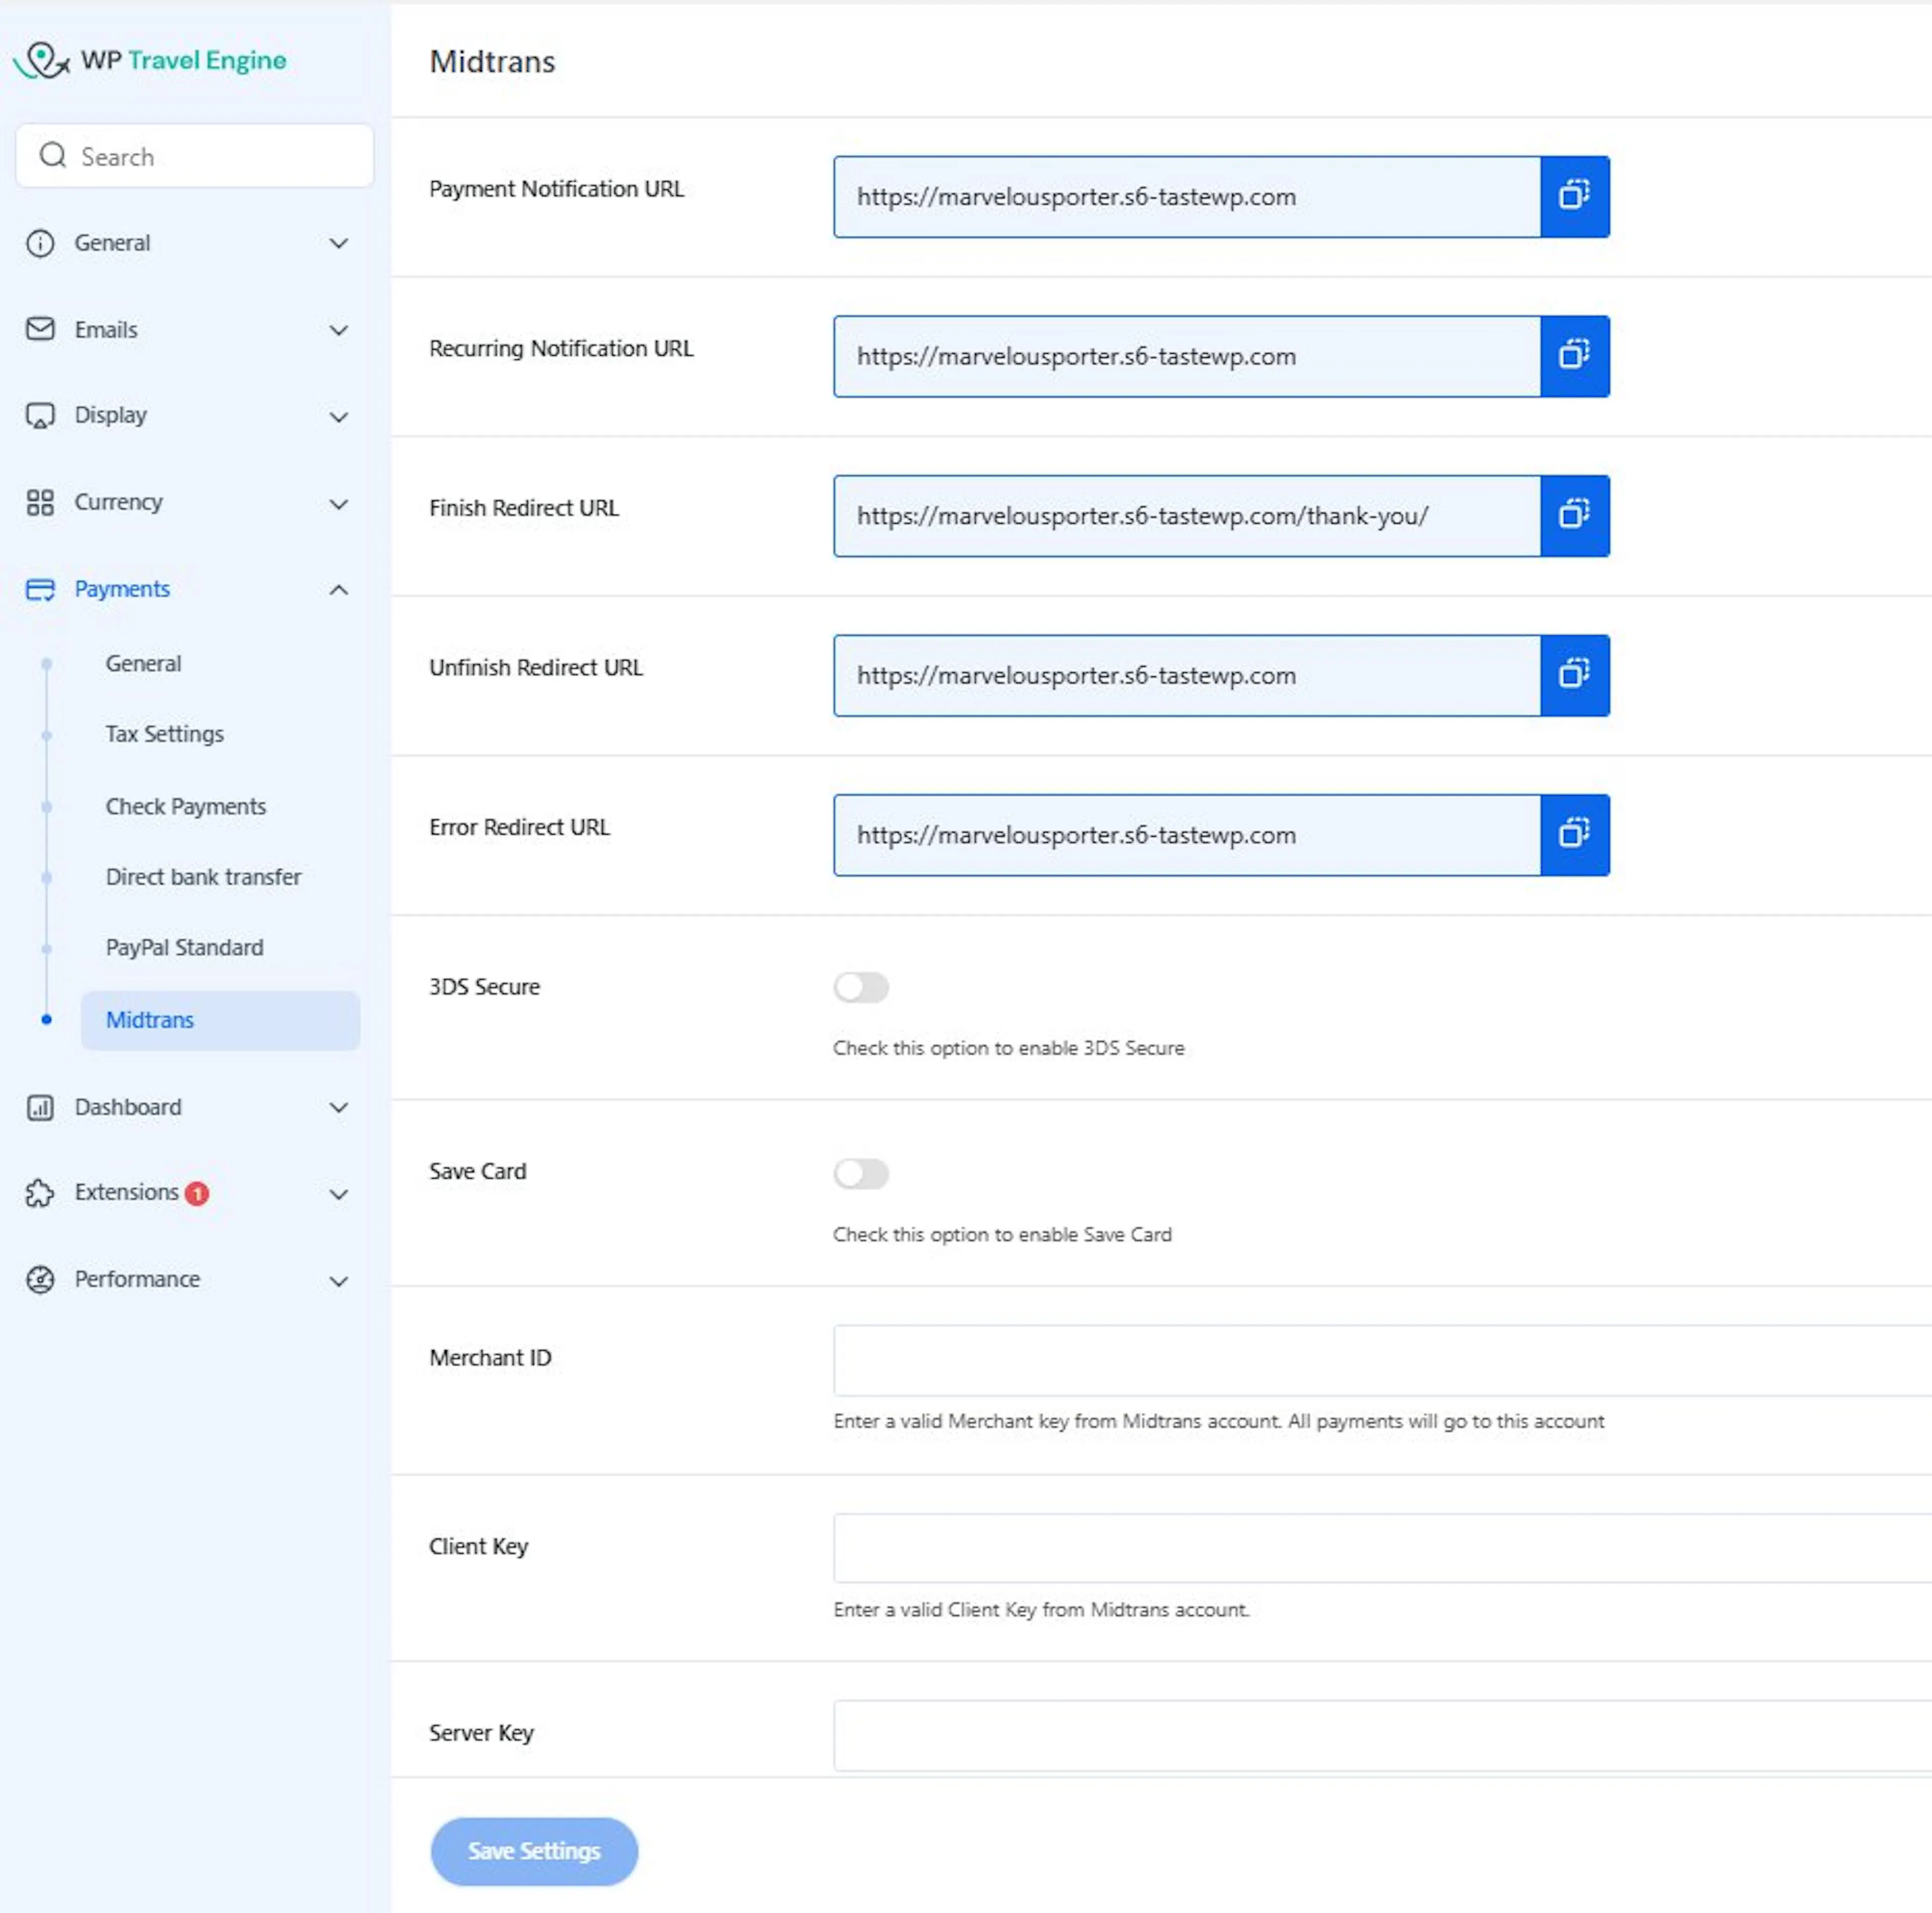
Enter your merchant credentials
Enter your Merchant ID, Client Key, and Server Key. You can find these credentials on the Midtrans MAP Dashboard under Settings > Access Keys. Copy each one and paste it into the matching field in WordPress.
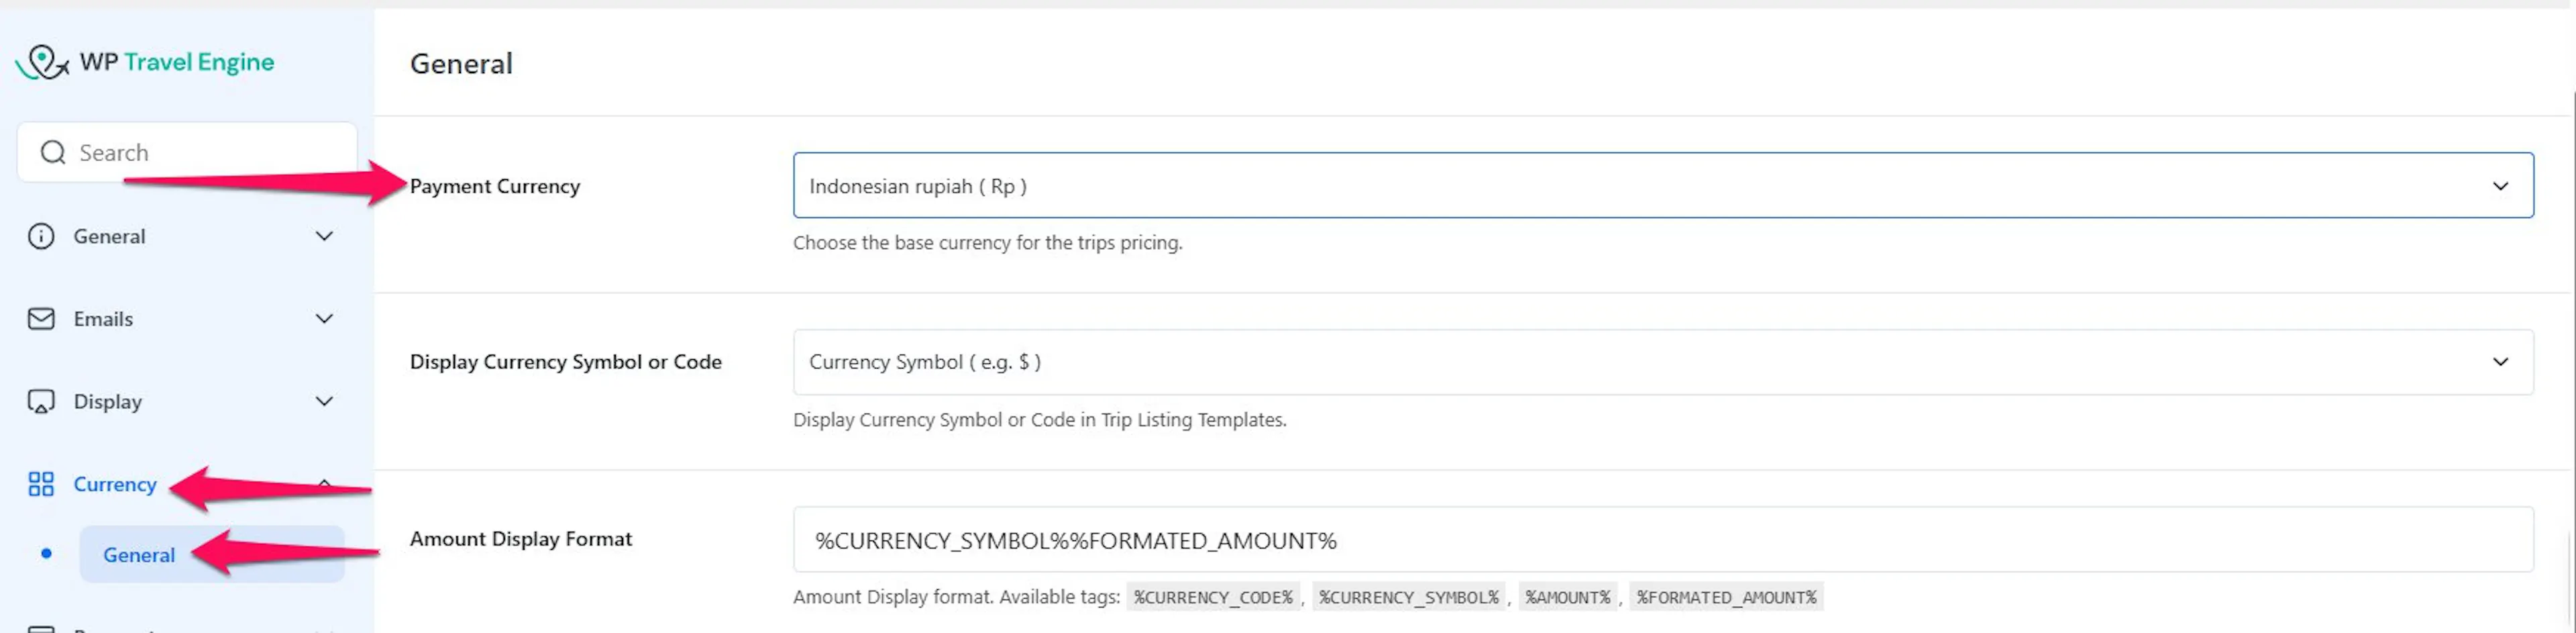
Set the currency to IDR
Go to WP Travel Engine > Settings > Currency > General. And choose Indonesian Rupiah as the Currency Code. This tells your booking form to display prices in IDR, which Midtrans requires.
Save your changes
Click Save Changes at the bottom of the page. Your site now knows Midtrans is connected and ready to use.
Midtrans gives you two sets of keys: one for Sandbox (testing) and one for Production (real payments). Use Sandbox keys while you're practicing or checking that everything works. When you're ready to accept real payments from travelers, switch to your Production keys. You can switch between Sandbox and Production in your Midtrans dashboard using the environment dropdown at the top of the page.
What each credential does
Your Midtrans Merchant ID. This is a unique identifier for your Midtrans account. Think of it like an account number. You can find it on your Midtrans dashboard under Settings > Access Keys.
Log in to the Midtrans MAP portal and navigate to Settings > Access Keys to find it.
Your Midtrans Client Key. This key is used by the front end of your website, which is what the traveler sees, to start the payment process. It's safe to use on the public side of your site.
Find it on the same Settings > Access Keys page in your Midtrans dashboard, right below your Merchant ID.
Your Midtrans Server Key. This key is used by the back end of your website, which is the admin side, to confirm payments with Midtrans. Keep this one private. Do not share it with anyone outside your team.
Find it on the Settings > Access Keys page in your Midtrans dashboard. It appears alongside your Client Key.
Once these three fields are filled in and saved, your website can connect to Midtrans. Your customers can now pay through Midtrans using any of its available payment methods.
What your travelers see at checkout
Once everything is configured, your travelers will see Midtrans as a payment option on your booking checkout page. When they choose it, Midtrans shows them a payment page with all the payment methods available on your account.
For example, a traveler booking a 3-day Bali trek can pick GoPay to pay from their phone. Another traveler booking a group Komodo island tour might choose a BCA virtual account transfer. Midtrans handles each payment type differently, but your traveler doesn't need to worry about that. They pick what works for them and follow the on-screen instructions.
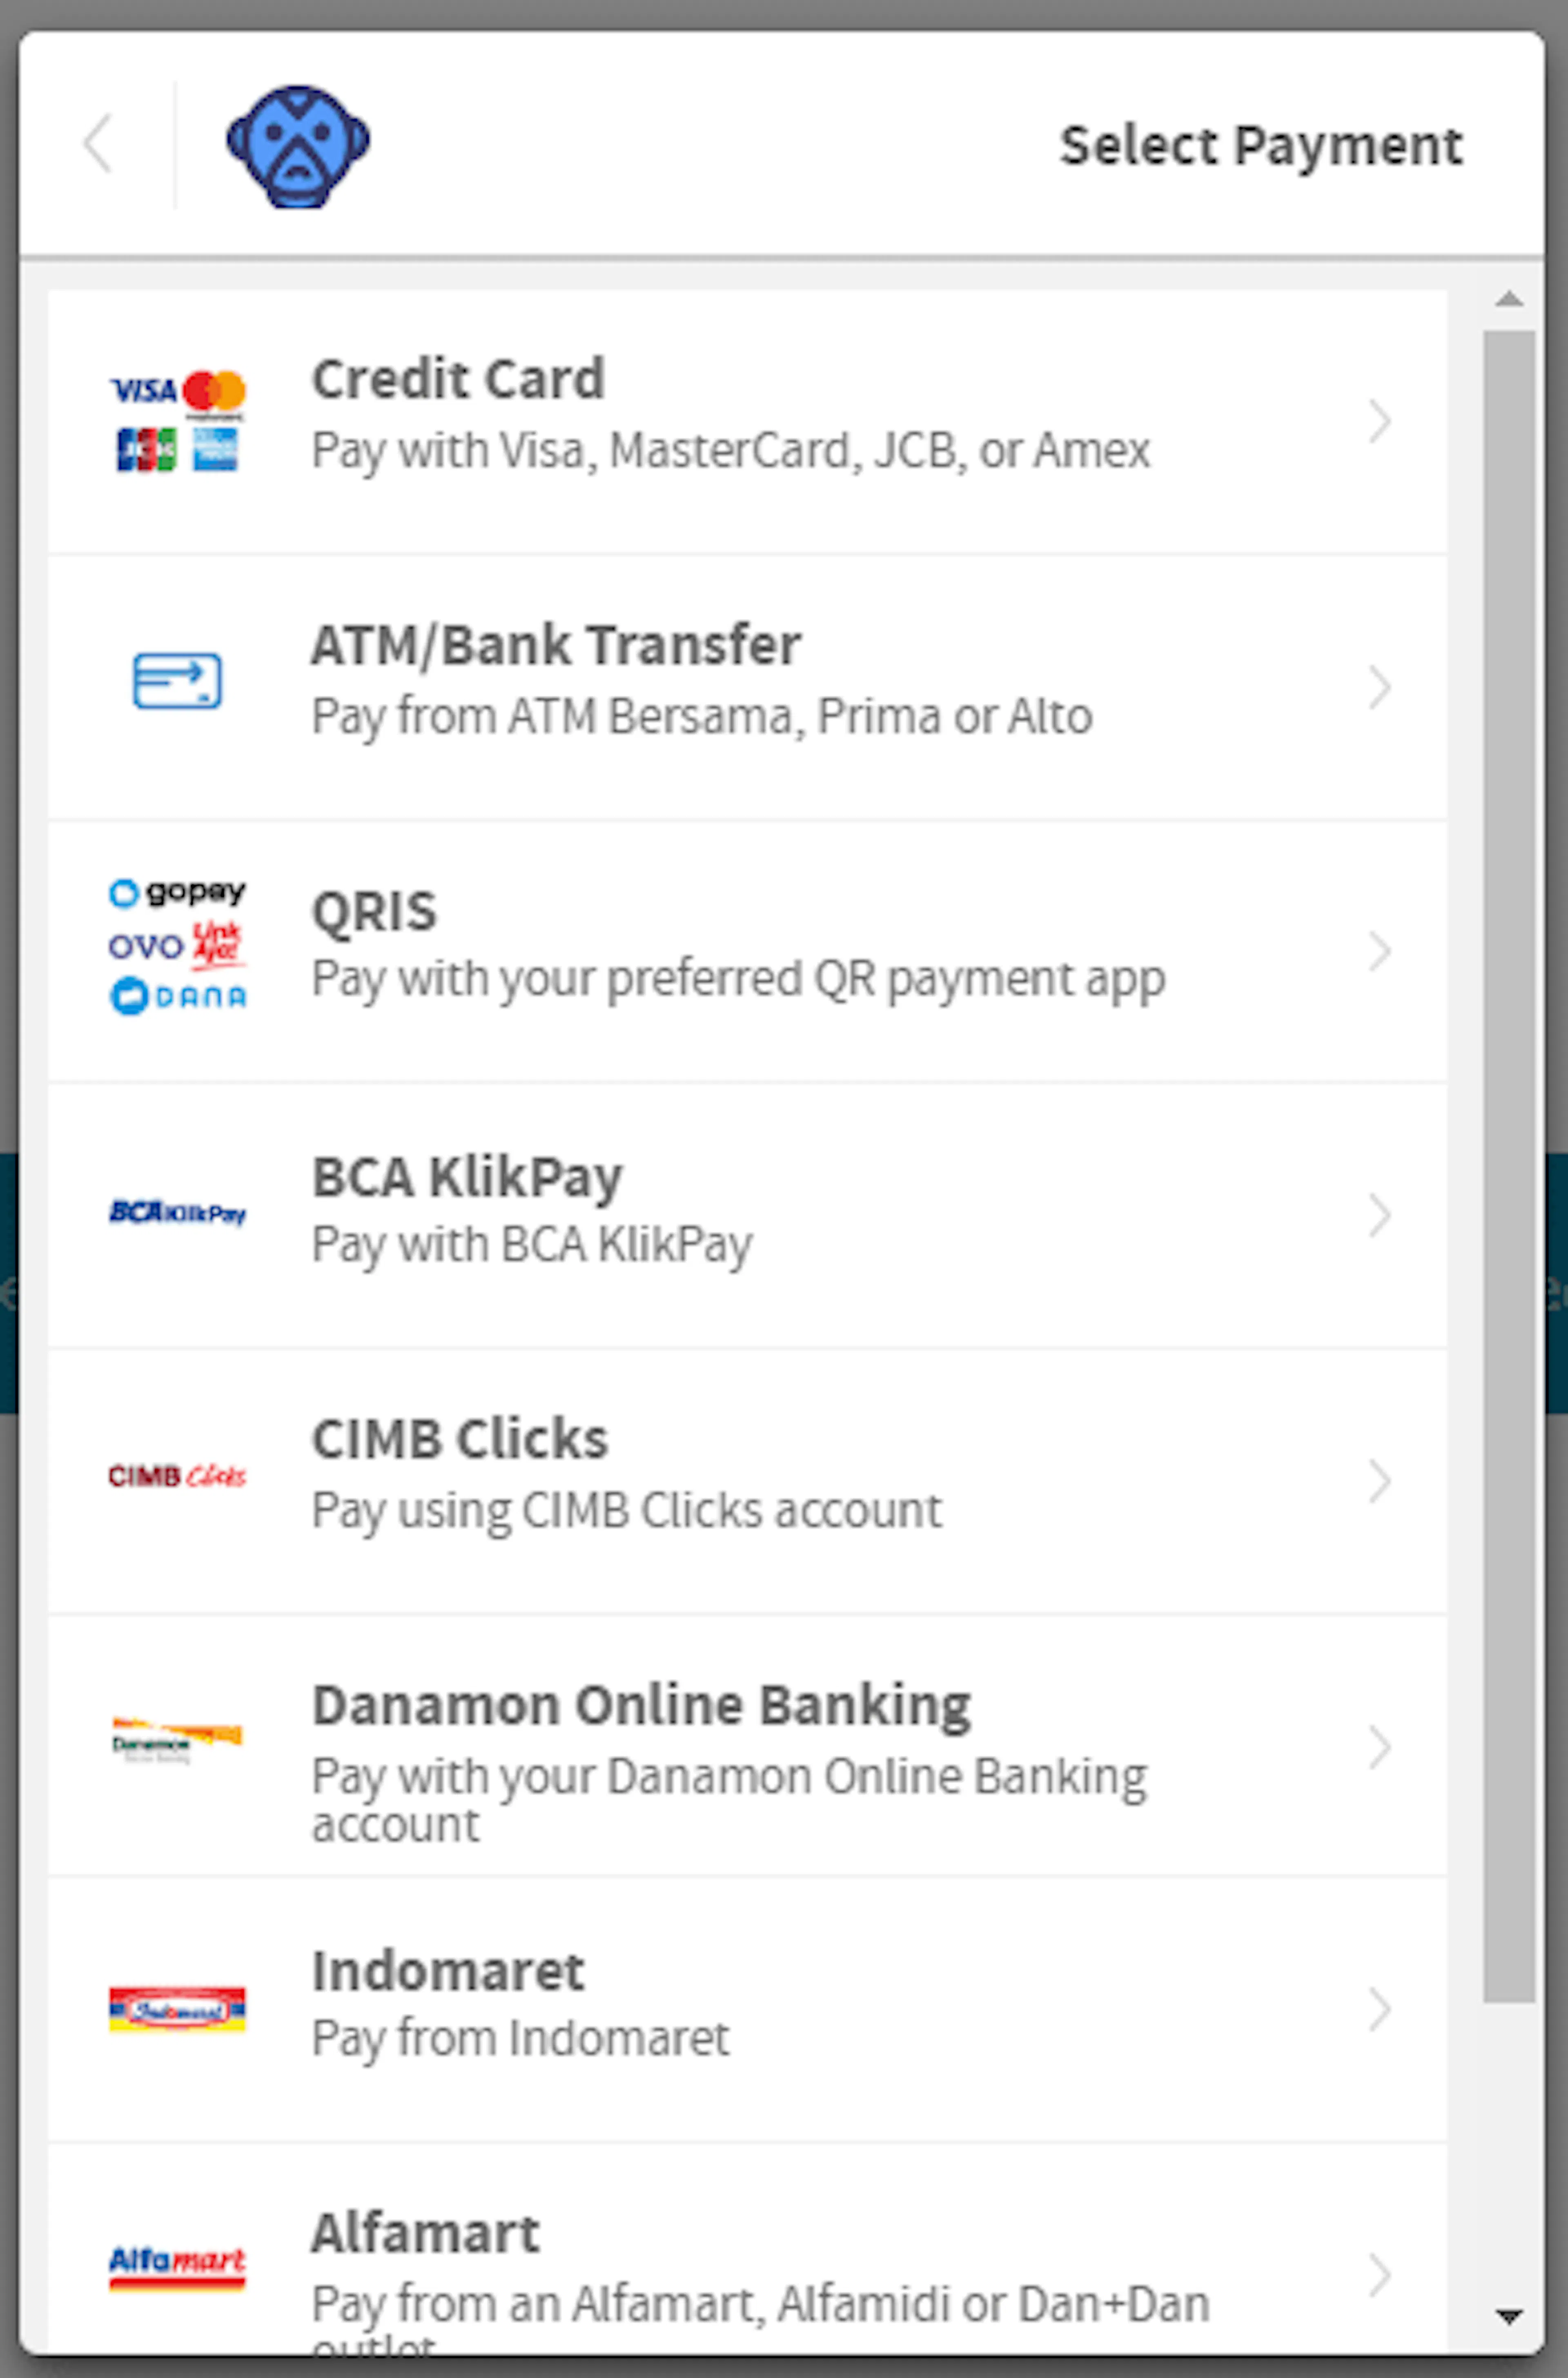
After the payment is complete, Midtrans sends them back to your website using the redirect URLs you set up earlier. Your site then shows the booking as confirmed, or failed if something went wrong.
If you're still stuck or have a question we didn't cover, our support team is happy to help. Reach out at our support page and we'll get you sorted.