

GA4 eCommerce Tracking
Connect Google Analytics 4 to WP Travel Engine to automatically track trip views, checkouts, and completed bookings.
Google Analytics 4, or GA4, is Google's tool for seeing what people do on your website. The GA4 eCommerce Tracking add-on connects your WP Travel Engine booking activity to GA4, so you can see when someone views a trip, starts checkout, and completes a booking.
That means you can follow the booking journey instead of only looking at page visits. For example, if lots of travelers view your Everest Base Camp trek but very few start checkout, you know where to take a closer look.
Features
- Use your current GA4 setup if it is already connected to your site, or add a new connection if you have not set it up yet.
- Track the key booking moments automatically, including trip views, checkout starts, and completed bookings.
- Import a ready-made GTM container file that already includes the booking events you need.
What you'll need before you start
A few things need to be ready before you begin. Once these are in place, the setup is much smoother.
- WP Travel Engine is installed and active on your WordPress site.
- You have a Google Analytics 4 property set up in your Google Analytics account. A property is the place inside Google Analytics where your website's data is collected.
- You have installed and activated the GA4 eCommerce Tracking add-on.
How to install
See how to activate a Pro add-on license key for the full installation and activation walkthrough.
Verifying installation
Check this first so you know the add-on is properly turned on before you start setting anything up.
Go to your WordPress Dashboard
Log in to your site's admin area.
Open the add-on settings
In the left sidebar of your WordPress dashboard, go to WP Travel Engine > Settings > Extensions > GA4 eCommerce Tracking.
Confirm the settings page appears
Make sure the GA4 Ecommerce Tracking settings page opens.
If the page does not appear, deactivate and reactivate the add-on from the Plugins page.
Once this page opens correctly, you are ready to connect GA4.
Connecting GA4 to your site
This is a global setting. It applies to your whole site, not to one trip at a time.
You only need to set this up once. After that, the add-on sends booking activity from all your trips through the same connection.
GA4 Connection
This setting asks one simple question. Is GA4 already connected to your website, or do you need to connect it now?
- Use Existing Connection - Pick this if GA4 is already connected to your site through another plugin. A plugin is a tool you install in WordPress to add features. One common example is Site Kit by Google.
- Set Up New Connection - Pick this if GA4 is not connected yet. This opens the Connection Type and Tracked Events settings, where you add your details.
Say you already installed Site Kit by Google to see your website traffic. That means GA4 is already connected. Pick Use Existing Connection and you're done.
Not sure if GA4 is already on your site? Check your installed plugins in WordPress for anything related to Google Analytics or Site Kit. If one is active and connected to GA4, use Use Existing Connection.
Connection Type
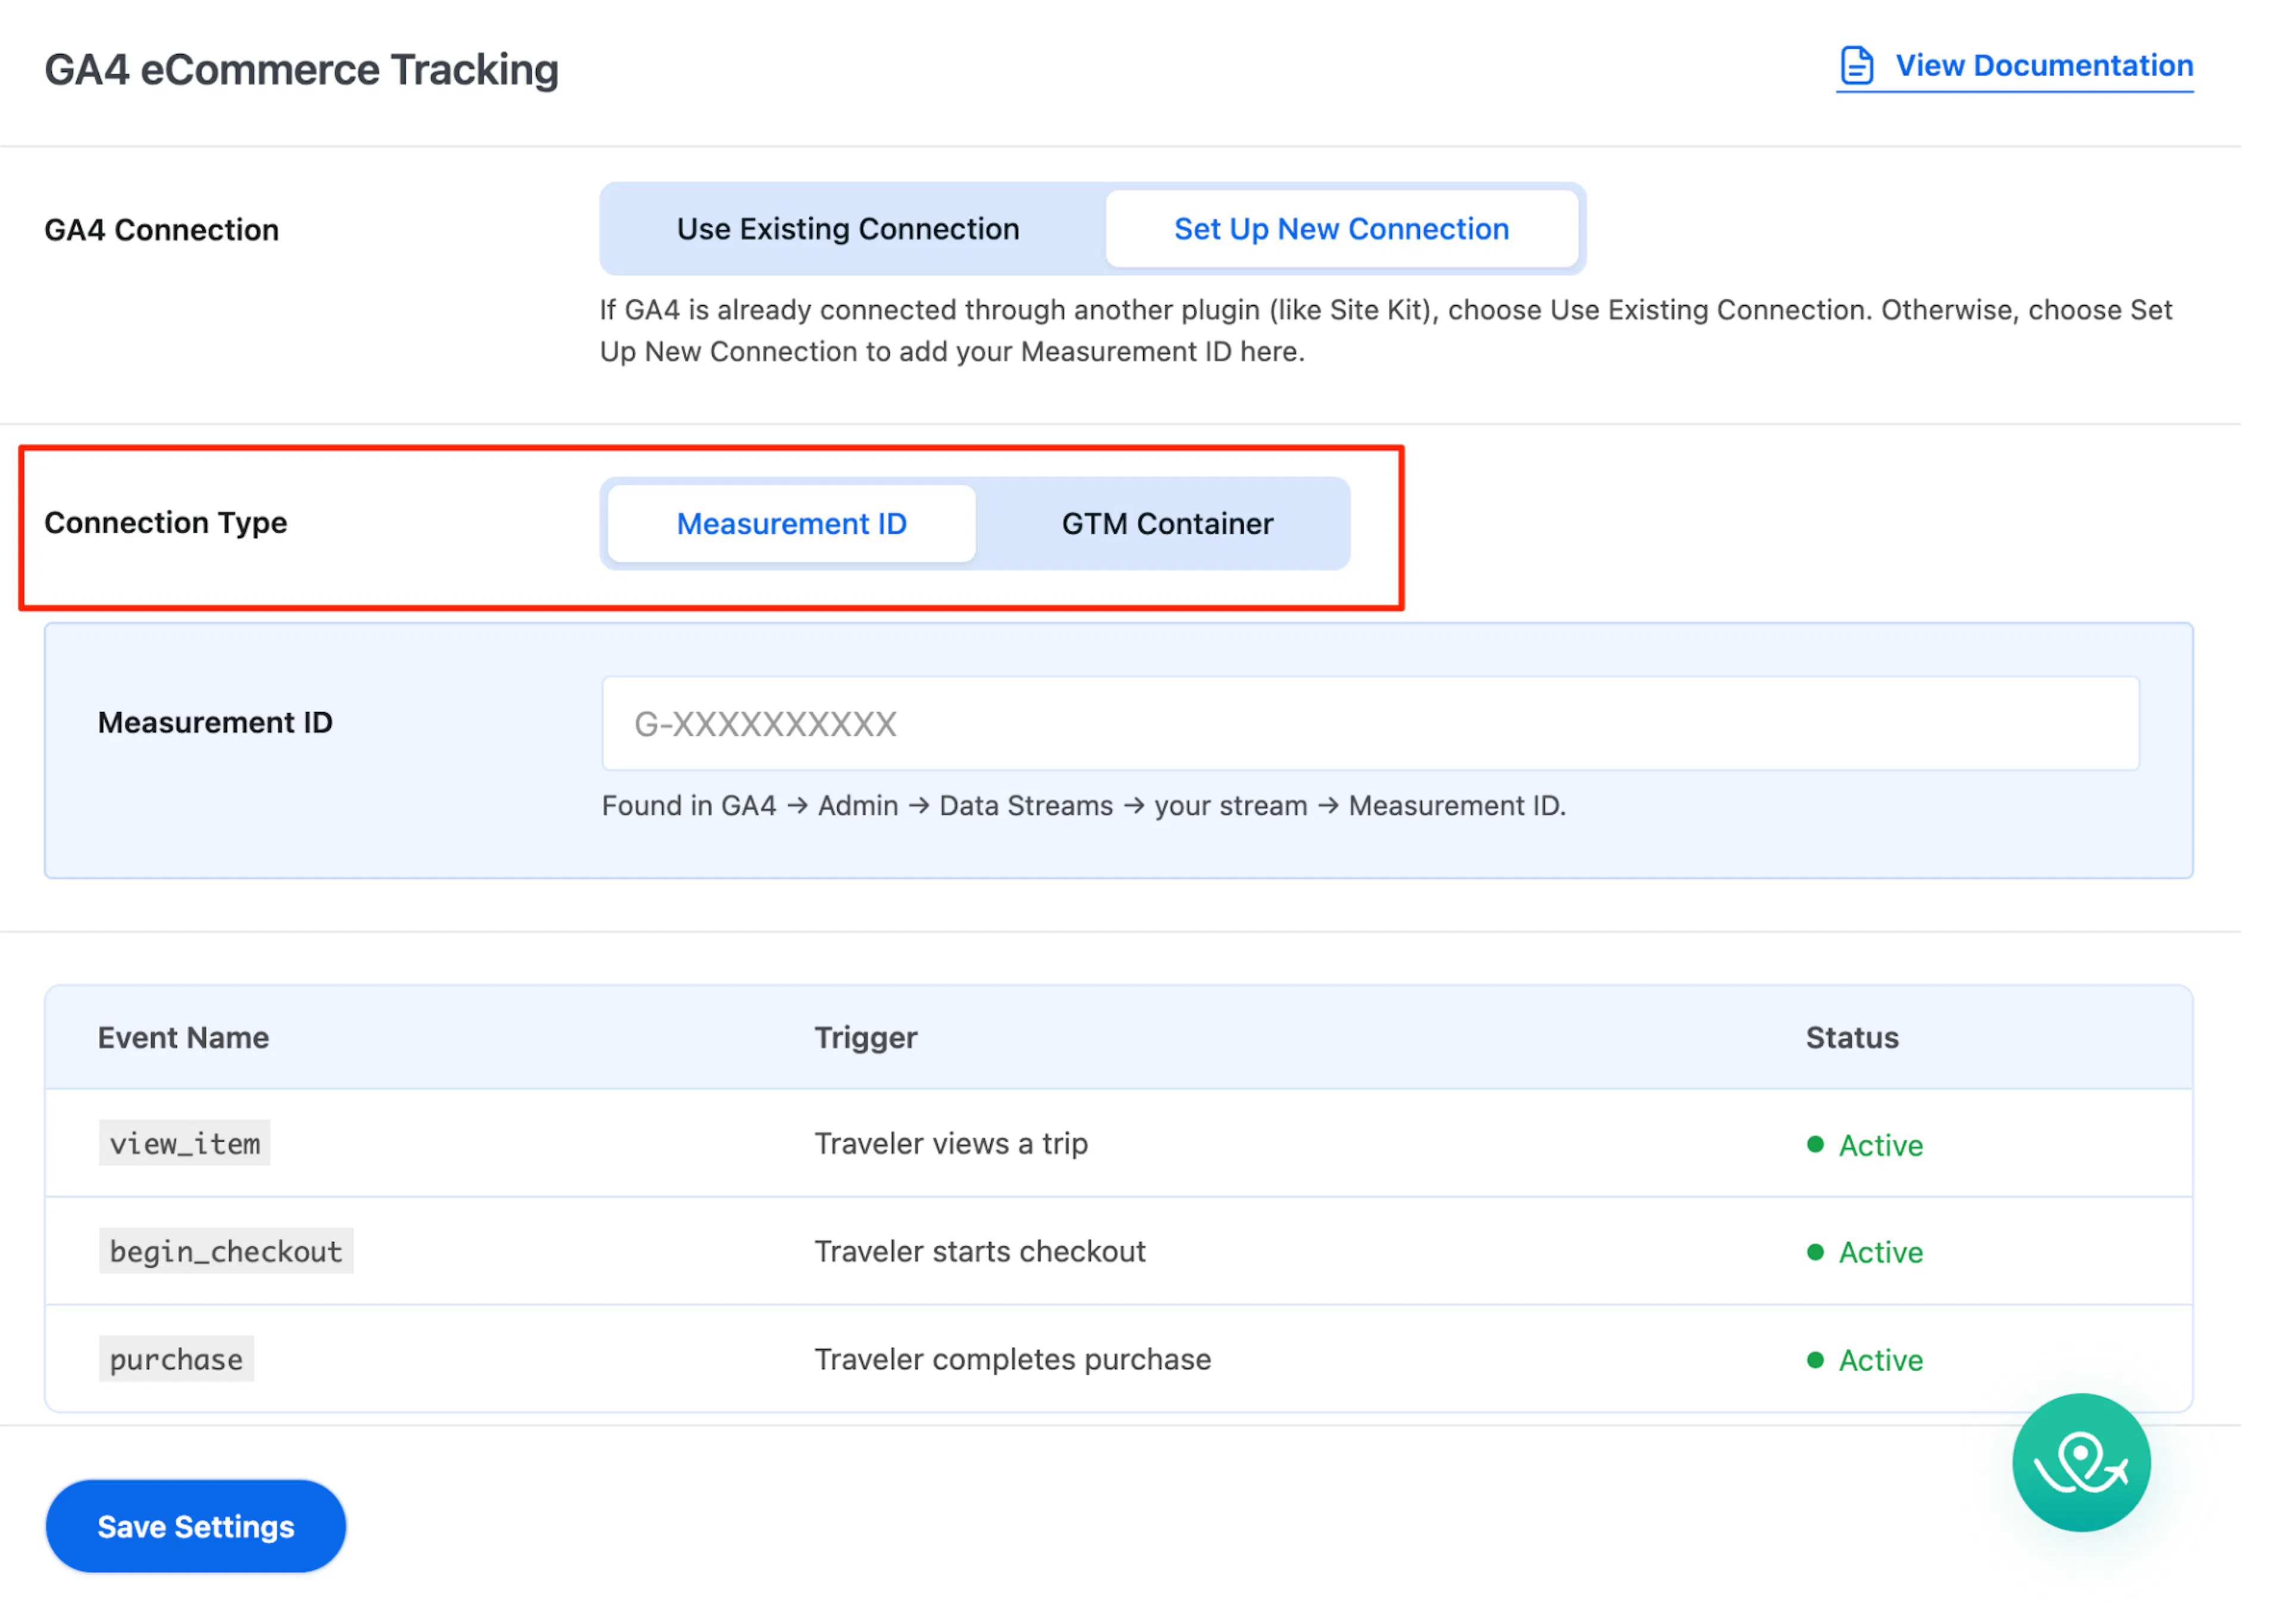
If you choose Set Up New Connection, you need to choose how your site will send data to GA4. You can connect with a Measurement ID or a GTM Container.
Measurement ID
This option works well if you want the most direct setup. A Measurement ID is the tracking ID that tells your website where to send the booking data inside Google Analytics.
Open your Data Streams
In your Google Analytics account, go to Admin > Data Collection and modification > Data Streams > your stream.
Copy the Measurement ID
Copy the ID shown at the top right of the page. It starts with G-.
Paste it into the field
Paste it into the Measurement ID field in WP Travel Engine.
Don't have a GA4 property yet?
If you have not used Google Analytics before, create the property first. Once that is done, you can come back and paste in the Measurement ID.
Sign in to Google Analytics
Go to analytics.google.com and sign in with your Google account.
Create a property
Click Admin, then click Create Property.
Fill in the property details
Enter a property name, your time zone, and your currency. Then click Create.
Create a Web data stream
Under Data Streams, choose Web, enter your website URL, and click Create Stream.
Your Measurement ID appears at the top of the stream details page. Copy it from there and paste it into the Measurement ID field above.
GTM Container
Choose this if you already use Google Tag Manager to manage tracking on your site. Google Tag Manager, or GTM, is a Google tool that helps you manage tracking codes from one place without editing your site files.
Copy your Container ID
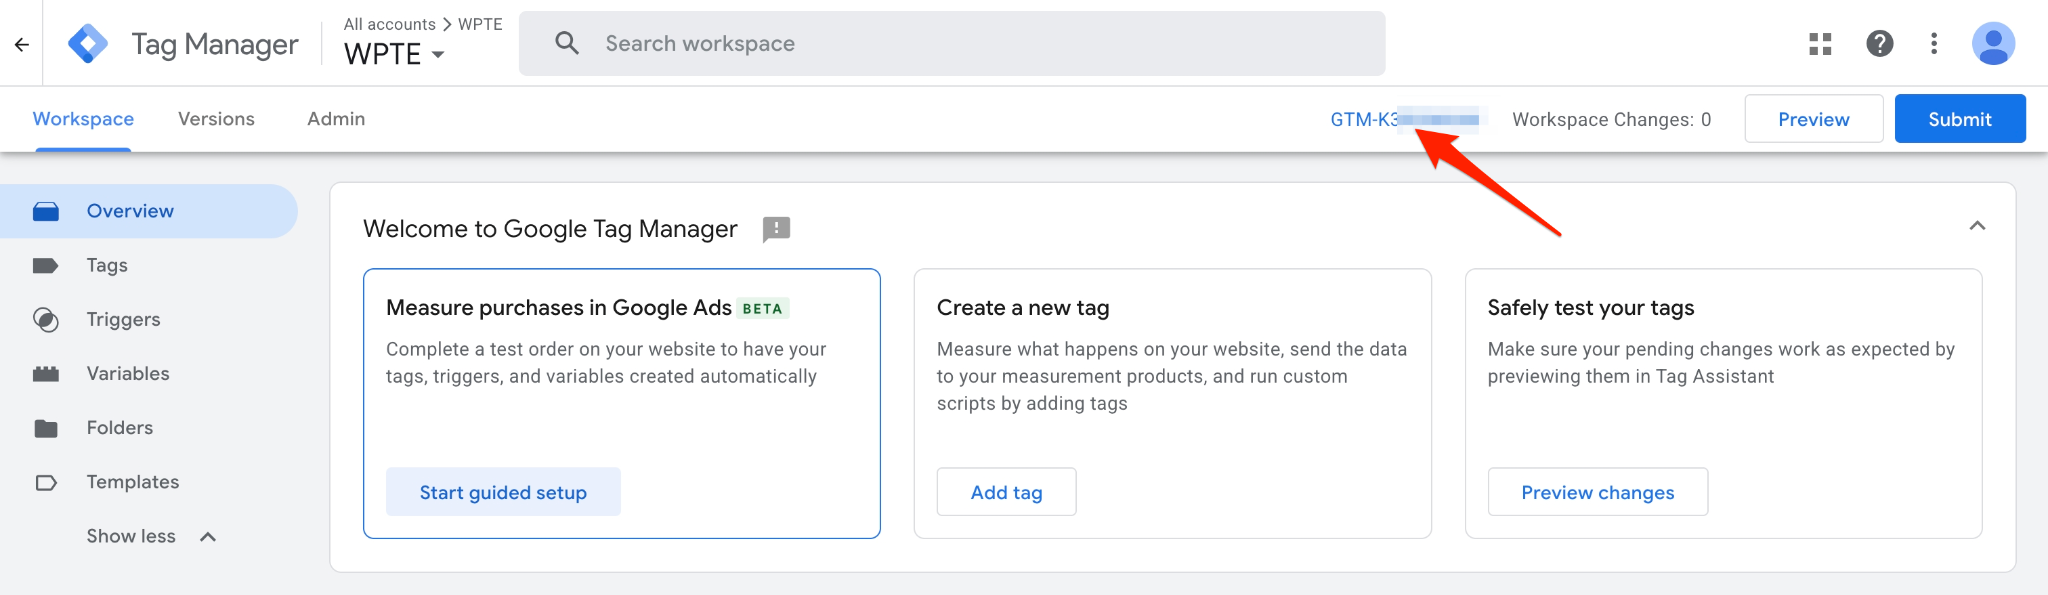
Open Google Tag Manager and copy the Container ID next to your container name. It starts with GTM-.
Paste it into the field
Paste it into the GTM Container ID field.
Import the ready-made container file
Download the ready-made container file from the notice below the field. Then import it into GTM. This file already includes the booking triggers.
Without importing the container file, booking data will not appear in GA4 even if you save your settings.
Don't have a GTM container yet?
If this is your first time using Google Tag Manager, set up the account and container first. After that, you can come back and paste the Container ID here.
Sign in to Tag Manager
Go to tagmanager.google.com and sign in.
Create an account
Click Create Account, enter your business name, and continue.
Create a Web container
Under Container, enter your website domain, select Web, and click Create.
Once your container is ready, copy its Container ID and paste it into the GTM Container ID field above.
Tracked Events
These events are the three moments in the booking process that your website automatically reports to Google Analytics.
| Event name | Trigger |
|---|---|
view_item | Fires when a traveler opens a trip detail page. |
begin_checkout | Fires when a traveler moves from the booking window to the checkout page after choosing dates, traveler count, and any add-ons. |
purchase | Fires when a traveler's payment goes through and the booking is confirmed. For deposits or installments, this fires once after the first payment. |
Click Save Settings after you finish the connection setup.
Confirming data is flowing
Run this check now so you know the connection is working before you wait for data to build up.
Using GA4 Realtime
Browse a trip page
Open your site in a new browser tab and view a trip page.
Open GA4 Realtime reports
In GA4, go to Reports > Realtime.
Confirm the session appears
Look for your session and the events from your visit. They should appear within a few seconds.
Using GTM Preview
Open GTM Preview
In Google Tag Manager, click Preview.
Connect your site
Enter your website URL and click Connect.
Run a test booking
Open a trip page and start a test booking.
Confirm the tags fire
In the Tag Assistant window, check that the imported GA4 tags fire on the pages you visited. A tag is the tracking instruction that sends information to Google.
If nothing shows up in either check, confirm the container file was imported for GTM or that the Measurement ID was pasted correctly for GA4. Then save your settings again.
If these checks work, your setup is in place and you can move on to reading the reports.
What gets tracked
The add-on tracks three points in the booking journey, and it does that in the background while travelers use your site.
- Traveler views a trip: This is tracked when someone opens a trip detail page. Use this to spot trips that get attention but do not lead to many bookings. For example, if your Annapurna Circuit page gets lots of views but few checkouts, you may want to review the price, dates, or trip details.
- Traveler starts checkout: This is tracked when someone moves from the booking window to the checkout page after choosing dates, traveler count, and add-ons. If people reach this point but do not finish, check your checkout flow, payment options, or add-on pricing such as gear rental or airport pickup.
- Traveler completes a booking: This is tracked when payment goes through and the booking is confirmed. This is your main conversion event in GA4. The amount recorded is what the traveler actually paid after discount codes are applied.
A few payment situations are worth knowing before you compare numbers.
Say a traveler books your 5-day Himalayan trek and pays a 20% deposit online. The purchase event fires once, right after that deposit payment. Their later installments will not trigger another purchase event.
| Payment scenario | Tracked? |
|---|---|
| Full payment | Yes. Tracked once when the full amount is paid. |
| Deposit or first installment | Yes, but only after the first payment. Follow-up payments aren't tracked again. |
| Pay Later, bank transfer, or offline payments | No. Only online payments are tracked. |
Viewing your data in GA4
Once the connection is live, your booking data appears in GA4 under Reports > Drive Sales > Ecommerce purchases.
If you want to see the full path from trip view to purchase, use Explore > Funnel exploration in GA4. Funnel exploration is a report that shows how many people move from one step to the next, such as viewing a trip, starting checkout, and completing a booking.
GA4 can take 24 to 48 hours to show new data after you first connect.
Troubleshooting
I don't see the GA4 settings page
The add-on may not be activated. Go to Plugins in the left sidebar of your WordPress dashboard and check whether the GA4 add-on is active. If it is there but the settings page still does not show, deactivate it and activate it again.
Nothing is showing up in Google Analytics
First, check that you clicked Save Settings after entering your Measurement ID or GTM Container ID. Then remember that GA4 can take 24 to 48 hours to show new data. If it has been longer than that, go back to Confirming data is flowing and run through those checks.
I'm using Site Kit by Google - which option do I pick?
Pick Use Existing Connection. Site Kit already connects your site to GA4, so the add-on sends booking events through that existing connection. You do not need to set up anything new.
My booking numbers in GA4 don't match my actual bookings
GA4 only tracks online payments. If a traveler booked with Pay Later, bank transfer, or another offline method, that booking will not appear as a purchase event in GA4. For deposits or installments, the purchase event fires once after the first payment.
The settings page loads but looks blank or broken
A caching plugin may be showing an older version of the page. Clear your cache if you use a caching plugin, then refresh the page. If that does not help, try a different browser or check whether another plugin may be conflicting.
Frequently asked questions
If you're still stuck or have a question we didn't cover, our support team is happy to help. Reach out at our support page and we'll get you sorted.