

Travel Booking Theme: Installation and Getting Started
Install the Travel Booking theme, import demo content, add your logo and branding, set up homepage sections, and customize colors, menus, widgets, and footer for a professional tour website.
Before you start
Thank you for choosing the Travel Booking theme. This page takes you from installation to a finished tour website with your trips, branding, homepage sections, menus, widgets, and footer in place.
Work through the page in order the first time. After that, press Ctrl+F to search for a setting or feature.
Travel Booking includes a video walkthrough if you prefer to follow along visually.
Requirements for getting started
Travel Booking works with WordPress 4.5 and newer. WordPress is the software that runs your website. Updating to the latest version gives you the best access to theme features and security fixes.
You can download the latest WordPress version.
Before you begin, make sure you have:
- Checked your WordPress version.
- Installed and activated the Travel Booking theme.
- Installed the recommended plugins. Some theme features do not work without them.
You will need access to your WordPress dashboard. The dashboard is the control area where you manage your website. It is usually available at yourdomain.com/wp-admin.
Check and update your WordPress version
An updated WordPress installation helps the theme and its plugins work as expected.
Log in to your WordPress dashboard. The dashboard menu appears on the left side of the screen.
Open the Updates screen
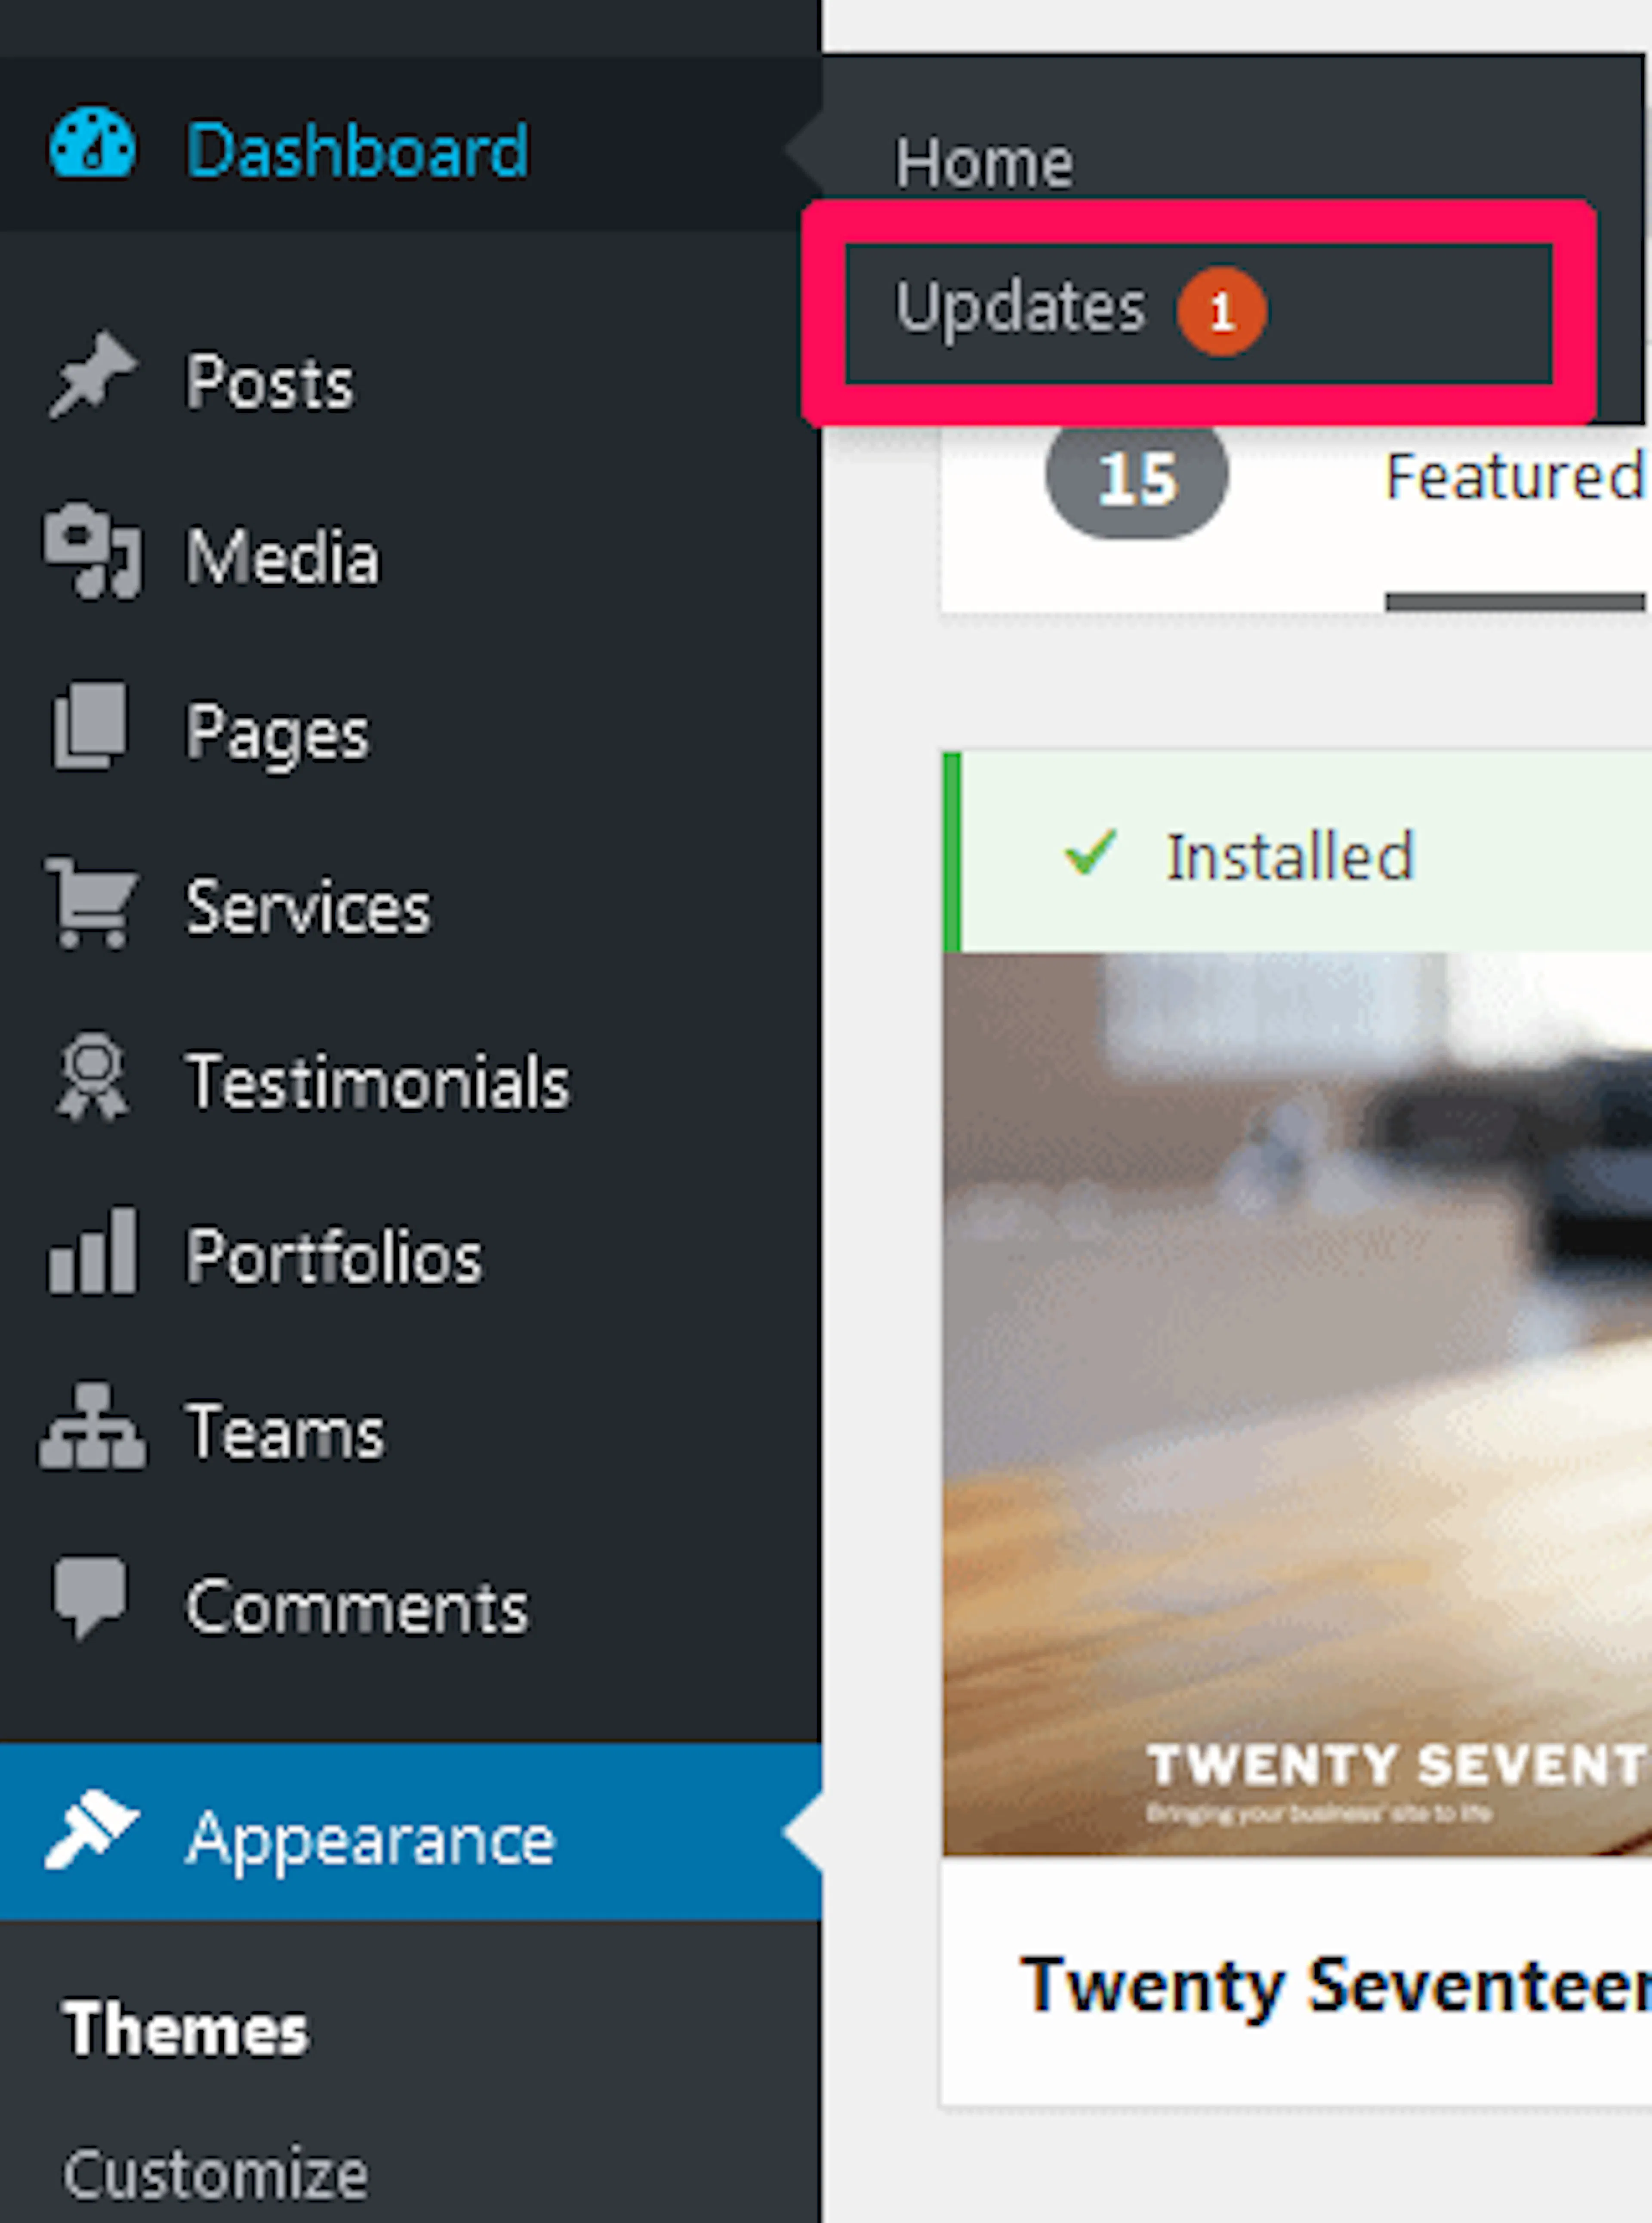
Go to Dashboard > Updates in the left sidebar.
Install available updates
Install any available WordPress update. Wait for WordPress to finish before continuing.
You are ready to continue when WordPress reports that your installation is up to date.
Recommended image sizes
Using the recommended sizes keeps banners, trip images, and profile photos from appearing stretched or cropped in unexpected places.
| Element | Recommended size |
|---|---|
| Banner | 1920 x 800 px, also used at 1920 x 680 px |
| Single Blog Post Featured Image | 1290 x 737 px |
| Trip Page Image | 990 x 490 px |
| Testimonial Image | 150 x 150 px |
| Team Member Image | 770 x 450 px |
For example, use the banner size for a wide photo of an Annapurna trek. Use the square testimonial size for a guide or guest profile photo.
Import the demo content
Demo content gives your website sample pages, layouts, images, and settings that look like the theme preview. You can replace the sample content with your own tours after the import.
What you'll need before you start: the demo ZIP file and permission to install plugins in WordPress.
Download the demo content
Download the Travel Booking demo file. Extract the ZIP file on your computer. You will find XML, WIE, and DAT files inside.
Install the demo import plugin
A plugin is an add-on that gives WordPress extra features. Install and activate the One Click Demo Import plugin.
Open the demo importer
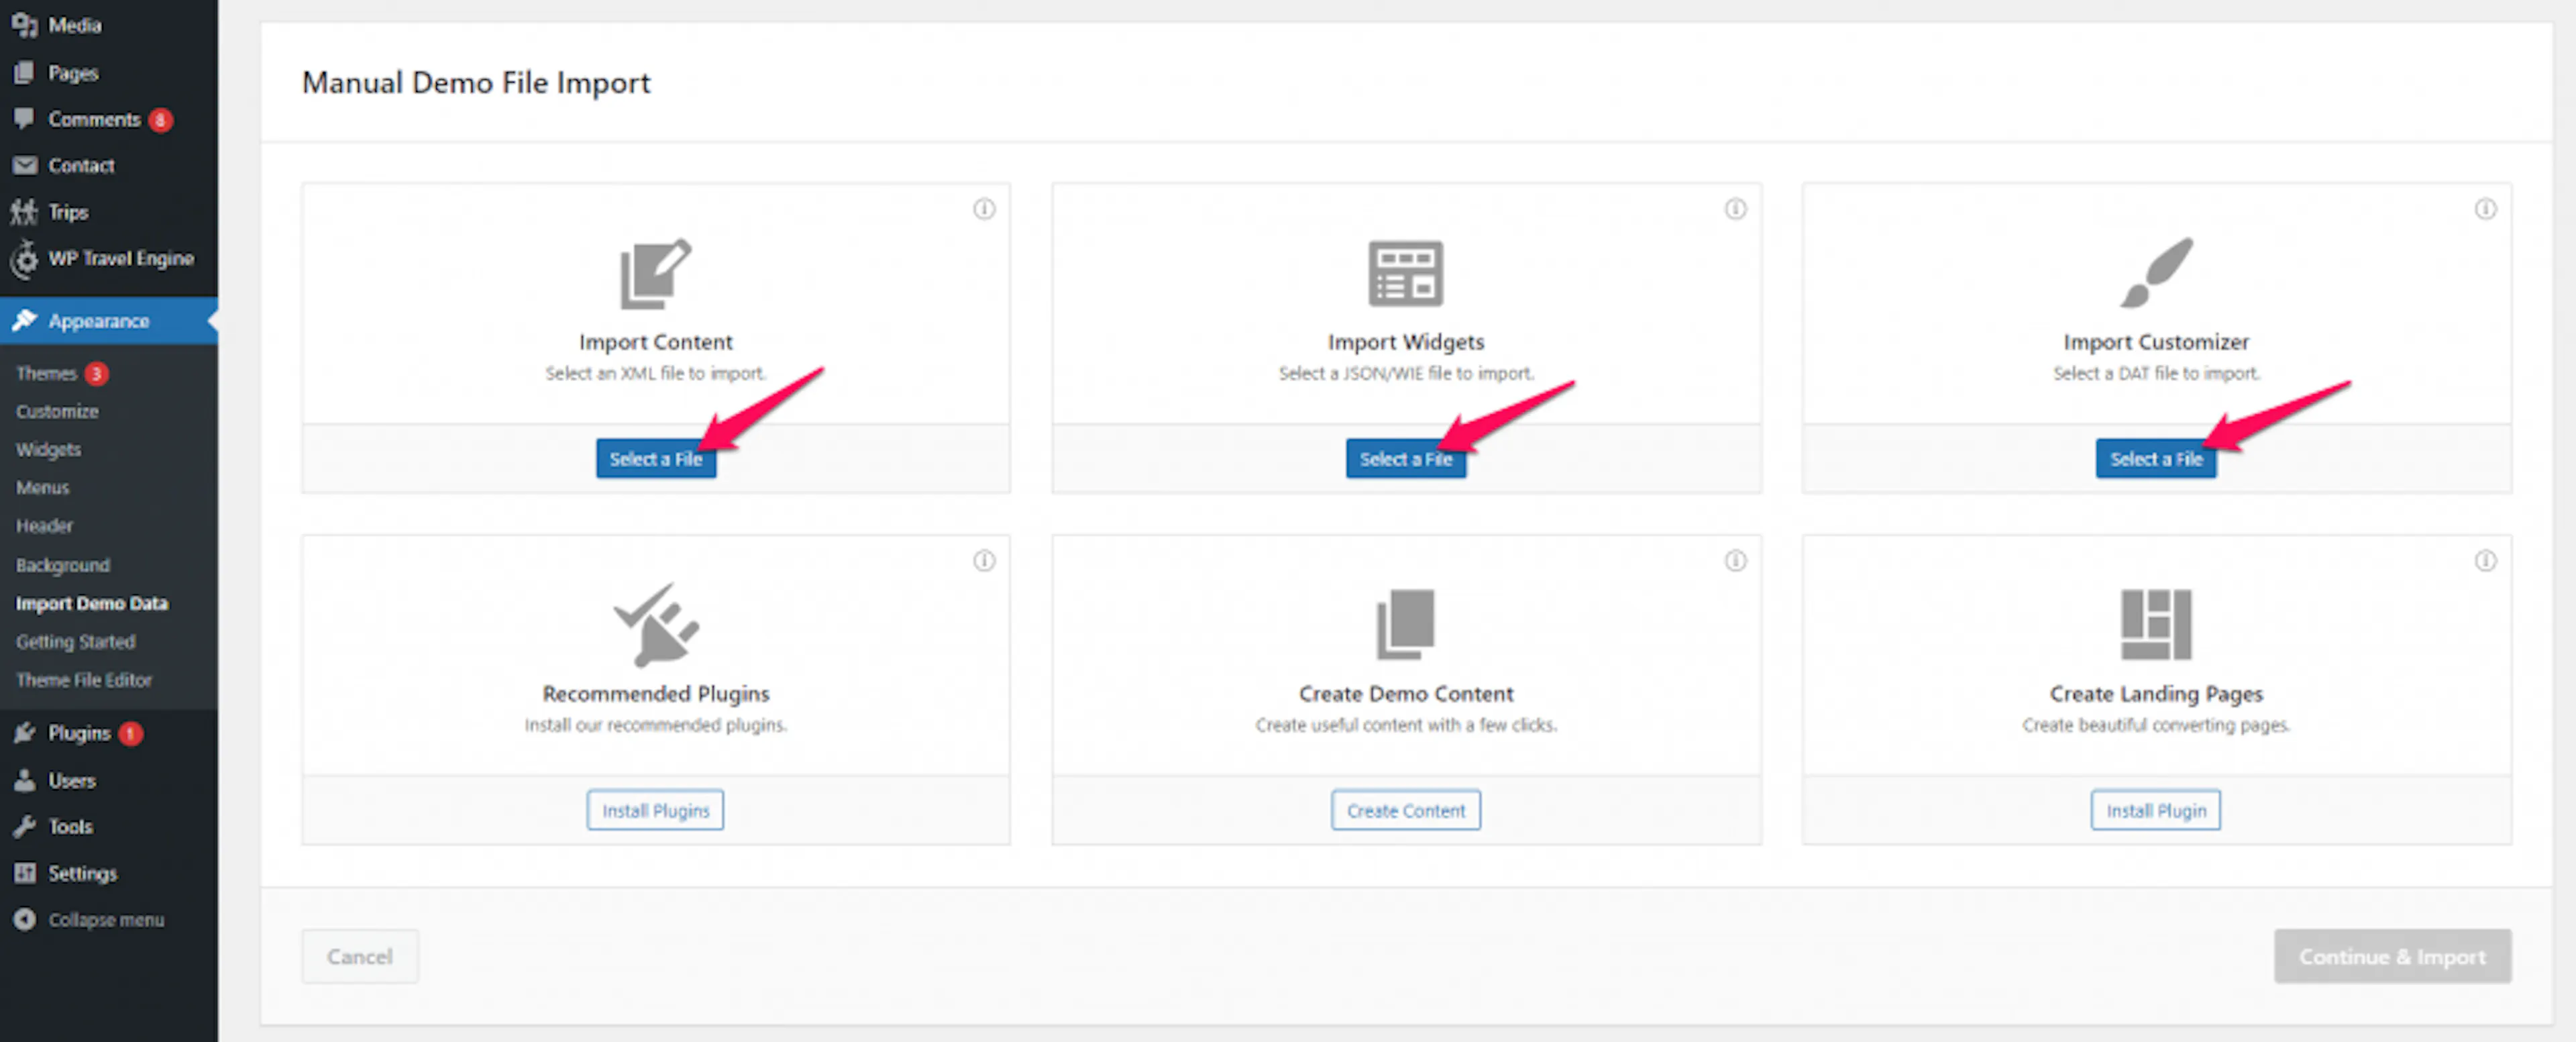
Go to Appearance > Import Demo Data.
Upload the demo files
Find Manual Demo File Import. Select and upload the XML, WIE, and DAT files from the extracted demo folder.
Run the import
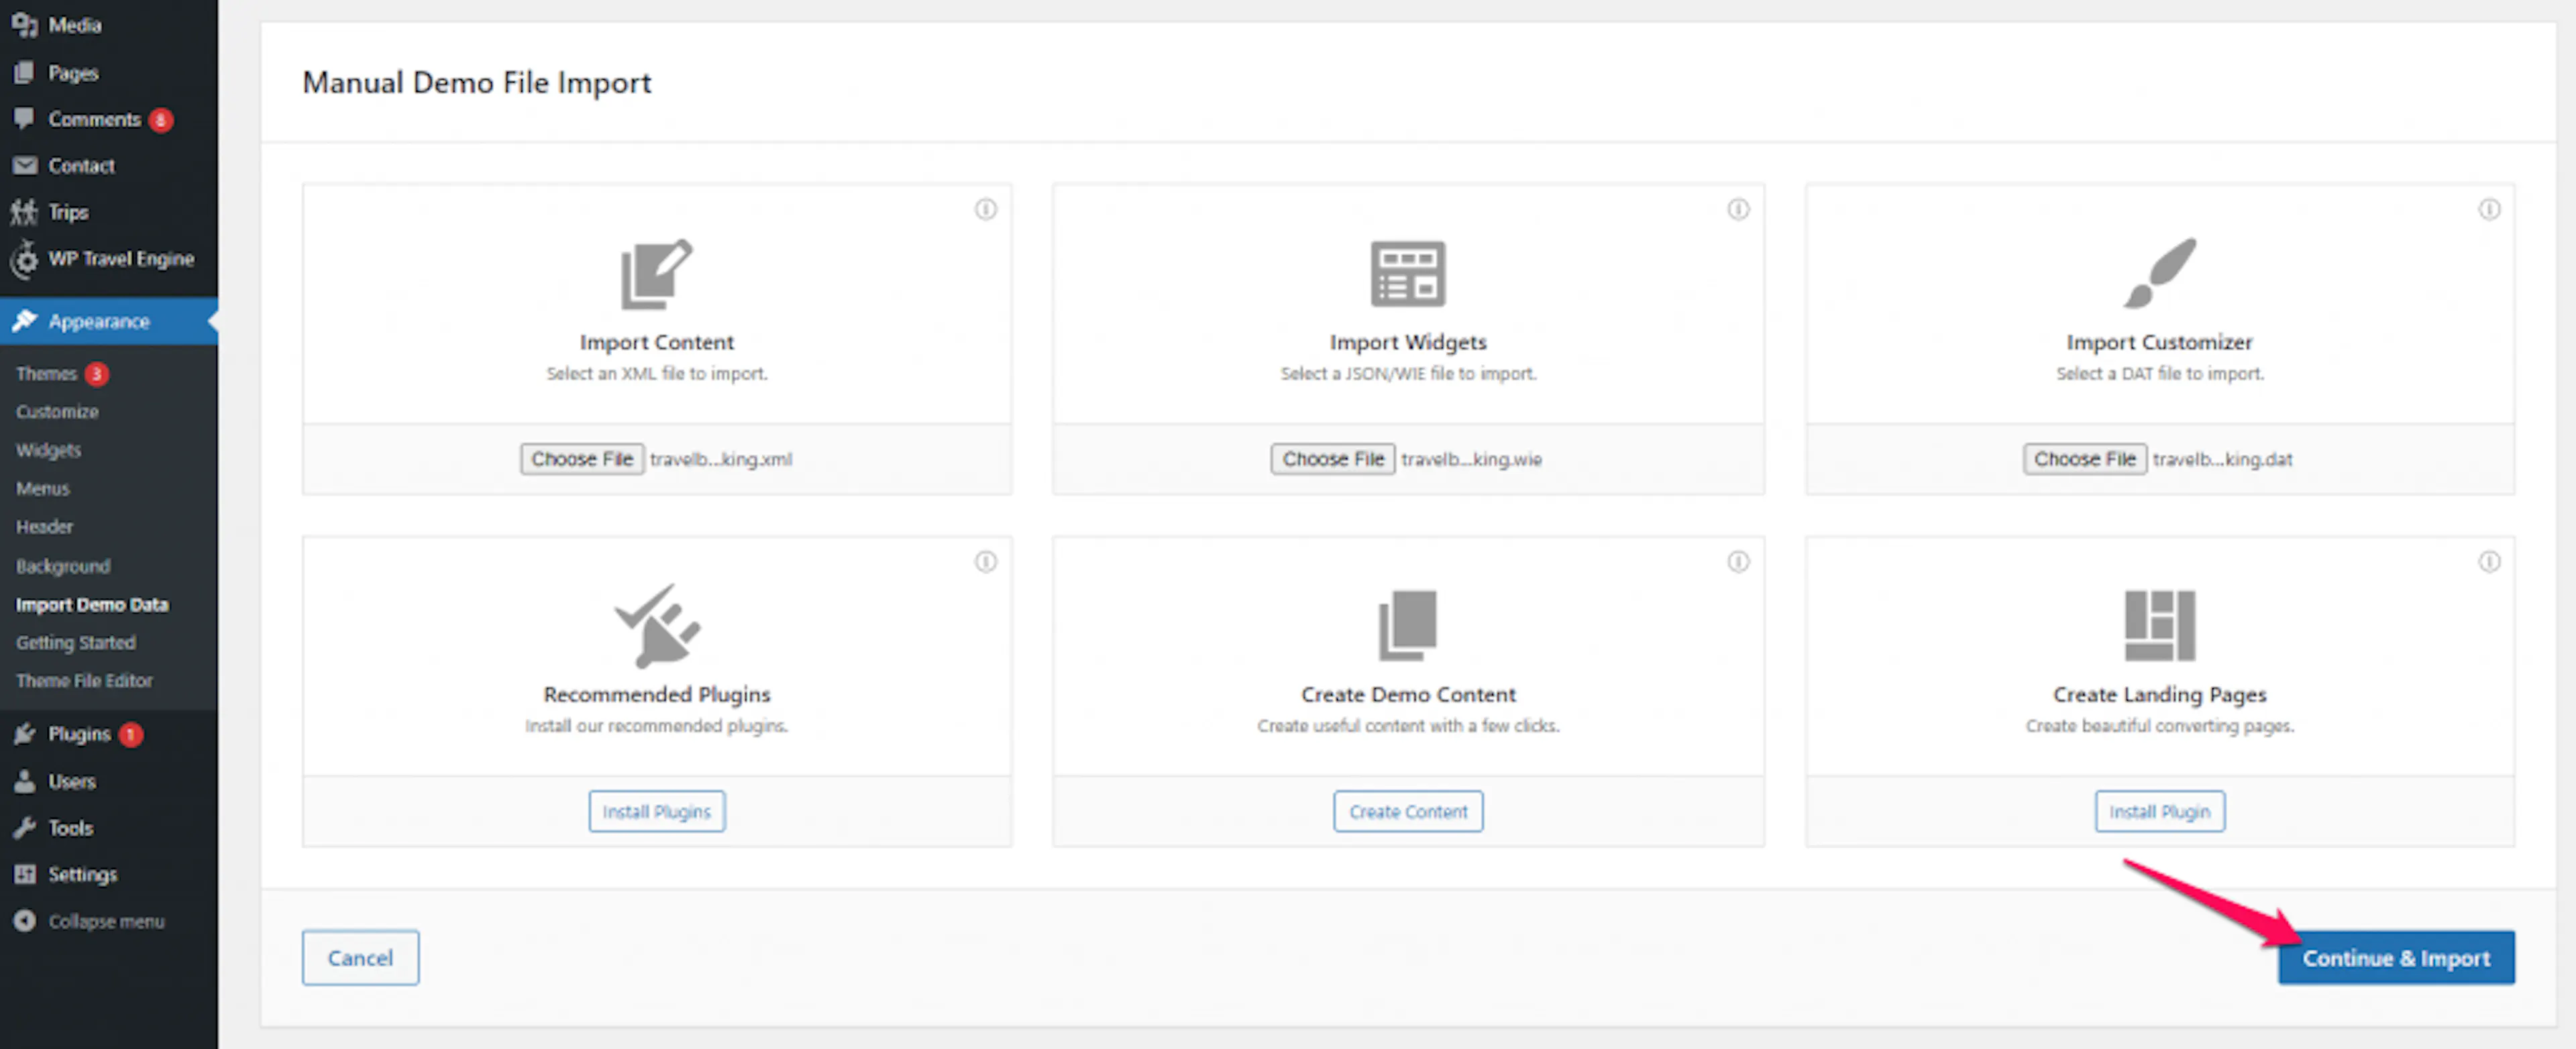
Click Continue & Import. Wait for the process to finish before closing the page.
Your website should now contain sample content that matches the Travel Booking preview. You can keep it while building your site, then replace the sample trips with your own Annapurna treks, rafting tours, or Bhutan cultural packages.
How to Check and Update WordPress Version
- Log in to the WordPress admin panel
- Go to Dashboard >Updates.
Install and activate the theme
The theme controls your website's overall design and layout. Keep the theme file in ZIP format so WordPress can install it.
If you use Safari on macOS, downloaded ZIP files may unzip automatically. Make sure the file is still named travel-booking.zip before you upload it. See how to stop Safari from unzipping files after download.
What you'll need before you start: the travel-booking.zip file saved on your computer.
Save the theme file
Save the downloaded travel-booking.zip file somewhere you can find it.
Open the theme uploader
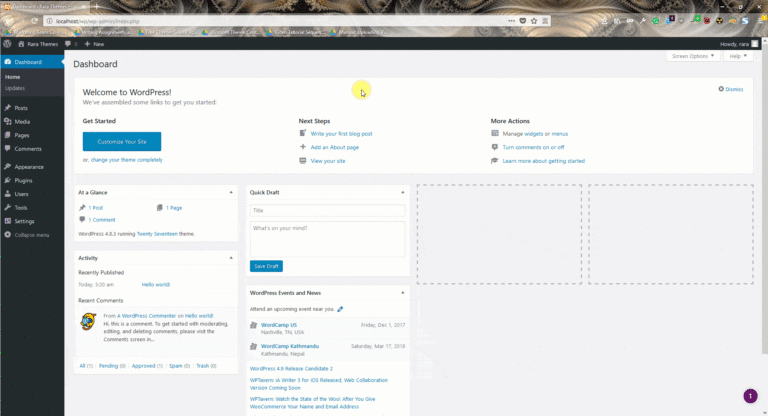
Log in to your WordPress dashboard. Go to Appearance > Themes in the left sidebar. Click Add New, then click Upload Theme.
Upload the theme
Click Browse. Select travel-booking.zip, click Open, and then click Install Now.
Activate the theme
After the installation finishes, click Activate.
Travel Booking is now active. The next step adds the plugins that provide trip management and the theme's extra homepage sections.
Install recommended plugins
Plugins add features to WordPress. Travel Booking uses the following plugins for trips, homepage sections, widgets, and image sizes.
| Plugin | What it does |
|---|---|
| WP Travel Engine | Creates and manages trips, destinations, itineraries, and other trip details. It provides the core travel features for your website. |
| Travel Booking Toolkit | Adds extra homepage sections and useful widgets. You need this plugin to see all front page sections. |
| Regenerate Thumbnails | Fixes image sizes for existing content. Run it when you move existing media into the theme. |
What you'll need before you start: permission to install and activate plugins.
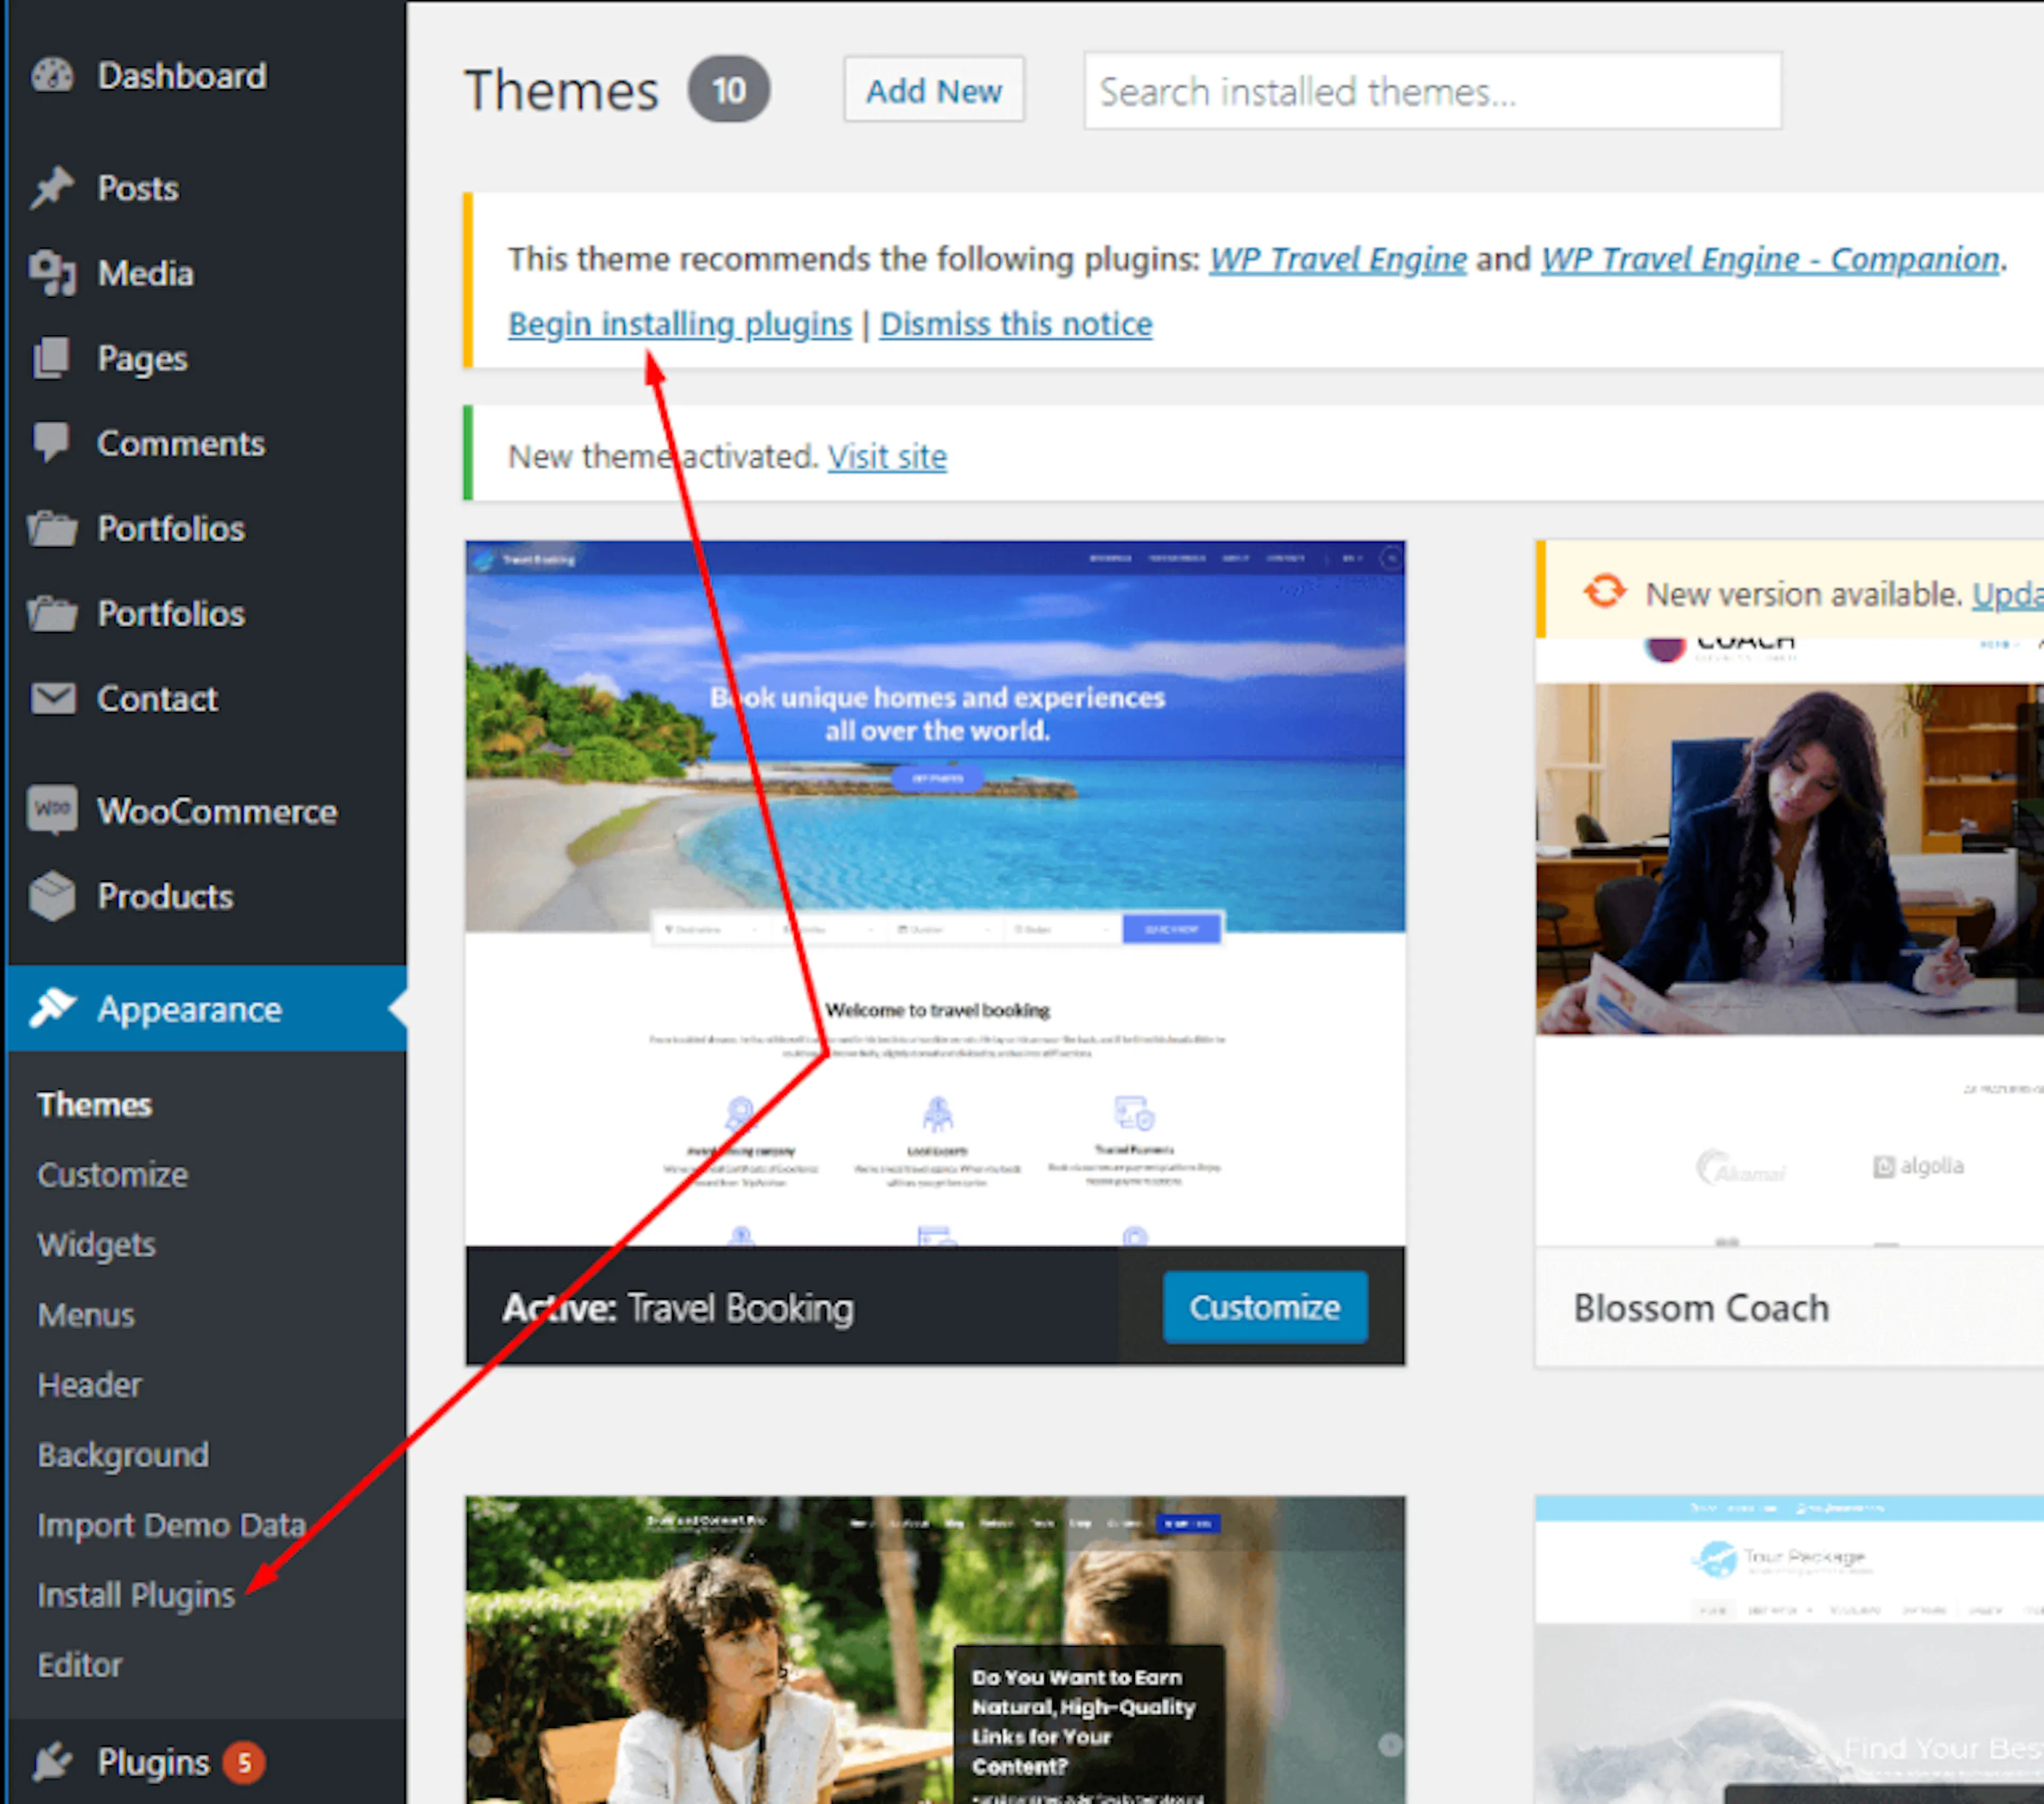
Open the plugin installer
Go to Appearance > Install Plugins.
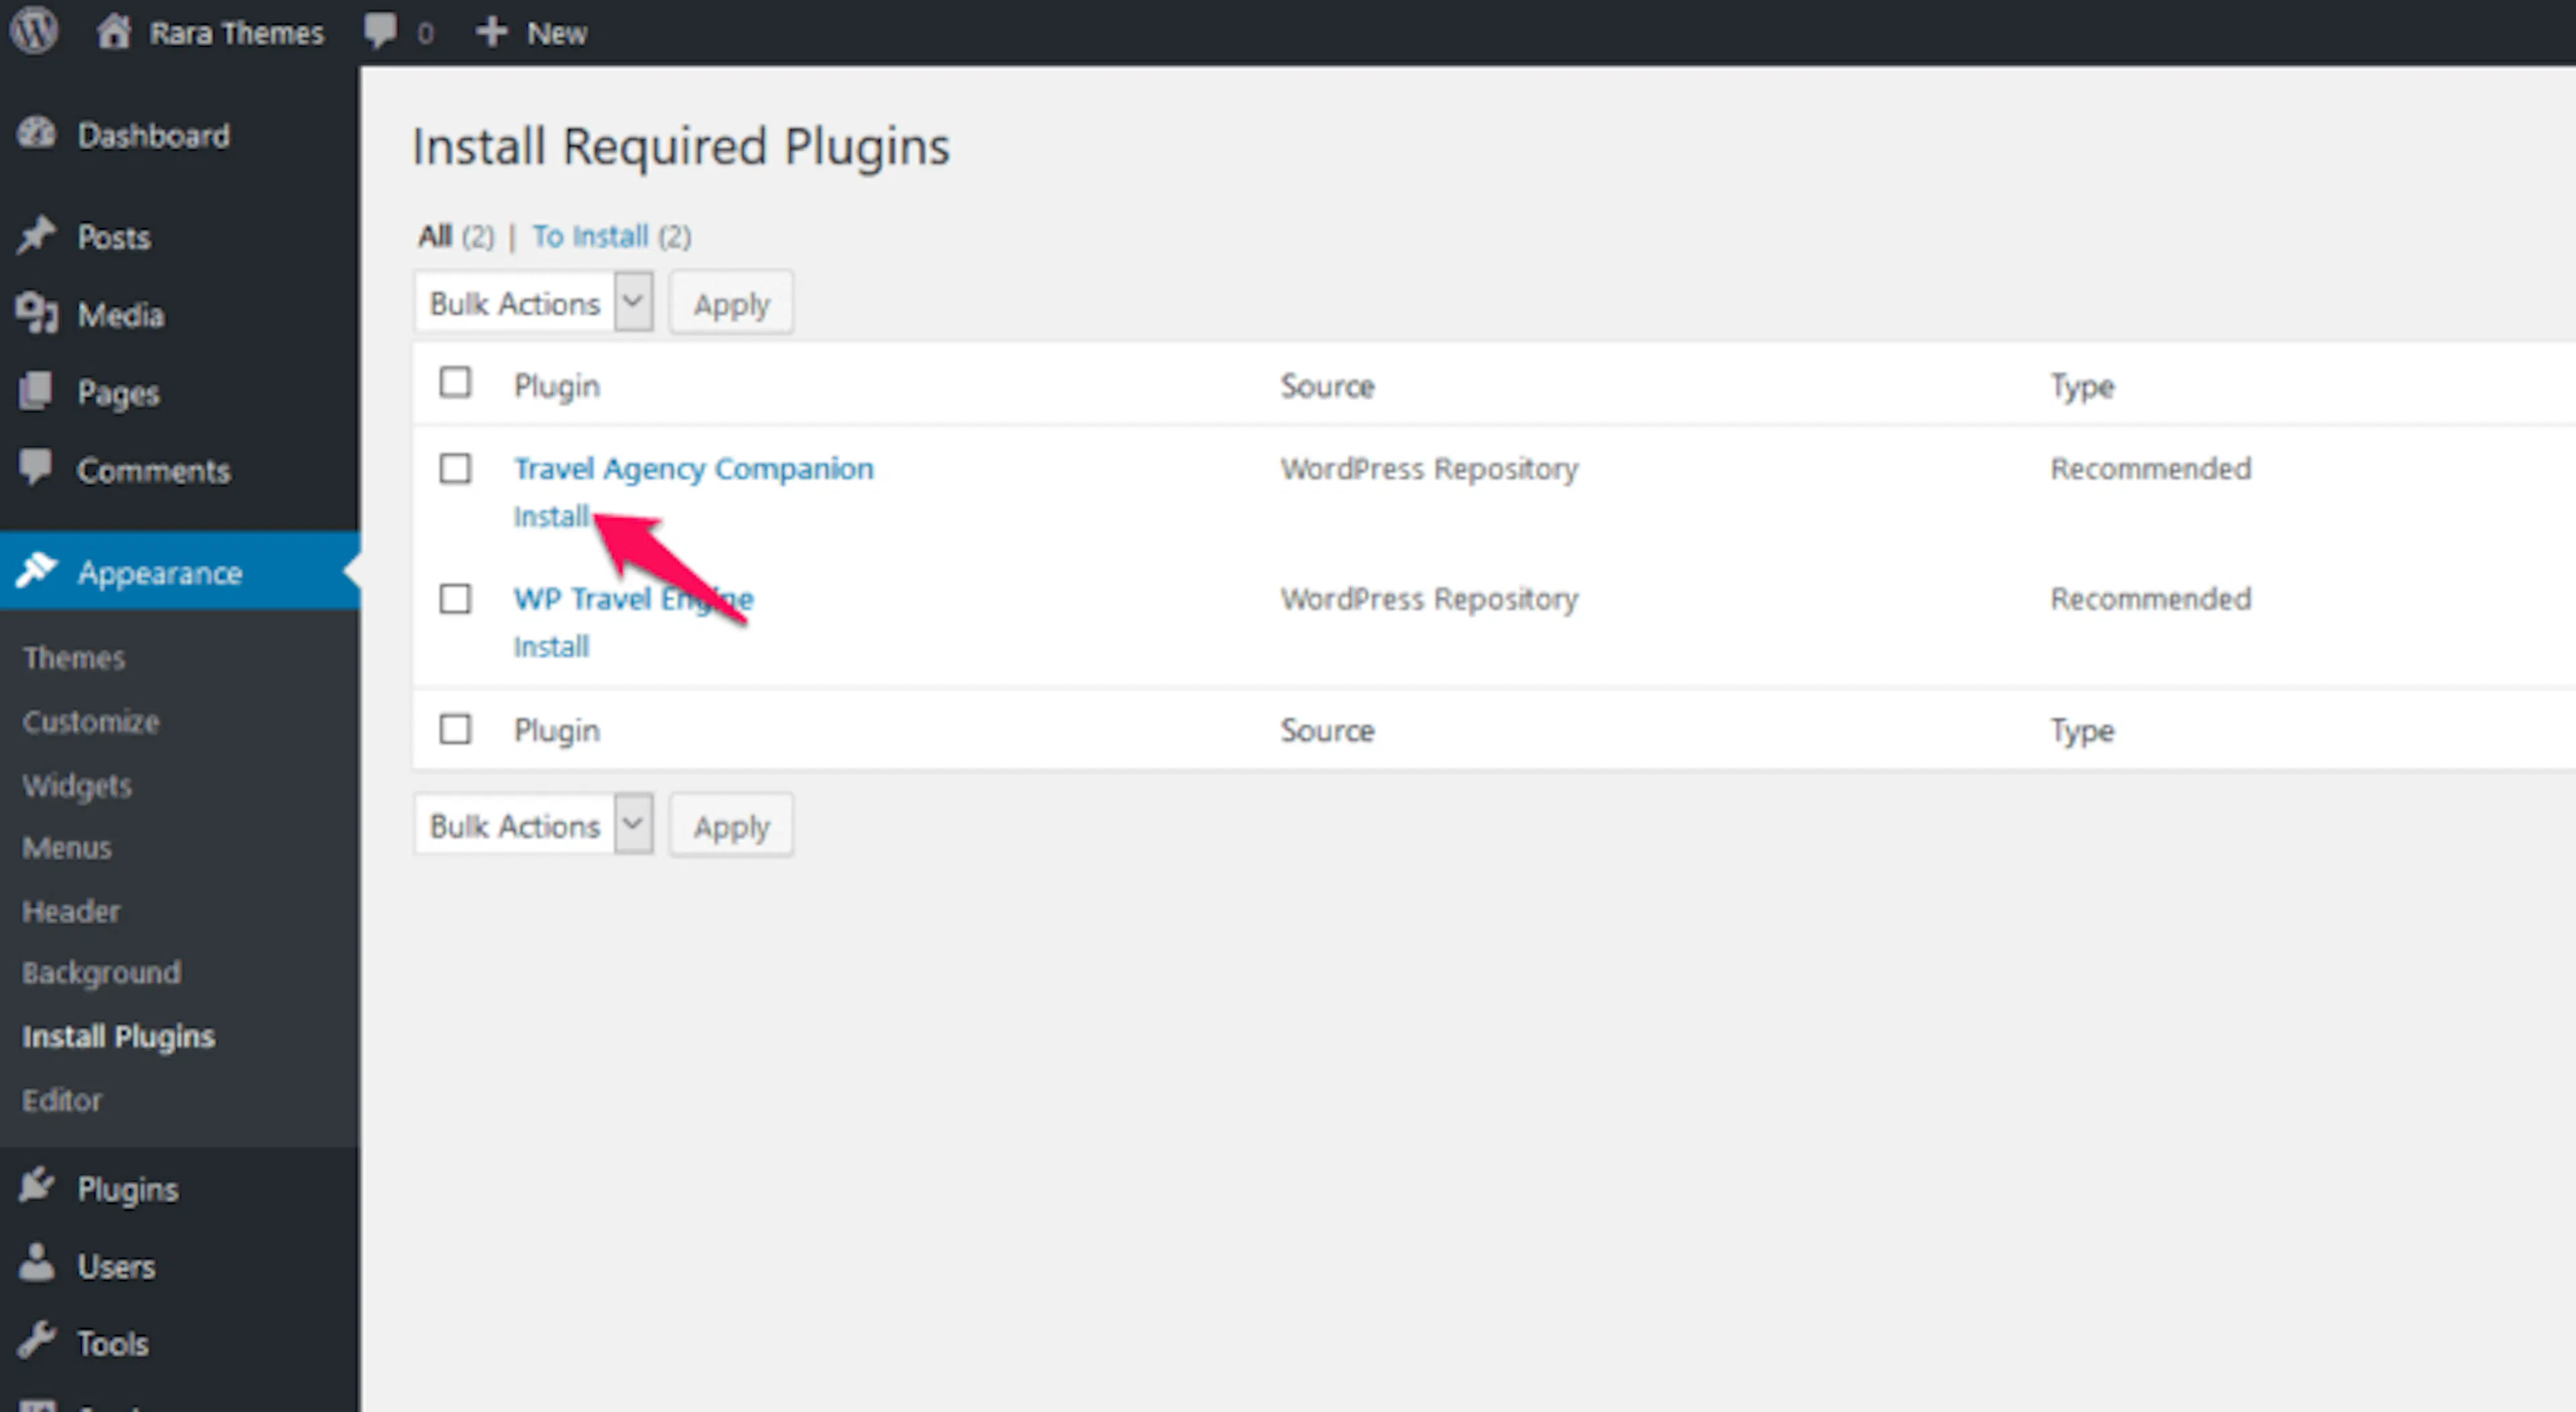
Install each plugin
Click Install next to each recommended plugin.
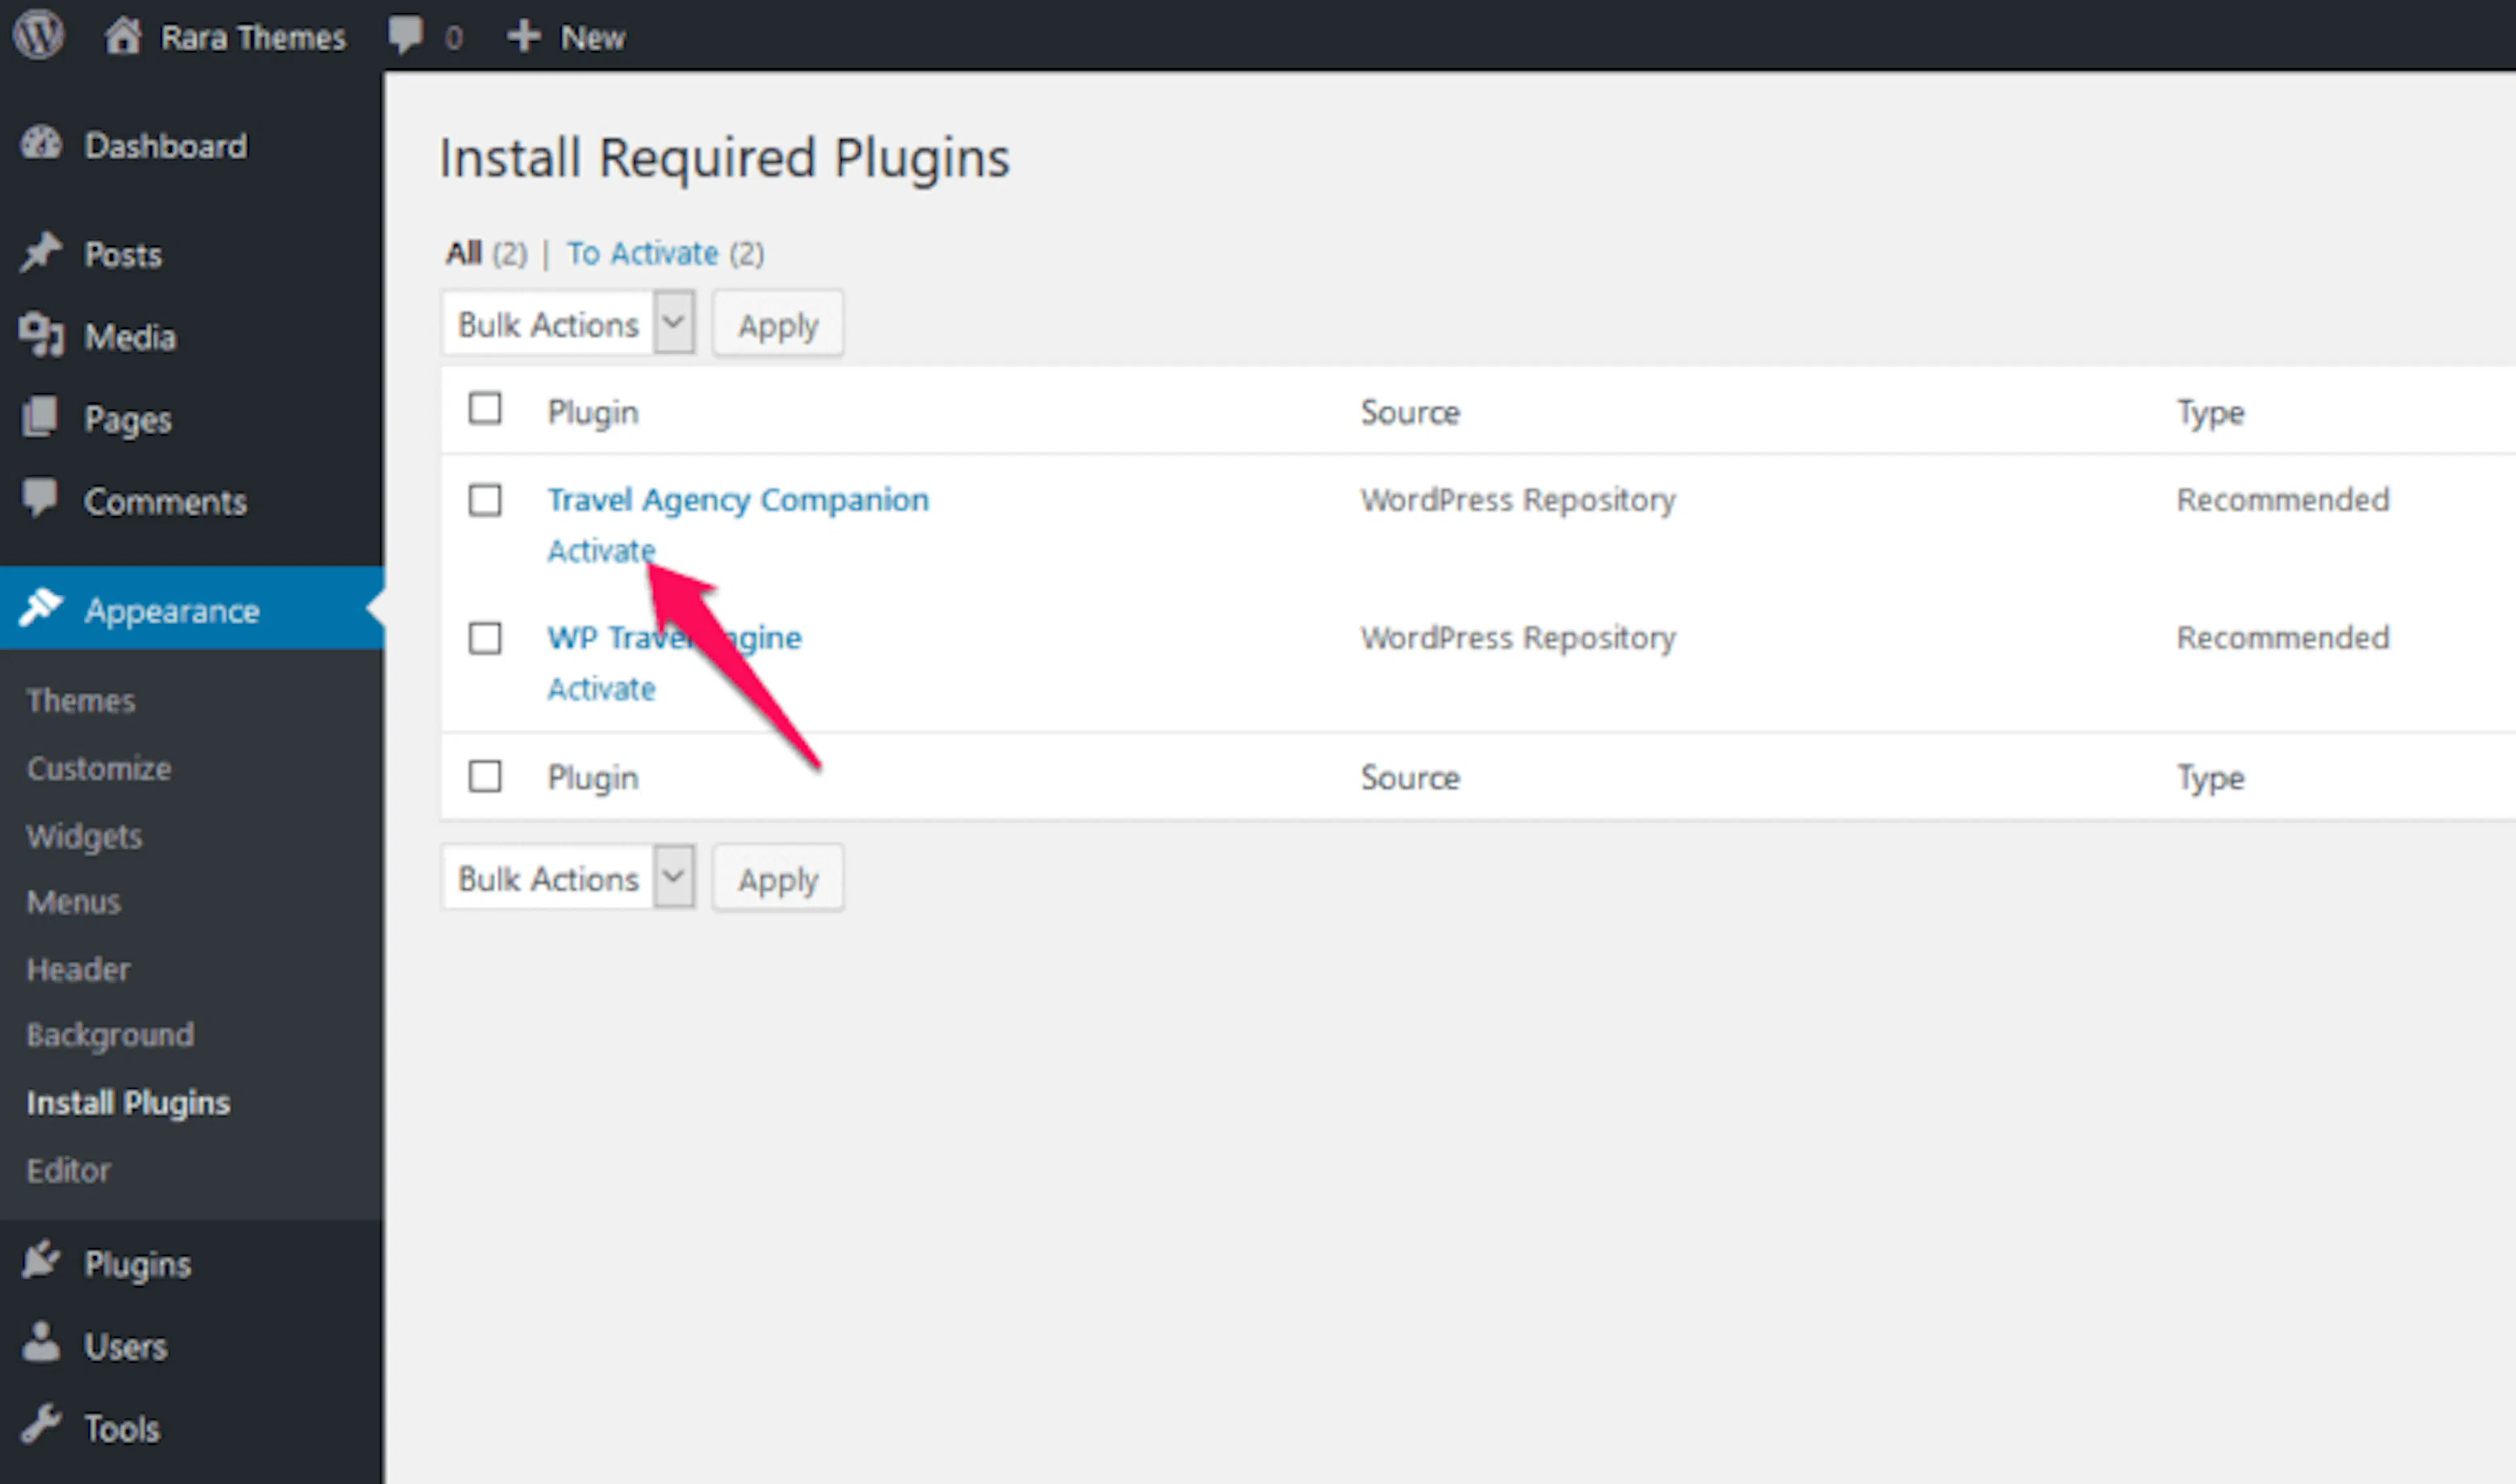
Activate each plugin
Click Activate next to each plugin after it finishes installing.
Your trip tools and homepage widgets are now available. Next, choose the page visitors should see first.
Set up your homepage and blog page
By default, WordPress shows your latest blog posts on the homepage. Most tour businesses use a static front page instead. A static front page lets travelers see your trips first, while your blog posts appear on a separate page.
After a demo import on a fresh WordPress installation, the required pages already exist. On an existing website, you choose the pages yourself.
Open Homepage Settings
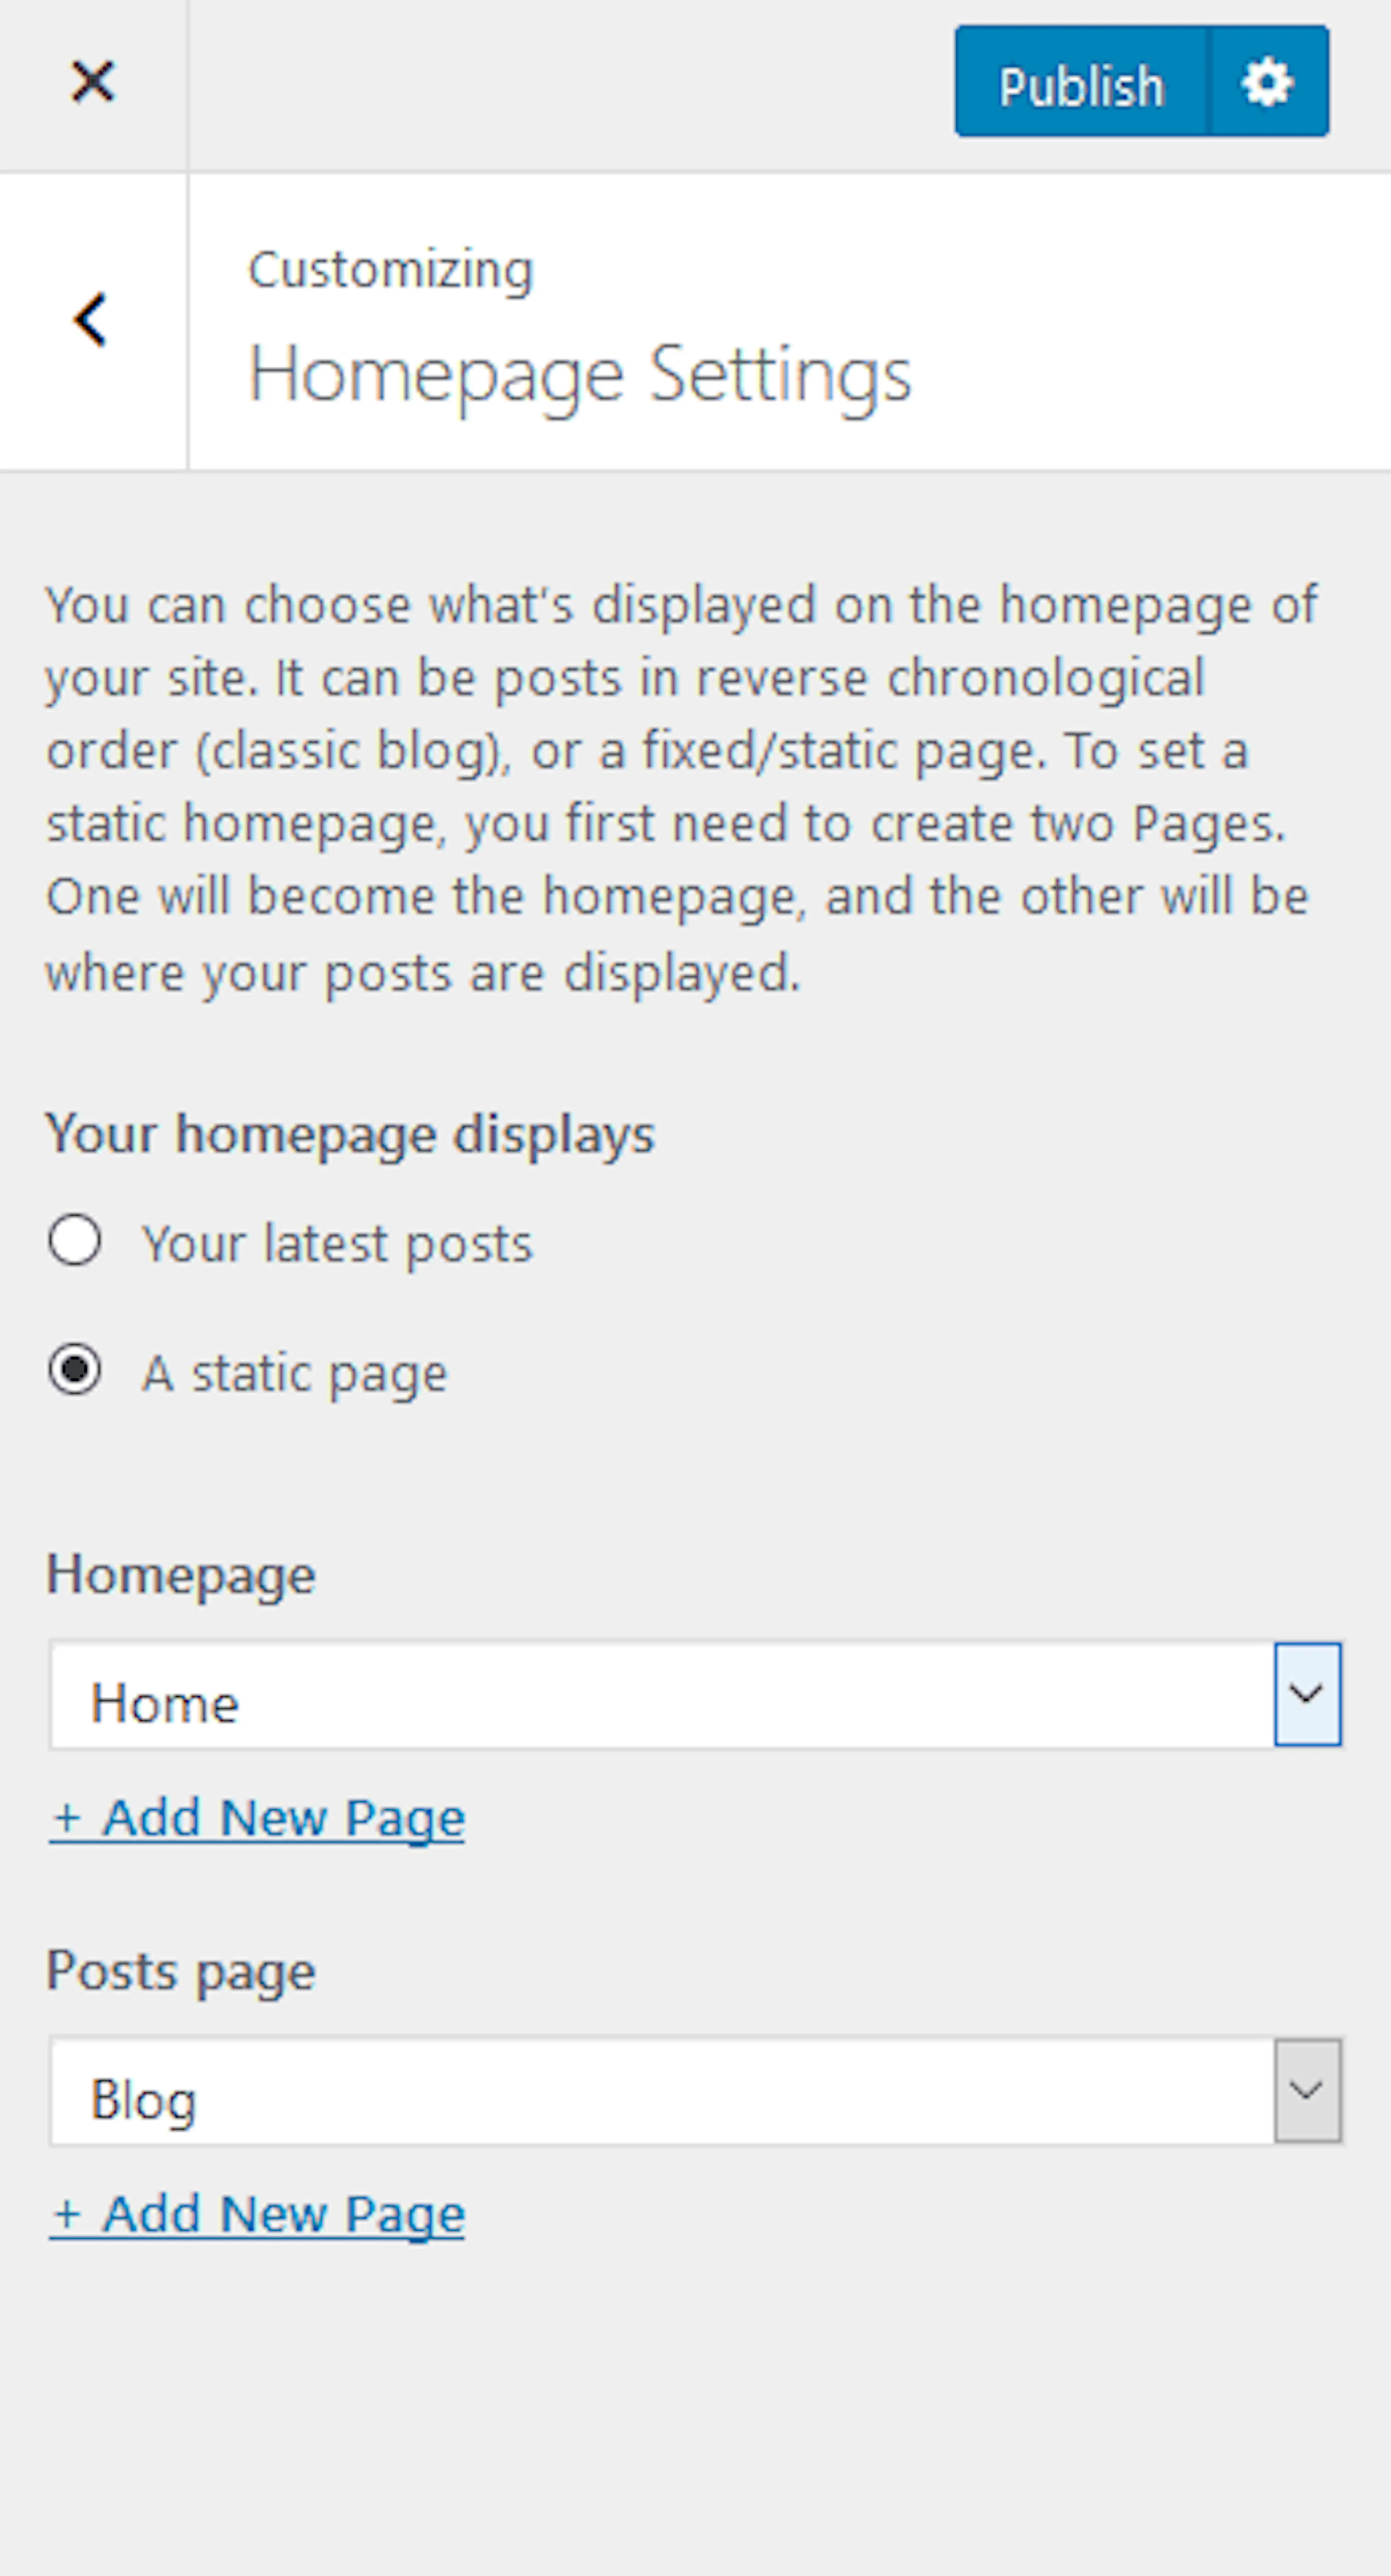
Go to Appearance > Customize > Homepage Settings. The Customizer is WordPress's built-in panel for changing your site's appearance and settings.
Select a static homepage
Under Your homepage displays, choose A Static Page.
Assign your pages on an existing site
If you imported the demo on a fresh WordPress installation, skip this step. If you are using an existing site, choose the page for Front Page and the page for Posts Page.
Publish your changes
Click Save & Publish.
Your homepage will now lead with your tour business instead of your latest blog posts.
Logo and header settings
The header is the top area of your website. Add your logo, business name, tagline, phone number, search form, and social media icons so visitors know who they are dealing with.
Site Identity
Site Identity controls your site name, tagline, logo, and favicon. A favicon is the small icon that appears in a browser tab.
What you'll need before you start: your logo file and a square image for your site icon.
Open Site Identity
Go to Appearance > Customize > Logo & Header Settings > Site Identity.
Add your logo
Click Select Logo and upload your logo.
Add your site name and tagline
Enter your Site Title and Tagline. For example, use Himalayan Pathways as the site title and Guided treks in Nepal as the tagline.
Show the site title and tagline
Check Display Site Title and Tagline.
Add your site icon
Click Select Image and upload a square image for your site icon.
Publish your identity settings
Click Save & Publish.
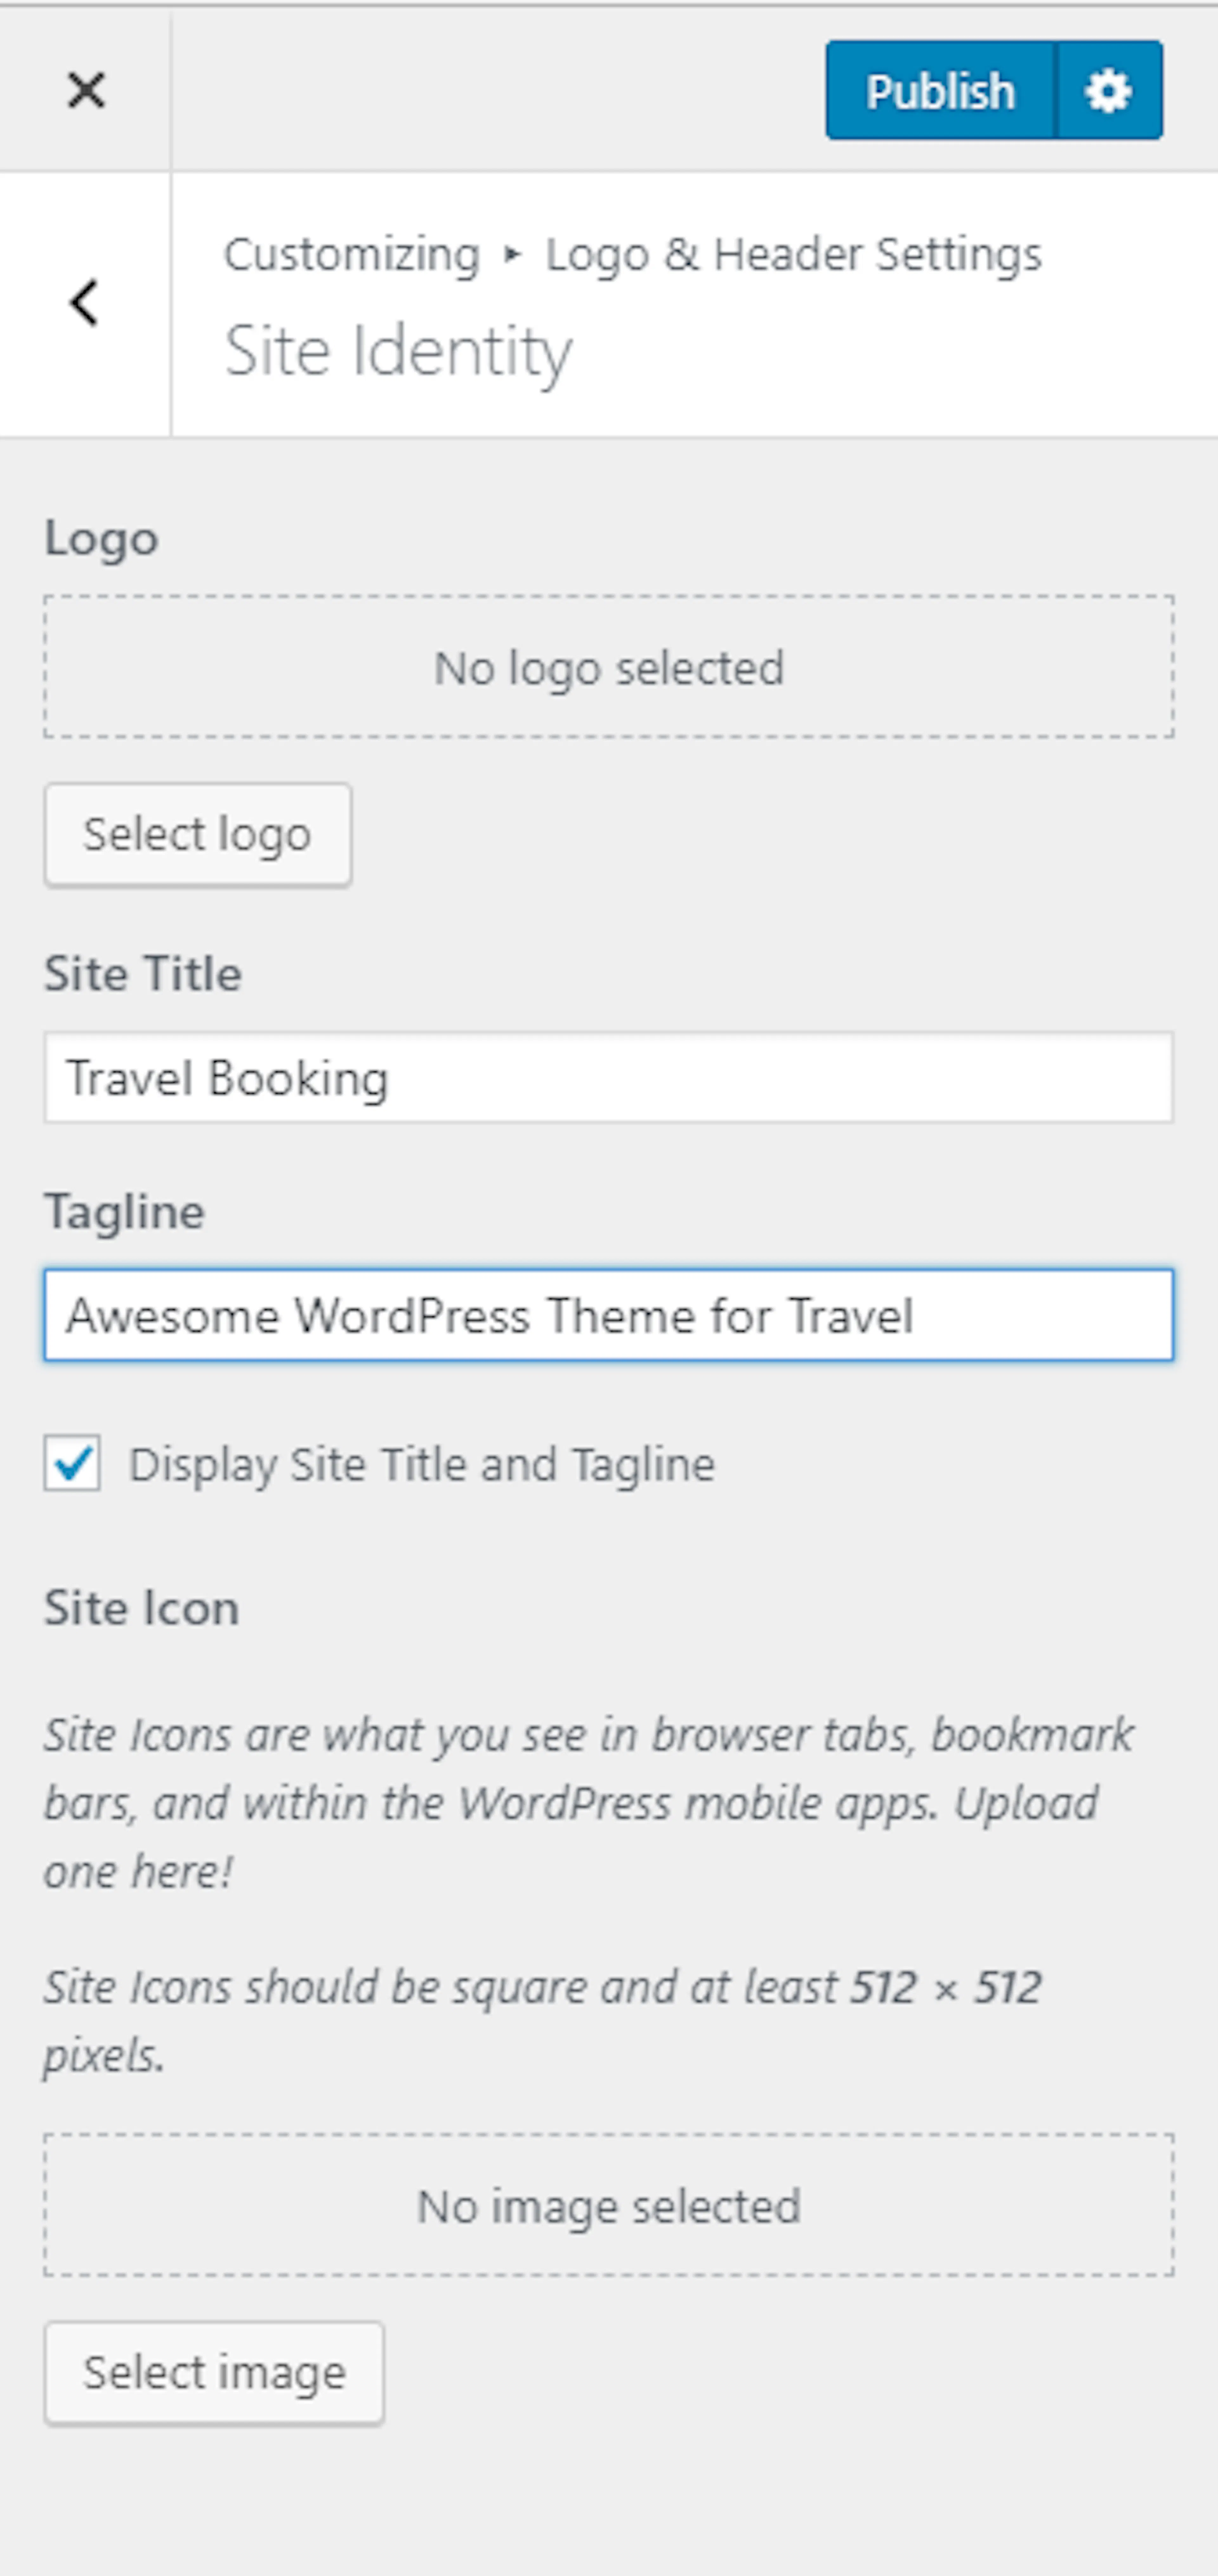
Your header should now show your business identity. Add a search form if you want visitors to find blog posts or other website content.
Search form
A search form adds a search bar to the header. Visitors might use it to find a specific trek, destination, or packing article.
Open Misc Settings
Go to Appearance > Customize > Logo & Header Settings > Misc Settings.
Enable the search form
Check Search Form to show the search bar in your header.
Publish the change
Click Save & Publish.
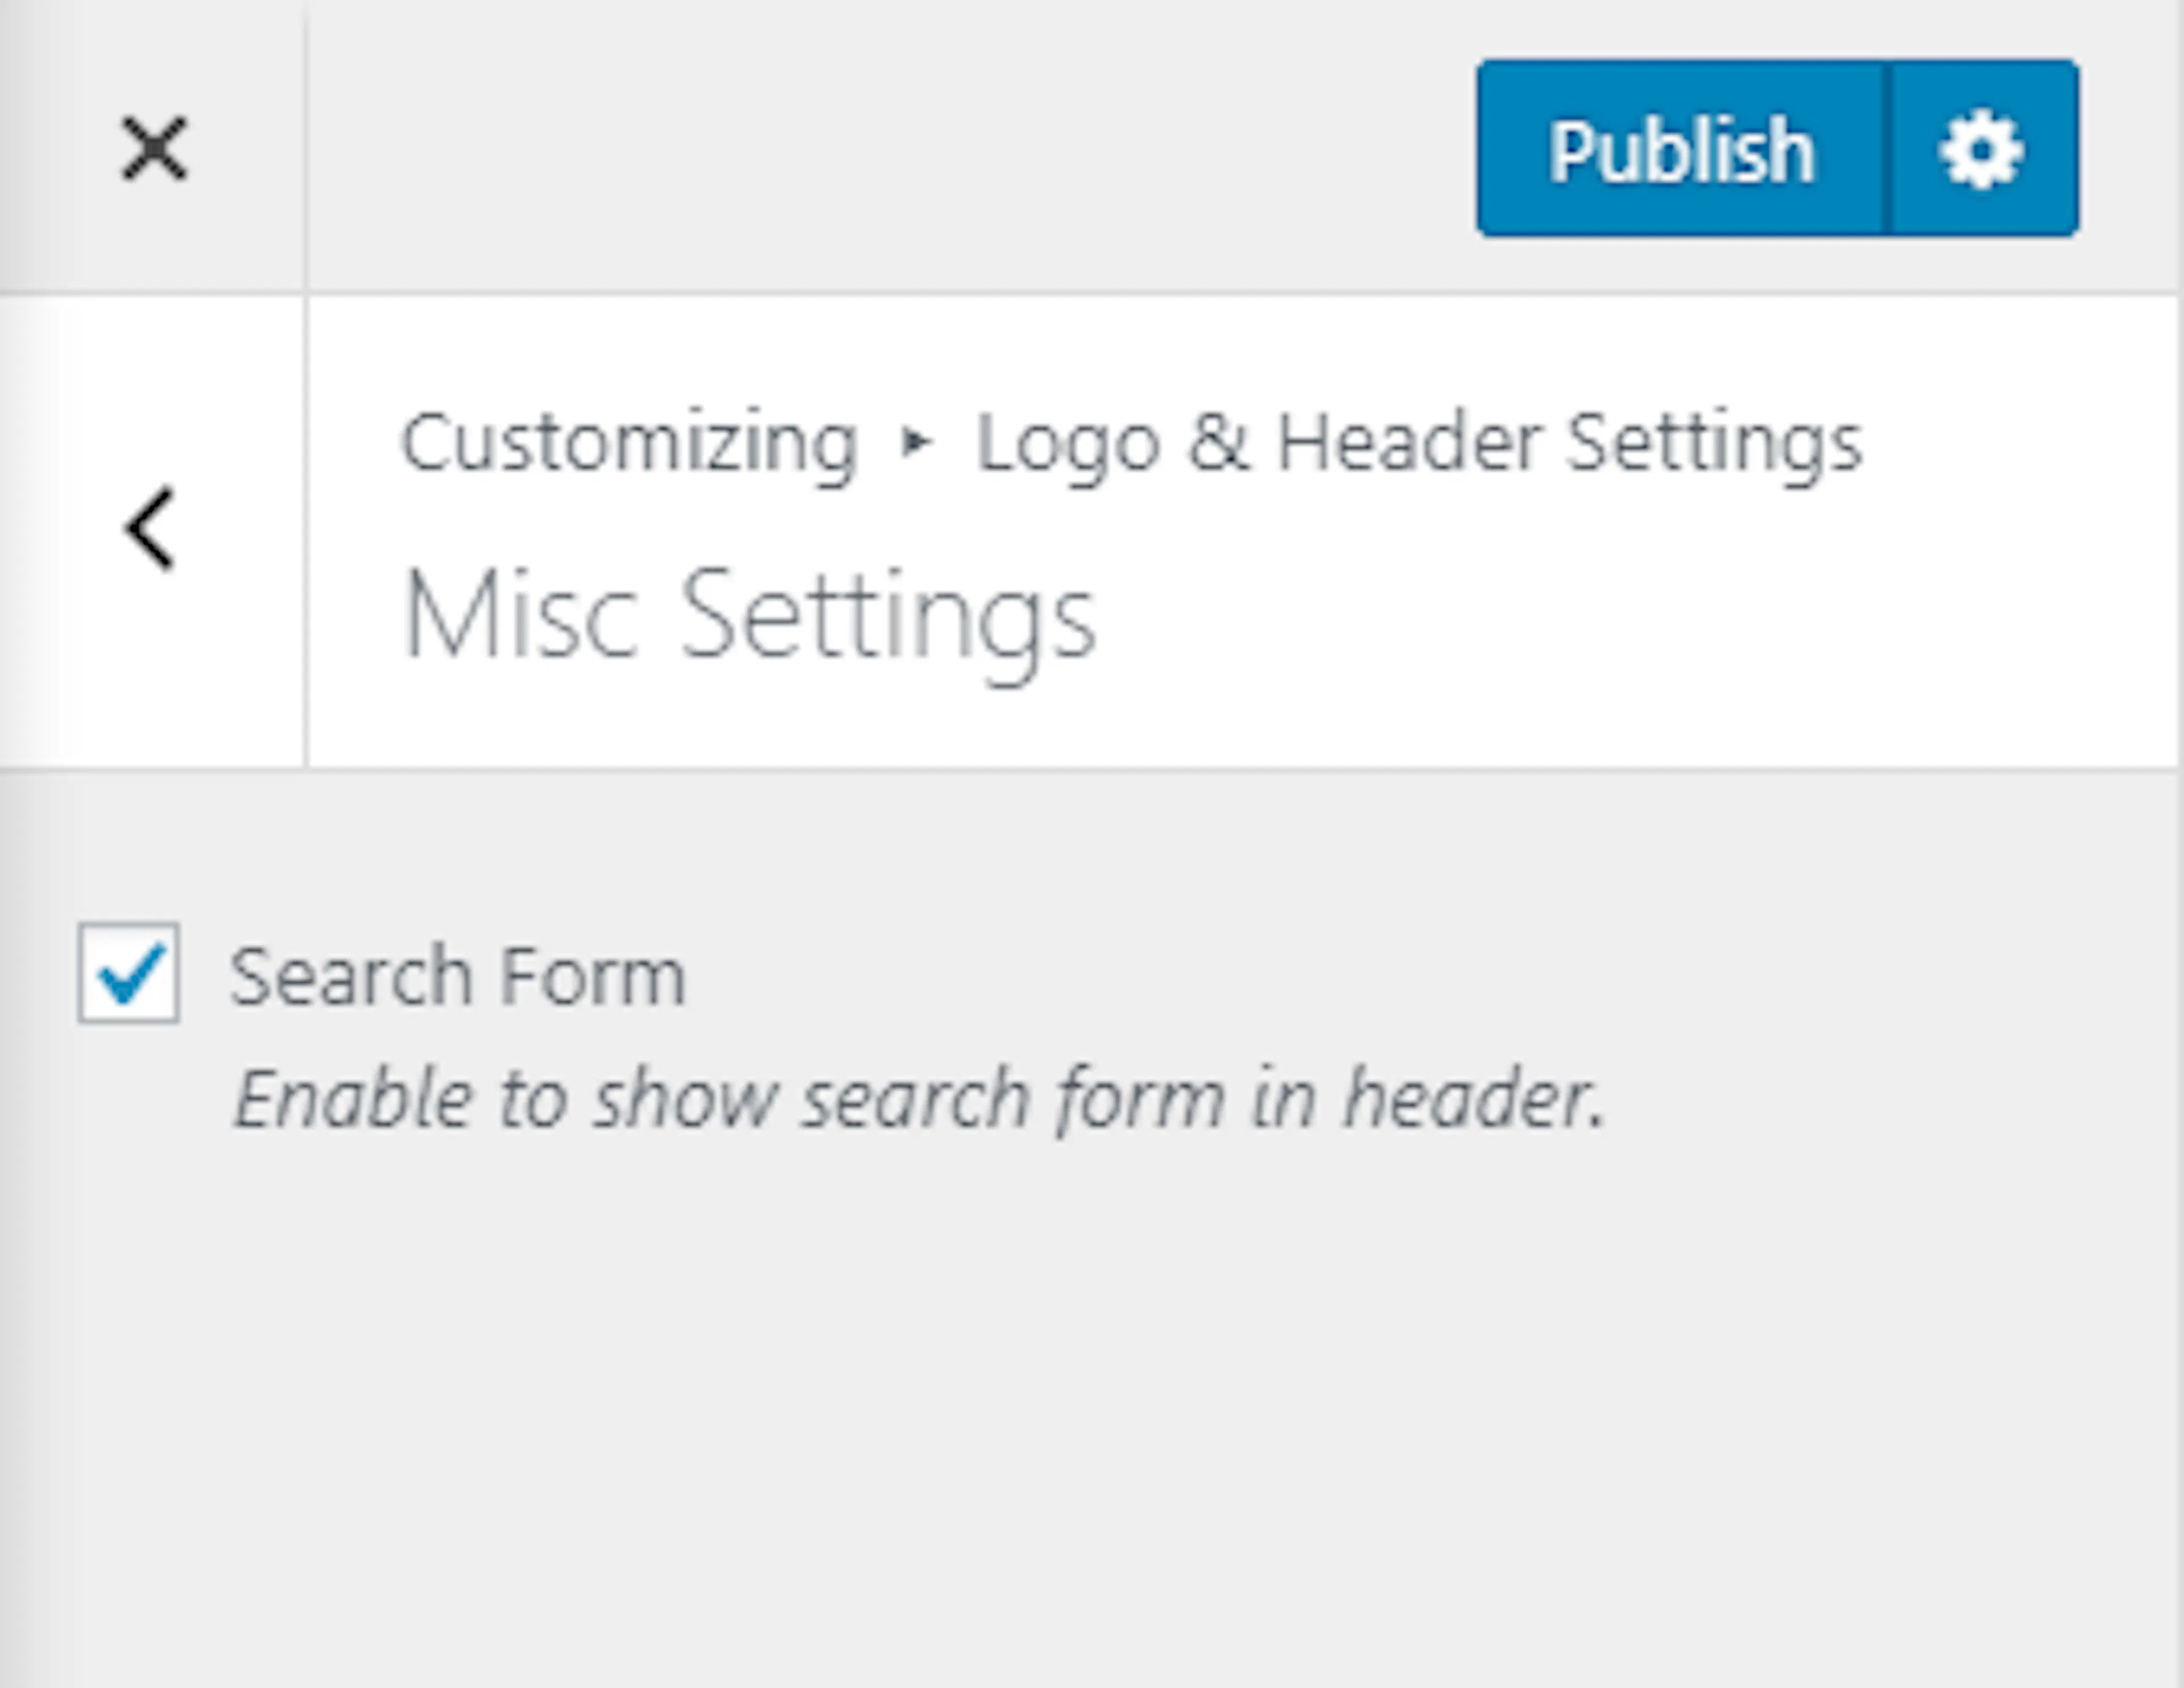
Front page settings
Front Page Settings controls the sections visitors see on your homepage. You must view the homepage in the Customizer to edit these sections.
Make sure you completed the homepage setup first. You must also install and activate the Travel Booking Toolkit plugin to see all available sections.
Banner section
The banner is the large image or video area at the top of your homepage. Use it to show the experience you sell, such as a Himalayan trail, a rafting river, or a cultural tour group.
The recommended banner size is 1920 x 800 px.
Open the Banner Section
Go to Appearance > Customize > Front Page Settings > Banner Section.
Enable the banner
Select Enable Banner Section.
Choose a video or image banner
Select a video for a video banner, or enter a YouTube URL. Click Add new image to add images to the banner.
Choose and arrange banner images
Select the image you want to display. To show a different uploaded image each time the site loads, click Randomize uploaded headers.
Add banner text and a button
Enter the banner title. Enter the Button Label and Button URL. For example, use Explore Annapurna Treks and link the button to your trips page.
Publish the banner
Click Save & Publish.
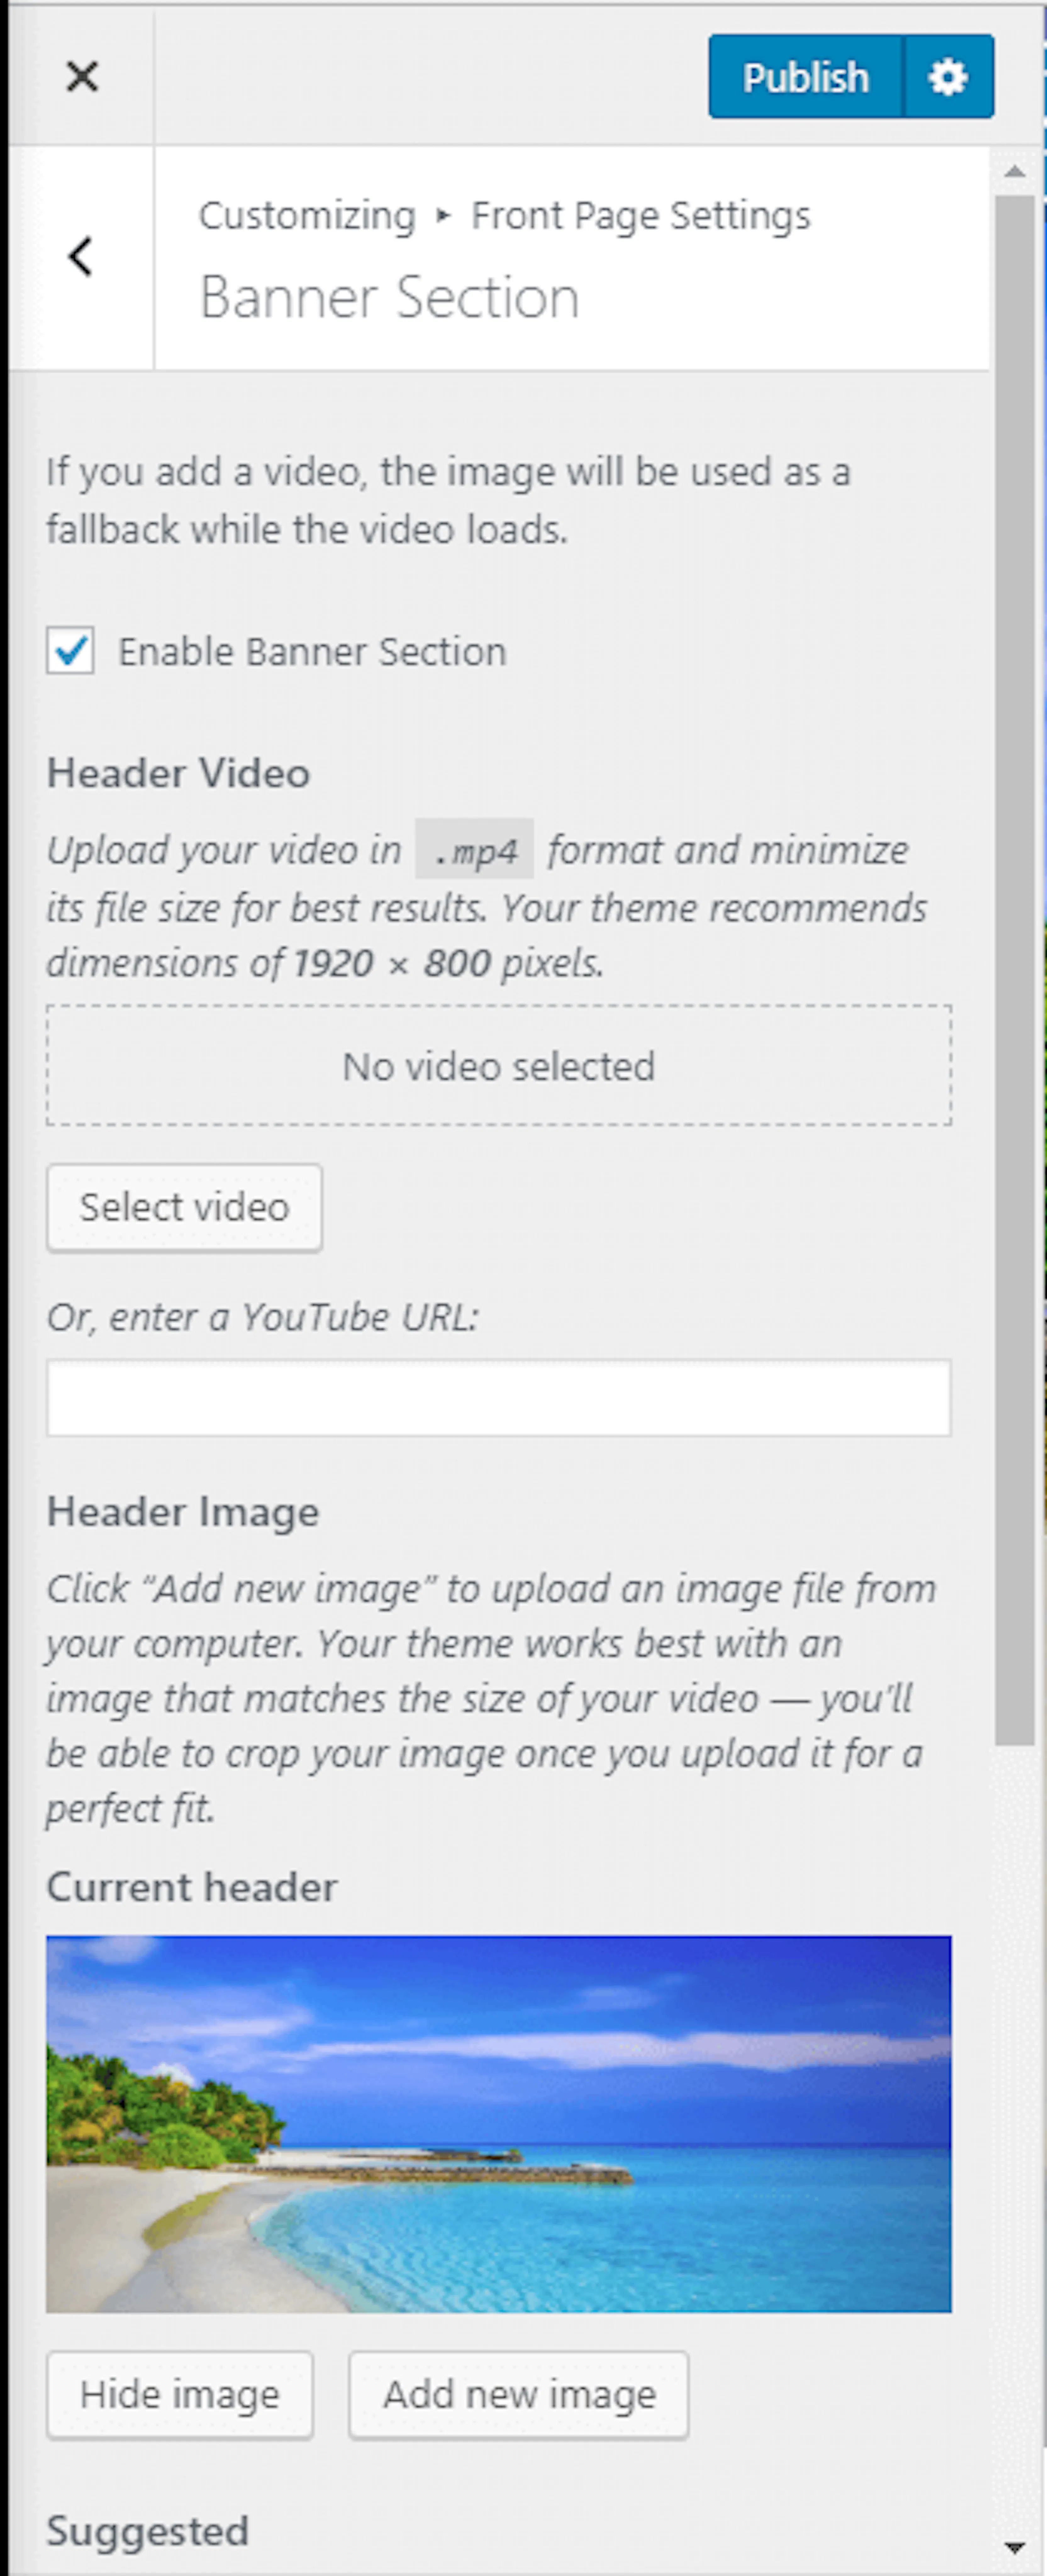
About section
Use the About section to explain who you are and what kind of trips you provide. A widget is a small block of content that you can place in a specific area of your website.
Open the About Section
Go to Appearance > Customize > Front Page Settings > About Section.
Add the section introduction
Add a Text widget for the section title and description.
Add an icon text widget
Add a WP Travel Engine: Icon Text Widget for the About section.
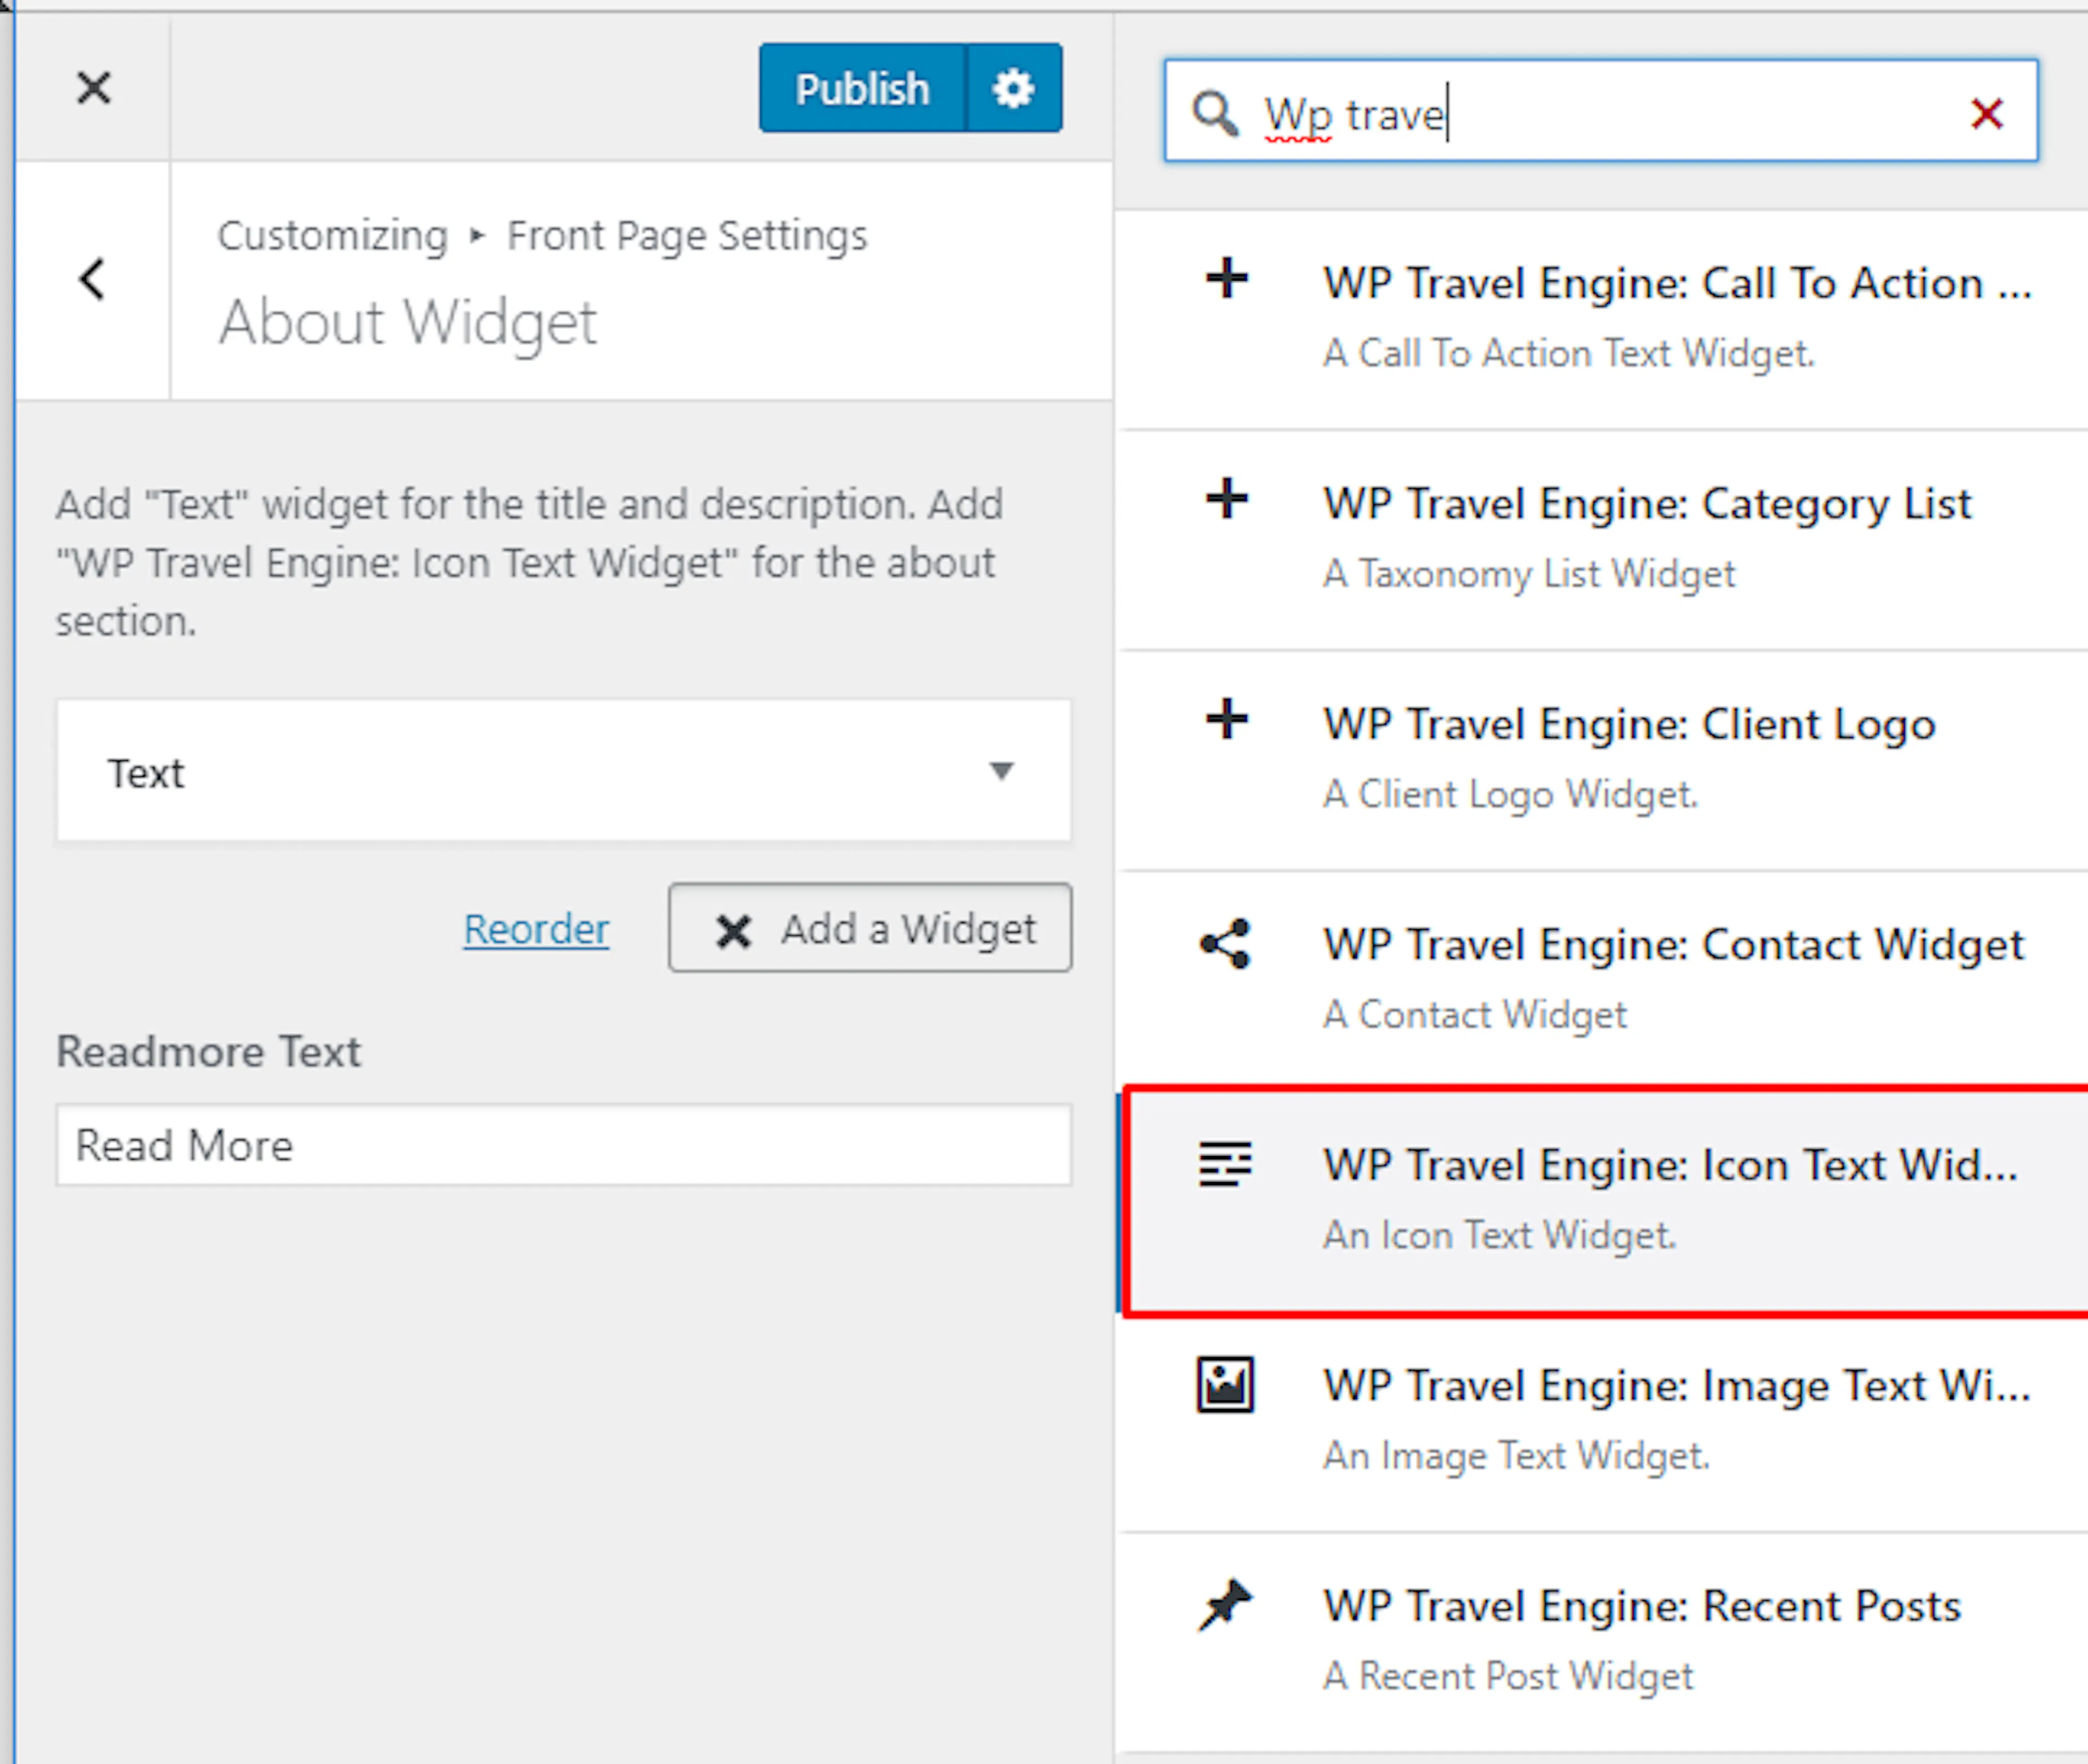
Add your About content
Enter a title and content. Upload an image or choose an icon. Add more widgets for additional icon text sections, such as Local guides, Small groups, or Airport pickup.
Add the link
Enter the Read more text and Read more URL.
Publish the About section
Click Save & Publish.
Call to action one
A call to action tells visitors what to do next. Use this section to invite travelers to book a trip, request a quote, or contact your team.
Open Call To Action One
Go to Appearance > Customize > Front Page Settings > Call To Action One.
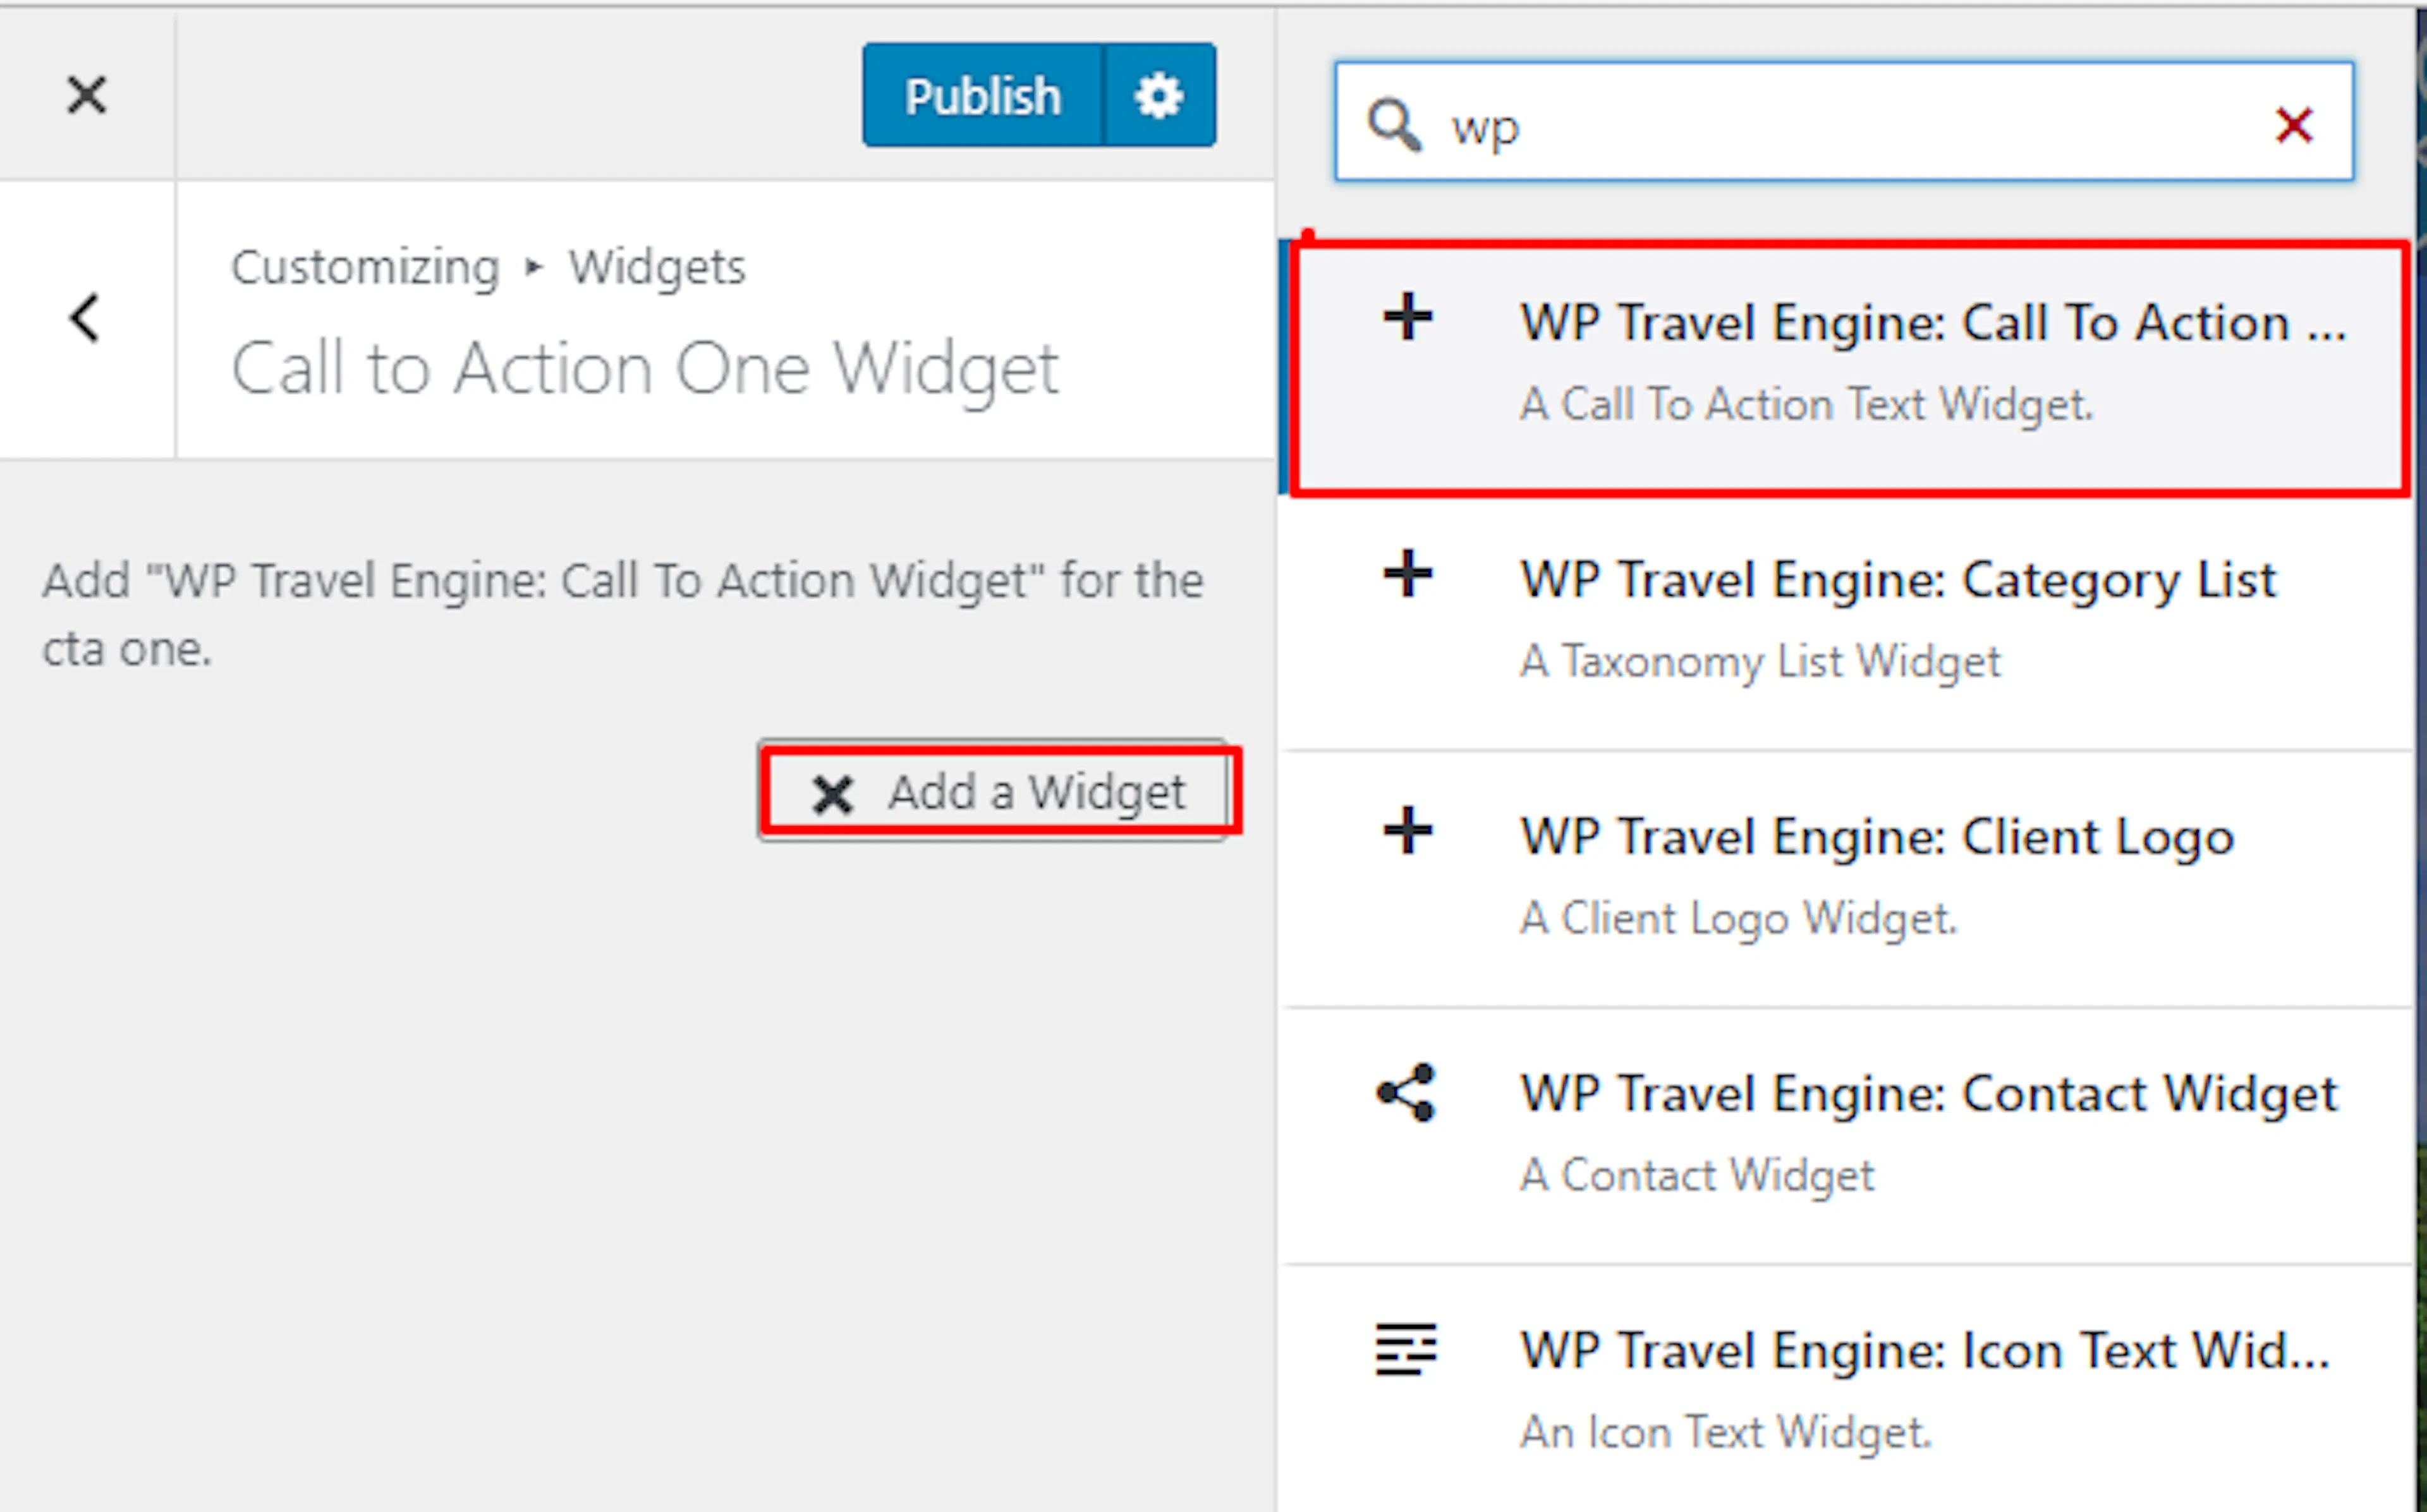
Add the call to action widget
Add a WP Travel Engine: Call To Action Widget.
Add the call to action details
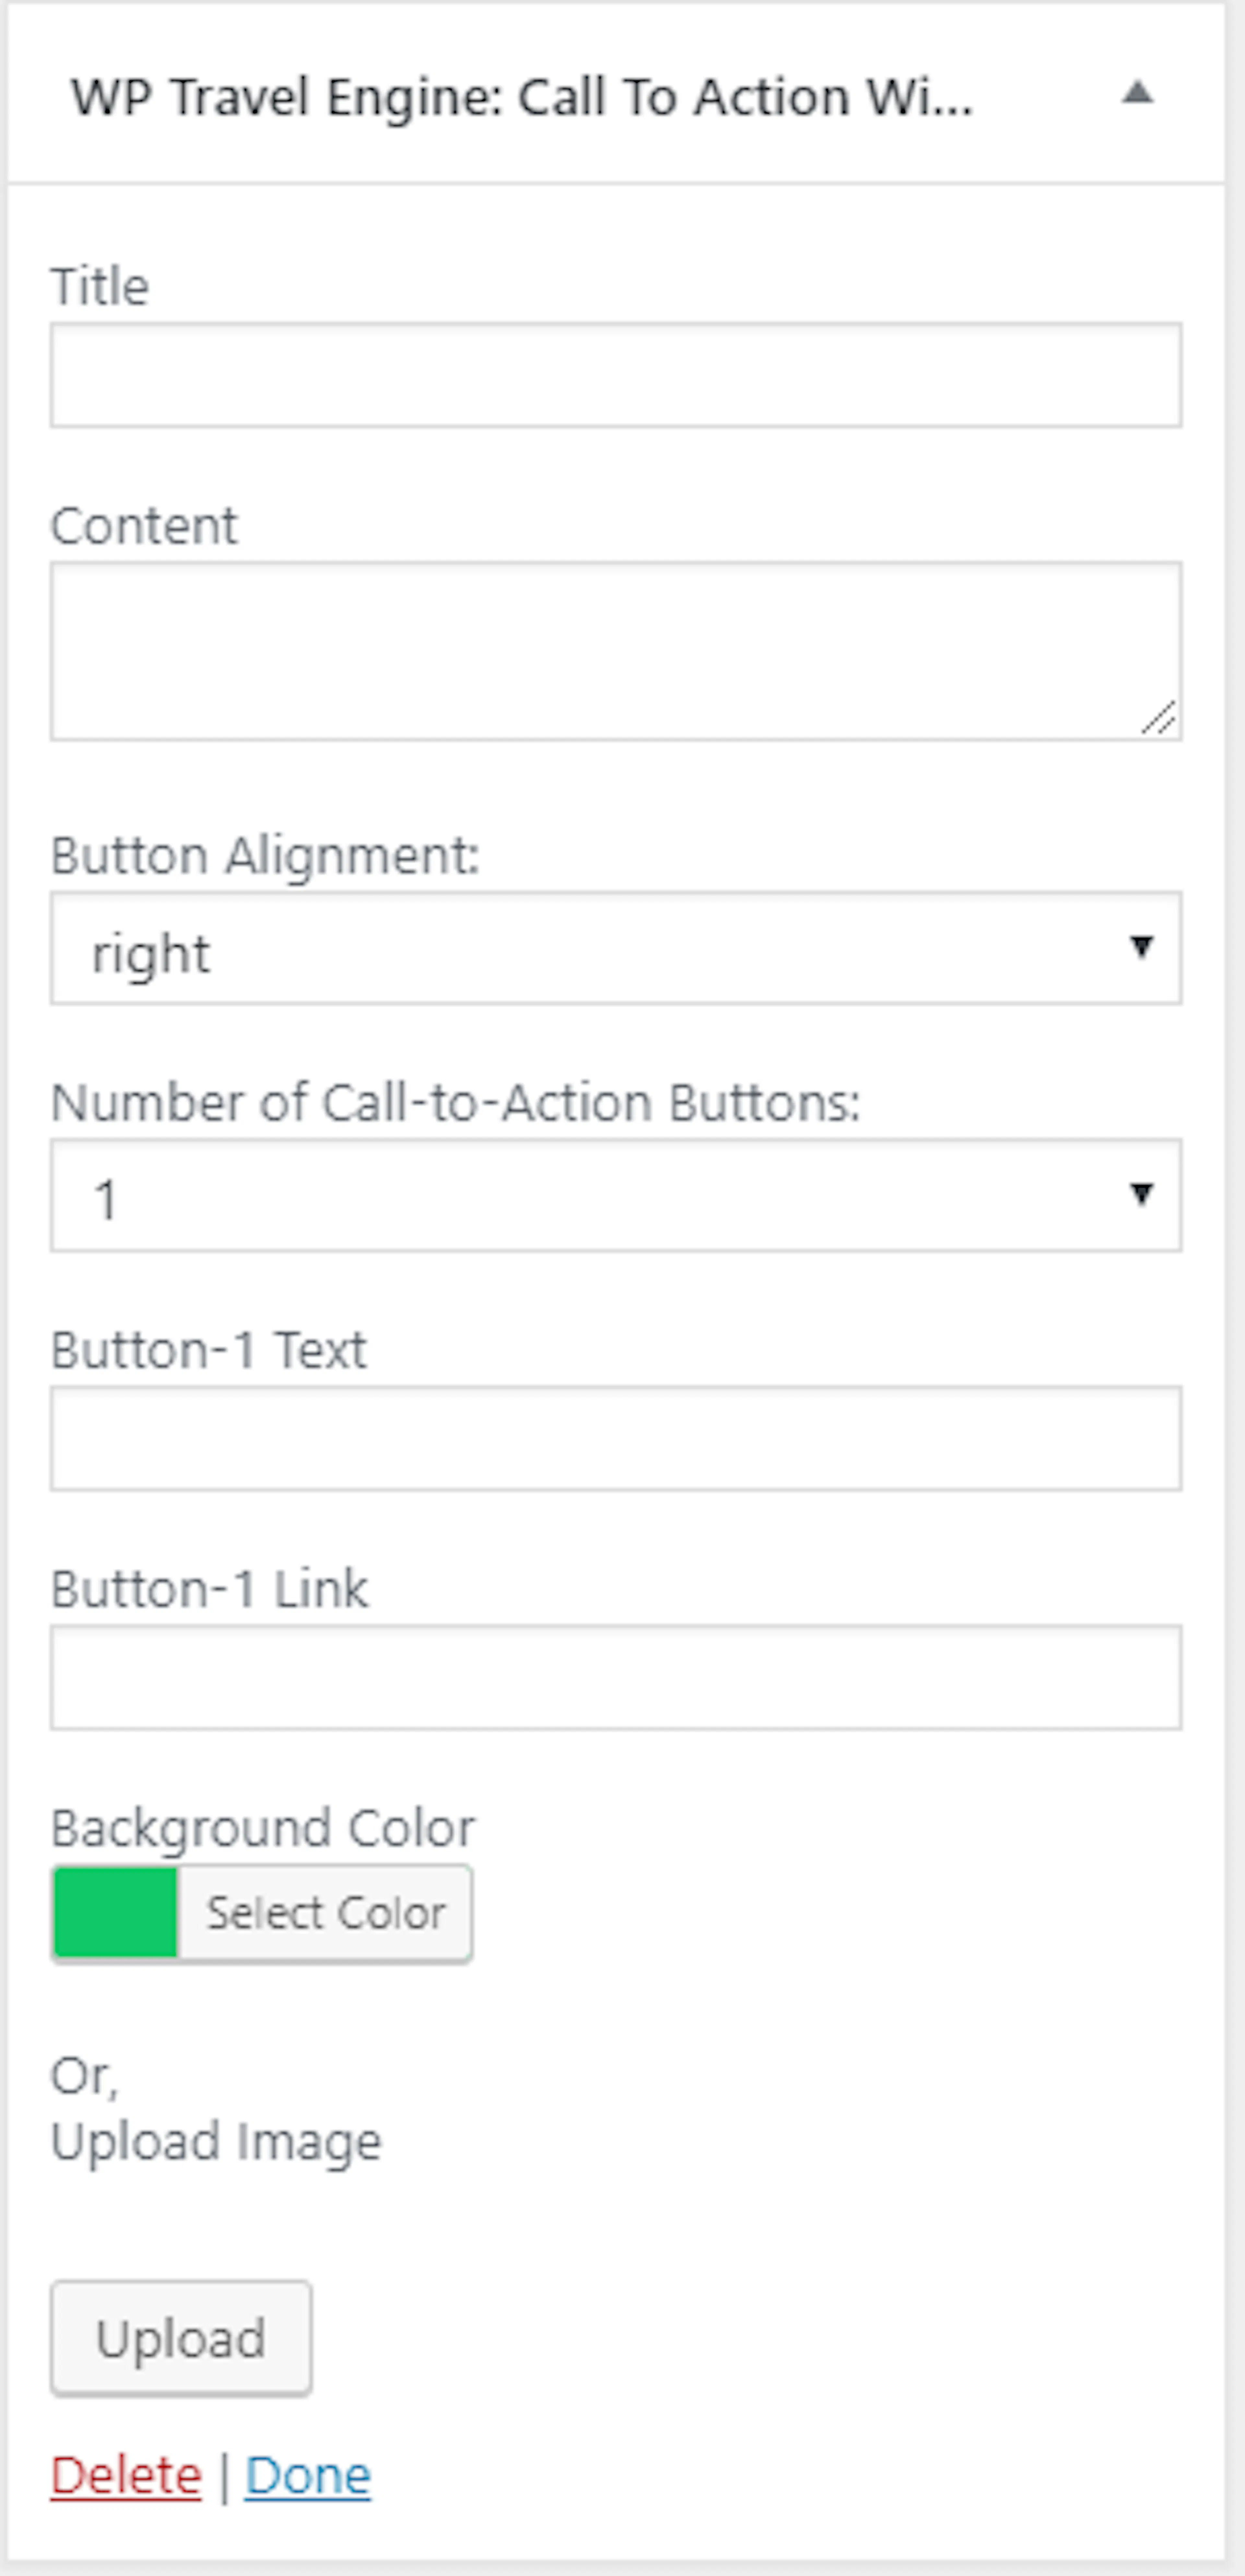
Enter a title and content. Choose the button alignment and the number of call to action buttons. Enter each button's text and link. Choose a background color or image.
Publish the section
Click Publish.
Popular packages section
The Popular Packages section displays your most popular trips on the homepage. Add your trips before selecting them here.
Create trips from Trips > Add New before setting this section up. For example, add your Annapurna Circuit trek, Pokhara day tour, and Chitwan safari first.
Open Popular Packages
Go to Appearance > Customize > Front Page Settings > Popular Packages.
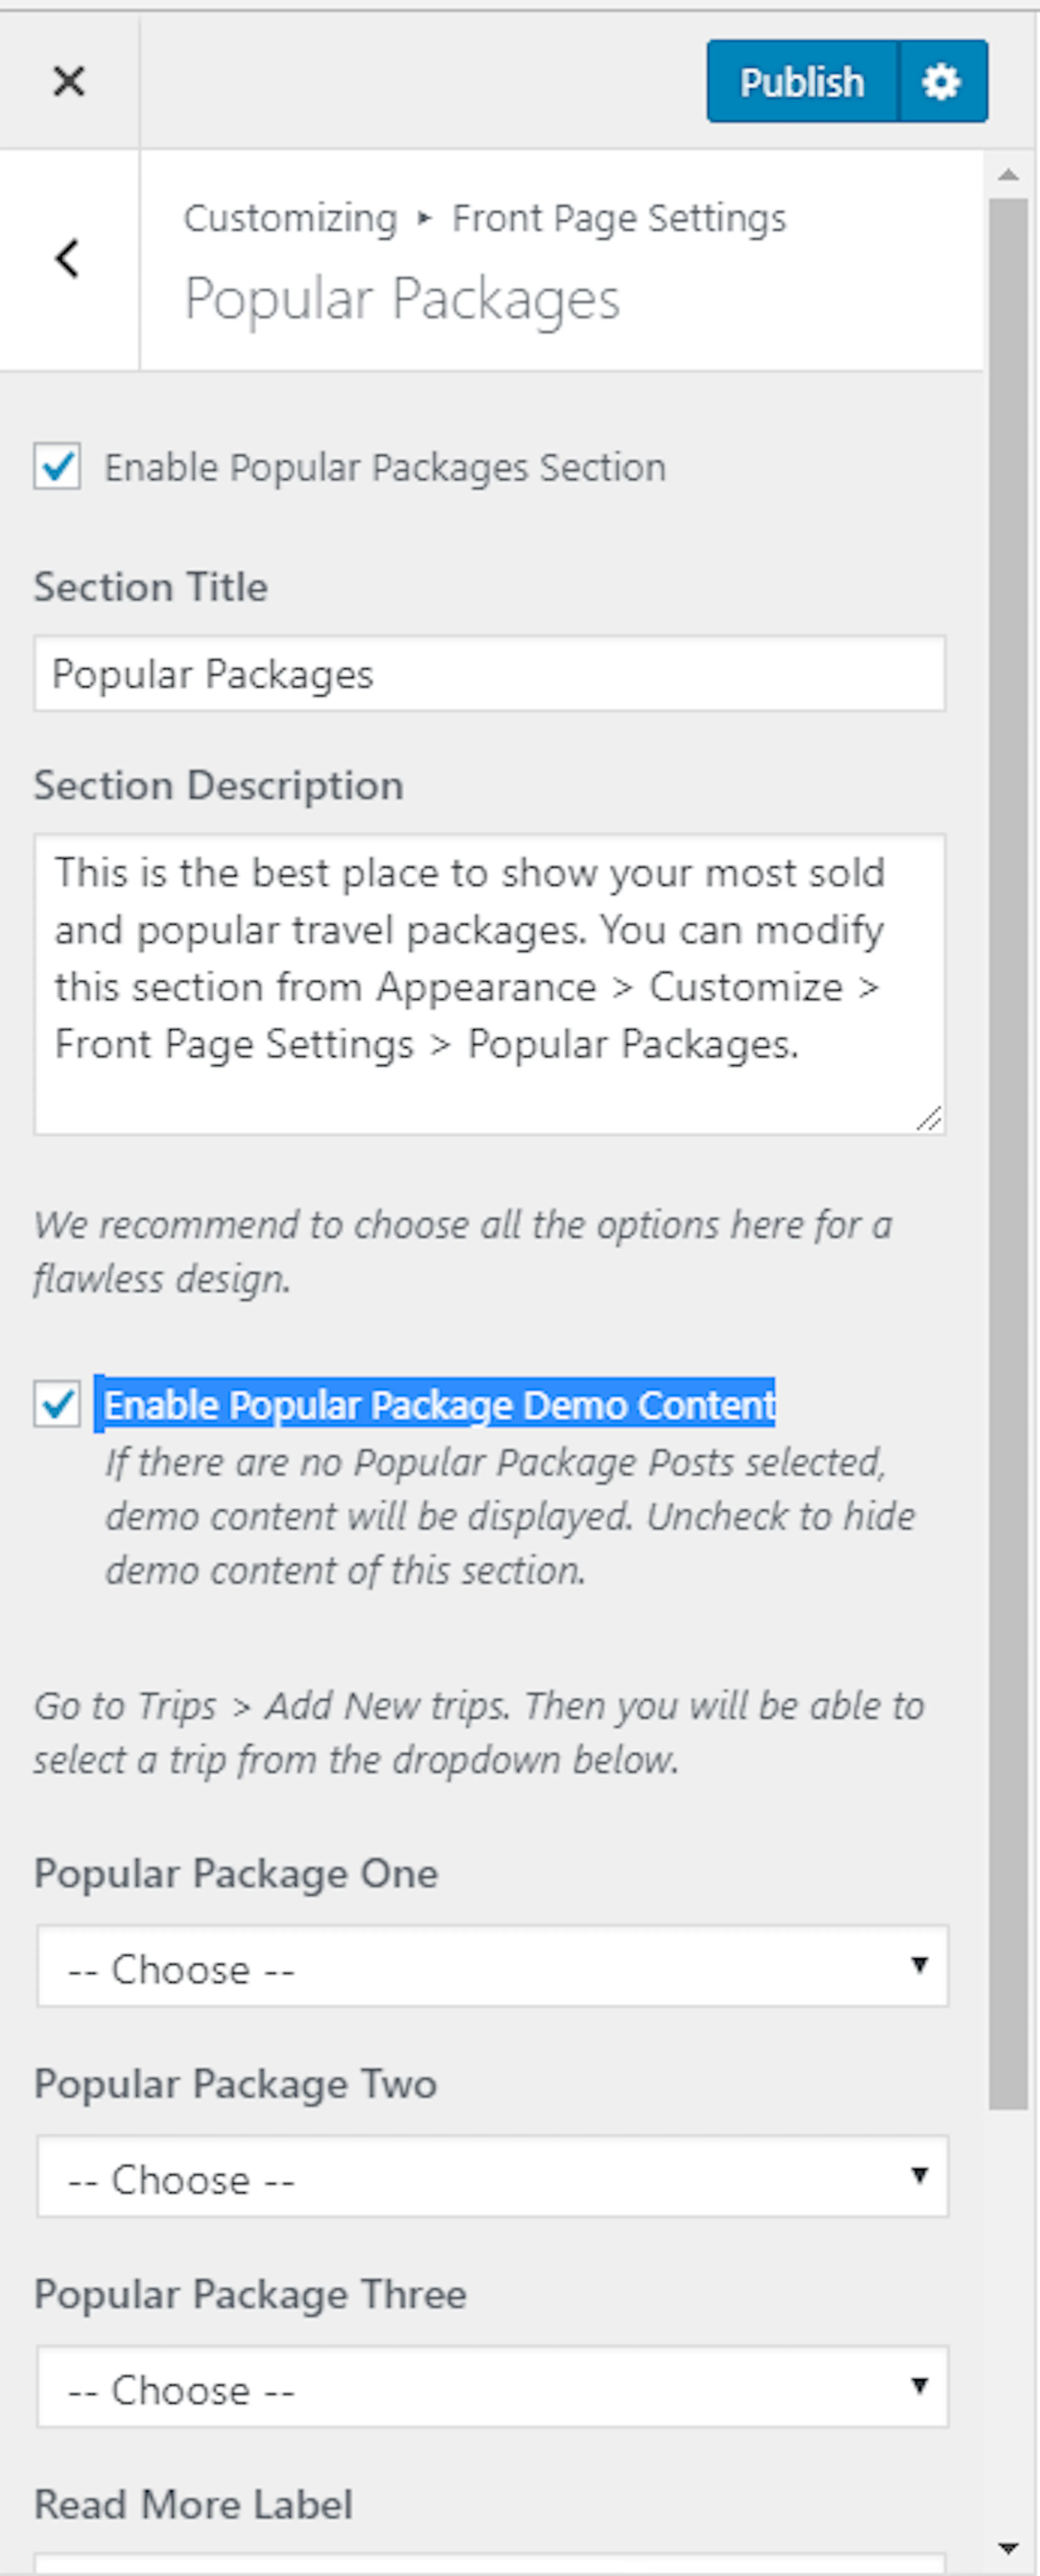
Enable the section
Check Enable Popular Packages Section.
Add the section title and description
Enter the Section Title and description.
Hide the demo content
Uncheck Enable Popular Package Demo Content to hide the sample trips.
Choose your popular trips
Choose Popular Packages One, Popular Packages Two, and Popular Packages Three. Select your trips from the dropdowns.
Add the section links
Enter the Read More Label, View All Label, and View All URL.
Publish the section
Click Publish.
Featured section
The Featured section highlights a trip or trip category. Use it to promote a seasonal package, such as a monsoon rafting tour or a Bhutan cultural tour.
Create your trips before setting up this section.
Open the Featured Section
Go to Appearance > Customize > Front Page Settings > Featured Section.
Enable featured trips
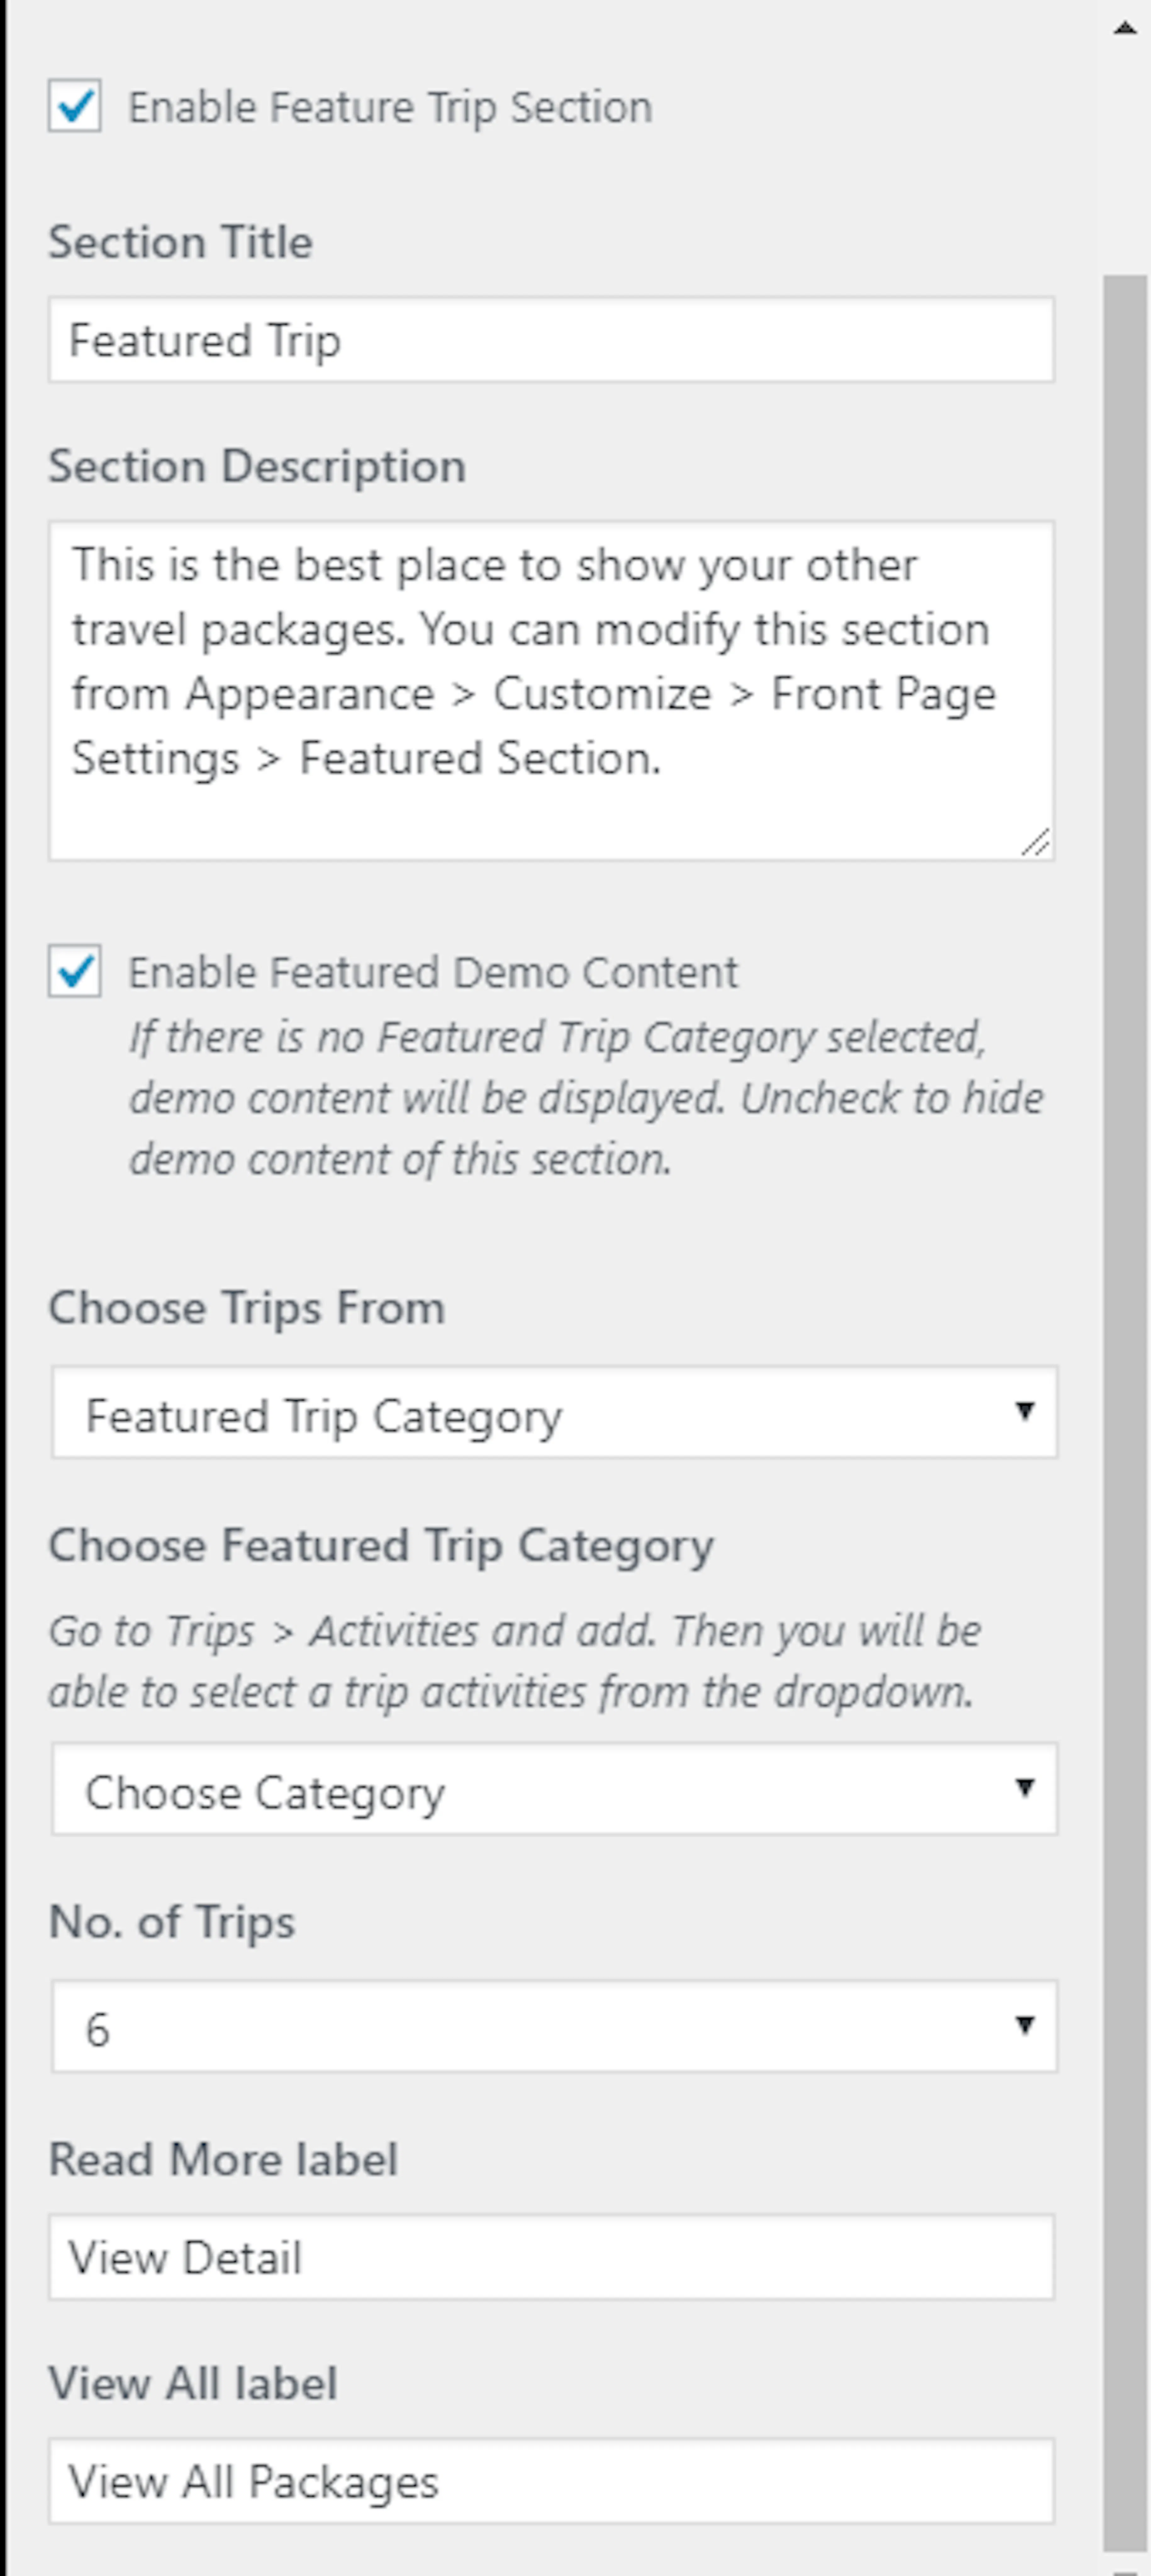
Check Enable Featured Trip Section.
Add the section title and description
Enter the Section Title and description.
Hide the demo content
Uncheck Enable Featured Demo Content to hide the sample content.
Choose what to display
Choose a featured trip category or the latest trips. Choose the number of trips to display.
Add the section labels
Enter the Read More Label and View All Label.
Publish the section
Click Publish.
Call to action two
Call to Action Two appears lower on the homepage. Use it for a second invitation, such as asking visitors to request group pricing after they view your trips.
Open Call To Action Two
Go to Appearance > Customize > Front Page Settings > Call To Action Two.
Add the call to action widget
Add a WP Travel Engine: Call To Action Widget.
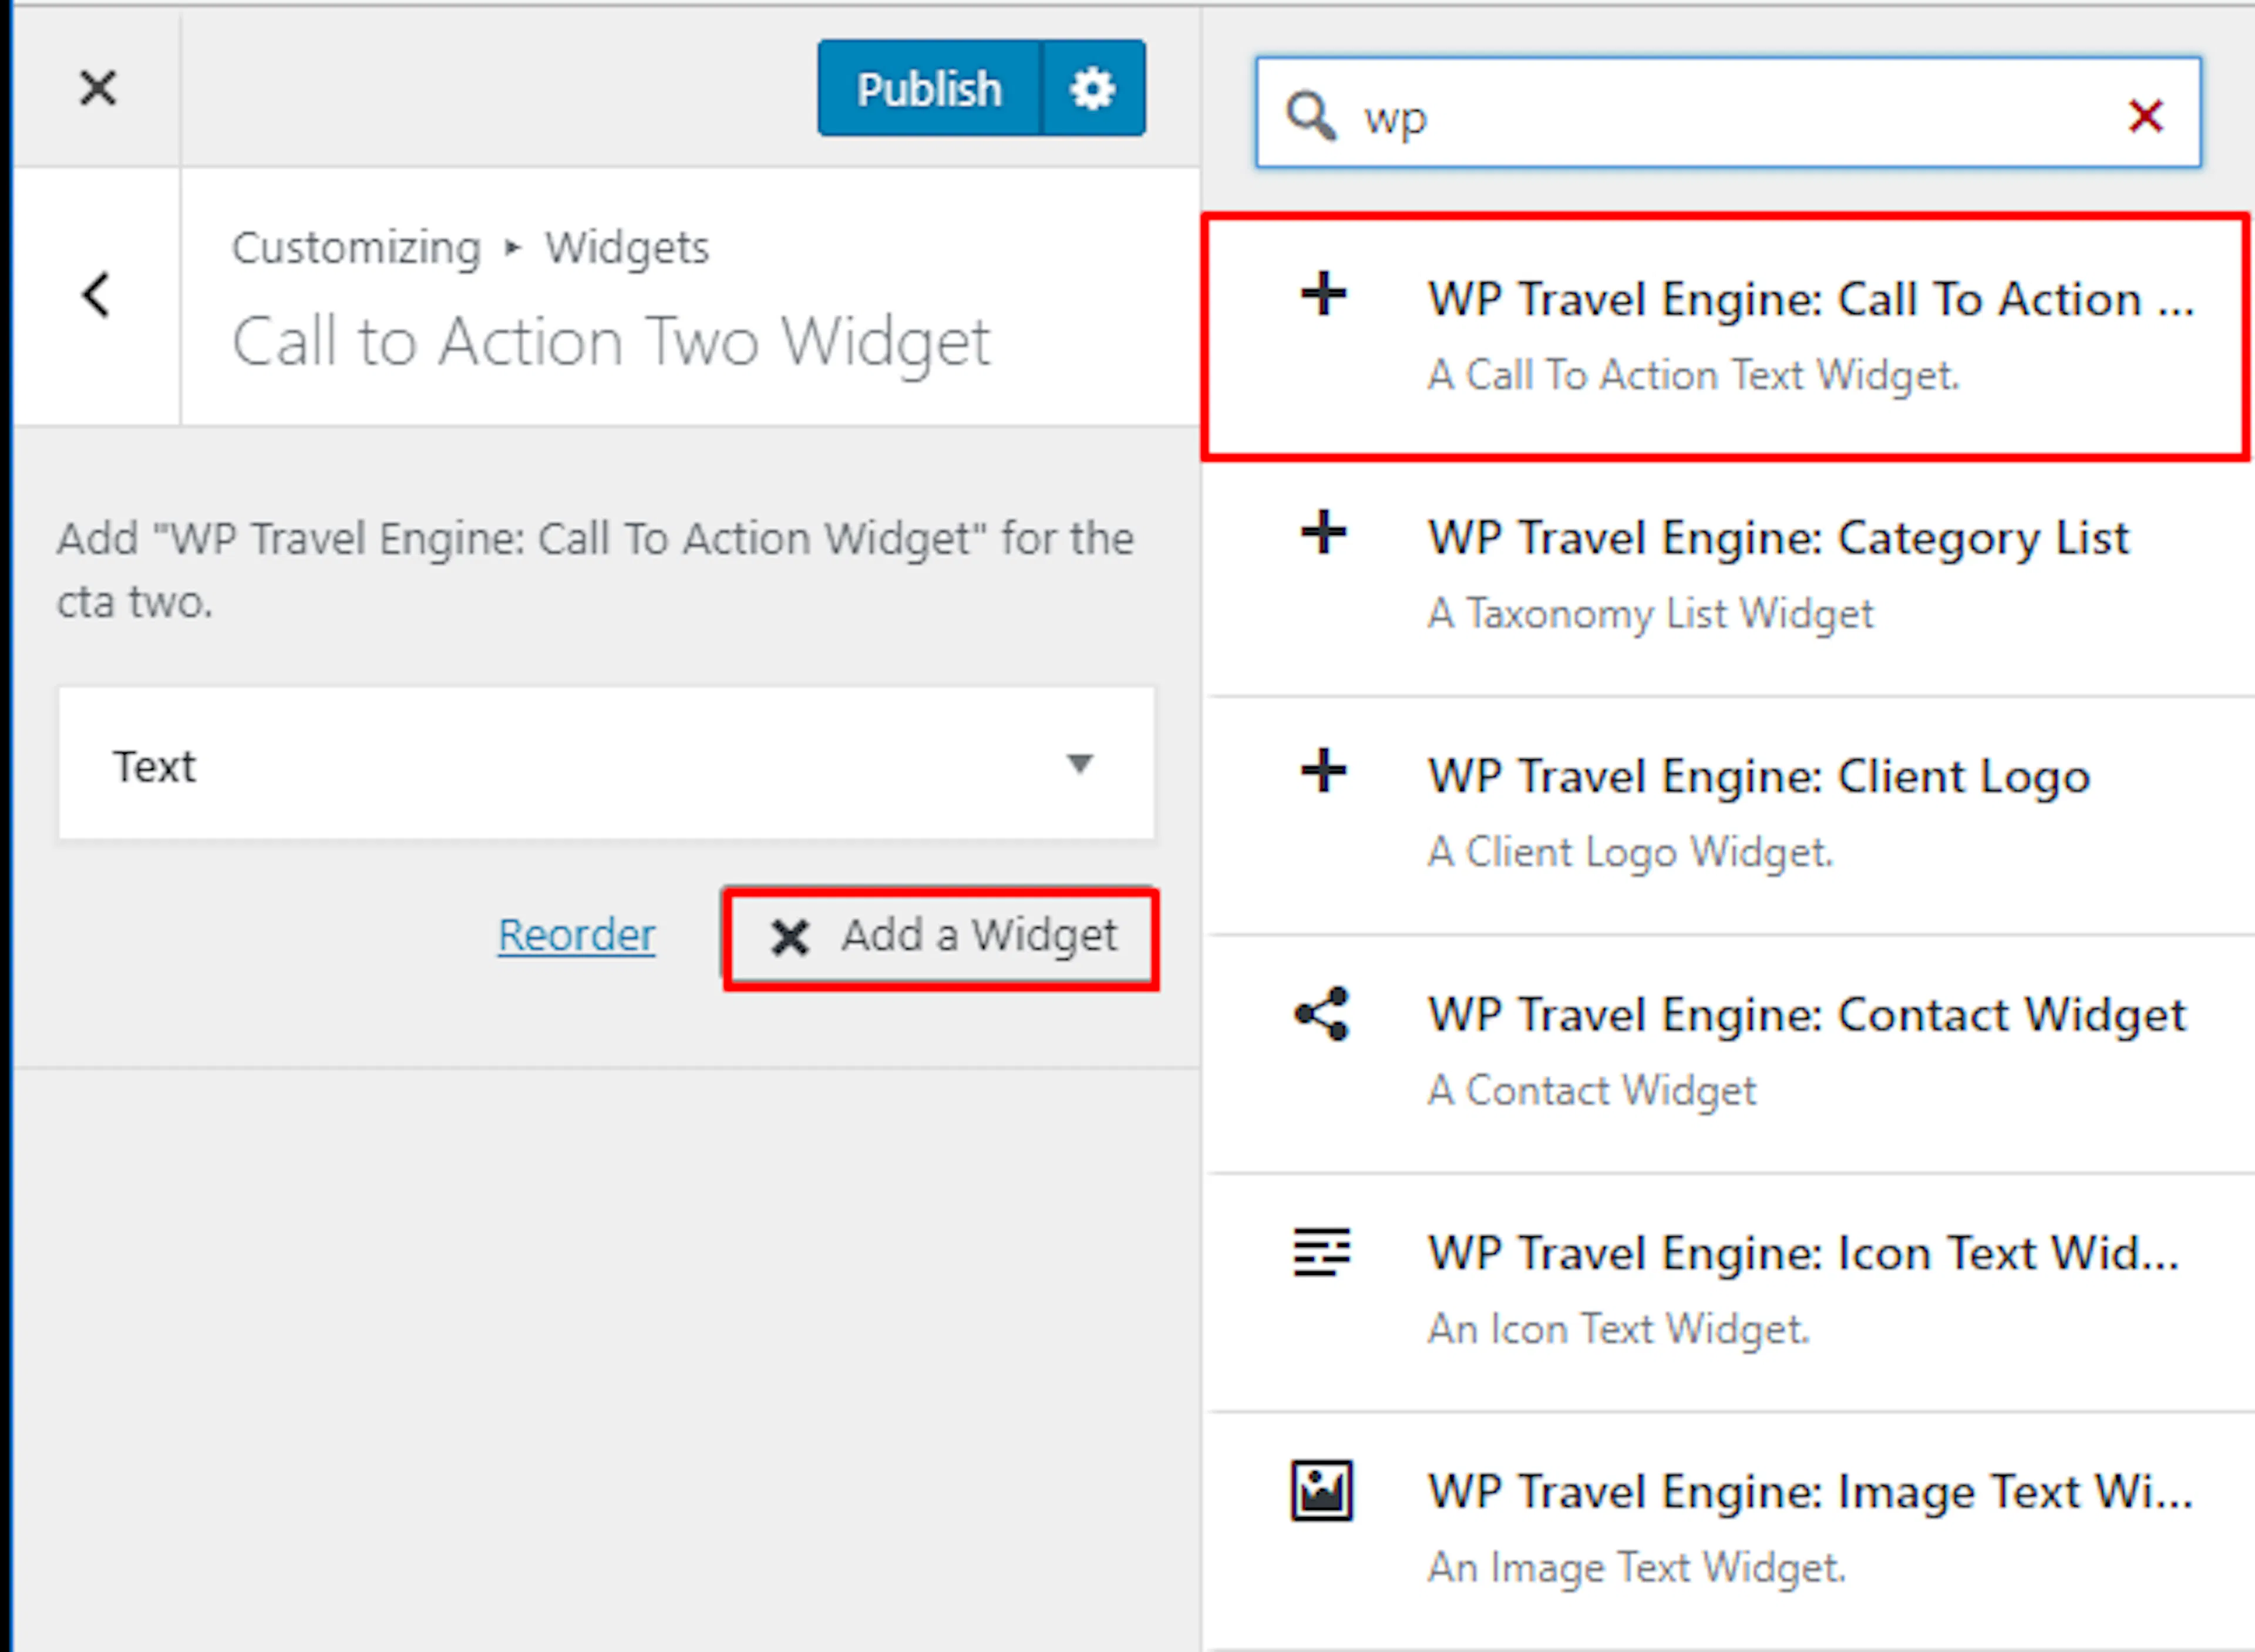
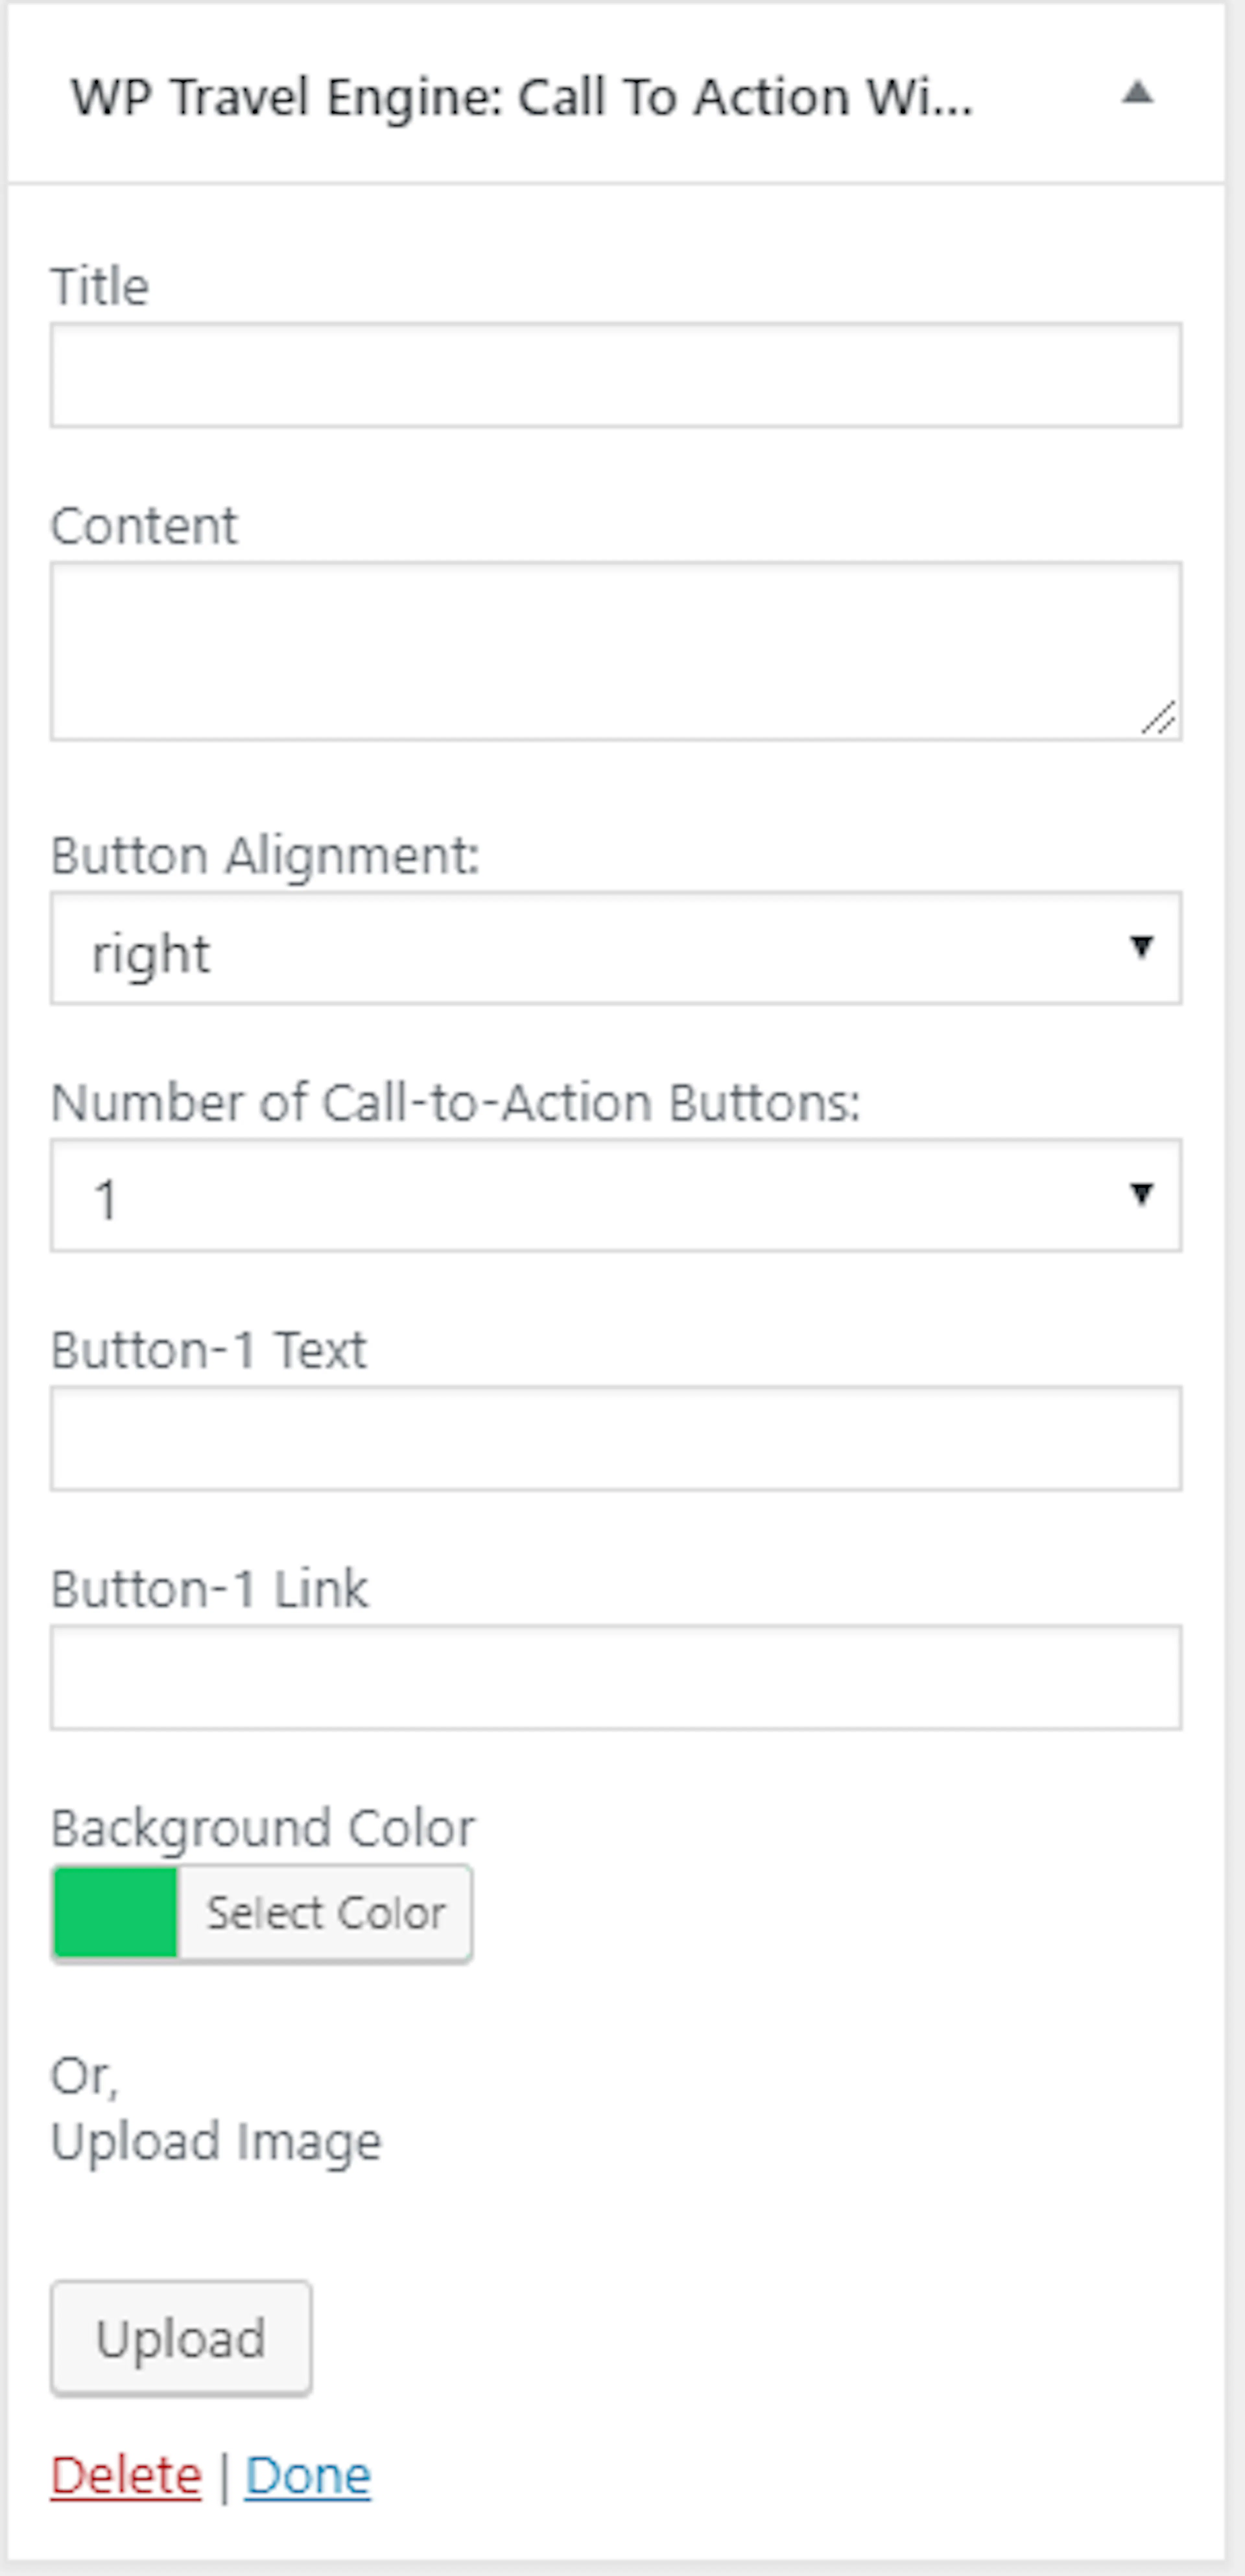
Add the call to action details
Enter a title and content. Choose the button alignment and the number of buttons. Enter the button text and button link. Choose a background color or image.
Publish the section
Click Publish.
Deals section
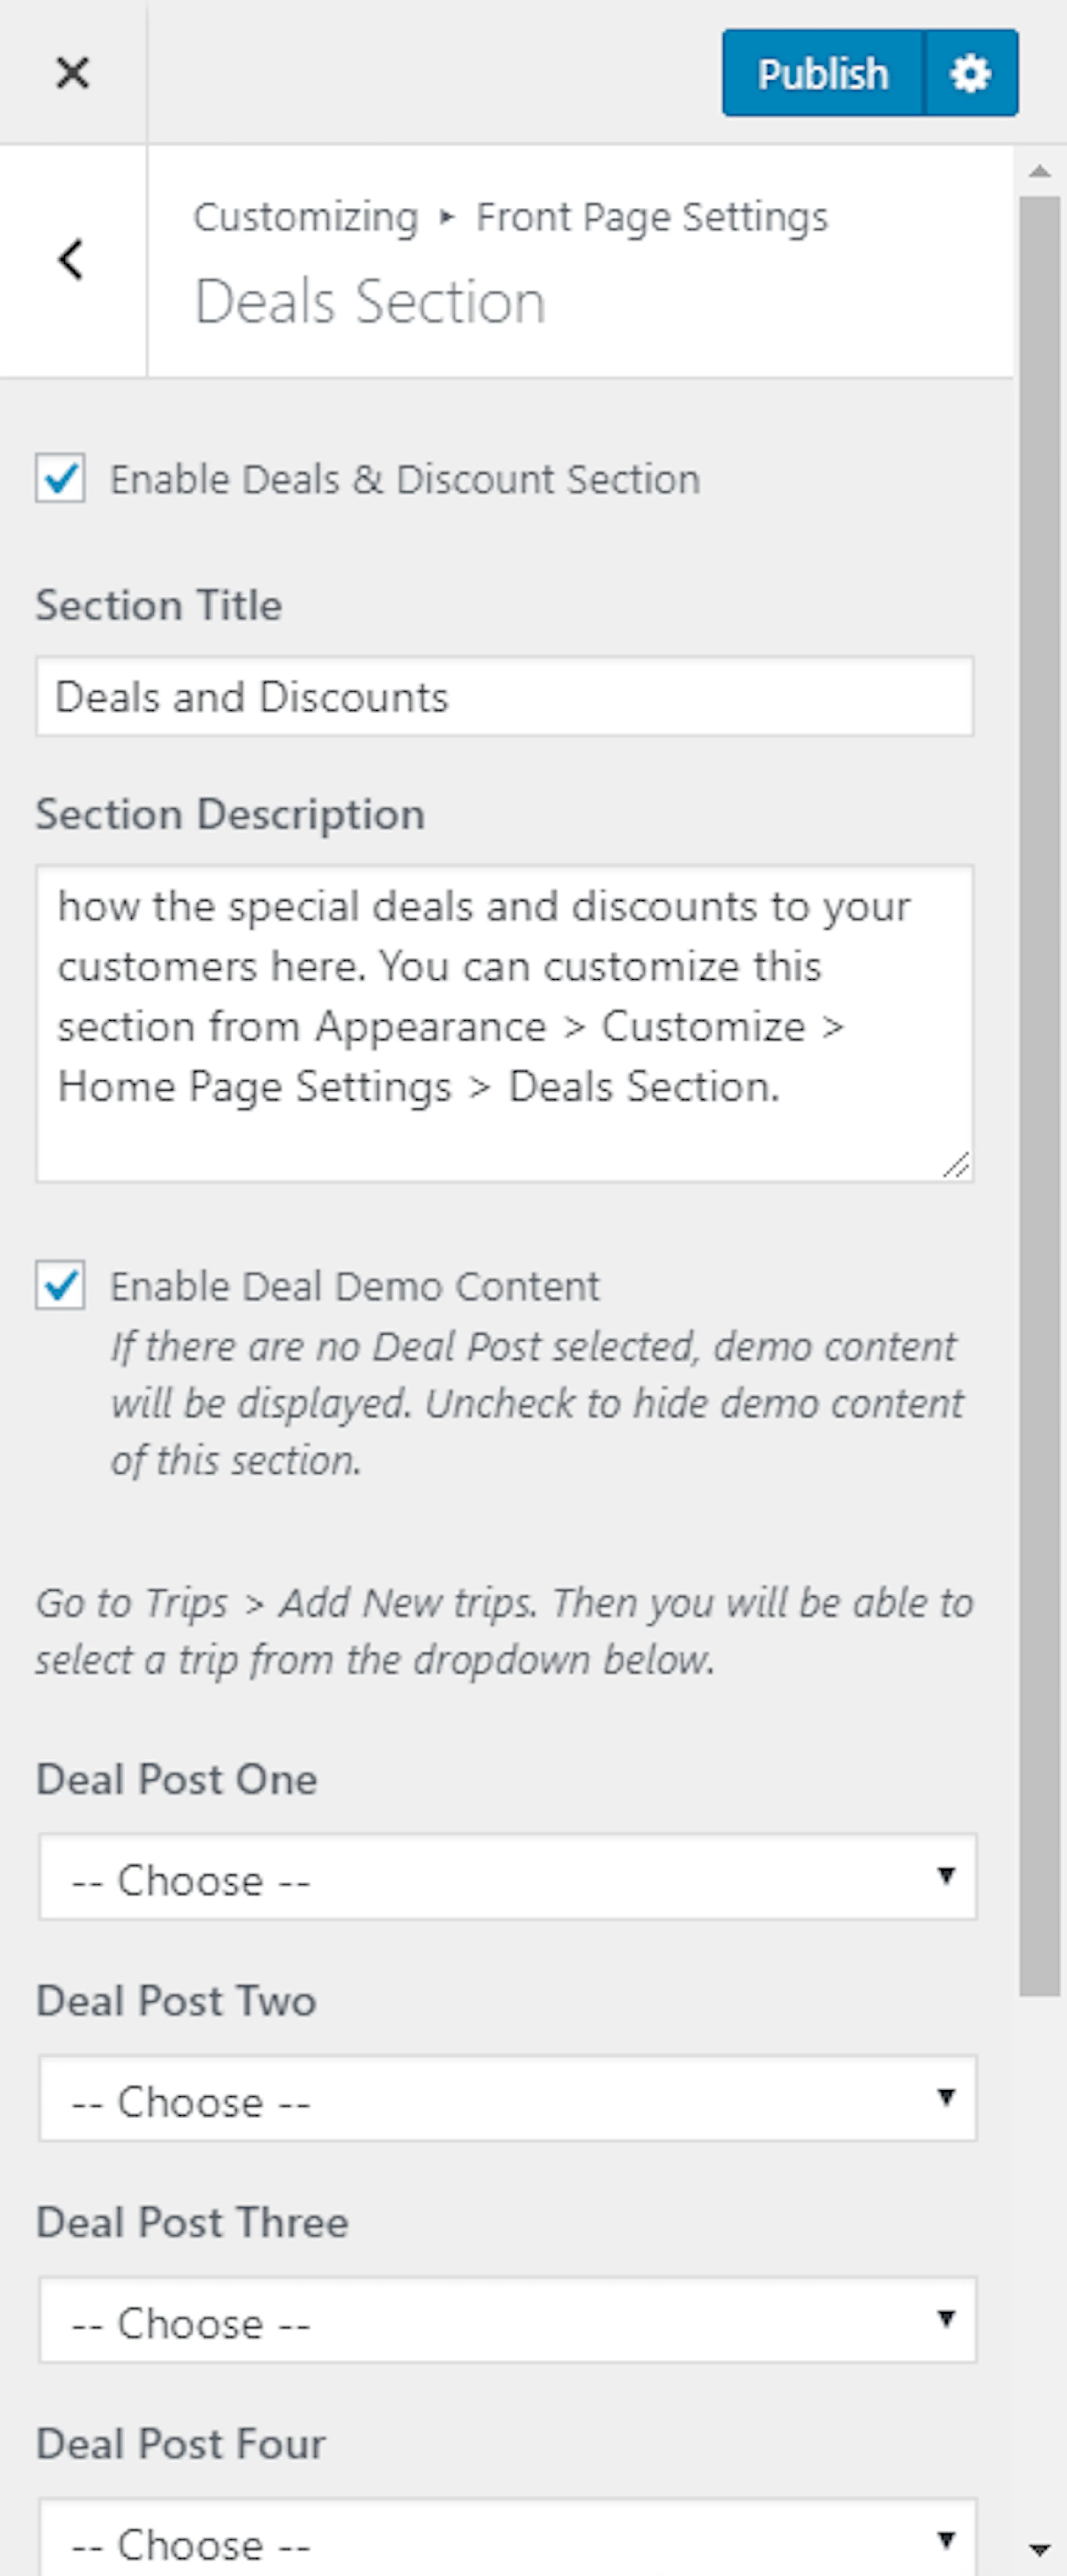
The Deals section highlights trips with special prices or discounts. Use it for seasonal pricing, early booking offers, or group discounts.
Add your trips before setting up this section.
Open Deals Packages
Go to Appearance > Customize > Front Page Settings > Deals Packages.
Enable the deals section
Check Enable Deal and Discount Section.
Add the section title and description
Enter the Section Title and description.
Hide the demo content
Uncheck Enable Deal Demo Content to hide the sample deals.
Choose your deal trips
Choose Deal Post One, Deal Post Two, Deal Post Three, and Deal Post Four. Select your trips from the dropdowns.
Add the section links
Enter the Read More Label, View All Label, and View All URL.
Publish the section
Click Publish.
Destination section
The Destination section displays the places you serve. Examples include Nepal, Bhutan, and India.
Add destinations before setting up this section. Go to Trips > Add New > Add destination to create them.
Open the Destination Section
Go to Appearance > Customize > Front Page Settings > Destination Section.
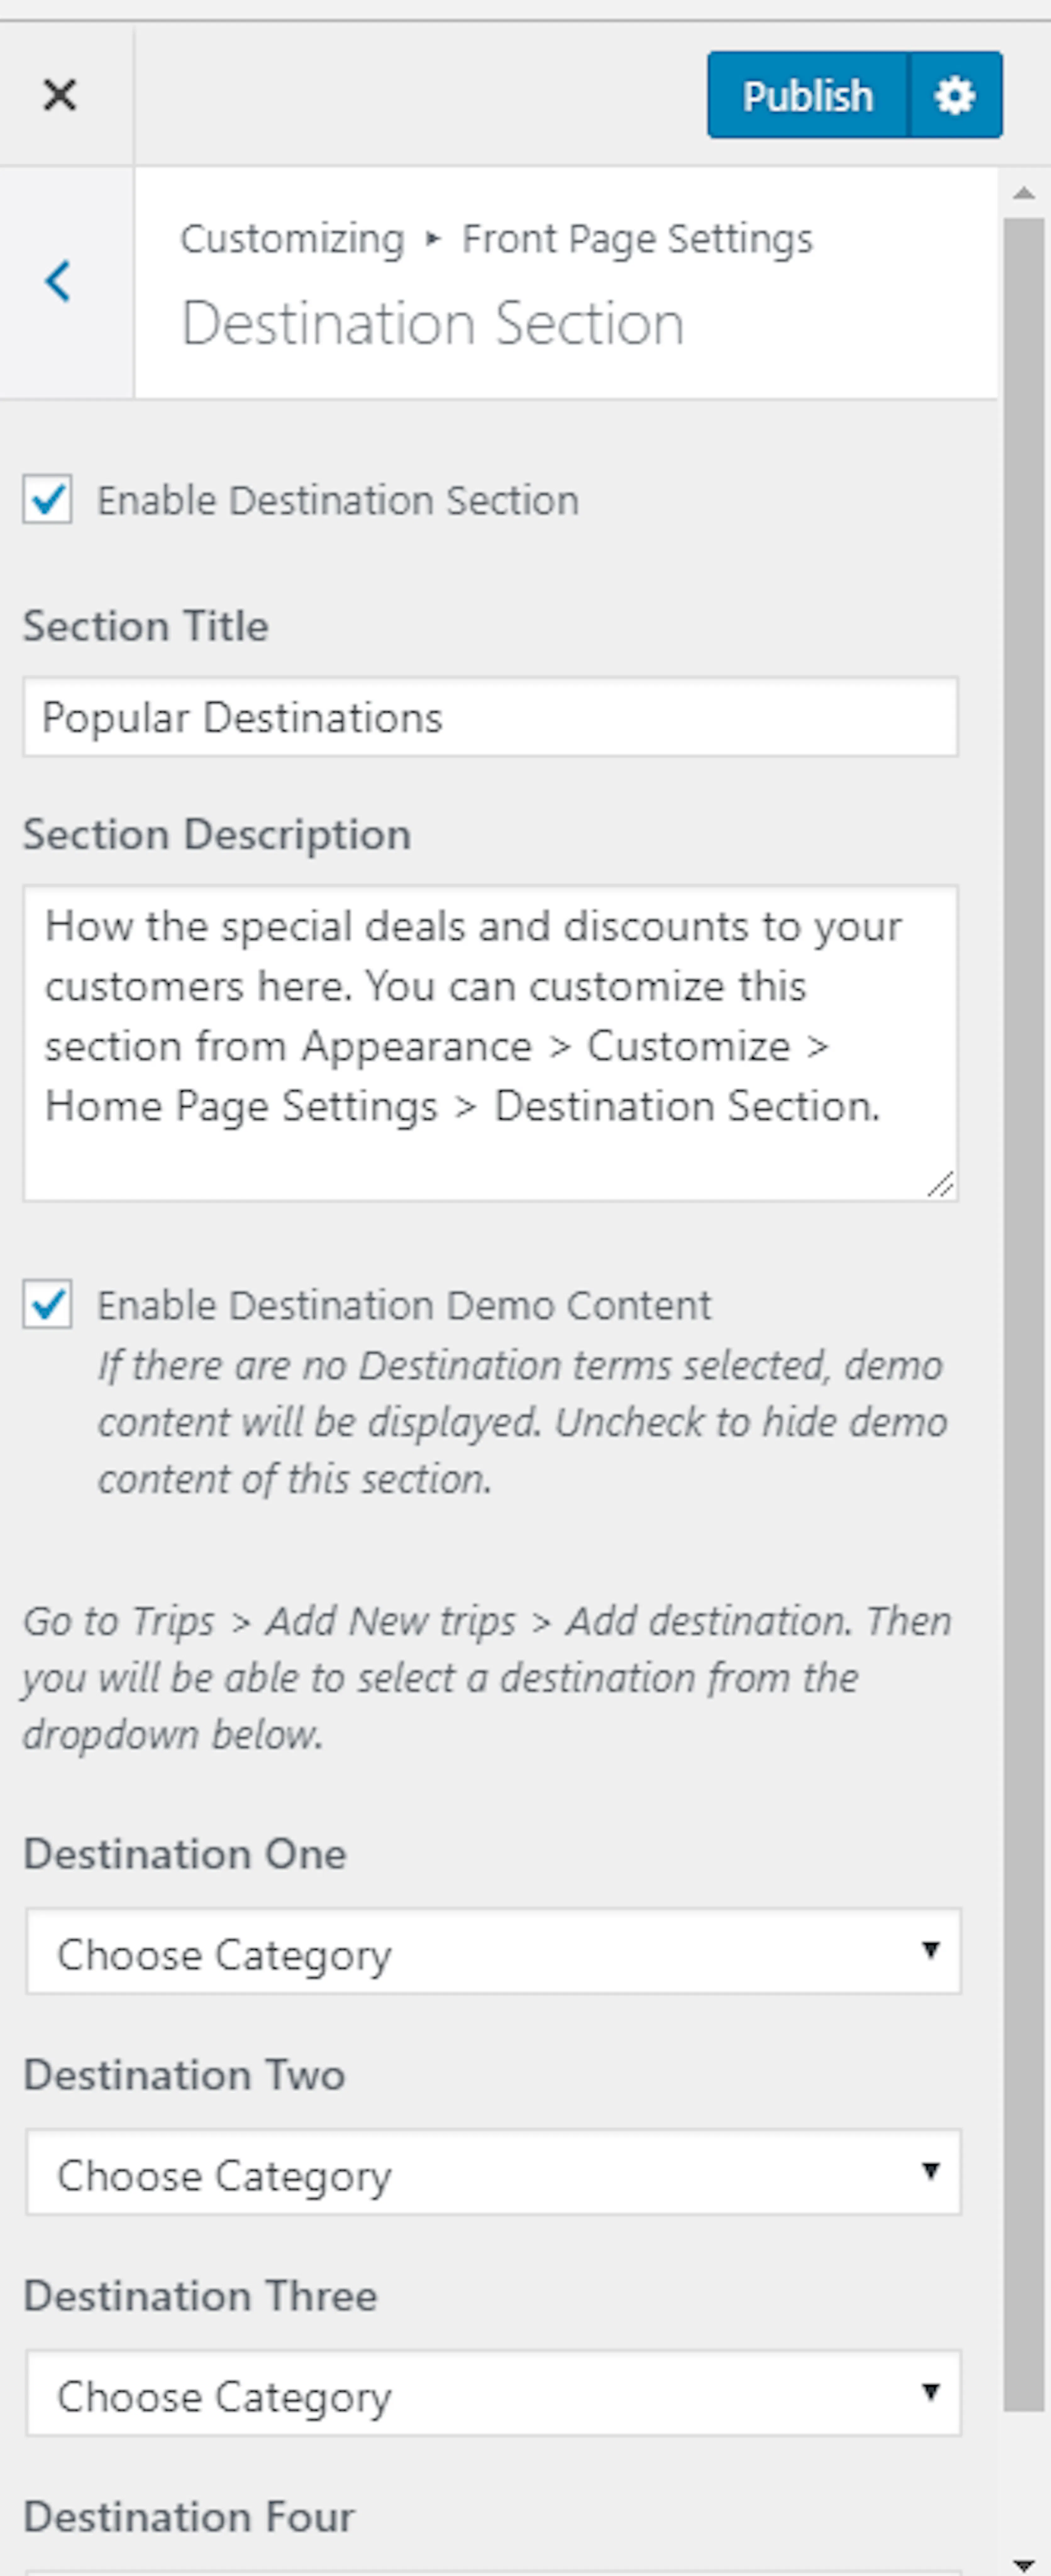
Enable the section
Check Enable Destination Section.
Add the section title and description
Enter the Section Title and description.
Hide the demo content
Uncheck Enable Destination Demo Content to hide the sample destinations.
Choose your destinations
Choose Destination One, Destination Two, Destination Three, and Destination Four.
Publish the section
Click Publish.
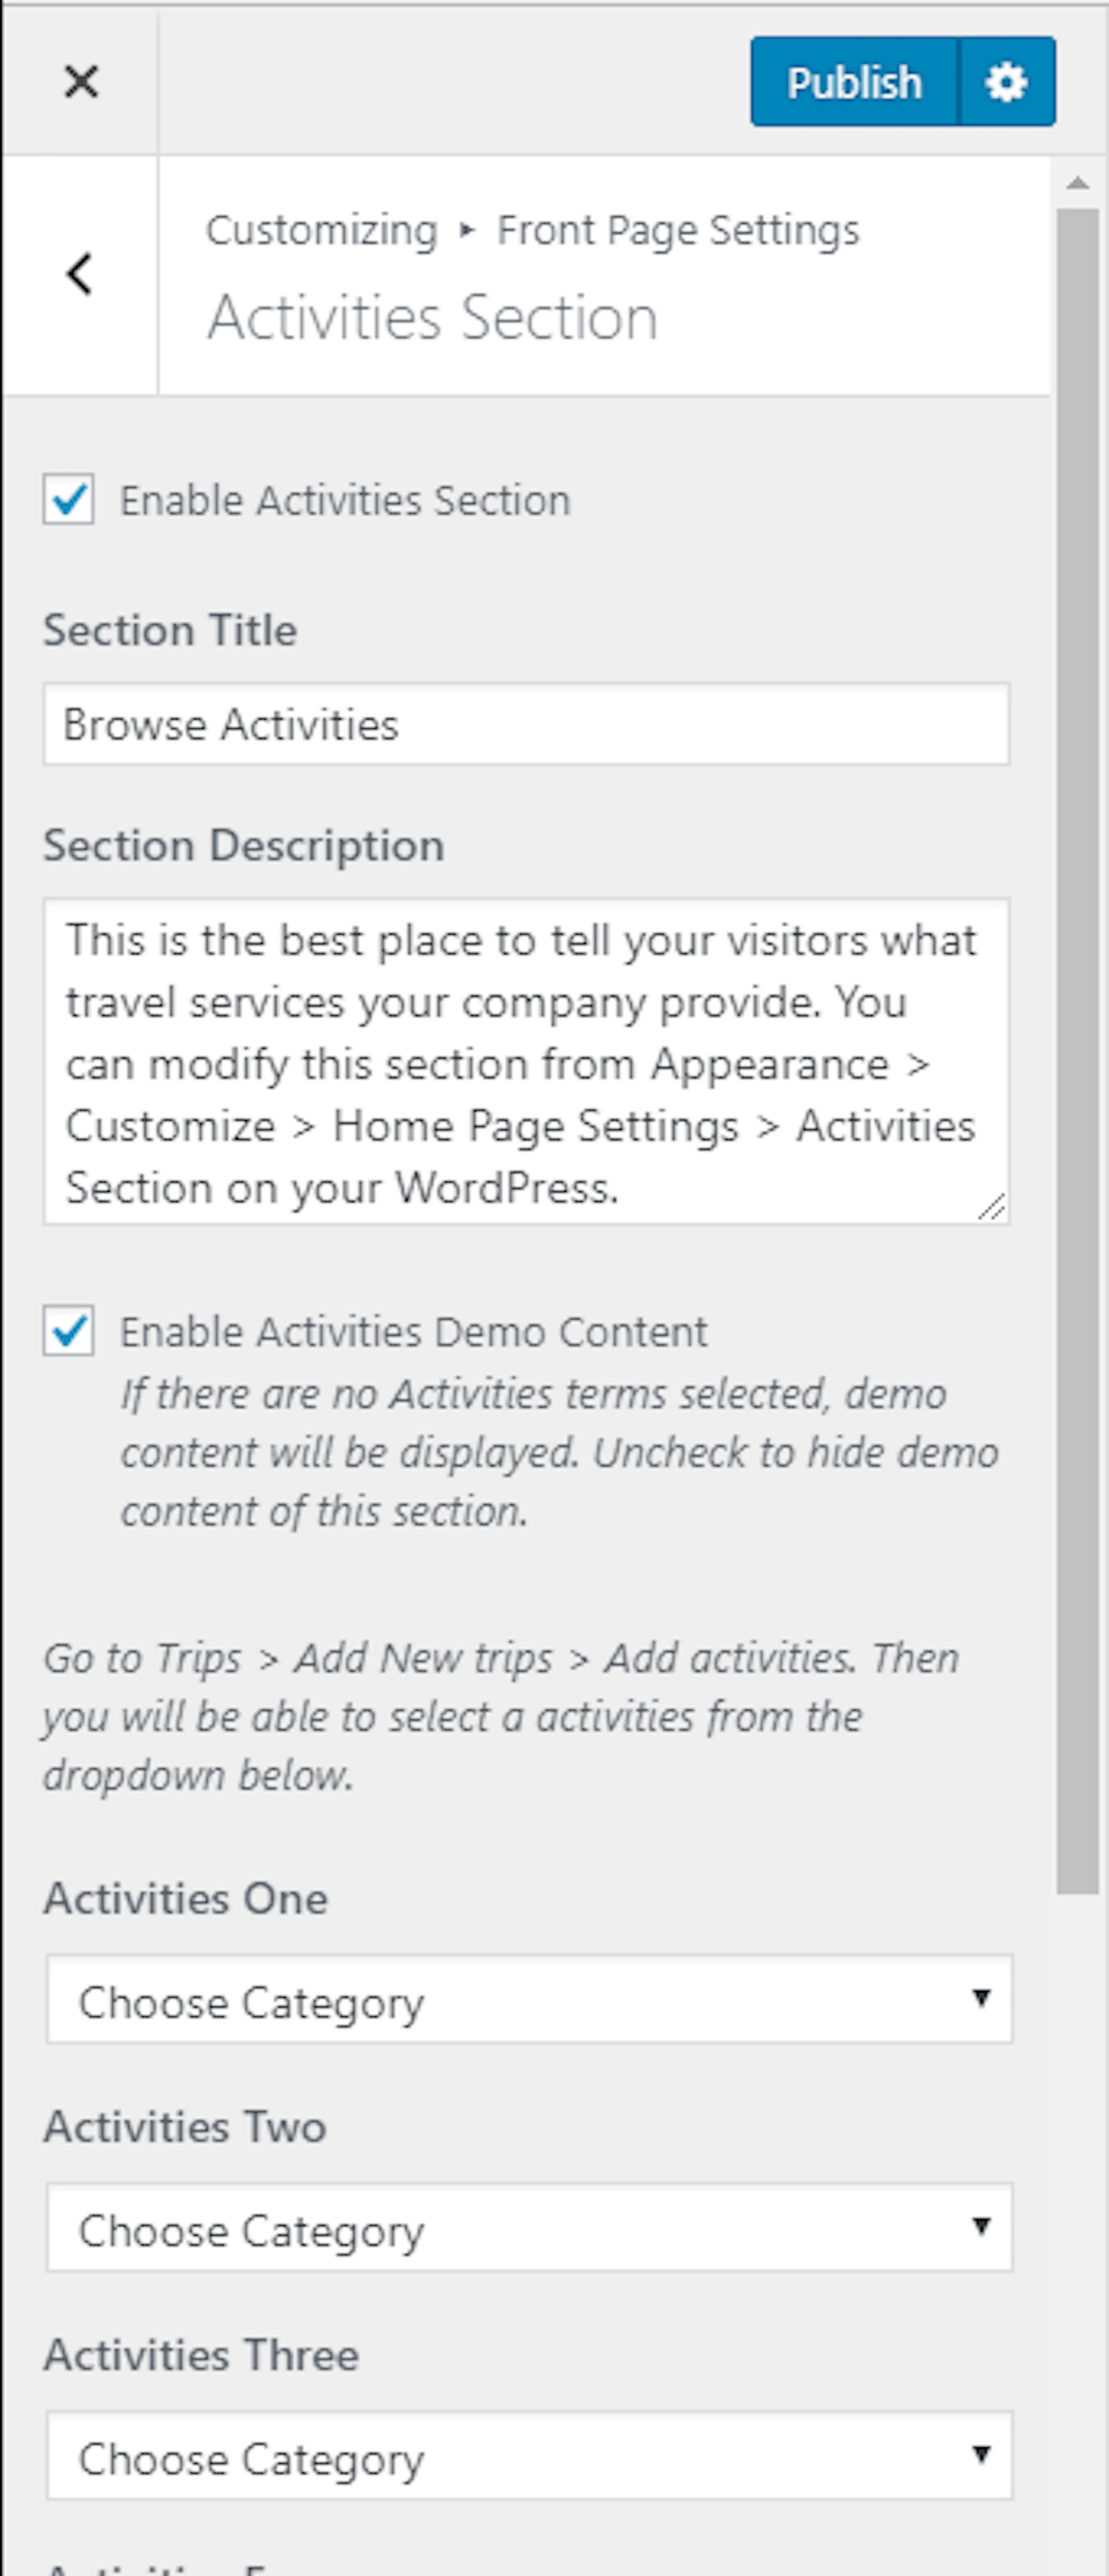
Activities section
The Activities section groups trips by activity type. Examples include trekking, rafting, wildlife tours, and cultural walks.
Add activities before setting up this section. Go to Trips > Add New > Add activities to create them.
Open the Activities Section
Go to Appearance > Customize > Front Page Settings > Activities Section.
Enable the section
Check Enable Activities Section.
Add the section title and description
Enter the Section Title and description.
Hide the demo content
Uncheck Enable Activities Demo Content to hide the sample activities.
Choose your activities
Choose Activities One through Activities Eight. You can display up to eight activities.
Publish the section
Click Publish.
Blog section
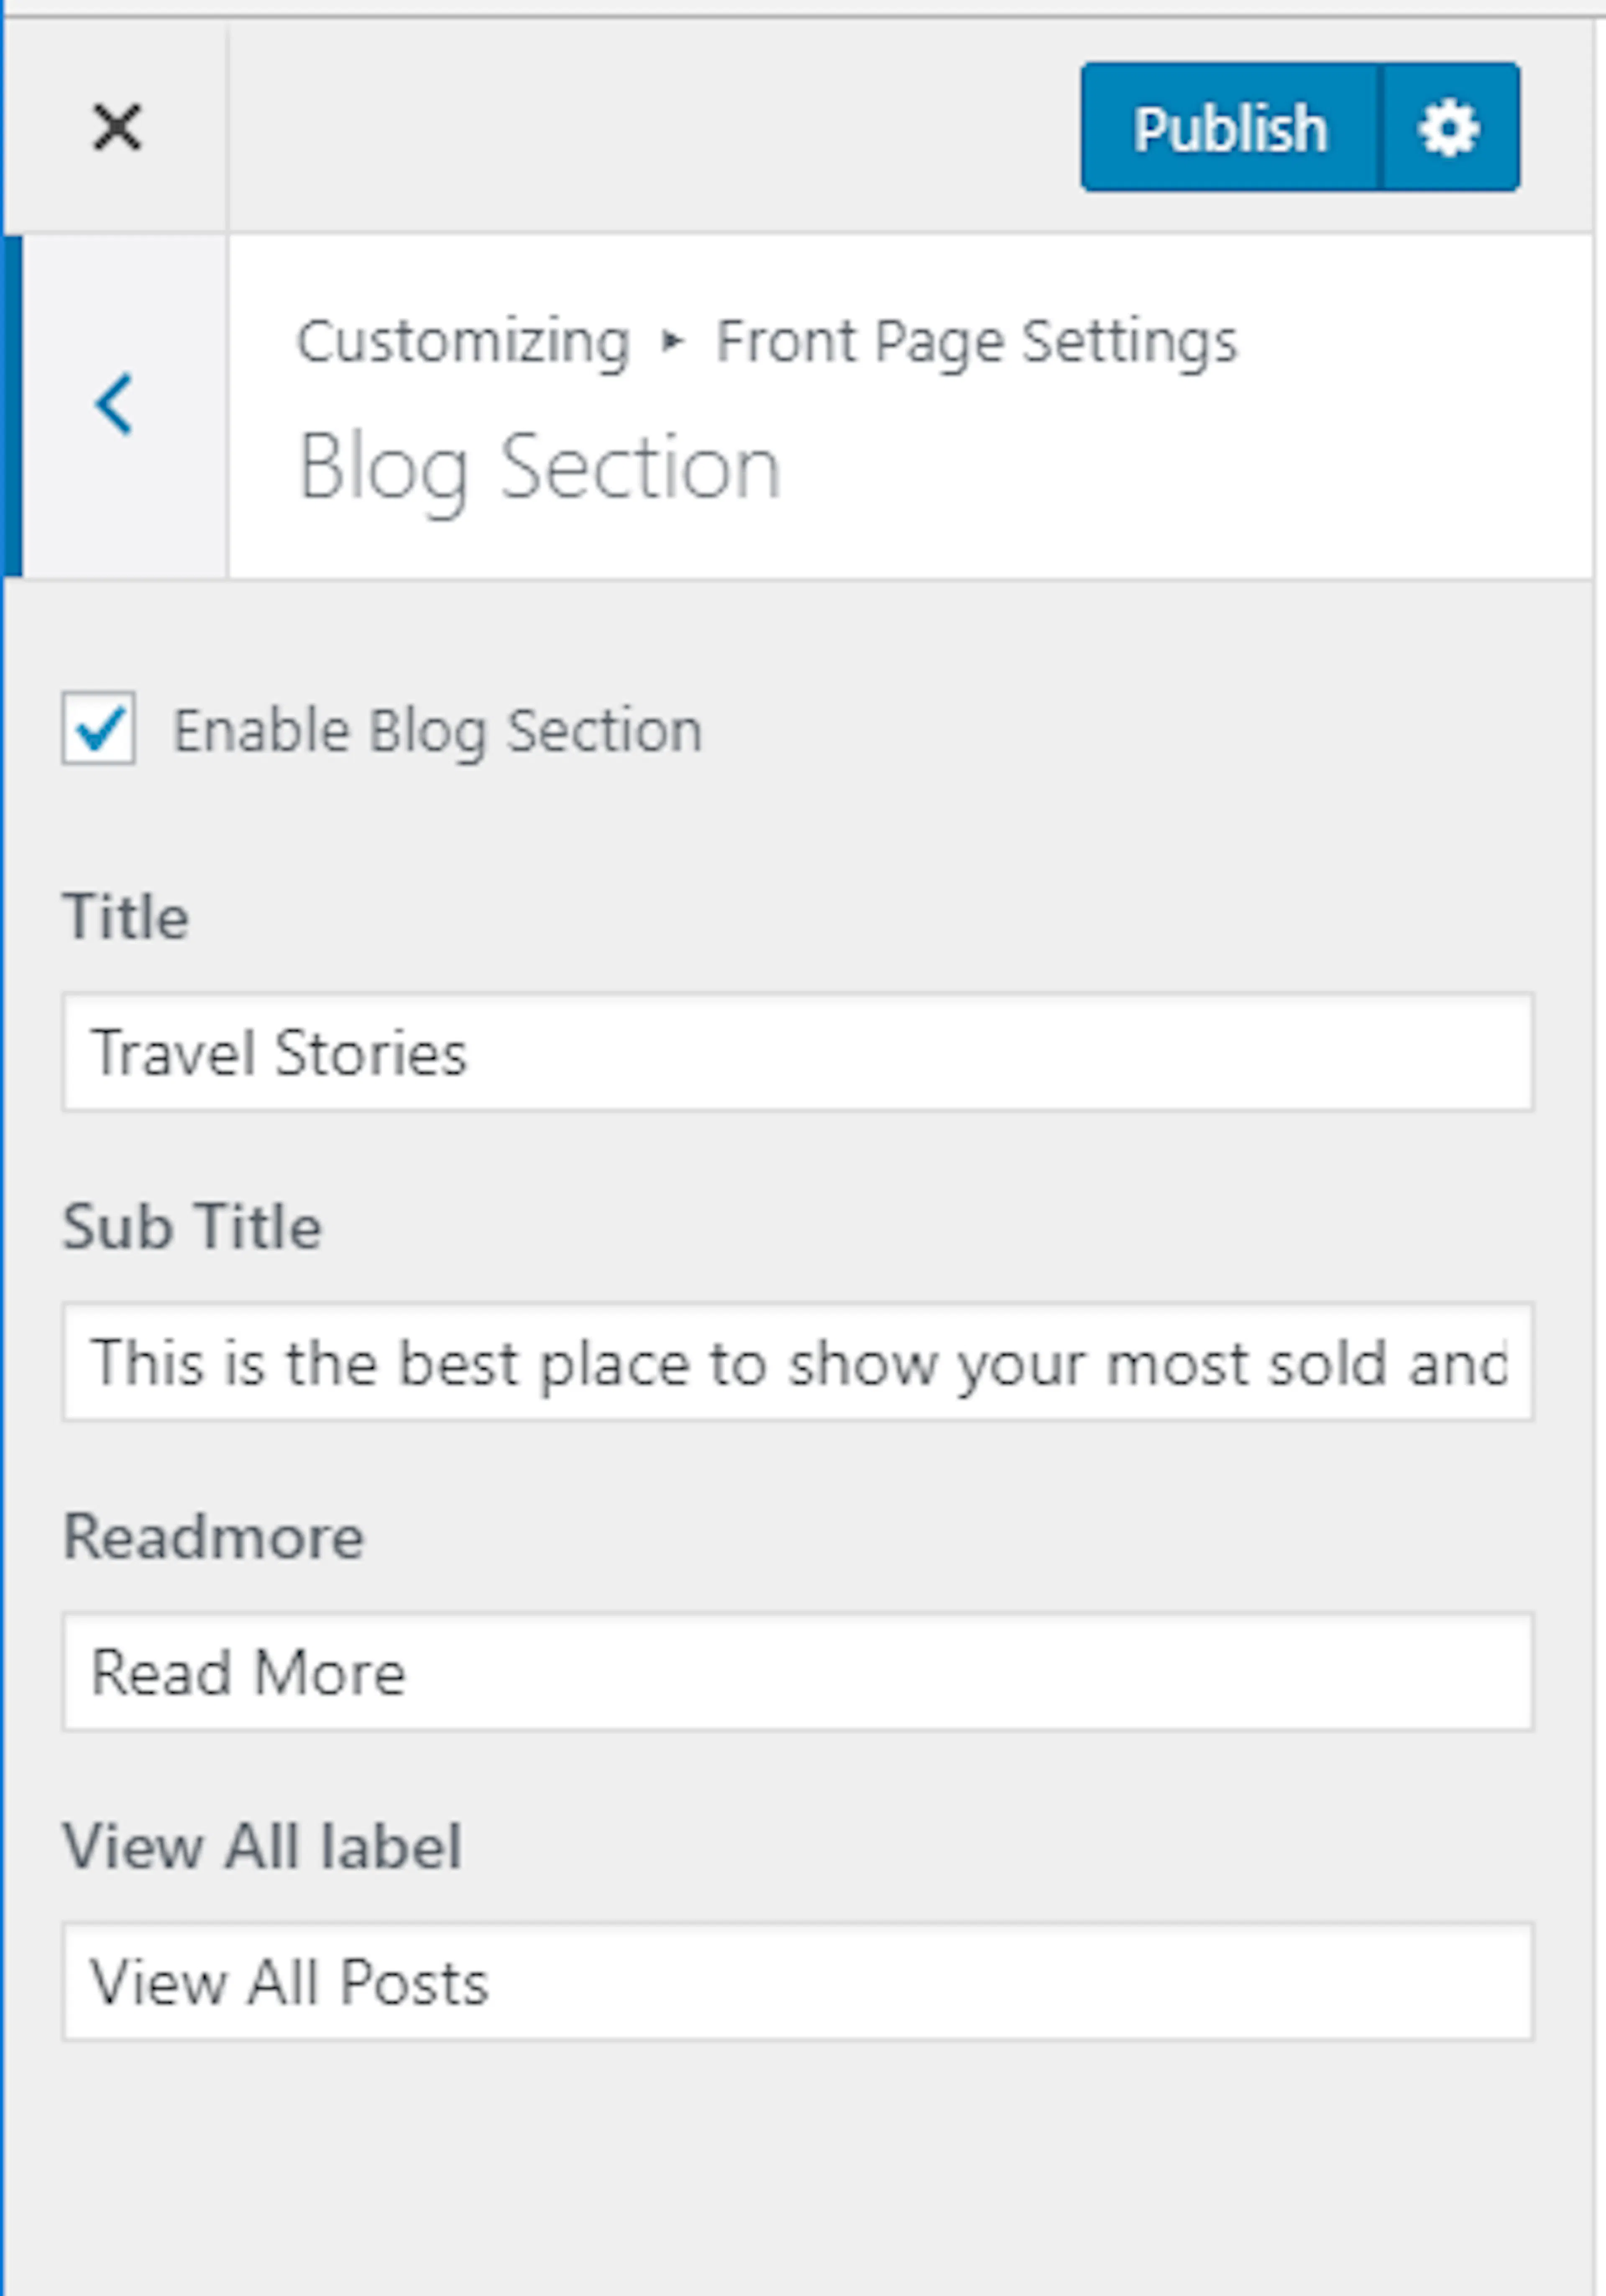
The Blog section displays recent posts on your homepage. Use it for packing advice, destination updates, and travel stories.
Open the Blog Section
Go to Appearance > Customize > Front Page Settings > Blog Section.
Enable the section
Check Enable Blog Section.
Add the section text
Enter the Section Title and Subtitle. Enter the Readmore text and View all Label.
Publish the section
Click Publish.
Your homepage sections are now set up. The next settings control your blog, search-friendly page paths, colors, and navigation.
Archive page settings
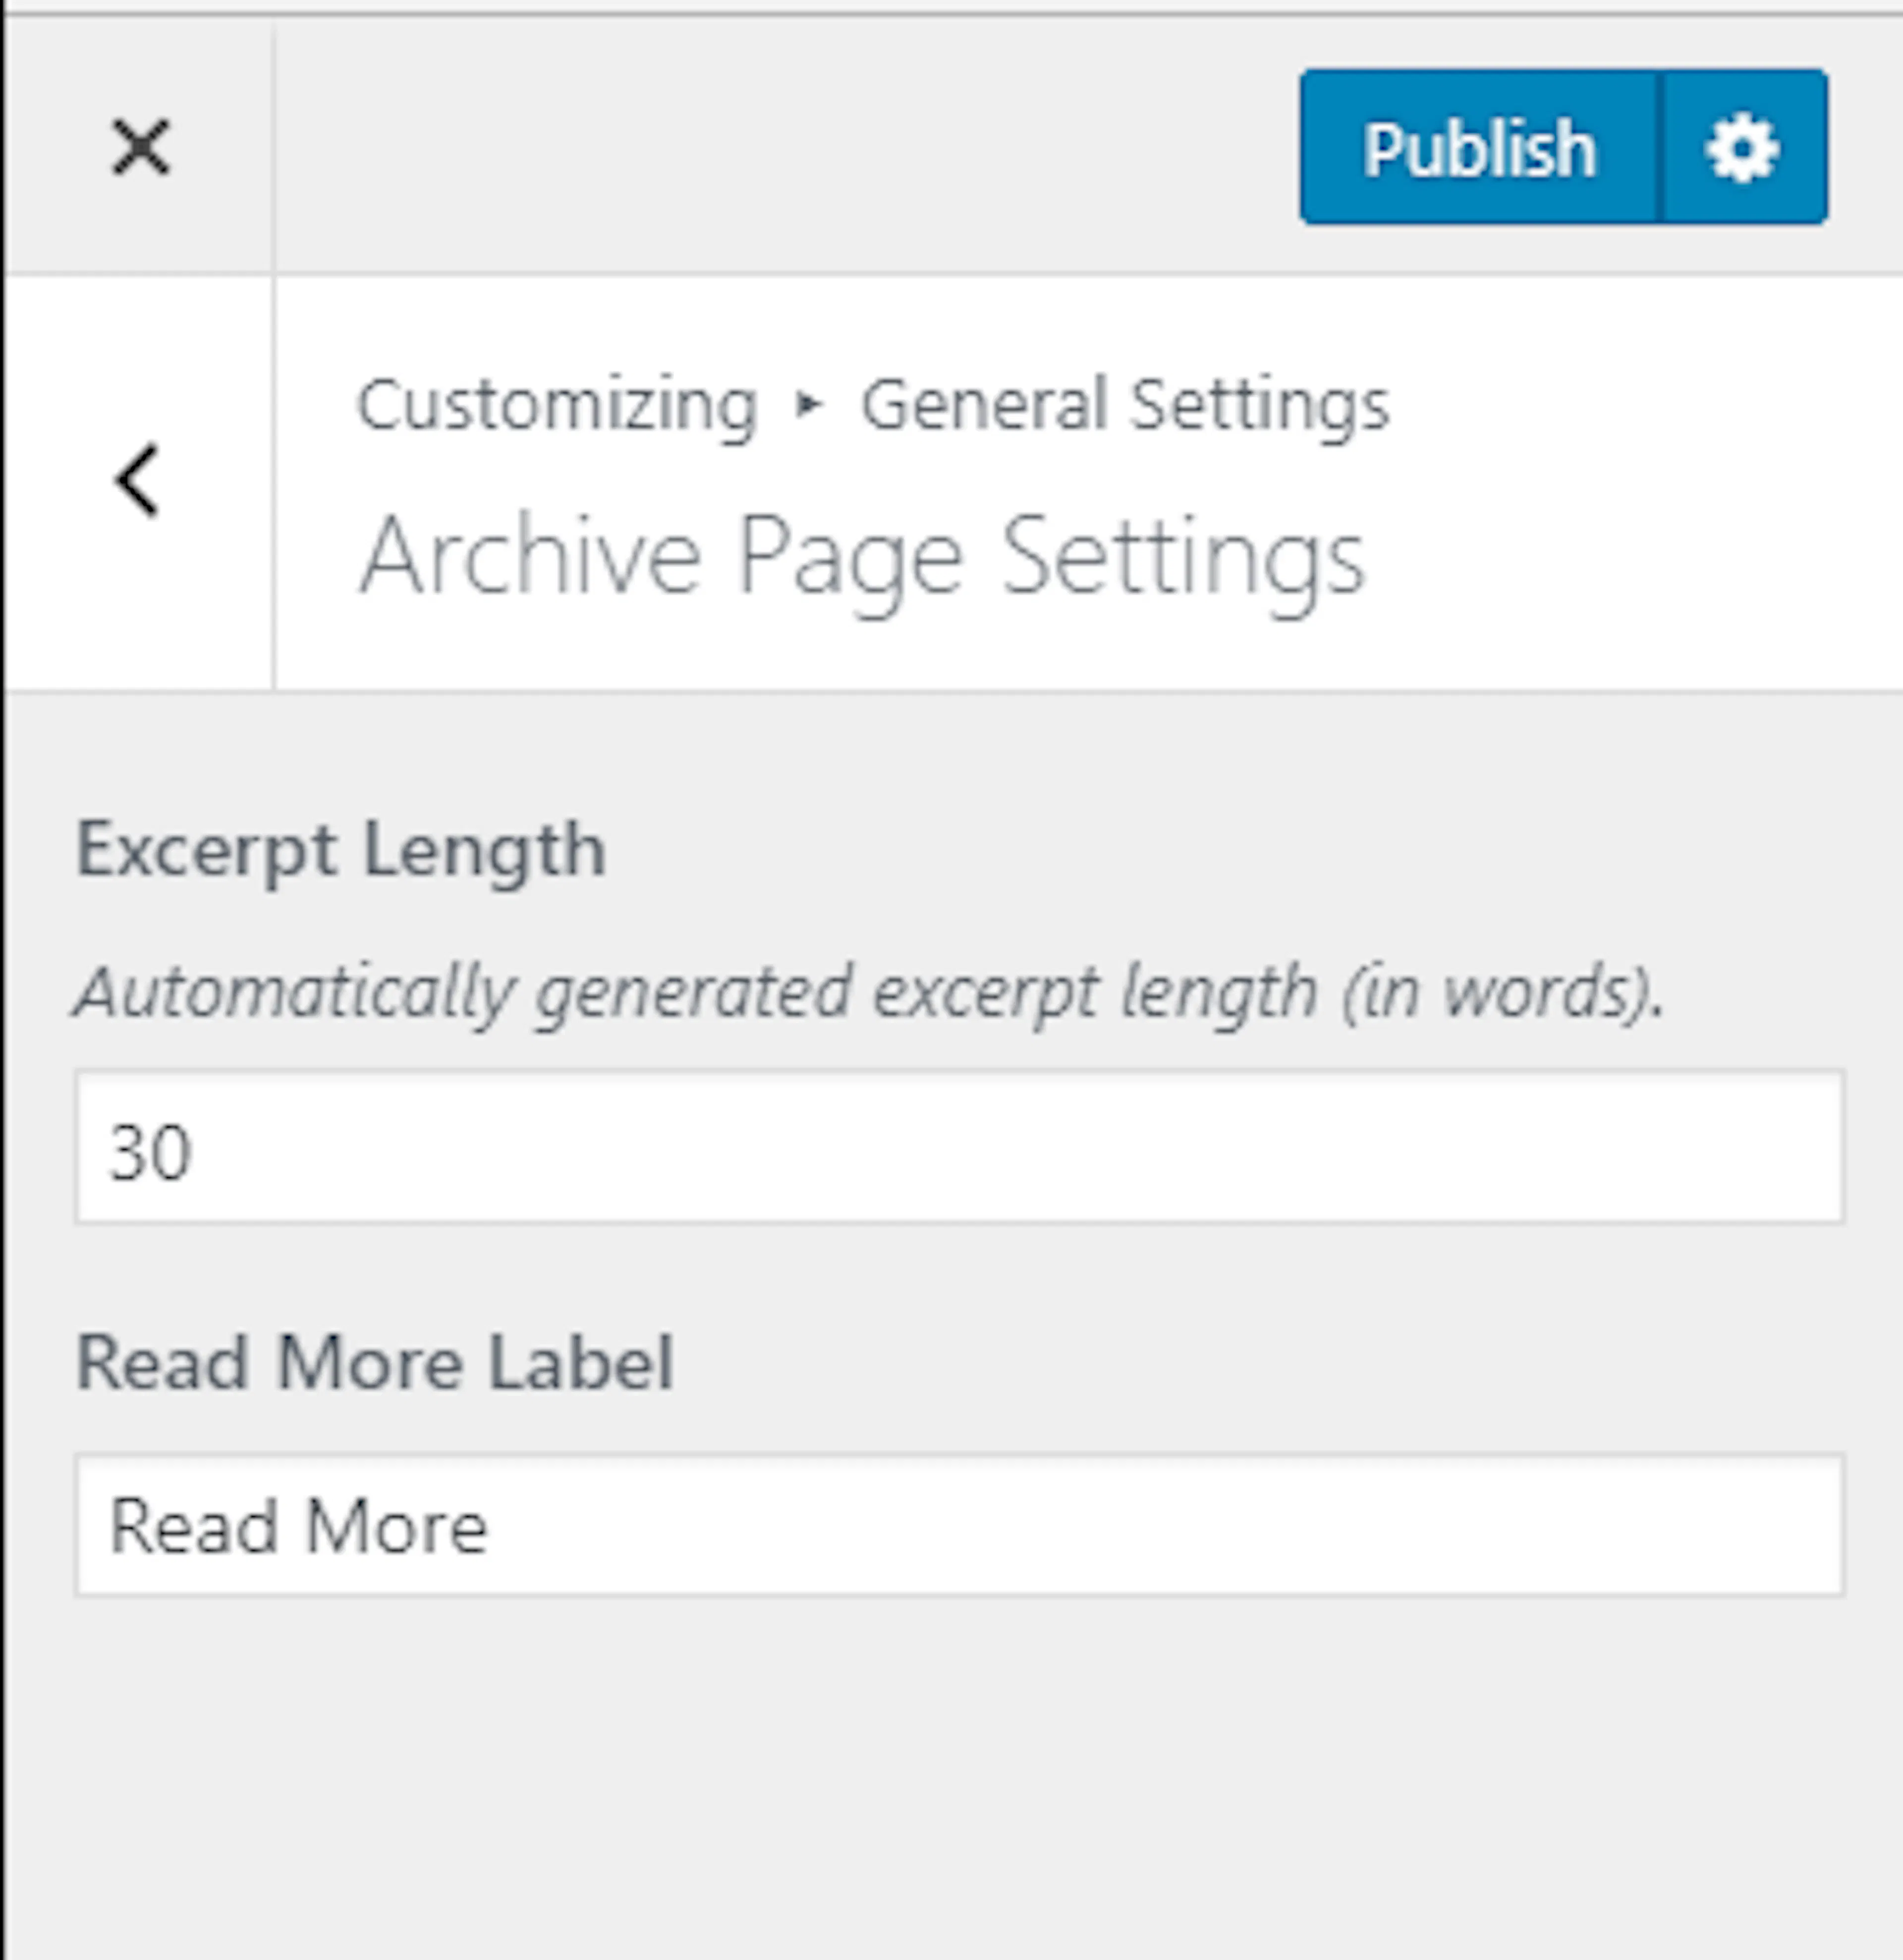
An archive page lists related content, such as all your blog posts. An excerpt is a short summary that appears before a visitor opens the full post.
Open the Blog Section settings
Go to Appearance > Customize > General Settings > Blog Section.
Set the excerpt length
Enter the Excerpt Length. This controls how many words appear in each post summary.
Set the read more label
Enter the Readmore Label. This is the text visitors click to open the full post.
Publish the settings
Click Publish.
Post page settings
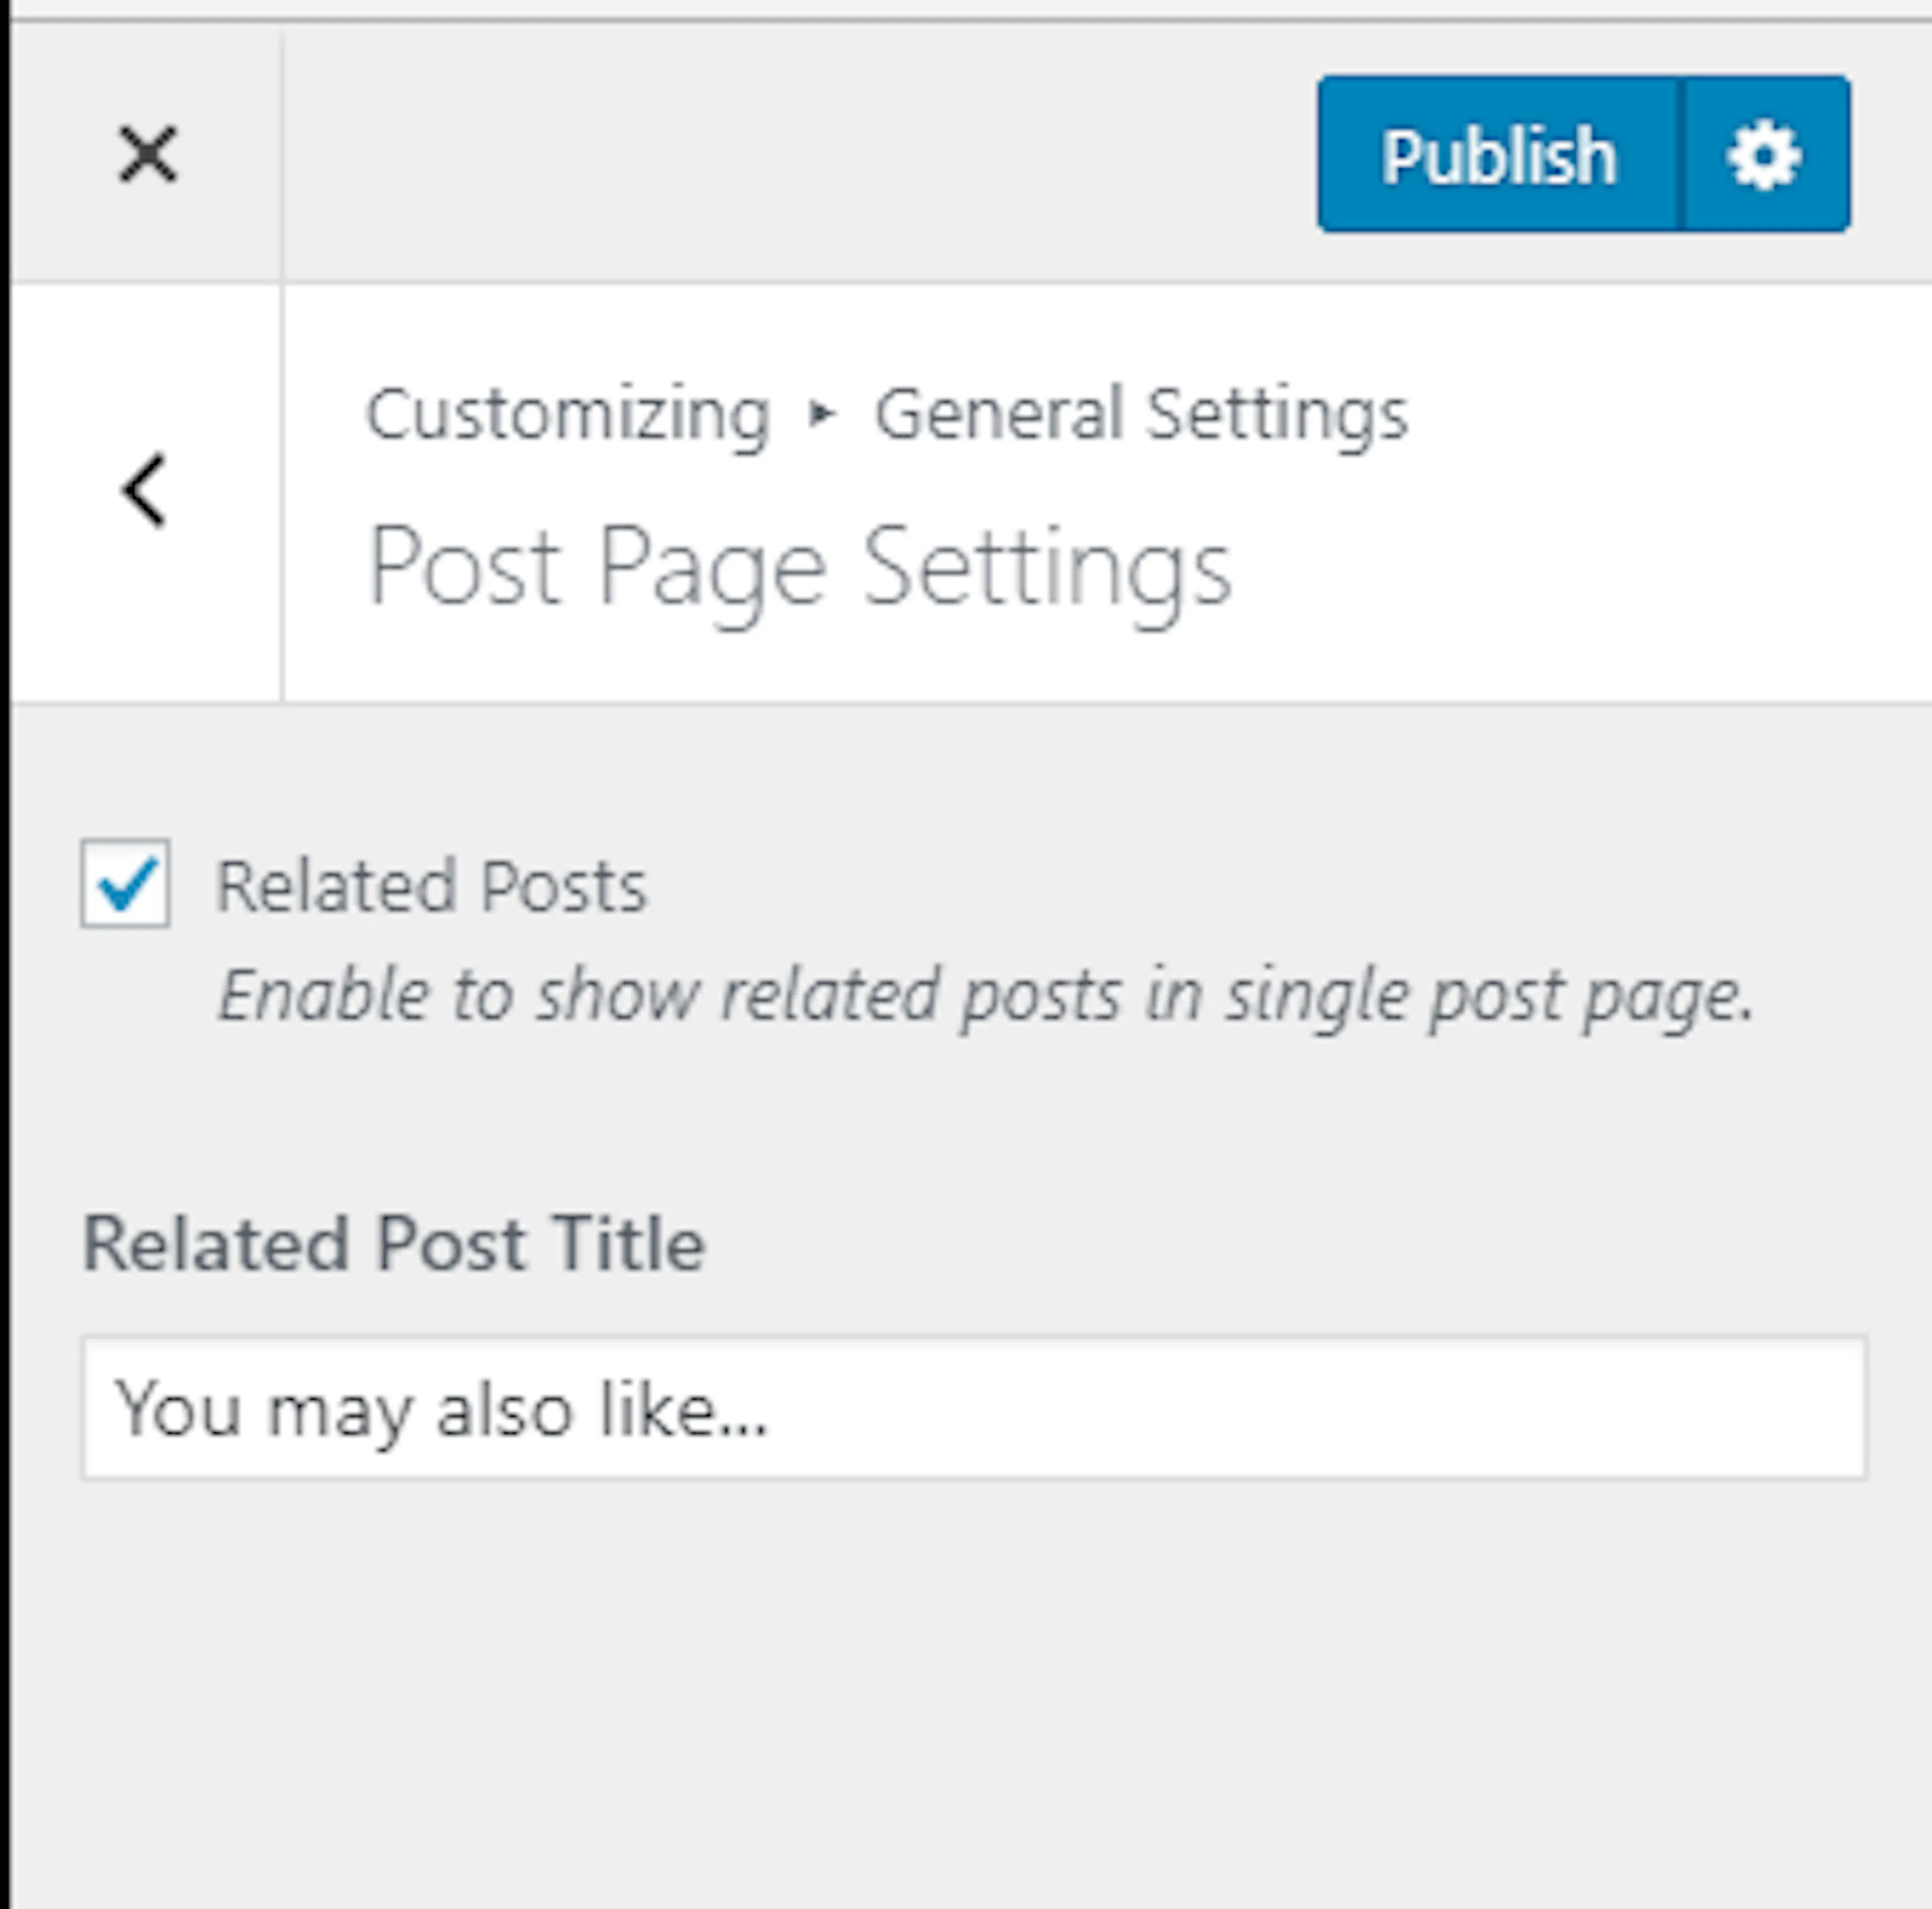
Post Page Settings controls what visitors see when they open one blog post.
Open Post Page Settings
Go to Appearance > Customize > General Settings > Post Page Settings.
Enable related posts
Check Related Posts to show related posts below the article.
Add the related posts title
Enter the Related Posts Title.
Publish the settings
Click Publish.
404 page settings
A 404 page appears when someone visits a page that does not exist. Showing popular trips there gives visitors a way back to your tours.
Open 404 Page Settings
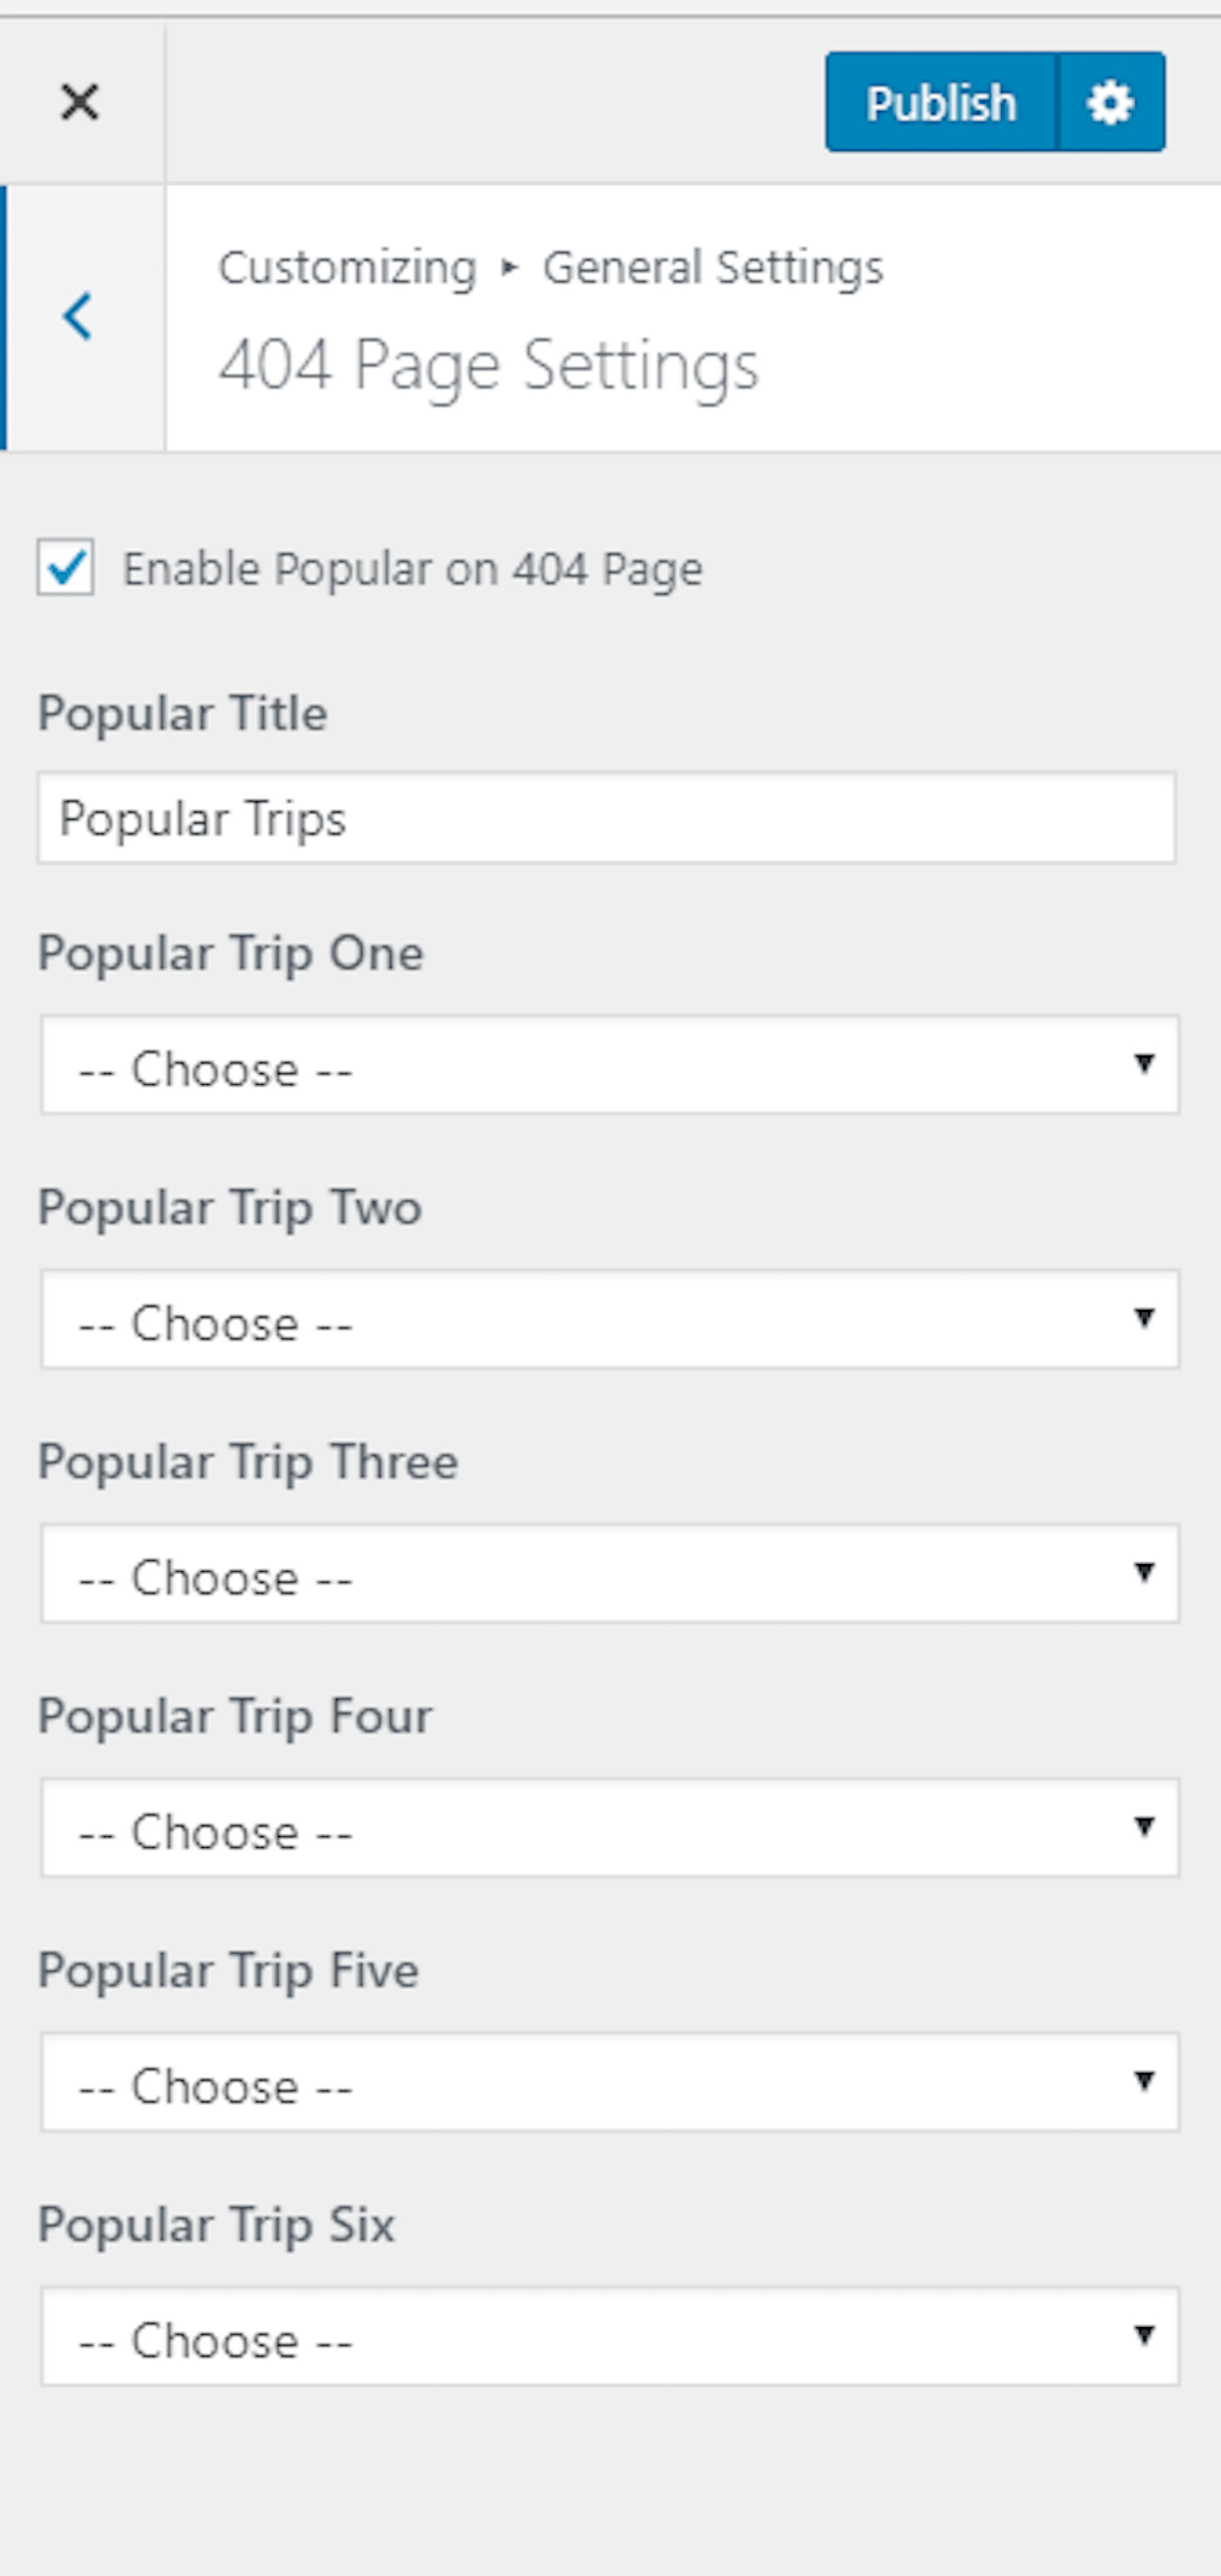
Go to Appearance > Customize > General Settings > 404 Page Settings.
Enable popular trips
Enable Popular Trips in 404 Page.
Choose popular trips
Choose your Popular Trips from the dropdown.
Publish the settings
Click Publish.
SEO settings
Breadcrumbs show a visitor's path from the homepage to the current page. For example, a visitor might see Home > Treks > Annapurna Circuit.
Open SEO Settings
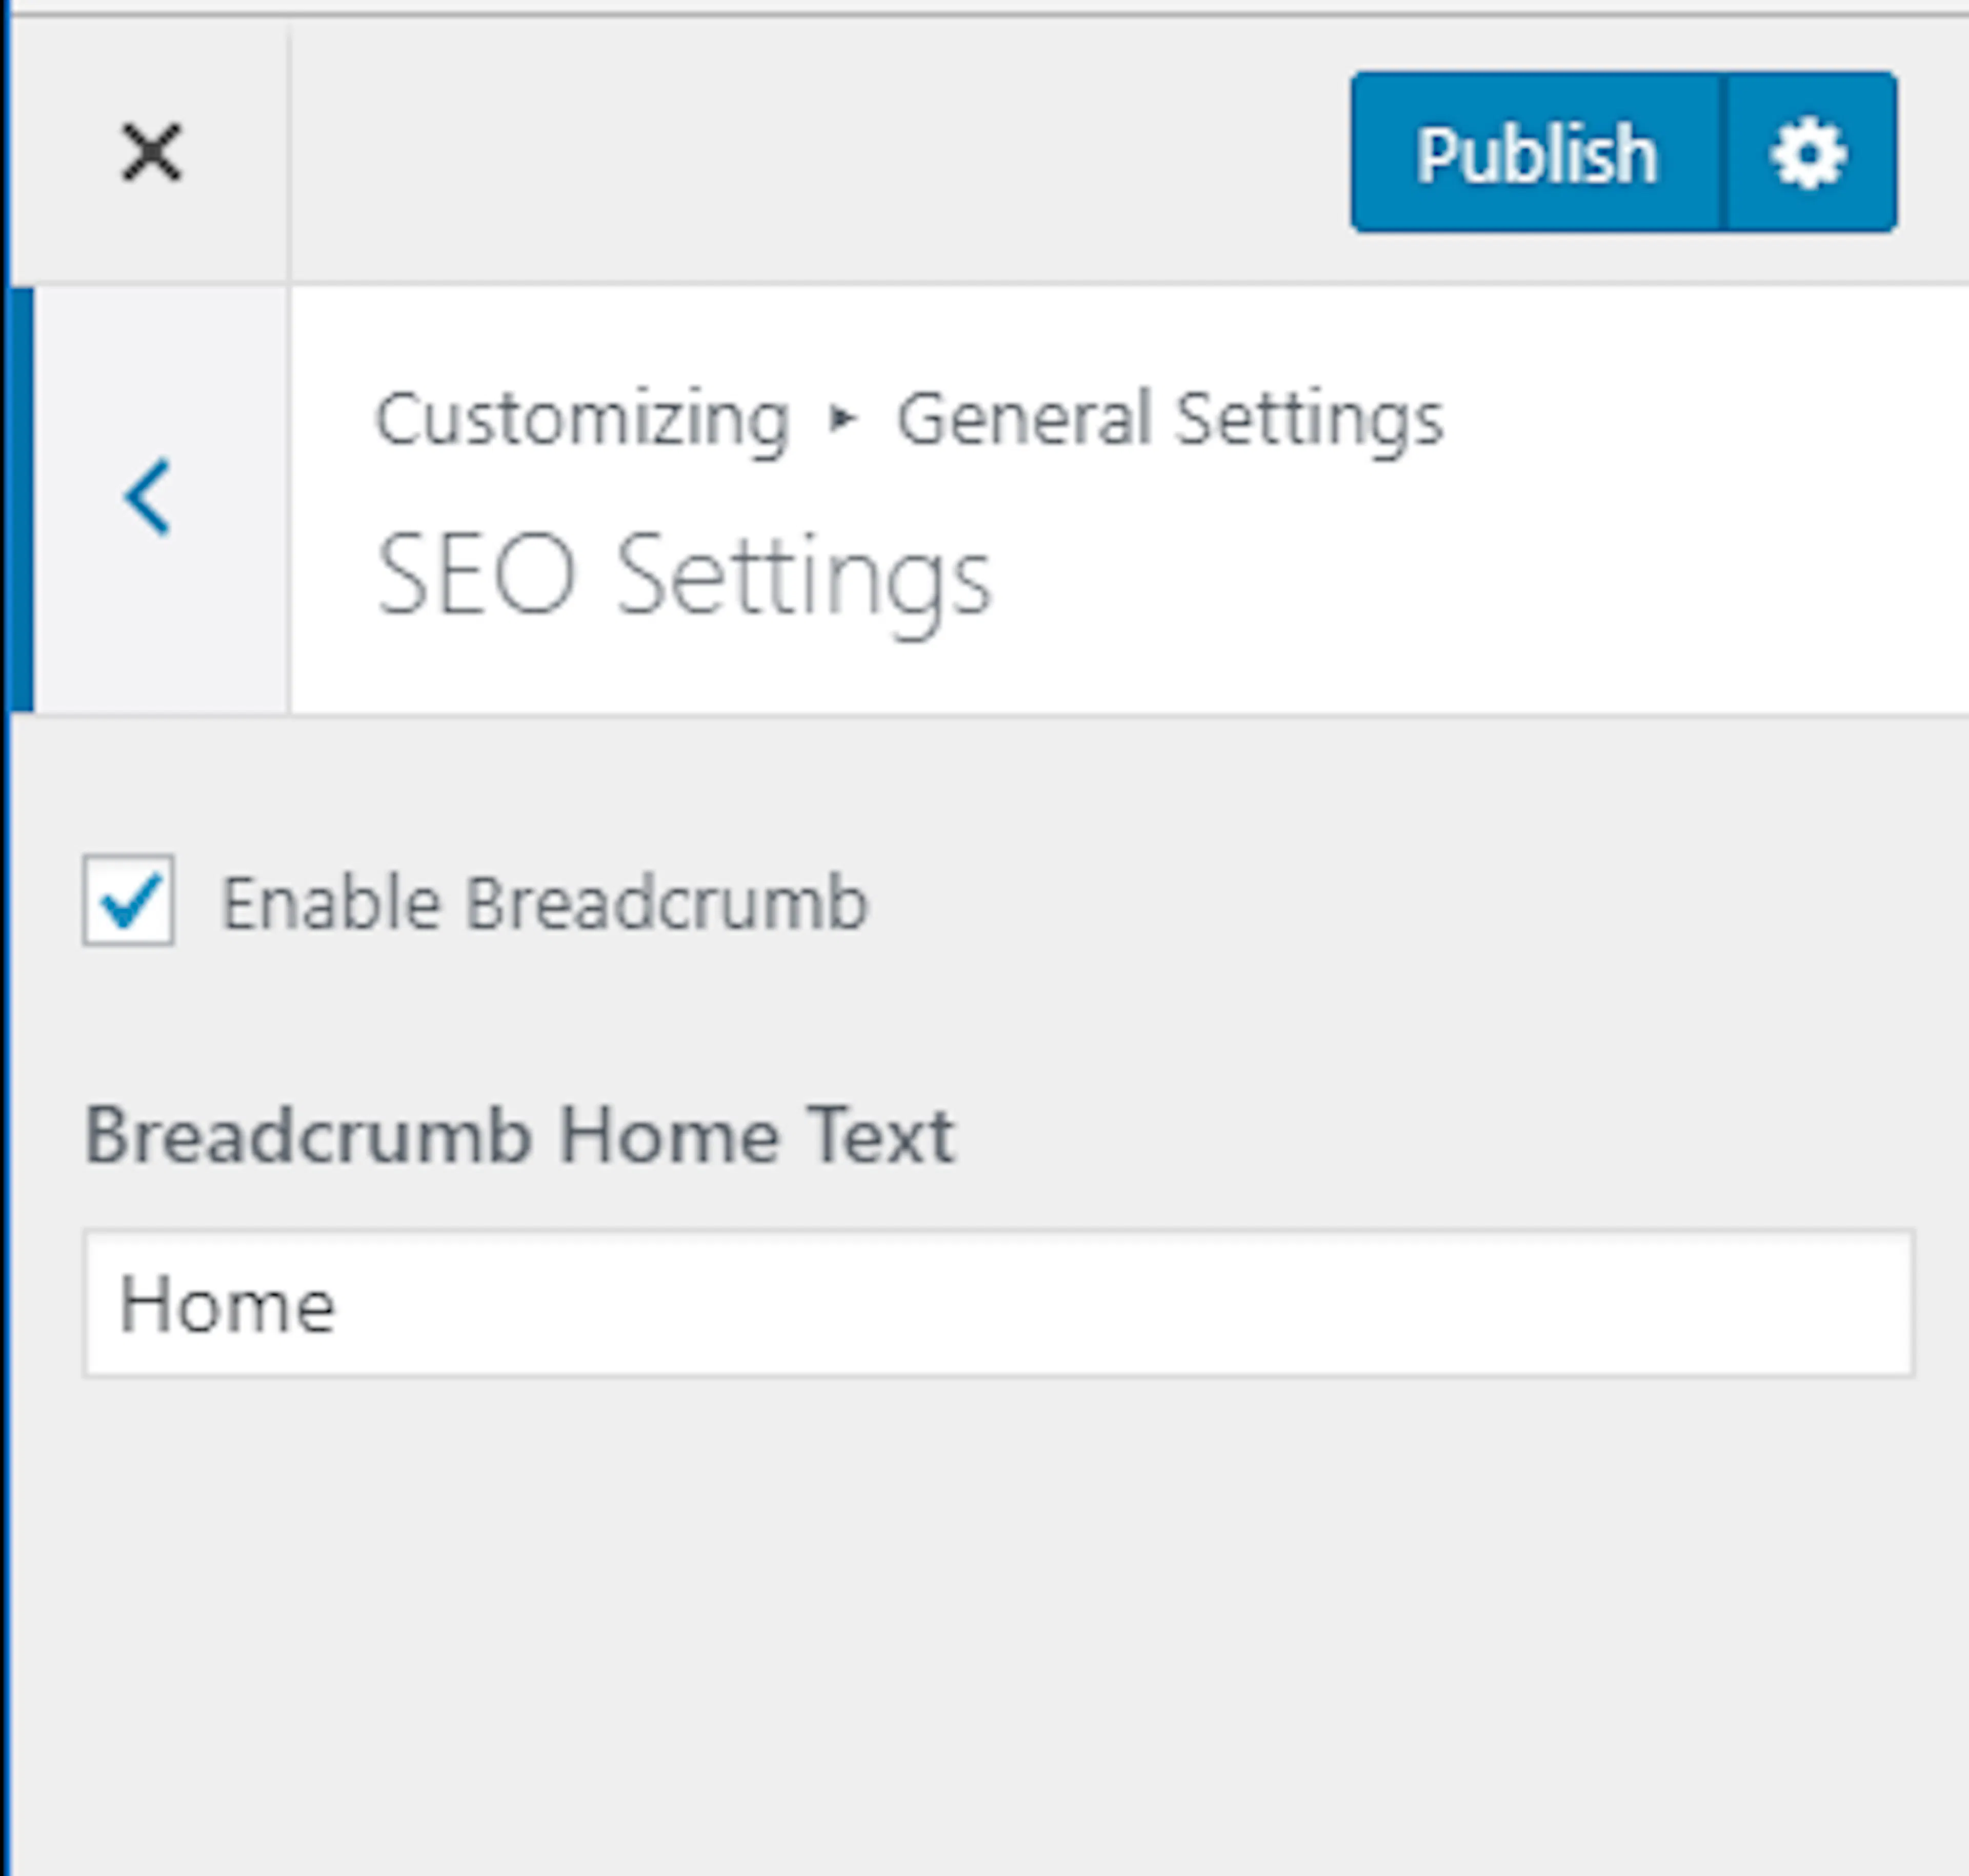
Go to Appearance > Customize > General Settings > SEO Settings.
Enable breadcrumbs
Enable Breadcrumb.
Set the home label
Enter Breadcrumb Home Text. Most websites use Home.
Publish the settings
Click Publish.
Color settings
Color settings change the background color of your theme. Choose a color that fits your logo and remains easy to read behind your content.
Open Colors
Go to Appearance > Customize > General Settings > Colors.
Choose a background color
Select the color you want to use.
Publish the color
Click Save & Publish.
Change the background image
A background image appears behind your website content. A subtle landscape or texture works better than a busy image because visitors still need to read your text.
Open Background Image
Go to Appearance > Customize > General Settings > Background Image.
Select an image
Select the image you want to use.
Publish the image
Click Save & Publish.
Menus
A menu is a list of links that helps visitors move around your website. By default, your primary pages may appear in the menu.
Travel Booking supports two menus: Primary and Secondary. If you need more than two menus, add another menu to a sidebar with the Custom Menu widget.
Create and edit a menu from the Customizer
The Customizer is WordPress's built-in settings panel for design changes. Use it when you want to see your menu changes while you work.
Open Menus
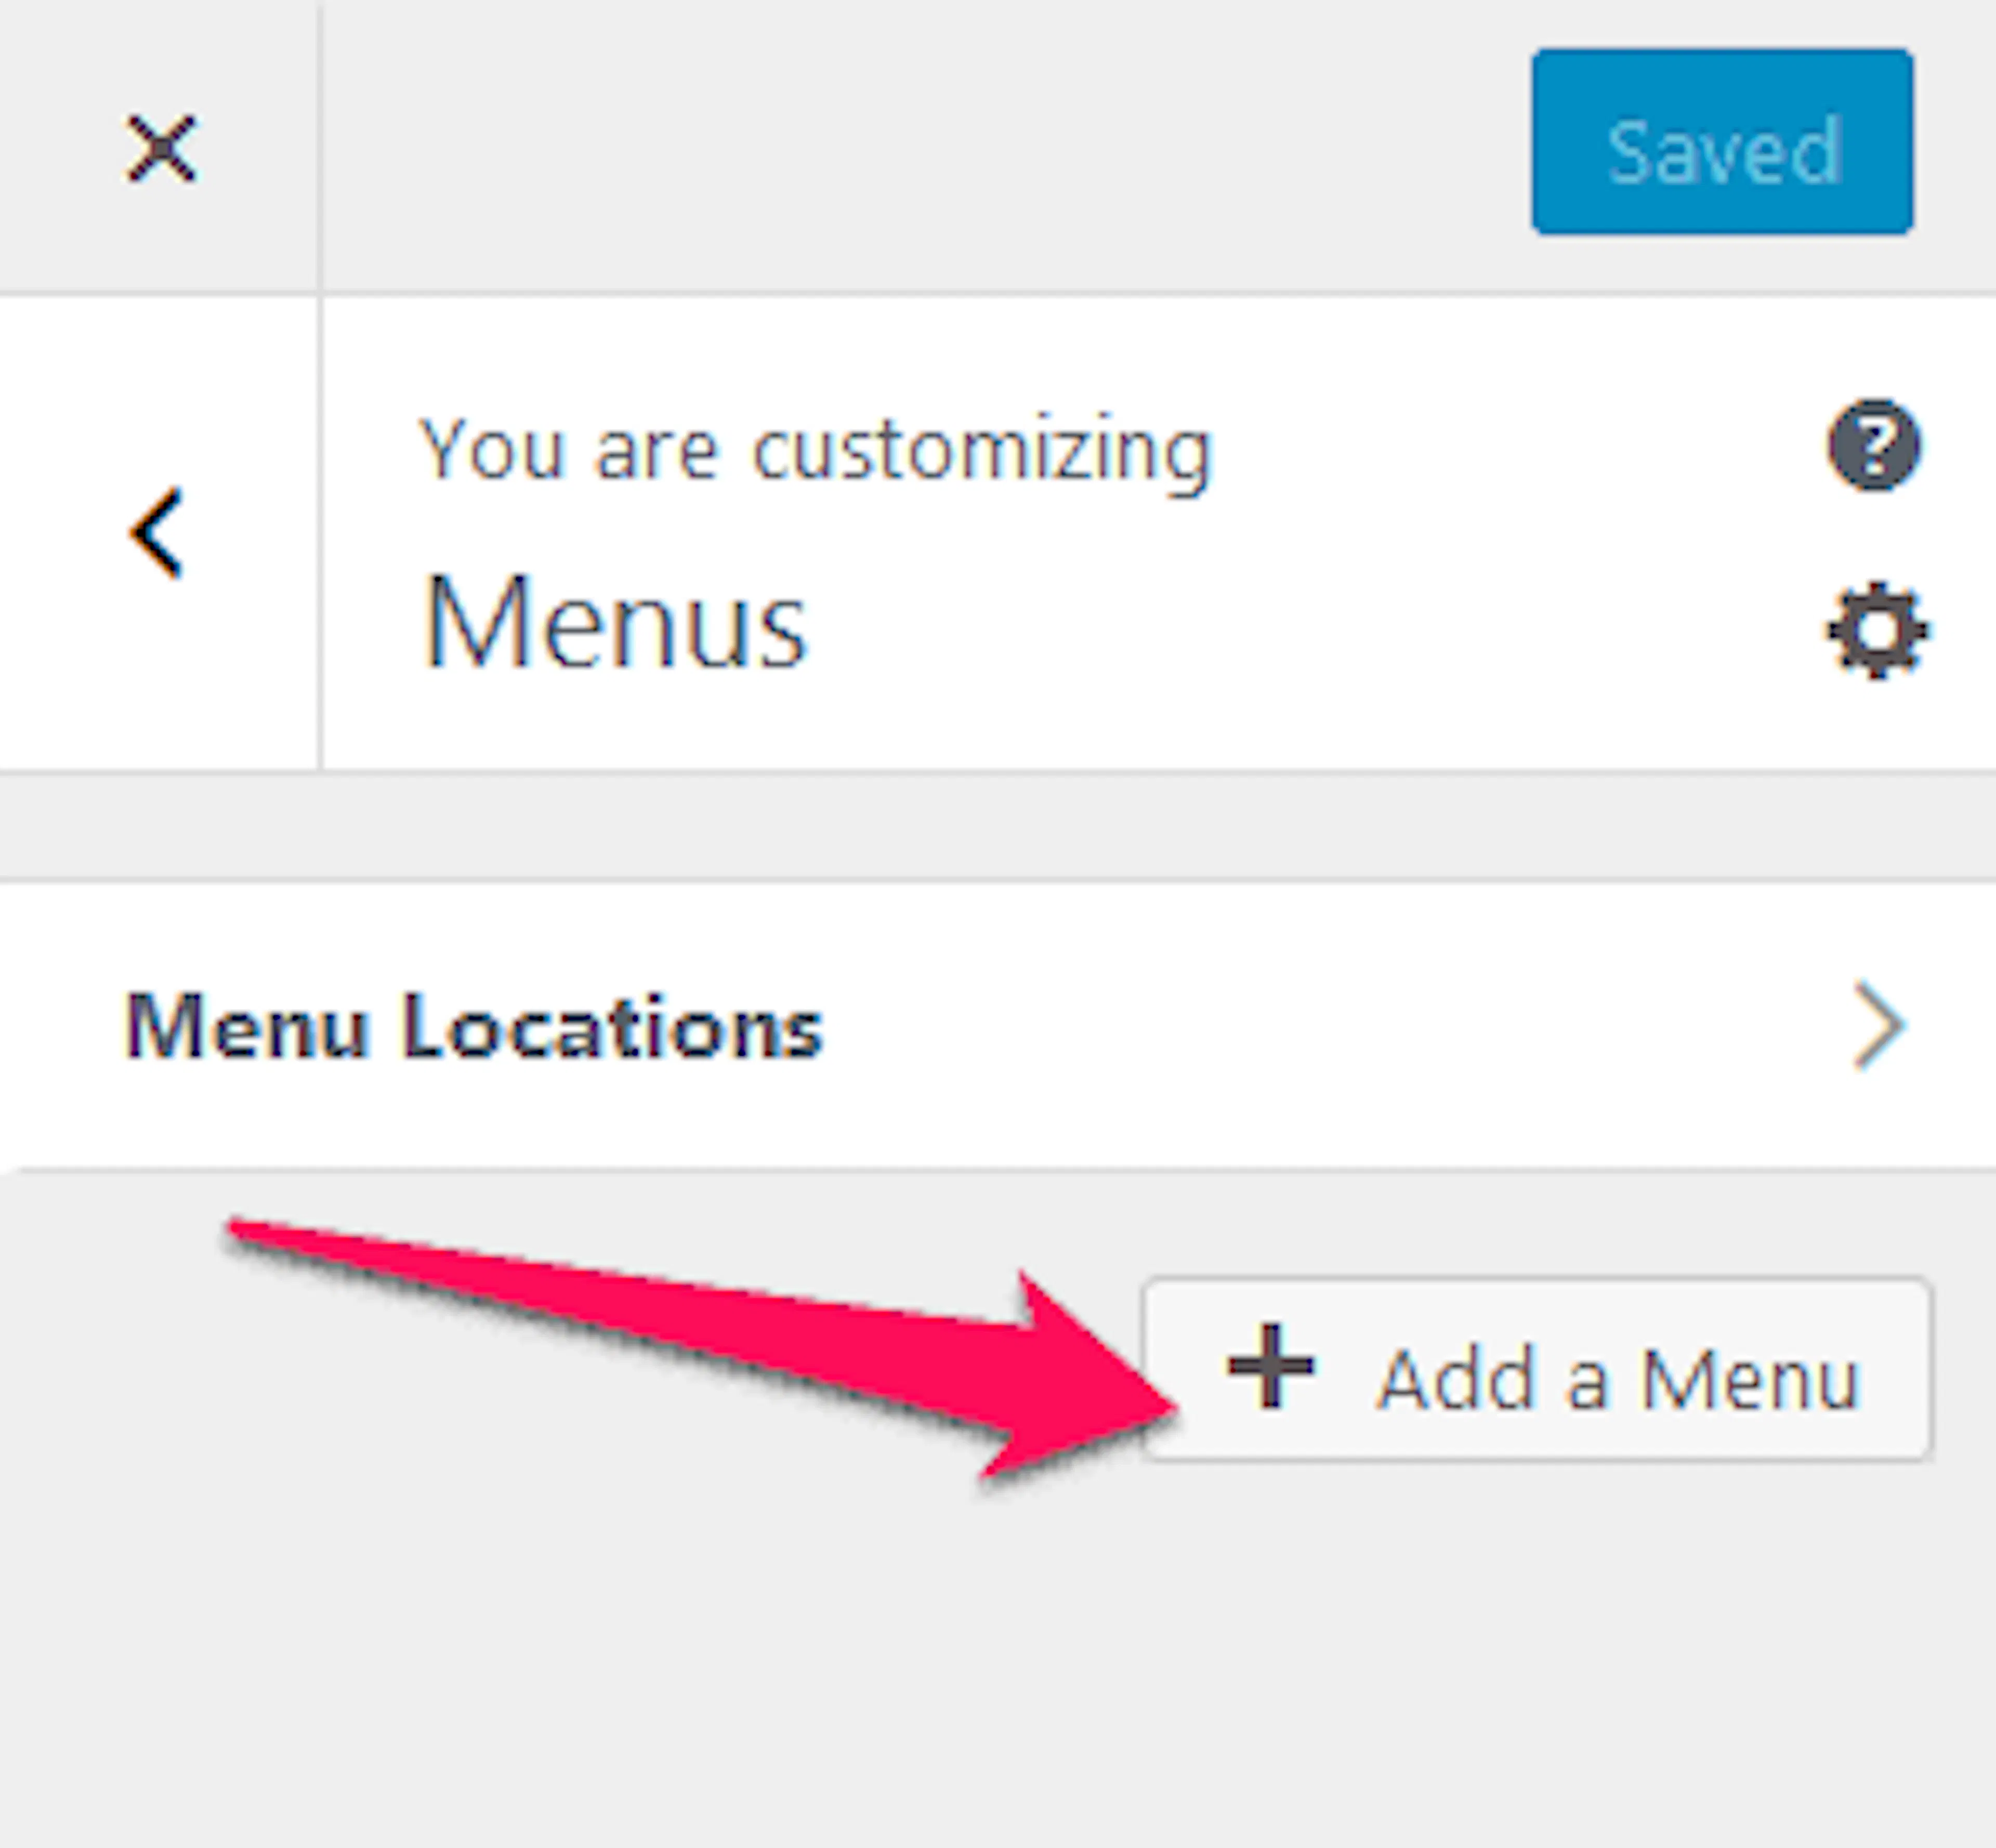
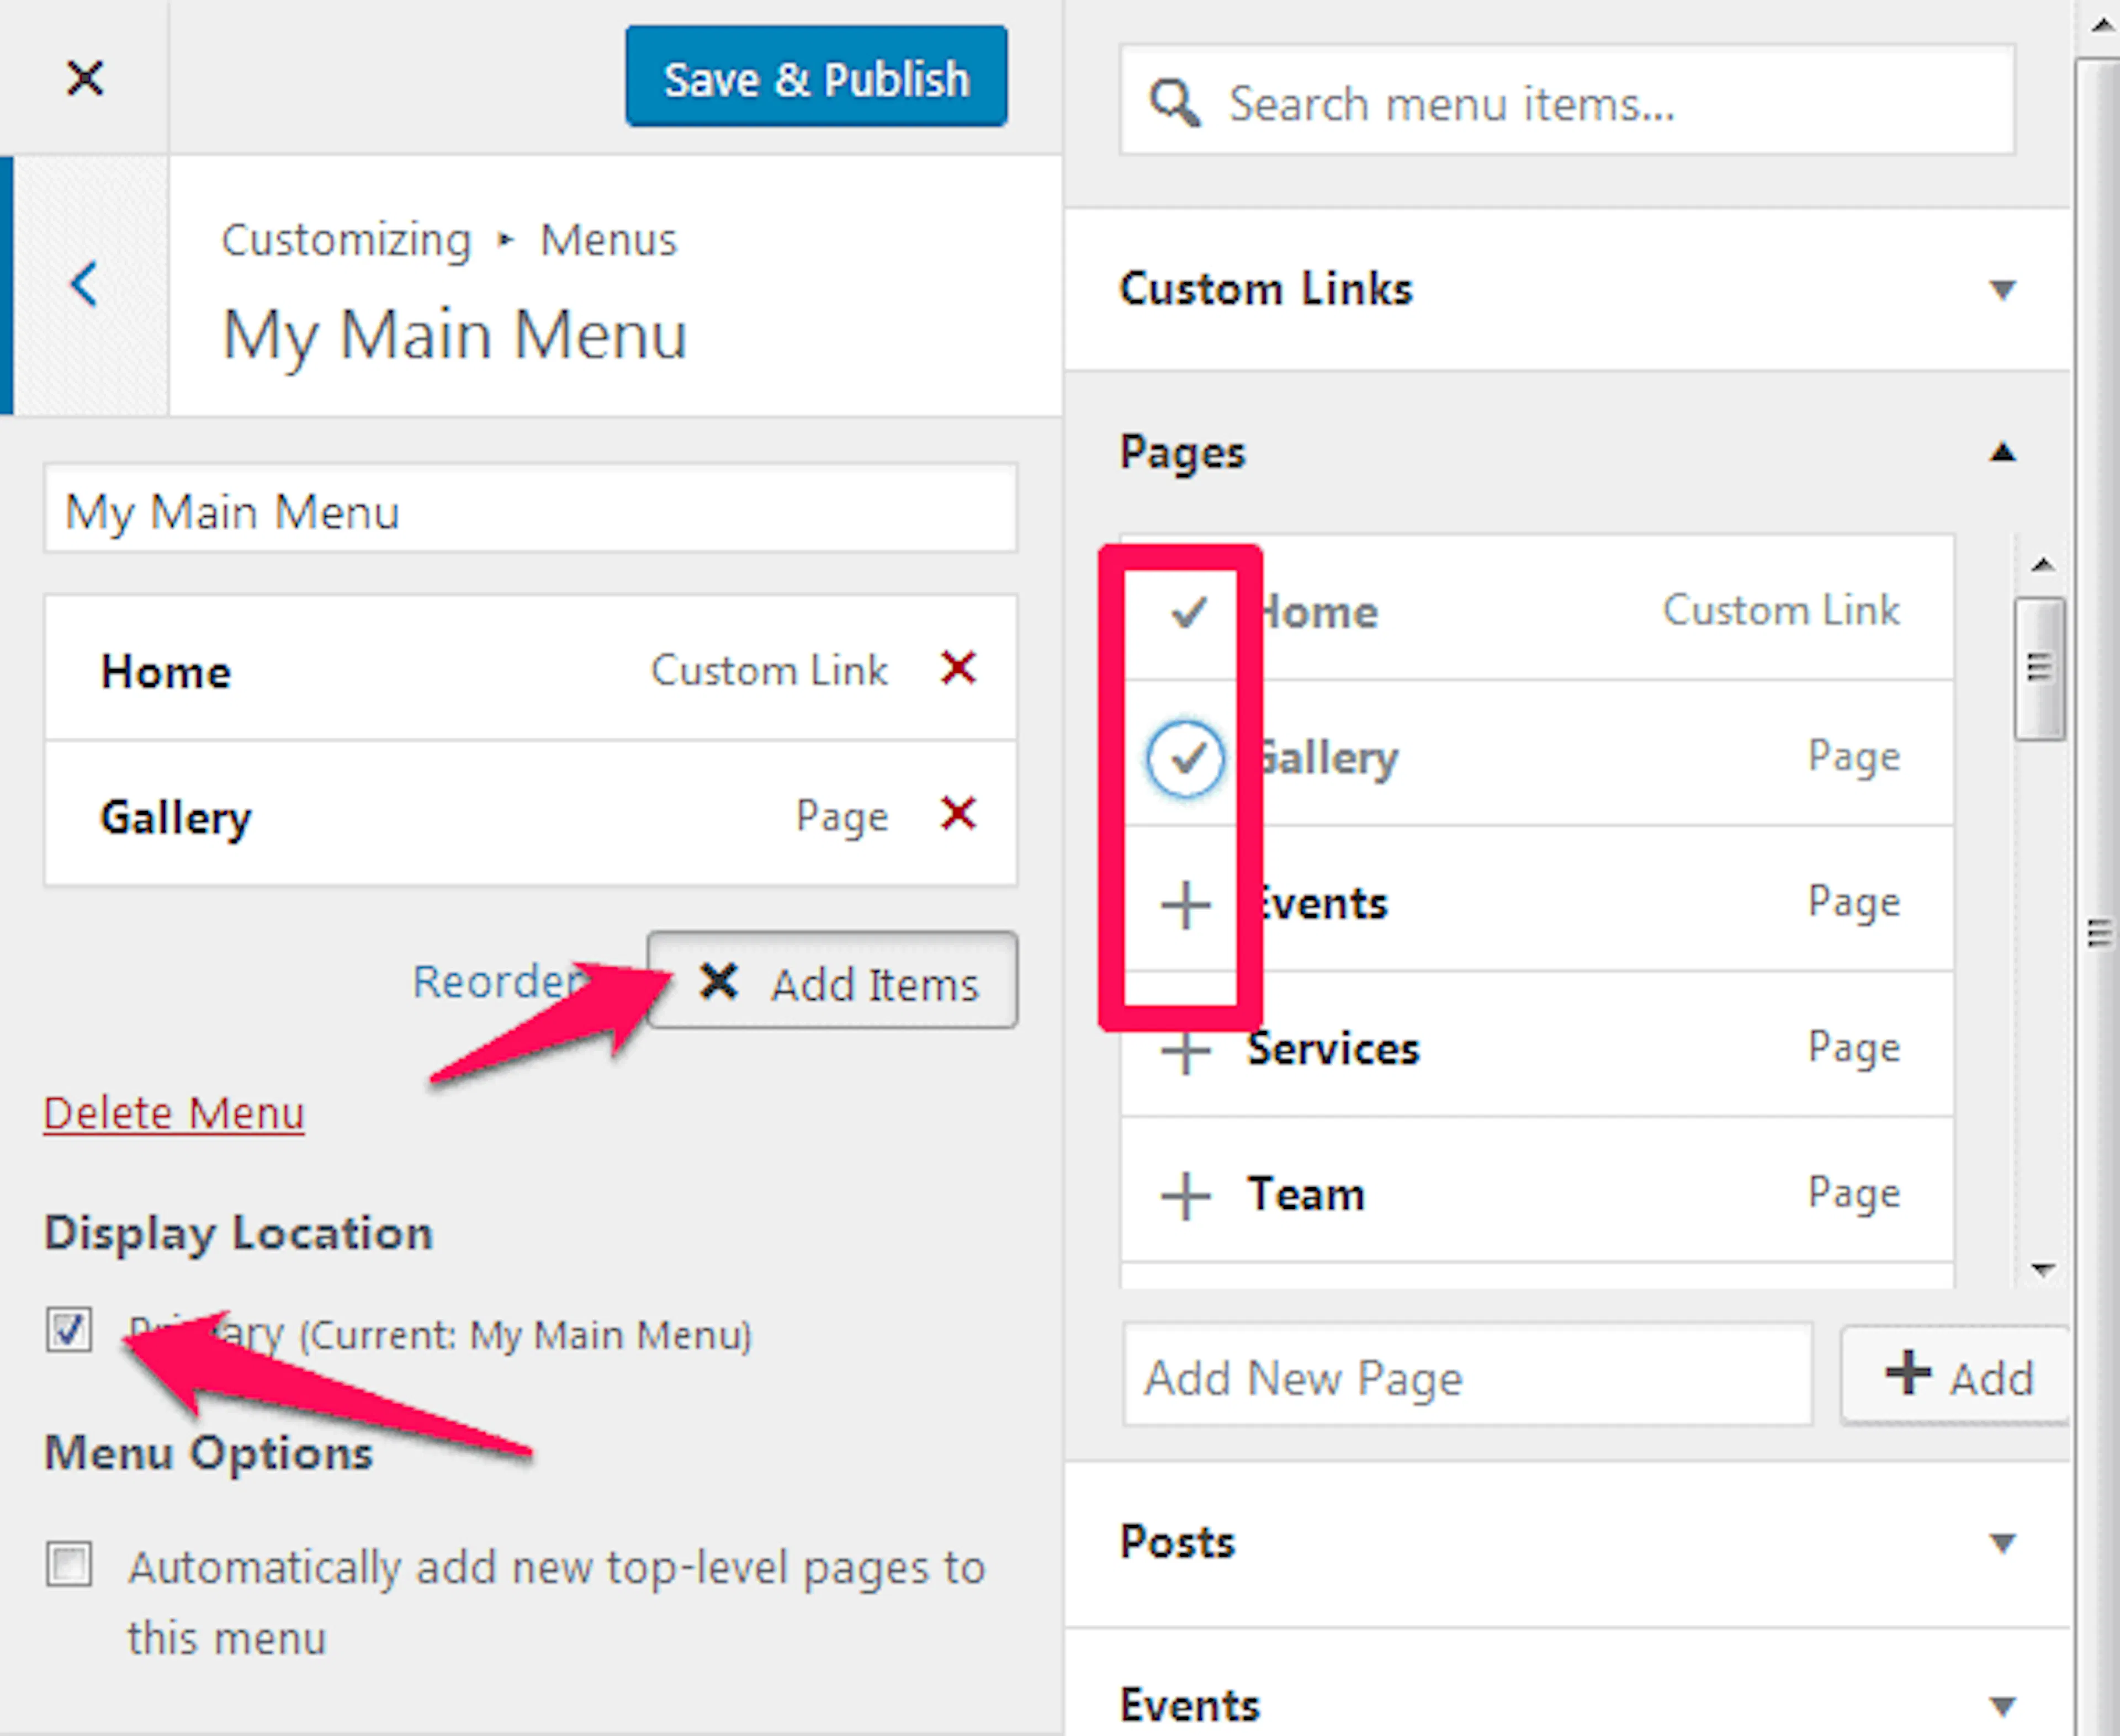
Go to Appearance > Customize > Menus.
Create a menu
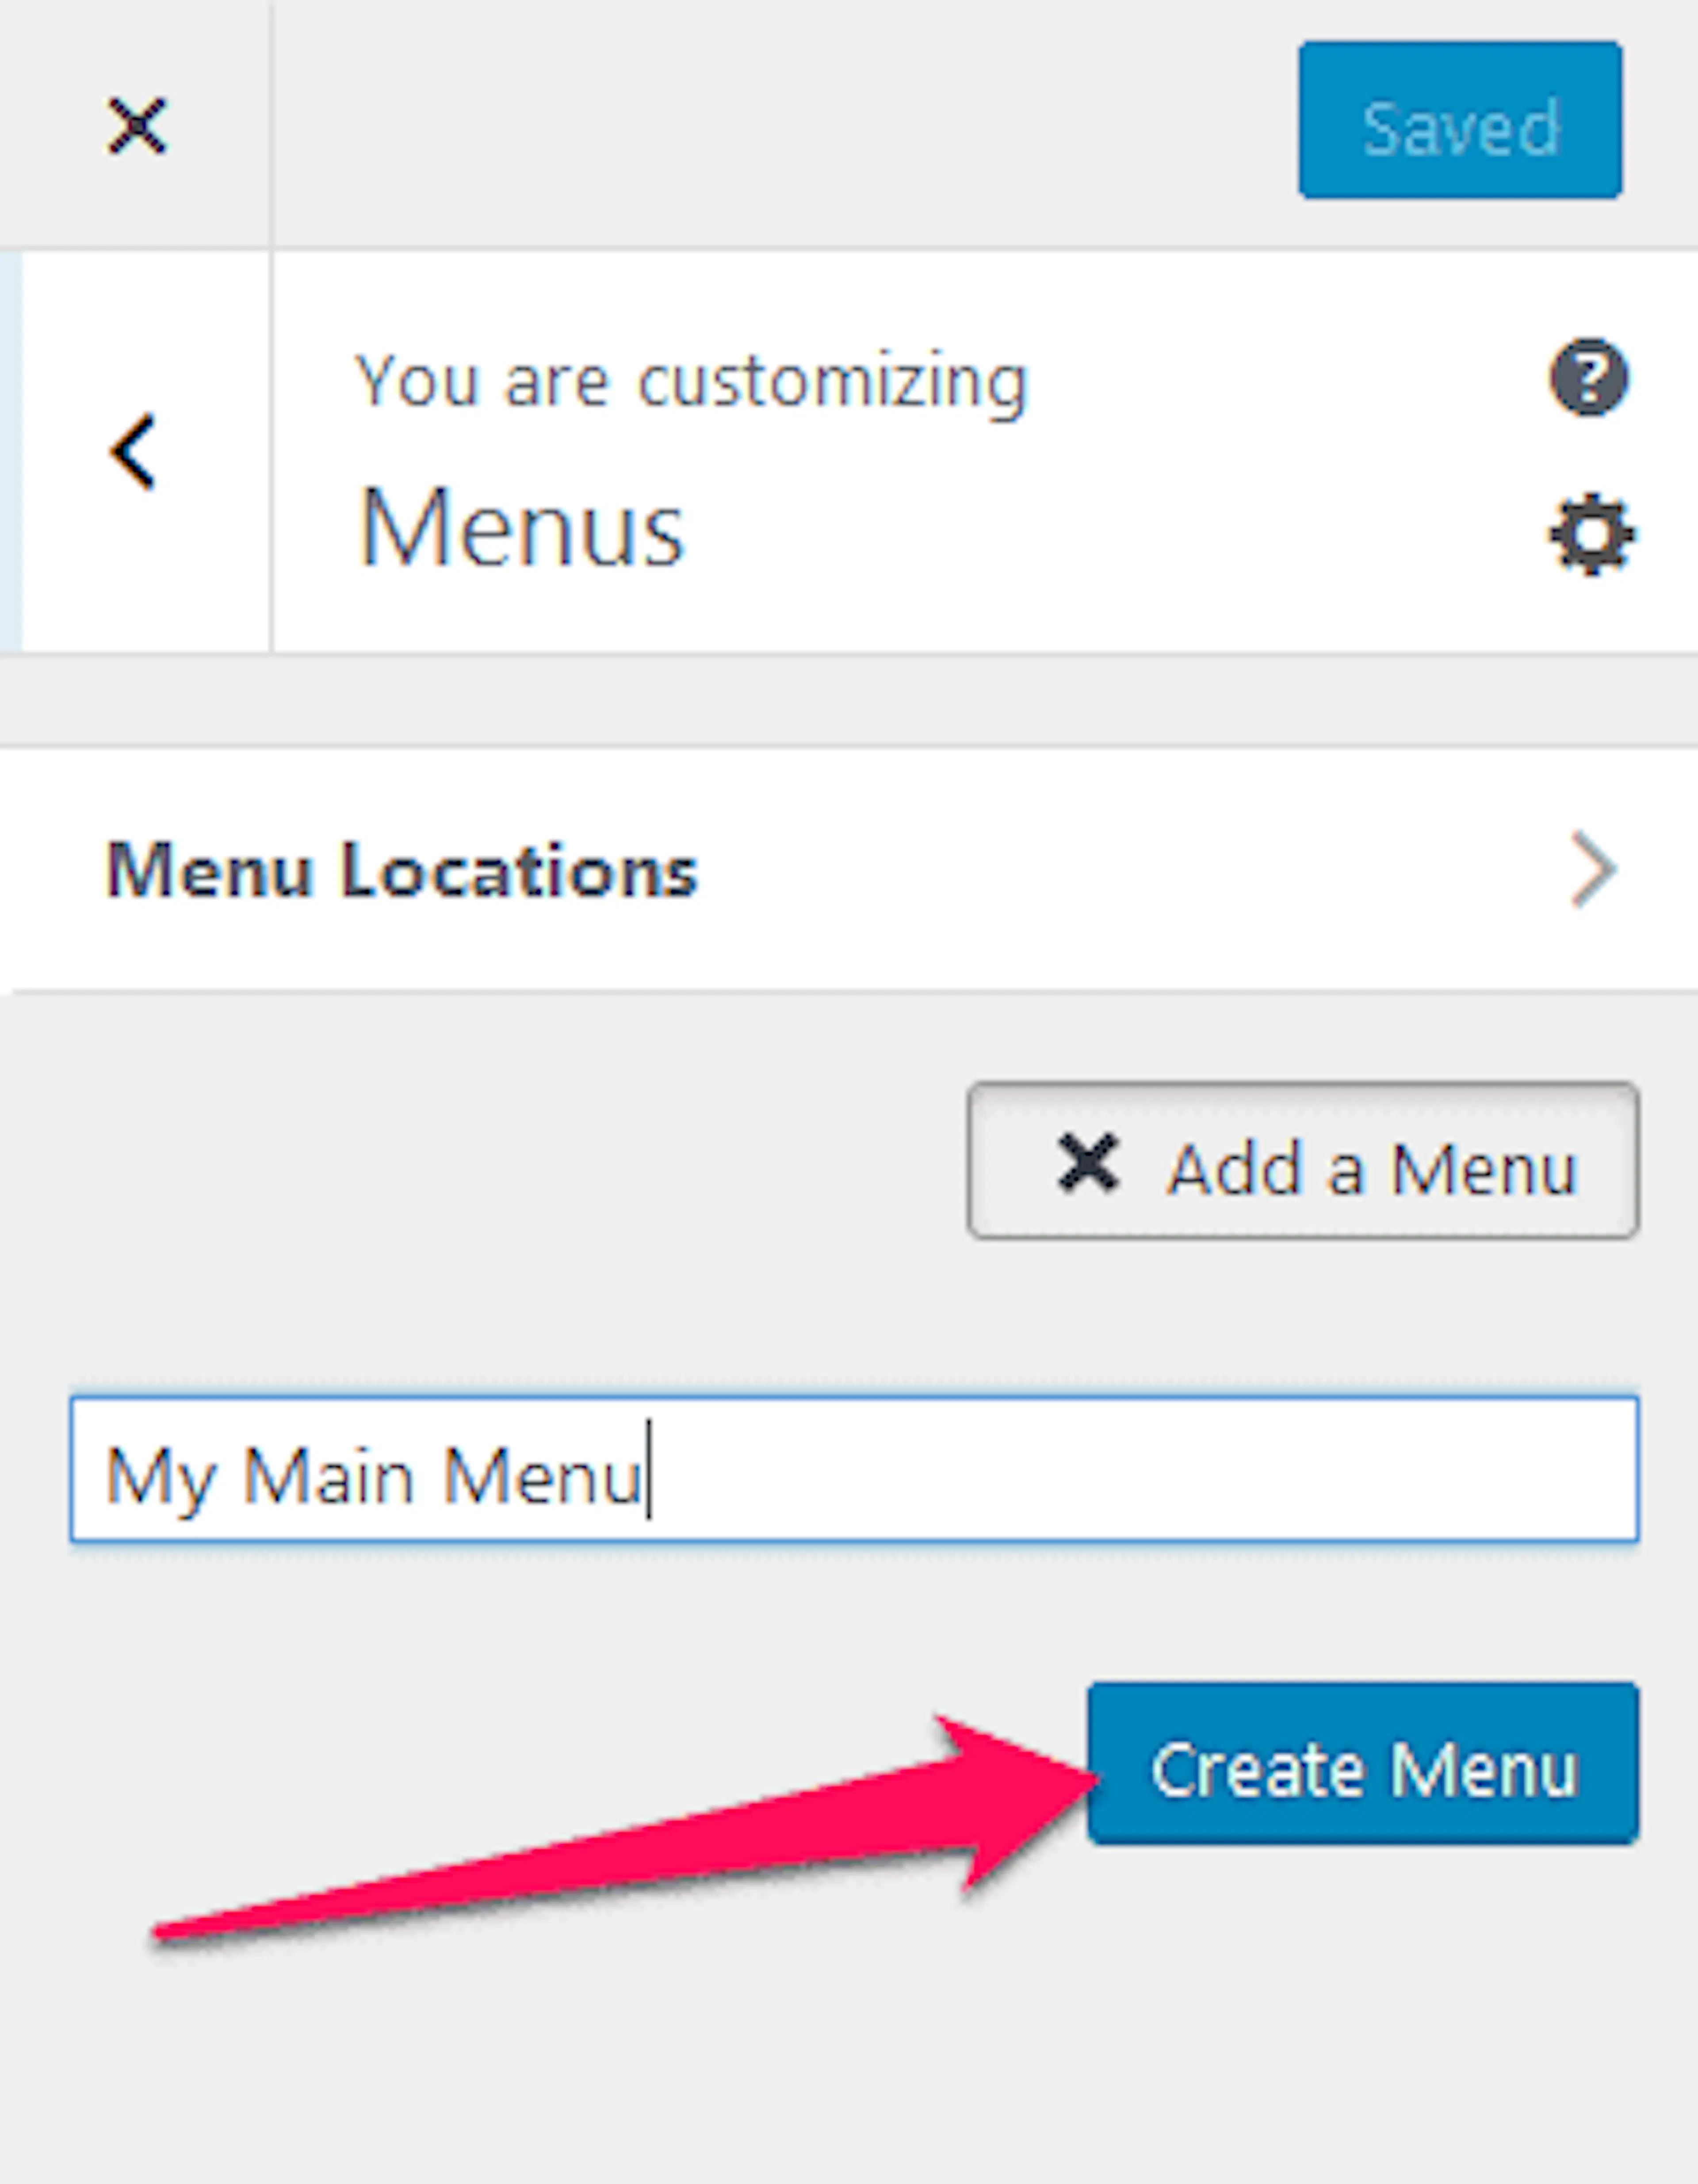
Click Add a menu. Give the menu a name and click Create Menu.
Add menu items
Click Add Items. Choose pages, posts, categories, or custom links. Click the + icon next to an item to add it to the menu.
Arrange the menu
Drag and drop the items to change their order.
Choose the menu location
Check the menu location, such as Primary or Footer.
Publish the menu
Click Save & Publish.
Create and edit a menu from the dashboard
Use the dashboard menu screen if you prefer to manage your navigation from the main WordPress administration area.
Open Menus
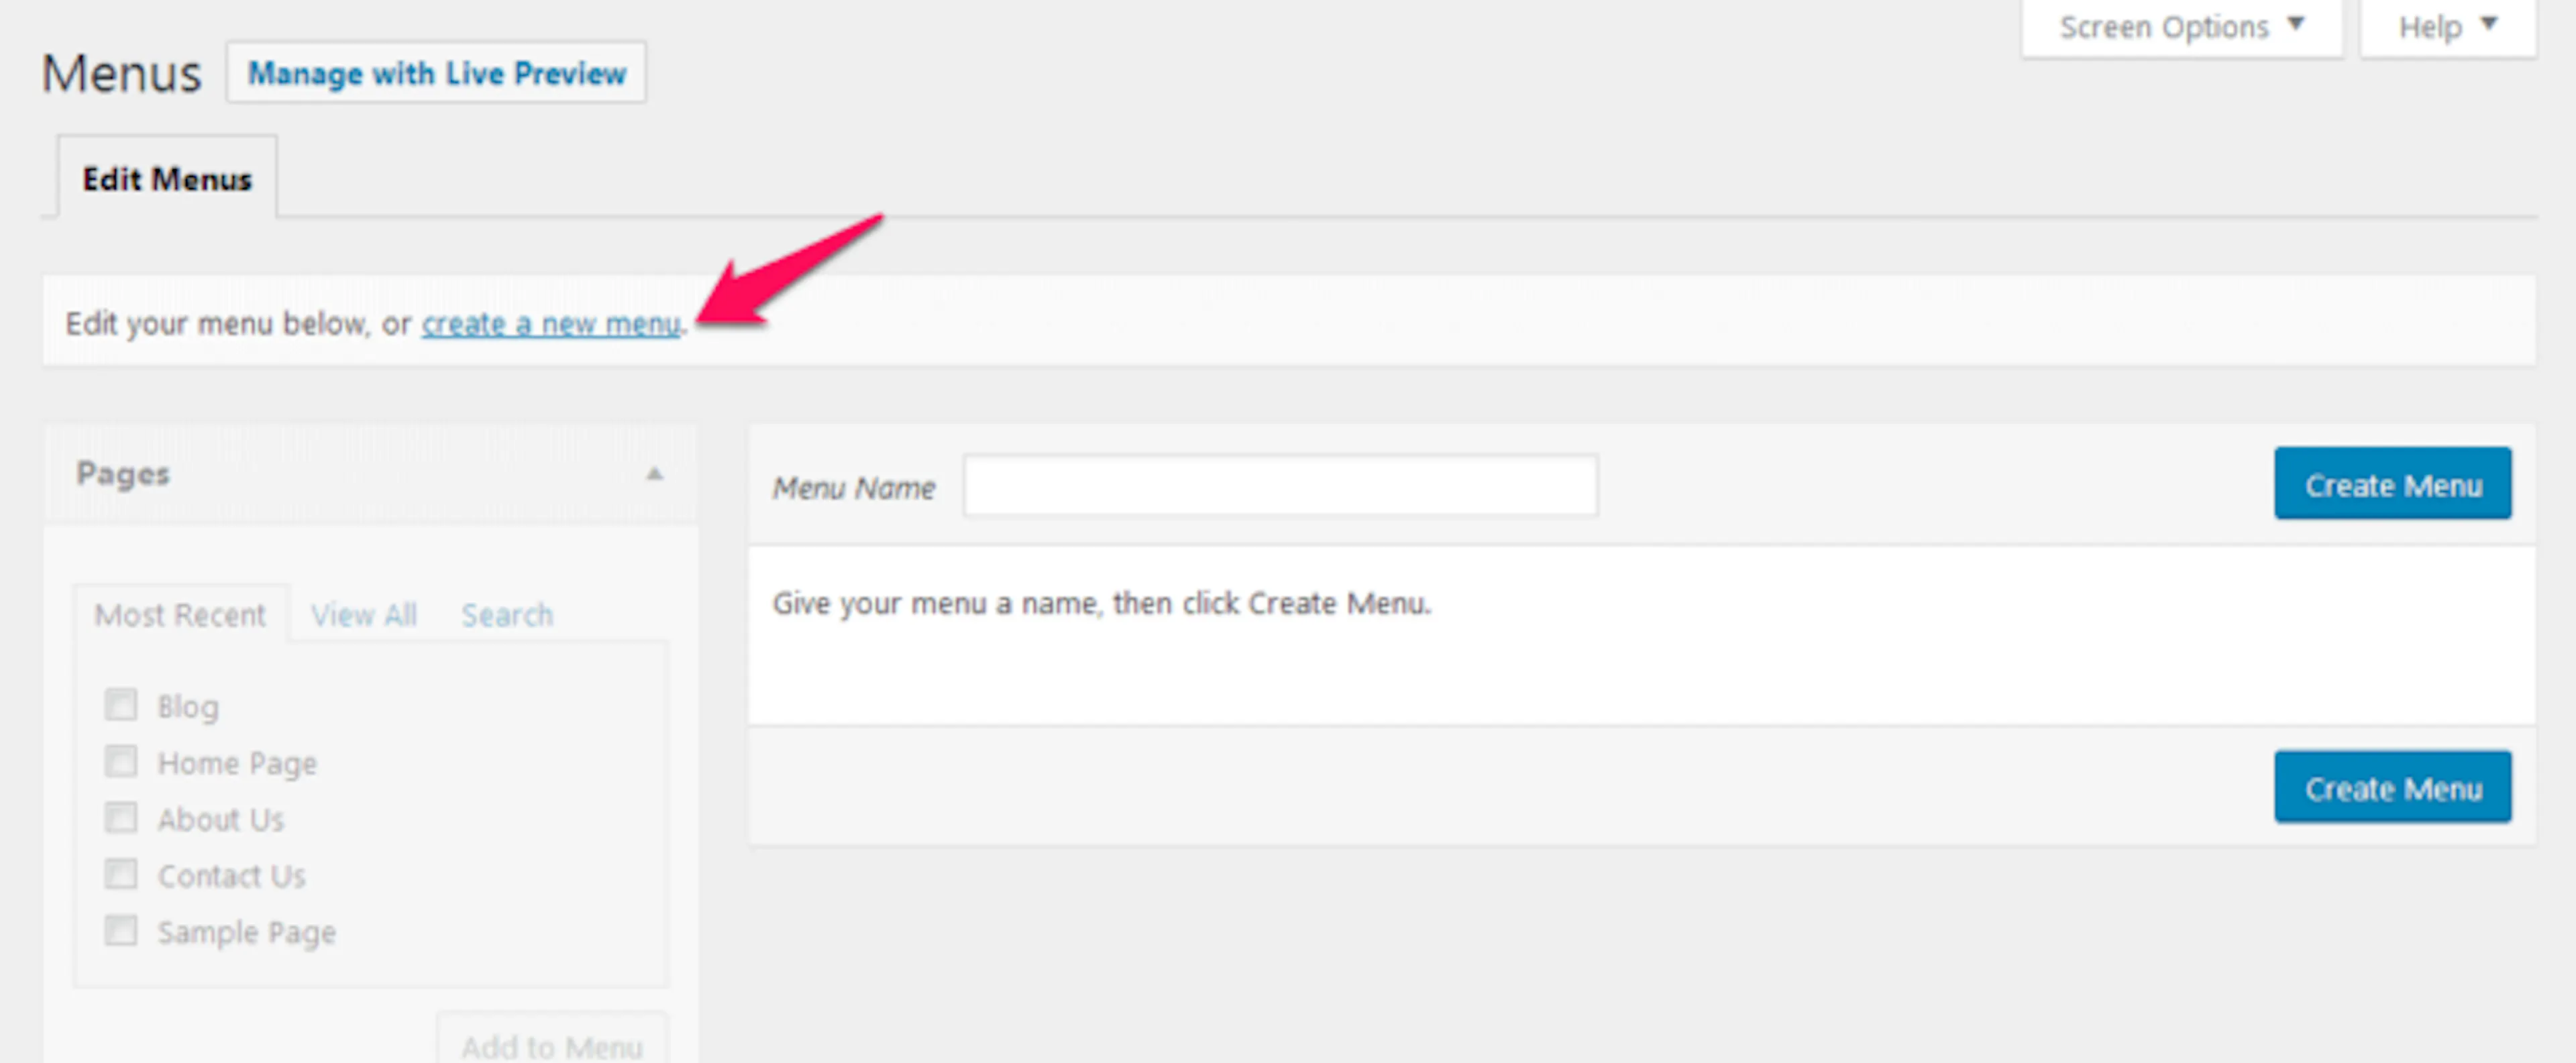
Go to Appearance > Menus.
Create a new menu
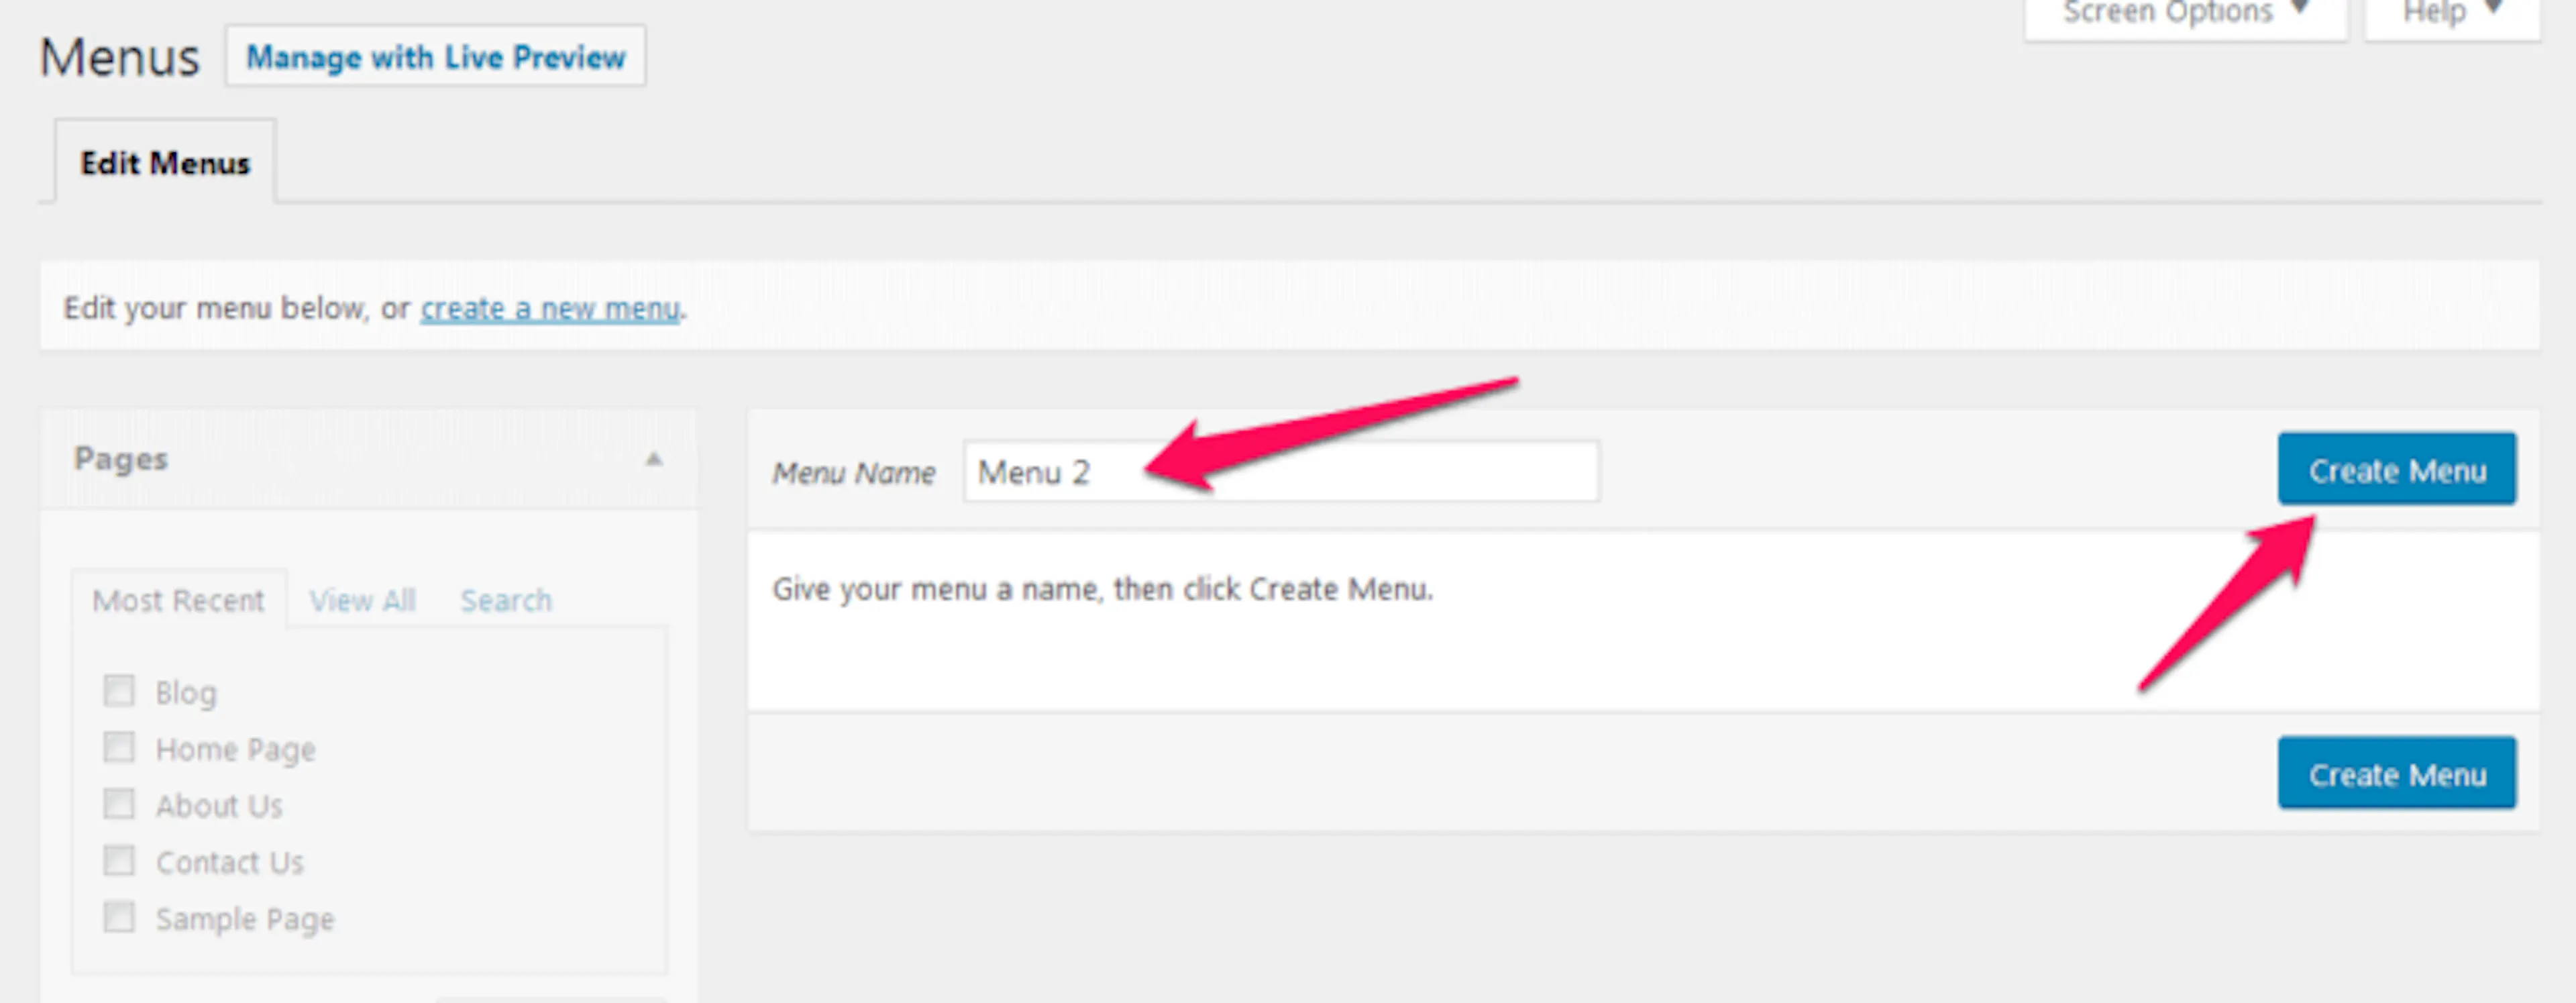
Click create a new menu. Enter a name in Menu Name and click Create Menu.
Add menu items
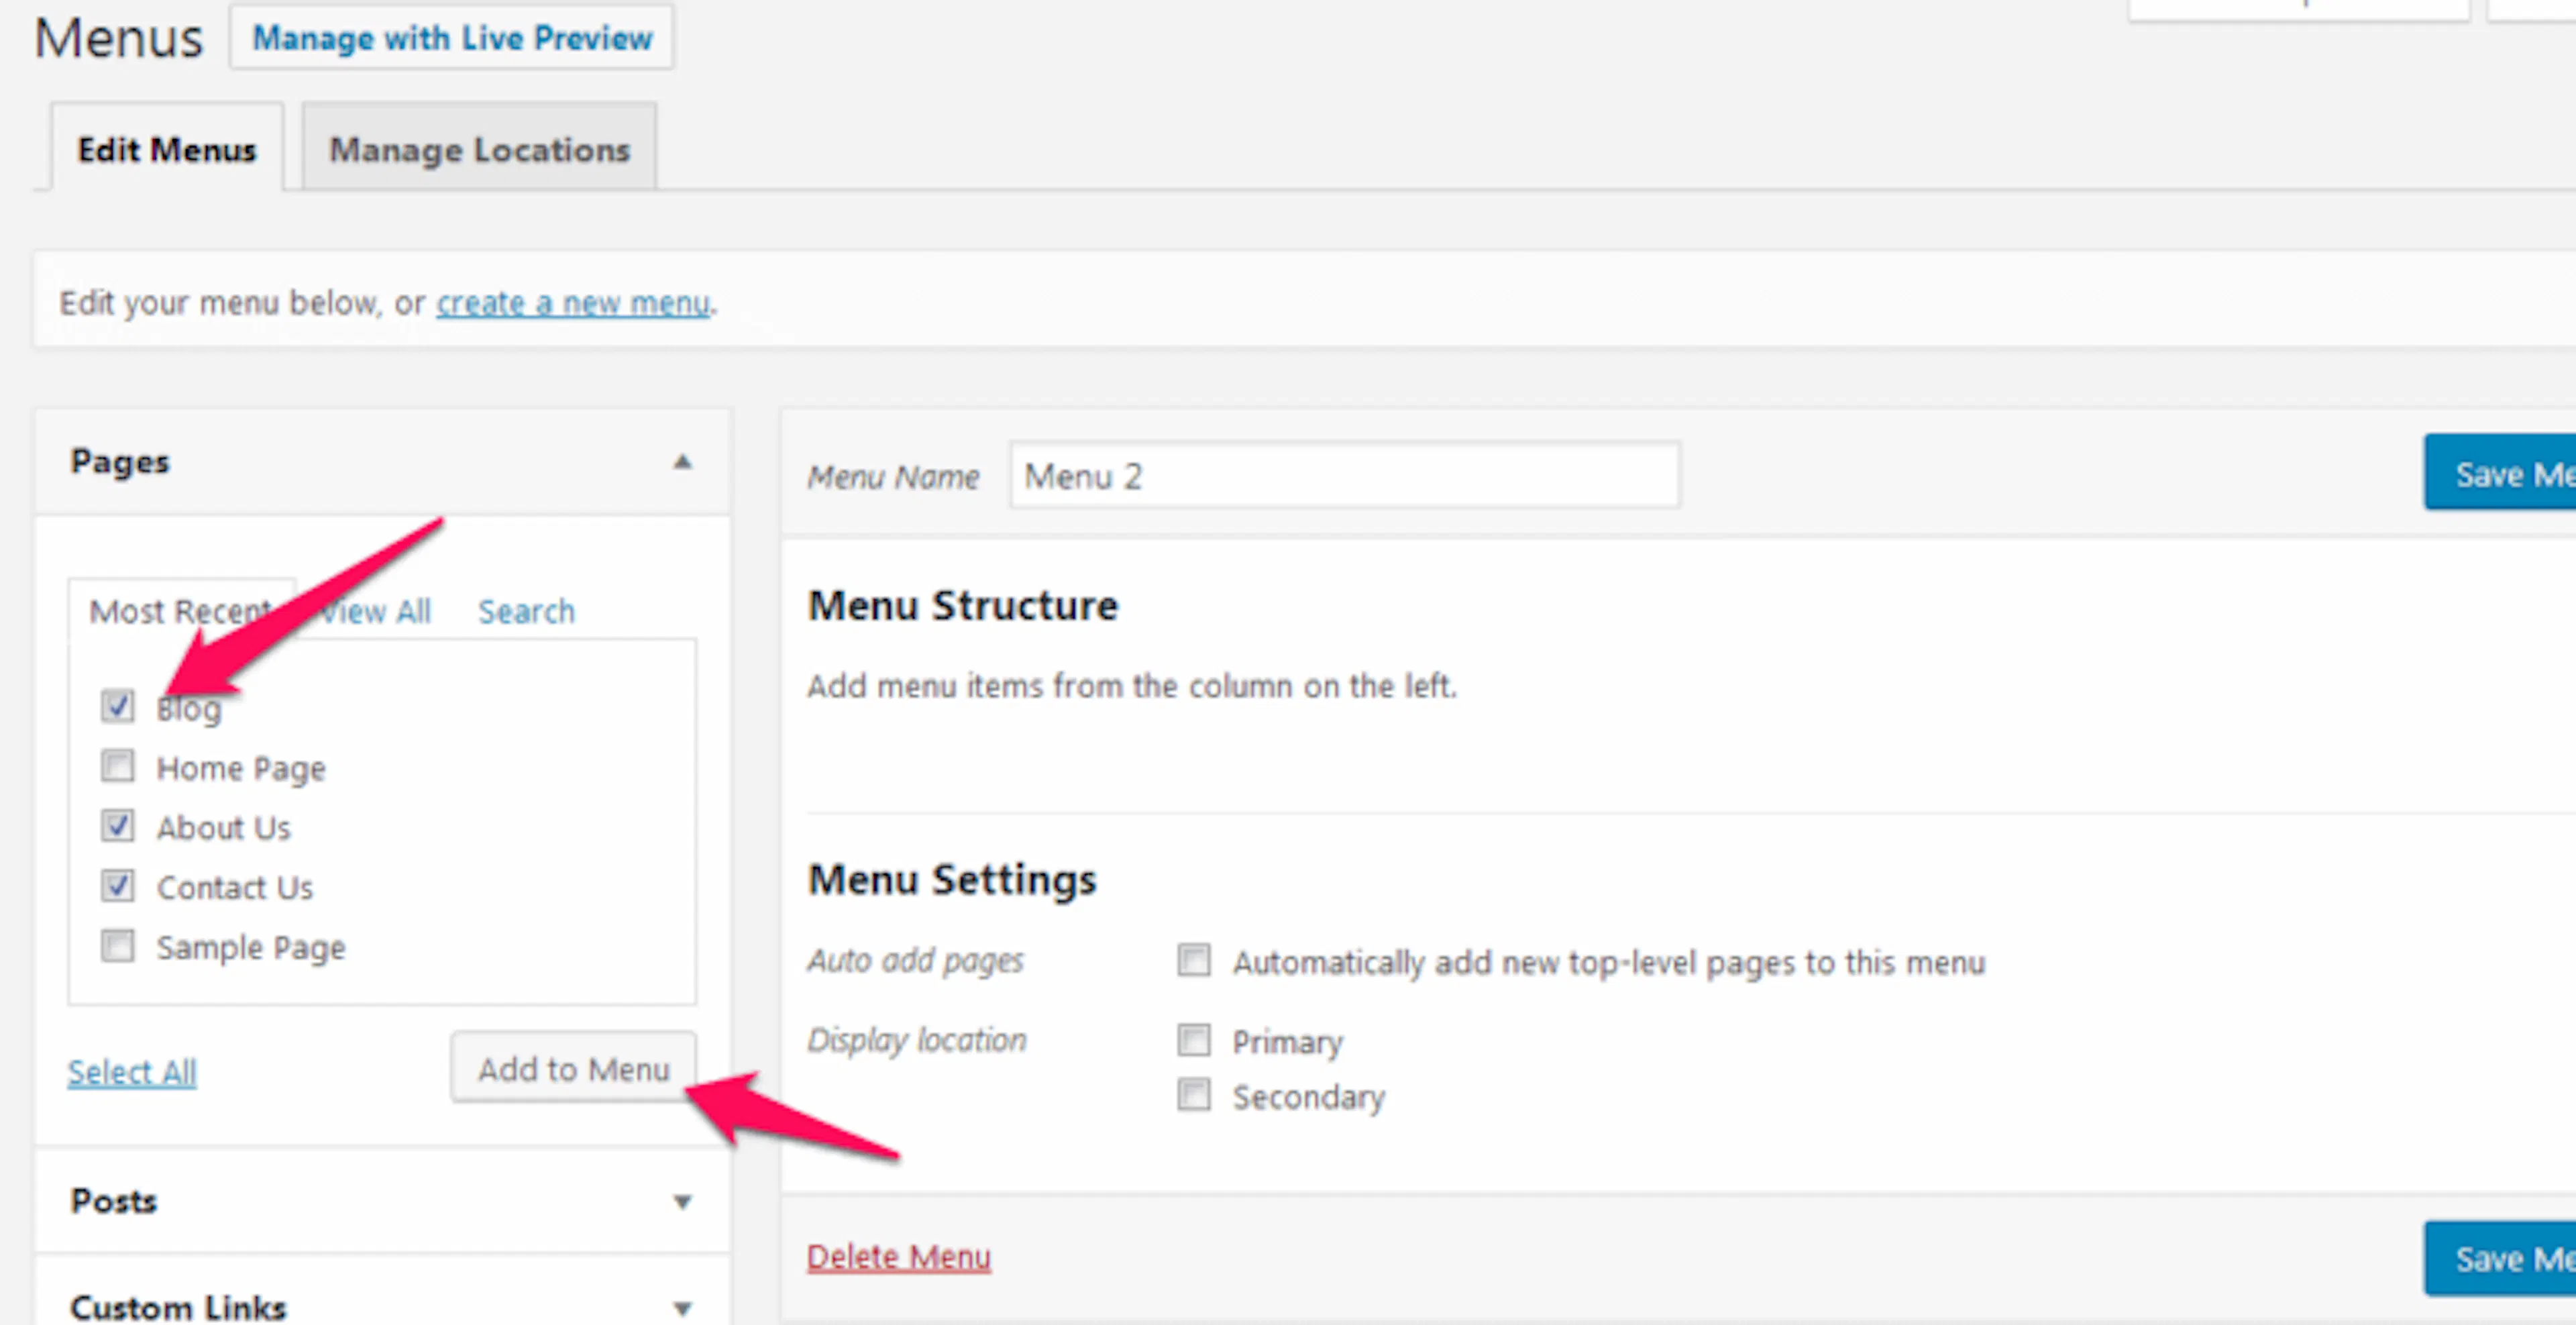
Choose items from Pages, Posts, Custom Links, or Categories. Click Add to Menu.
Arrange the menu
Drag and drop the items to change their order.
Choose the menu location
Check the menu location, such as Primary or Footer.
Save the menu
Click Save Menu.
Widgets
A widget is a small block of content that you place in an area such as a sidebar or footer. For example, you might add a contact phone number, an office address, or a list of popular trips.
You can add widgets from the Customizer or the dashboard.
Add widgets from the Customizer
Use the Customizer when you want to see the widget area while you make changes.
Open Widgets
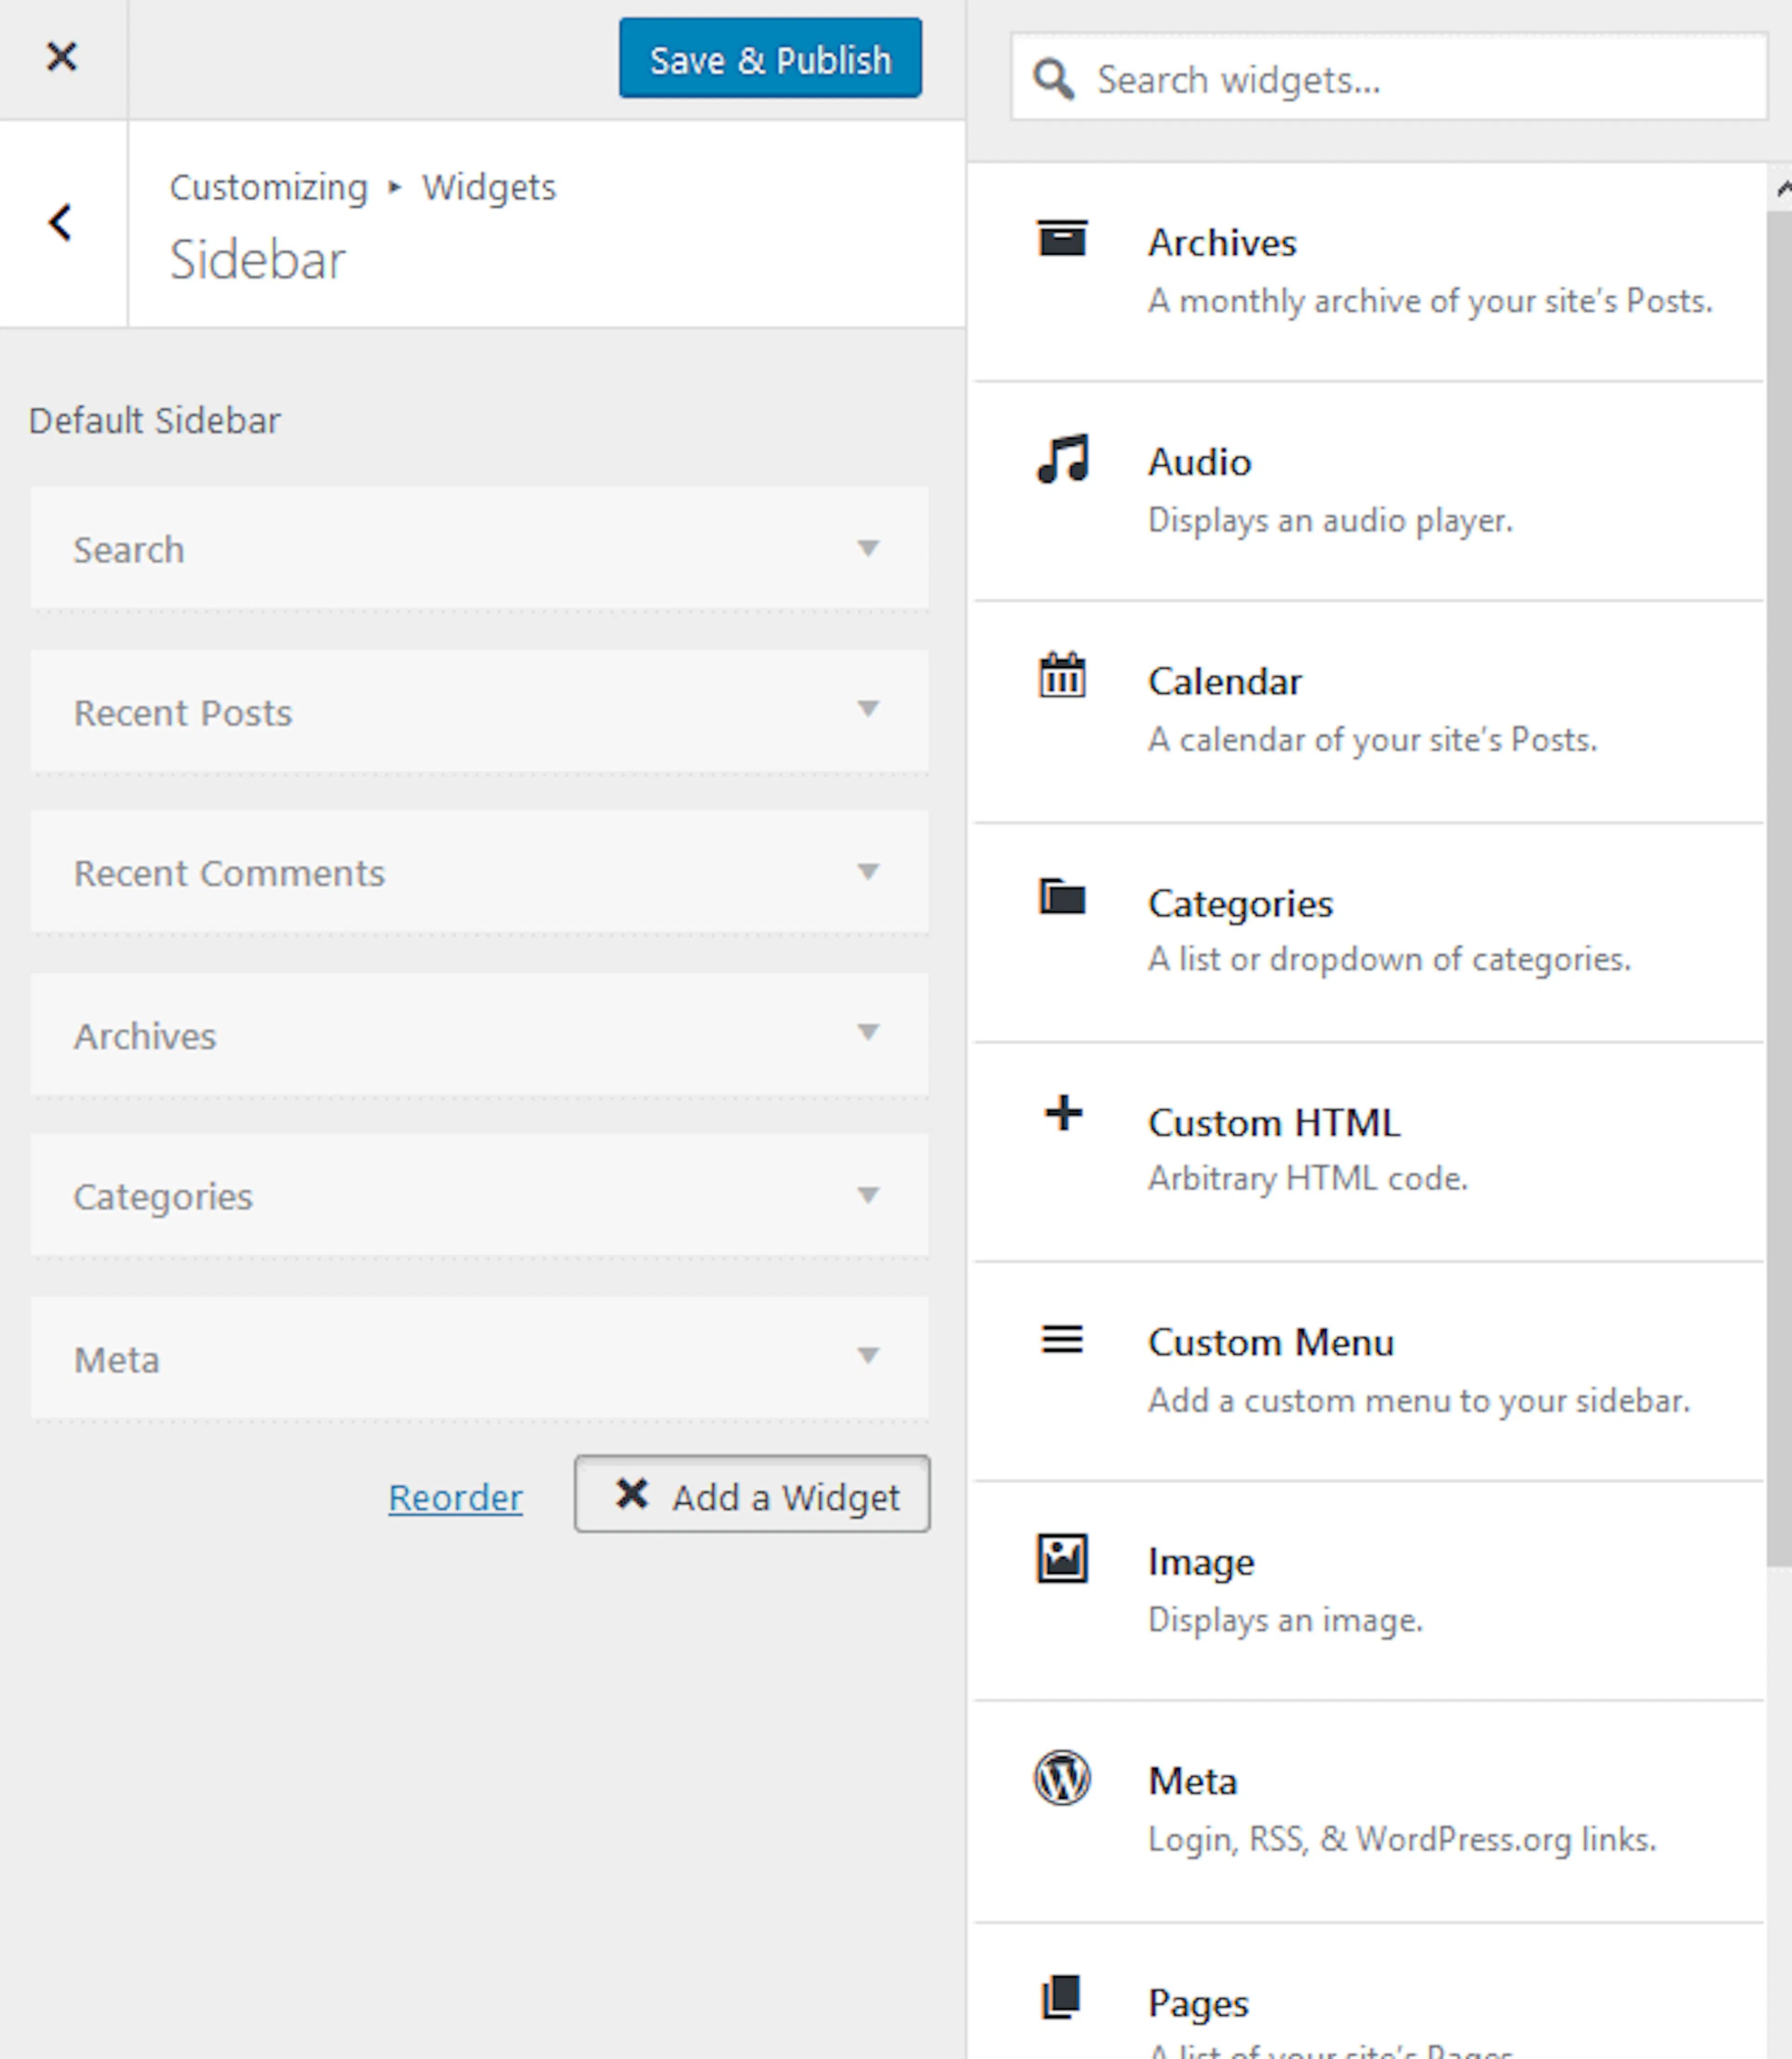
Go to Appearance > Customize > Widgets.
Choose the page and location
Make sure you are viewing the page where you want the widget to appear. Click the desired Sidebar or another location. You can also choose a Footer location.
Add a widget
Click Add a Widget. Select the widget you want and give it a title.
Add and arrange more widgets
Click Add a Widget to add more content. Drag and reorder the widgets as needed.
Publish the widgets
Click Save & Publish.
Add widgets from the dashboard
Use the dashboard when you want to move several widgets between areas quickly.
Open Widgets
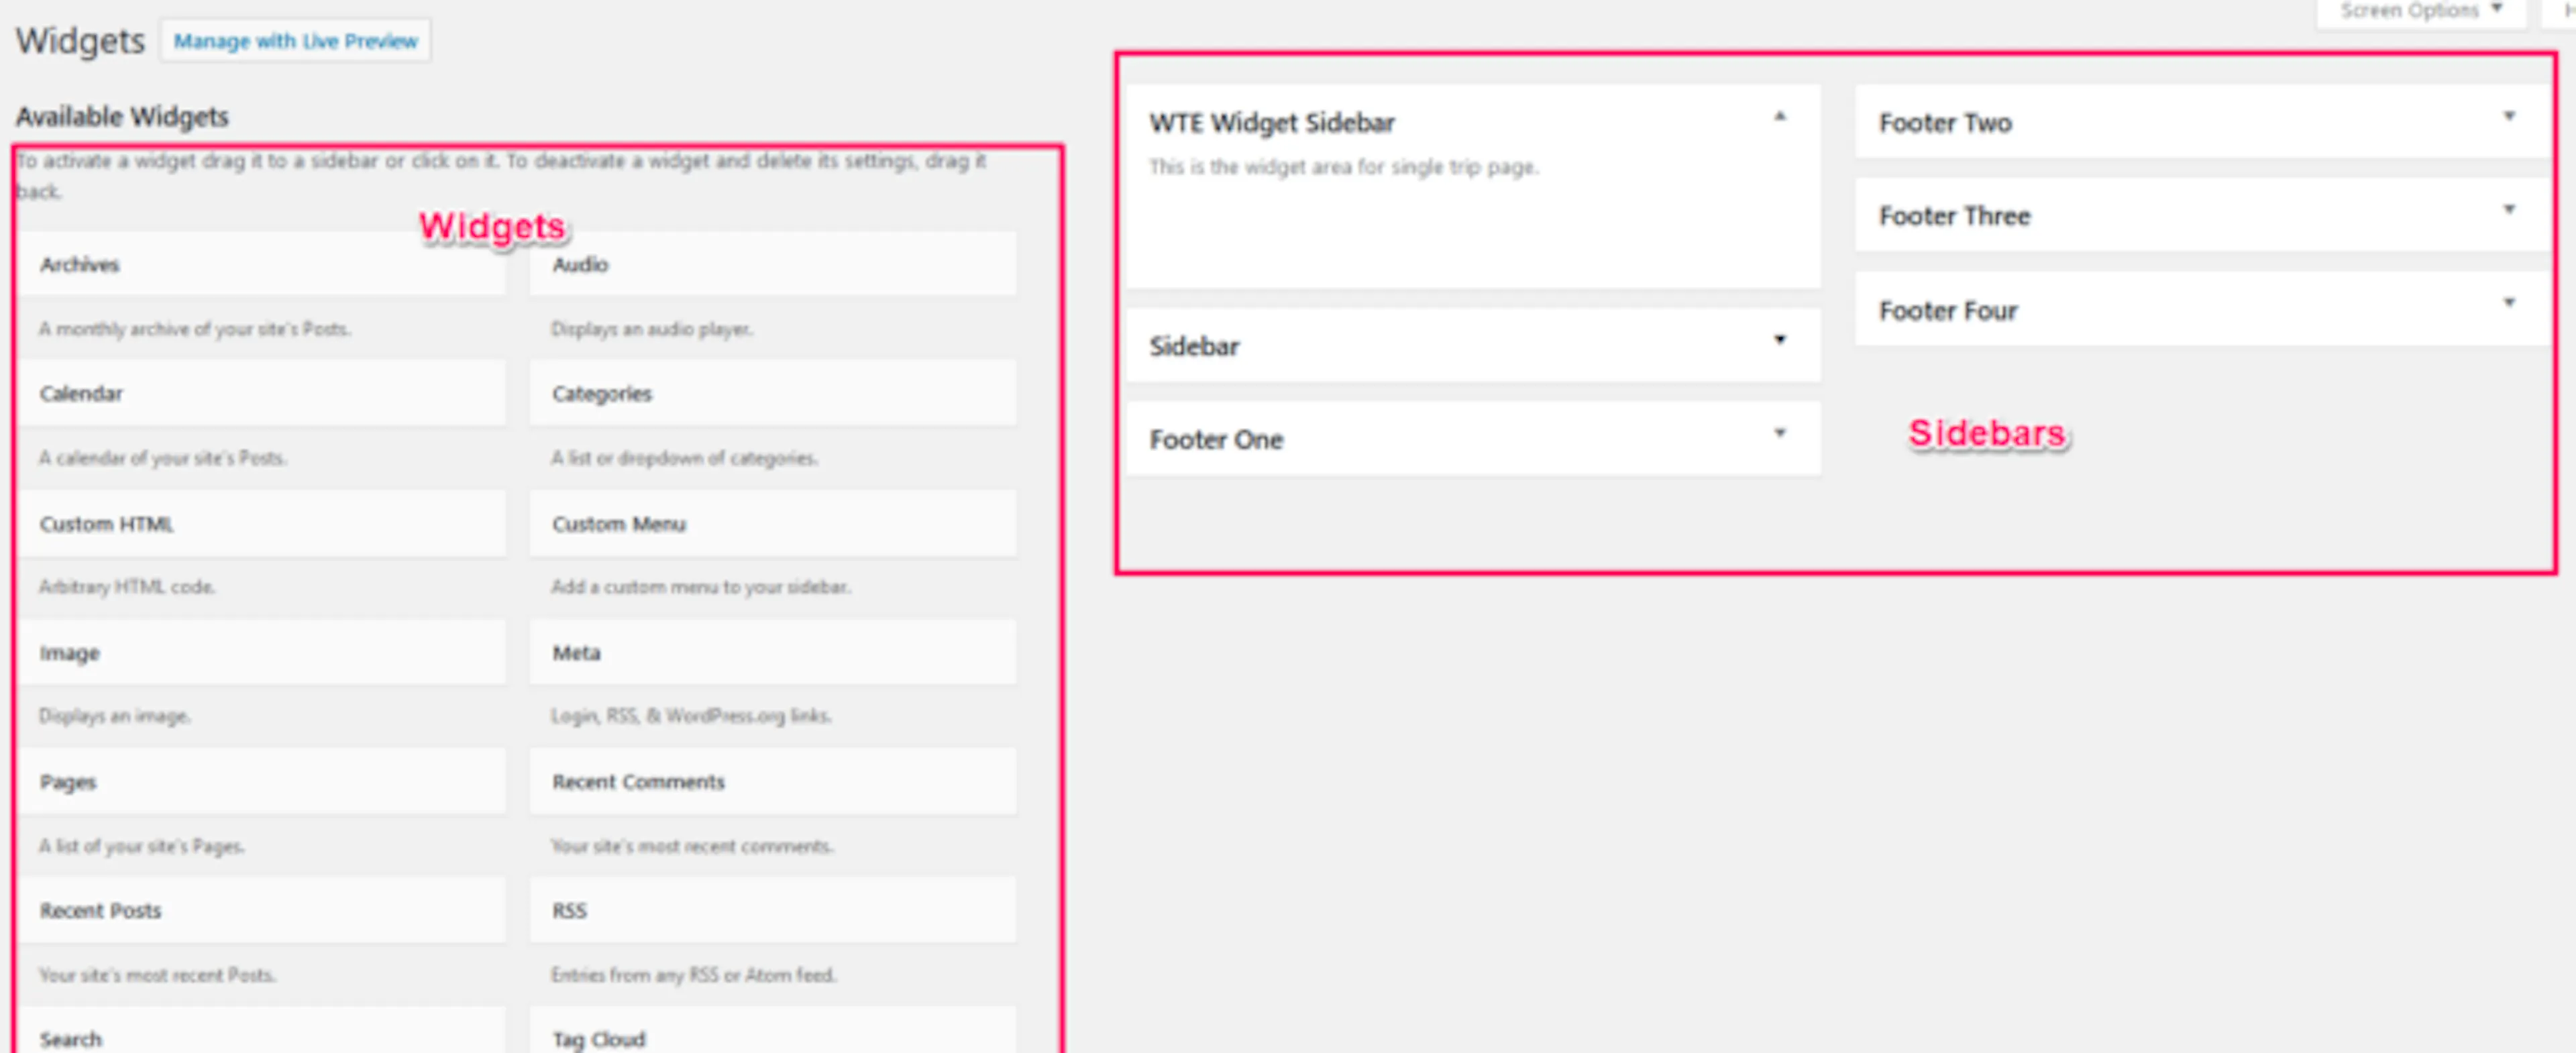
Go to Appearance > Widgets.
Place your widgets
Available widgets appear on the left. Sidebars and other widget areas appear on the right. Drag and drop each widget into the desired area.
Additional CSS
CSS is code that controls how your website looks, including colors, fonts, and spacing. Use Additional CSS when the theme settings do not provide the design change you need.
If you are not comfortable editing code, ask a developer to review your CSS. Keep a copy of any code you add so you can remove it later.
Open Additional CSS
Go to Appearance > Additional CSS.
Add your CSS
Enter your CSS code.
Save the code
Click Save & Publish.
Footer section
The footer is the area at the bottom of your website. Travel Booking has four footer widget areas where you can add contact details, a menu, trip links, or a newsletter widget.
Open the footer widget areas
Go to Appearance > Customize > Widgets.
Choose a footer area
Select Footer One, Footer Two, Footer Three, or Footer Four.
Add your footer widgets
Add the widgets you want to display in that footer area.
Footer credit settings
The footer credit is the text at the very bottom of your website. Tour businesses often use it for a copyright notice or business name.
Open Footer Settings
Go to Appearance > Footer Settings.
Enter your footer credit
Enter your desired footer credit text.
Publish the credit
Click Save & Publish.
Helpful tips
A few habits will protect your website as you make further changes.
Use a child theme if you need to change theme code. A child theme is a separate copy that keeps your changes safe when the main theme updates. Do not edit the parent theme files directly because an update will remove those changes.
Keep a backup of your theme before making changes. A backup gives you a way to restore your website if a setting or code change causes a problem.
If you run into an issue, try these checks:
- Deactivate unused plugins. Plugin conflicts can cause display or feature problems.
- Replace modified code with the original code.
- Contact support if the issue continues.
Your Travel Booking site is ready for your own branding and tour content. Add real trips, prices, destinations, seasonal offers, and booking information before sharing the site with travelers.
If you're still stuck or have a question we didn't cover, our support team is happy to help. Reach out at our support page and we'll get you sorted.