

Configure Site Identity
Add your logo, site title, tagline, and icon to your Travel Monster site so visitors recognize your tour brand at a glance.
What Site Identity controls
Your site's identity is the first thing visitors notice. It includes your logo, site title, tagline, and the little icon that shows up in browser tabs (called a favicon). These settings let you add all of those and control how they look.
Say a traveler lands on your homepage. The logo in the top corner tells them they're in the right place. The site title and tagline underneath reinforce your brand name and what you do. For example, your title might be "Himalayan Treks" and your tagline might be "Guided adventures in Nepal."
Getting to the Site Identity settings
You'll need the Travel Monster theme active on your WordPress site before these settings are available. If you haven't installed it yet, start with the Install Travel Monster Theme guide.
You'll find these settings in the WordPress Customizer. The Customizer is a live preview tool. It lets you see changes on your site before you publish them.
Open your WordPress dashboard
Log in to your WordPress dashboard. This is the admin area of your site. You can usually reach it by adding /wp-admin to your website address.
Open the Customizer
On the left sidebar of your dashboard, click Appearance, then click Customize. This opens the Customizer screen with your site visible on the right and settings on the left.
Open Site Identity settings
In the left panel, click Site Identity. You may need to scroll down to find it. This opens the settings panel shown below.
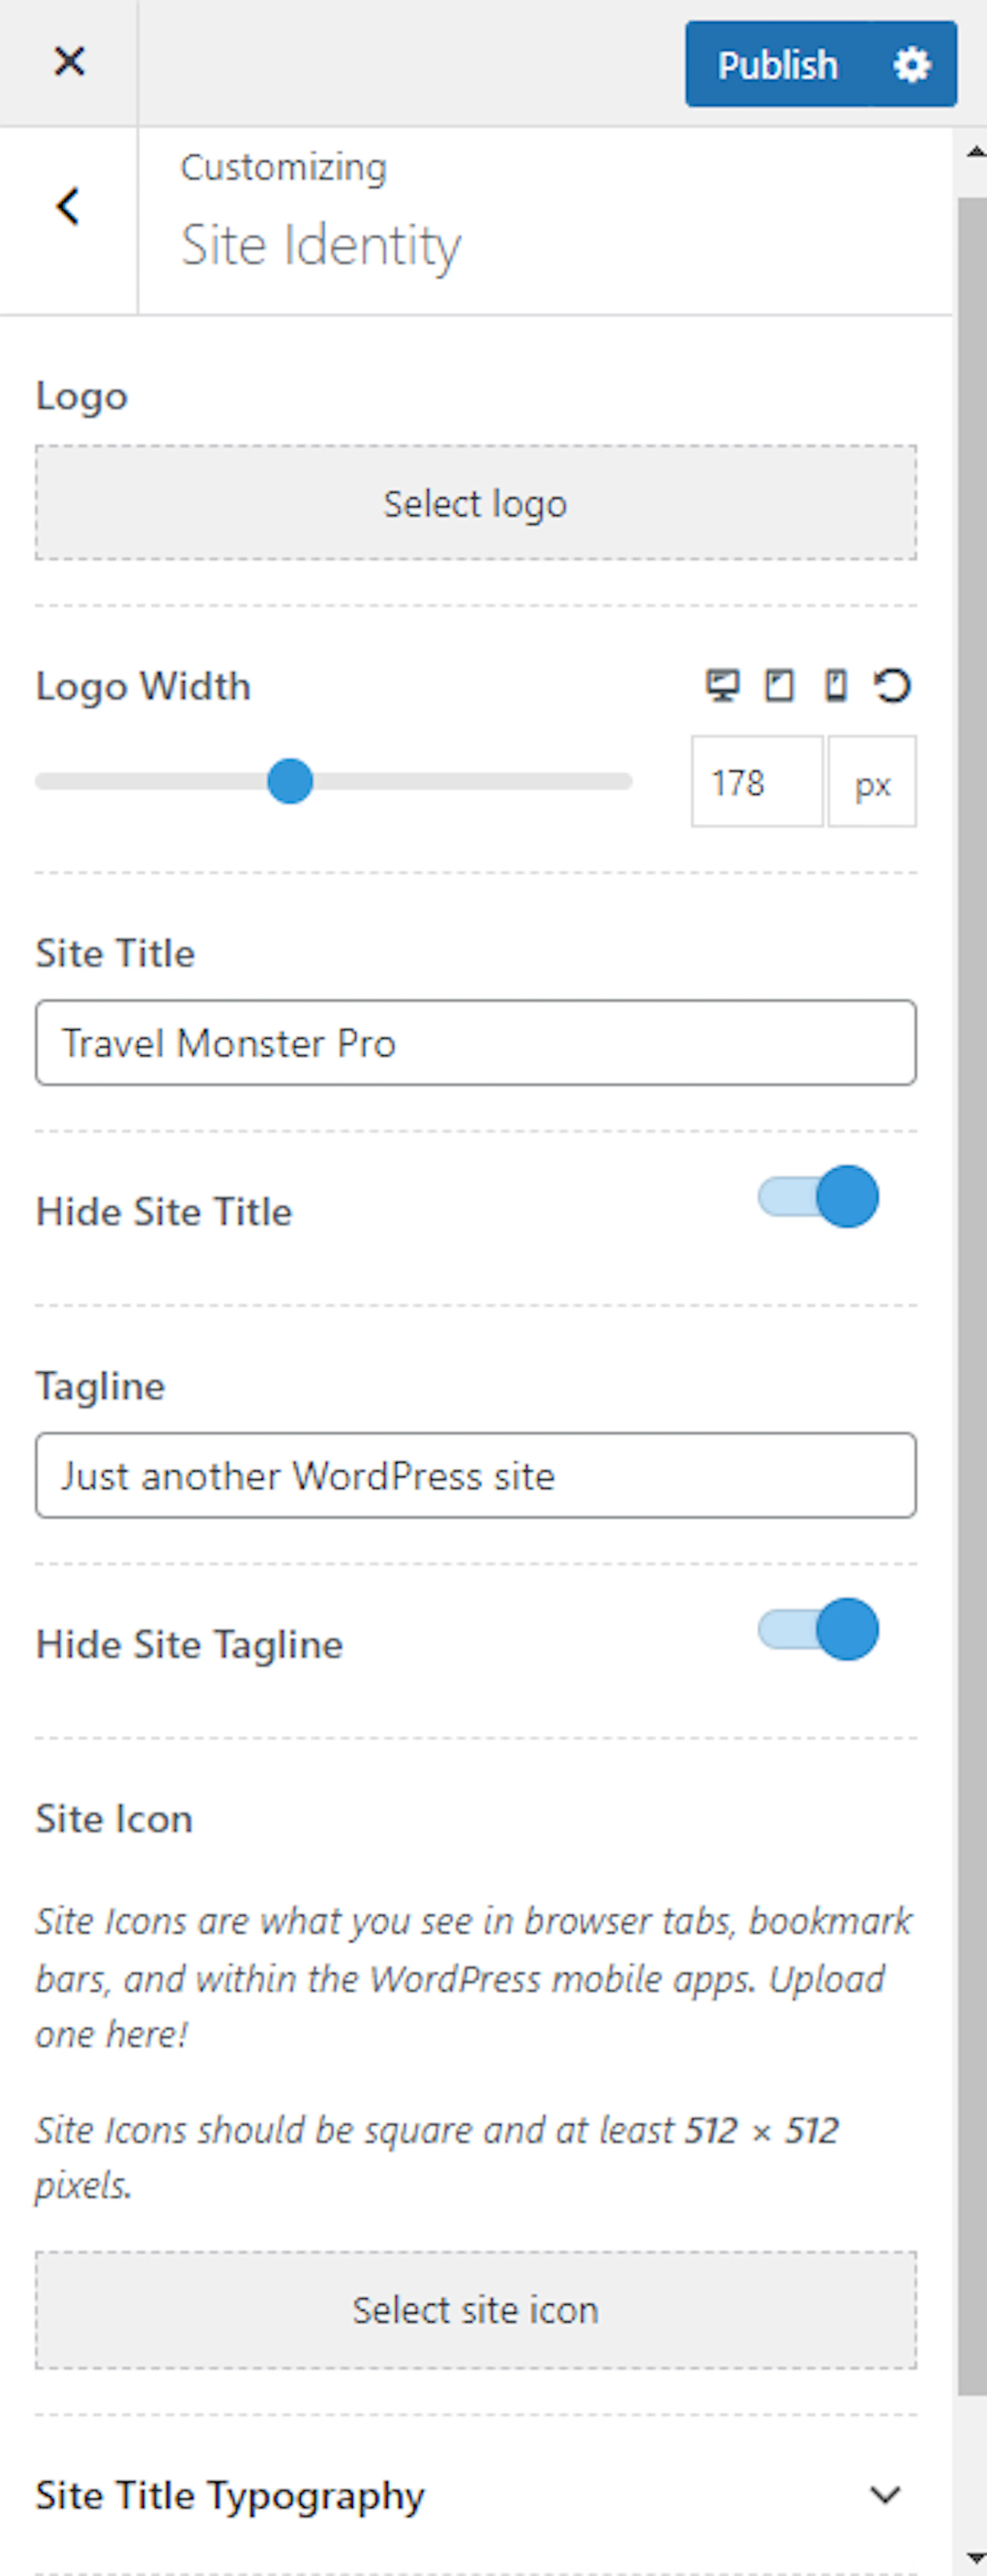
Take a moment to look through the panel. You'll see sections for your logo, site title, tagline, site icon, and font and color options for the title and tagline. Each one is described below.
Your logo
Your logo is the image that appears in your site's header. The header is the top section of every page. It's how travelers recognize your brand across your whole site.
| Setting | What it does |
|---|---|
| Logo | Uploads your site logo to display it in the site header. |
| Logo Width | Sets the logo's width across different screen sizes. You can set different widths for desktop, tablet, and phone. This way your logo always looks right. |
A good logo for a tour website is usually a simple, clear image. Think of your company name with a small icon or symbol. If you don't have a logo yet, you can skip this for now and come back to it later.
Site title
Your site title is the text name of your website. WordPress shows it in the header and in browser tabs. Even if you upload a logo, the site title still appears underneath. You can hide it if you'd prefer.
| Setting | What it does |
|---|---|
| Site Title | Sets your site's title text. This is usually your business or brand name. |
| Hide Site Title | Hides the site title text from the site header when enabled. |
The site title also appears in browser tabs and search results. That makes it worth filling in even if you hide it from the header.
Tagline
A tagline is a short phrase that appears under your site title. It describes what you do in a few words. For example, "Guided treks in the Himalayas" or "Small-group tours since 2015."
| Setting | What it does |
|---|---|
| Tagline | Sets your site's tagline text. |
| Hide Site Tagline | Hides the site tagline from the site header when enabled. |
If your logo already includes your business name, you might not need the site title text cluttering the header. Enable Hide Site Title after uploading your logo to keep things clean. The same goes for the tagline. If you'd rather keep the header focused on the title alone, hide the tagline too.
Site icon
| Setting | What it does |
|---|---|
| Site Icon | Uploads the icon used as your site's favicon. A favicon is the small image that appears in the browser tab when someone visits your site. |
Think of the site icon as a tiny version of your logo. It should be a square image, at least 512 by 512 pixels. Travelers who keep your site open in a browser tab will see this icon and recognize it's your site.
Site title typography
These settings control how your site title text looks. That includes the font, size, spacing, and style. They only affect the site title, not other text on your site.
| Setting | What it does |
|---|---|
| Font Family | Sets the font family applied to the site title. The font family is the overall style of the letters. For example, you might choose a clean modern font or a more traditional one. |
| Font Size | Sets the site title's font size across different screen sizes. You can choose different sizes for desktop, tablet, and phone. |
| Line Height | Sets the line height value for the site title. Line height controls the vertical space between lines of text. |
| Letter Spacing | Sets the spacing applied between the site title's letters. |
| Font Weight | Sets the font weight for the site title. Font weight controls how thick or thin the letters appear. The range goes from light to bold. |
| Transform | Sets the text capitalization style for the site title. For example, you can make all letters uppercase or capitalize the first letter of each word. |
If you're not sure what to pick, the default settings work well for most tour websites. You can always come back and adjust later.
Site title and tagline colors
| Setting | What it does |
|---|---|
| Site Title Color | Sets the color of the site title text. |
| Site Tagline Color | Sets the color of the site tagline text. |
If your header has a dark background, choose a light color for your title and tagline. This keeps them easy to read. If the background is light, go with a darker color. The goal is contrast. Your text should stand out clearly against the background.
Don't forget to click Publish at the top of the Customizer when you're happy with your changes. Until you do, everything you've set up here stays as a preview only.
If you're still stuck or have a question we didn't cover, our support team is happy to help. Reach out at our support page and we'll get you sorted.
\
Next step
General Settings
Continue configuring your Travel Monster site's core layout and behavior settings.