

Razorpay Payment Gateway
Set up Razorpay in WP Travel Engine so travelers can pay for your tours online, then test the checkout flow before you go live.
Overview
Razorpay lets you accept online payments on your travel booking website. After you connect it to WP Travel Engine, travelers can pay during checkout instead of contacting you later.
This can reduce payment follow-ups for your business. It also gives travelers a smoother way to pay for a day tour, trek, or multi-day package.
What is Razorpay Payment Gateway?
Razorpay is a payment service. It collects payments from your customers and sends payment updates back to your website.
When someone books a tour, Razorpay handles the payment part of the booking. Your website then receives an update that tells it whether the payment succeeded, failed, or needs attention.
Supported payment methods
Your customers can use these payment methods when you connect Razorpay to WP Travel Engine:
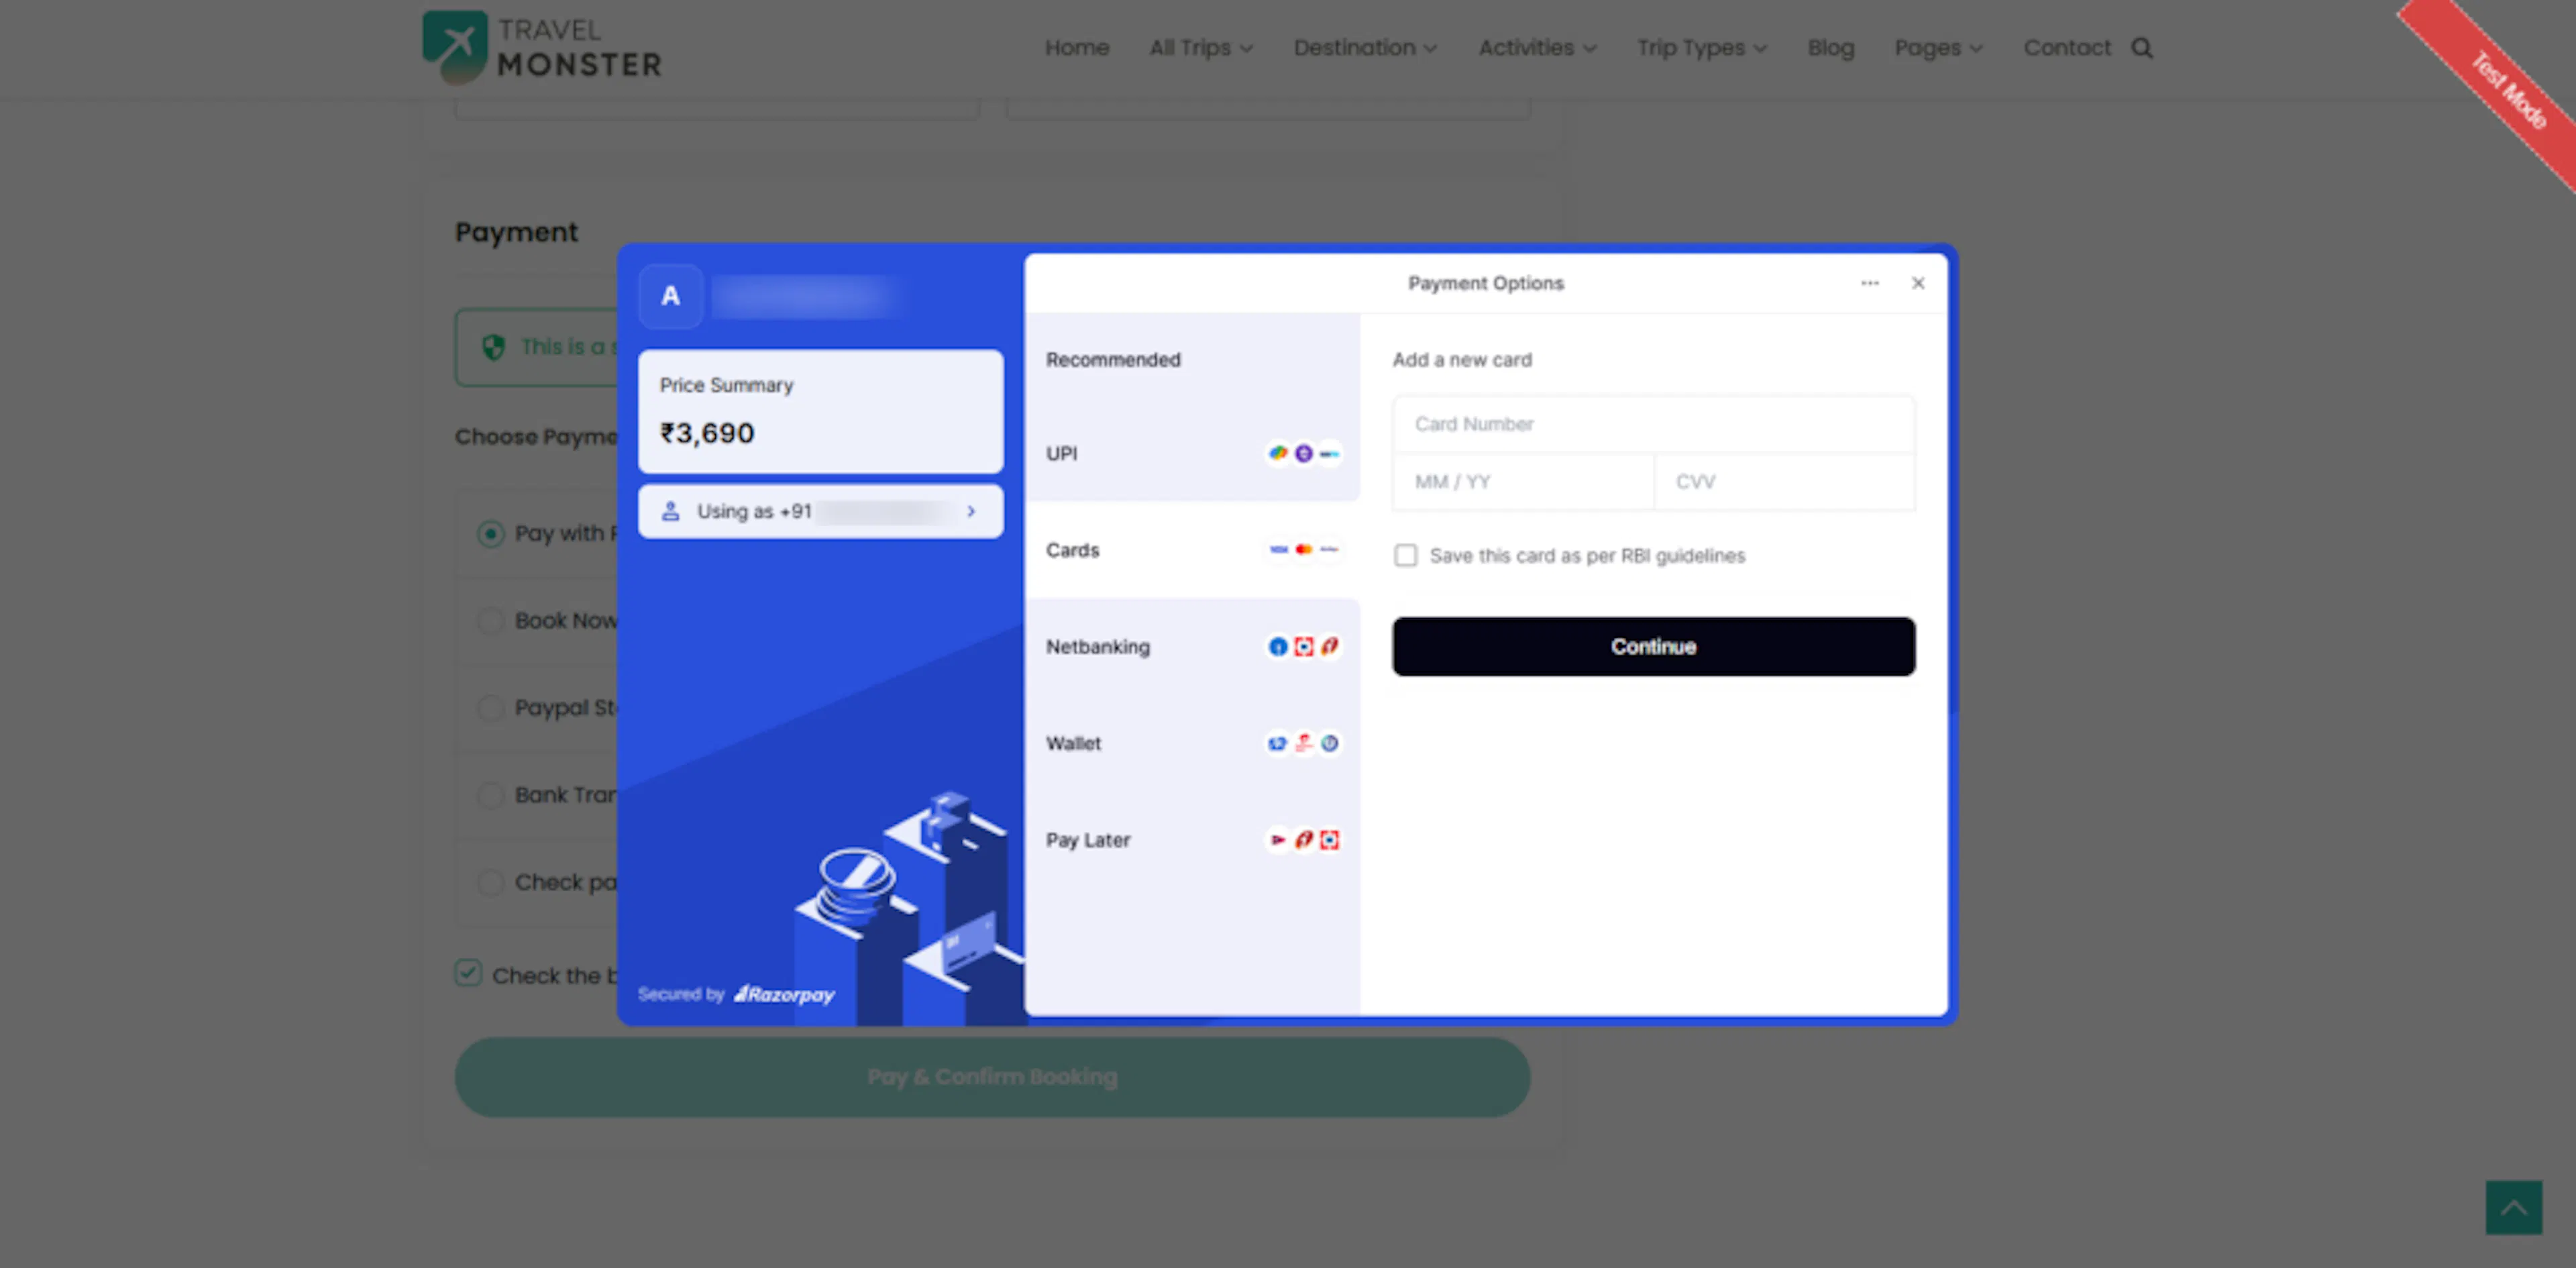
- Credit and debit cards, including Visa and Mastercard
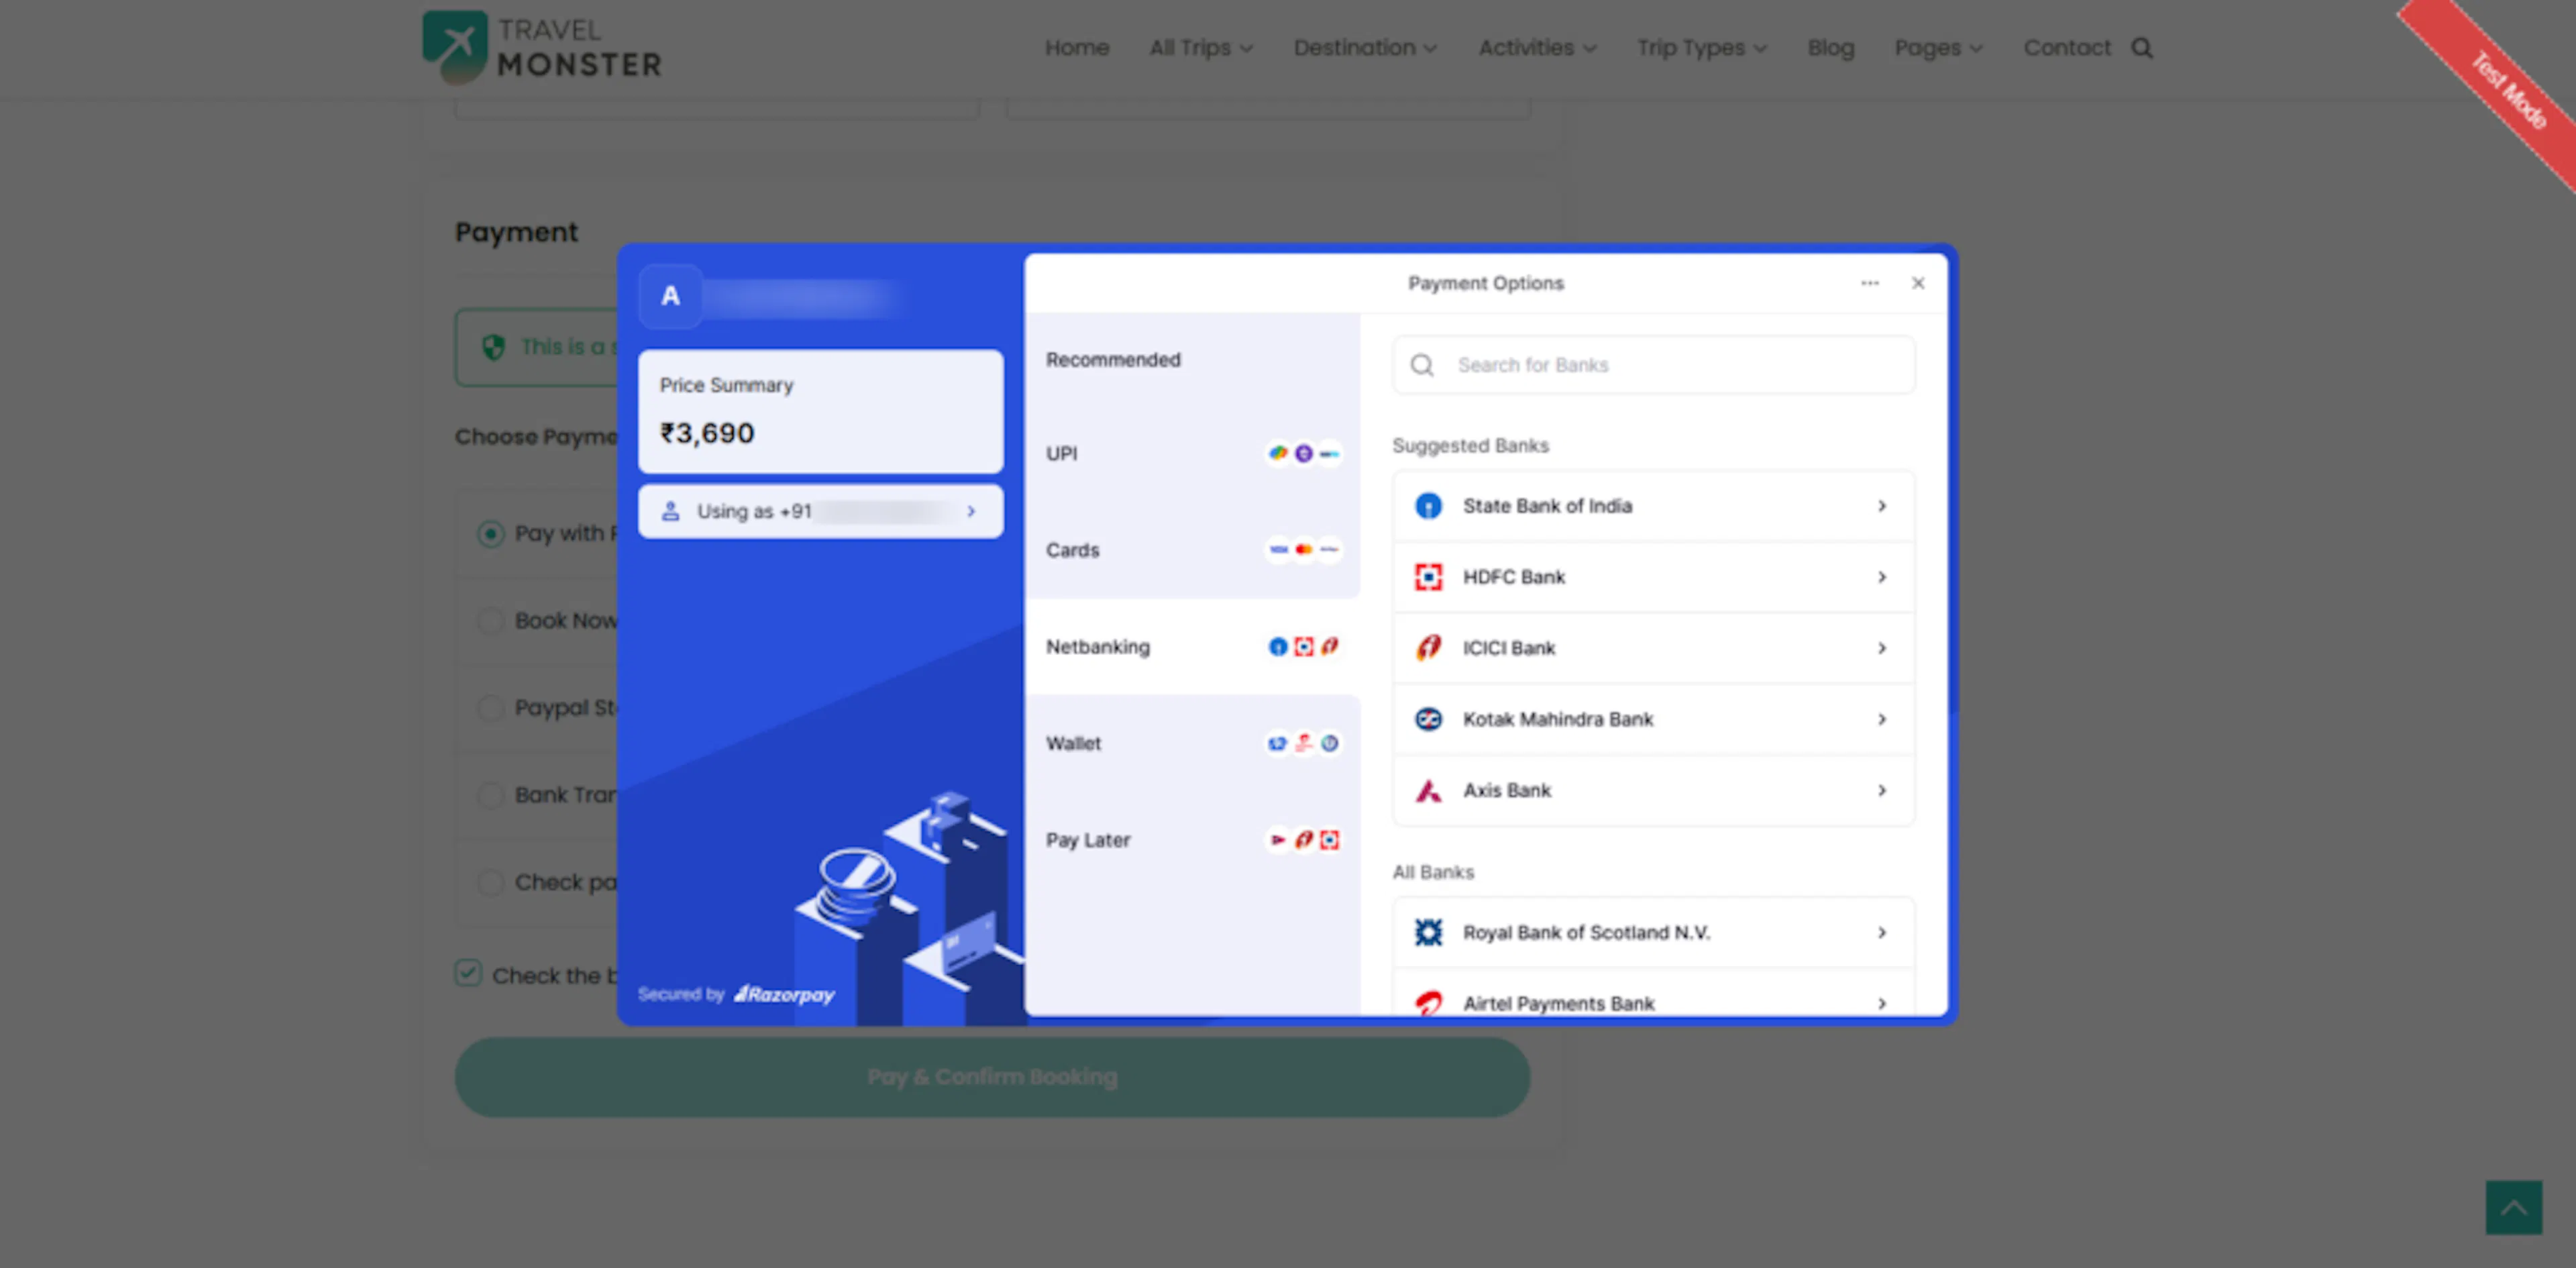
- Net banking through major banks in India
- UPI, which lets customers pay directly from a supported bank account or payment app
- Digital wallets, including Airtel Payments Bank, Mobikwik, Jio Money, Freecharge, and others
- Pay Later options, including LazyPay, ICICI, ePayLater, Kotak Mahindra Bank, Amazon Pay Later, RazorpayX Postpaid, and others
The choices can help different travelers pay in the way they prefer. For example, one guest booking a weekend wildlife tour may use UPI. Another guest booking a family holiday package may use a card.
For more detail about supported payment methods, see Razorpay's payment methods documentation.
You now know what travelers can use to pay. Next, check whether Razorpay supports the region where your business operates.
Supported regions
Razorpay primarily supports businesses and payments in India. Businesses with international operations can also accept payments from global customers using cards.
Check the full list of supported regions on the Razorpay website.
If you serve travelers from outside India, review the regional requirements before you go live. This helps you avoid problems when someone tries to pay for a tour from another country.
Your region and payment methods are the first things to confirm. Razorpay can then help you collect and track booking payments.
Why use Razorpay for your travel booking website?
- Wide range of payment options: Let customers choose a card, UPI, net banking, wallet, or Pay Later option.
- Payment processing during checkout: Let travelers pay while they book instead of arranging payment later.
- Payment security: Razorpay follows PCI-DSS standards for secure transactions.
- Payment updates: Receive updates when a payment succeeds or fails.
For example, you can confirm a deposit for a group trekking package soon after the traveler pays. You can then follow up only when a payment needs attention.
Before you begin
Have these items ready:
- Your WordPress admin login. WordPress is the system that runs your website. You use its dashboard to manage pages, plugins, and WP Travel Engine.
- Access to WP Travel Engine Pro and the Razorpay Payment Gateway add-on, version 1.0.7 or later. An add-on is an extra package that adds a feature to WP Travel Engine.
- WP Travel Engine core plugin version 6.8.7 or later. A plugin is a package that adds features to WordPress. This version gives you the combined settings card and the Verify Connection button used in this guide.
- Your Razorpay account with access to Settings > API Keys.
On older WP Travel Engine versions, the add-on still works. The Key ID, Key Secret, and Webhook fields appear as plain text fields on separate tabs. The Verify Connection button is not available. See Older WP Travel Engine versions at the end of this guide.
You do not need to be a WordPress expert for this setup. Keep this page open while you work through the steps.
Step-by-step configuration guide
The setup has five parts. You will install the add-on, connect Razorpay, add a webhook, enable Razorpay, and test one booking.
Install and activate the Razorpay Payment Gateway add-on
The add-on must be active before Razorpay can appear in your payment settings.
Follow the pro add-on installation and license activation guide.
Your WordPress dashboard is the admin area you see after logging in. Its main menu is on the left side of the screen.
When the add-on is active, Razorpay is ready to configure. You can move on to the connection settings.
Enter your Razorpay details and create a webhook
This step connects your website to Razorpay and lets Razorpay send payment updates back to your bookings.
Open the Razorpay settings
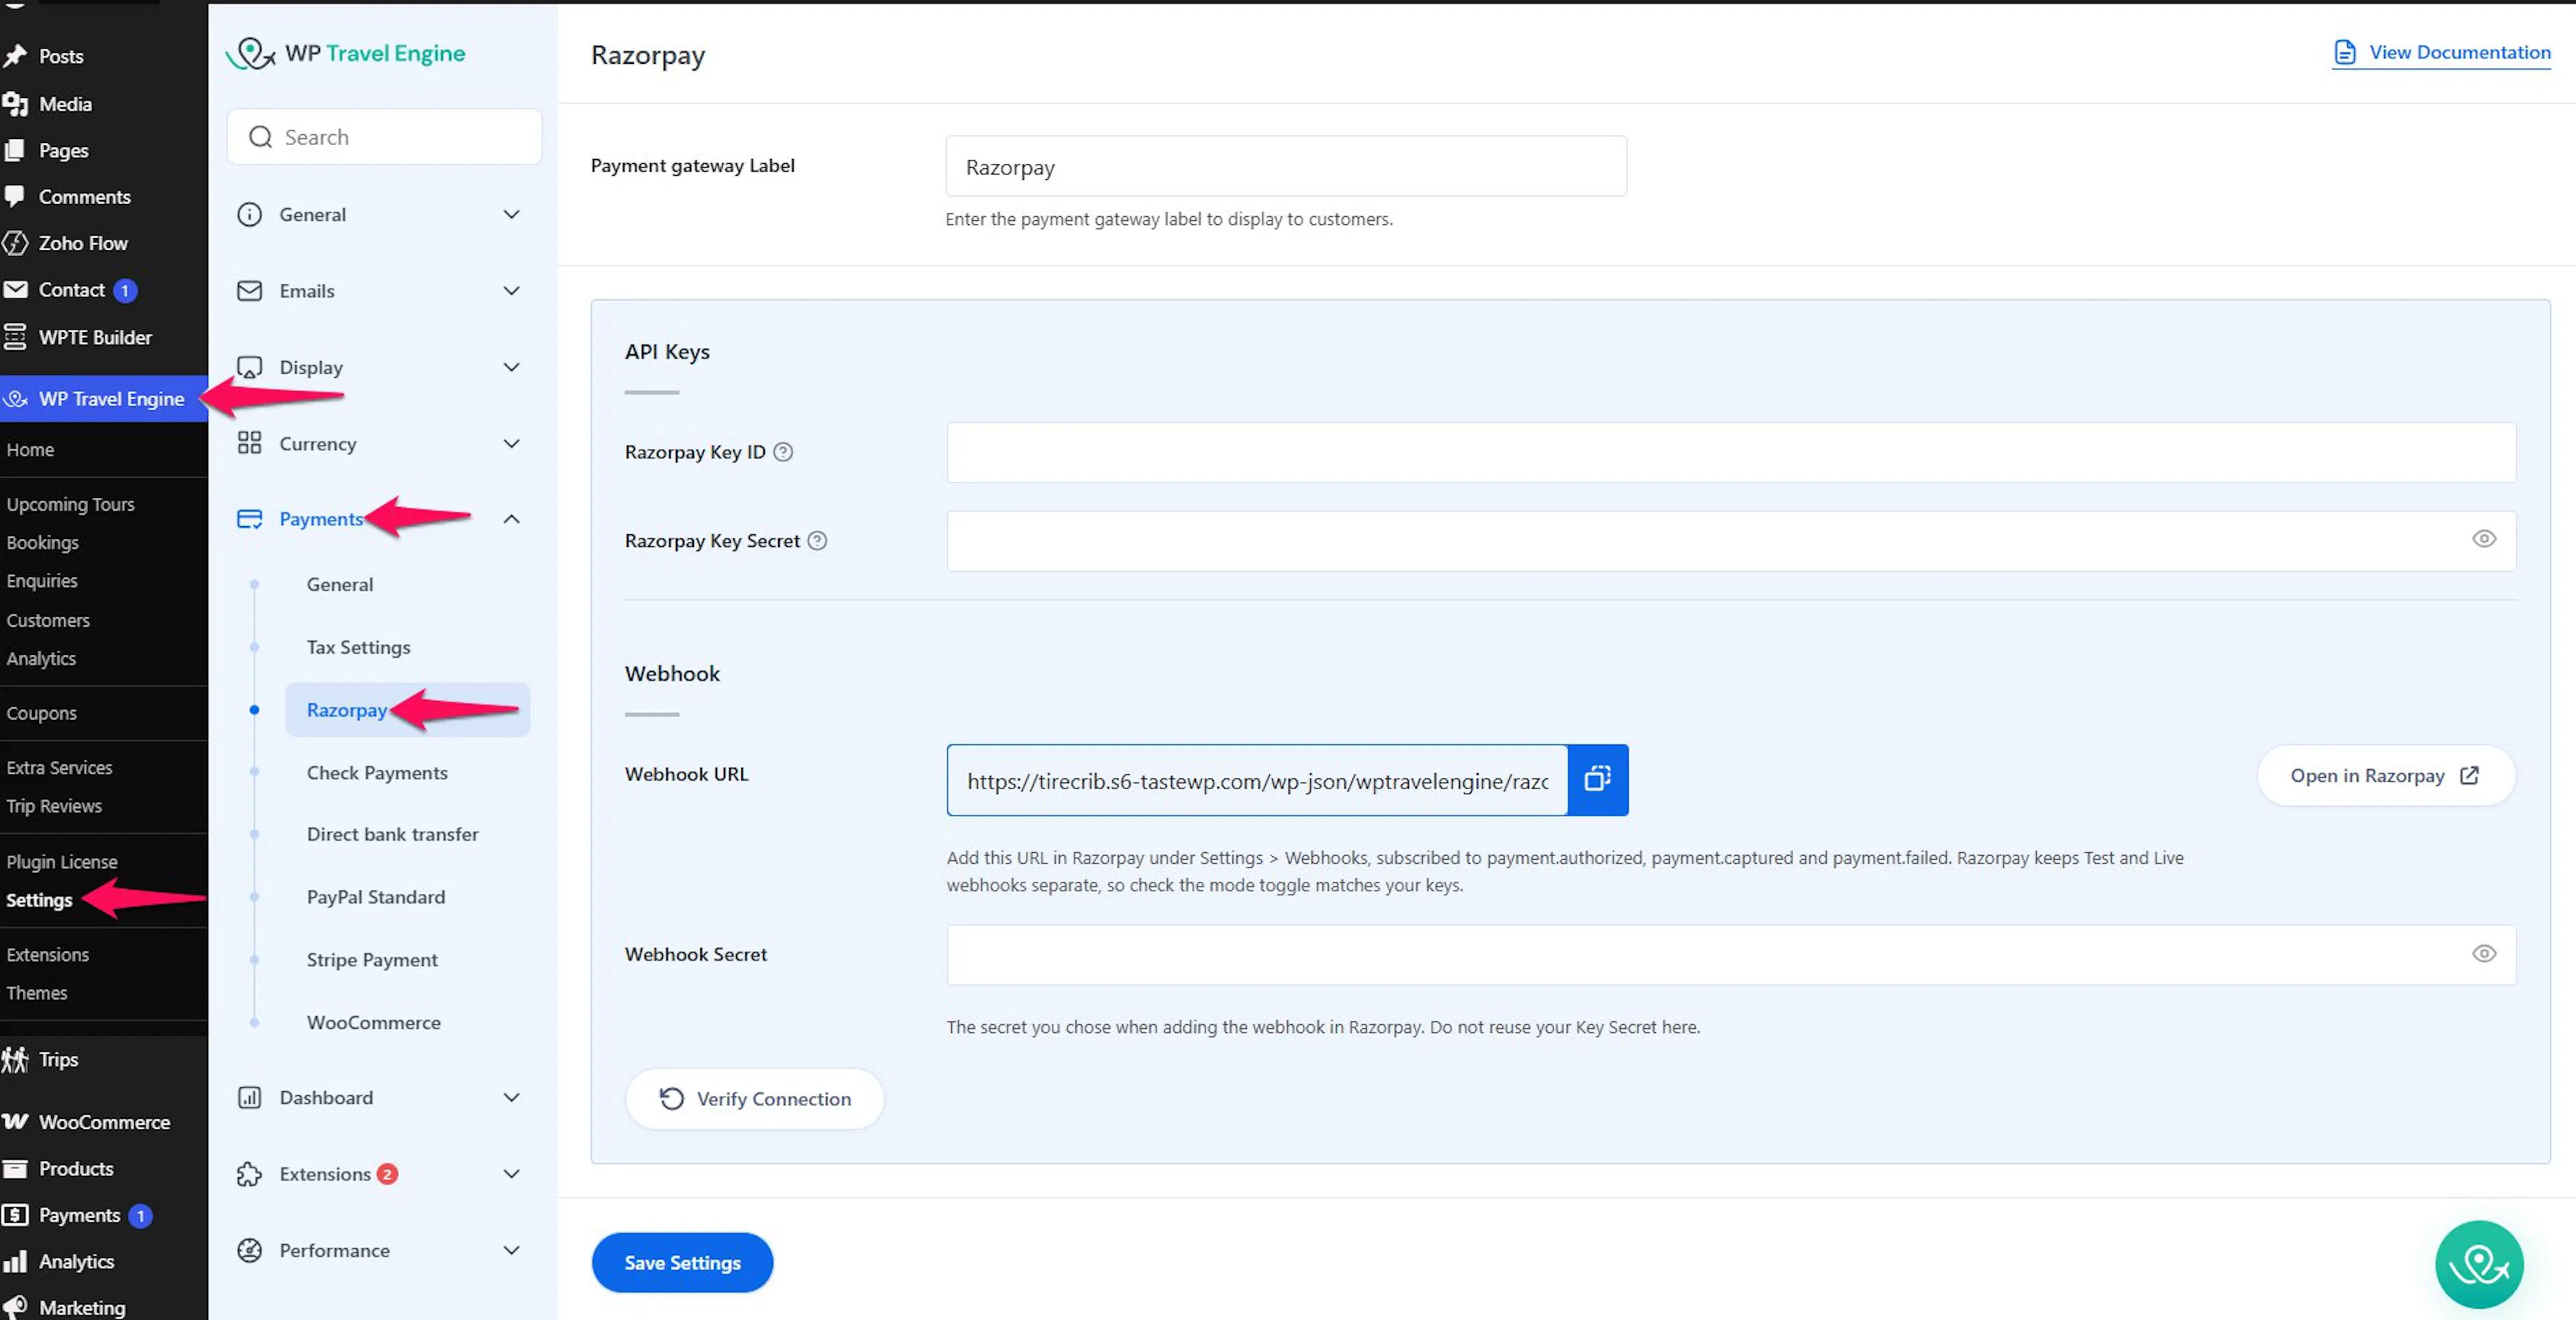
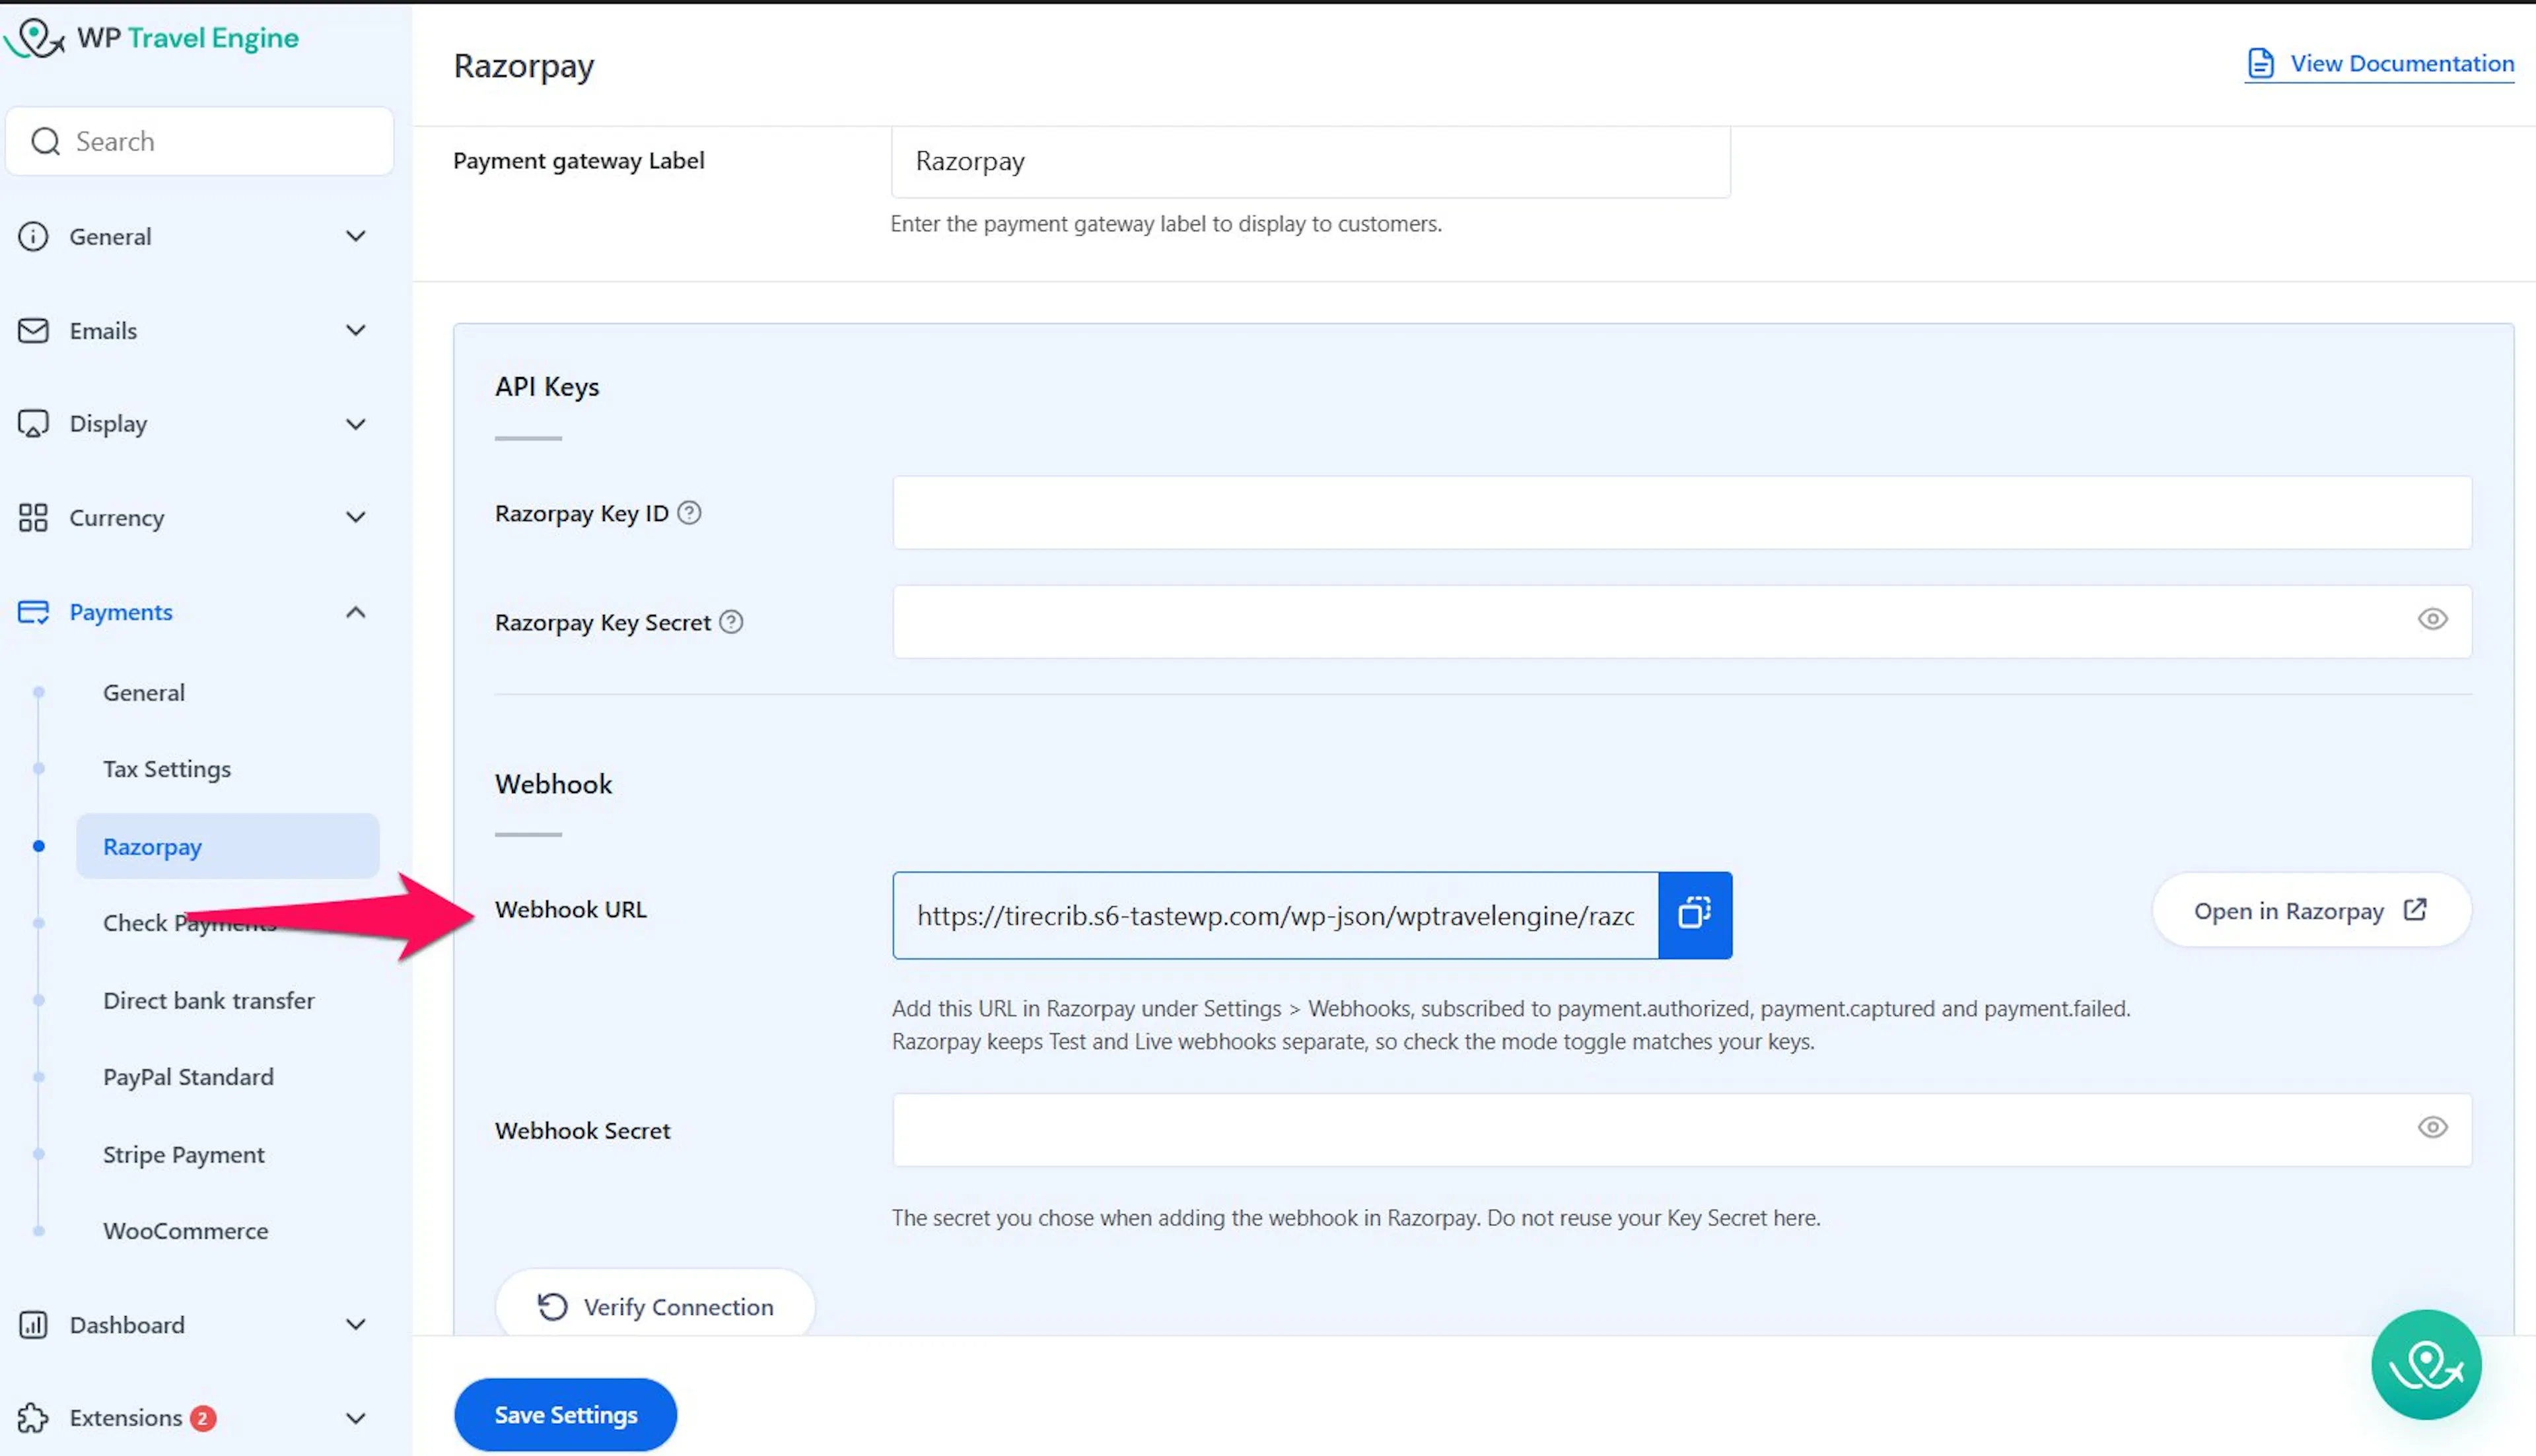
In your WordPress dashboard, use the menu on the left to open WP Travel Engine > Settings > Payments > Razorpay.
Choose the payment label
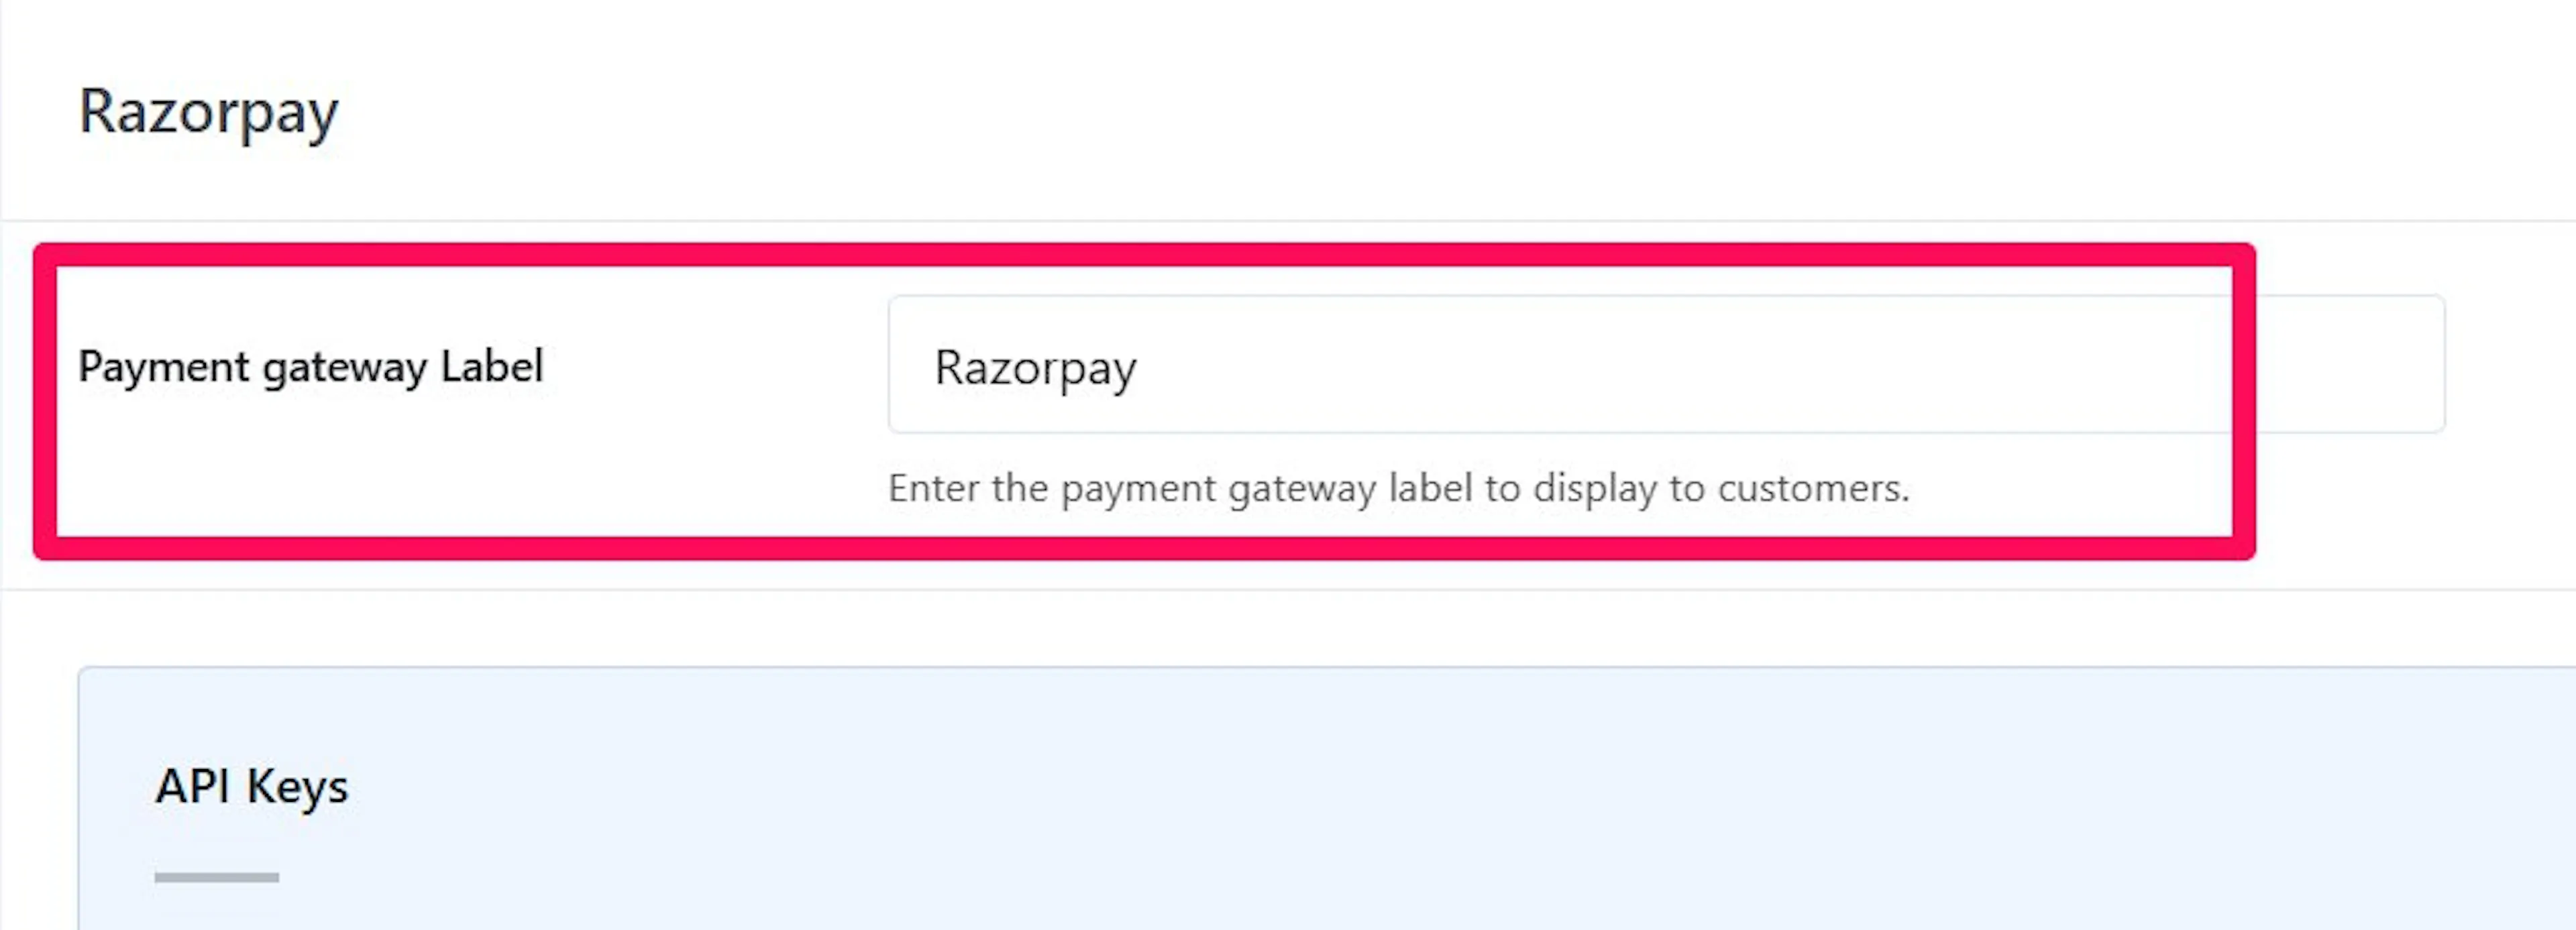
The payment gateway label is the name travelers see at checkout. A payment gateway is the service that collects the payment.
The default label is Razorpay. You can change it to Pay with Razorpay if that is clearer for your customers.
Add your API keys
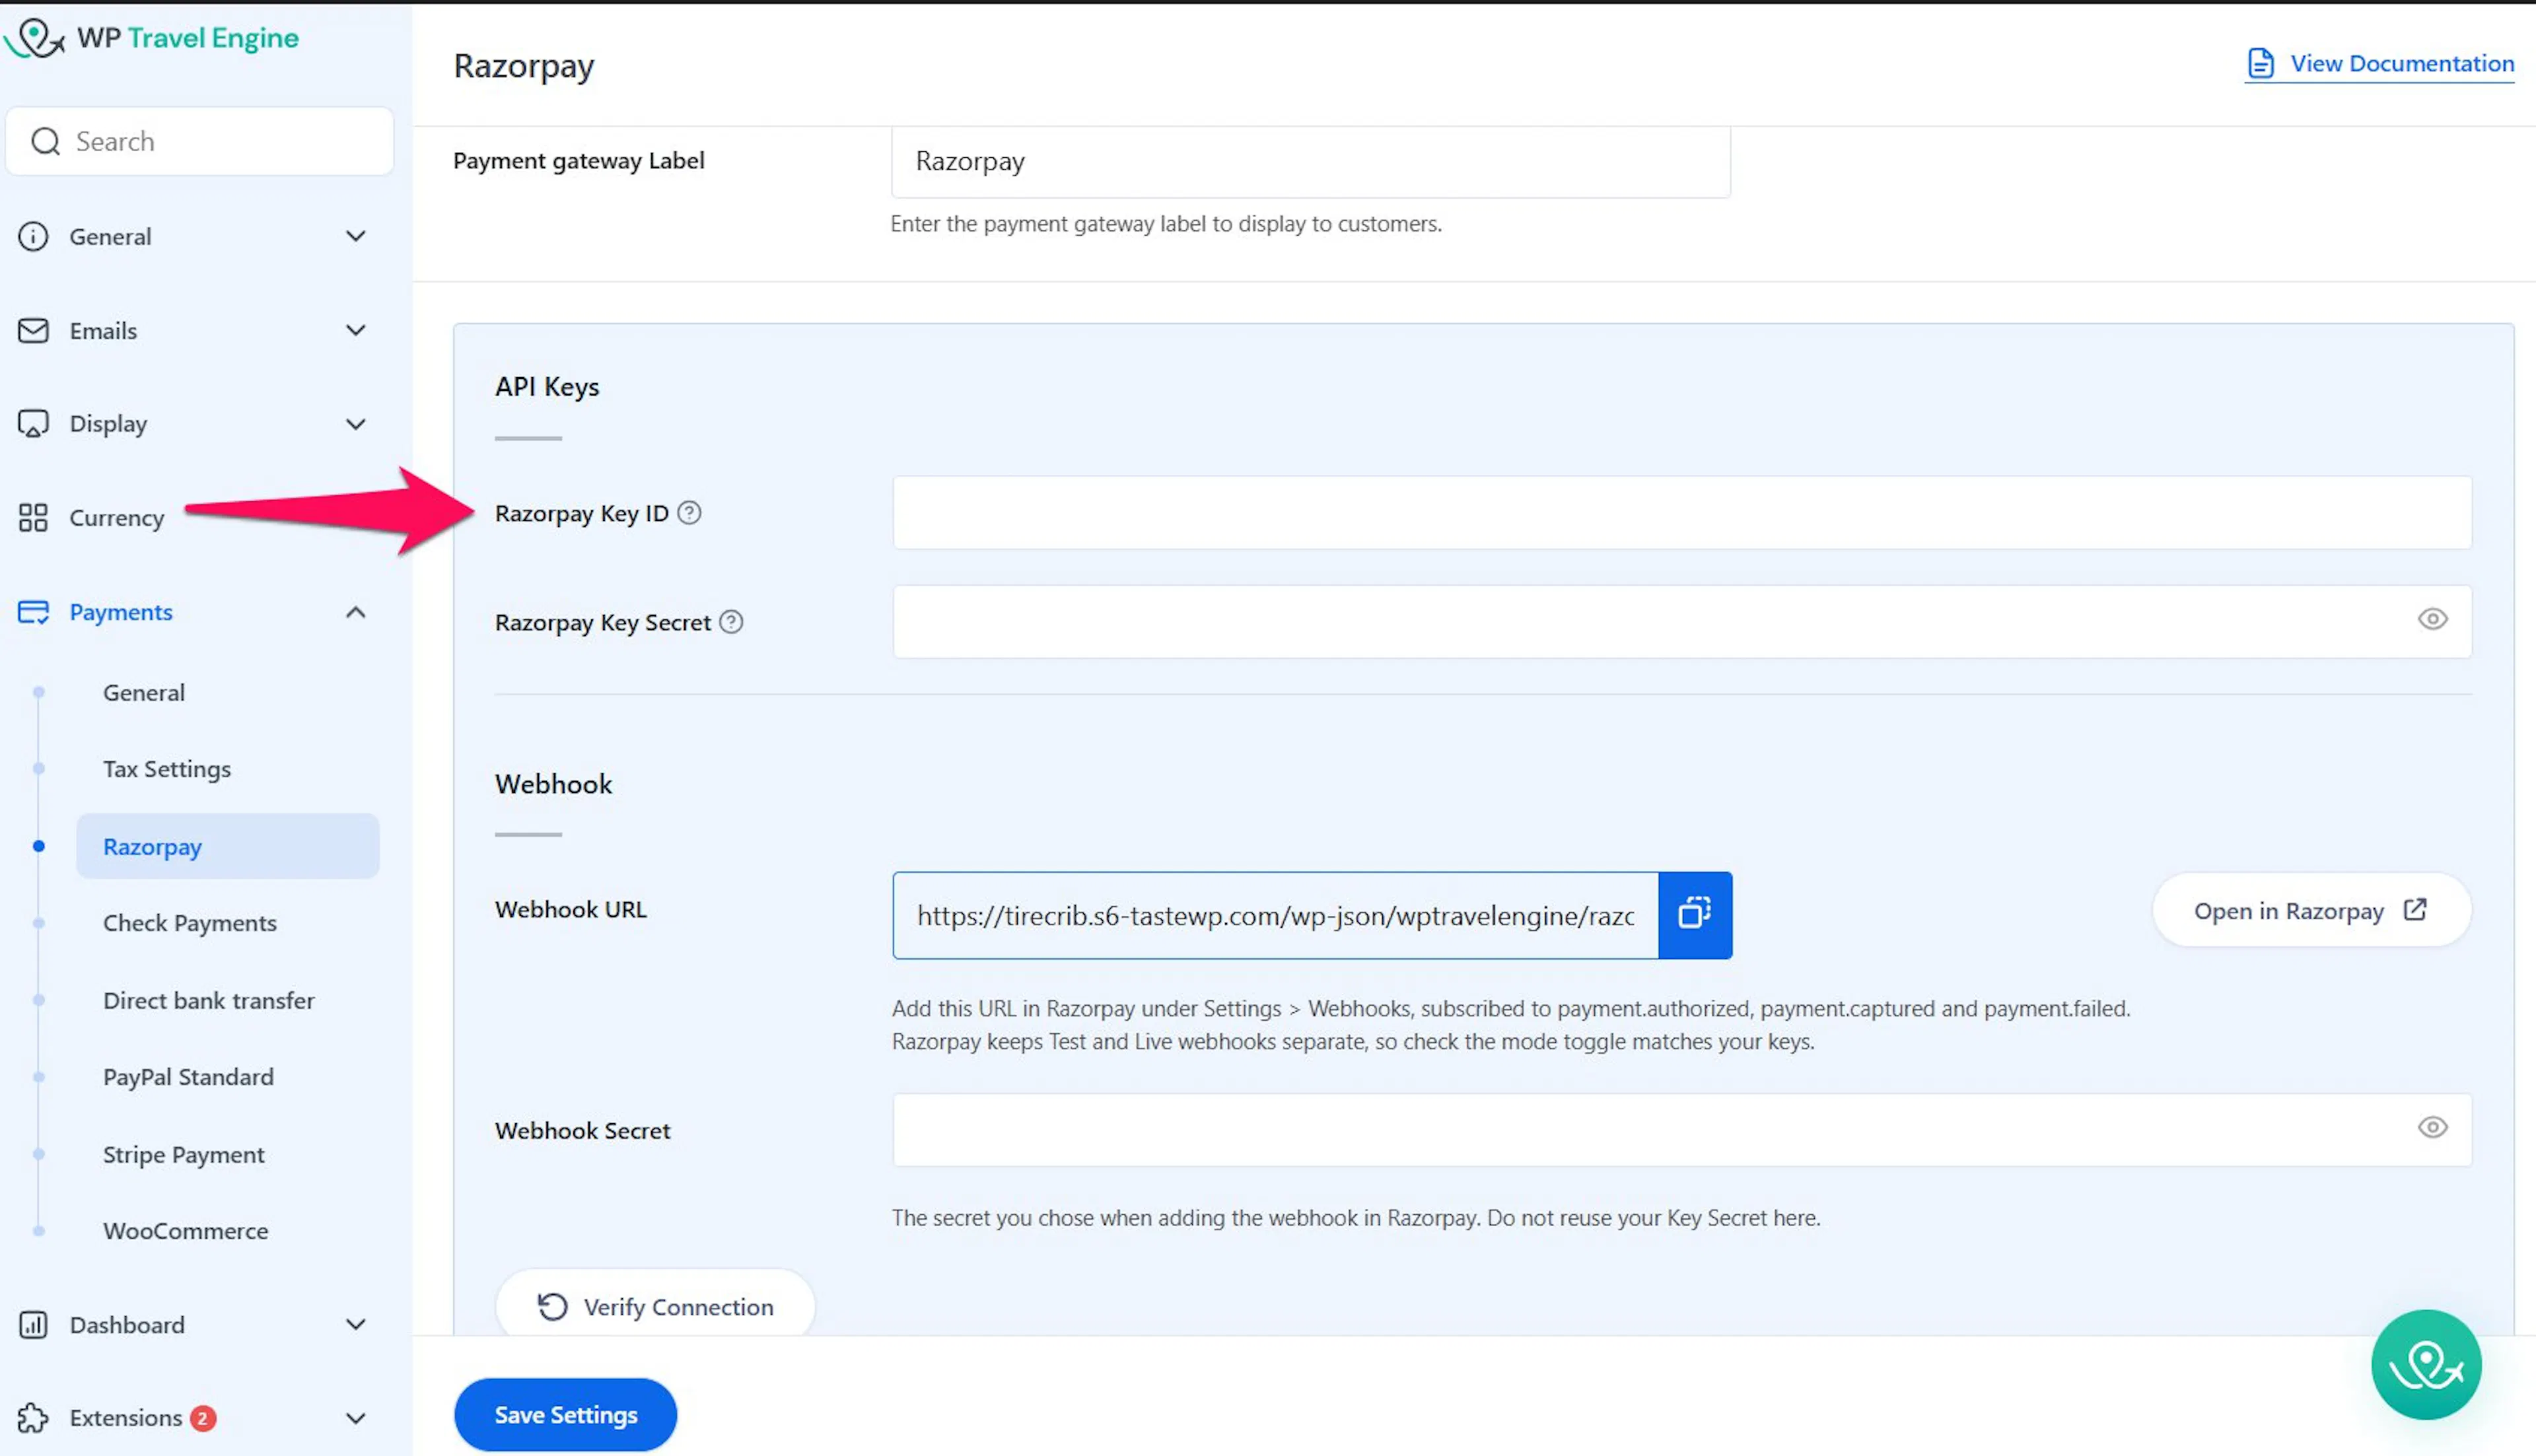
An API key is a private code that lets your website connect to Razorpay. Razorpay gives you two parts: a Key ID and a Key Secret.
Your Key ID identifies your Razorpay account. Your Key Secret works with the Key ID to confirm that your website is allowed to use the account.
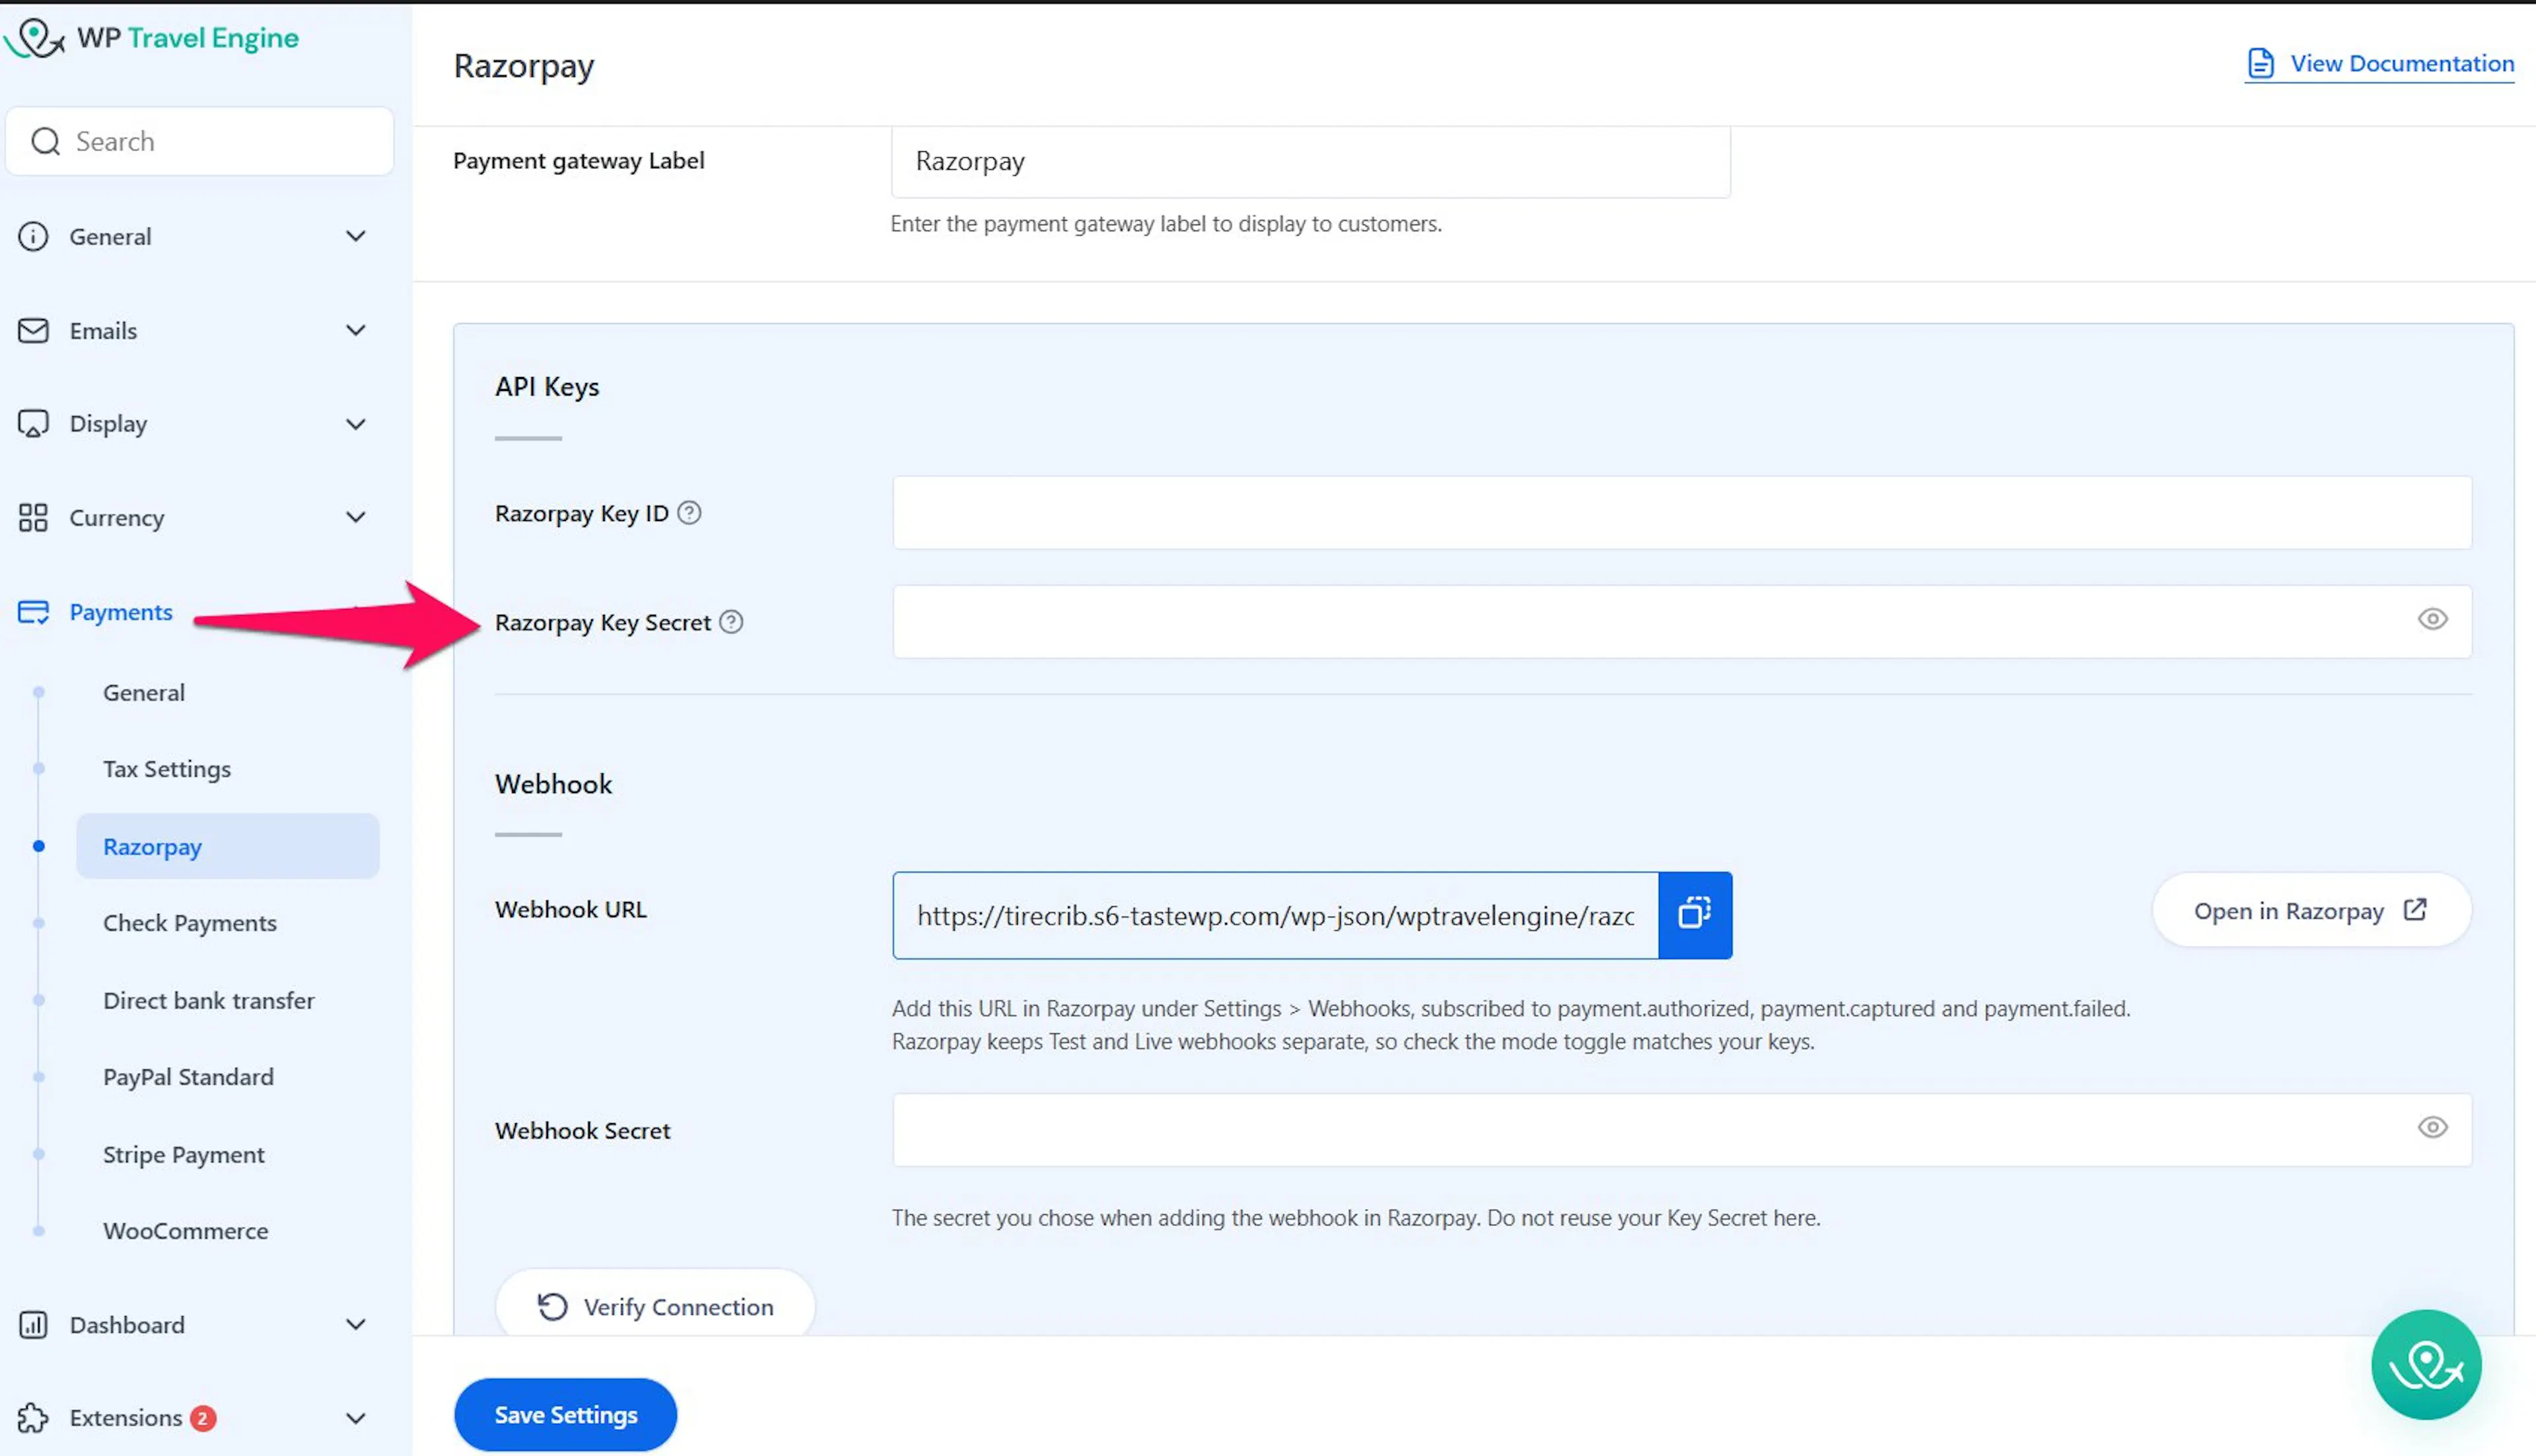
Under API Keys, enter the following details:
- Razorpay Key ID: Find this in your Razorpay Dashboard under Account & Settings > API Keys.
- Razorpay Key Secret: Find this beside the Key ID in the same Razorpay screen.
See Razorpay's guide to generating Test and Live API keys if you need help finding these values.
Test keys start with rzp_test_. Live keys start with rzp_live_. You will use the matching key type when you test or accept real payments.
Razorpay shows the Key Secret only once when you create the key. If you did not save it, you must create a new key pair in the Razorpay Dashboard.
Keep your Key Secret private. Do not send it in an email to a customer or paste it into a public support forum.
After you enter the keys, your website can connect to Razorpay. The next part makes sure your booking payment status stays up to date.
Add the webhook
A webhook is an automatic message from Razorpay to your website. It tells your site when a payment is authorized, captured, or failed.
This keeps the payment status in WP Travel Engine in sync with Razorpay. For example, it helps your site mark a trekking deposit as paid after Razorpay confirms the payment.
Copy the webhook URL
In your Razorpay add-on settings, find Webhook URL. Click the copy icon beside it.
The URL is the address Razorpay will use to send payment updates to your website.
Open Razorpay webhook settings
Click Open in Razorpay beside the Webhook URL field. Razorpay opens its Webhooks page in a new browser tab.
You can also open it from Account & Settings > Webhooks in the Razorpay Dashboard.
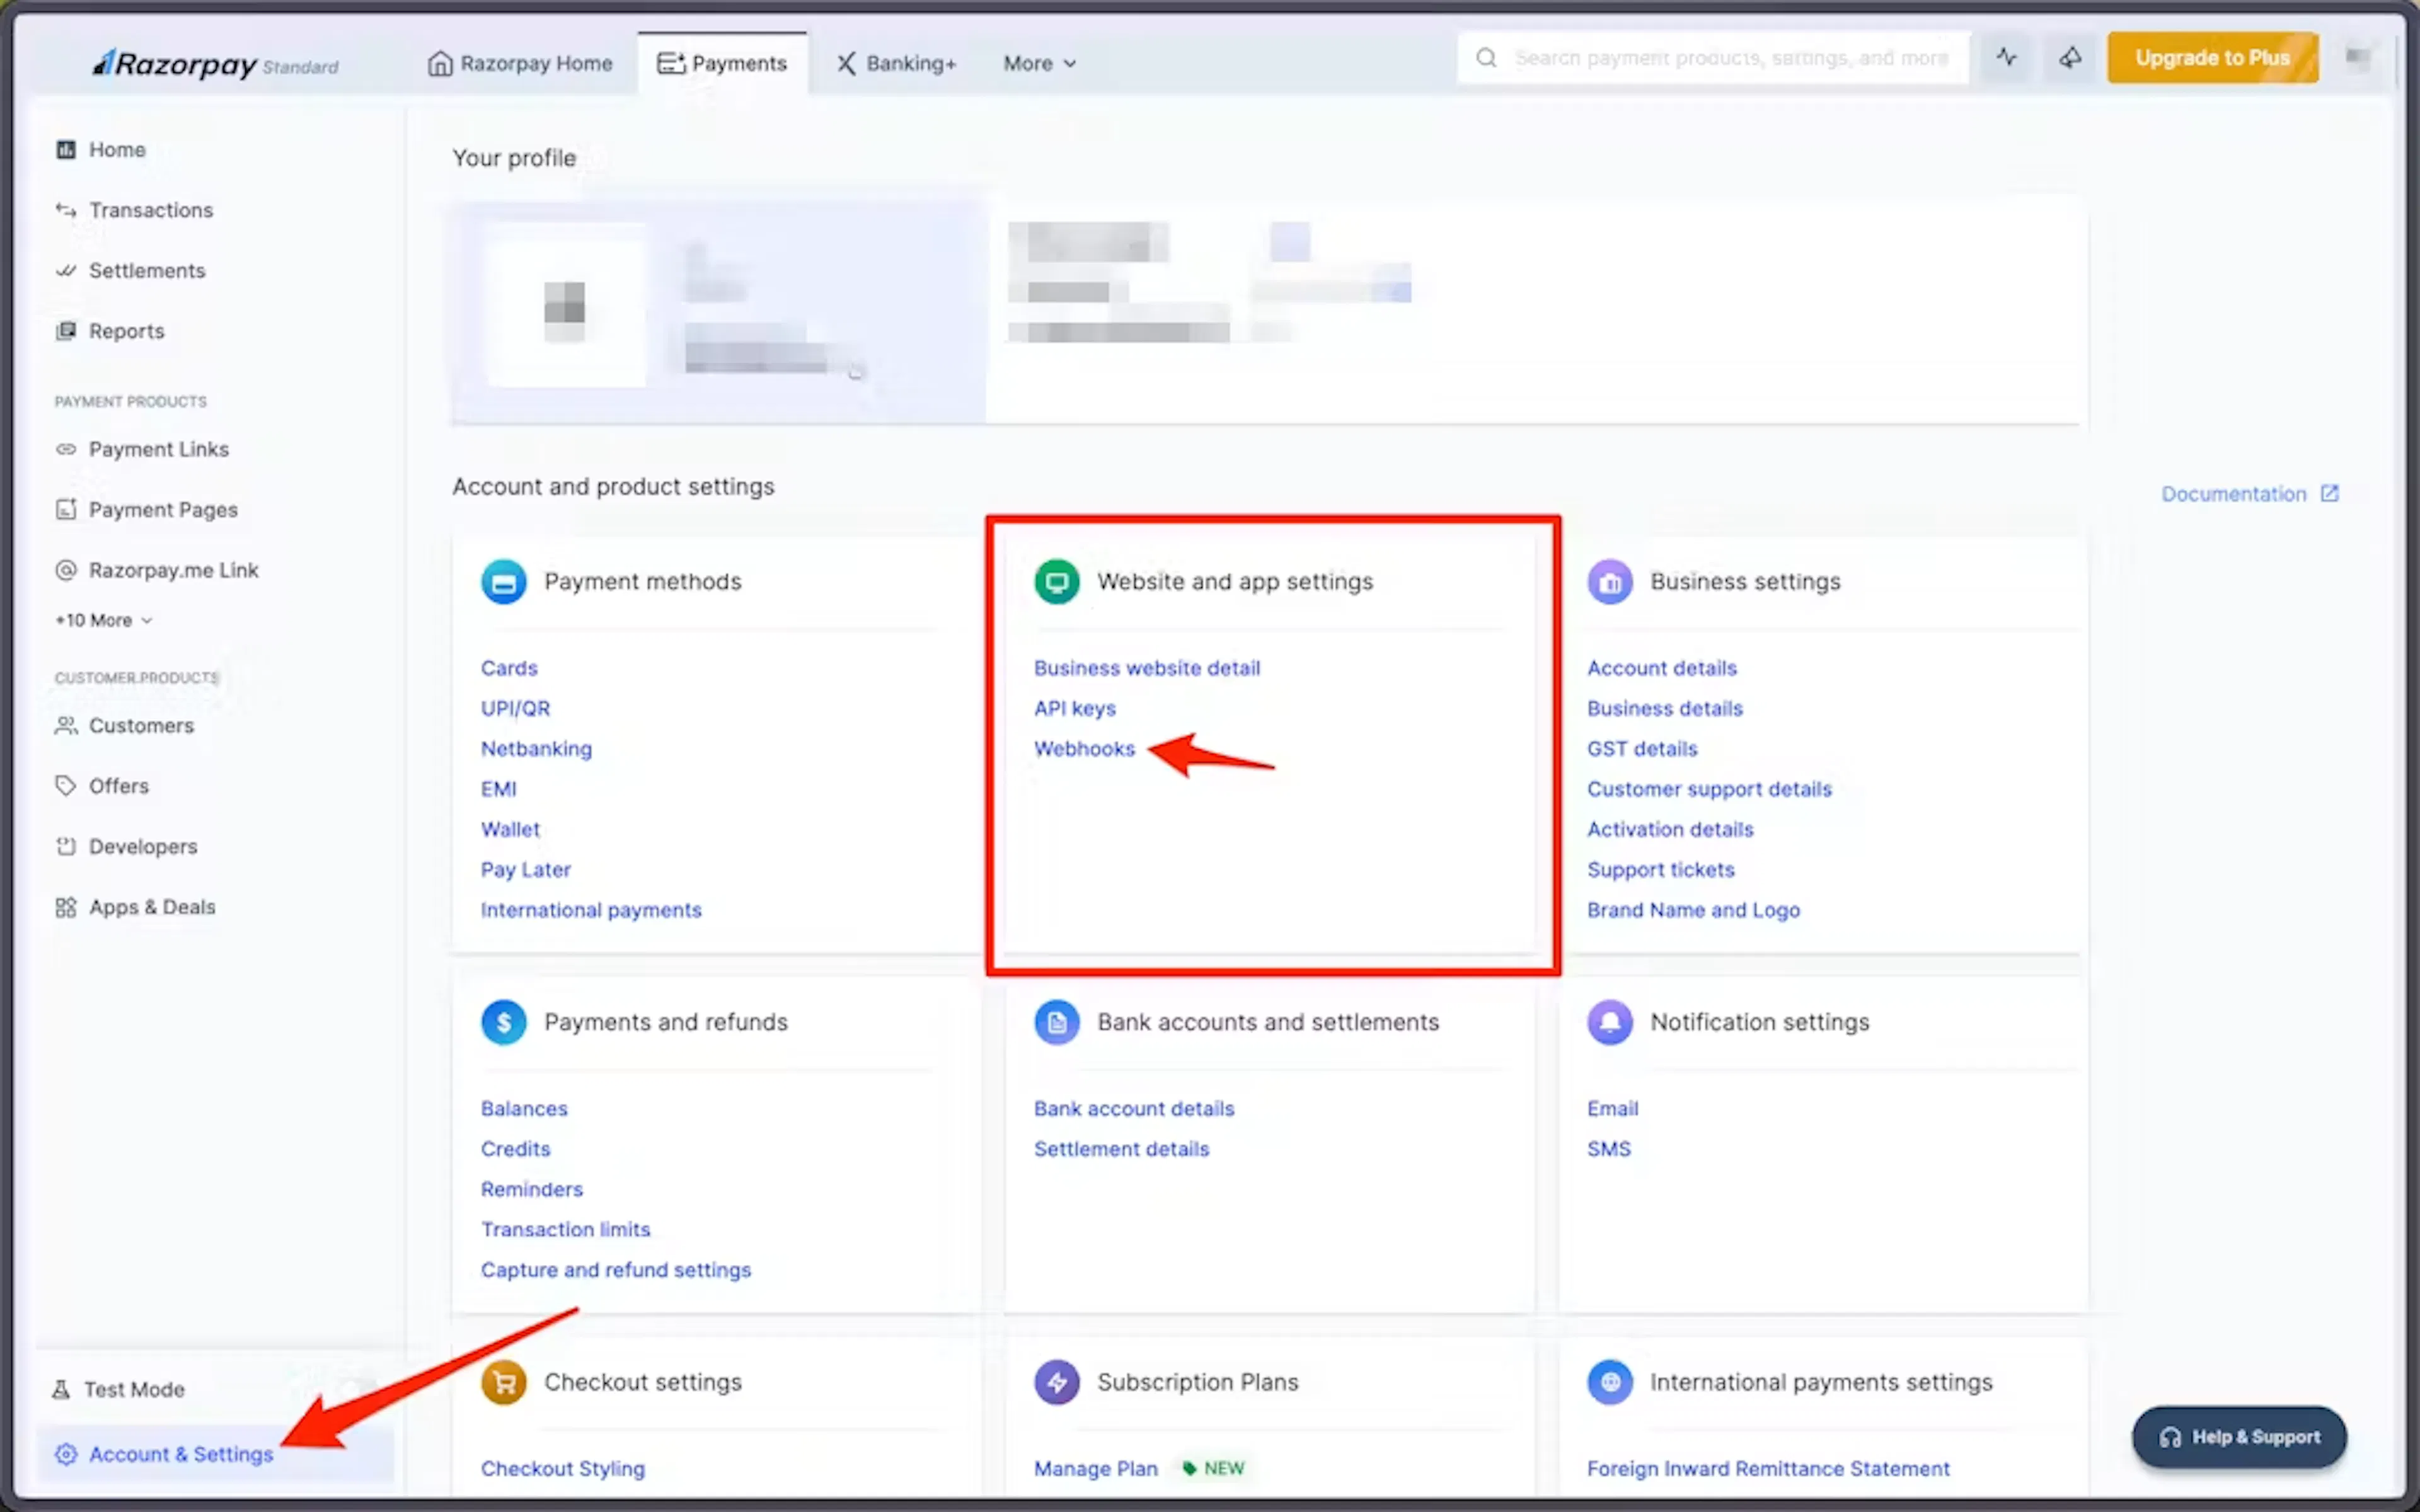
Create the webhook
On the Webhooks page, click + Add New Webhook.
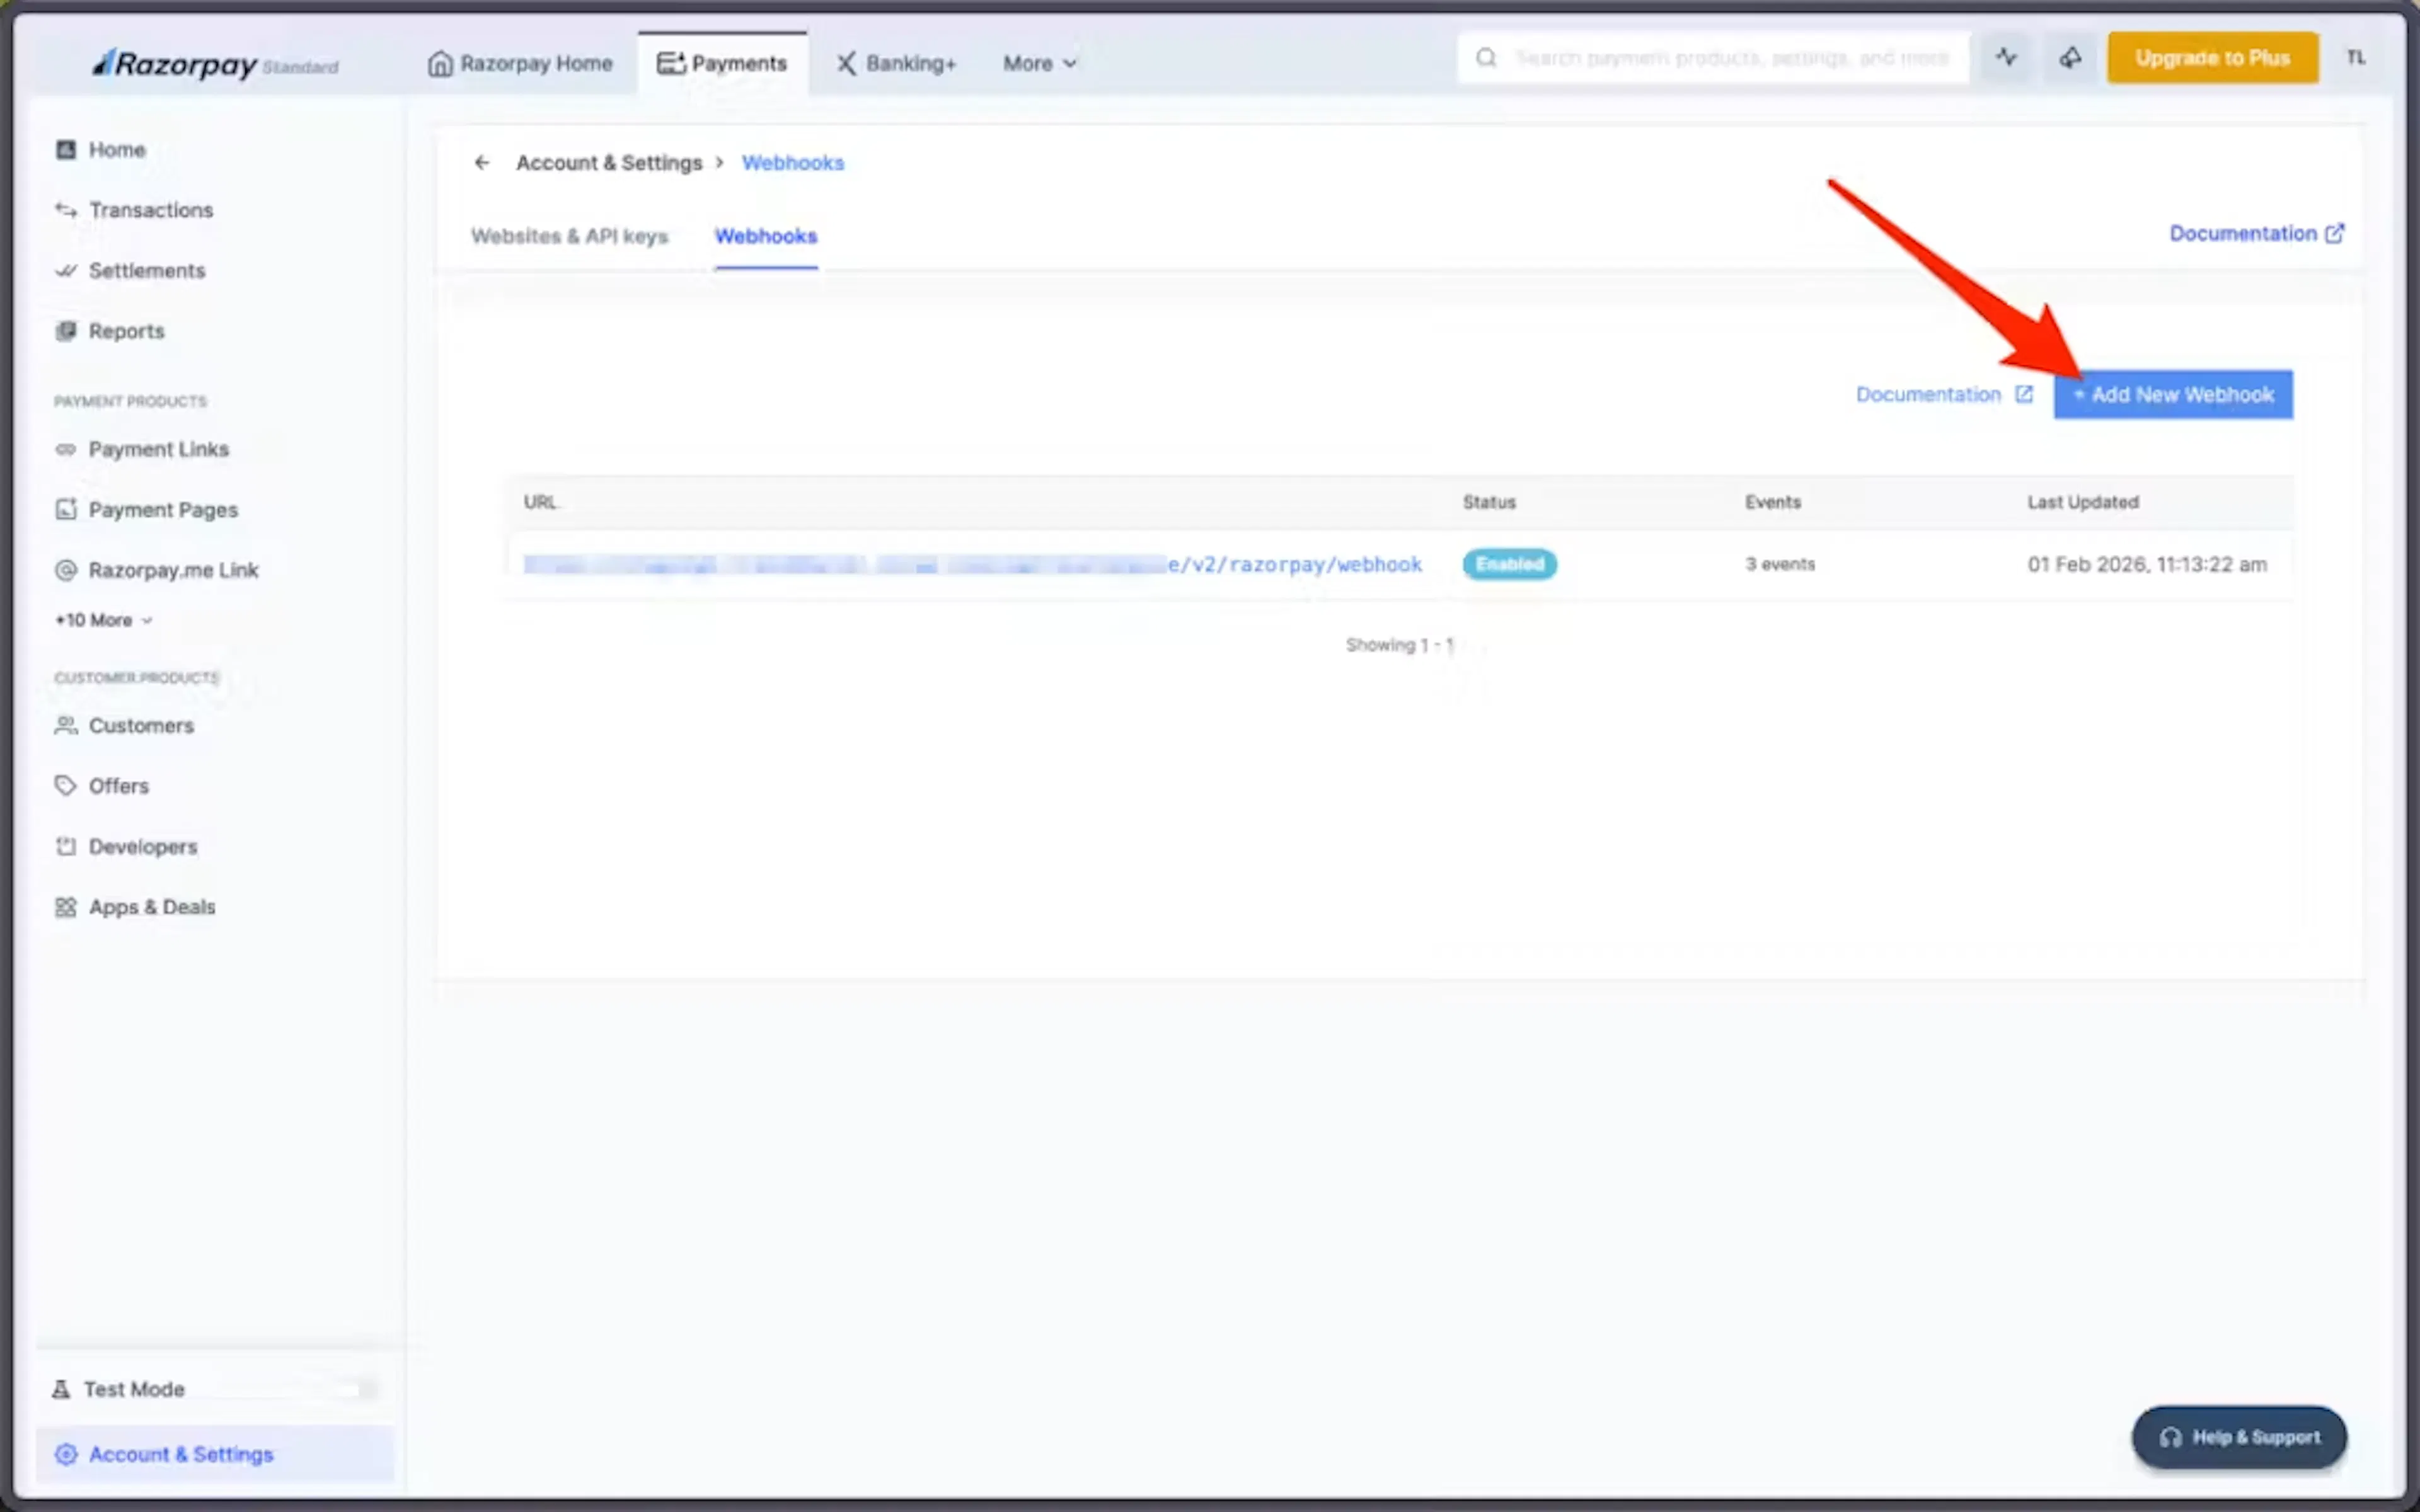
In the Webhook Setup window:
- Paste the webhook URL from your WP Travel Engine settings.
- Enter a secret key of your choice.
- Save the secret key in your password manager or another secure place.
- Subscribe to
payment.authorized,payment.captured, andpayment.failed. - Click Create Webhook.
The webhook secret is a private password for checking that payment messages came from Razorpay. Do not use your Key Secret as the webhook secret. They must be two different values.
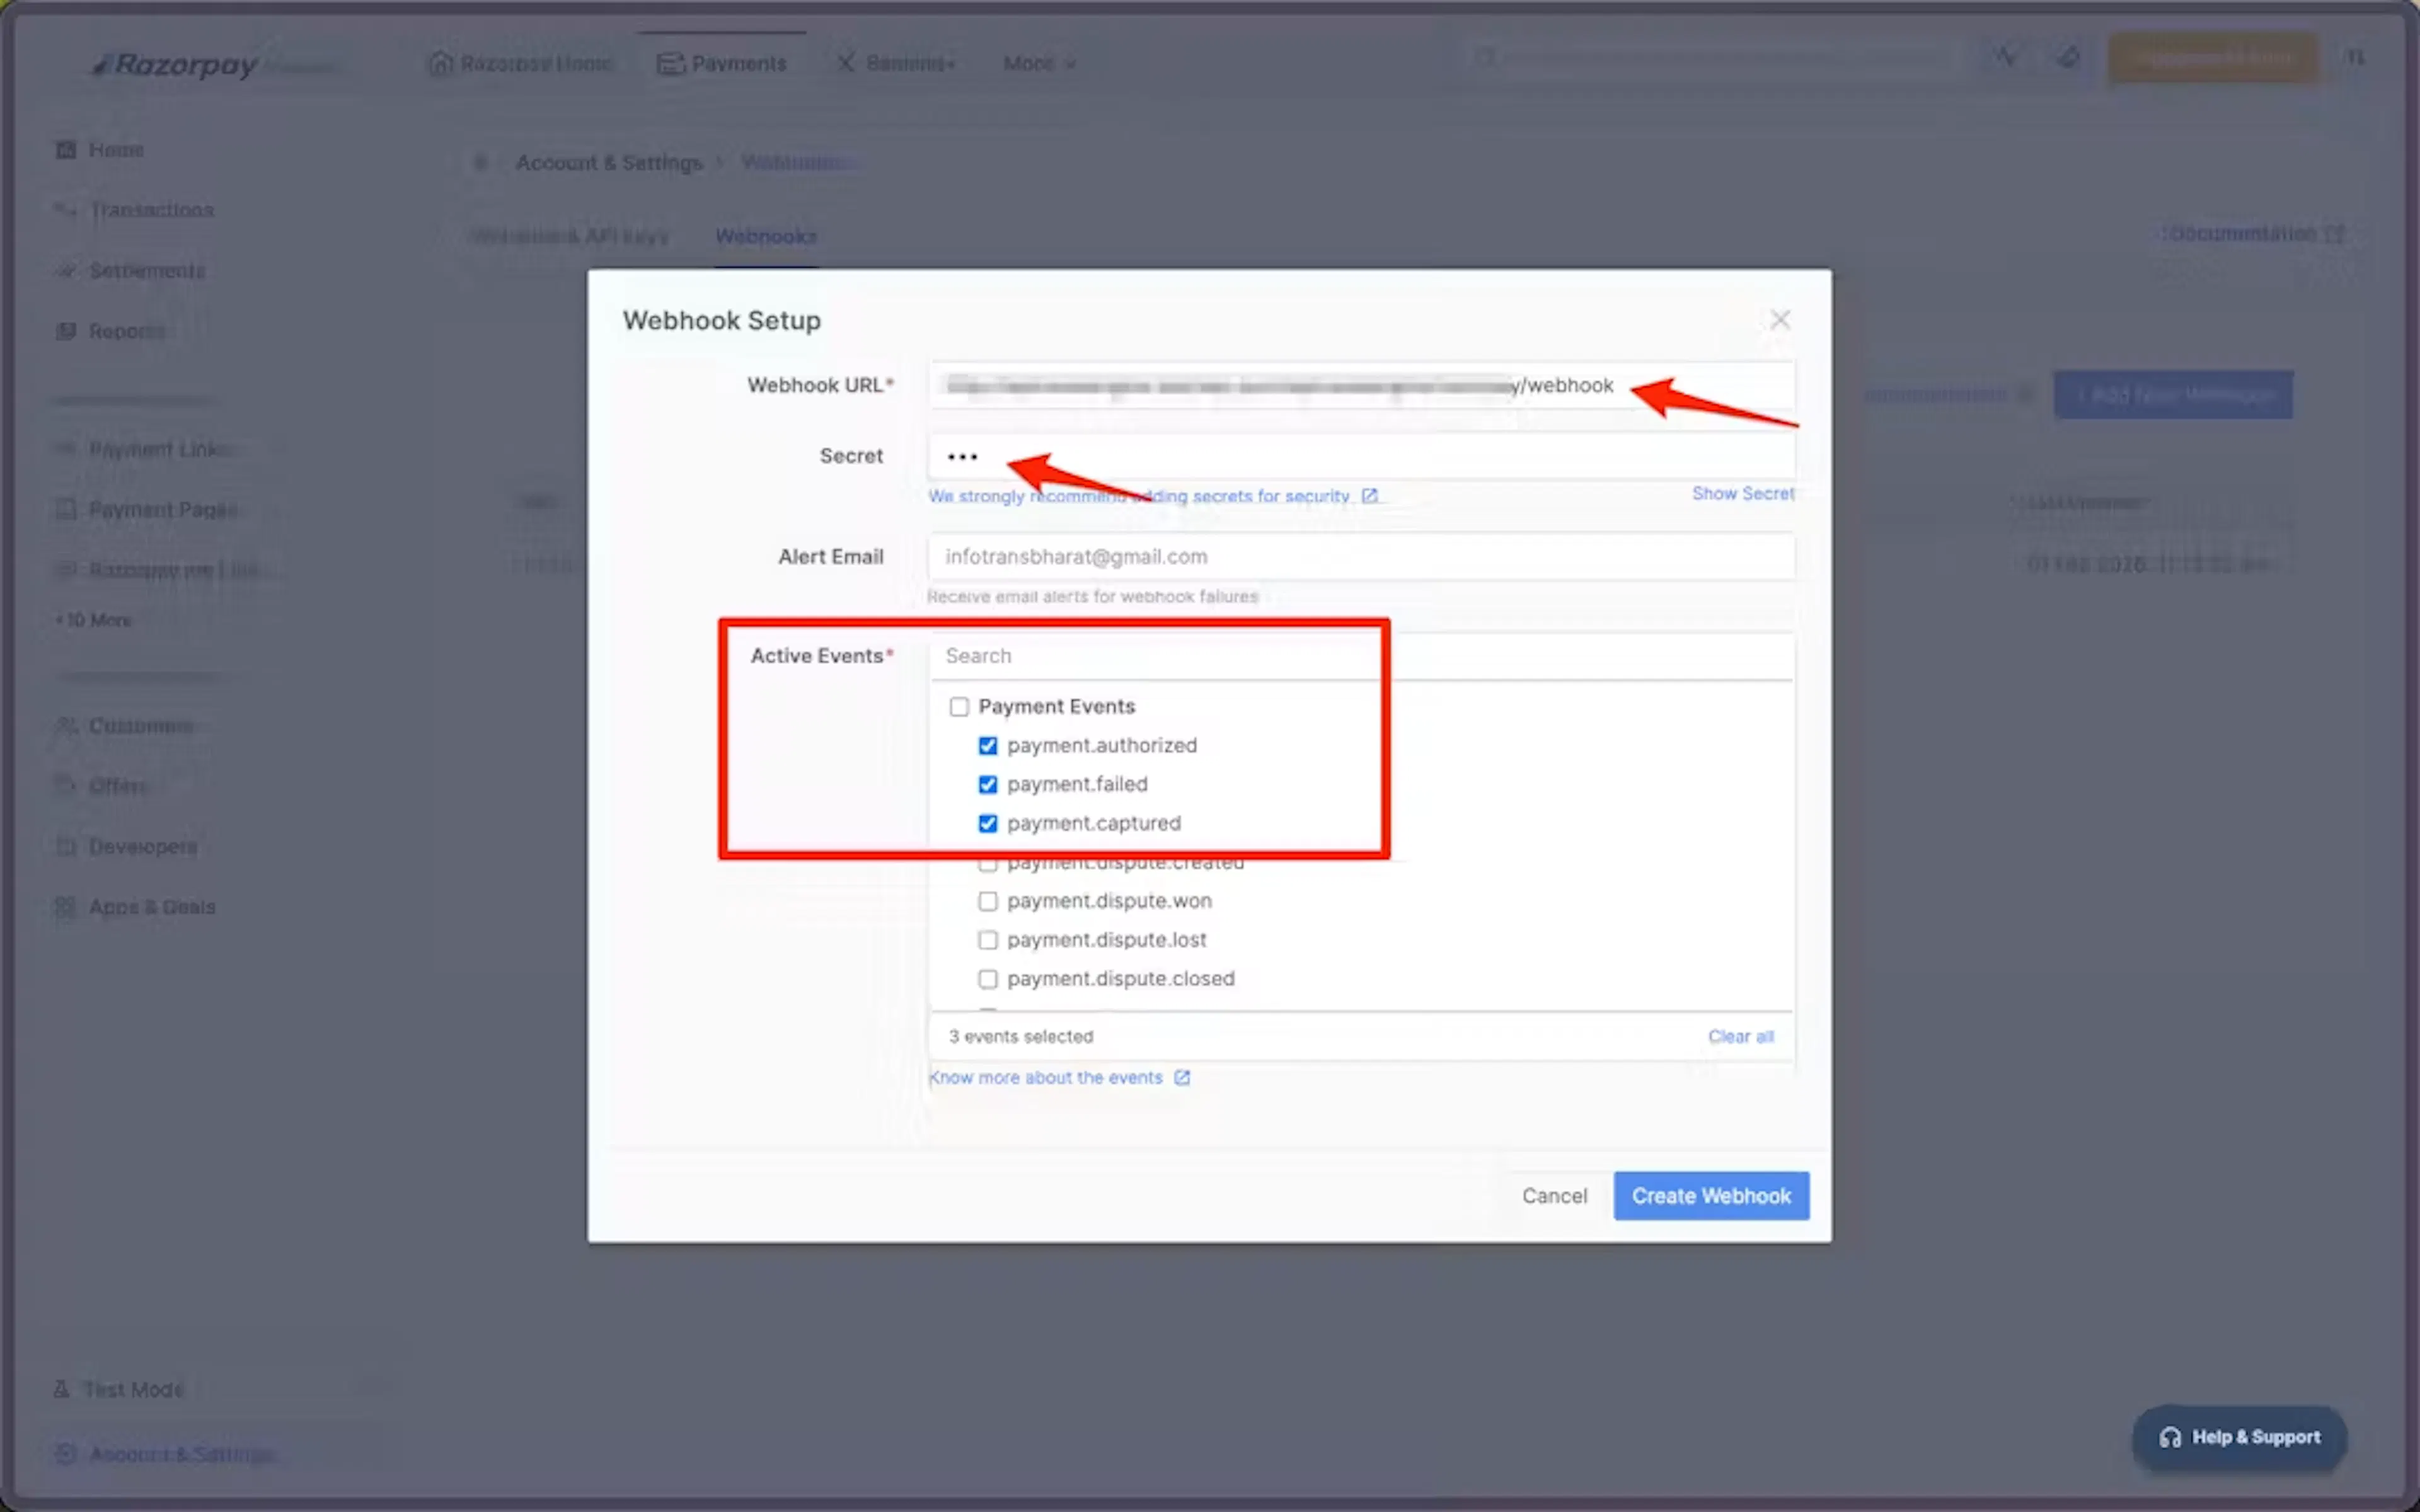
For example, if a traveler pays a deposit for a group trekking package, these events help your website tell the difference between a successful payment and a failed payment.
Test and Live webhooks are separate in Razorpay. If your Key ID starts with rzp_test_, create the webhook while Razorpay is in Test Mode. Create a separate webhook while Razorpay is in Live Mode for keys that start with rzp_live_. A webhook created in the wrong mode will not send updates for the keys you are using.
Save the webhook secret in WP Travel Engine
Return to the Razorpay add-on settings in WordPress. Paste the same value into Webhook Secret.
The value must match in Razorpay and WP Travel Engine. Otherwise, your site may not trust the payment updates.
Keep the secret in a password manager or secure admin note. You may need it if you reconnect Razorpay or investigate a payment issue.
The connection details are now in place. The next step checks them before you save the settings.
Verify the connection
This check tells you whether WP Travel Engine can connect to Razorpay before you accept bookings.
At the bottom of the Razorpay settings card, click Verify Connection. The check uses the Key ID, Key Secret, and Webhook Secret currently in the form. It does not save your settings.
| Result | What it means |
|---|---|
| Connection verified. Your webhook secret is set. | Your Key ID and Key Secret are valid. A Webhook Secret is also filled in. |
| Connection verified. No webhook is configured yet. | Your Key ID and Key Secret are valid, but the Webhook Secret field is empty. Payments can work, but booking statuses will not update automatically until you add a webhook. See Add the webhook. |
| Invalid API key. | The Key ID format is not recognized, the Key Secret is empty, or Razorpay rejected the pair. Check both values in your Razorpay Dashboard. |
| Connection verified, but your webhook secret must not be your Key Secret. | You entered the same value in both fields. Create or reopen your webhook and use its separate secret. |
| Could not reach Razorpay. Please try again. | Your website could not get a response from Razorpay in time. Try again and check with your hosting provider if the problem continues. See Troubleshooting. |
The check does not compare your webhook secret with Razorpay's saved value. Razorpay does not provide a way to look up that value. The check only confirms that the field is not empty and is not the same as your Key Secret.
The check works with both test and live keys. It reads the rzp_test_ or rzp_live_ prefix automatically.
If the check succeeds, click Save Settings. Your connection is not saved until you click that button.
You now know whether the basic connection works. Next, make Razorpay visible to travelers at checkout.
Enable Razorpay for bookings
This step makes Razorpay appear as a payment choice on your booking checkout page.
In the WordPress dashboard, open WP Travel Engine > Settings > Payments > General. The menu is on the left side of the dashboard.
Under Payment Gateways, find Razorpay and select the box beside it.
Click Save Changes at the bottom of the page.
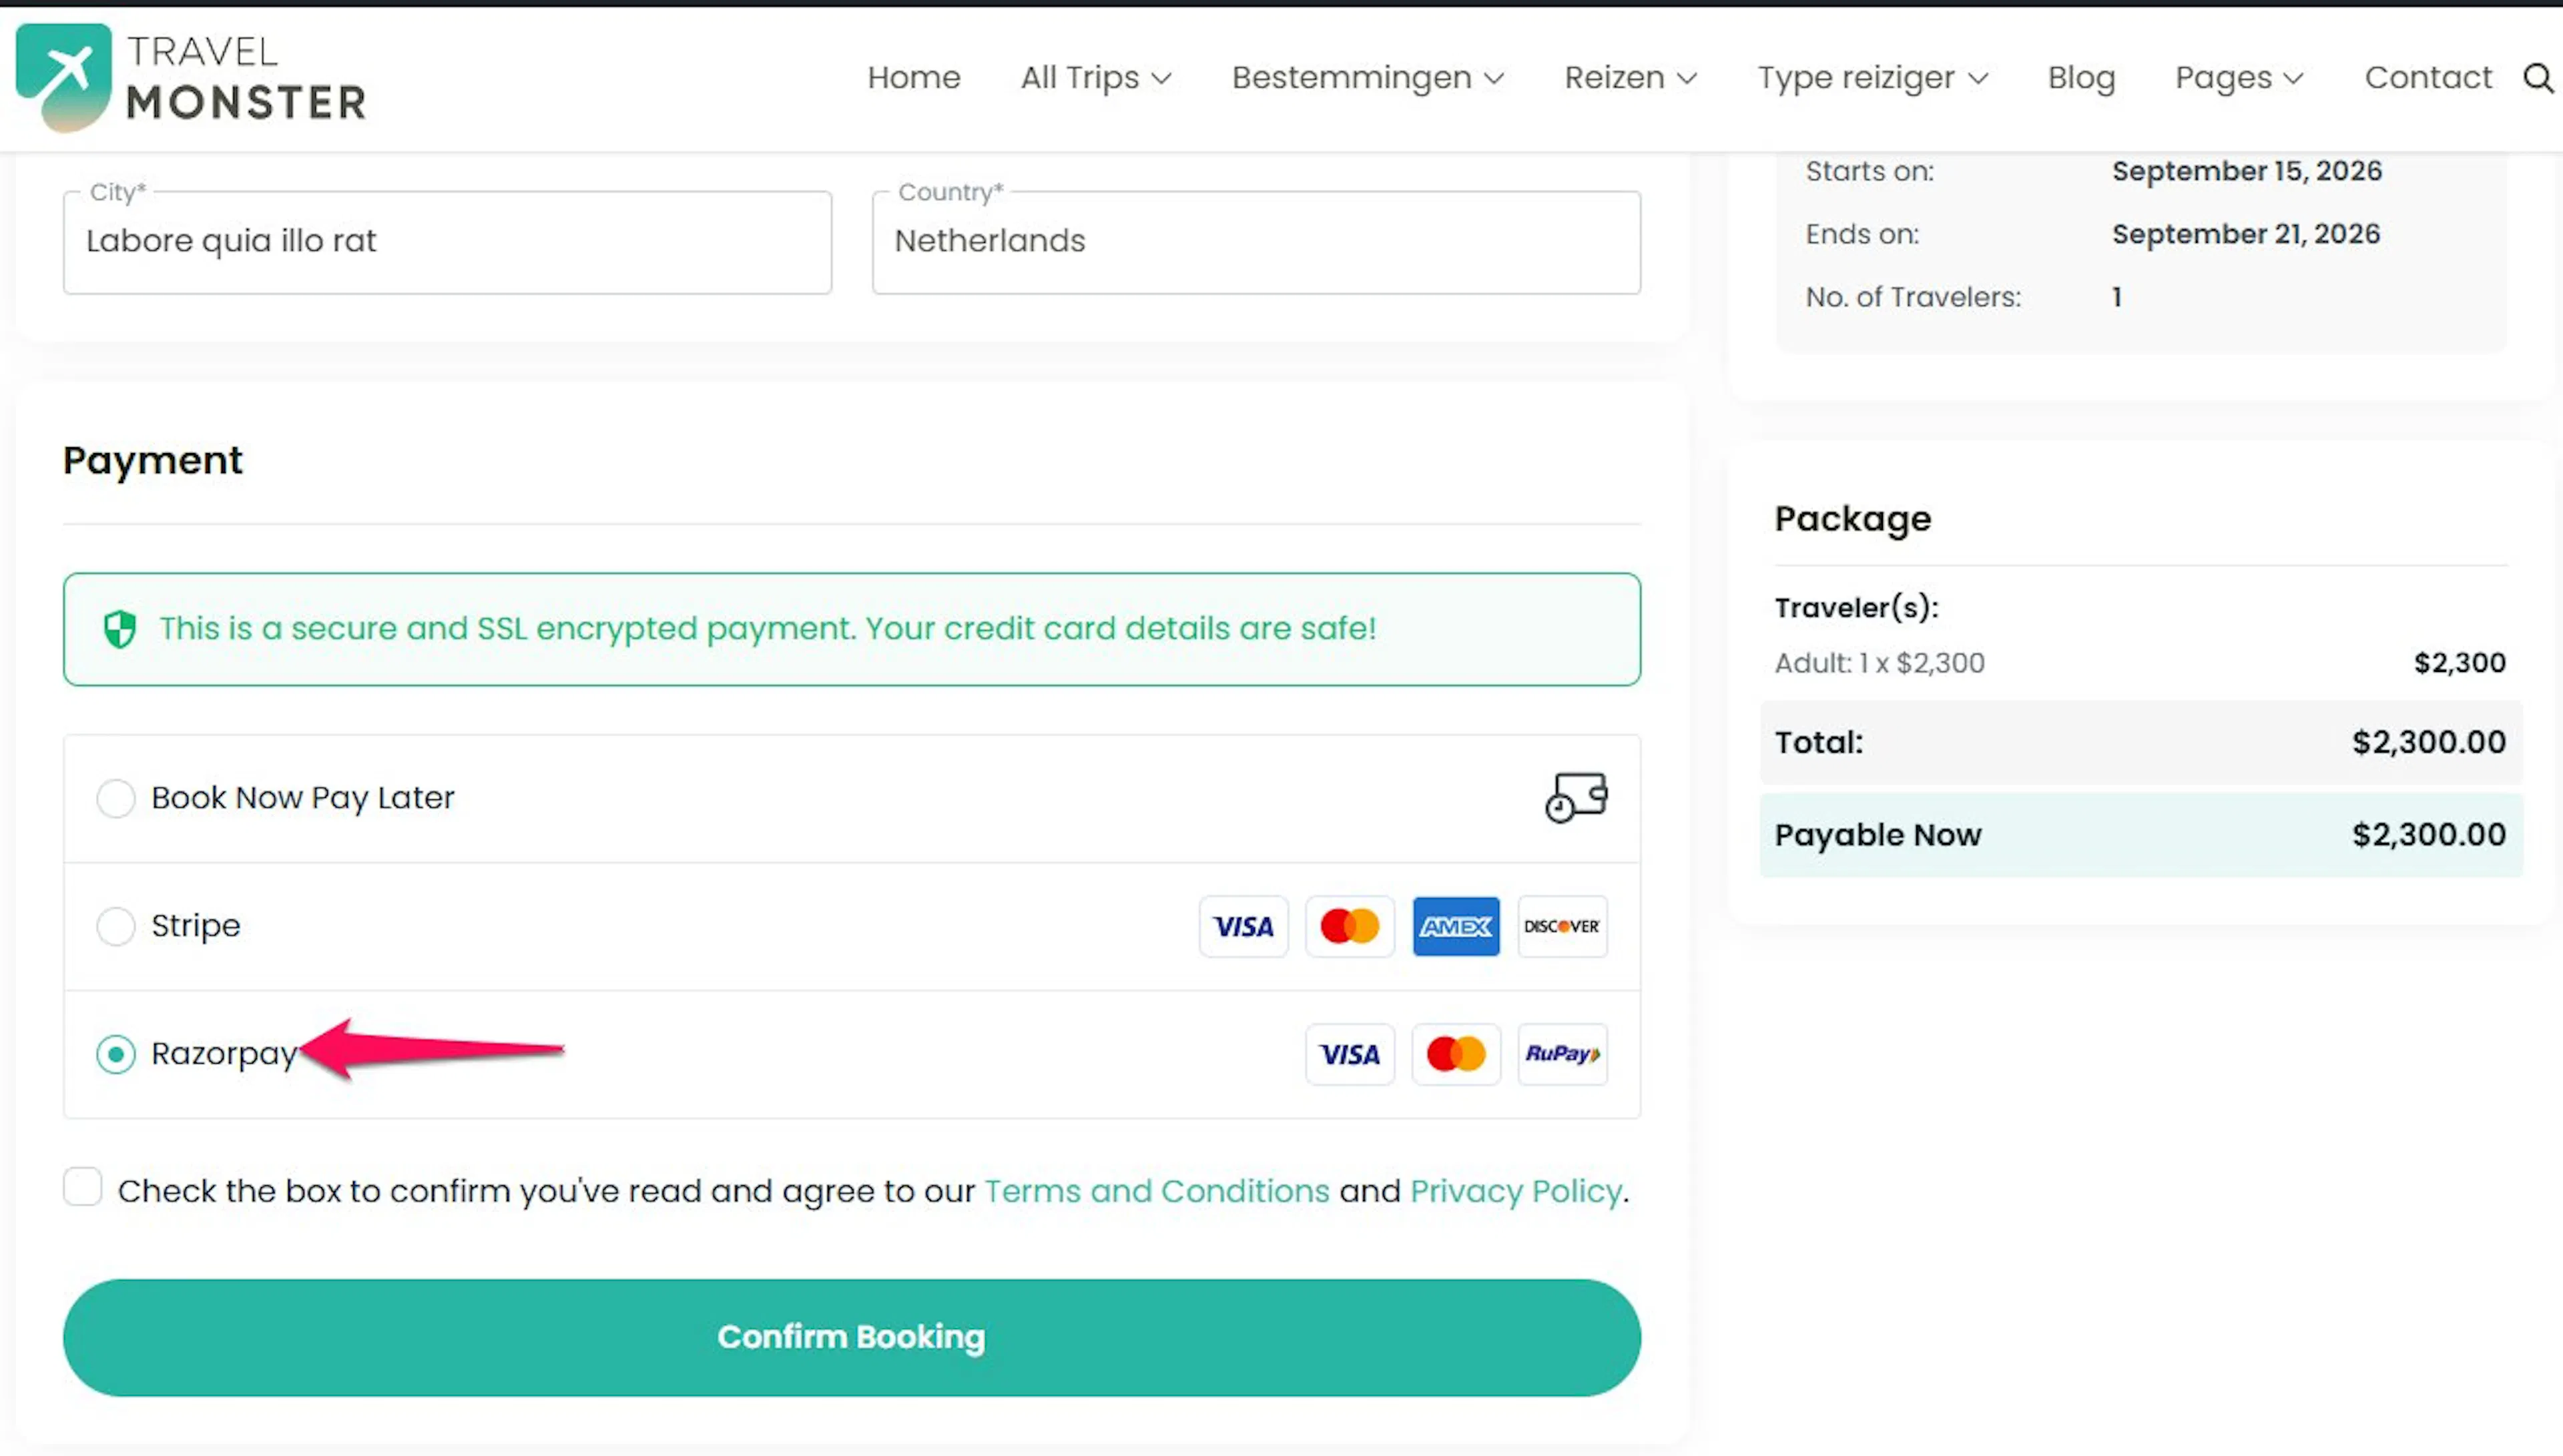
Razorpay is now an active payment option. A traveler booking a multi-day tour should see it as a payment choice during checkout.
If Razorpay is enabled, the next step lets you test the complete booking flow without charging real money.
Test the Razorpay payment flow
Testing helps you find problems before a real traveler pays. Use Test Mode for this step so you do not charge real money.
Switch to Test Mode
Open your Razorpay Dashboard and switch to Test Mode under Settings > API Keys. Test Mode creates a safe practice version of the payment flow.
See Razorpay's Test Mode documentation for more information.
Enter the test keys
Return to WP Travel Engine > Settings > Payments > Razorpay in your WordPress dashboard.
Replace the live Key ID and Key Secret with your Razorpay test Key ID and Key Secret.
Click Verify Connection again. The successful message confirms that the test keys work before you create a booking.
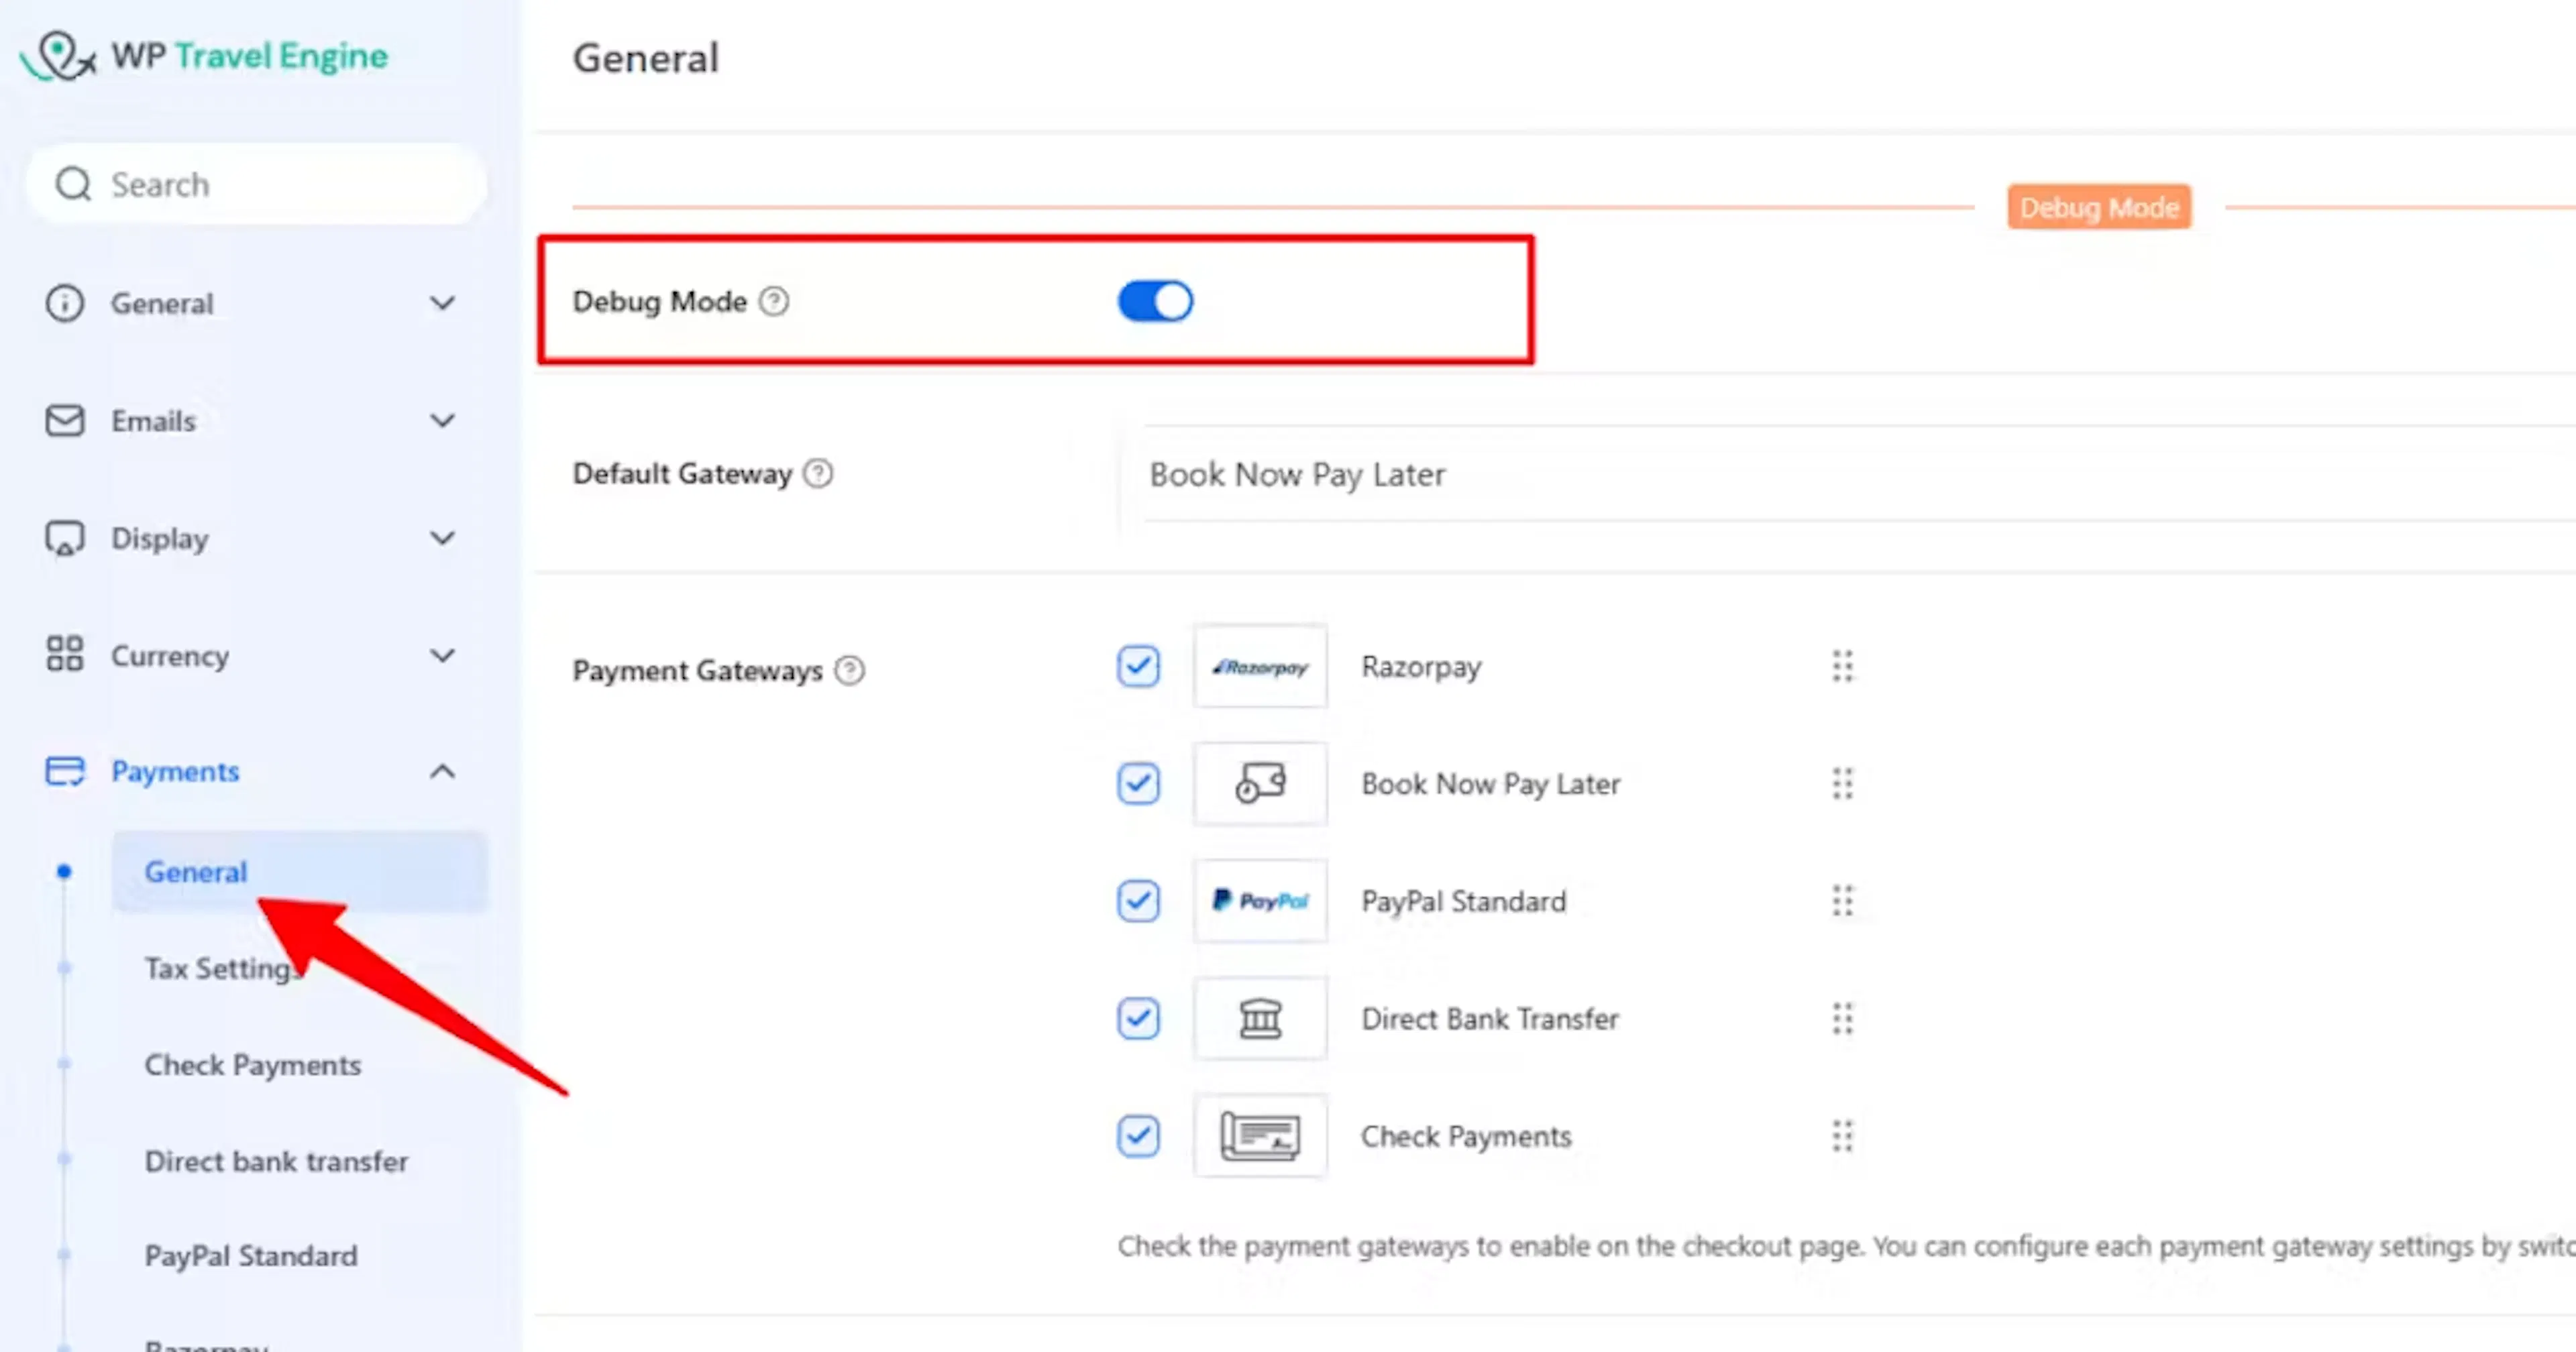
Turn on Debug Mode
Open WP Travel Engine > Settings > Payments > General. Enable Debug Mode.
Debug Mode records extra information when something goes wrong. It can include details about webhook activity in your server's error log.
Make a test booking
Create a booking for one of your own tours. Follow the same checkout steps a customer would use.
You could test a half-day city walk, a three-day hiking package, a group discount, or a booking with a deposit. Complete the payment with the test payment details provided by Razorpay.
Check that the booking shows the expected payment status after the test payment. This confirms that the checkout and webhook flow are working together.
Switch back to Live Mode
After testing, switch Razorpay back to Live Mode. Copy your live Key ID and Key Secret from Settings > API Keys.
Return to the Razorpay settings in WP Travel Engine. Replace the test keys with the live keys.
Click Verify Connection with the live keys. Then click Save Settings.
Live Mode is the version that charges real customers. Make sure you have switched back to live keys before accepting real bookings.
The test booking gives you a clear check of the whole process. You are ready for the final review.
Final verification
Check the customer side of your website before you accept real bookings:
- Verify Connection returns a success message with your live keys.
- Your checkout page shows Razorpay with the correct label.
- A live booking follows the expected payment flow.
If all three checks pass, your payment setup is ready for customers. You can now move on to common fixes if something does not look right.
Troubleshooting
If something does not work as expected, start with the issue that matches what you see. Most problems come from a missing key, a mismatch between Test Mode and Live Mode, or a webhook that was created in the wrong mode.
Verify Connection says “Invalid API key.”
Return to Settings > API Keys in your Razorpay Dashboard. Copy the Key ID and Key Secret again.
Check these common causes:
- Extra spaces at the beginning or end of either value
- A Key ID that does not start with
rzp_test_orrzp_live_ - Test keys being used with live settings
- Live keys being used while Razorpay is in Test Mode
Run Verify Connection again after replacing the values. If the message changes to a success message, your keys are correct.
Verify Connection says “Could not reach Razorpay. Please try again.”
Wait a few seconds and click Verify Connection again.
If the message keeps appearing, your website host may be blocking the connection to Razorpay. Contact your hosting provider and ask whether the server allows outgoing requests to api.razorpay.com.
The problem may be with the connection rather than your keys. Checking with your host should help you find the next step.
Verify Connection says the webhook secret must not be your Key Secret
You entered the same value in Razorpay Key Secret and Webhook Secret.
Open your webhook in the Razorpay Dashboard. Copy the separate secret you created for that webhook. Paste it into Webhook Secret in WP Travel Engine.
Run Verify Connection again. The warning should disappear.
Razorpay is not showing up at checkout
Open WP Travel Engine > Settings > Payments > General in your WordPress dashboard. Find Razorpay under Payment Gateways and select its box.
Click Save Changes.
If Razorpay still does not appear, open WP Travel Engine > Settings > Payments > Razorpay. Check that your Key ID and Key Secret are filled in and that Verify Connection succeeds.
The payment option should appear after the gateway is enabled and its connection details are valid.
I entered my API keys, but the payment does not go through
Run Verify Connection first. It can tell you whether the keys are wrong.
If the connection succeeds, check that the key type matches the mode you are using:
- Use test keys while testing.
- Use live keys when accepting real payments.
Test and live keys are different. Mixing them can make the payment look correct in one mode while failing in the other.
My test payment worked, but the booking status did not update
This usually means the webhook needs attention. Check the following:
- The webhook URL from your WordPress site was copied into Razorpay correctly.
- The webhook secret in Razorpay matches the value in Webhook Secret in WP Travel Engine.
- You subscribed to
payment.authorized,payment.captured, andpayment.failed. - The webhook was created in the same mode as the keys you are using.
For example, a Test Mode booking needs a Test Mode webhook. A Live Mode booking needs a Live Mode webhook.
Turn on Debug Mode through WP Travel Engine > Settings > Payments > General if you need more information. Debug Mode records webhook activity in your server's error log.
I switched to Live Mode but forgot to replace my test keys
Razorpay gives you a different set of keys in Live Mode.
Open the Razorpay Dashboard and switch to Live Mode. Copy the live Key ID and Key Secret from Settings > API Keys.
Return to WP Travel Engine > Settings > Payments > Razorpay. Replace the test values with the live values. Click Verify Connection, then click Save Settings.
Until you replace the keys, your website continues to use Test Mode. Real travelers will not be charged through the live account.
The Razorpay option appears, but the payment page is blank or shows an error
Your website server may be blocking its connection to Razorpay.
Contact your hosting provider. Ask them to confirm that your server allows outgoing connections to Razorpay.
Most hosting services allow these connections. Some security settings can block them.
I changed the Razorpay label, but the old name still appears
Your website may be showing a cached version of the page. A cache is a temporary saved copy of a page that helps it load faster.
Clear your website cache if you use a caching plugin. Check the checkout page again after a few minutes.
The new label should appear after the saved copy is replaced. If it does not, ask your hosting provider whether another cache is active.
Older WP Travel Engine versions
If your WP Travel Engine core version is older than 6.8.7, the Razorpay add-on still works. The settings page looks different from the screenshots in this guide.
- The Key ID and Key Secret appear as plain text fields under a General tab.
- The Webhook URL and Webhook Secret appear as plain text fields under a separate Webhooks tab.
- The Verify Connection button is not available. You can confirm the keys only by completing a test or live payment.
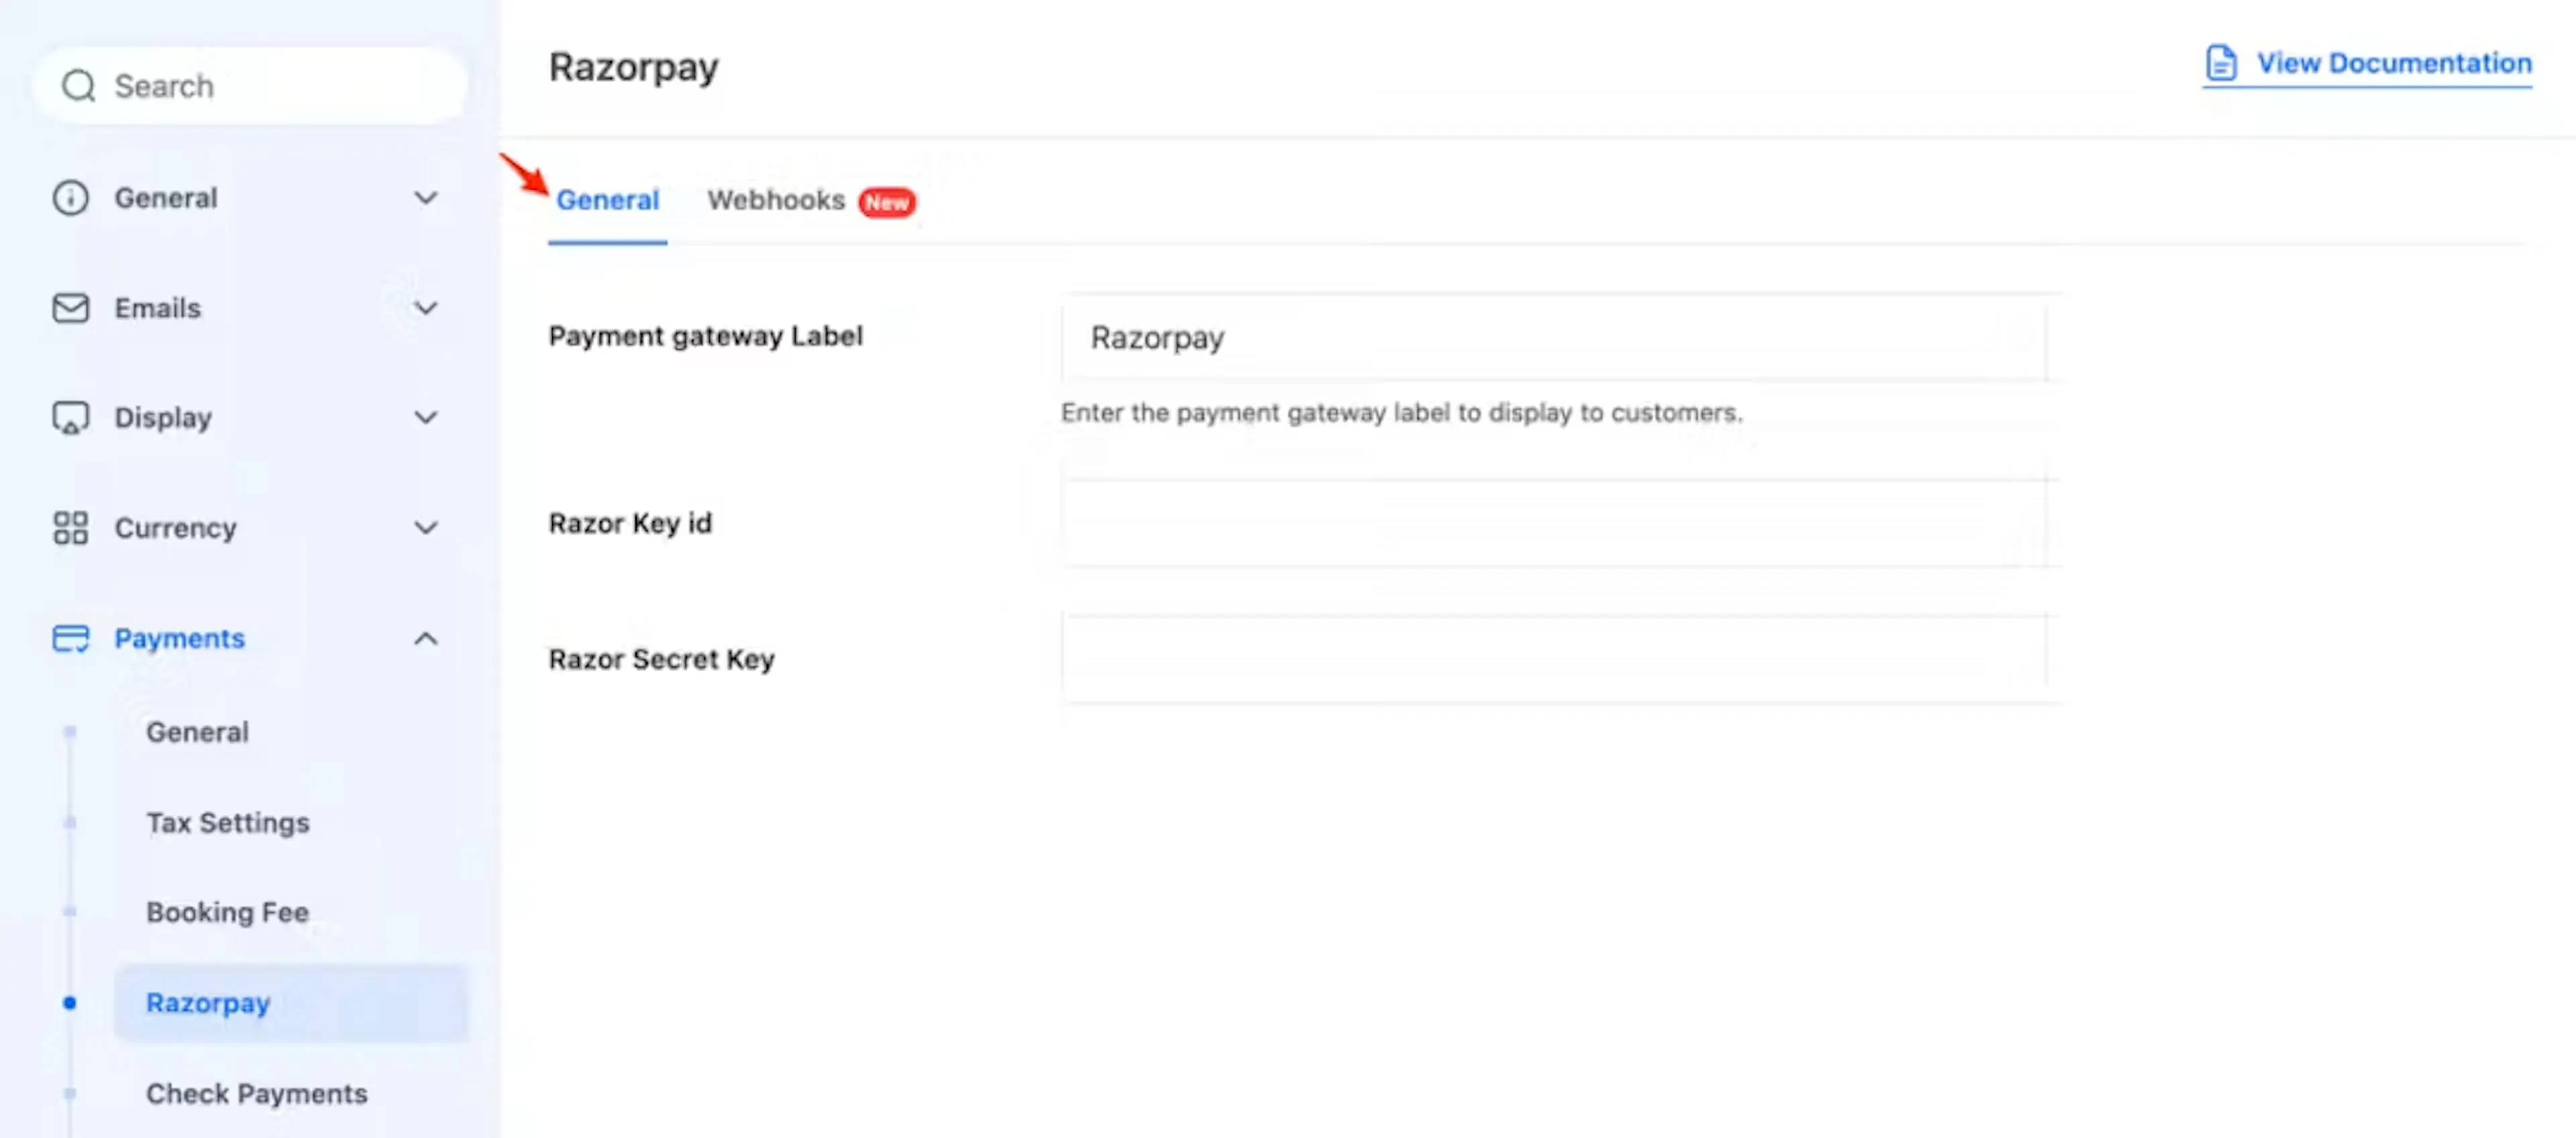
Update WP Travel Engine to version 6.8.7 or later to get the combined settings card and Verify Connection button. You do not need to change the Razorpay add-on if version 1.0.7 or later is already installed.
The older screen does not prevent you from using Razorpay. The newer WP Travel Engine version gives you an easier way to check your connection before testing a payment.
Conclusion
You have connected Razorpay to WP Travel Engine, added the webhook, enabled Razorpay at checkout, and tested the payment flow.
You can now accept payments for day tours, private departures, and multi-day packages. You can also collect deposits, group payments, and payments for bookings with seasonal pricing or gear rental add-ons.
Keep your Key Secret and webhook secret private. If you change from Test Mode to Live Mode, replace the test keys with your live keys before accepting real bookings.
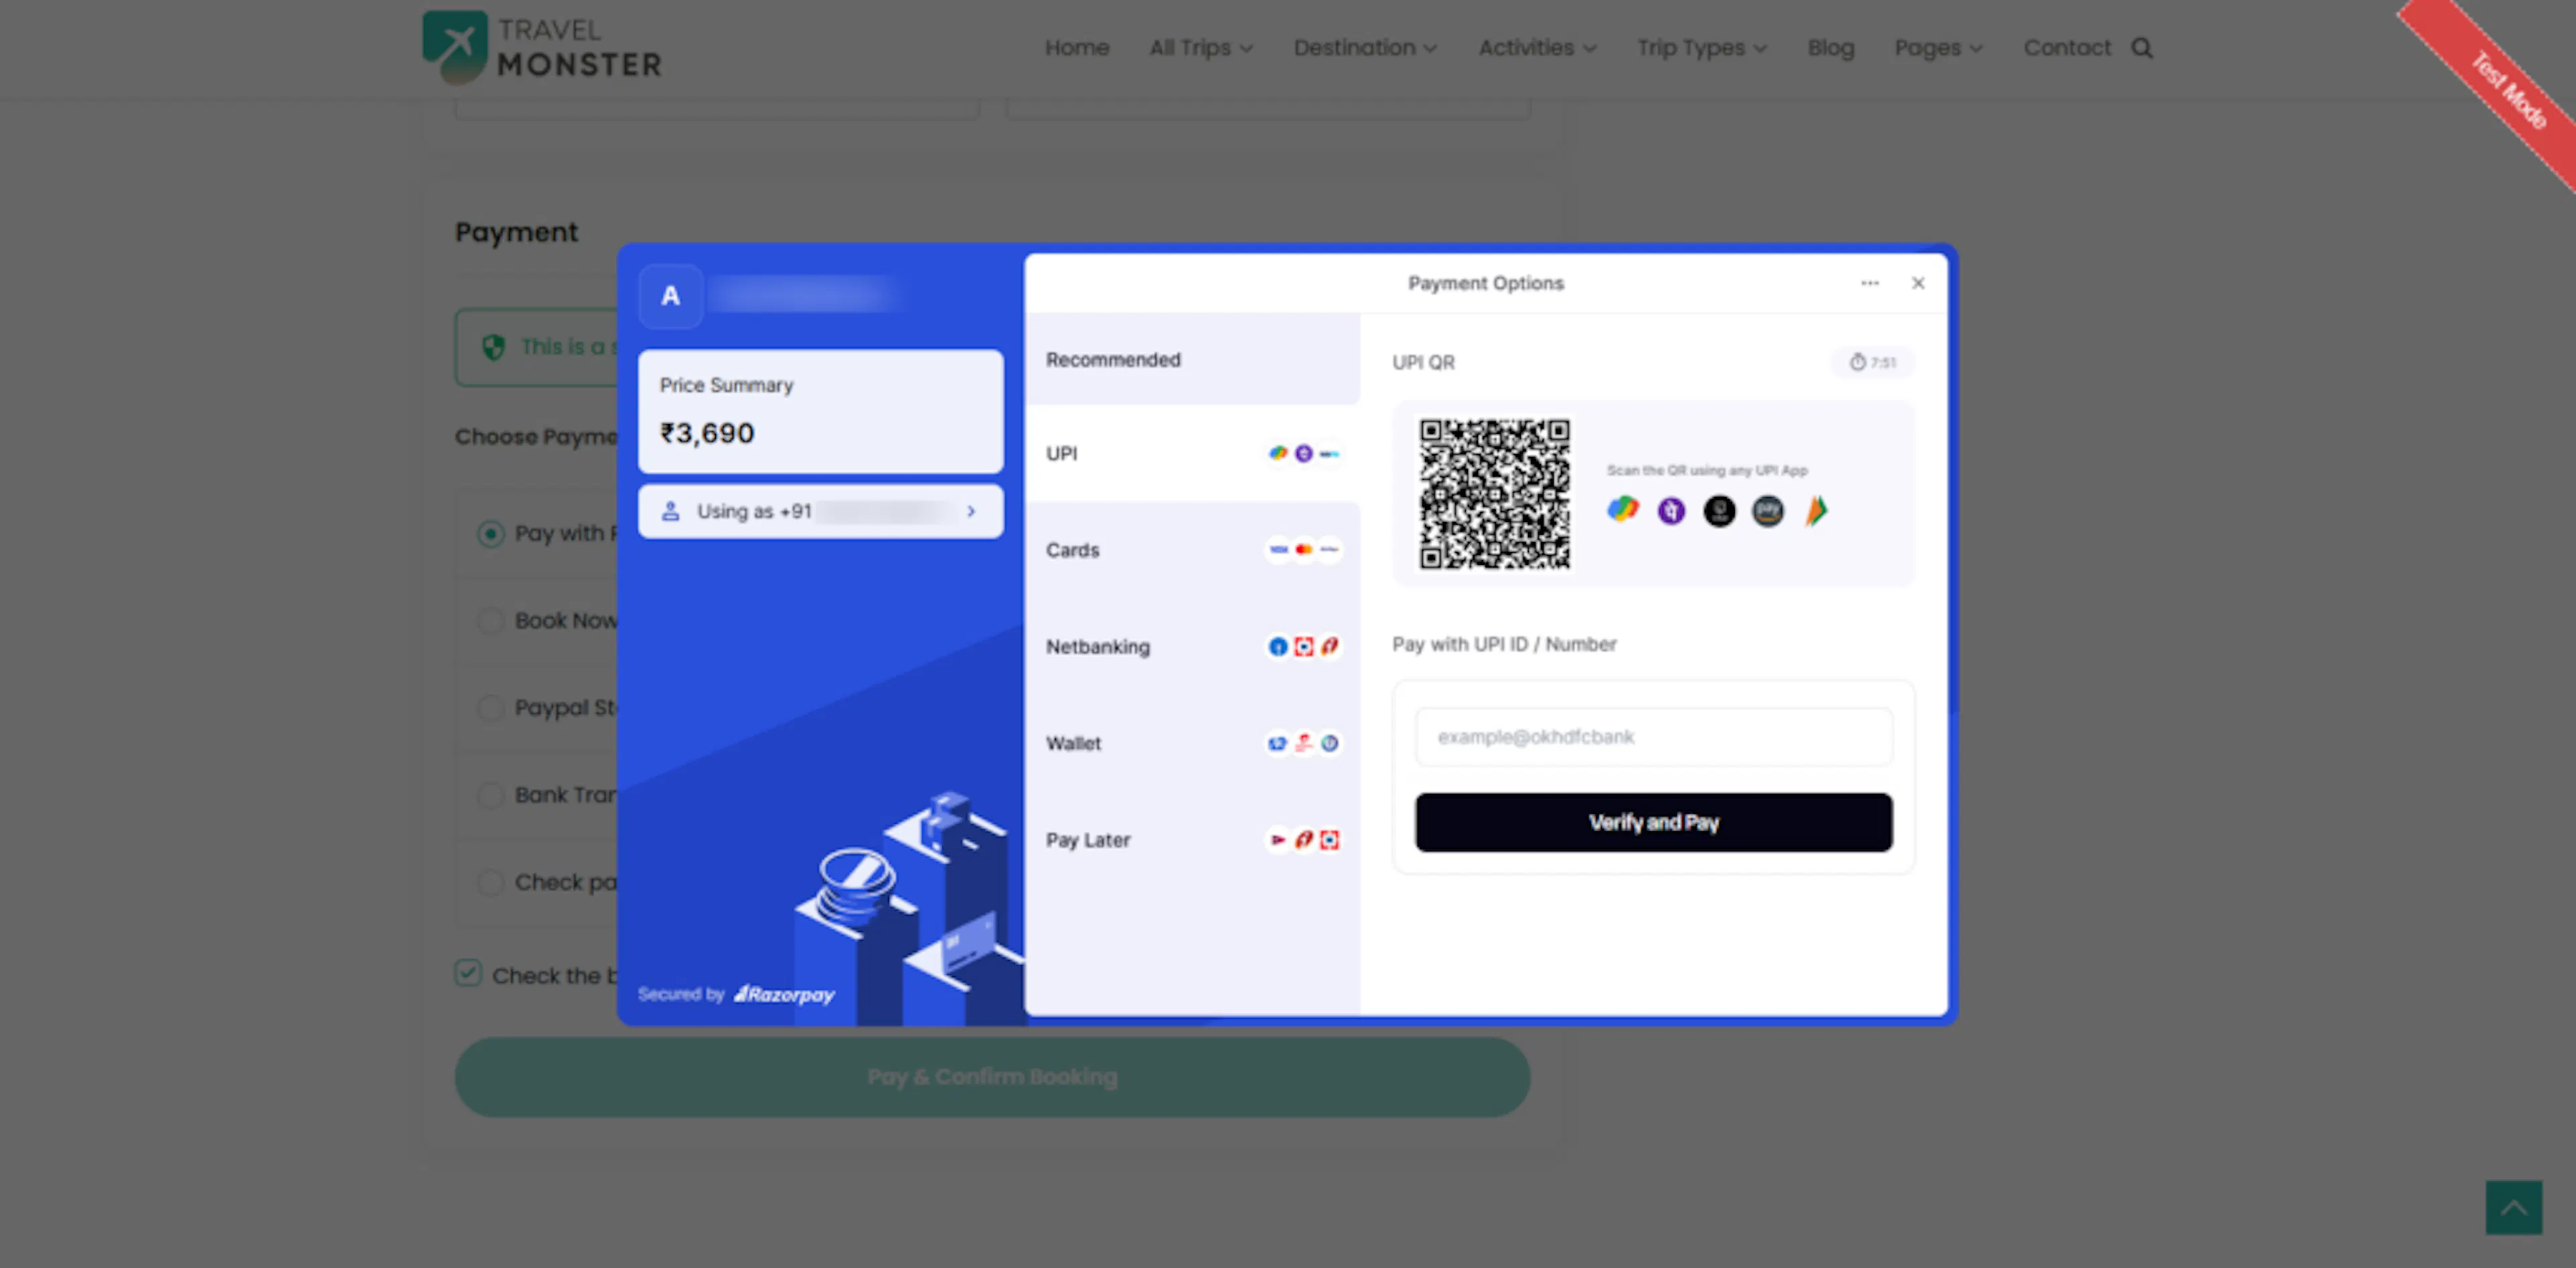
Your checkout is ready for a final look. The examples below show how Razorpay can appear to your travelers.
Checkout Page Preview
If you're still stuck or have a question we didn't cover, our support team is happy to help. Reach out at our support page and we'll get you sorted.