

How to Build a Multilingual Travel Website Using WP Travel Engine and WPML
Set up a multilingual travel website with WPML so travelers from different countries browse your trips, prices, and booking details in their own language.
Help travelers browse your trips in their language
WPML lets you show your WP Travel Engine trips in more than one language. A multilingual plugin adds language versions to your WordPress website so visitors can choose the language they understand.
Say you offer trekking tours in Nepal. Most of your international customers speak English, but you also want to reach French travelers. WPML lets you show the same trips in both languages without building a second website.
You can translate trip packages, custom fields, images, menus, widgets, and short site-wide messages. WPML is a paid plugin, and you need the WPML components that handle these types of content.
What you'll need before you start
- A WordPress website with WP Travel Engine installed and activated.
- The paid WPML Multilingual CMS plugin.
- WPML's String Translation component for short site-wide messages.
- WPML's Translation Management component for managing translations.
- The optional Media Translation component if you need different images or translated media details for each language.
For most websites, the WPML Multilingual CMS plan is enough. It includes all WPML features and free automatic translation for around 45,000 words. The plan costs 99€ per year.
You will work from the left sidebar of your WordPress dashboard. Once WPML is installed, you can choose your languages and connect it to your trips.
Install and set up WPML
The setup wizard connects WPML to your website. It also gives travelers a way to switch between languages.
Upload the WPML plugin
Go to Plugins in the left sidebar. Select Add New. Select Upload Plugin. Upload the WPML Multilingual CMS plugin file.
Activate WPML
Install the plugin. Then select Activate.
Run the setup wizard
Choose your site's default language. Add the languages you want to offer.
Set up a language switcher. A language switcher is a small menu that lets visitors choose which language they want to see on your site. You can place it in a menu, widget, or footer.
Register your WPML license when the wizard asks for it.
WPML is now connected to your site. For more detail about installation, see WPML's official installation documentation.
Configure WPML for WP Travel Engine
These settings tell WPML which WP Travel Engine content should have language versions. A post type is a type of content on your website. Trips are a post type, just like blog posts or pages.
Make trips translatable
Open WPML settings
In the left sidebar of your WordPress dashboard, go to WPML. Select Settings.
Make the Trips post type translatable
Find Post Types Translation. Set the WP Travel Engine Trips post type to Translatable.
Your trip posts can now have language versions. Next, you will configure the groups used to organize those trips.
Make trip taxonomies translatable
A taxonomy is a way to group things together. For example, you can group trips by destination or activity.
Open taxonomy settings
On the WPML settings page, find Taxonomies Translation.
Make trip taxonomies translatable
Set these taxonomies to Translatable:
- Destinations
- Activities
- Trip Types
- Difficulty
- Trip Tag
- Any custom taxonomy added by WP Travel Engine
Think of destinations such as Annapurna or Everest Base Camp. When a taxonomy is translatable, you can show a translated destination name on the matching language version of your site.
Keep trip package categories untranslatable
Find the Categories taxonomy named trip-packages-categories. Set it to Not Translatable.
Keep the trip package categories taxonomy set to Not Translatable. If you make it translatable, your 7-day Everest Base Camp trek might show different prices on the English and French versions of the same trip. That can confuse travelers and cause booking problems.
Your trip content and grouping settings are ready. You can now create translations for each trip.
Translate your trip packages
Translate the information travelers use to decide whether to book. This includes the trip description, schedule, inclusions, and booking details.
Open your trips list
In the left sidebar of your WordPress dashboard, go to Trips. Select All Trips.
Start a translation
Find the trip you want to translate. Select the plus icon in the language column for the language you want to add.
Choose a translation editor
WPML opens the Advanced Translation Editor by default. Switch to the Classic Editor if you prefer.
Translate the trip content
Translate the trip title, description, itinerary, highlights, and FAQs.
Translate the price and duration only when they differ by language. For example, you might show a different currency or booking length for a regional market.
Complete the translation
Select Complete after you finish translating the trip.
You can enable automatic translation from WPML in the left sidebar. Select Translation Management. Then select Settings. WPML can use DeepL, Google, or Microsoft to pre-translate your content.
Your translated trip is ready for review. Check the trip details in each language before you publish it.
Translate custom fields and media
Trip descriptions are only part of a travel package. WP Travel Engine also stores extra details and images that travelers need before booking.
Translate custom fields
Custom fields are the extra details you fill in for each trip. Examples include itinerary stops, pricing options, FAQs, group discounts, seasonal pricing, and gear rental add-ons.
WPML detects most custom fields automatically. If a field does not appear in the translation editor, add it to WPML's translation settings.
Open custom field settings
In the left sidebar of your WordPress dashboard, go to WPML. Select Settings.
Find custom field translation options
Scroll to Custom Fields Translation.
Make a field translatable
Find the custom field that is missing from your translation. Set the field to Translate.
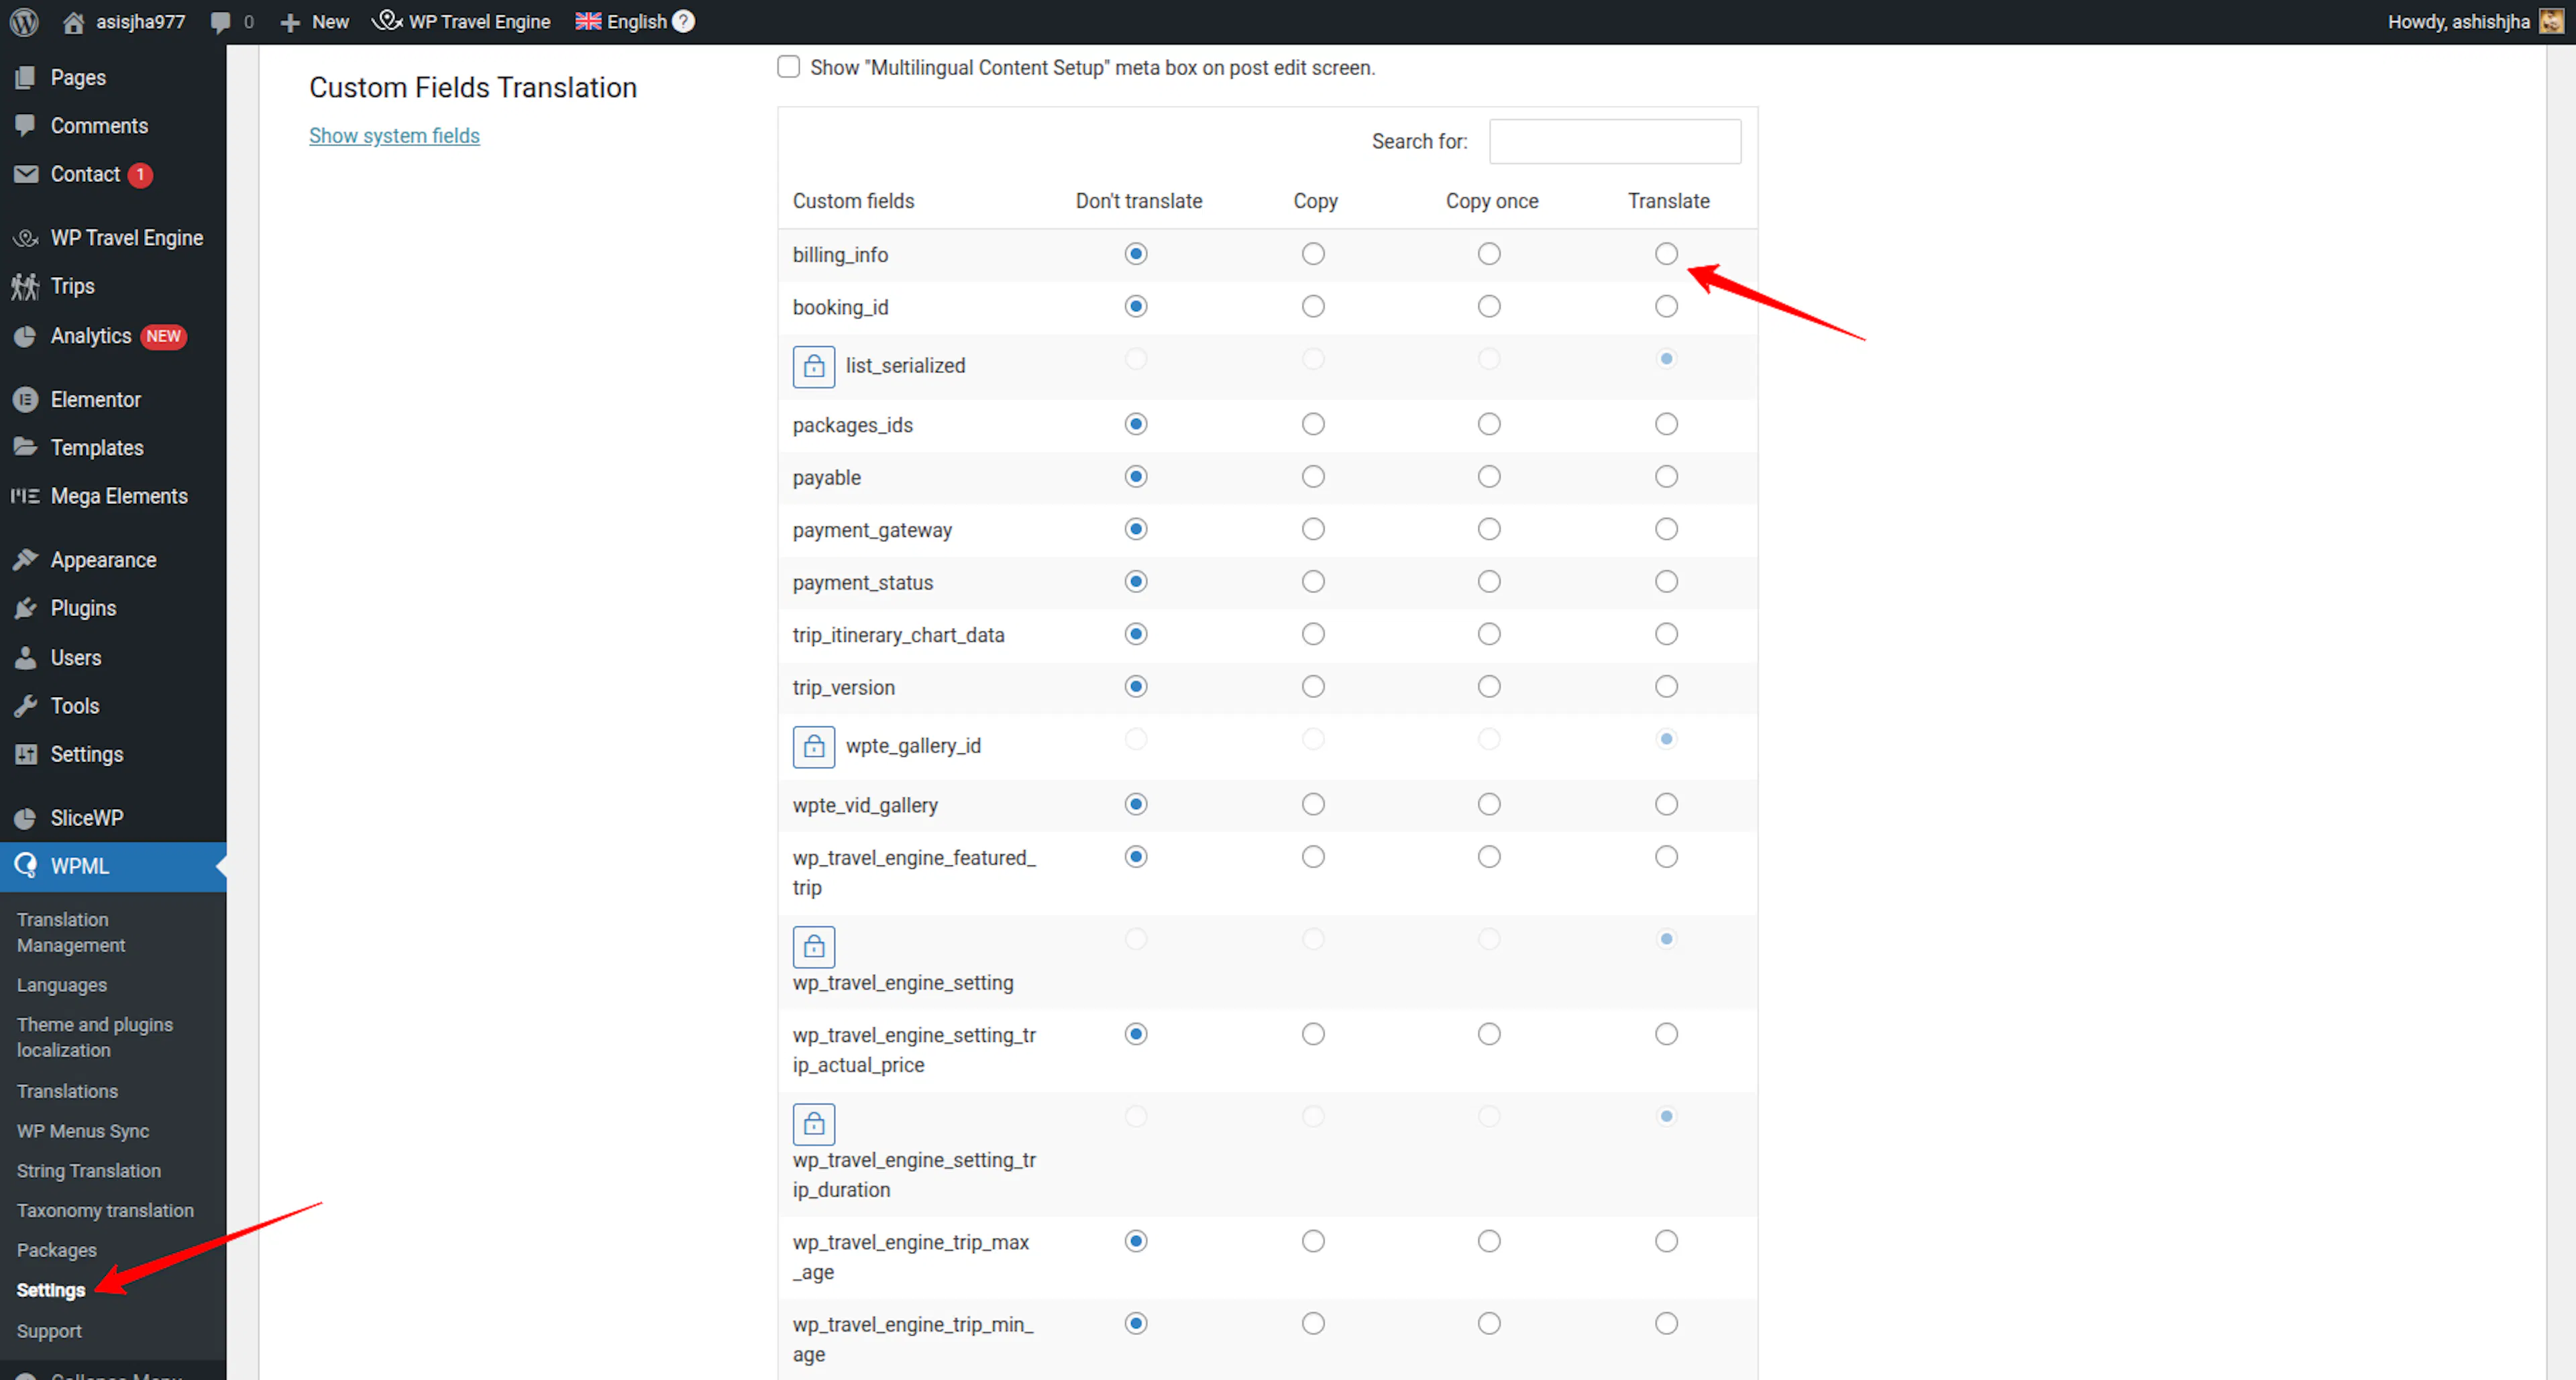
The field will be available for translation. You can now translate details such as a French itinerary or language-specific group discount.
Translate image galleries and media
Use Media Translation when a language needs different images. You can also translate image titles and alt text. Alt text describes an image to search engines and people who use screen readers.
Open media translation
In the left sidebar of your WordPress dashboard, go to WPML. Select Media Translation.
Add alternative images
Upload alternative images when a specific language needs different media. For example, you might show a regionally relevant photo for a French day tour page.
Translate image details
Translate the image title and alt text for each language.
Your trip details and media now match the language your traveler selected. Next, translate the navigation and reusable content around those trips.
Translate menus, widgets, and site-wide text
Travelers need to find the same important pages in every language. Translate your menu links and the short messages that appear across your site.
Create translated menus
Open your menus
In the left sidebar of your WordPress dashboard, go to Appearance. Select Menus.
Choose your primary menu
Select your primary menu from the menu selector.
Create menus for other languages
Select the plus icons for the languages you want to add. WPML creates menu versions for those languages.
Add translated links
Add links to the translated trip pages, blog, and contact page. For example, your French menu can link to the French version of an Everest trek and your French contact page.
Your visitors can now move through the site without leaving their chosen language.
Show language-specific widgets
A widget is a small block of content that appears in a sidebar or another area of your site. Use WPML Widget Logic or Block Widgets to display different widgets for different languages.
For example, you could show a French booking notice in a sidebar on French trip pages. Your English pages can show the English version of the same notice.
Translate static strings
Static strings are short pieces of text that stay the same across your site. Examples include button labels such as “Book Now” and headings such as “Read More.”
Open String Translation
In the left sidebar of your WordPress dashboard, go to WPML. Select String Translation.
Search for a string
Search for the text you want to translate. Search for strings such as “Book Now” or “Read More.”
Add translations
Add a translation for each language. For example, change “Book Now” to “Réserver” for French visitors or “Reservar” for Spanish visitors.
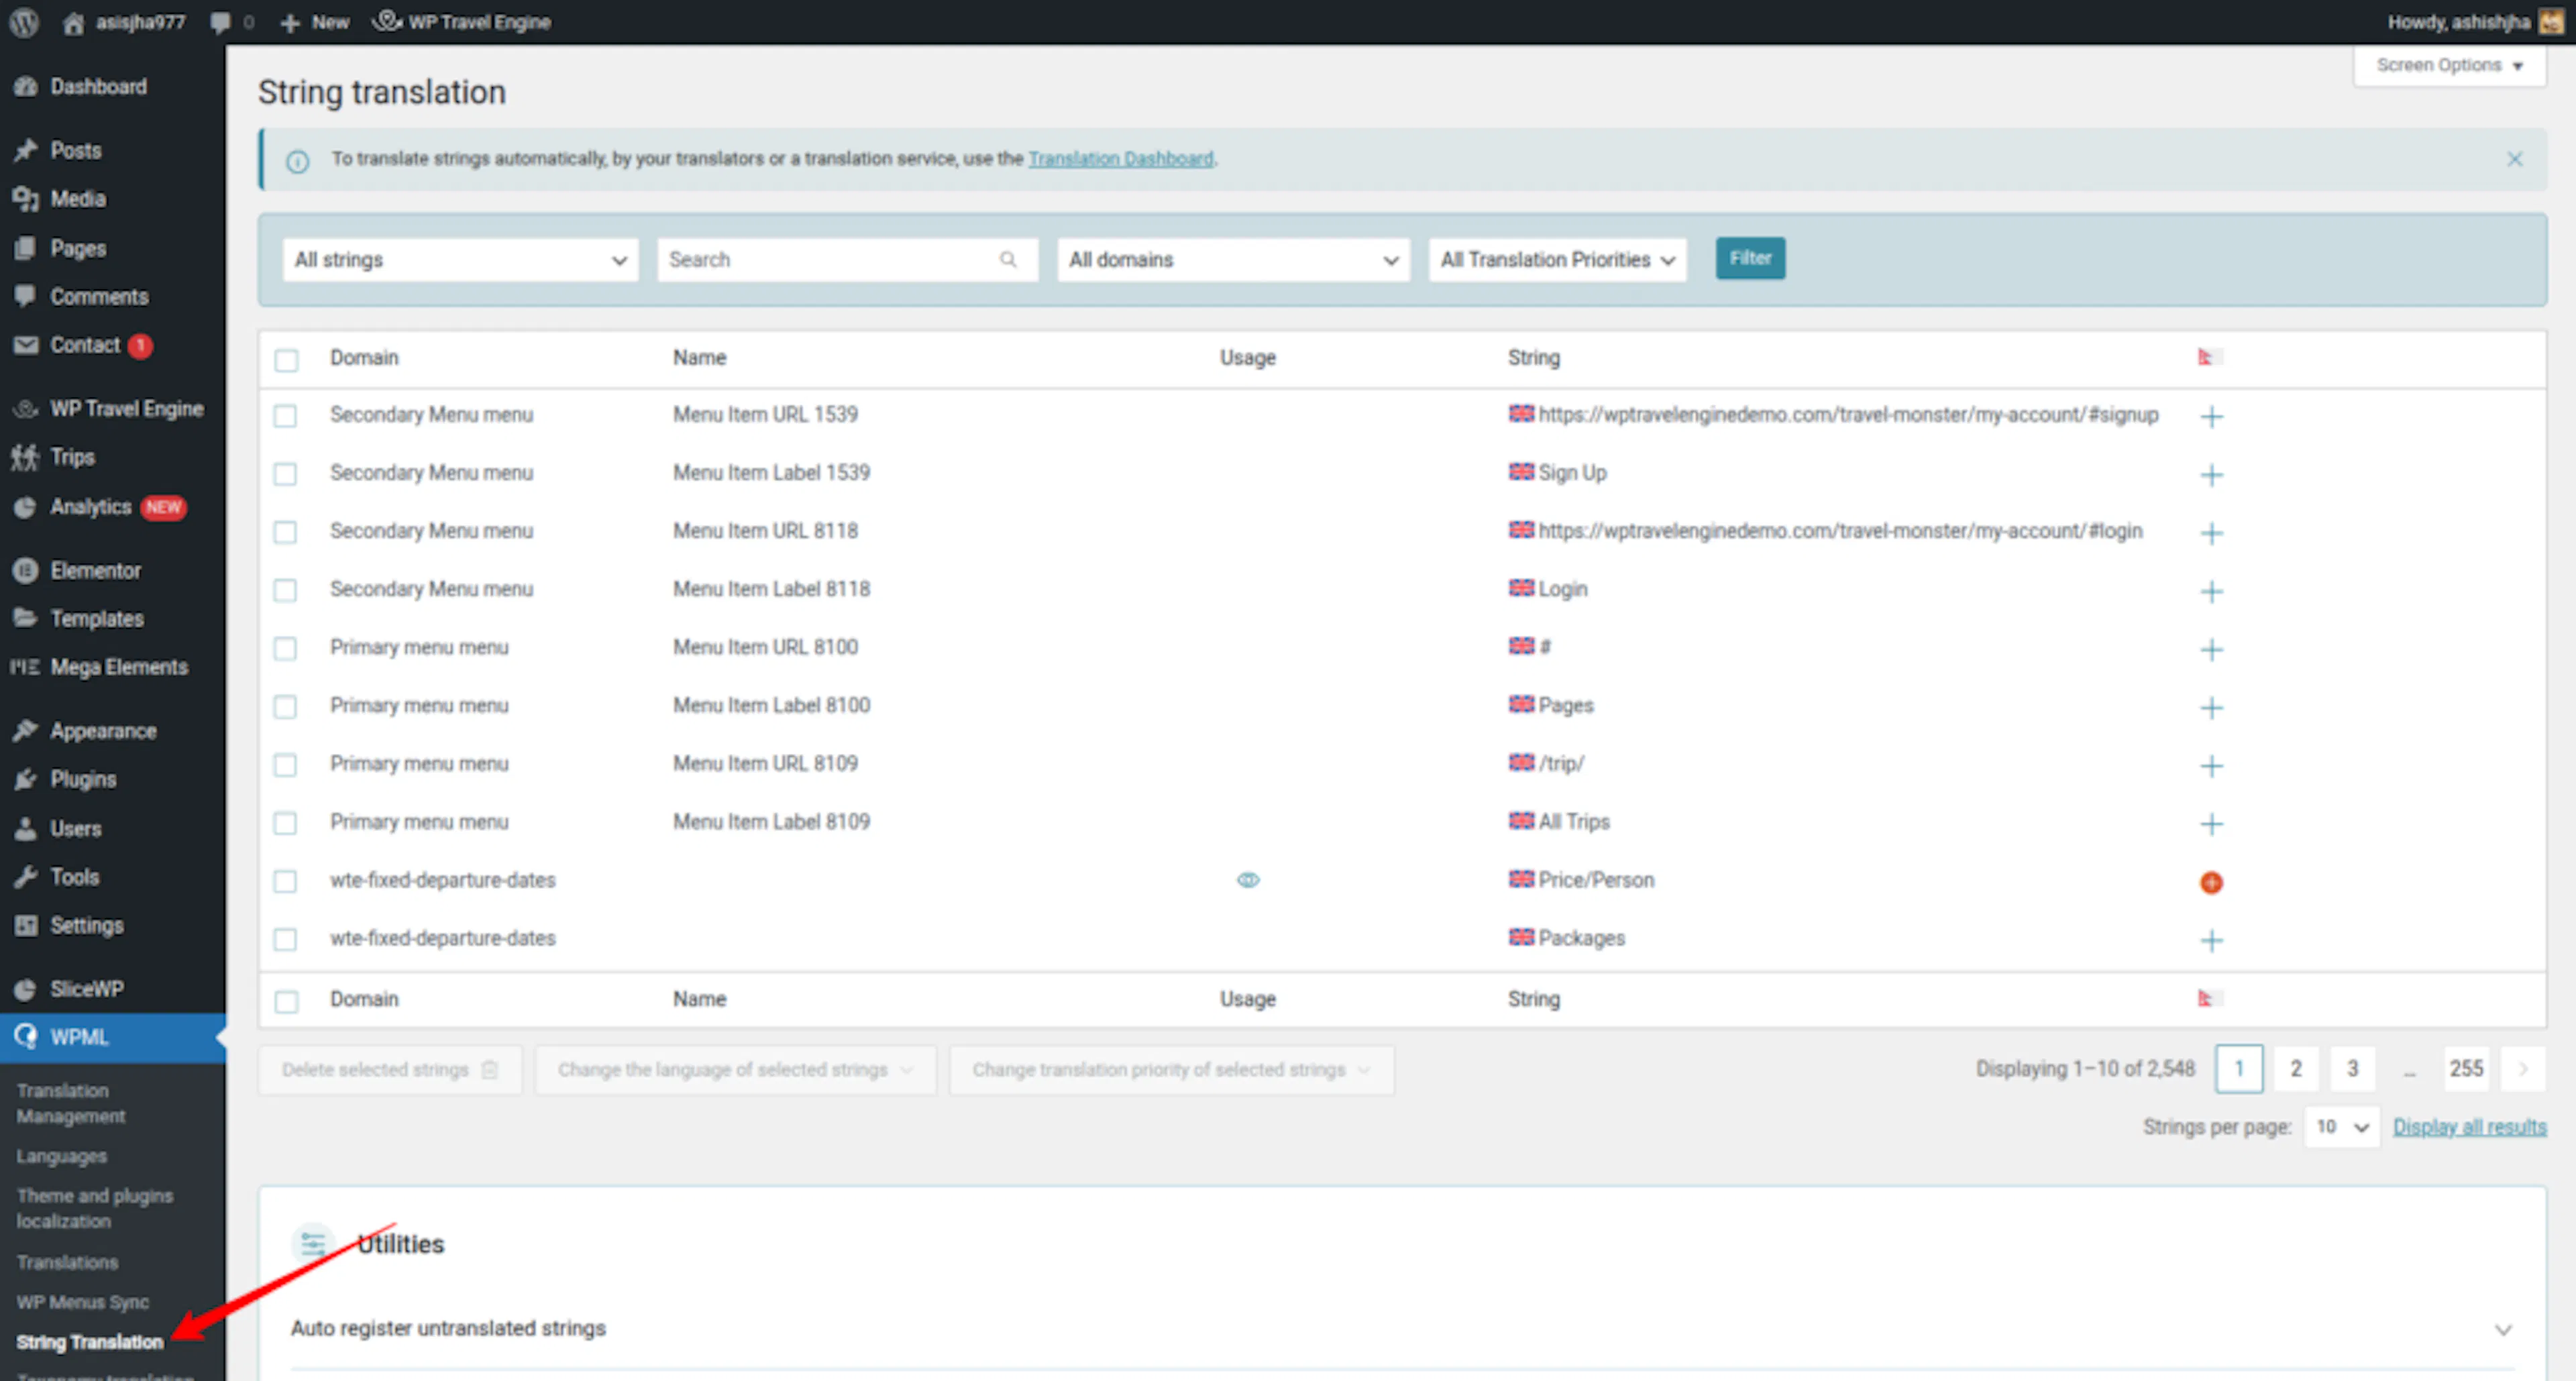
Scan WP Travel Engine for more translatable strings from WPML in the left sidebar. Select Theme and Plugin Localization.
Your menus and reusable text are now ready for multilingual visitors. Review the main booking path in each language before you invite travelers to use it.
Optional: enable automatic translation
Automatic translation can create a first draft for selected content. Review the result before publishing because travel names, pricing terms, and booking instructions may need manual corrections.
Open Translation Management
In the left sidebar of your WordPress dashboard, go to WPML. Select Translation Management.
Choose content types
Select the content types you want to include in automatic translation.
Turn on automatic translation
Enable Translate Everything Automatically.
Automatic translation is now available for the content types you selected. Check each translated trip before publishing it.
If you're still stuck or have a question we didn't cover, our support team is happy to help. Reach out at our support page and we'll get you sorted.