

Installment Payments
Let travelers split trip costs into scheduled payments through Stripe, so they can book sooner and pay over time.
Offer travelers more flexible ways to pay
Installment Payments lets you collect trip payments in scheduled parts instead of asking for the full amount upfront. That can help more travelers say yes to higher-value trips.
Say you run a 10-day trek that costs $2,000. With a 4-installment plan, your traveler can pay $500 at a time instead of paying the full amount in one go. That can feel more manageable for them and help you secure the booking sooner.
An add-on is a plugin that adds a feature to your WordPress site. Stripe is an online payment processor that handles charging credit cards. With this add-on, Stripe handles the scheduled charges for you, so you do not need to chase each payment by hand.
Once you have it set up, travelers can see their payment plan at checkout and pay over time. Next, here is what the add-on gives you.
Key features
- Global and trip-specific settings - Set installment plans for your whole site and choose whether individual trips should use them.
- Multiple installment plans - Offer different payment options, such as 10, 6, or 4 installments.
- Optional installment surcharge - Add an extra percentage when travelers choose to pay in installments.
- Automatic payment scheduling - The system calculates payment dates and amounts for you.
- Stripe-powered payments - Stripe processes scheduled installment payments automatically and securely.
These features give you control without adding extra admin work. Now you can see what that looks like in day-to-day use.
Benefits at a glance
| Feature | Benefit |
|---|---|
| Customizable Installment Plans | Offer installment plans so travelers can pay for trips in smaller, more manageable amounts. |
| Final Installment Due In | Make sure all payments are completed before the trip starts. |
| Cut-Off Days Enforcement | Stop installment payments from appearing when the booking is too close to the trip start date. |
| Installment Surcharge | Add a small extra fee to increase your margin on installment bookings. |
| Automatic Payment Scheduling | Let the system work out payment dates and amounts for you, so you do less manual tracking. |
| Secure Stripe Payments | Charge scheduled payments safely through Stripe without manual follow-up. |
| Clear Installment Schedule | Let both you and your travelers see each payment amount, due date, and status clearly. |
If you are happy with how that works, the next step is making sure your site is ready.
What you'll need before you start
A few things need to be in place before installment payments can work properly.
- You have WP Travel Engine installed and activated on your WordPress site. You need Version 6.7.0 or later.
- You have installed and activated the Stripe Payment Gateway add-on to its latest version.
- You have installed and activated the Installment Payments add-on.
- You have configured your Stripe webhook. A webhook is a way for Stripe to automatically notify your site when a payment happens. See how to set up your webhook.
Make sure you have added these two events in Stripe: invoice.payment_succeeded and invoice.payment_failed, so that the system can track successful and failed payments.
Once these pieces are ready, you can check that the add-on is installed correctly.
Installing the Installment Payments add-on
If you have not activated the add-on yet, start there first. This makes the Installment Payments settings appear in your WordPress dashboard.
See how to activate a Pro add-on license key for the full installation and activation walkthrough.
After activation, it is worth taking a quick look to make sure everything is showing where it should.
Verifying the installation
This check helps you confirm the add-on is active before you spend time setting it up.
Open the Extensions settings
In the left sidebar of your WordPress dashboard, go to WP Travel Engine > Settings > Extensions.
Look for the Installment Payments tab
If the add-on is active, you will see the Installment Payments tab under Extensions.
If you can see that tab, the add-on is ready. Next, you can set the rules that apply across your site.
Setting up global settings
Global settings are the default rules for all your trips. You will find them in the left sidebar of your WordPress dashboard under WP Travel Engine > Settings > Extensions > Installment Payment
Show Installment Payments
Turn Show Installment Payments on if you want this feature available across your site. If this is off, travelers will not see installment options at checkout.
This is the main switch for the feature. Once it is on, you can decide how the payment plans should work.
Final Installment Due
This setting decides how many days before the trip starts the last payment must be completed. That helps you avoid carrying unpaid balances too close to departure.
For example, if you set this to 20 days and the trip starts on June 30, the final installment will be due by June 10.
That gives you a clear payment deadline. Next, you can build the plans travelers will choose from.
Add New Plan
Each plan tells the system how to split the total trip cost.
Number of Installments
Choose how many payments the traveler will make. Common options are 4, 6, or 10 installments.
For example, if you sell a multi-day package for $1,200 and offer 4 installments, the traveler will pay the total across 4 scheduled payments. This helps you match the plan to the type of trip you sell.
Installment Cut-Off Days
Set the minimum number of days before the trip start date that a traveler must book to use installments. The minimum allowed value is 30 days.
This protects you from offering installment plans when there is not enough time left to complete them. For example, if the trip starts on June 30 and your cut-off is 20 days, travelers booking on or after June 10 will no longer see the installment option.
Increment Percentage
Use Increment Percentage if you want to add a surcharge for travelers who choose installments. Leave it blank if you do not want to charge anything extra.
For example, if your day tour package costs $800 and you add a 5% increment, the installment option will include that extra amount. This can help cover payment risk or admin costs.
Once your plans are in place, you can decide how the extra fee should appear to travelers.
Installment Surcharge Label
Enter the name you want travelers to see for the surcharge at checkout. For example, you might use "Installment Fee."
A clear label helps avoid confusion during checkout. The last setting decides where that fee sits in the tax calculation.
Installment Surcharge Position
Choose whether the surcharge is applied Before Tax or After Tax.
- Before Tax - Tax is calculated on the trip cost plus the installment surcharge.
- After Tax - Tax is calculated only on the trip cost, not on the installment surcharge.
This affects the final amount your traveler pays. Once your global settings are done, you can still control installments on specific trips.
Setting up installment payments for individual trips
Sometimes you want one trip to follow your main rules and another trip to stay excluded. You can control that inside each trip.
In the left sidebar of your WordPress dashboard, open the trip and go to WP Travel Engine > Trip Settings > Date and Price. Scroll down to the Installment Payments setting.
You will see these options:
- Use Global - The trip uses the installment settings you created in the main Installment Payments area.
- Disabled - The trip does not offer installments, even if installments are turned on globally.
For example, you might use Use Global for a 7-day cultural tour that has enough lead time for scheduled payments. You might choose Disabled for a last-minute seasonal departure that starts too soon.
That gives you room to be flexible trip by trip. Next, let us look at the emails that keep everyone informed.
Email notifications for installments
These emails help you and your travelers keep track of what is happening with scheduled payments. You can edit all of them to match your business tone.
In the left sidebar of your WordPress dashboard, go to WP Travel Engine > Settings > Emails > Notifications.
Admin emails
These emails help you stay on top of successful and failed automatic charges.
- Automatic Installment Success - Sent to the admin when a scheduled payment is processed successfully.
- Automatic Email Failed - Sent to the admin when a scheduled payment fails.
Customer emails
These emails tell the traveler whether their scheduled payment went through.
- Automatic Installment Success - Sent to the customer when a scheduled payment is processed successfully.
- Automatic Email Failed - Sent to the customer when a scheduled payment fails.
You can edit both the subject line and the message content for each email. That gives you a chance to use the same tone you use in your trip confirmations and customer messages.
The {installment_schedule} placeholder shows the full installment schedule, including each installment number, due date, amount, and status.
Once your emails are in place, it is a good idea to set up what should happen when a payment fails.
Setting up retry policies in Stripe
Retry policies tell Stripe what to do when a scheduled card payment does not go through. This matters because failed payments happen for normal reasons, like low funds, expired cards, or bank declines.
Log in to Stripe
Open your Stripe Dashboard and sign in to your account.
Find Revenue recovery
Use the search bar at the top and search for Revenue recovery.
Open the Retries tab
Click the Retries tab to choose how Stripe should handle failed installment payments.
Now you can choose the retry style that fits how you want to run your business.
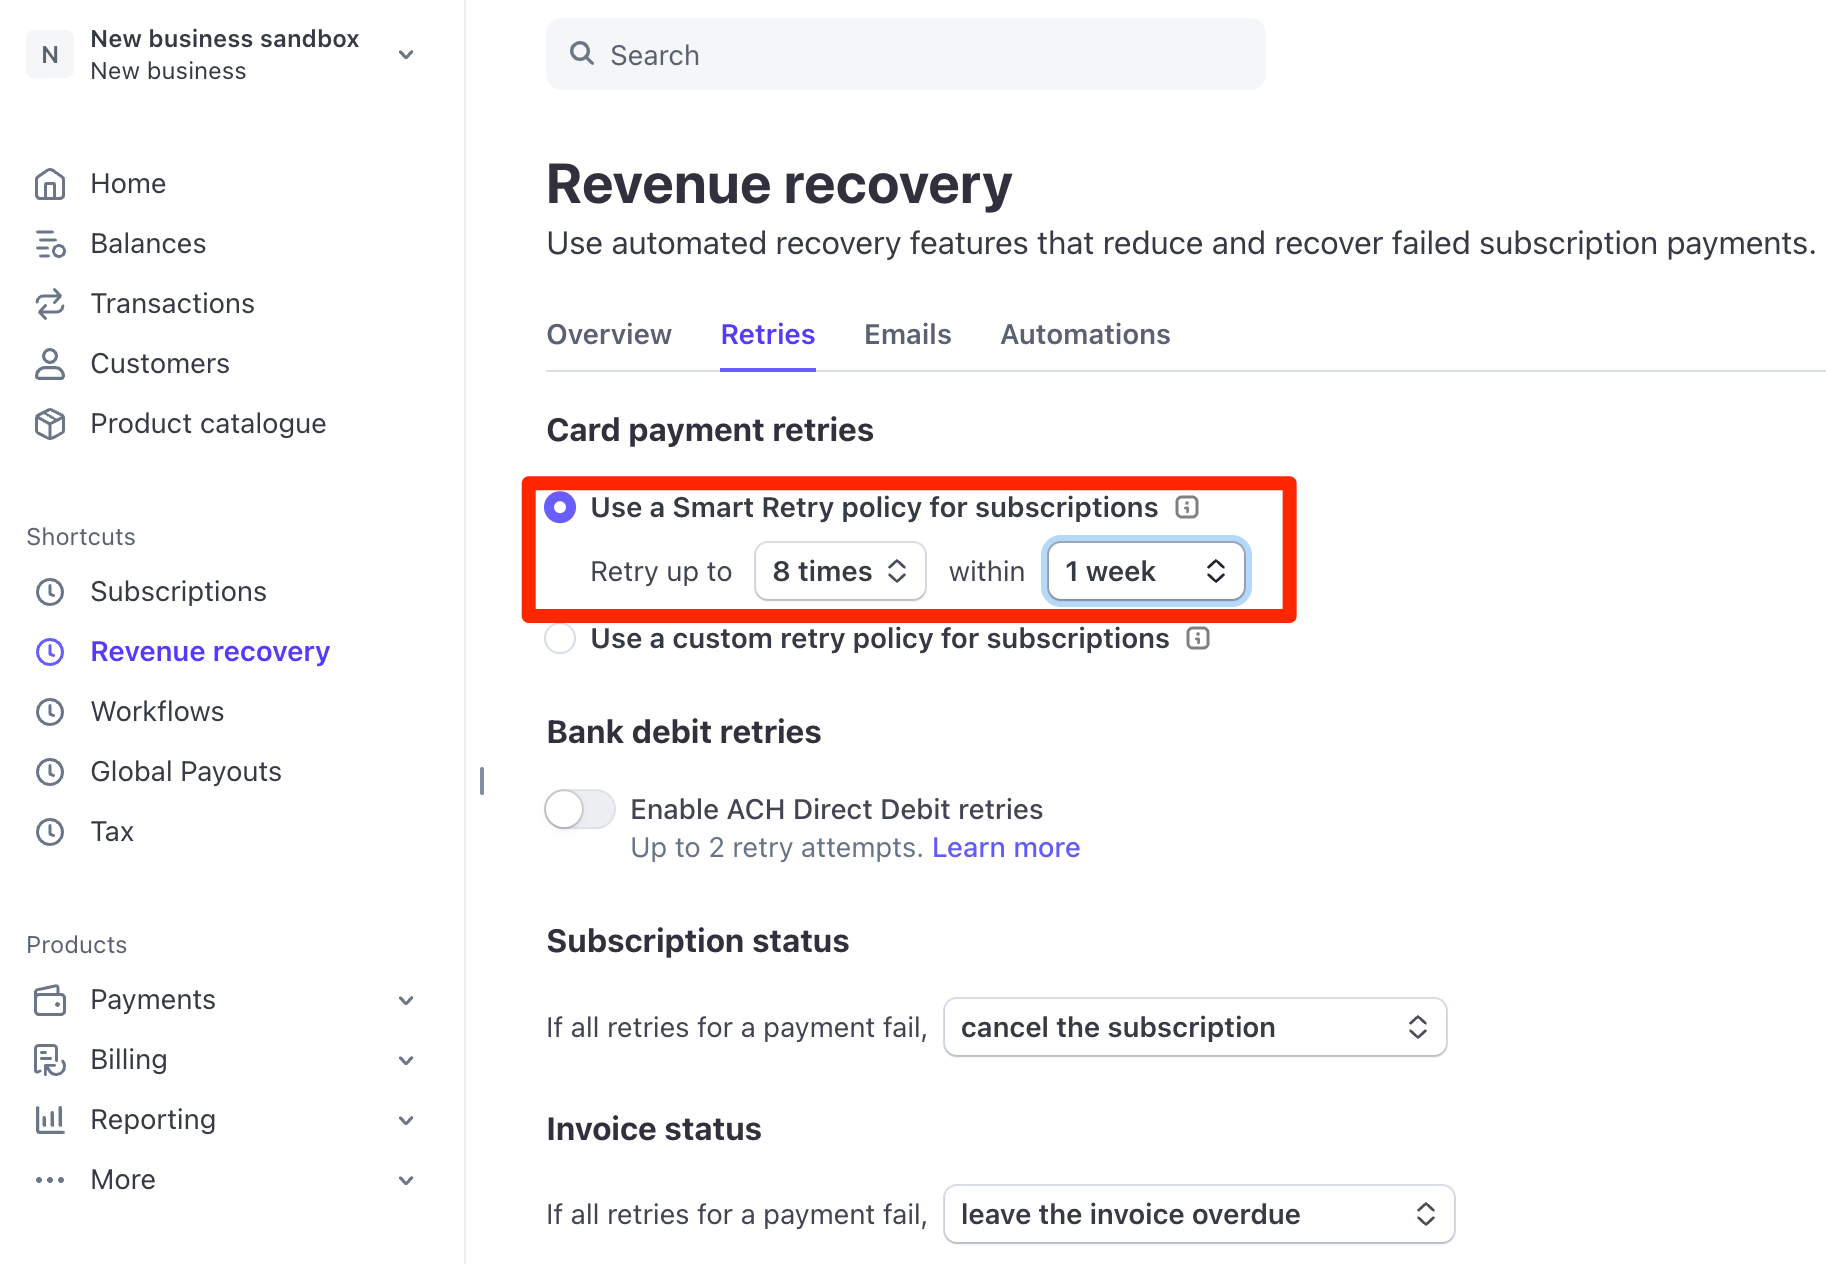
Smart Retries
Choose this if you want Stripe to decide the best time to try the charge again. Stripe looks at payment patterns and chooses moments when the card is more likely to go through.
You can still control the limits. For example, you might allow Stripe to retry up to 8 times within 1 week.
Custom Schedule
Choose this if you want to decide exactly when retries happen. You can set the number of days between each attempt.
Stripe may suggest a schedule like 3, 5, and 7 days after the previous attempt. You can change those days to suit your booking flow. You can set a maximum of 3 retry attempts.
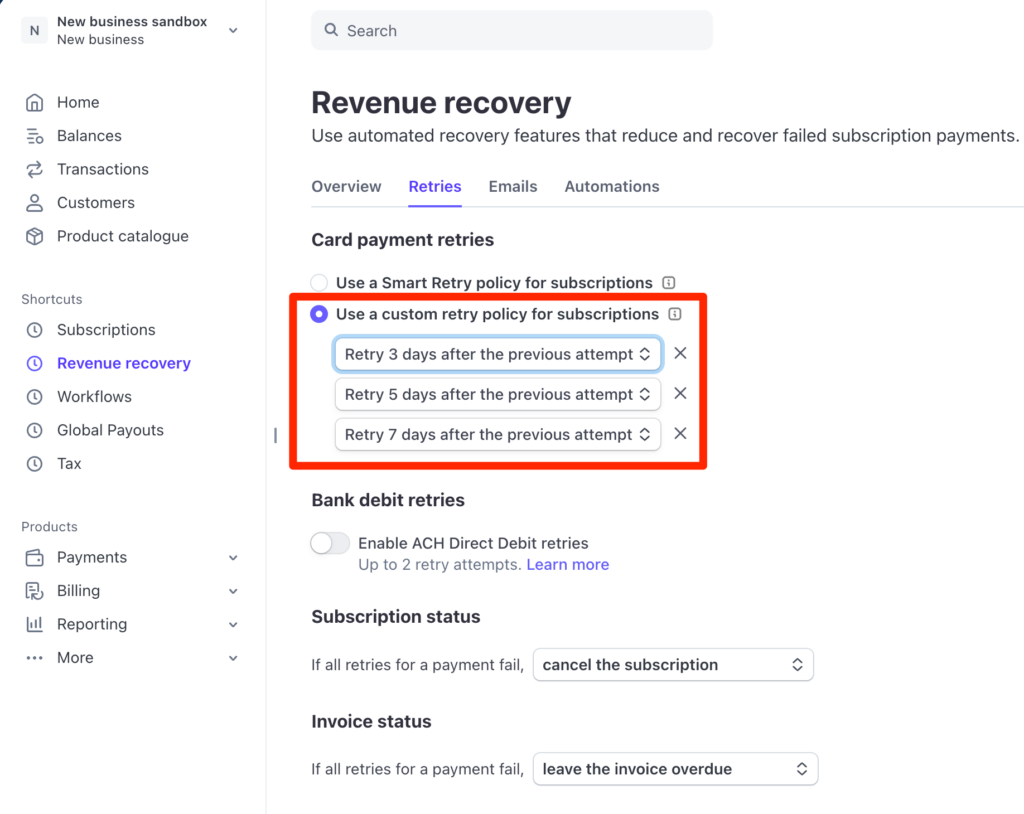
Once you save this in Stripe, it runs automatically in the background. The next setting decides what happens if all retries still fail.
Subscription Status
This setting controls the result after Stripe has finished all retry attempts.
| Option | What it does | Can it be resumed? |
|---|---|---|
| Cancel the subscription (strict) | The installment plan is permanently canceled. The traveler would need to book again, or you would need to create a new manual order. | No |
| Mark the subscription as unpaid (recommended for flexibility) | The installment plan stays active, but the status changes to "Unpaid." Stripe stops retrying the card automatically, but the subscription is not deleted. | Yes |
| Leave the subscription overdue | The installment plan stays active and remains in a "Past Due" state. This means the payment is late, but the subscription is still there. | Yes |
If you want the option to sort out a failed payment later, choose "Mark the subscription as unpaid." If you want the booking to cancel automatically after retries fail, choose "Cancel the subscription."
With retries set up, your installment system is ready for most real-world situations. If something still looks off, the next section covers the most common issues.
Troubleshooting
Syncing mismatched payment status
Sometimes Stripe shows a payment as successful, but your WP Travel Engine booking still shows it as Pending. That usually means the payment happened, but your site did not update the status properly.
This can happen for two common reasons:
- The Installment Payments add-on was deactivated when the scheduled payment happened.
- A temporary sync gap caused one payment to update and another one to stay behind. For example, Payment 4 may show as completed while Payment 3 still shows as pending.
This fix checks Stripe and updates the booking with the real payment status.
Open the booking
In the left sidebar of your WordPress dashboard, go to WP Travel Engine > Bookings and open the affected booking.
Find the Installment Schedule section
Scroll down until you see the Installment Schedule area.
Click Sync
Click the Sync button.
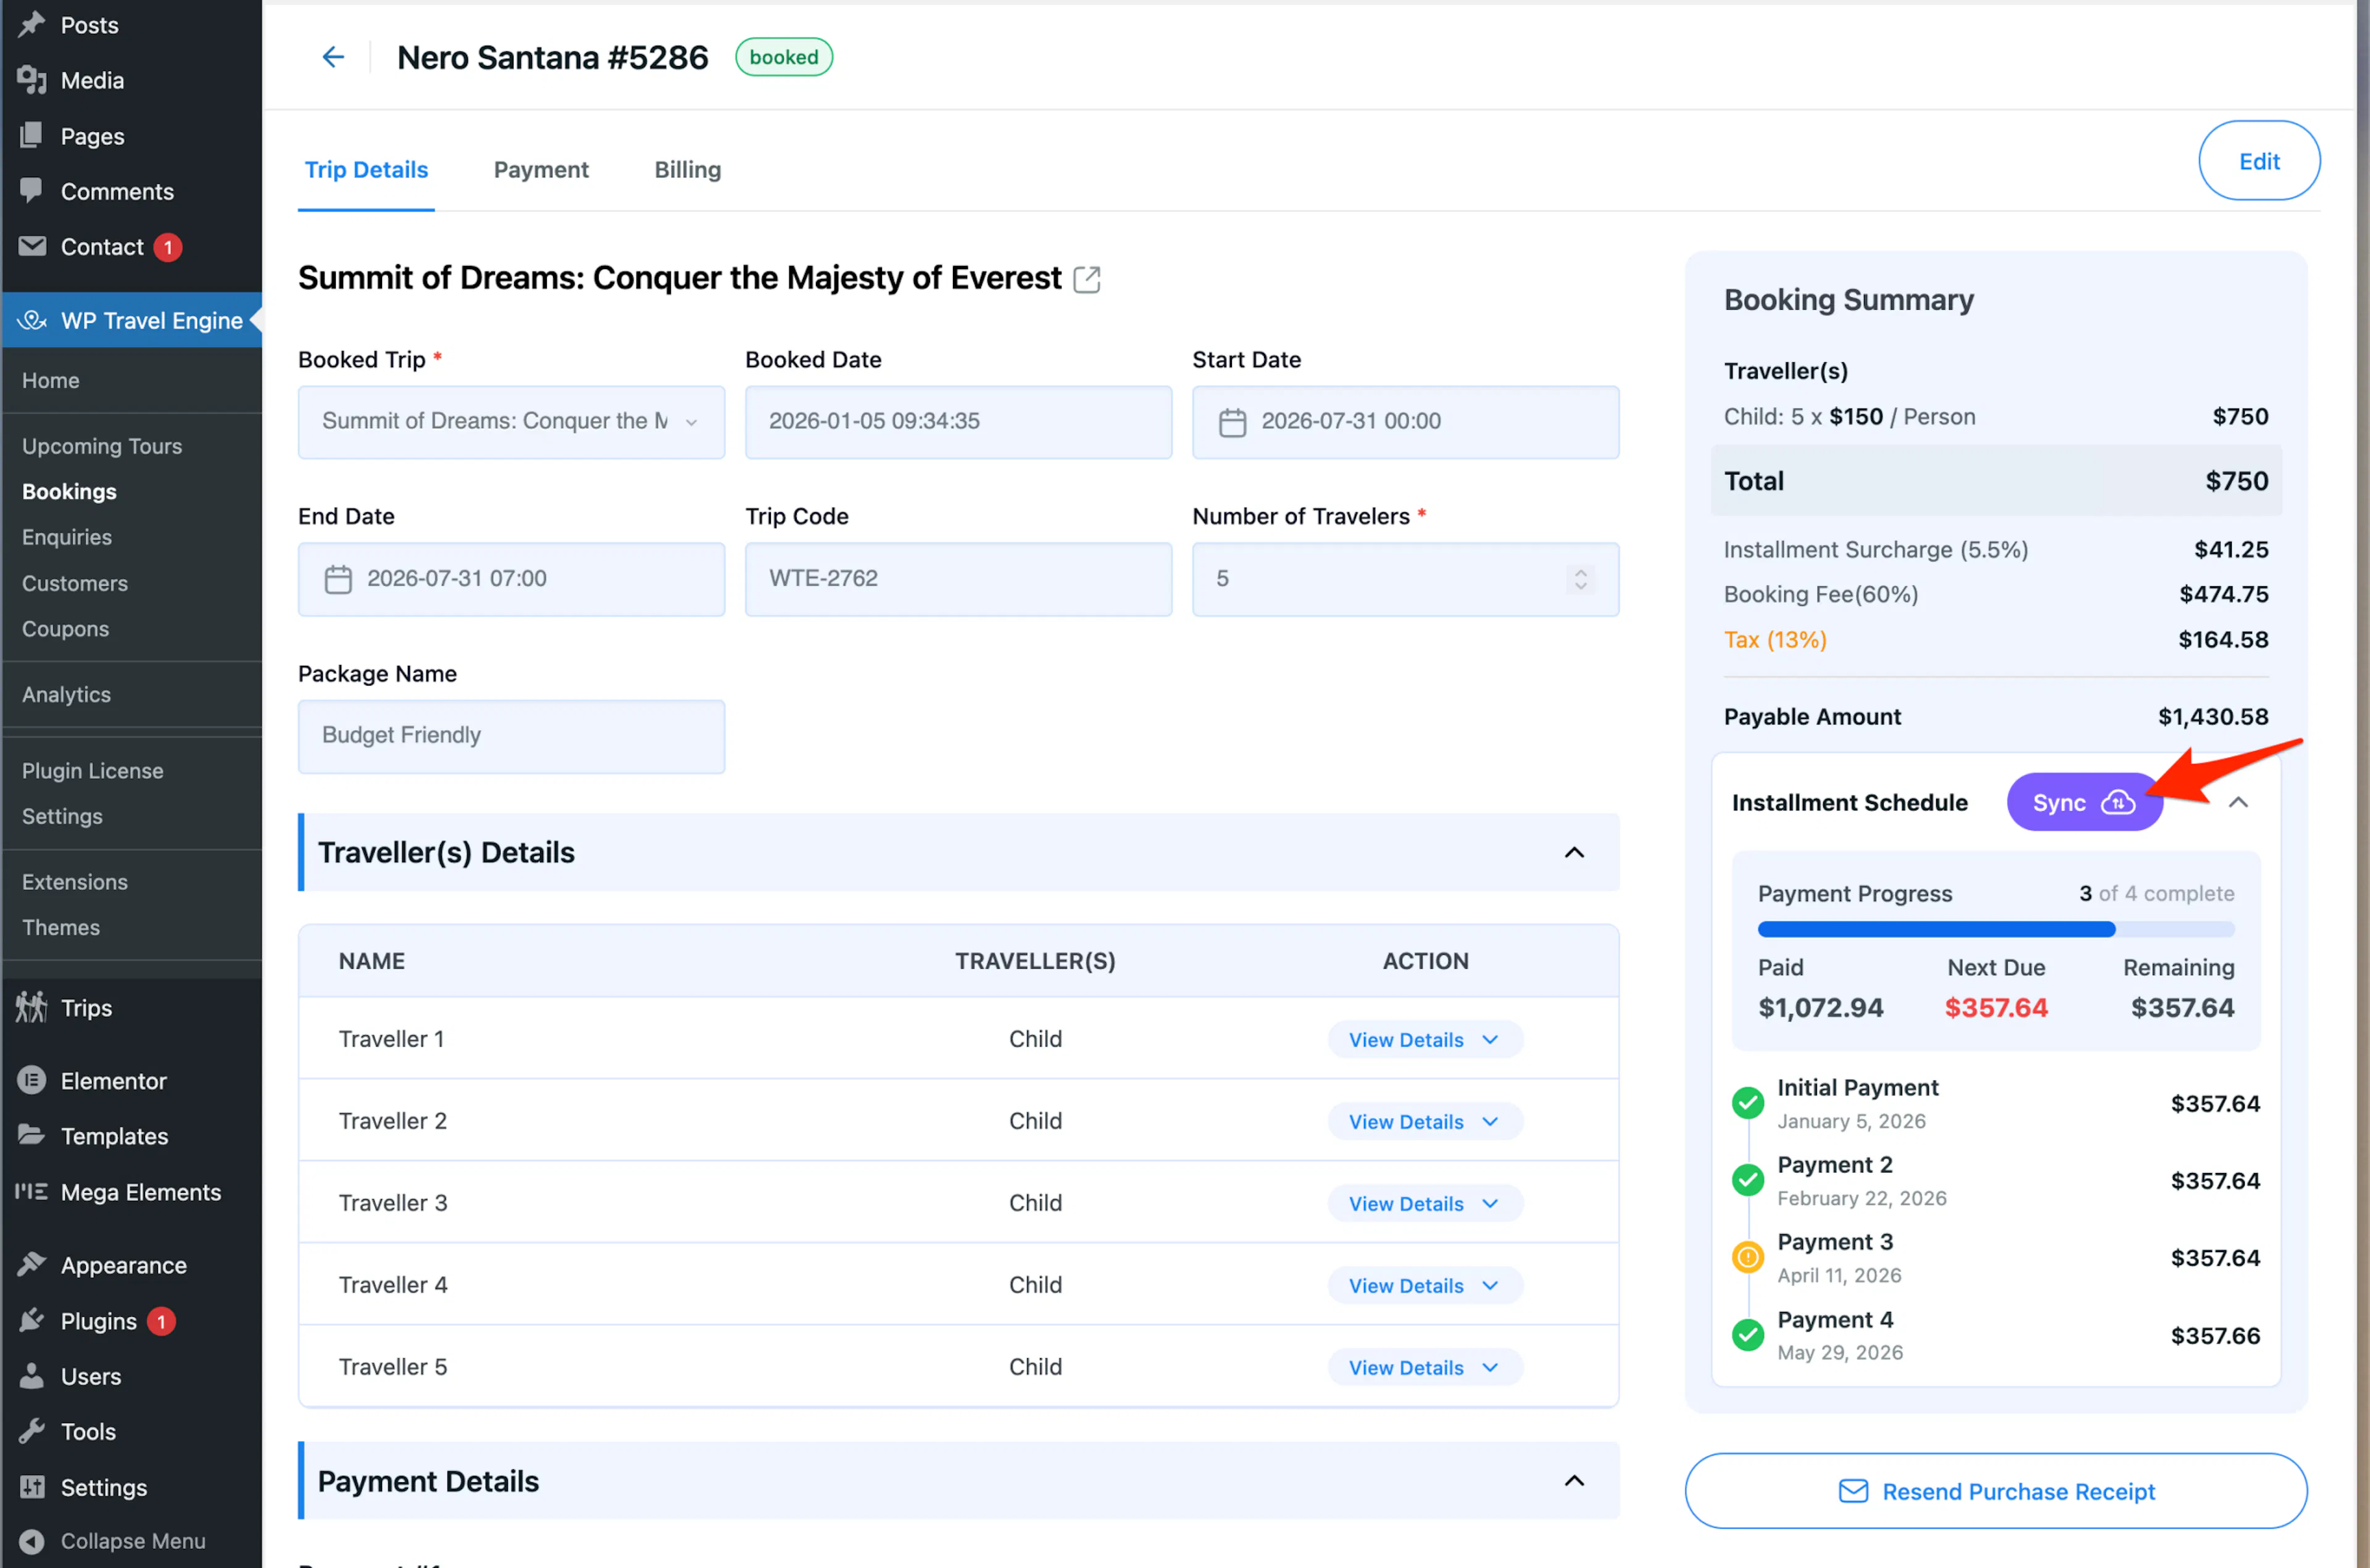
The system checks Stripe and updates the booking right away. If Stripe did receive the payment, the status in WP Travel Engine will change to Completed.
The installment option isn't showing up at checkout
This usually comes down to one of three settings.
First, check that Show Installment Payments is turned on in your global settings. Then check the trip itself and make sure the trip-specific setting is not set to Disabled.
Last, check the trip date against your cut-off days. If the traveler is booking too close to the departure date, the installment option will not appear.
A traveler says they can't see the installment option
Most of the time, this means the traveler is booking after the cut-off period has started. Cut-off days set the minimum time you need before departure in order to offer scheduled payments.
For example, if your cut-off is 30 days and the trip starts in 25 days, the traveler will only see your normal payment options. This is expected behavior.
The installment schedule isn't showing in my emails
This usually means the email template is missing the {installment_schedule} placeholder.
Open the installment email template and make sure that placeholder is included in the message content. Once it is there, the full schedule can appear in the email.
A traveler's card was declined but they were charged
This is usually a timing issue, not a double charge. One installment may have been processing successfully while a different installment failed.
Open the booking details and review the installment entries one by one. Then use Sync to pull the latest status from Stripe.
Frequently asked questions
If you're still stuck or have a question we didn't cover, our support team is happy to help. Reach out at our support page and we'll get you sorted.