

How to Customize the Trip Related Trips
Show travelers more trips they'll love at the bottom of every trip page, and control how those suggestions look - from the heading text to the number of trips, the matching filter, and the layout.
What are Related Trips?
When a traveler opens one of your trip pages, they see all the details about that specific trip. Dates, price, itinerary, and so on. At the bottom of that same page, you can also show a few other trips they might be interested in. These are called "related trips."
Think of it like a shop display. If someone is looking at a 3-day trek in the Himalayas, showing them a similar trek or a day tour in the same area gives them more options to choose from. It keeps travelers on your site longer and gives them more reasons to book.
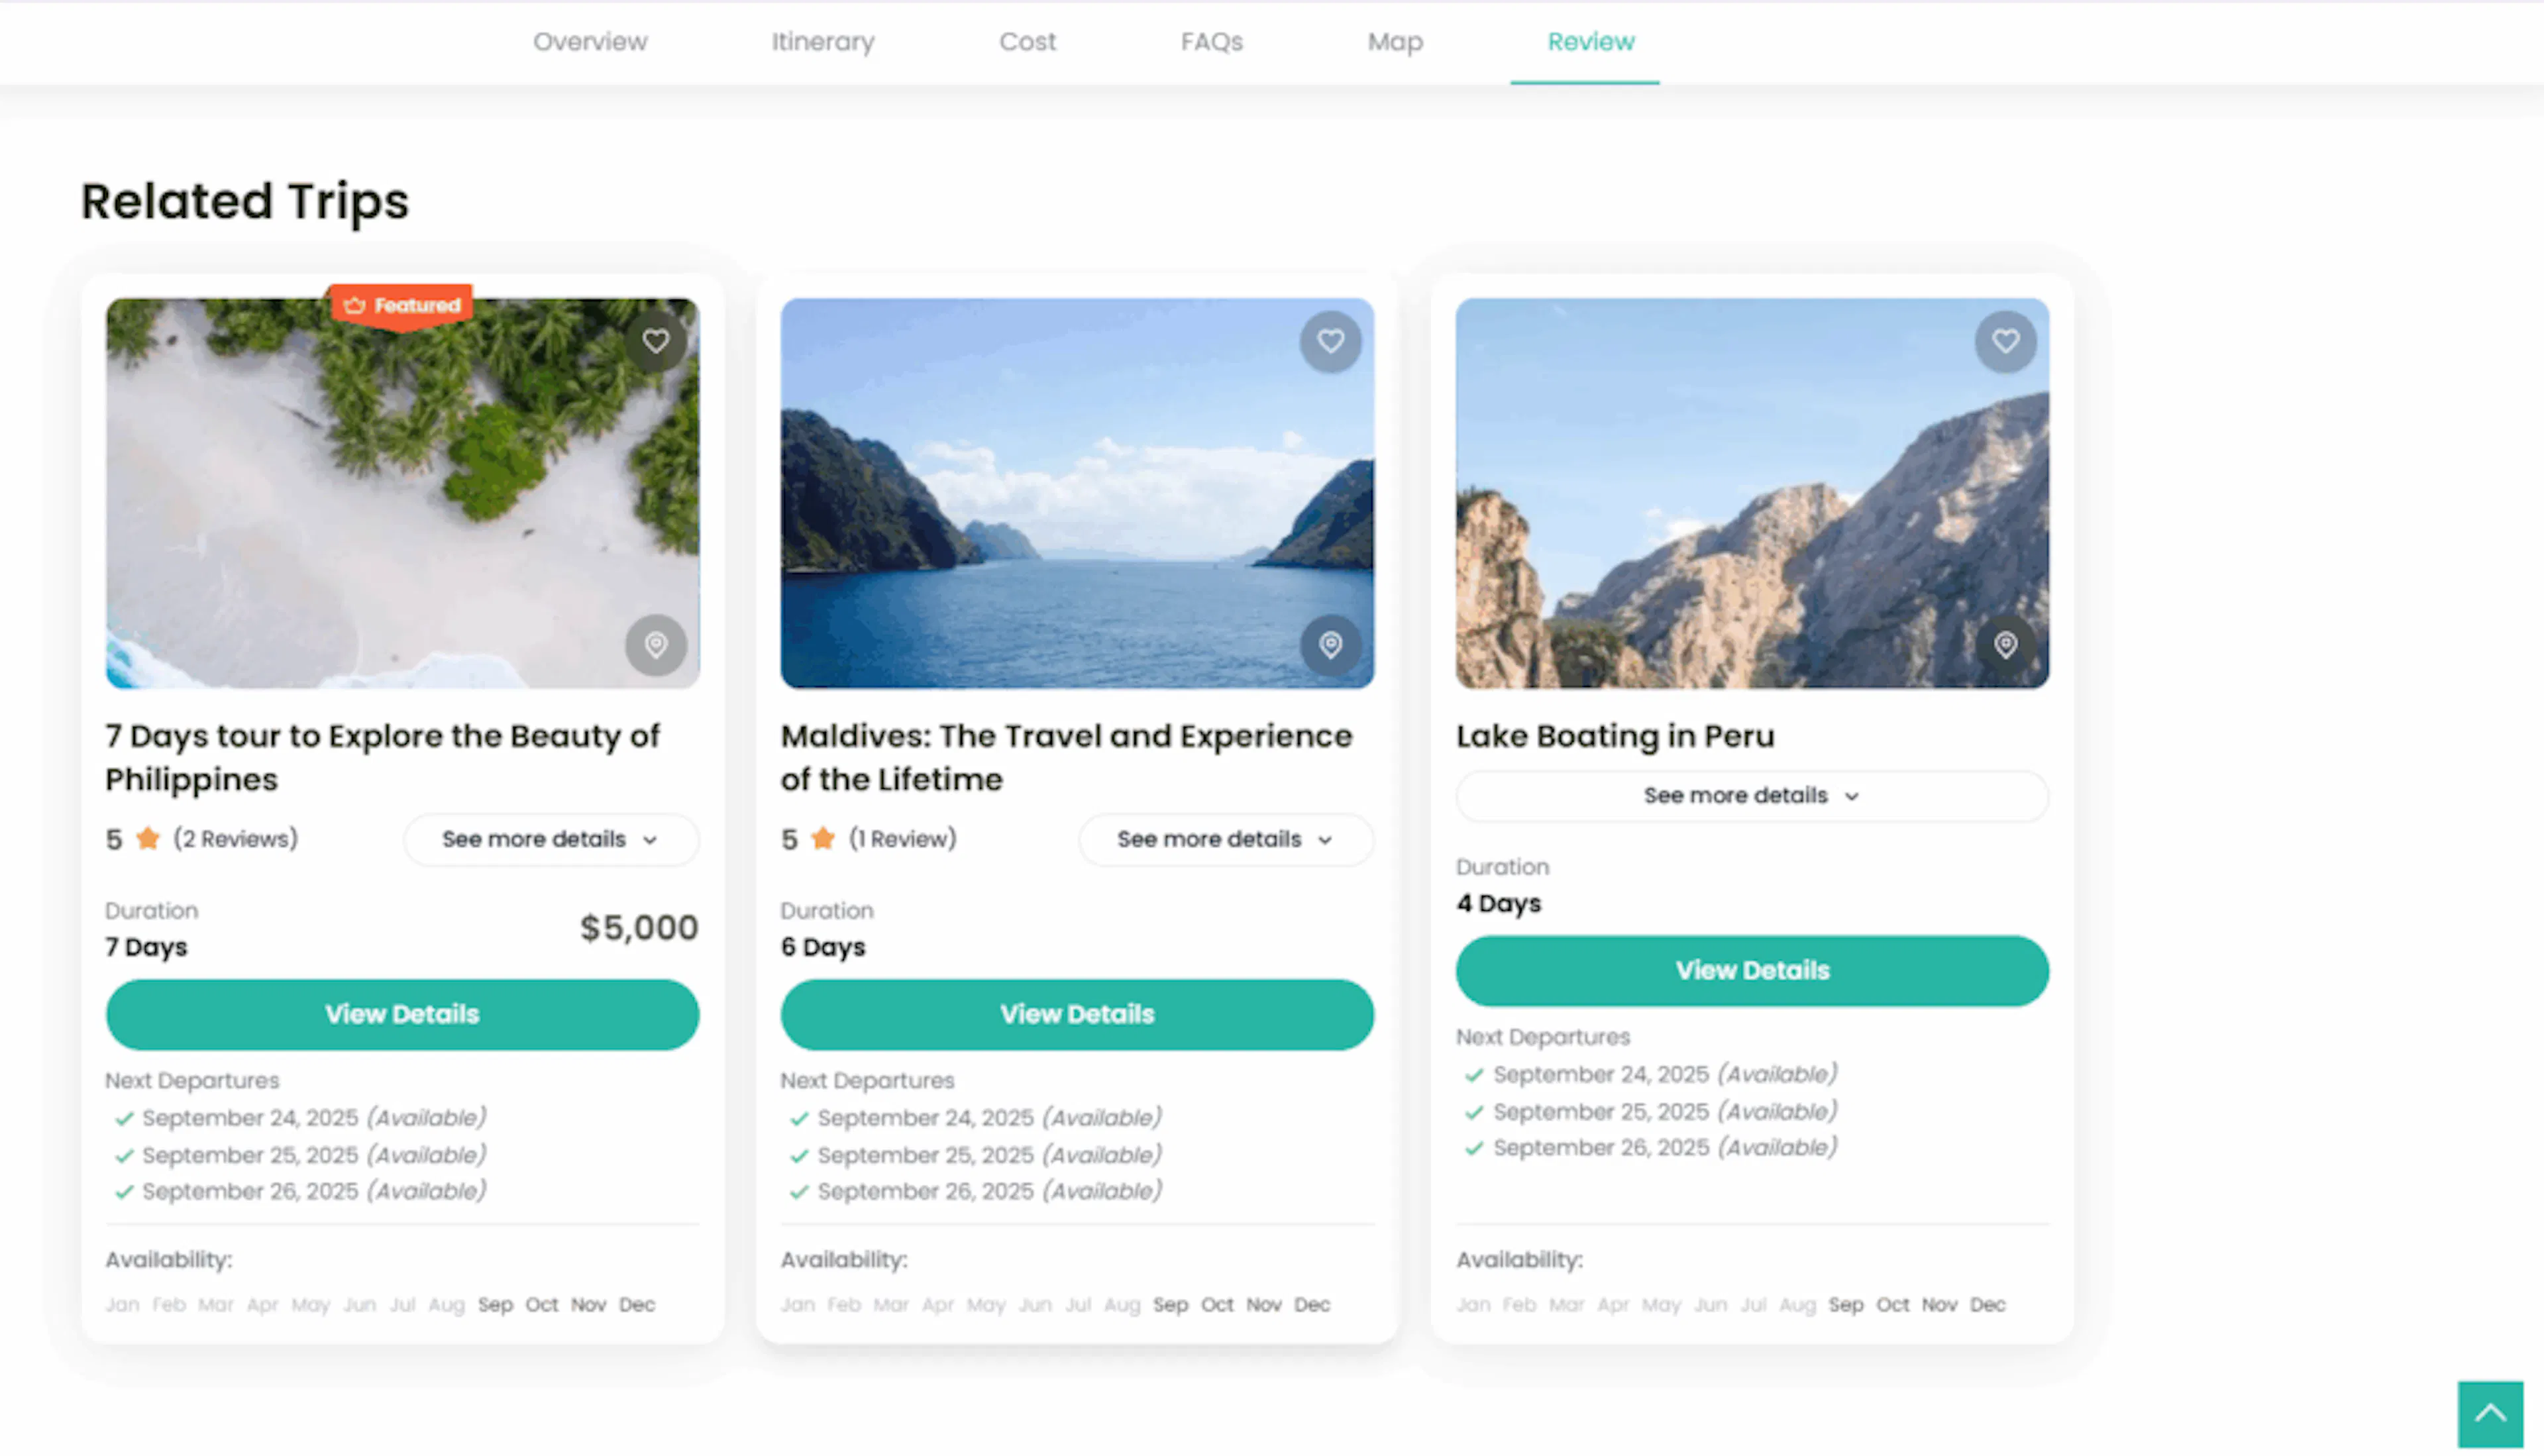
Why use Related Trips?
- More bookings per visit. Travelers see more of what you offer without having to search for it themselves.
- A better experience for travelers. It's easier for them to find trips similar to the one they're already interested in.
- A more professional-looking site. A well-organized trip page with suggestions at the bottom looks polished and complete.
Turning on Related Trips
You'll need WP Travel Engine running on your WordPress site before you start. A plugin is a piece of software that adds features to WordPress. WP Travel Engine is a plugin, and it shows up in your Plugins menu on the left side of your WordPress dashboard. If it's in the list and active, you're good to go.
Open the Single Trips display settings
From the left sidebar of your WordPress dashboard, go to WP Travel Engine > Settings. Then click the Display tab at the top of the page. Inside that tab, click the Single Trips section.
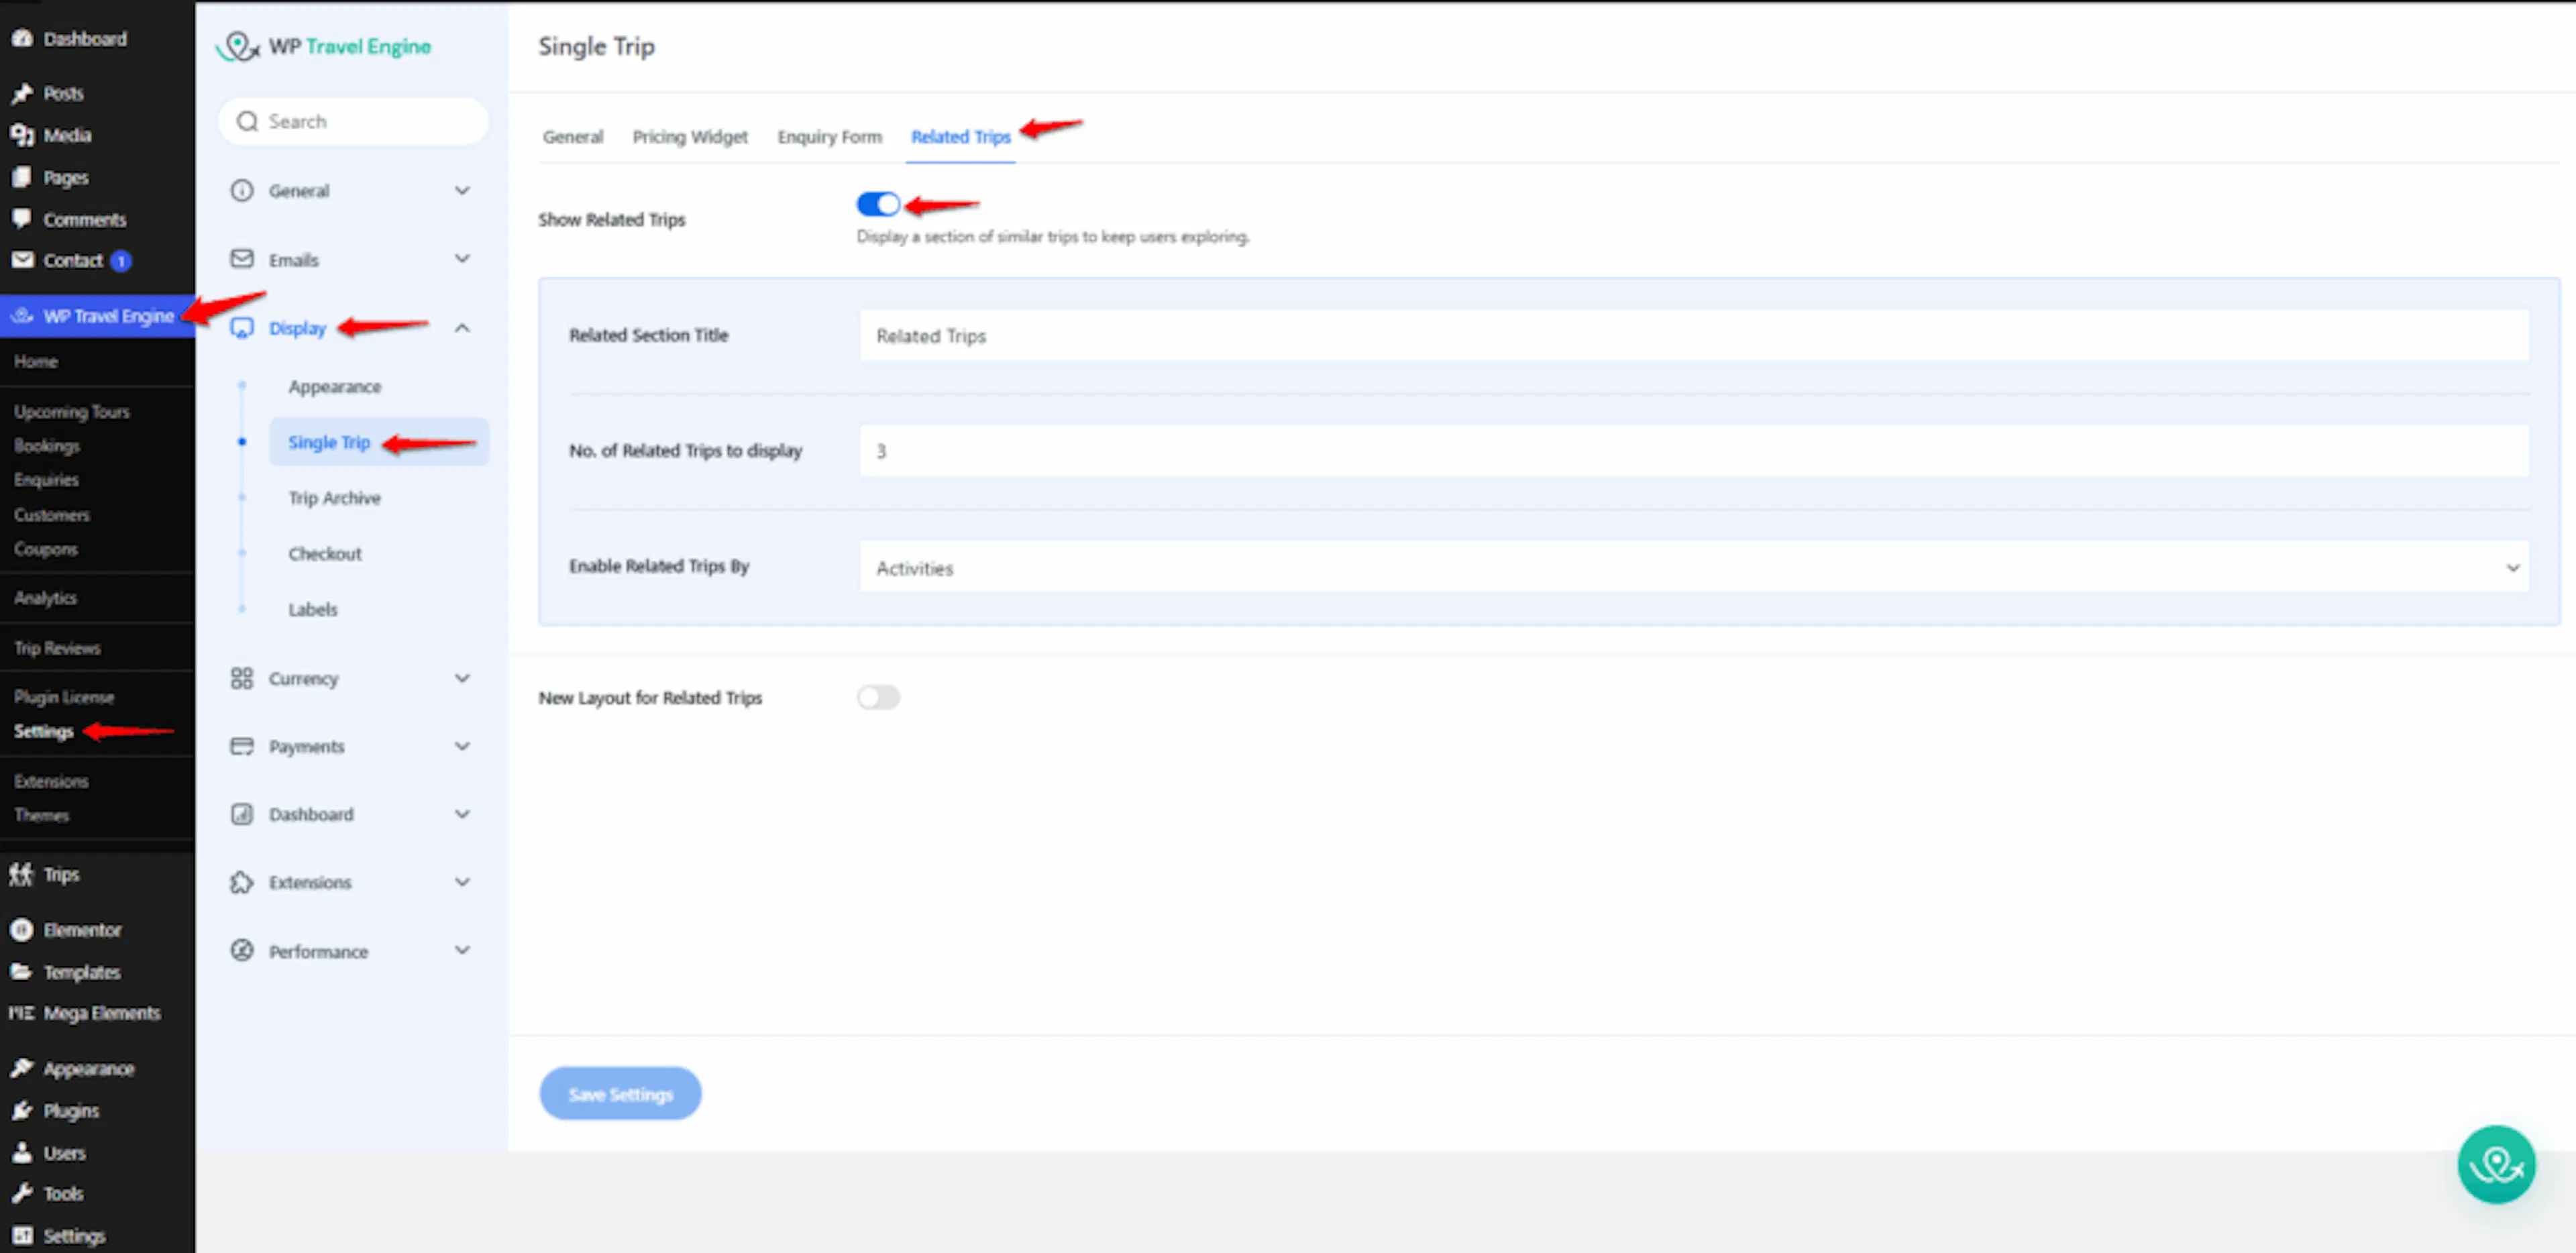
This is where you control how each individual trip page looks to your visitors.
Turn on Related Trips
Find the Show Related Trips option and flip the switch next to it.
Once it's on, related trips will appear at the bottom of every trip page. Nothing changes live on your site until you save your changes, so take your time with the settings below.
Setting up Related Trips
Once Related Trips is turned on, you'll see several options on the same settings page. These let you control what the related trips section looks like and how trips are matched up.
Section heading
This is the title that appears above the related trips. The default text is Related Trips, but you can type anything you like.
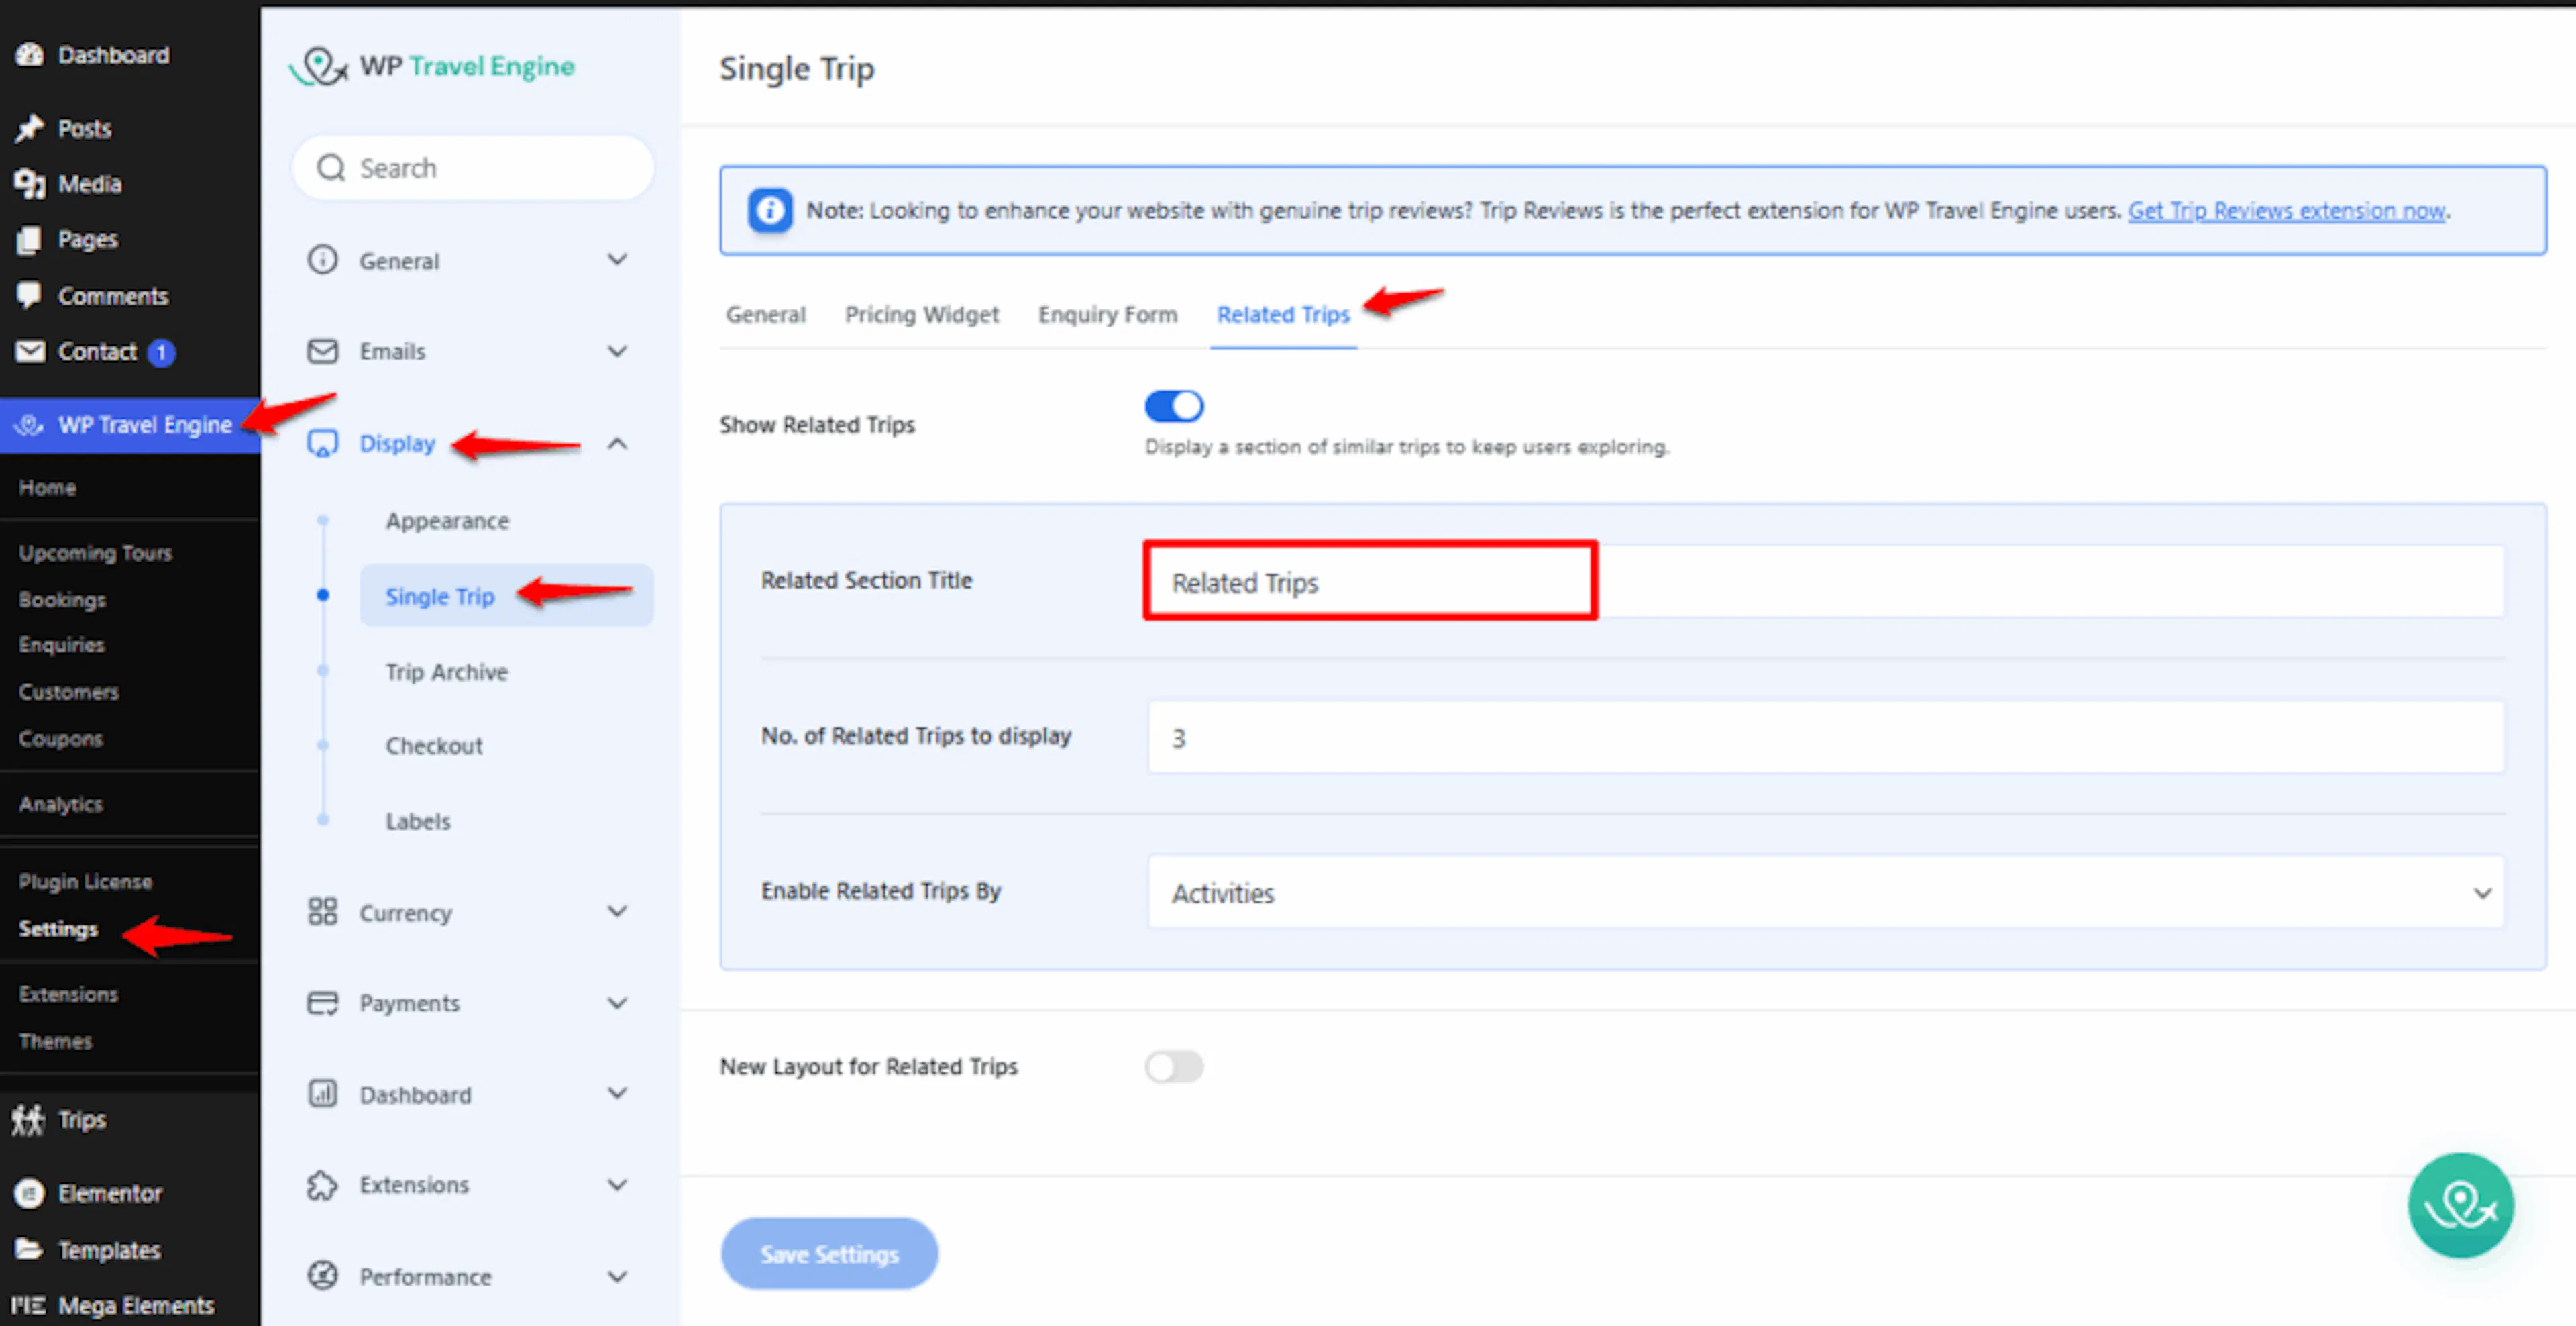
For example, if you run adventure tours, you might use something like "You May Also Like" or "More Adventures Like This." Pick something that fits your brand and sounds natural to your travelers.
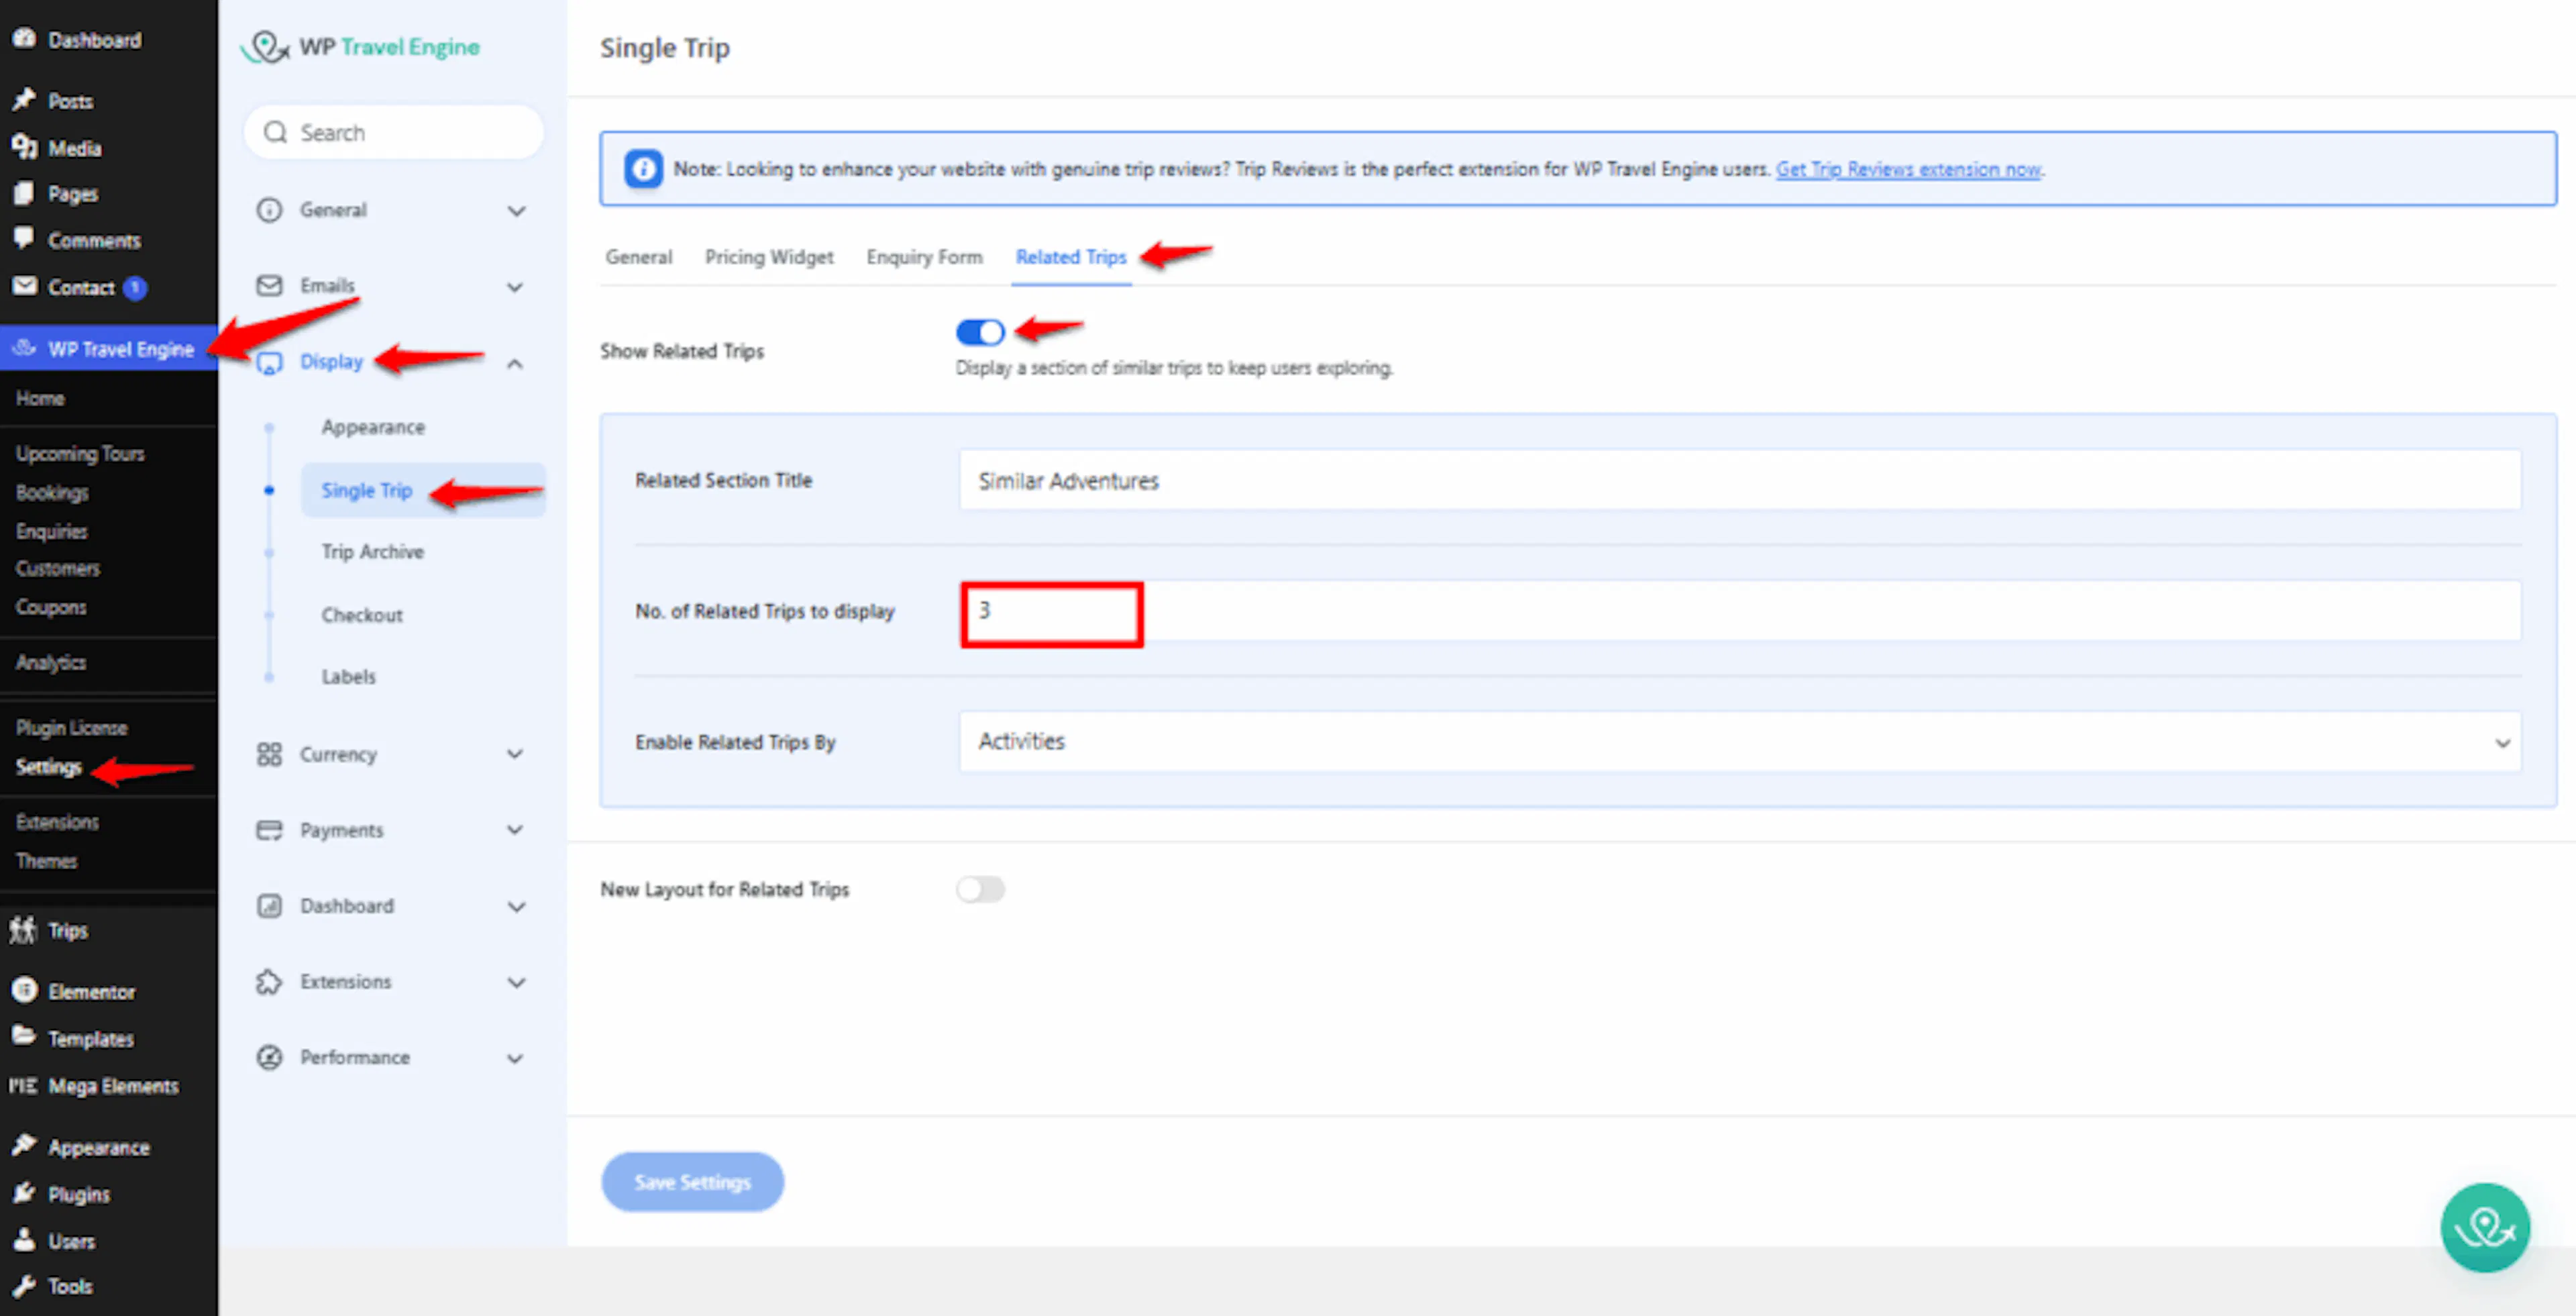
How many trips to show
You can choose how many related trips appear at the bottom of each page. The default is 3 trips.
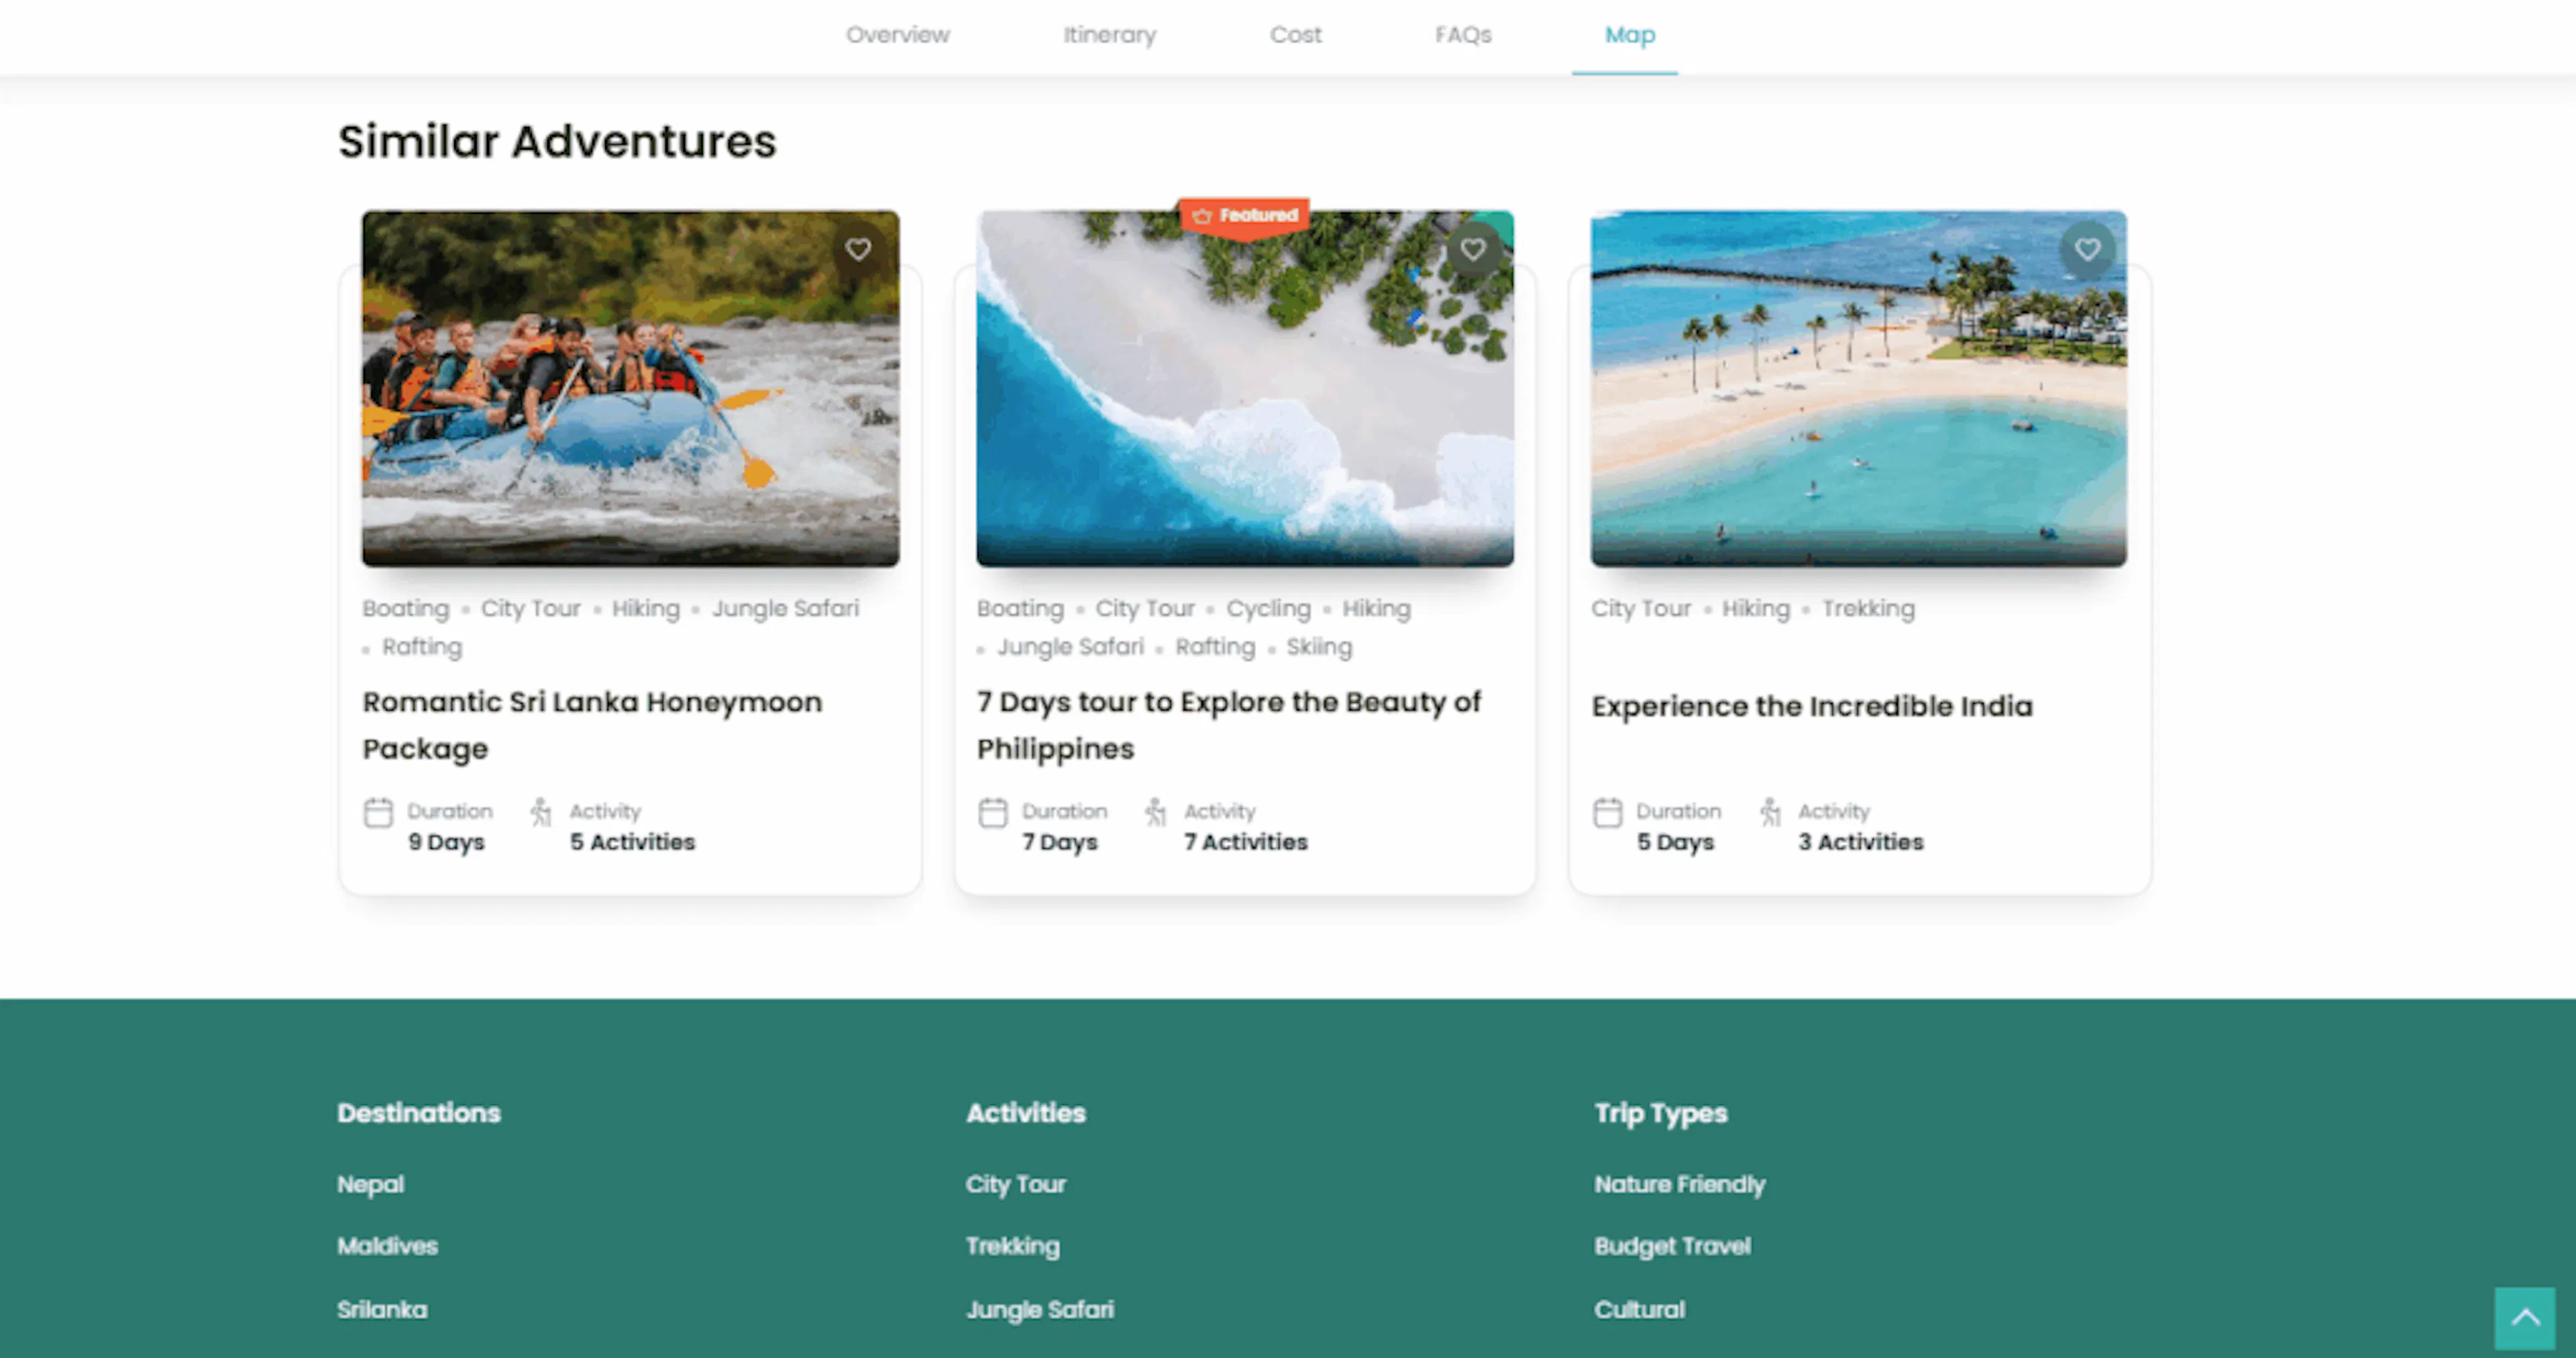
If you have a smaller catalog, 2 or 3 trips might be plenty. If you offer dozens of tours, showing 4 or 5 gives travelers more to browse without cluttering the page.
How trips are matched
This setting controls how the system picks which trips to show. By default, it uses a built-in rule. But you can choose a specific filter to get more relevant matches.
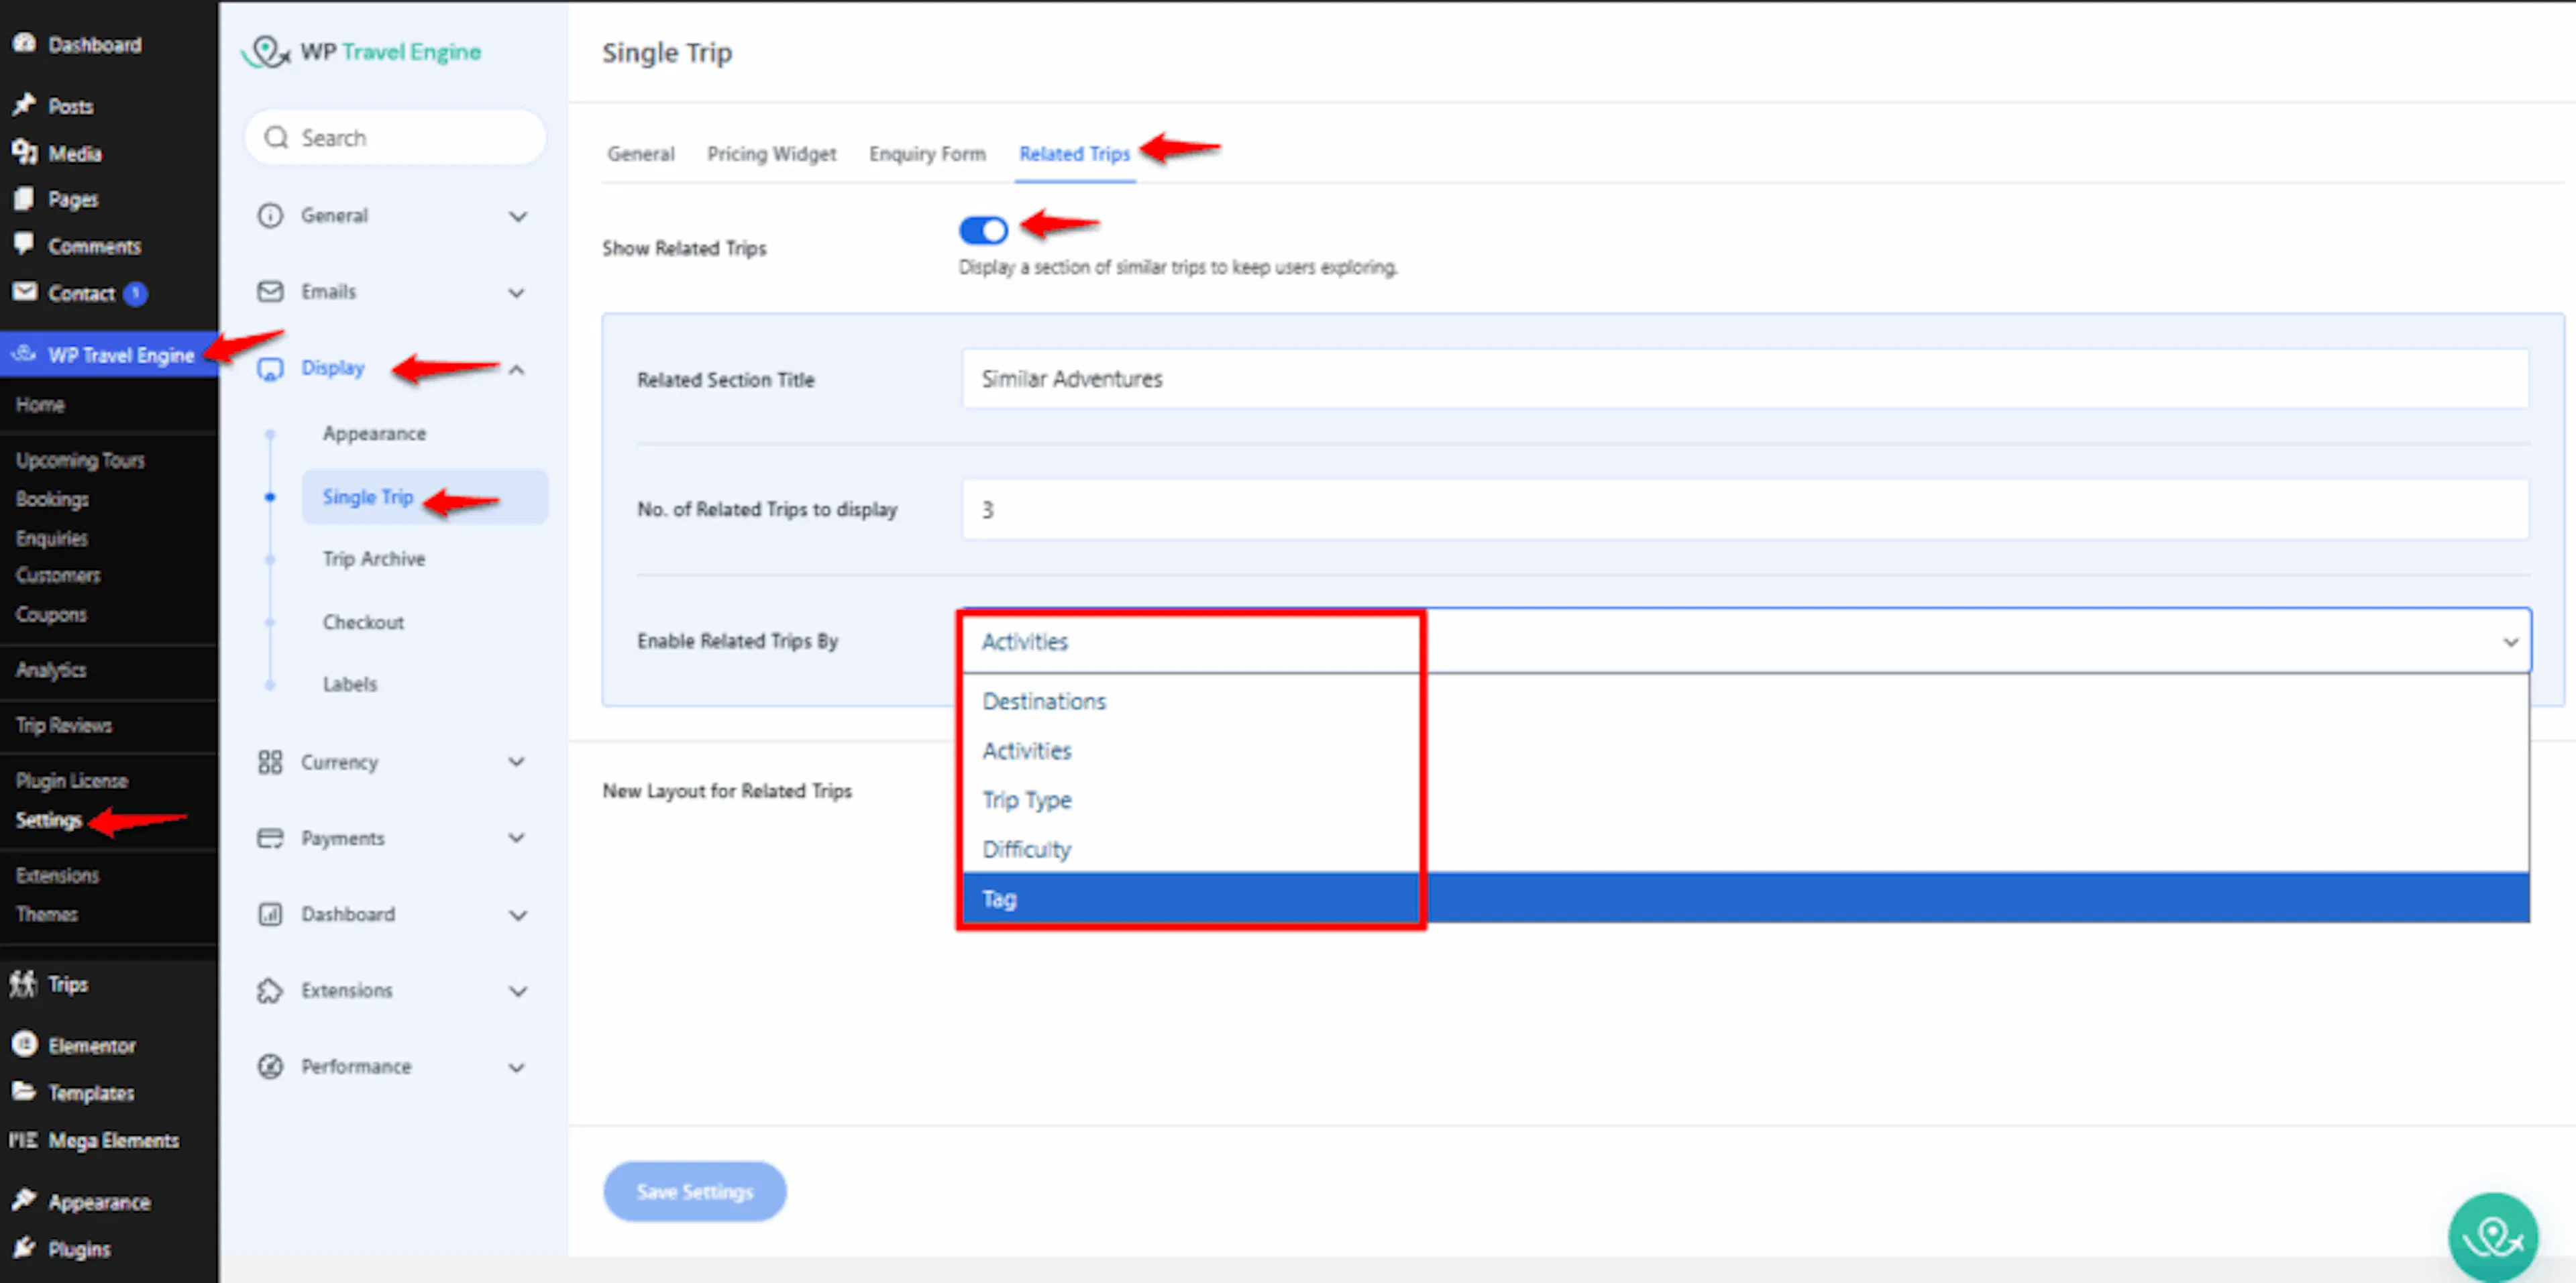
Say you run trips across Nepal. If a traveler is looking at a trek in the Everest region, you might want to show other Everest treks. That's the "Destination" filter. Or if you want to show other treks of the same difficulty level, you'd choose "Difficulty."
| Filter | How it matches related trips |
|---|---|
| Destination | Same location, such as the same city or region |
| Activities | Same activity, like Boating or City Tour |
| Trip Type | Same trip type, like Adventure, Child-friendly, or Home Stay |
| Difficulty | Same difficulty level |
| Tag | Shared tags (tags are keywords you assign to trips to group them) |
| Package | Same package |
Pick the filter that makes the most sense for how you organize your trips. There's no wrong answer here. It's about what helps your travelers find what they're looking for.
New layout option
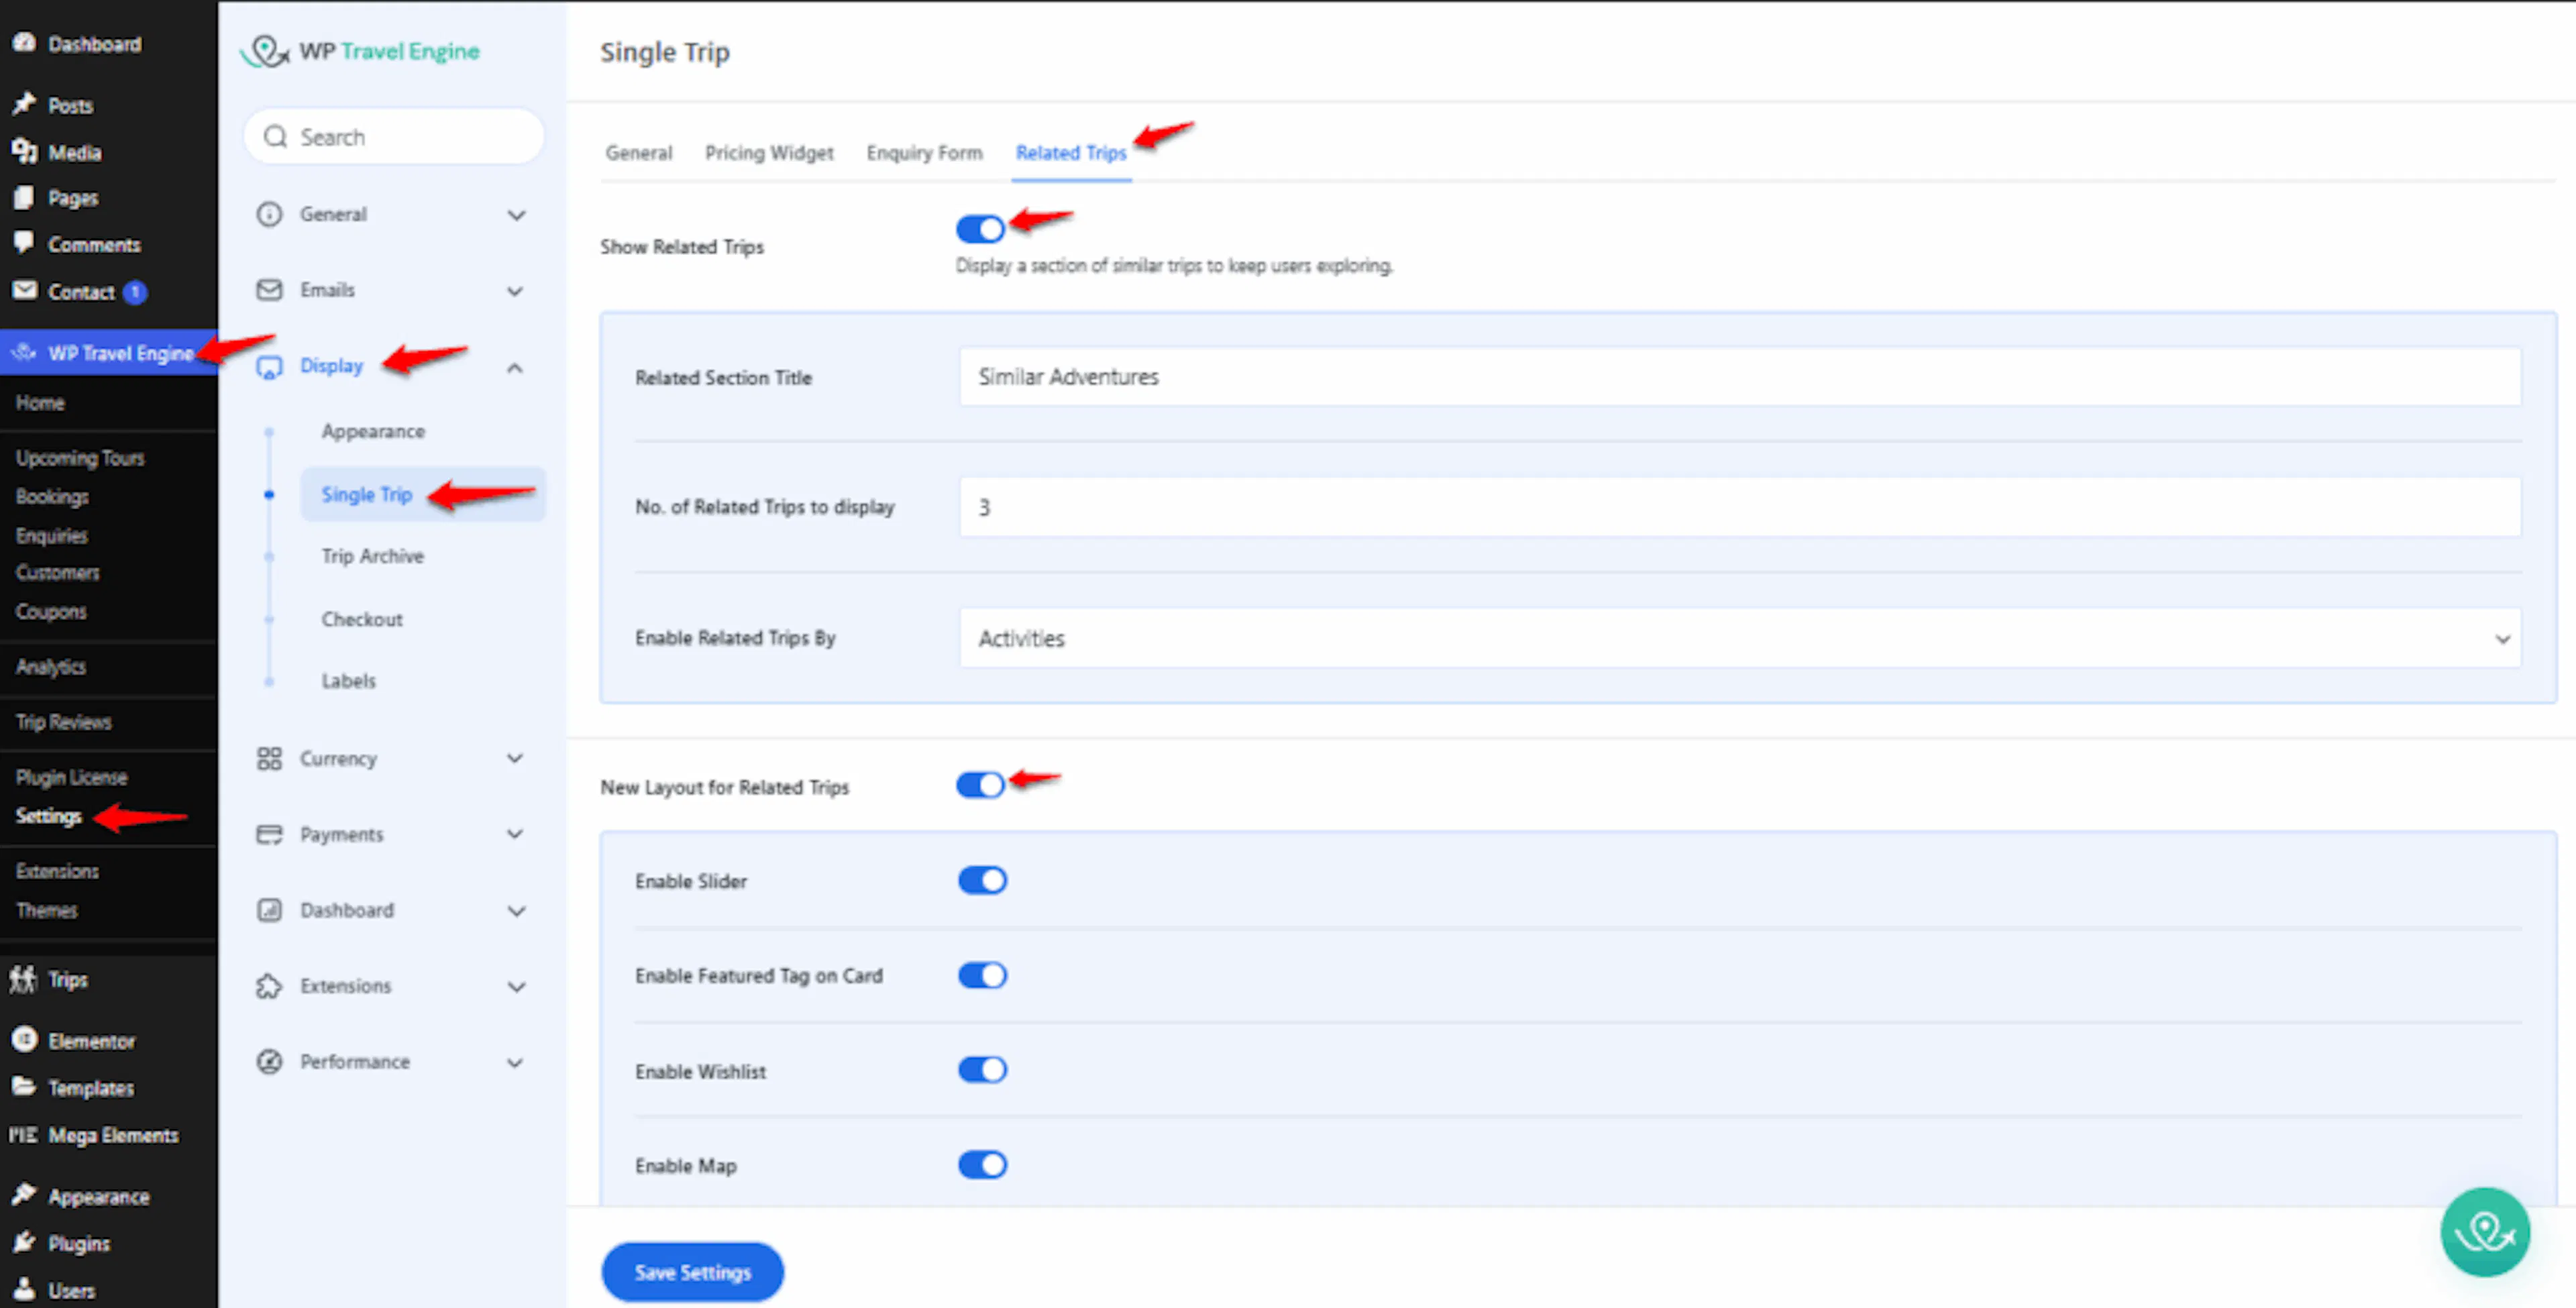
WP Travel Engine also offers a newer, more modern layout for related trips. It's optional, but if you turn it on, you get several display options that make the related trips section more useful and visually appealing.
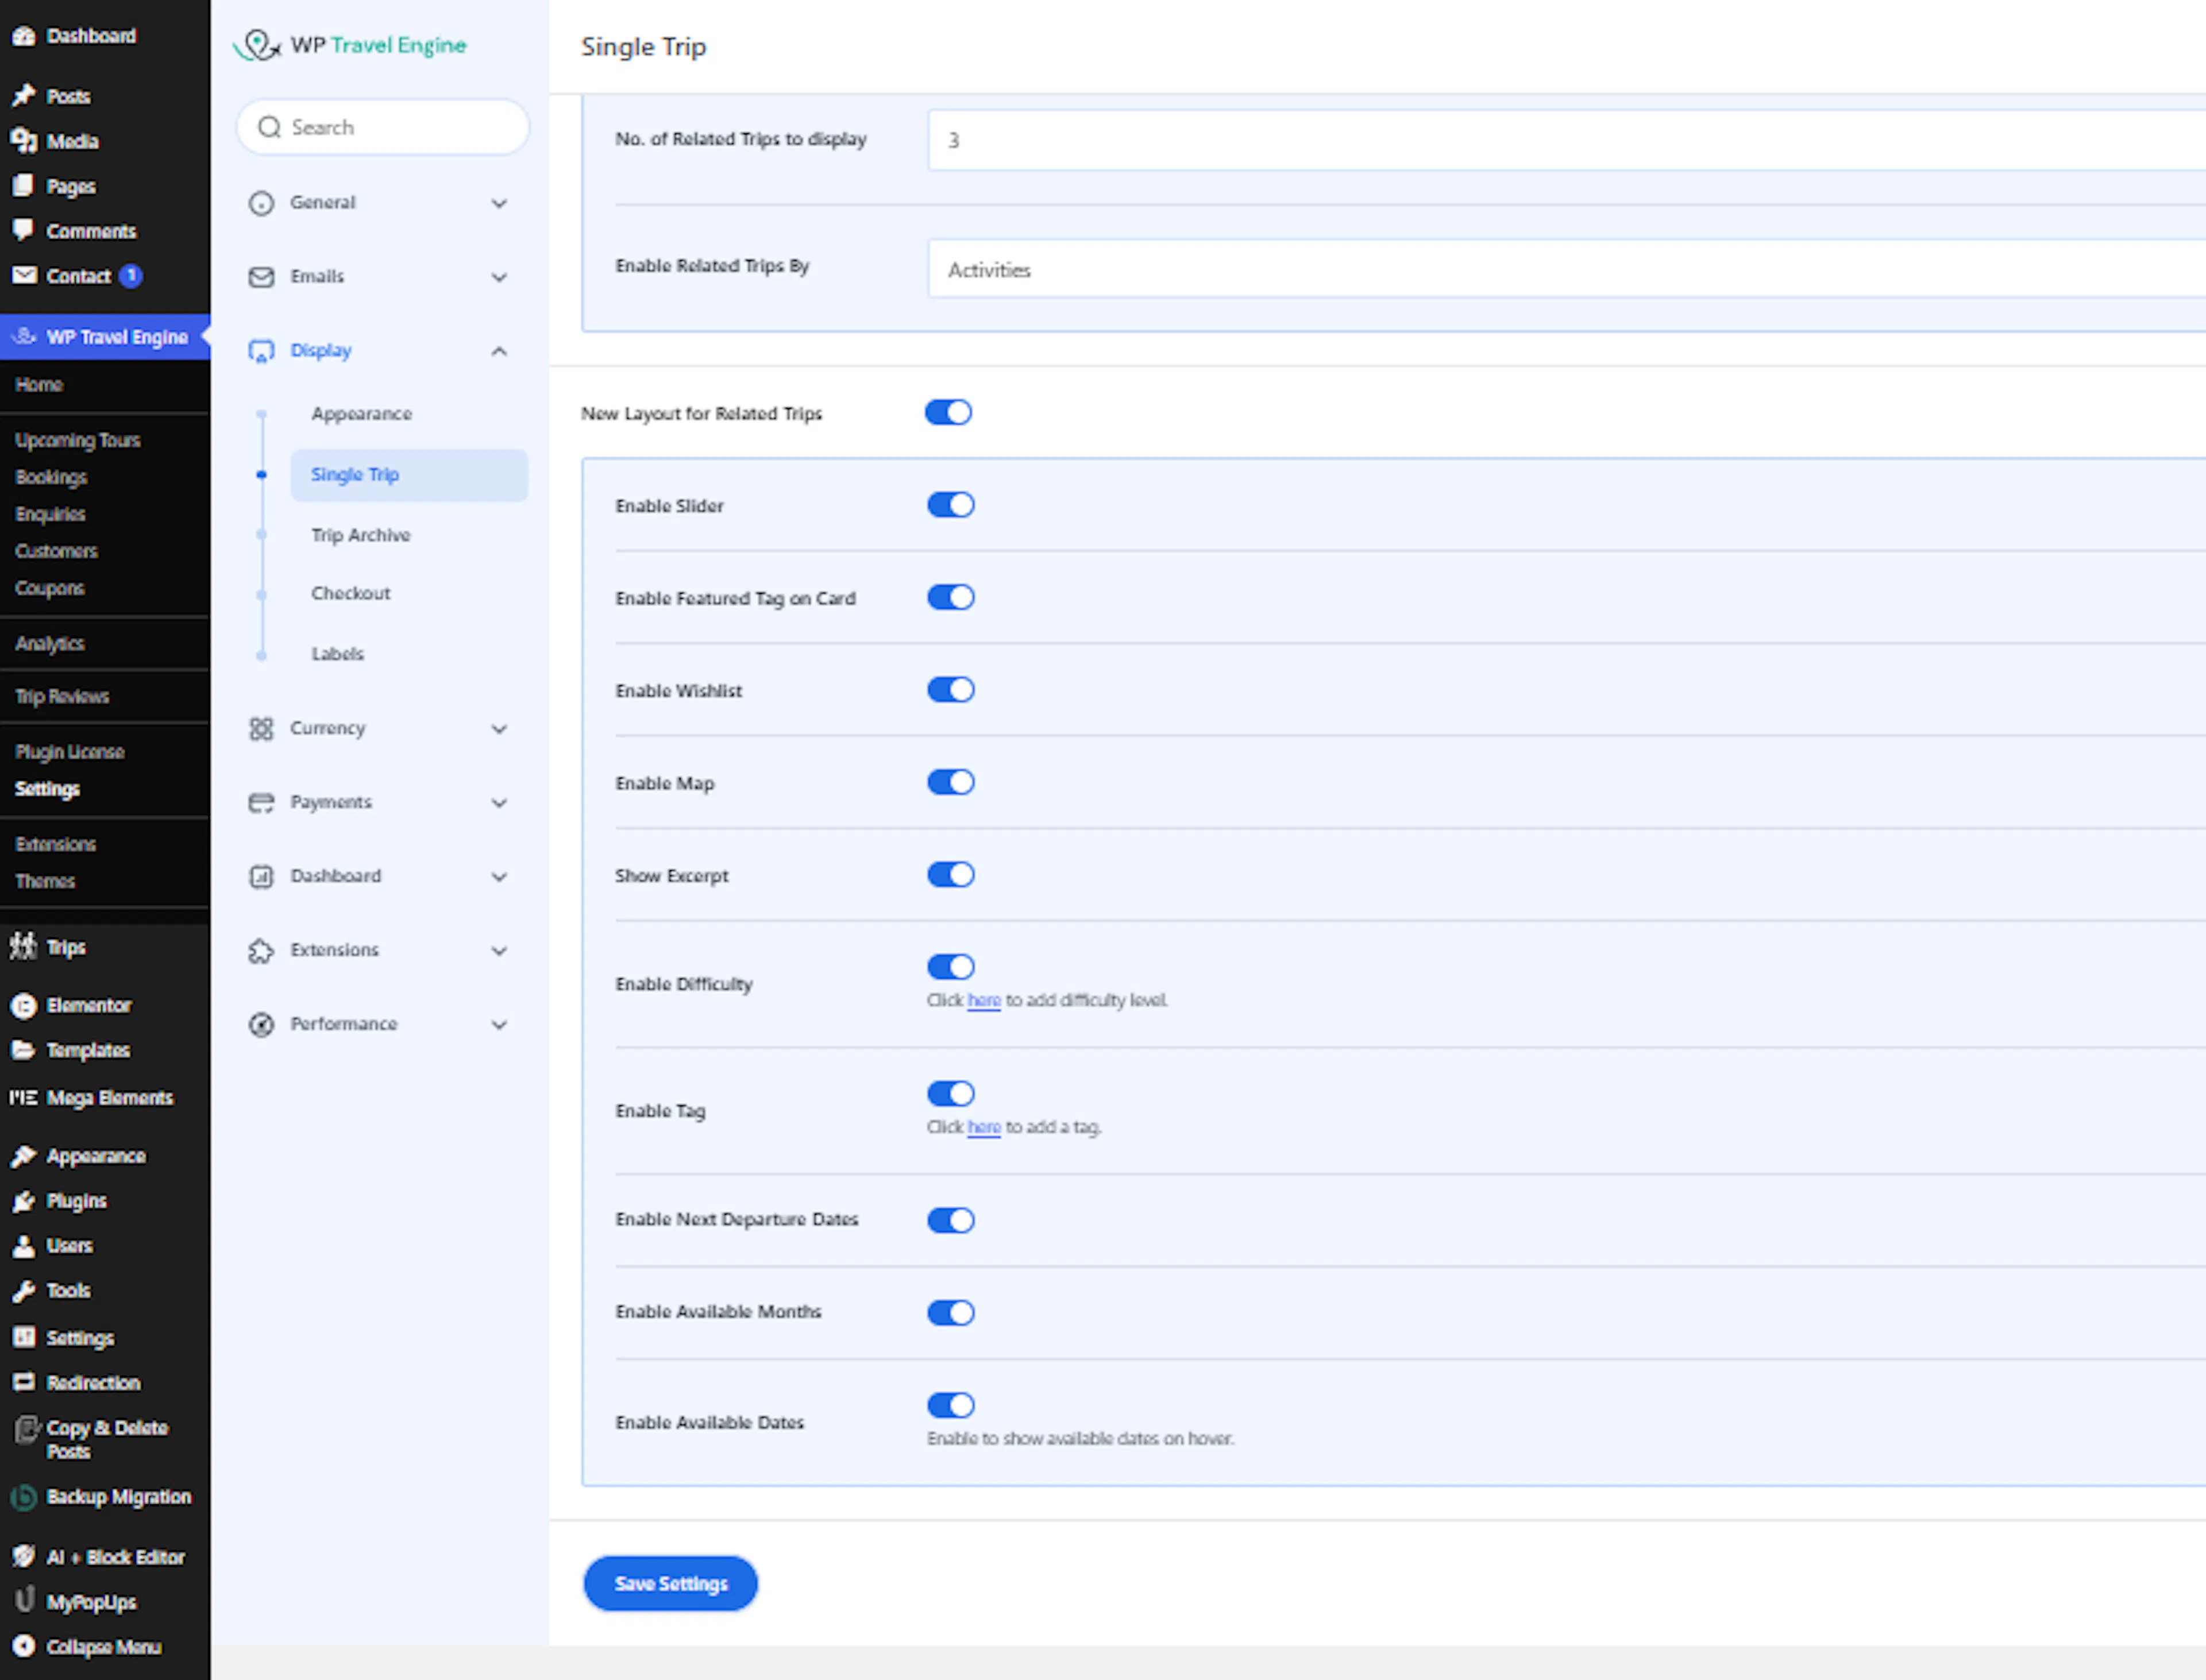
Here's what each option does:
| Option | What it does |
|---|---|
| Enable Slider | Shows trips in a scrolling slider instead of a fixed row. Travelers click arrows to see more. |
| Enable Featured Tag on Card | Adds a small badge (like "Featured" or "Popular") on trips you want to highlight |
| Enable Wishlist | Adds a heart icon so travelers can save trips they're interested in for later |
| Enable Map | Shows a map or map link for the trip location |
| Show Excerpt | Shows a short description under each trip title |
| Enable Difficulty | Shows the trip's difficulty level (like Easy, Moderate, or Challenging) |
| Enable Tag | Shows the trip's tags so travelers can see what category it falls under |
| Enable Next Departure Dates | Shows the next available departure date for each trip |
| Enable Available Months | Shows which months the trip runs (like Jan to Mar) |
| Enable Available Dates | Shows the specific dates the trip is available |
Don't feel like you need to turn on every option. Pick the ones that give your travelers the most useful information without making the page feel crowded.
If you turn on Enable Difficulty or Enable Tag, make sure the related trips already have a difficulty level or tag assigned. Otherwise, those badges will have nothing to show.
You can assign difficulty levels and tags when you create or edit a trip, under the trip details on your WordPress dashboard.
That's everything you need to set up related trips. Once you've picked your settings, scroll to the top or bottom of the page and click Save Changes to make everything live.
If you're still stuck or have a question we didn't cover, our support team is happy to help. Reach out at our support page and we'll get you sorted.