

How Does the Trip Expiry Date Feature Work in WP Travel Engine?
Set an expiry date on any trip so it automatically disappears from your website after the season ends - and learn how to find, change, or remove expiry dates.
What the Trip Expiry Date feature does
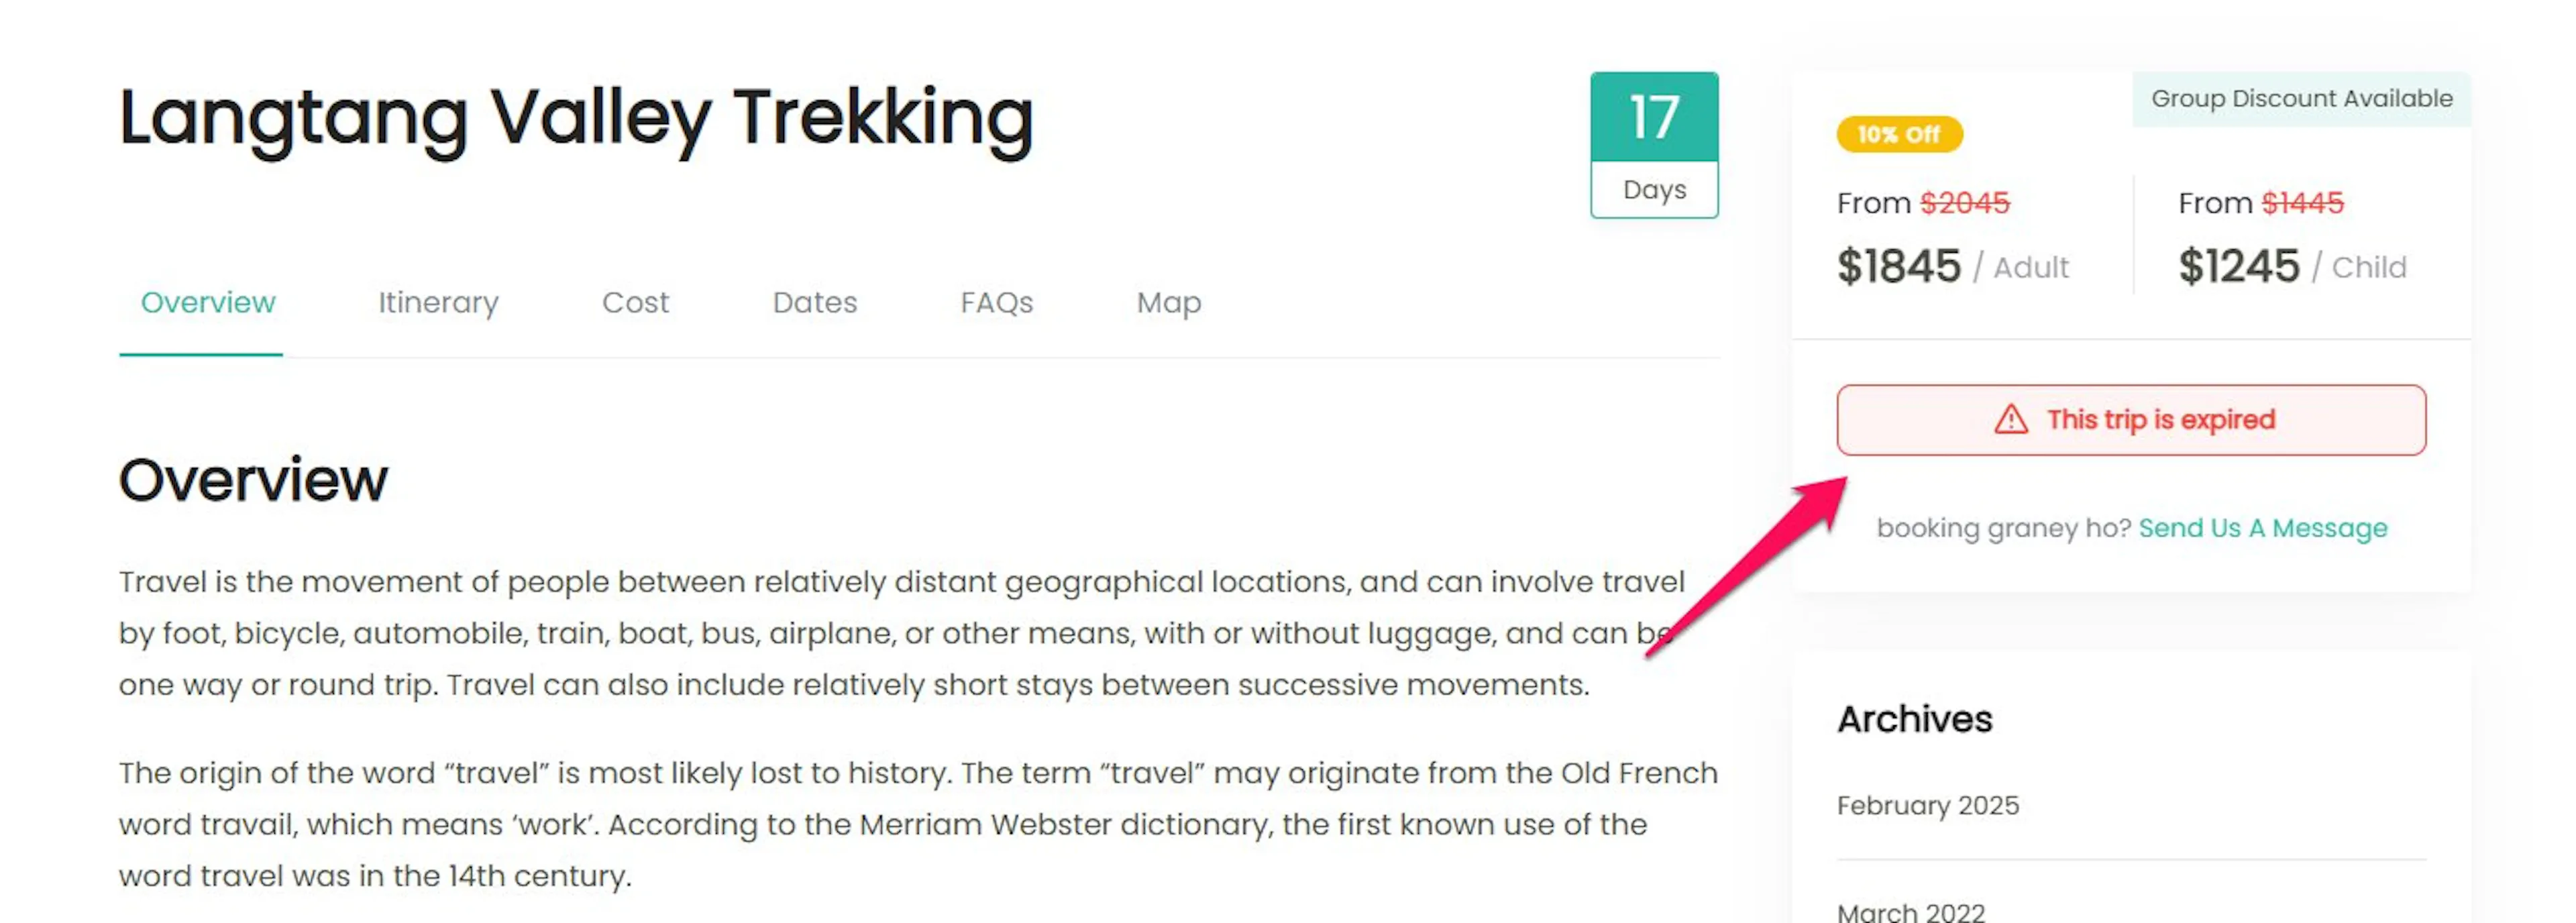
The Expiry Date feature lets you set an end date for a trip. After that date, WP Travel Engine marks the trip as expired and hides it from your website.
The trip also stops appearing as an active, bookable trip. For example, you can use an expiry date to hide a winter trek after the season ends.
What happens when a trip expires
When the expiry date passes:
- The trip becomes unavailable for booking.
- The trip is removed from the trip archive and search results.
- The trip appears under the Expired tab in your WordPress dashboard.
The WordPress dashboard is the admin area you log into to manage your website. Expired trips remain available there, so you can review or republish them later.
Set an expiry date for a trip
Setting an expiry date keeps old seasonal trips from staying visible after they are no longer available. You can add the date while creating a trip or when editing an existing one.
You'll need a trip already created in WP Travel Engine before you can set an expiry date. If you haven't added one yet, you can come back to this once your trip is ready.
Open the trip
From the left sidebar of your WordPress dashboard, select Trips. Then select All Trips and click Edit on the trip you want to update.
Open the Date & Price tab
This tab is where you manage all the timing and pricing details for your trip. Open the Date & Price tab, then scroll down to the Date Settings area. Look for the Expiry Date field.
Choose the expiry date
Click the Expiry Date field and choose a date. A date picker, which is a small calendar that pops up, will open for you to select the date.
Save your changes
Click Update to save an existing trip. If you are creating a new trip, click Publish instead.
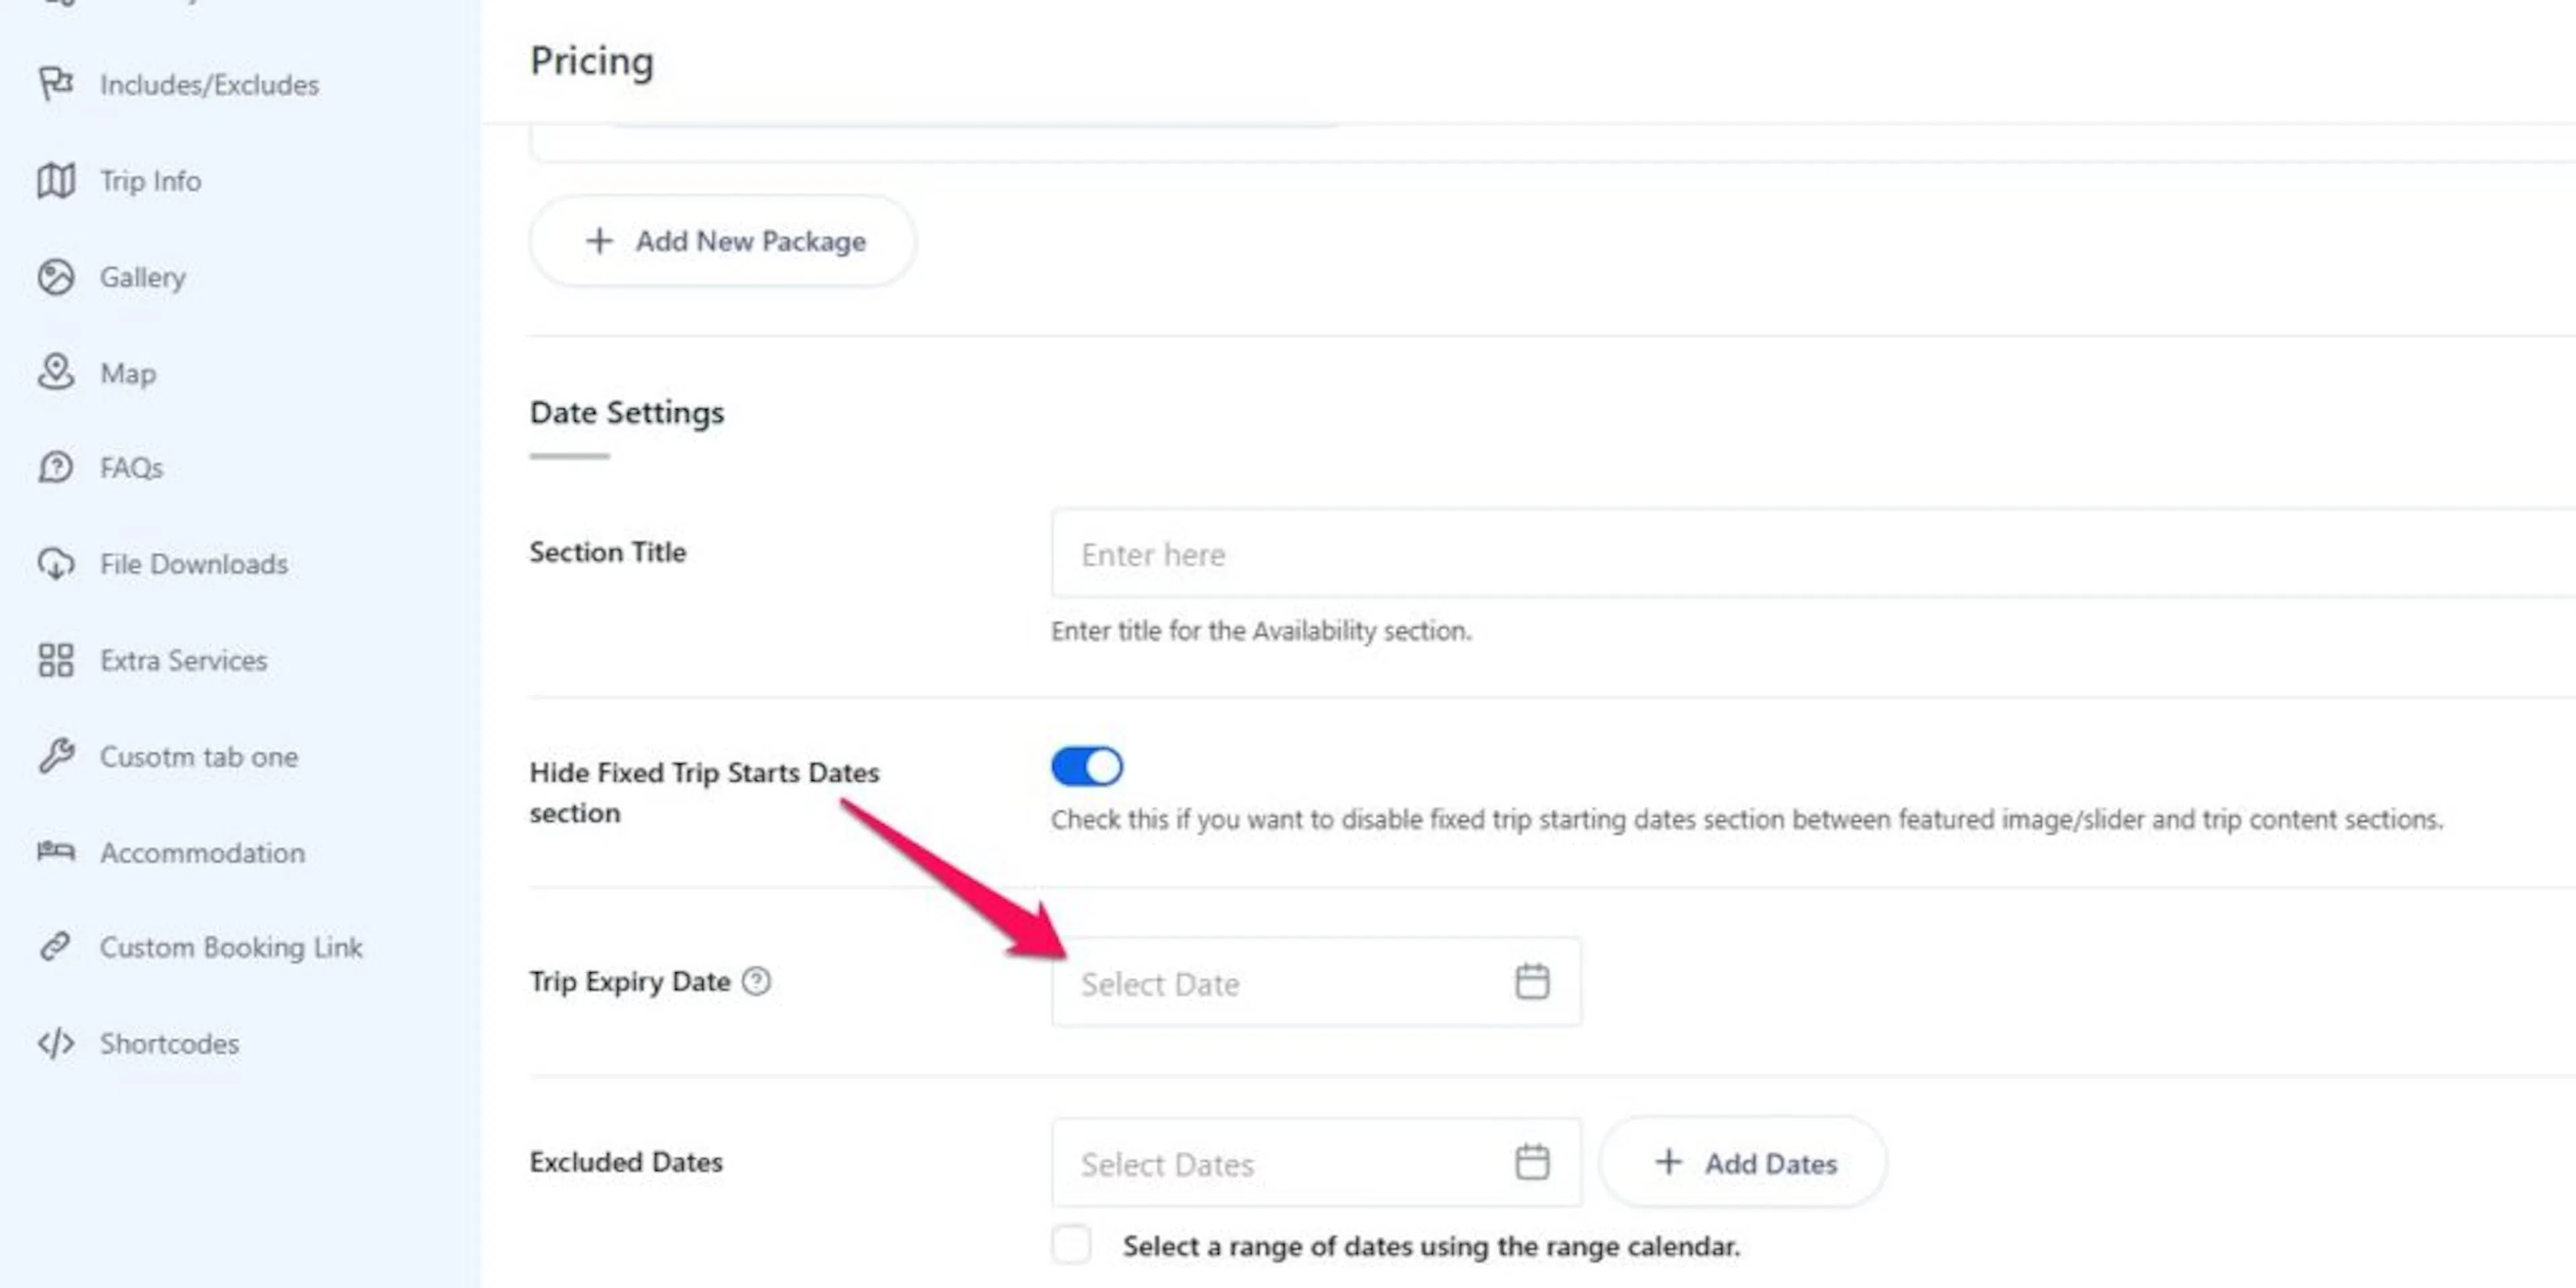
After you save the trip, WP Travel Engine uses the date you selected to control when the trip stops appearing as available. Your trip settings are now ready.
Change or remove an expiry date
You can change the date when you add more departures. You can also remove the date if the trip should remain available without an end date.
- To change the date: Edit the trip, adjust the Expiry Date, and click Update.
- To remove the date: Clear the Expiry Date field and click Update. The trip returns to normal availability.
For example, if you extend a group package into the next month, change the expiry date to a few days after the new final departure.
Find your expired trips
Expired trips are grouped under the Expired tab in your Trips dashboard. This makes it easier to review, manage, or republish trips when you offer them again.
To find an expired trip, select Trips from the left sidebar of your WordPress dashboard. Select All Trips, then click the Expired tab.

You will see the full list of trips that have expired.
Best practices for expiry dates
Use expiry dates for:
- Seasonal trips, such as monsoon treks or winter tours.
- Fixed-date tours that are no longer available after a scheduled departure.
- Limited-time offers and group packages.
Set the expiry date a few days after your last departure. This gives pending inquiries time to finish before the trip disappears from your website.
Check your WordPress timezone settings if a trip expires earlier or later than expected. WP Travel Engine uses your website's timezone when it determines when the expiry date has passed.
Troubleshooting
My trip is still visible after the expiry date
Clear your website's cache, then check the expiry date and timezone settings on the trip. Caching is a way your website stores temporary copies of pages so they load faster. A caching plugin is a tool that speeds up your site by storing those copies.
If you use a caching plugin, look for an option to clear or purge the cache. The old trip page may remain visible until those stored copies are refreshed. You can also try opening your website in a private or incognito browser window. If the trip is gone there, the issue is just your browser showing an old saved version.
My trip disappeared earlier than expected
Check the exact date you selected in the Expiry Date field. If you need the trip to stay visible through a certain day, set the expiry date to that day. WP Travel Engine treats the trip as expired starting the following day.
I can't find my expired trip
Go to Trips in the left sidebar of your WordPress dashboard, then select All Trips. Click the Expired tab to see the full list of expired trips.
If you're still stuck or have a question we didn't cover, our support team is happy to help. Reach out at our support page and we'll get you sorted.